
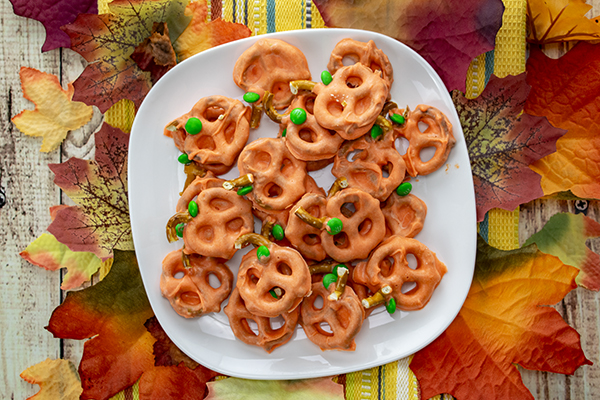
Chocolate Covered Pumpkin Pretzels
(Culinary.net) A sweet and savory treat, these Chocolate Covered Pumpkin Pretzels will disappear scary fast at your next Halloween party. With just three ingredients, they’re easy to make and share with guests of all ages.
Visit Culinary.net to find more quick, simple treats.
Watch video to see how to make this recipe!
Chocolate Covered Pumpkin Pretzels
Prep time: 10 minutes
Cook time: 5 minutes
Yield: about 36 pretzels
- 3/4 cup orange candy melts
- 1 bag (16 ounces) mini pretzel twists
- 1/4 cup mini green coated chocolate candies
- Line baking sheet with parchment paper and set aside.
- In medium microwave-safe bowl, melt candy melts 30 seconds then stir. Working in 15-second intervals, continue microwaving until melted and smooth, stirring between intervals. With fork or dipping utensil, dip 36 mini pretzel twists, one at a time, into melted orange chocolate and gently tap side of bowl to remove excess.
- Lay each covered pretzel on parchment paper. Using remaining pretzel twists, break apart enough to equal 1/4 cup.
- Place one mini green chocolate candy (to form leaf) and one broken pretzel piece (to form stem) on top of each dipped pretzel. Repeat with remaining pretzels and chocolate candies.
- Let set until solid. Pretzels can harden on counter about 30 minutes, or placed in refrigerator or freezer 5-10 minutes.

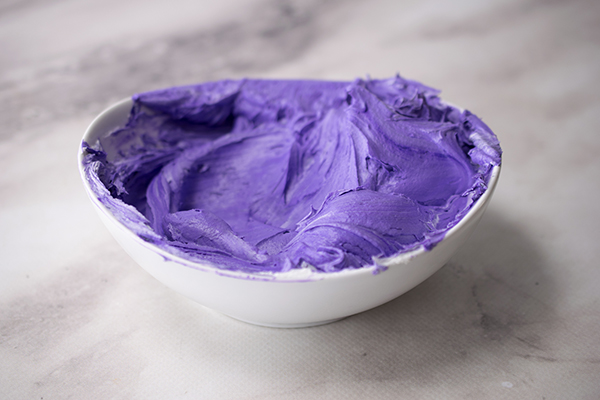
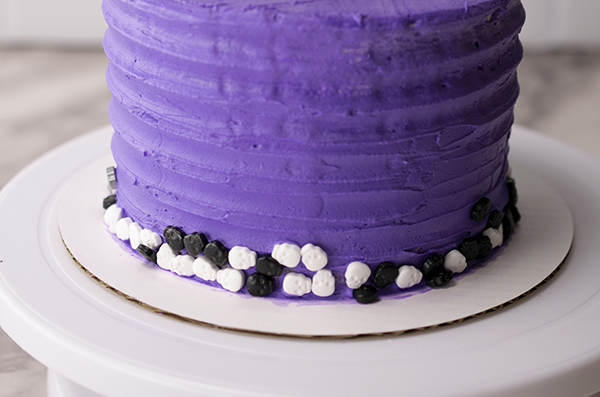
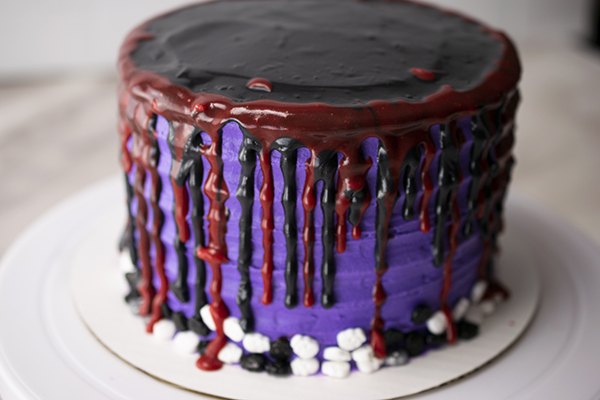
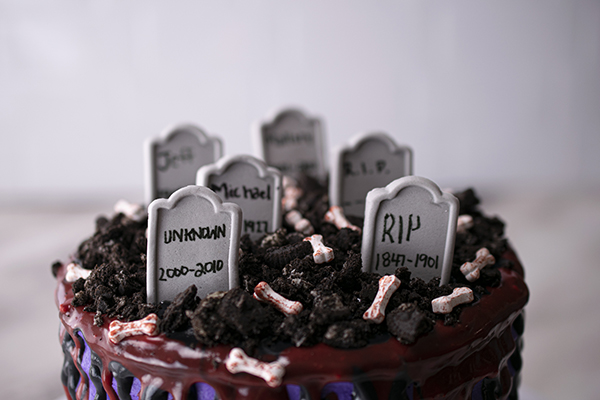
Ghostly Graveyard Cake
(Family Features) For a frighteningly fun time in the kitchen this Halloween, gather your family around the cauldron to create a sweet, spooky dessert. Tricks and treats may provide thrills, but a homemade concoction can be the star of your hauntingly happy evening.
This Ghostly Graveyard Cake takes imagination and creativity from everyone with tombstones, skulls and spooky icing daring all to try a bite. With looks this chilling, it’s a perfect treat to enjoy while watching everyone’s favorite scary movie.
Find more deliciously devious desserts at Culinary.net.
Watch video to see how to make this recipe!

Ghostly Graveyard Cake
- 1 box chocolate cake mix
- 10 chocolate creme cookies
- 1 cup black melting chips
- 1 cup red melting chips
- 1 cup heavy whipping cream
- 3 cans buttercream icing
- 1 purple food coloring
- 1 black food coloring
- skull sprinkles
- tombstones and bones candies
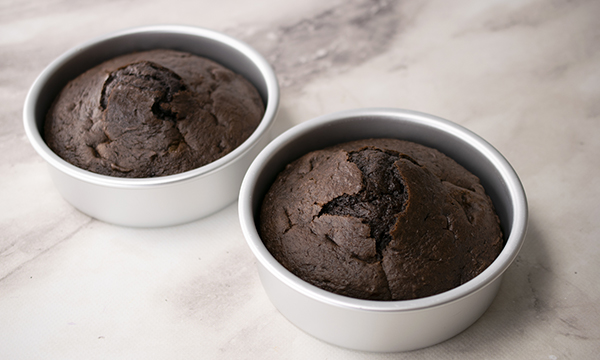
1. Prepare cake mix according to package instructions in three 6-inch baking pans. Once baked, allow to completely cool outside of pans.
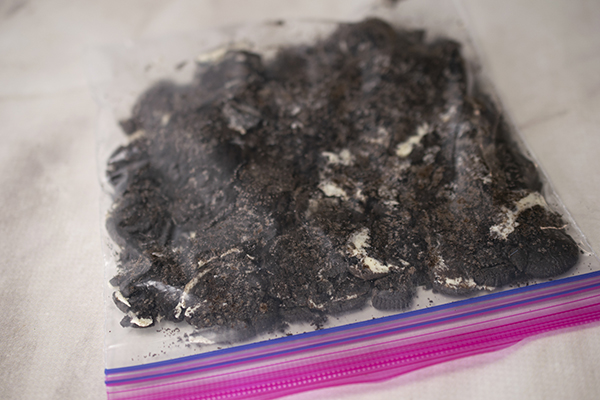
2. In zip-top bag, using rolling pin, crush chocolate creme cookies; set aside.
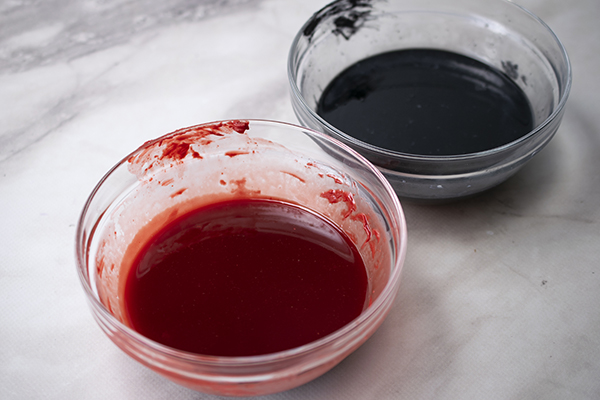
3. In separate small bowls, add black melting chips and red melting chips.
4. In microwave, heat heavy whipping cream 1 1/2 minutes. Pour half the mixture into one bowl of chips and other half into other bowl of chips. Stir until chips are completely melted; set aside.
5. After cakes cool, on cake board, add small amount of buttercream icing so cake sticks. Using bread knife, level cakes.
6. Place one cake on cake board and add thin layer of icing on top. Place second layer of cake on top and add thin layer of icing on top. Place final layer of cake on top and add thin layer of icing on top. Add thin layer of icing to entire cake. Freeze 15 minutes.
7. In small bowl, mix two parts purple food coloring to one part black food coloring. Ice cake with deep purple icing. Using grooved scraper, scrape along sides of cake. Using angled spatula, smooth top of cake.
8. Add skull sprinkles around edges of cake. Using piping bag with small opening at tip, drip black drip mixture around top edges of cake. Repeat using red drip mixture.
9. Add chocolate creme cookie crumbs to top of cake. Add tombstones and bone sprinkles to top of cake.

Spooky Snacks that Make Halloween Pop
(Family Features) From watching scary movies to dressing up as ghouls and goblins, spooky season means it’s time to pop up your loved ones’ favorite snacks for a ghostly good time. Before heading out to trick-or-treat, gather your minions in the kitchen for some family-friendly fun crafting these haunting yet tasty treats.
Throughout October, you can honor National Popcorn Poppin’ Month with eerie, delicious eats like Spooky Popcorn Spider Web, Green Halloween Zombies, Witchy Popcorn Balls and Popcorn Caramel Apples that add festive fun to the Halloween excitement.
As a perfect ingredient in treats of all types, popcorn is beloved for its seed-to-snack simplicity as a non-GMO, vegan, gluten-free, sugar-free snack that’s naturally low in fat and calories. Add in its irresistible smell, taste and versatility, and it’s easy to see why it pairs so well with spooky celebrations.
Find more Halloween treats at popcorn.org.
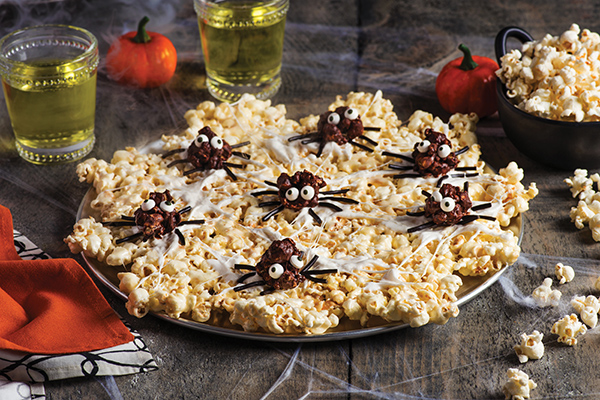
Spooky Popcorn Spider Web
Yield: 1 spider web
- 1/4 cup butter
- 8 cups mini marshmallows, divided
- 1 tablespoon vanilla extract
- 9 cups popped popcorn, divided
- 1 cup semisweet chocolate chips, divided
- black string licorice
- candy eyes
- Line round pizza pan with parchment paper; set aside. In large saucepan over low heat, melt butter; stir in 5 cups marshmallows, stirring constantly, 3-4 minutes, or until completely melted. Stir in vanilla. Remove from heat. Stir in 8 cups popcorn until coated. Spread onto prepared pizza pan in irregular round shape, about 1-inch thick, to resemble spider web. Refrigerate about 15 minutes, or until firm.
- In microwave, melt remaining marshmallows about 20 seconds, or until melted. Using spatula, string strands of melted marshmallow over popcorn spider web to create cobweb effect.
- In heatproof bowl set over saucepan of hot (not boiling) water, melt 3/4 cup chocolate chips; cool slightly. In large bowl of remaining popcorn, pour chocolate over popcorn, folding gently to coat. Spread mixture on waxed paper-lined baking sheet, separating into eight small clusters. Affix two candy eyes to each popcorn cluster. Refrigerate 10-15 minutes, or until set.
- Melt remaining chocolate chips. Cut licorice into 1-inch lengths. Using small spoon, dab circles of chocolate onto spider web. Affix chocolate-coated popcorn onto chocolate circles. Affix licorice lengths to chocolate popcorn clusters to resemble spider legs.
- Refrigerate 15 minutes, or until set. To serve, cut into smaller pieces.
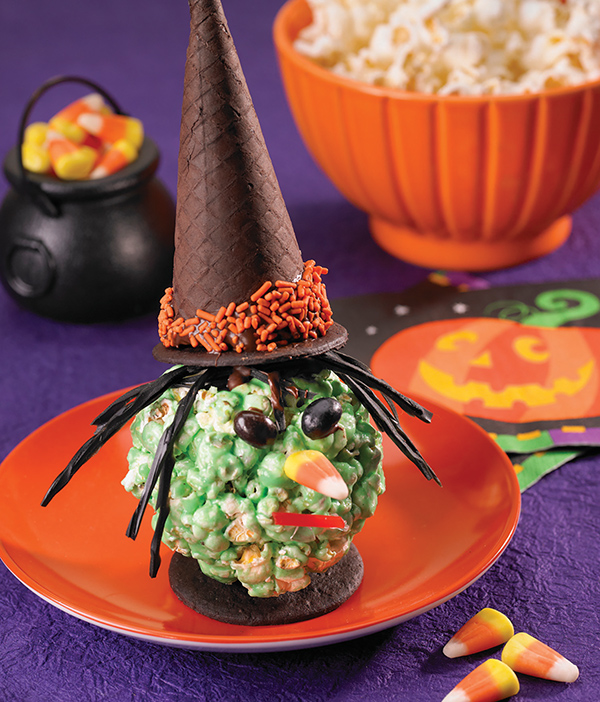
Witchy Popcorn Balls
Yield: 8 popcorn balls
- 16 chocolate wafer cookies
- nonstick cooking spray
- 3 quarts popped popcorn
- 4 tablespoons (1/2 stick) butter or margarine
- 3 cups miniature marshmallows
- 3 tablespoons (1/2 of 3-ounce box) lime gelatin dessert mix
- green food color (optional)
- 3/4 cup chocolate chips
- licorice strings
- 8 chocolate ice cream cones
- orange sugar sprinkles, placed in small dish
- jelly beans
- candy corns
- Spread sheet of waxed or parchment paper over work surface and place wafer cookies on it.
- Spray large mixing bowl with nonstick cooking spray and place popcorn inside.
- In medium saucepan over low heat, melt butter. Stir in marshmallows and gelatin powder until marshmallows are melted and mixture is smooth. Adjust color with 1-2 drops food color, if desired. Pour mixture over popcorn and mix until coated.
- Spray hands with nonstick cooking spray and press firmly to form into eight balls. Place balls on eight wafer cookies. Press candy decorations into popcorn balls to form "eyes," "nose" and "mouth."
- In small, microwave-safe bowl, heat chocolate chips, covered, 10 seconds. Stir to aid melting. Repeat as needed until chocolate is melted and smooth.
- Spoon about 1/2 teaspoon melted chocolate on top of each popcorn ball. Press licorice strings into chocolate to form "hair."
- Dip cone edges into melted chocolate then orange sugar sprinkles. Place on remaining wafer cookies to form "witches' hats." Place hats on popcorn balls. Allow chocolate to set about 45 minutes before serving.
- Serve or seal individually in plastic wrap.
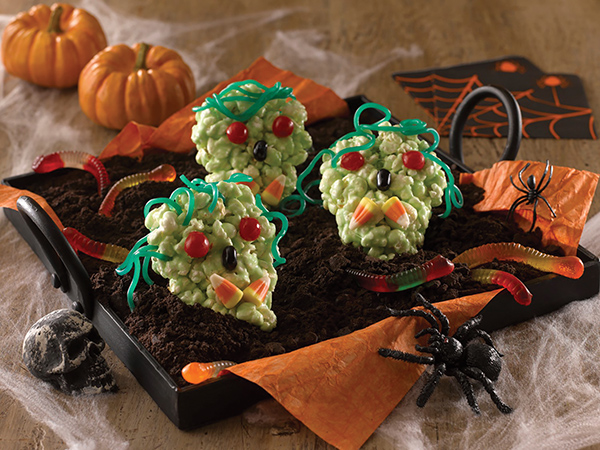
Green Halloween Zombies
Yield: about 7 pieces
- 2 1/2 quarts popped popcorn
- 6 tablespoons butter or margarine
- 3 cups mini marshmallows
- 4 tablespoons lime gelatin powder
- red gum balls
- candy corn
- flat green candy strips or fruit leather
- green sugar sprinkles
- Place popcorn in large bowl; set aside.
- In medium saucepan over medium heat, melt butter. Stir marshmallows into butter until melted. Stir in gelatin powder until evenly colored.
- Pour melted mixture over popcorn and stir until evenly coated. With buttered hands, shape popcorn into seven ovals.
- Flatten one oval slightly and squeeze one end to form "skull" shape. Place on parchment-lined baking sheet. Repeat with remaining ovals.
- To decorate: Press two gumballs into each skull to form "eyes." Press candy corn into skull to form "teeth." Use scissors to trim candy strips and press into top for "hair." Sprinkle with sugar sprinkles.
- Allow "zombies" to set about 20 minutes before wrapping individually in plastic wrap or serve immediately.
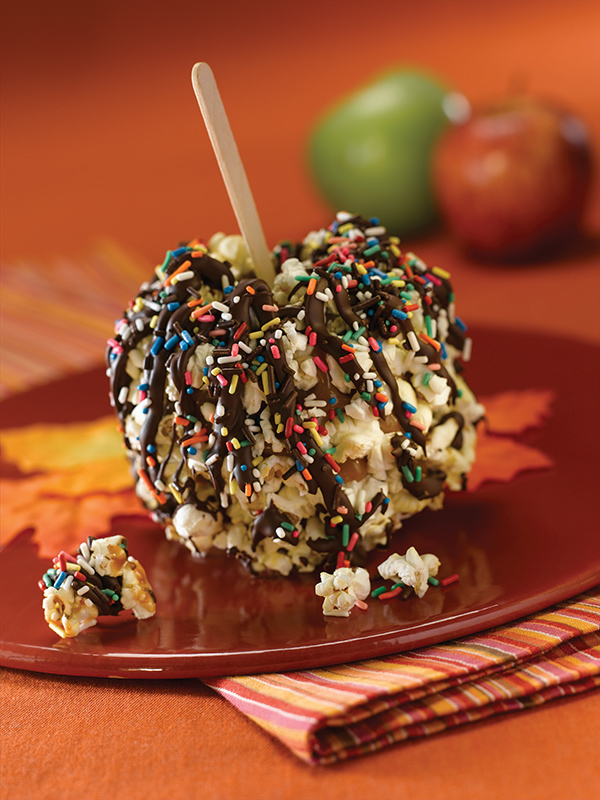
Popcorn Caramel Apples
Yield: 4 apples
- 1 quart freshly popped popcorn
- 1 package (9 1/2 ounces, 35 total) caramels, unwrapped
- 1/4 cup light cream or half-and-half
- 4 lollipop sticks or wooden candy apple sticks
- 4 apples
- 1/2 cup chocolate chips
- sugar sprinkles
- decorative ribbon (optional)
- Place popcorn in large bowl; set aside. Place sheet of waxed paper on work surface.
- In small saucepan over medium-low heat, heat caramels and cream. Stir frequently until caramels are melted and cream is blended into caramels.
- Push one stick into apple center and dip into caramel. Spoon caramel over apple to coat. Repeat with remaining apples
- Place caramel-coated apple in bowl of popcorn and press popcorn onto caramel to cover. Place apple on waxed paper to set; repeat with remaining apples.
- In small, resealable plastic bag, microwave chocolate chips 10 seconds and press chips to aid melting. Repeat, heating at 10-second intervals, until chips are completely melted. Cut small corner off bag and squeeze chocolate onto each apple, allowing chocolate to drip down sides. Sprinkle with sugar sprinkles.
- Tie bow to each apple stick, if desired. To serve, cut apples into slices.
Source: Popcorn Board

5 Tips for Tackling Leftover Halloween Treats
Going door to door for candy and treats is part of many families’ Halloween traditions, and the routine almost always ends with a kitchen loaded with treats. When the spooky season comes to a close, consider these ways to use up those delectable goodies.
Take Some to Work
A tried and true classic. It’s likely you won’t be the only person in your office bringing in leftovers a few days after Halloween, but there’s a good chance you have coworkers without kids who may not be as tired of treats as parents.
Freeze It
Certain candies like chocolates freeze better than others, so be conscious of what you’re putting in the freezer. This method keeps your sweets better longer and allows you to use them as ingredients in baking desserts throughout the year, or you can simply thaw a few at a time for snacking.
Make Trail Mix
The traditional recipe calls for peanuts, raisins and small chocolate pieces, but you can take matters into your own hands with a creative hodgepodge of just about anything you’re left with after Halloween passes. Candy corn, pretzels, chocolates and other sweets are perfect for mixing up as a snack to put in baggies for work or school – just choose your family’s favorites and toss together.
Set It Out for Guests
Leftover goodies don’t have to be hidden in the pantry. Grab a small glass dish, fill it with wrapped fun-size candies and place it on an end table, kitchen island or anywhere guests often gather and would feel invited to take one.
Create a Sweet Pairing
Although it’s (probably) your kids’ hard work that led to an abundance of candies, you can enjoy the fruits of their labor. For adults who enjoy a sweet chocolate treat (even if it isn’t fancy) with a glass of red wine or spiked hot chocolate, there are few better ways to wind down after Halloween than with a boozy pairing.
Visit Culinary.net for more Halloween treats and recipe ideas.
Photo courtesy of Getty Images

A DIY Halloween Creation
(Family Features) When it comes to family fun, it’s hard to beat Halloween, and with all the candy flying around, it’s an opportunity to add something nutritiousand delicious to festive celebrations.
Chocolate milk can provide the best of both worlds. It satisfies kids’ sweet tooth while providing all the nutrients of classic white milk, like calcium, vitamin D and high-quality protein to help keep little skeletons strong, making it a Halloween hit for kids and parents alike.
Carve out some quality time to make memories during the eeriest time of the year with this Scary Sweet Cemetery – including chocolate pudding, gummy worms and sandwich cookies – to get kids cooking and crafting, all while nourishing their bodies and bones with nutritious chocolate milk.
Visit MilkLife.com for more kid-friendly, DIY Halloween treats.
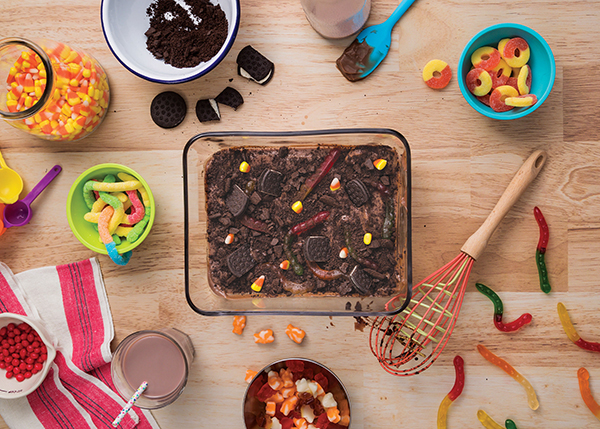
Scary Sweet Cemetery
Recipe courtesy of MilkPEP
Servings: 6
Pudding:
- 2 tablespoons unsweetened cocoa powder
- 2 tablespoons cornstarch
- 2 cups cold chocolate milk
- 1 pinch salt
- 1 large egg
- 4 ounces chopped semisweet chocolate (about 3/4 cup)
- 10 ounces chocolate vanilla sandwich cookies (about 20 cookies)
- 12 gummy worms
- In large saucepan over high heat, stir cocoa powder, cornstarch, chocolate milk and salt to incorporate dry ingredients into milk. Cook until mixture starts to boil then reduce heat to simmer until mixture starts to thicken, about 3-5 minutes.
- In large bowl, using whisk, beat egg, slowly drizzling hot chocolate mixture into bowl, whisking continuously. Fold in chopped chocolate and stir until chocolate has completely melted.
- Pour pudding mixture into glass baking dish. Place piece of parchment paper on top of surface of pudding. Chill in refrigerator 3 hours, or overnight.
- To prepare “dirt,” place chocolate vanilla sandwich cookies in large re-sealable bag. Using rolling pin, crush cookies into crumbs.
- When ready to serve, sprinkle cookie crumbs over pudding and place gummy worms on cookie crumb layer, making sure to “bury” parts of gummy worm ends as if worms are coming out of dirt.
Nutritional information per serving: 460 calories; 18 g fat; 8 g saturated fat; 35 mg cholesterol; 6 g protein; 75 g carbohydrates; 4 g fiber; 250 mg sodium; 104 mg calcium. Nutrition figures based on using low-fat chocolate milk.
Source: MilkPEP

Homemade Halloween Treats
(Culinary.net) Halloween calls for candies and treats of all kinds as trick-or-treaters roam neighborhoods, but don’t forget to stock your own snack supply with homemade goodies.
Skip the store-bought sweets this year and instead opt for ideas like these that can be whipped up in the comfort of your own kitchen.
Party Mix
As one of the easiest recipes you could imagine, a Halloween-themed party mix simply calls for your favorite snack-type foods tossed together in a group-sized bowl or individual containers. You can try just about anything from candy corns and miniature chocolates to pretzels, popcorn and more.
Spooky Cupcakes
Kid-friendly treats are the name of the game when it comes to Halloween, and there’s almost no better way to get children involved in the kitchen than with some personalized decorations. Bake your preferred cupcakes – chocolate or vanilla – then call on the kiddos to use icing and toppings for creepy custom creations.
Pumpkin Pie
There’s nothing wrong with going with a classic. While it may not scream All Hallows’ Eve, pumpkin is the flavor of the season, which makes pumpkin pie a traditional taste this time of year. Because most versions call for a fairly small number of ingredients, it’s a simple way to bake a desirable dessert. Plus, you can easily give pumpkin pie some Halloween flair using whipped cream to “draw” a spooky Jack-o-lantern-like face.
Creepy Cookies
Whether your family craves chocolate chip or prefers the sweetness of sugar cookies, you can lay out your favorite dough and use seasonal cookie cutters – think Frankenstein, witches, ghosts, spiders and more – for a frightful bite.
Caramel-Dipped Apples
Skip out on bobbing for apples and instead dip yours in caramel for a traditional Halloween treat. Just insert wooden skewers in the tops of your apples, dip the opposite end into melted caramel and enjoy. To add a bit of fun and flavor, sprinkle chopped nuts or crushed candies on the caramel end of each apple.
Find more snacks, desserts and treats at Culinary.net.
Photo courtesy of Getty Images

A Creative Twist on Halloween Carvings
(Family Features) When it comes to Halloween, carving the same pumpkin designs each year can become routine. This year, save a pumpkin and carve your spooky masterpiece into a watermelon instead.
Nutrient-rich watermelon can be a healthy alternative to other sweet treats full of added sugar during Halloween festivities as it’s a source of vitamins A and C as well as the antioxidant lycopene and the amino acid citrulline.
Because they are made up of 92% water, watermelons can be an effective way to stay hydrated during trick-or-treating, and creations like a Mummy or Jack O’Melon can help satisfy sweet cravings while keeping friends and family members frightfully delighted.
To get started, consider these carving tips and tricks:
- To make cutting and slicing easier, the watermelon should be at room temperate when carving.
- Cut a small, thin, flat piece from the bottom of the watermelon to provide a stable base for carving.
- Draw the design on the watermelon rind with a dry-erase marker before cutting. If you make a mistake, this can make it easier to wipe off.
- Use a sharp knife with a pointed tip for easier, cleaner cuts. Consider a paring knife with a smaller tip for ease of detail.
- Blend scraps of watermelon that are too messy for dicing or slicing to create an easy juice.
For more watermelon carving ideas, visit watermelon.org.
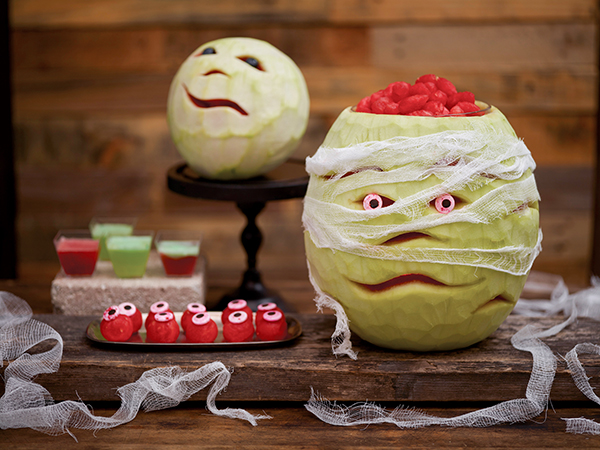
Mummy
Supplies and Tools:
- Watermelon
- Cutting board
- Kitchen knife
- Dry-erase marker
- Paring knife
- Melon baller
- Scoop
- Vegetable peeler
- Cheesecloth or gauze
- Straight pin (optional)
- Battery-operated candle or light
- Small bowl
- Blueberries or bloody candy eyes
- Toothpicks, pins or glue
- Wash watermelon under cool running water and pat dry.
- On cutting board, place watermelon on its side and use kitchen knife to cut off 1/4-1/2-inch of rind from bottom to provide sturdy base, being careful not to cut too deep into white part of rind. Cut 1-2 inches from stem end to create opening for bowl to be added.
- Using dry-erase marker, draw eyes, nose and mouth, along with wavy slits around carving. Use paring knife to cut them out, being sure to cut through to red flesh to let more light flow through.
- Use melon baller to hollow out inside of watermelon. Reserve watermelon balls. Use scoop to remove remaining watermelon.
- Using vegetable peeler, remove green skin off outside of watermelon, similar to peeling cucumber.
- Wrap thin strips cheesecloth or gauze around mummy carving and secure with straight pin, if needed.
- Place battery-operated candle or light inside carving and fit small bowl into top of carving. Trim away excess rind to make bowl fit securely.
- Fill bowl with melon balls. Attach candy eyes or blueberries using a toothpicks, pins or glue.
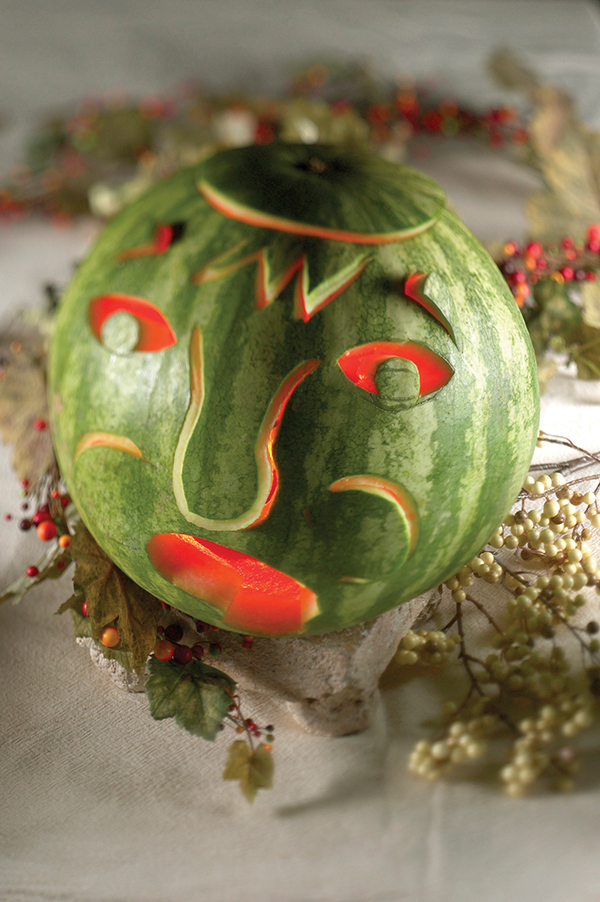
Jack O'Melon
Supplies and Tools:
- Knife
- Round watermelon
- Melon baller
- Dry-erase marker
- Toothpicks (optional)
- Battery-operated light
- Using knife, cut thin slice from bottom of watermelon to provide stable base.
- Cut circular piece of rind from top of watermelon big enough to reach into and remove flesh. Carefully remove top section and reserve for use as “lid.”
- Remove flesh from inside watermelon using melon baller, reserving melon balls for snacking. Hollow out remaining watermelon flesh and use blender to juice scraps and excess juice.
- Using dry-erase marker, draw outlines of eyes, nose, mouth, hair, ears and other features on side of watermelon. If mistake is made with marker, wipe off using paper towel to start over. Following outlines, carve features into watermelon and remove excess rind.
- Safe, battery-operated light can be firmly placed inside watermelon to provide haunting glow.
- Place circular piece of rind back on top of watermelon.

Eeek, Eat and Be Scary
(Family Features) Brew up a witch’s cauldron of fun this Halloween with special spooky treats. The Haunted House Cake looks almost too spooky to eat, but this masterpiece will disappear as if by magic. Invite guests to tread through the graveyard of creative chocolatey treats you’ve conjured up with some of your favorite candies.

Haunted House Cake
Prep time: 20 minutes
Decoration time: 40 minutes
Makes: 1 cake
2 cans (16 ounces each) vanilla frosting
orange food coloring
2 frozen pound cakes (16 ounces each), thawed
1 box thin chocolate wafer cookies
1 tube (.68 ounces) black decorating gel
1 bag Twix Fun Size Bars
1 bag M&M’S Milk Chocolate Candies Pumpkin Patch Mix
1 bag M&M’S Peanut Chocolate Candies Pumpkin Patch Mix
In bowl, tint frosting orange using food coloring; set aside.
Spread 1/2 cup frosting on bottom of both pound cakes; press together. Stand cakes vertically on serving plate.
Create pitch of roof by trimming top of one cake at slight angle. Trim other cake at steeper angle to make roof look tipsy.
Completely cover cake with remaining frosting. For roof tiles, break chocolate wafers in half and arrange, overlapping slightly.
Pipe black decorating gel for windows. Add candy bars for door and chimney. Use broken wafer cookies for shutters. Use chocolate candies to outline top of roof and sides of house.
In food processor, grind remaining cookies along with a few candy bars. Spread mixture around base of house for “dirt” and scatter chocolate candies on top.

Scary Good Seasonal Treats
(Family Features) Whether your tastes tend toward the spooky or spectacular, or maybe a little of both, this Halloween you can set the scene for a scary good time with a menu that entices goblins big and small.
You won’t have to scour a witch’s lair to find the right ingredients for these treats. All you need is Limited Edition TruMoo Orange Scream Milk, which is inspired by an orange frozen ice pop with vanilla ice cream. It’s tasty served on its own in a cold glass, or added to Halloween-inspired recipes perfect for hosting your fellow ghouls and goblins.
Try using it for non-traditional recipes, such as Orange-Cranberry Scones for hosting a scary fun Halloween get-together. Or for another creative snack option at your ghoulish gala, go for Bread Pudding to send guests home screaming with delight.
An added bonus, TruMoo Orange Scream Milk leaves out lots of things. It contains no high fructose corn syrup, no artificial growth hormones, no artificial sweeteners and no artificial flavors, so all that’s left is a nutritious, family-friendly and tasty fun time. TruMoo Orange Scream Milk has no GMO ingredients.
For more Halloween-inspired recipes, visit TruMoo.com, and find TruMoo Milk on Facebook, Twitter and Pinterest.

Orange-Cranberry Scones
Servings: 6 scones
Scones:
- 2 1/4 cups all-purpose flour
- 1/4 cup granulated sugar
- 2 teaspoons baking powder
- 1/2 teaspoon salt
- 4 tablespoons cold butter
- 2 large eggs
- 1/2 cup TruMoo Orange Scream Milk
- 1/2 cup dried cranberries
- 1 tablespoon grated orange peel
Orange Glaze:
- 1/2 cup confectioners’ sugar
- 1 tablespoon TruMoo Orange Scream Milk
- To prepare Scones: Heat oven to 425° F. In large bowl, combine flour, sugar, baking powder and salt. With pastry blender or two knives, cut in butter until mixture resembles coarse crumbs. Stir in eggs, one at a time, then milk, cranberries and orange peel.
- Turn dough onto lightly floured surface. Refrigerate 30 minutes, or until firm. Pat dough into 8-inch round, about 3/4-inch thick. Cut into six wedges; carefully separate wedges and place on parchment-lined baking sheet about two inches apart. Bake about 15 minutes until lightly golden and crusty.
- To prepare Orange Glaze: In small bowl, combine confectioners’ sugar and milk until well blended. Cool scones slightly. Drizzle scones with glaze.

Orange Custard Bread Pudding
Servings: 6
- 1 loaf (16 ounces) sliced raisin-cinnamon bread
- 2 cups TruMoo Orange Scream Milk
- 3 large eggs
- 1/2 cup granulated sugar
- 1 tablespoon grated orange peel
- 1/4 teaspoon ground nutmeg
- 1/4 teaspoon orange extract
- 1/8 teaspoon salt
- confectioners’ sugar
- Heat oven to 350° F. Cut raisin bread into 1-inch pieces (about 8 cups). In large bowl, whisk together milk, eggs, sugar, orange peel, nutmeg, orange extract and salt. Toss with raisin bread to mix well.
- Butter 2-quart casserole or baking dish. Pour bread mixture into dish. Place in center of deep, ovenproof pan. Pour boiling water into pan until it reaches halfway up sides of dish. Place pan on center rack in oven. Bake until just set, about 40 minutes. Carefully remove from oven.
- To serve, sprinkle with confectioners’ sugar. Serve warm.
Source: TruMoo

Chillingly Creative Drinks for Halloween
(Family Features) If you’re planning a monster bash this Halloween, brew up drinks so frightfully delicious that it will spook the taste buds of every little ghost, witch and goblin.
The Spooky Smoothie is a flavorful combination of vanilla milk and Greek yogurt, which is blended with ice and topped with whipped cream. The fun is all in the orange-tinted Limited Edition TruMoo Lowfat Vanilla Milk, so make sure to serve it in a clear glass. And ghosts will rise from the dead for the chocolaty Monster Mash Mudslide. For more information, visit www.facebook.com/TruMooMilk.
Both of these tasty concoctions feature TruMoo, which is made with 35 percent less total sugar than the leading chocolate and vanilla milk competitor and has no high fructose corn syrup. That’s one thing that won’t scare you this Halloween season.

Spooky Smoothie
Yield: 4 servings
- 3 cups Limited Edition TruMoo Lowfat Vanilla Milk, orange color
- 1 1/2 cups lowfat vanilla Greek yogurt
- 5 cups ice cubes
- 1/4 cup fat free whipped cream
- Candy corn for garnish, optional
- In blender, combine vanilla milk, yogurt and ice cubes. Blend on high speed until smooth and creamy.
- To serve, pour into serving glasses. Top with whipped cream and candy corn.

Monster Mash Mudslide
Yield: 4 servings
- 4 cups TruMoo Lowfat Chocolate Milk
- 10 chocolate wafer cookies, coarsely broken
- 1/2 cup frozen non-dairy whipped topping, thawed
- 8 mini chocolate chips or mini chocolate candies (orange/brown color recommended)
- In blender, blend chocolate milk and chocolate wafer cookies until smooth. Heat mixture in saucepan or microwave until just heated through.
- To serve, pour chocolate milk mixture into 4 glasses. For each serving, spoon a large, upright dollop of whipped topping to resemble a ghost. Insert chocolate chips or chocolate candies into dollop for eyes.
Note: To enjoy a cold mudslide, do not heat in saucepan or microwave.
Source: TruMoo