
Take the Fear Out of Fish
(Family Features)With more time spent in the kitchen, people are increasingly looking to different ingredients for inspiration. That includes seafood – sales of canned and frozen seafood are 37% higher than last year, according to IRI Worldwide.
If you’re not familiar with buying and cooking seafood, there’s nothing to fear. Frozen seafood is an affordable, nutritious and sustainable protein that can earn a spot in your kitchen. Good food pioneers chef Nora Pouillon, a James Beard Lifetime Achievement Award winner, and her daughter, Blue Circle Foods product director Nina Damato, offer these recommendations for sustainable frozen seafood, from defrosting techniques to cooking tips and seasonal pairings.
Why buy frozen?
Frozen seafood is just as high quality as fresh since modern techniques like flash-freezing preserve fish moments after it is caught. Stores generally carry a larger selection of frozen fish and it’s typically less expensive than fresh seafood. Because frozen fish keeps longer, you can find greater variety and more sustainable options. Plus, it’s convenient – use exactly the portion you need and save the rest for later – making it perfect for meal planning.
What about taste?
When done right, freezing locks in flavor and nutrients, so you can enjoy frozen fish that’s every bit as delicious as when it was caught.
How long will it last?
Frozen fish is safe indefinitely, but for best quality, the USDA recommends using frozen fish within 3-8 months after purchase.
How can you thaw frozen fish safely?
If you know you’ll be serving fish, pop frozen fillets in the fridge the night before or the morning you plan to cook them.
How can you cook directly from frozen?
- Preheat your oven to 375 F.
- Remove frozen fillets from packaging and rinse under cold water. Pat dry with a paper towel.
- Arrange fillets on a baking sheet. Brush lightly with oil on all sides and season with salt and pepper, to taste. Bake 25-30 minutes, or until fish is tender and flakes easily.
How should you season frozen fish?
Salt and pepper can enhance seafood’s flavor. If you’re feeling bold, a simple glaze or a crust of seasonings can elevate your fish to the next level.
What pairs well with frozen fish?
Frozen fish is a versatile protein that plays well with many recipes. Fatty fish like salmon brings out the flavors in seasonal veggies including zucchini and summer squash, while leaner fillets like cod can be breaded or used in tacos.
Fish also pairs excellently with a variety of wines. The trick is to serve delicate fish with light wines and heartier fish with richer, more substantial wines. If you’re in the mood for salmon, try Pouillon’s Pumpkin Seed Crusted Salmon. This recipe also works well with cod and can be served with a rosé for a tasty seasonal pairing.
To learn more about frozen seafood and purchase sustainable fish, visit bluecirclefoods.com.
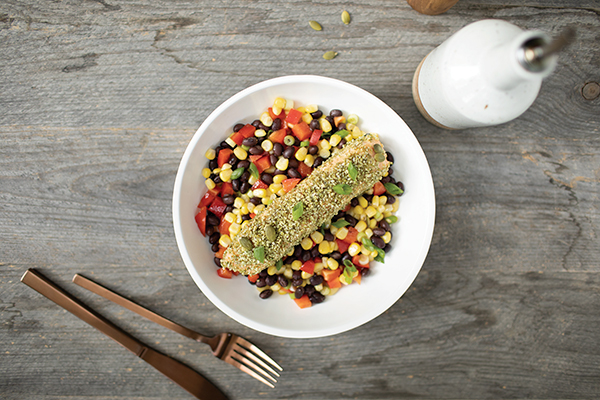
Pumpkin Seed Crusted Salmon
Recipe courtesy of chef Nora Pouillon
- 2 cups frozen sweet corn
- 1 can (4 ounces) black beans, rinsed and drained
- 1 red bell pepper, diced
- 1/4 cup cilantro, chopped
- 1 1/2 teaspoons ground cumin
- 1/2 teaspoon smoked chili (optional)
- salt, to taste
- pepper, to taste
- 1 cup pumpkin seeds
- 4 teaspoons pumpkin seed oil or olive oil
- 2 tablespoons sliced scallions
- 2 Blue Circle Frozen Atlantic Salmon Fillets
- Preheat oven to 375 F.
- Mix corn, black beans, bell pepper, cilantro, ground cumin and smoked chili, if desired. Season with salt and pepper, to taste. Spread onto baking dish.
- In blender, pulse pumpkin seeds, oil, sliced scallions and salt and pepper, to taste, until paste forms.
- Coat frozen salmon fillets with pumpkin seed paste.
- Place fillets in baking dish on top of black bean and corn salad. Bake 25-30 minutes.
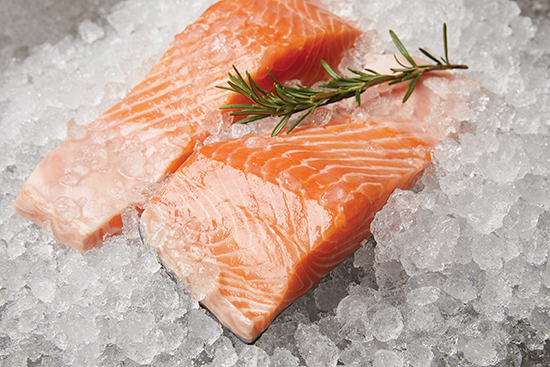
Photo courtesy of Getty Images (salmon on ice)
Source: Blue Circle Foods

Flavor Fusion
(Family Features) A distinctive and unexpected ingredient like rice vinegar is an easy way to bring faraway flavors to your favorite summer dishes. This pantry staple adds an Asian-inspired flavor to recipes of all kinds, from marinades to high-end meals.
Explore a new way to enjoy steak this summer with a recipe for zesty, marinated beef paired with crisp broccolini and peppers to give a familiar dish a fresh makeover using flavors from another origin. Give fajitas an Asian makeover with shrimp seared in a decadent hoisin-ginger sauce or try a fresh take on a crunchy salad with this Mexican-meets-Asian layered approach that’s perfect for lunch.
Include seasonal produce like cucumbers, bell peppers and tomatoes to enhance your summer flavor fusions. Pantry staples like black beans and canned corn also offer accessible ways to make elevated summer classics.
Capture Asian flavors with ingredients like NAKANO Rice Vinegar, which has perfected its rice vinegars over eight generations to offer unique and delicious flavors perfect for making mouthwatering Asian-inspired recipes at home.
Pro Flavor-Fusion Tips
- The key to a successful stir-fry is to use high heat to quickly cook meats and vegetables in stages without overcrowding the pan. This ensures that veggies stay slightly crisp, and meats develop a delicious sear instead of steaming.
- Avocado oil has one of the highest smoke points, making it a great choice for high-heat cooking like stir-frying.
- Hoisin sauce, which you can find in the Asian section of most grocery stores, is used frequently in Chinese and Vietnamese cuisine. It’s a salty, fermented soybean paste often combined with garlic, chiles and five-spice powder, which adds a sweet, umami-rich, aromatic flavor to the dish.
- Shishito peppers are slender, mild, green Japanese peppers available in the produce section of well-stocked grocery stores or Asian markets. If shishito peppers are unavailable, substitute with multicolored mini peppers.
- To accommodate those who love a lot of spice and those who prefer less spice, serve mild-to-medium-spicy foods with additional chili sauce on the side.
- Swap out heavy, high-calorie salad dressings for a splash of additional flavor with NAKANO rice vinegar.
Find more flavorful ways to put an Asian twist on your summer dishes at nakanoflavors.com.
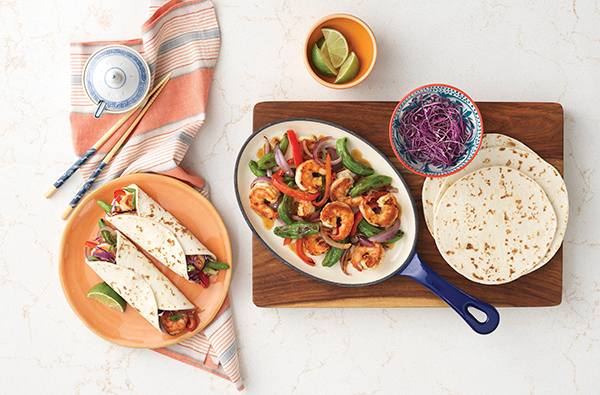
Sizzling Shrimp Fajita Stir-Fry
Prep time: 15 minutes
Cook time: 10 minutes
Servings: 6
- 1 1/2 pounds large, raw shrimp, peeled and deveined (21-25 shrimp total)
- 2 tablespoons soy sauce, divided
- 4 teaspoons cornstarch, divided
- 1/4 cup NAKANO Roasted Garlic Rice Vinegar
- 3 tablespoons hoisin sauce
- 2 teaspoons grated fresh ginger
- 3 tablespoons vegetable oil, divided
- 1 red onion, cut into thin slivers
- 1 red bell pepper, cut into thin strips
- 1/2 pound shishito peppers, stemmed
- 6 warmed corn or flour tortillas
- 1/2 cup finely shredded red cabbage
- 1/4 cup thinly sliced green onions
- In medium bowl, combine shrimp, 2 teaspoons soy sauce and 2 teaspoons cornstarch; let stand 5 minutes to marinate.
- In separate bowl, whisk remaining soy sauce, remaining cornstarch, rice vinegar, hoisin sauce and ginger until blended.
- In large nonstick skillet over medium-high heat, heat 1 tablespoon oil until shimmering. Add half of shrimp; cook 1 minute on each side. Transfer to clean bowl; repeat with remaining shrimp. Wipe out skillet with paper towel.
- In same pan, heat remaining oil until shimmering. Add red onion, bell pepper and shishito peppers. Cook, stirring, 2-4 minutes until peppers begin to blister. Add vinegar mixture; cook, stirring, 1-2 minutes, or until sauce is slightly thickened. Add shrimp to pan. Cook, tossing well until shrimp and vegetables are coated with sauce.
- Fill tortillas with shrimp mixture, cabbage and green onions.
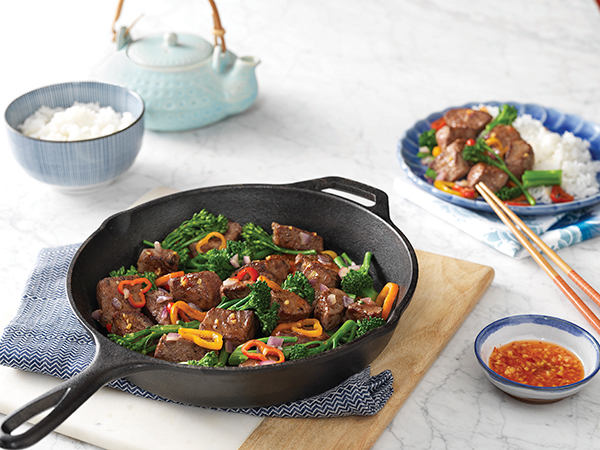
Spicy Steak and Broccoli
Prep time: 20 minutes
Cook time: 10 minutes
Servings: 6
- 1 beef tenderloin (1 1/2 pounds), cut into 2-inch cubes
- 1 tablespoon soy sauce
- 1 tablespoon cornstarch
- 1/2 teaspoon ground black pepper
- 1/2 teaspoon garlic powder
- 3 tablespoons avocado oil, divided
- 2 cups multicolored, mini sweet peppers, cut into thin rings
- 1/4 pound broccolini, cut into 3-inch sections
- 2 large shallots, chopped
- 1/4 cup NAKANO Seasoned Rice Vinegar
- 1 tablespoon sugar
- 1 teaspoon sambal oelek (Asian-chili garlic sauce) or sriracha
- 1/4 teaspoon kosher salt
- 2 teaspoons grated fresh ginger
- In medium bowl, combine beef, soy sauce, cornstarch, black pepper and garlic powder.
- In large nonstick skillet over medium-high heat, heat 1 tablespoon oil. Add peppers, broccolini and shallots; cook 3 minutes, or until tender crisp. Transfer to clean bowl.
- In same skillet over high heat, heat 1 tablespoon oil until shimmering. Add half of beef in single layer. Cook undisturbed 2 minutes, or until bottoms are browned. Stir. Cook 1 minute, or until outer surfaces are no longer pink. Transfer to bowl with vegetables. Repeat with remaining oil and beef. Return beef and vegetables to skillet over medium-high heat.
- In small bowl, combine rice vinegar, sugar, sambal oelek, salt and ginger. Add mixture to pan. Cook 2 minutes, or until sauce is slightly thickened.
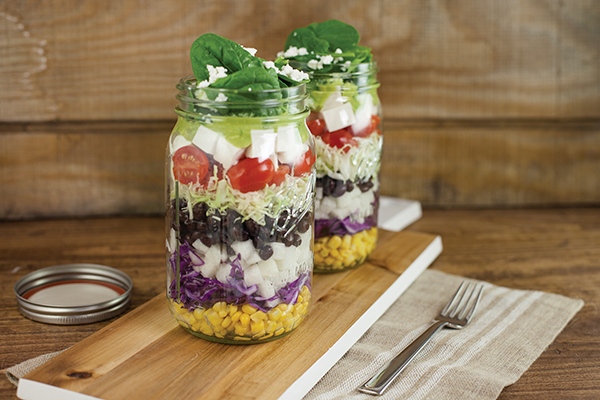
Glass Jar Layered Taco Salad
Prep time: 10 minutes
Servings: 1
- 1/2 avocado
- 1/4 teaspoon serrano pepper
- 1 tablespoon cilantro
- 2 tablespoons NAKANO Organic Seasoned Rice Vinegar
- 2 tablespoons sesame oil
- 1 teaspoon lime juice
- 1/3 teaspoon salt
- 1/2 cup corn
- 1/2 cup red cabbage, shredded
- 1/2 cup jicama, diced
- 1/2 cup black beans, rinsed
- 1/2 cup shredded green cabbage
- 1/2 cup cherry tomatoes, halved
- 1/2 cup extra-firm tofu, diced
- 1/2 cup corn chips, crushed
- 1/2 cup spinach
- 1 tablespoon queso fresco
- In bowl, mash avocado and add serrano pepper, cilantro, rice vinegar, sesame oil, lime juice and salt. Stir to combine.
- Build salad in layers of corn, cabbage, jicama, black beans, cabbage, tomatoes, tofu, corn chips, spinach and queso fresco while adding drizzles of dressing between layers.
Source: NAKANO

Vegetarian Stuffed Peppers
(Family Features) With the rise in popularity of plant-based diets and dishes, combining them with dairy products can create a superfood power couple. For example, the cheddar cheese found in these Vegetarian Stuffed Peppers helps optimize nutrient absorption from the rice, black beans, corn and tomatoes to create a nutritious and delicious appetizer or meal.
Find more recipes that combine the goodness of dairy and plant-based foods at milkmeansmore.org.
Watch video to see how to make this recipe!

Vegetarian Stuffed Peppers
- 6 large sweet bell peppers
- 1/2 cup diced sweet onion
- 1 cup cherry tomatoes, sliced in half
- 1 cup frozen corn, thawed
- 1 1/2 cups cooked black beans plain (drained and rinsed if using canned beans)
- 2 cups cooked brown rice
- 1/2 teaspoon chipotle chili powder
- 1/2 teaspoon dried oregano
- 1/2 teaspoon ground cumin
- 3/4 teaspoon kosher salt
- 1/2 teaspoon black pepper
- 1 1/2 cups shredded Sharp Cheddar Cheese, divided
- Preheat the oven to 350º F. Line a rimmed half sheet pan with non-stick aluminum foil.
- Slice the tops off of the sweet bell peppers. Use a spoon to scoop the seeds and white membranes from the insides of the peppers. Discard the pepper tops and seeds. Place the peppers onto the prepared half sheet pan; briefly set aside.
- In a large bowl, stir together the diced onion, cherry tomatoes, corn, black beans, and brown rice until combined. Sprinkle the chili powder, oregano, salt, and pepper over top before stirring to distribute the seasonings throughout. Fold 1 cup of the Cheddar cheese into the filling, reserving the remaining cheese for later.
- Stuff the open cavities of the sweet bell peppers tightly with filling, mounding a bit of the filling over the top edge of the peppers. Sprinkle the remaining Cheddar cheese over top of the filling. Bake the stuffed peppers for 30 to 35 minutes or until filling is heated through, the peppers soften, and the exteriors begin to wrinkle. Serve immediately.

A Fiesta of Flavor!
(Family Features) This Cinco de Mayo, gather the whole family together and enjoy a true Mexican fiesta like Mama Ortega would have thrown over 100 years ago. With mariachi music, dancing, piñatas and traditional homemade Mexican meals, Mama's fiestas were always a favorite with family, friends and especially her 13 children!
The flavors and smells of Mama's homemade meals still taste great today, but are easier to create - and more fun to eat! Her legendary meals inspired today's convenient and great tasting Ortega Mexican products. Achieve authentic fiesta flavors by using crisp and crunchy Ortega taco shells made with whole kernel corn, topped with slow simmered Ortega Taco Sauce and authentic fire-roasted green chiles. Ortega's zesty Mexican seasonings and fresh-tasting salsas are perfect for adding flavor to your favorite snack, casserole, dip or soup!
So, gather the family together and enjoy a fiesta of flavors with Ortega. For other great recipe ideas or to learn more about Ortega's line of products, visit www.ortega.com.

Taco Rice and Beans
Prep time: 5 minutes
Start to finish: 15 minutes
Serves 4
- 2 tablespoons olive oil
- 1 medium onion, diced
- 1 package (1.25 ounces) Ortega Taco Seasoning Mix
- 1 cup water
- 1 can (15 ounces) black beans, drained
- 2 cups cooked rice
- 1/4 cup Ortega Thick & Chunky Salsa
- In skillet, heat oil over medium heat. Add onion; cook 3 minutes. Add taco seasoning mix and water. Stir until combined and slightly thickened. Add beans, rice and salsa; stir. Cook 5 minutes more or until contents are heated through.
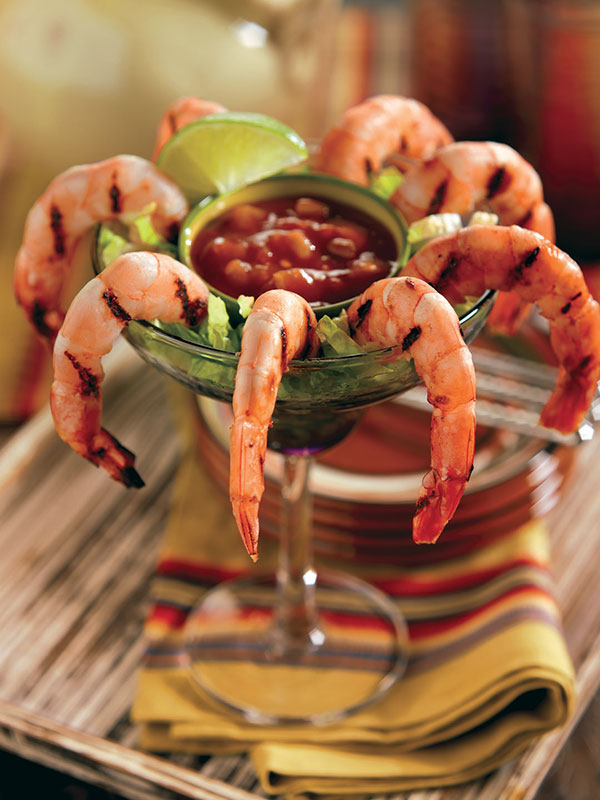
Grilled Margarita Shrimp
Prep time: 40 minutes
Start to finish: 50 minutes
Serves 6
- 1 cup margarita mix
- 1 cup Ortega Taco Sauce, divided
- 2 pounds raw shrimp (21 to 30), peeled and deveined
- 3 tablespoons Ortega Diced Green Chiles
- In large bowl, pour margarita mix and 1/2 cup taco sauce over shrimp and toss well. Marinate in refrigerator 30 minutes or up to 2 hours.
- Preheat grill until sizzling hot, about 15 minutes. Grill shrimp 4 minutes on each side or until pink.
- Combine remaining 1/2 cup taco sauce with green chiles to use as dipping sauce.
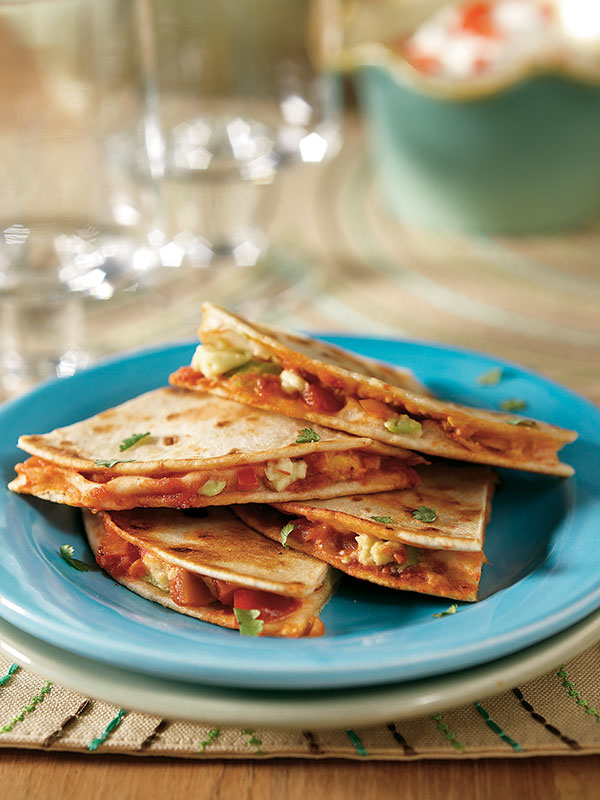
Ham and Cheese Quesadillas
Prep time: 10 minutes
Start to finish: 20 minutes
Serves 5
- 1/2 pound cooked ham, diced
- 3/4 cup cream cheese, softened
- Zest of one lime
- 2 green onions, white and green parts, diced
- 1 Ortega Soft Taco Kit - includes 10 soft tortillas, 1 package (1.25 ounces) taco seasoning mix and 1 package (3 ounces) taco sauce
- Cooking spray
- 1 tomato, diced
- 1/4 cup cilantro, chopped
- 1/2 cup sour cream
- In mixing bowl, combine diced ham, cream cheese, lime zest, green onions and half of taco seasoning packet contained in soft taco kit. Heat large skillet on medium and spray with cooking spray.
- Spread about 1 teaspoon taco sauce onto a flour tortilla and then spread about 1/4 cup ham/cream cheese mixture on top.
- Place tortilla-side down onto hot skillet and top with another flour tortilla. Heat about 4 minutes, until bottom of tortilla is browned; spray top of the other tortilla and flip. Cook another 4 minutes and repeat with remaining quesadillas. Cook two at a time if skillet is large enough.
- Cut into wedges and top with tomato, cilantro and sour cream and serve.
Mexican Meatballs
Prep time: 15 minutes
Start to finish: 30 minutes
Makes about 30 meatballs
- 3 Ortega Yellow Corn Taco Shells
- 1 pound (16 ounces) lean ground beef
- 1 teaspoon Ortega Chili Seasoning Mix
- 1 egg
- 2 teaspoons Ortega Diced Green Chiles
- 1 bottle (8 ounces) Ortega Taco Sauce
- 1/4 cup shredded cheddar cheese
- Cilantro, finely chopped (optional)
- Break taco shells into food processor and pulse several times to create about 1/2 cup taco shell crumbs. Place into large mixing bowl and add ground beef, seasoning mix, egg and green chiles. Mix thoroughly.
- Form mixture into 30 (1-inch) meatballs and drop into hot skillet. Cook until they begin to brown. Carefully turn over and continue browning. Add taco sauce. Coat meatballs with sauce and simmer over low heat, uncovered, 10 minutes.
- Sprinkle meatballs with cheese and garnish with cilantro, if desired. Serve with toothpicks.
Photos copyright (c) 2008 Publications International, Ltd. Used by permission.
Source: Ortega

Feeding the Game Day Frenzy
(Family Features) What better way to serve a hungry gang than with two crowd-pleasers: meatballs and BBQ? Anyone hosting a big game gathering needs to have recipes on-hand that are hearty and tasty, while still being easy to prepare.
The easiest and fastest way to find what you need to feed the fans is by utilizing local club stores like Sam's, where shoppers can huddle and find great game-day foods and entertaining items at affordable prices. These crowd-pleasing recipes start off with Byron's Hand Pulled Pork BBQ and Casa Di Bertacchi Meatballs, both sold at Sam's Clubs nationwide.
The Mini Meatball Hamburgers are made from fully-cooked meatballs crafted from an outstanding, authentic family recipe. The seasoned and lightly steamed meatballs can be warmed up quickly and paired with a tasty sauce for some super-star sliders.
BBQ Nachos take game-day appetizers to a whole new level. Made with hickory-smoked pulled pork that's finished with a sweet and spicy sauce, this BBQ is ready to be warmed up and loaded up with fan-favorite nacho toppings for an appetizer that will have your guests calling for a replay.
For more information about Byron's Hand Pulled Pork BBQ, Casa Di Bertacchi Meatballs, or for additional recipes, visit www.ClubEntertaining.com.

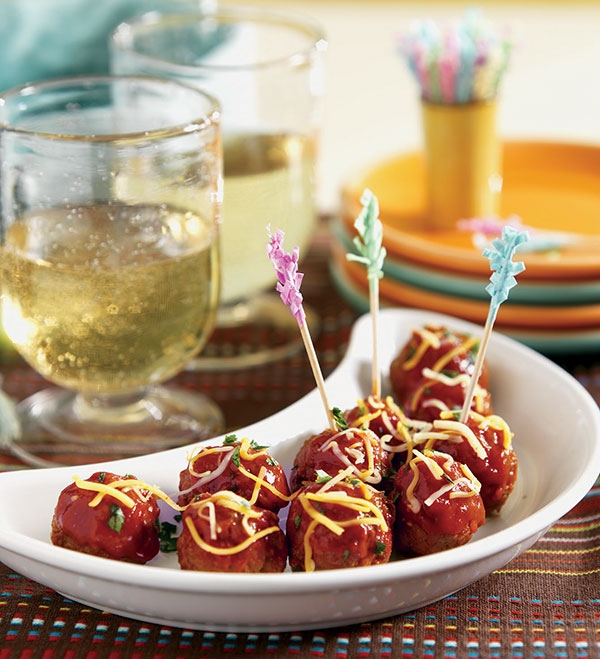
Mini Meatball Hamburgers
Makes 26 appetizers
- 26 frozen Casa Di Bertacchi fully cooked meatballs (1 pound)
- 1 cup ketchup
- 3 tablespoons Dijon honey mustard
- 26 2-inch rolls, sliced in half horizontally
- 1 1/2 cups sweet pickle relish
- Preheat oven to 400°F.
- Place meatballs in 8 x 8 or 9 x 9-inch pan. Bake for 25 to 30 minutes, or until thoroughly heated.
- In a small bowl, combine ketchup and mustard. Place a heaping teaspoon of ketchup mixture on the bottom of roll. Place a meatball on top. Follow with a rounded teaspoon of pickle relish. Place top half of roll over top. Repeat for remaining meatballs and rolls. Serve immediately on a large platter.
Cheeseburger Variation: Place a small slice of cheddar cheese over each meatball.

BBQ Nachos
Serves 4
- Byron's BBQ
- 1 cup shredded Monterrey Jack cheese
- 1/2 cup red onion, diced
- 1 green bell pepper, diced
- 1 tomato, diced
- 1 15-ounce can black beans, rinsed and drained
- Tortilla chips
- Whole kernel corn
- Sliced jalapeño
- Fresh guacamole
- Sour cream
- On a large oven safe serving plate, arrange a layer of tortilla chips; top with BBQ. Sprinkle with cheese, onions, bell peppers, diced tomato and black beans. Heat in microwave (or in oven) until cheese is melted. Garnish with whole kernel corn, sliced jalapeño, fresh guacamole, and sour cream.
Source: Byron's BBQ / Casa Di Bertacchi Meatballs

5 Tips to Meal Prep Like a Pro
(Family Features) Dinner can be a daunting task for any family with multiple mouths to feed. Factor in complex schedules and individual tastes, and a family meal can become a stressful thought for home cooks.
However, with proper meal planning and preparation, those stressful evenings can become a thing of the past. Consider these steps to becoming a better meal prepper:
Start Slow
If you’re new to meal prepping, don’t bog yourself down trying to come up with ideas and ingredients multiple days in advance. Start by planning just one or two days ahead then consider lengthening your prep phases as you get more comfortable.
Shop Smart
Avoid overbuying by heading to the grocery store with a plan in mind or, even better, a specific list. While perusing the aisles, look for the Produce for Kids logo next to healthy, family-friendly items to help make nutritionally sound choices.
Go with What You Know
Rather than teaching yourself to meal prep while trying to learn new recipes at the same time, stick to the basics. Create dishes you’ve made in the past while you get into the habit of meal prepping.
Make It a Family Event
Recruit some help from your kids by enlisting them with some easier kitchen tasks. It can be a learning and bonding experience to make recipes like Easy One-Dish Chicken and Veggie Bake or Sweet Potato and Black Bean Quesadilla.
Plan for In-Season Produce
Certain fruits and veggies are stocked (and taste better) at certain times of year. Be sure to create shopping lists with these timeframes in mind.
To find family meal tips and more than 400 registered dietitian- and family-approved recipes, visit produceforkids.com.
Easy One-Dish Chicken and Veggie Bake
Recipe courtesy of Produce for Kids
Prep time: 10 minutes
Cook time: 50 minutes
Servings: 4
- 1 pound chicken breast, cut in fourths
- 12 small red potatoes, quartered
- 12 ounces green beans
- 1 tablespoon olive oil
- 3 cloves garlic, minced
- 1 tablespoon herbs de Provence
- 1/4 teaspoon salt
- 1/8 teaspoon pepper
- Heat oven to 350 F.
- Place chicken, potatoes and green beans in rows in 13-by-9-inch baking dish with chicken in middle. Drizzle with olive oil and season with garlic, herbs de Provence, salt and pepper.
- Bake 50 minutes, or until chicken reaches internal temperature of 165 F and potatoes are tender.
Nutritional information per serving: 554 calories; 8 g fat; 65 mg cholesterol; 87 g carbohydrates; 11 g fiber; 37 g protein; 9 g sugar; 82 mg calcium; 5 mg iron; 282 mg sodium.
Sweet Potato and Black Bean Quesadilla
Recipe courtesy of Produce for Kids
Prep time: 5 minutes
Cook time: 10 minutes
Servings: 4
- 1 large sweet potato
- 1 can low-sodium black beans, drained and rinsed
- 1/4 cup chopped cilantro
- 1 tablespoon low-sodium taco seasoning
- 8 whole-wheat tortillas
- 1 cup low-fat shredded Monterey Jack cheese
- Use fork to prick sweet potato. Microwave 5 minutes on high. Let cool slightly.
- Cut potato in half lengthwise and scoop flesh into large bowl. Mash until smooth.
- Combine beans, cilantro and seasoning with sweet potato; mix well.
- Heat skillet over medium heat. Spread sweet potato mixture evenly on one side of tortilla, sprinkle with cheese and place second tortilla on top. Cook 3-4 minutes, or until cheese is melted. Flip and cook 2-3 minutes more.
- Repeat with remaining tortillas and mixture. Cut each into quarters.
Nutritional information per serving: 293 calories; 9.34 g total fat; 34.82 g carbohydrates; 10.39 g fiber; 17.04 g protein; 2.33 g total sugars; 237 mg calcium; 2.65 mg iron; 146 mg sodium.
Source: Produce for Kids

Dig Into 7 Game-Winning Dips
(Family Features) Although you may share a passion for a favorite sports team, not everyone has the same taste when it comes to the tailgating menu. Enter these seven dips: from a yogurt turmeric dip to spicy buffalo chicken dip, you’re sure to please nearly every game-day guest.
Visit McCormick.com or find McCormick on Facebook and Pinterest for more recipes to make your tailgating menu a winner.

Texas Trash Dip
There won’t be any trash talk when it comes to this dip. It’s the ultimate ooey, gooey, cheesy dish that’s sure to be all the rage at game-day parties and social gatherings.

Easy Buffalo Chicken Dip
Games and wings go hand-in-hand, but you can keep hands mess-free with this alternative that combines all the flavors of savory Buffalo chicken wings in a warm, creamy dip.

Sweet Georgia Peach and Pecan Dip
Think outside the box this season with a dip that is the perfect blend of salty and sweet. Bacon, Georgia peaches, sweet onions and a brown sugar bourbon marinade are complemented by pecans for a nutty, crunchy finish.

Creamy Turmeric and Cinnamon Dip
Low-fat yogurt and milk blend with golden turmeric and cinnamon for a tangy dip just waiting for crispy dippers like pita chips and veggies.

Roasted Carrot Yogurt Dip
Move over cheesy, chili dips – the tangy sweetness of orange juice, carrots and honey make for a simple dip you can feel good about devouring.

Spinach Artichoke and Dill Dip
Warm up with this crowd-pleasing dip made with fresh spinach, artichoke hearts, cream cheese and Parmesan.

Spicy Black Bean Dip
Simply mix together a can of black beans, chopped tomatoes and spices like chili powder and cumin for an easy dip to throw together for last-minute guests.
Source: McCormick

What’s in the Can May Surprise You
Cooking with canned foods combines convenience and nutrition
(Family Features) Simple, convenient and versatile, canned foods provide an array of options for families looking to increase nutrition during mealtimes. However, some home chefs may not be aware of the benefits canned foods bring to the table.
Consider these common consumer misnomers cleared up by the Canned Food Alliance:
Myth: Canned foods don’t count toward dietary goals.
Fact: Canned foods provide important nutrients that deliver on the USDA’s Dietary Guidelines, as all forms of fruits, vegetables, beans, meats and seafood – whether fresh, frozen, canned or dried – are recommended to help ensure a proper balance of nutrients. In fact, according to a survey conducted by the Canned Food Alliance, 95 percent of health professionals surveyed agree that all forms of food, including canned, can help consumers meet the USDA’s MyPlate fruit and vegetable recommendations.
Myth: Canned foods aren’t as nutritious as fresh or frozen foods.
Fact: Research published in the “Journal of the Science of Food and Agriculture” shows canned foods can be as nutritious, and in some cases more nutritious, than fresh and frozen counterparts.
Myth: Canned foods are filled with preservatives.
Fact: Because canned foods have already been cooked, preservatives aren’t necessary to prevent spoilage. The canning process itself preserves the food.
Myth: Canned foods are highly processed.
Fact: Once canned fruits and vegetables are picked and packed near peak ripeness, they’re cooked quickly at high temperatures to lock in nutrients, similar to the home-canning process.
Myth: Canned foods are high in sodium.
Fact: Salt and sodium aren’t required for preservation of canned foods, and low- and no-sodium canned food options are available. Additionally, draining and rinsing canned foods can further reduce sodium by up to 41 percent.
Find more canned food facts and recipes at mealtime.org.
Chipotle Pumpkin Black Bean Chili
Recipe courtesy of the Canned Food Alliance
Prep time: 20 minutes
Cook time: 60-70 minutes
Servings: 4-6
- 2 tablespoons vegetable oil
- 1 onion, chopped
- 1 rib celery, chopped
- 2 jalapenos, seeded and chopped
- 3 cloves garlic, minced
- 1 teaspoon ground cumin
- 1 teaspoon dried oregano
- 1/4 teaspoon ground pepper
- 2 tablespoons tomato paste
- 1 can (28 ounces) no-salt added canned diced tomatoes
- 1 cup canned pureed pumpkin
- 1 cup no-salt-added canned chicken broth
- 1 can no-salt-added canned black beans, drained and rinsed
- 1 can (12 1/2 ounces) no-salt-added chicken, drained
- 1 chipotle in adobo sauce, finely chopped
- 1 teaspoon brown sugar
- salt, to taste
- 2 green onions, finely chopped
- lime wedges, for serving
- In Dutch oven or large saucepan over medium heat, heat oil. Add onions, celery, jalapenos, garlic, cumin, oregano and pepper. Cook, stirring, 5-8 minutes, or until vegetables soften. Add tomato paste and cook 2 minutes.
- Add tomatoes, pumpkin puree, chicken broth, black beans, chicken, chipotles and brown sugar. Bring to boil. Reduce heat to low. Simmer, stirring occasionally, 1 hour, or until chili thickens. Add salt, to taste.
- Garnish with green onions and serve with lime wedges.
Tip: Add preferred canned beans, such as white kidney beans, pinto or Romano beans, in place of or in addition to black beans.
Nutritional information per serving: 240 calories; 6 g fat; 35 mg cholesterol; 210 mg sodium; 29 g carbohydrates; 8 g fiber; 8 g sugar; 18 g protein; 7,390 IU vitamin A; 35 mg vitamin C; 98 mg calcium; 3.2 mg iron.
Source: Canned Food Alliance

Unleash the Power of Dairy
(Family Features) If you’re trying to boost the nutrition of your meals and snacks, look no further than your refrigerator. Dairy products provide a powerful nutrition package that can help you meet your nutrient needs and achieve better health.
The most recent Dietary Guidelines for Americans affirm dairy’s important place in the diet with a recommendation that people ages 9 and older consume three servings of low-fat or fat-free dairy foods every day. With nine essential nutrients, milk, cheese and yogurt deliver a unique nutrition package superior to milk alternatives, such as almond or rice beverages, which are often fortified or fall short on these important nutrients.
During the hot summer months, when you don’t feel like spending much time in the kitchen, dairy products offer ease and convenience, as many are ready to use in recipes or round out a meal or snack. For a quick, easy and healthy snack this summer, put a fresh take on traditional pizza with this recipe that uses crescent rolls topped with cheeses and fresh seasonal veggies. Or turn up the heat on a classic beef burrito by adding warm pepper jack cheese and black beans.
Visit MidwestDairy.com to pledge Dairy 3 for Me, find additional recipes and learn more about how to unleash the power of dairy nutrition.

Summer Pizza Snack
Recipe courtesy of Cindy Heins, Heins Family Farms
Total time: 22 minutes
Servings: 12
- 1 tube (8 ounces) crescent rolls
- 1 tub (8 ounces) low-fat cream cheese
- 1/4 cup light mayonnaise
- 1/4 teaspoon garlic powder
- 1 cup shredded part-skim mozzarella cheese
- 3/4 cup sliced cherry tomatoes
- 1/2 cup sliced black olives
- 1/2 cup chopped broccoli florets
- 1/2 cup chopped cucumber
- Heat oven to 375° F. In 9-by-13-inch baking pan, spread out crescent roll dough. Seal seams together to form one large rectangle across bottom of pan. Bake 10-12 minutes, or until lightly browned. Cool on rack.
- In small bowl, mix together cream cheese, mayonnaise and garlic powder. Spread evenly over entire cooled crust. Top with mozzarella, tomatoes, olives, broccoli and cucumber. Cut into 12 squares and serve.

Beef Burrito with Pepper Jack Cheese and Black Beans
Total time: 9 minutes
Servings: 6
- 1/2 pound ground beef sirloin
- 2 teaspoons minced garlic
- 1 cup chunky salsa, divided
- 2 cups cooked brown or white rice
- 6 whole-wheat tortillas (9 inches each)
- 1 can (15 ounces) black beans, drained and rinsed
- 1 can (11 ounces) corn kernels, drained
- 2 cups shredded pepper jack cheese
- sliced green onion, including green tops
- In medium, nonstick skillet, brown ground beef and garlic over medium heat (break beef mixture up into smaller chunks with spatula). Drain fat and stir in 1/2 cup salsa; set aside.
- Spread 1/3 cup rice on center of tortilla, leaving 1/2-inch border. Scatter about 2 tablespoons beans and 1 1/2 tablespoons corn over rice. Spread 1/3 cup beef mixture and 1/4 cup cheese over corn. Top with 2 teaspoons salsa and a few slices green onion. Fold in two opposite edges of tortilla 1 inch each and roll up. Place seam-side down on microwave-safe dish.
- Repeat with remaining tortillas. Place burritos in microwave oven and heat 1 minute, or until heated through. Serve with remaining salsa.
Source: Midwest Dairy Association