
Meal-Prep Tips for a Manageable Back-to-School Menu
(Family Features) The hustle and bustle of back-to-school season can cause chaos in households. Class time, field trips and homework typically rule each day, which can make sitting down for a meal seem like a far-off dream. One easy way to save time is simplifying family recipes and prioritizing meal-planning.
Consider these meal-planning tips from the experts at Healthy Family Project, whose partners are donating $16,000 to the Foundation for Fresh Produce to support children’s accessibility to fresh fruits and vegetables.
Choose the meals you plan to make for the week. Cut down on prep time by planning dishes with overlapping ingredients then write out a grocery list to keep from overbuying. Recipes like this Southwest Quiche Muffins Bento Box that include a brief list of widely used ingredients can help you avoid buying items you may only use once.
Stock the kitchen with ingredients your family often uses. Ensure you have the spices, seasonings, condiments, sauces and canned foods to prepare favorite meals at a moment’s notice.
Save time by washing and prepping produce once each week. For example, if you’re using sweet peppers in these Mini Sweet Pepper Sheet Pan Nachos and again in another meal that week, prep all at once so they’re ready when it’s time to cook – just be sure to store in an airtight container.
Serve quick snacks that won’t spoil dinner. Kids often need a little fuel for homework, but complicated snacks can cut into already busy schedules. Keep ingredients on hand for simple options like trail mix, fruit parfaits and meat and cheese wraps.
Use kitchen tools that speed up the process. Pressure cookers and air fryers can help you put nutritious meals on the table faster while slow cookers let you prep in the morning and come home to a hot, delicious dinner.
Visit HealthyFamilyProject.com to find more back-to-school recipes.
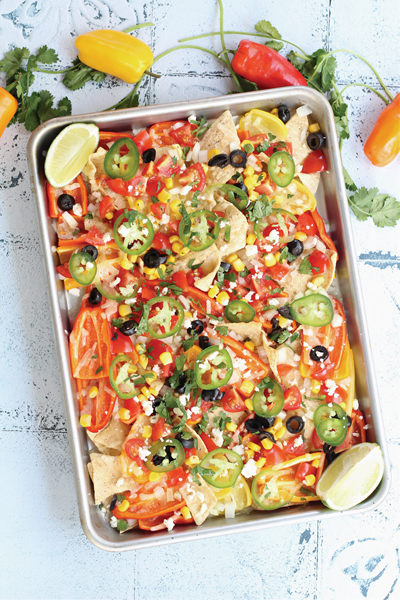
Mini Sweet Pepper Sheet Pan Nachos
Recipe courtesy of Healthy Family Project
Prep time: 10 minutes
Cook time: 5 minutes
Servings: 4
- 8 ounces Pero Family Farms Mini Sweet Peppers, cut into chip shapes
- 7 ounces tortilla chips
- 1/2 cup sweet or red onion, diced.
- 1/2 cup canned or fresh corn
- 1/2 cup queso fresco cheese
- 1/4 cup black olives
- 1/4 cup jalapeno peppers, fresh sliced
- 1/4 cup cilantro leaves, for garnish
- 1 lime, cut into thin wedges, for garnish
- Preheat oven to 350 F.
- Place peppers and tortilla chips on sheet pan. Layer onion, corn, cheese, black olives and jalapeno peppers. Bake 3-5 minutes.
- Garnish with cilantro and lime wedges.
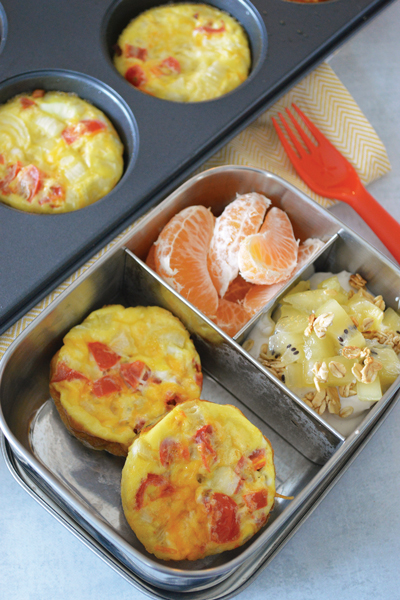
Southwest Quiche Muffins Bento Box
Recipe courtesy of Healthy Family Project
Prep time: 10 minutes
Cook time: 25 minutes
Servings: 12
- 8 large eggs
- 1/2 cup milk
- nonstick cooking spray
- 3/4 cup black beans, drained and rinsed
- 1/2 cup chopped Nature Fresh Farms Tomz tomatoes
- 1/3 cup shredded cheddar cheese
- 1/4 small RealSweet sweet onion, chopped
- 1/2 cup vanilla Greek yogurt
- 1/4 cup granola
- 1/2 Zespri SunGold kiwi, chopped
- 1 Bee Sweet Citrus mandarin, peeled and segmented
- Preheat oven to 325 F.
- In large bowl, whisk eggs and milk.
- Coat 12-cup muffin pan with nonstick cooking spray or use silicone muffin liners. Evenly divide beans, tomatoes, cheese and onion among cups. Pour eggs over top.
- Bake 20-25 minutes, or until eggs are set and lightly browned.
- Remove from oven and cool in pan 2-3 minutes. Use knife to loosen edges and remove.
- In cup or bowl, mix yogurt, granola and kiwi.
- Assemble bento box with two quiche muffins, kiwi parfait and mandarin slices.
Source: Healthy Family Project

Break Out Brunch Favorites for Spring Celebrations
(Family Features) Deck your kitchen, dining room or patio with bright decor and fun, festive springtime frills – brunch season is here. Whether your weekend morning meal is shared with that special someone or friends, family and neighbors, warm, sunny days can bring out the best of brunch.
Impress your loved one with these Mini Banana Rice Pancakes for two, a healthy and satisfying meal made with Minute Brown Rice & Quinoa Cups. This recipe allows for more moments together at the table because the whole-grain combination is ready in just 1 minute and prep time is minimal.
Pairing the crunchiness of red quinoa with the chewy texture of brown rice, these cups earned a spot on the “Men’s Health” Best Foods for Men Awards in 2022. Plus, packed in single-serve portions, you can eat the grains right out of the BPA-free cup for a simple lunch or snack that provides a good source of fiber with 55 grams of whole grains in each serving.
If you need a dish that feeds a crowd, put this Hearty Bacon and Egg Breakfast on the menu. Ready in 35 minutes, it can satisfy brunch cravings for a group of up to 12 as a main course that easily pairs with other morning favorites.
As an ideal complement to the eggs, bacon and cheese, Minute Rice & Quinoa can make this family-style recipe a breeze. In just 10 minutes, the tasty blend of brown rice, red rice, wild rice and quinoa cooks up light and fluffy for a slightly chewy, nutty flavor. It’s also a dependable replacement for oatmeal in other breakfast dishes so you can complete your mission to make meals quick and enjoyable. Not to mention, the bag is BPA-free and recyclable via store drop-off in most communities, while the carton is recyclable curbside.
Find more brunch inspiration for spring celebrations at MinuteRice.com.
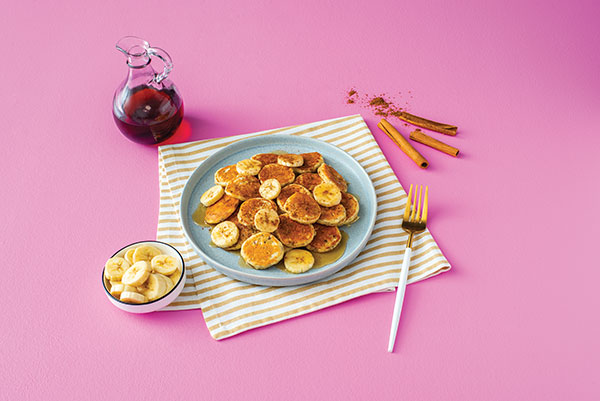
Mini Banana Rice Pancakes
Prep time: 15 minutes
Cook time: 20 minutes
Servings: 2
- 1 cup Minute Brown Rice & Quinoa
- 1 1/4 cups all-purpose flour
- 1 teaspoon baking powder
- 1/2 teaspoon baking soda
- 1/4 teaspoon salt
- 1 cup milk
- 2 teaspoons freshly squeezed lemon juice
- 2 bananas, divided
- 1 egg, beaten
- 1/4 cup pure maple syrup, divided
- 4 teaspoons butter, melted
- 2 tablespoons vegetable oil, divided
- 1/8 teaspoon ground cinnamon
- Heat rice and quinoa according to package directions.
- In large bowl, whisk flour, baking powder, baking soda and salt.
- In medium bowl, whisk milk and lemon juice. Let stand 5 minutes.
- Mash 1/2 banana. Transfer to milk mixture. Add egg and 1 teaspoon maple syrup; stir to combine. Stir in melted butter.
- Pour milk mixture over flour mixture. Whisk just until combined; do not overmix. Fold in rice and quinoa. Let batter rest 10-15 minutes.
- Preheat large nonstick skillet over medium heat; brush with 1 teaspoon oil. Once skillet is hot, reduce heat to medium-low. In batches, adding oil as necessary, scoop 1 tablespoon batter per pancake into skillet and cook 3-4 minutes, or until bubbles start to form. Flip and cook 1-2 minutes until golden on bottom.
- Slice remaining half and full bananas. Serve pancakes with remaining maple syrup, banana slices and cinnamon.

Hearty Bacon and Egg Breakfast
Prep time: 5 minutes
Cook time: 30 minutes
Servings: 12
- Nonstick cooking spray
- 1 1/2 bags Minute Rice & Quinoa
- 9 eggs, lightly beaten
- 5 bacon slices, cooked and crumbled
- 3/4 cup shredded cheddar cheese
- 1/2 teaspoon salt
- black pepper, to taste
- Preheat oven to 325 F. Coat 12-cup muffin pan with nonstick cooking spray.
- Prepare rice and quinoa according to package directions.
- In medium bowl, combine rice and quinoa, eggs, bacon, cheese, salt and pepper, to taste.
- Divide batter between prepared cups and bake 18-20 minutes, or until eggs are just set.
Source:

Stress-Free Steps Toward Self-Care
(Family Features) Over the last few years, self-care has taken on heightened importance for moms across the country.
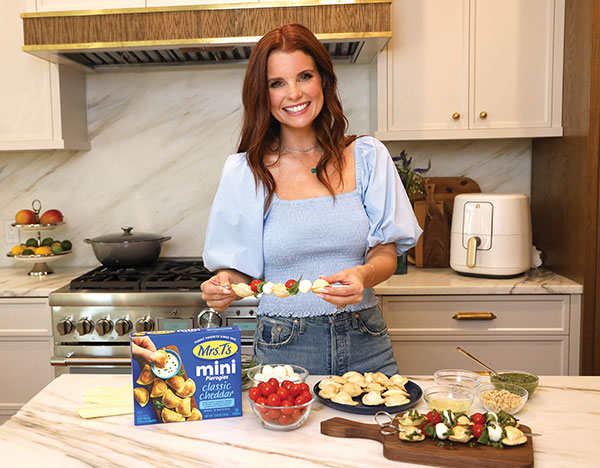
That is why Mrs. T’s Pierogies is partnering with actress, entrepreneur and mom JoAnna Garcia Swisher for its “All-Star Moms” campaign to spotlight the importance of finding ways to recharge and help these real-life superheroes prioritize me-time.
 Simplifying self-care for All-Star Moms everywhere can be as easy as designating a “recharging room” in the home, which offers a personal space to reset and relax. When creating your recharging room, keep these tips from Garcia Swisher in mind:
- Balance Beautiful with Functional: Find hosting staples like cutting boards, utensils and napkins that match the vibe of your personal space so the area can double as an entertaining space.
- Keep it Easy to Clean: Choose furniture and decor that can handle a little mess from snacks, like Mrs. T’s Mini Pierogies and your favorite dip, which are perfect for enjoying while binge-watching favorite shows.
- Add a Personal Touch: Showcase a piece that tells a story, like a favorite embroidered pillow, piece of meaningful jewelry or framed photo of an amazing memory.
- Bring In Something Cozy: Add cozy touches like a blanket, fluffy pillow or favorite slippers for something comfortable.
- Make a Statement: Let your inner designer shine by taking a chance on something bold that represents a part of your personality you don’t normally indulge.
- Plan an Anchor Piece: This item is the foundation for everything, such as a vintage armchair, comfy couch or storage piece that tells a story. Choose this item first then build around it.
Moms can also prioritize self-care by whipping up an easy-to-make recipe, like these Margherita Pizza Pierogy Skewers, for themselves, a gathering of friends or an afternoon family snack. Pasta pockets filled with creamy mashed potatoes, cheesy goodness and other big, bold flavors, Mrs. T’s Pierogies are simple to prepare. This means more time for moms to do the stuff they love like unwinding from the day with favorite foods in their recharging spaces.
Visit MrsTsPierogies.com for more recipe inspiration.
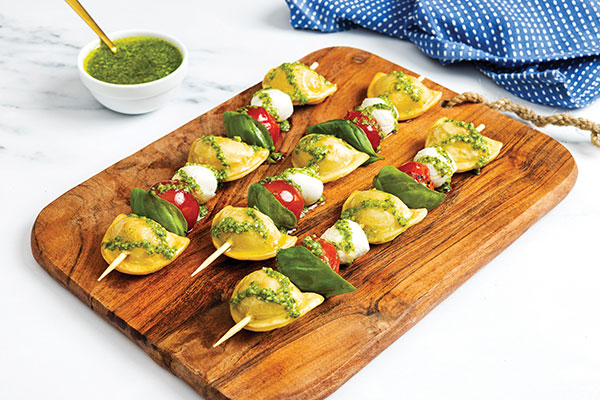
Margherita Pizza Pierogy Skewers
Prep time: 10 minutes
Total time: 35 minutes
Servings: 9
Pizza Skewers:
- 1 box (12.8 ounces) Mrs. T's Mini Classic Cheddar Pierogies
- 3 cups cherry tomatoes
- 2 tablespoons olive oil, plus additional for brushing pierogies, divided
- 1 teaspoon salt
- 1/2 teaspoon ground black pepper
- 1/2 teaspoon oregano
- 1-2 cups mozzarella balls (18 total)
- fresh basil leaves
- bamboo skewers (10 inches)
Fresh Pesto:
- 2 cups fresh basil
- 2 garlic cloves, peeled
- 1/2 cup olive oil
- 1/4 cup pine nuts
- 1/4 grated Parmesan cheese
- salt, to taste
- ground black pepper, to taste
- Preheat air fryer to 400 F.
- To make pizza skewers: In small bowl, combine cherry tomatoes, olive oil, salt, ground black pepper and oregano; toss to coat. Transfer tomatoes to air fryer tray or basket. Cook in air fryer 10 minutes, or until tomatoes are slightly charred; remove and set aside.
- Lay pierogies on same tray or basket. Make sure not to overlap. Lightly brush each side with olive oil. Cook about 12 minutes, or until golden brown and crispy. Flip halfway through cooking.
- To make pesto: In food processor, process basil; garlic; olive oil; pine nuts; Parmesan cheese; salt, to taste; and pepper, to taste, until smooth. (If preferred, use store-bought pesto.)
- Add one pierogy to bamboo skewer followed by one tomato, one mozzarella ball and one basil leaf. Repeat with ingredients until each skewer is filled. Drizzle with pesto.
Source: Mrs. T’s Pierogies

Hearty, Wholesome Winter Meals
(Family Features) Seeking comfort from the cold in the form of a wholesome meal is a perfect way to cap off a day with loved ones. During the winter months when brisk temperatures chill you to the bone, warming up with hearty dishes at the family table can bring everyone together.
- Full of seasonal flavors with top-notch taste, Pecan-Crusted Pork Tenderloin offers a delicious main course you don’t have to feel guilty about. This easy yet elegant entree puts a unique spin on a dinnertime staple thanks to a crunchy pecan crust.
- With cheddar and ricotta cheeses, sour cream and cavatappi noodles, this Mac and Cheese with Pecan Breadcrumbs is an extra creamy, creative twist on the kid-friendly classic. Pair this family favorite with the pork tenderloin for an easy weeknight combination that little ones can help with in the kitchen by stirring together the cheesy goodness.
This family dinner is made possible with tasty pecans, which are among the lowest in carbs and highest in fiber compared to other tree nuts, helping you stay fuller longer. As a nutrient-dense powerhouse, they have 3 grams of plant-based protein and 3 grams of fiber per 1-ounce serving with 12 grams of “good” monounsaturated fat and only 2 grams of saturated fat. Essential nutrients like thiamin, zinc, copper and manganese – a mineral that’s essential for metabolism and bone health – mean you can feel good about serving pecan-infused dishes to your loved ones.
Visit americanpecan.com to find more winter weeknight recipe inspiration.
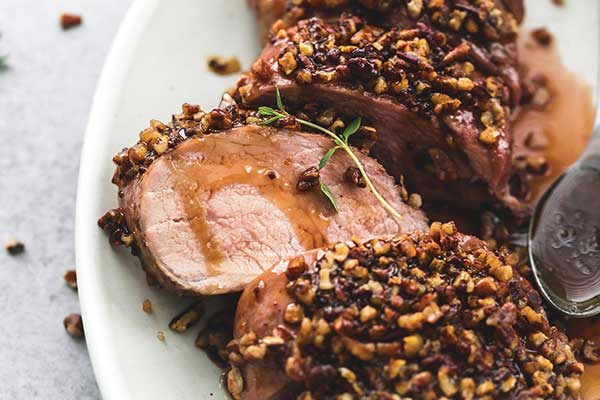
Pecan-Crusted Pork Tenderloin
Total time: 35 minutes
Servings: 6
- 1 pork tenderloin (about 1 1/2 pounds)
- salt, to taste
- pepper, to taste
- 1/2 cup brown sugar, divided
- 2 tablespoons soy sauce, divided
- 2 teaspoons minced garlic
- 1/2 cup pecan pieces
- 1/4 cup pineapple juice
- 2 tablespoons Dijon mustard
- Preheat oven to 400 F and lightly grease large baking dish. Season pork tenderloin with salt and pepper, to taste; set aside.
- In small bowl, stir 1/4 cup brown sugar, 1 tablespoon soy sauce and minced garlic. Spread mixture over pork.
- Press pecan pieces into brown sugar mixture on pork. Bake, uncovered, 20 minutes.
- In medium saucepan over medium-high heat, combine remaining brown sugar, remaining soy sauce, pineapple juice and Dijon mustard. Bring mixture to boil; reduce to simmer 3-5 minutes then remove from heat.
- Slice pork, spoon sauce over top and serve.
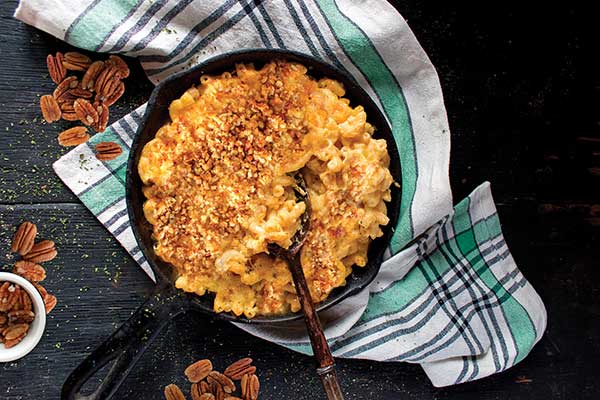
Mac and Cheese with Pecan Breadcrumbs
Total time: 50 minutes
Servings: 6
- 8 ounces cavatappi pasta
- 1 tablespoon butter
- 1 block (8 ounces) cheddar cheese
- 1/2 cup raw pecan pieces
- 15 ounces part-skim ricotta cheese
- 4 tablespoons sour cream
- 1 teaspoon salt
- 1/4 teaspoon ground pepper
- 1 large egg, lightly beaten
- Preheat oven to 375 F.
- In salted boiling water, cook pasta according to package instructions. Drain, reserving 1/2 cup pasta cooking water. Return pasta to pot and stir in butter.
- Using box grater, shred cheddar cheese.
- Using food processor, process 1/4 cup shredded cheese with pecans to coarse breadcrumb consistency.
- Add remaining cheddar cheese, ricotta, sour cream, salt and pepper to warm pasta. Stir until thoroughly combined. Add egg; stir. Add reserved pasta water to loosen mixture; stir until smooth.
- Pour into buttered 9-inch square or round casserole dish and top evenly with pecan topping.
- Bake 30 minutes.
Source: American Pecan Council

Holiday Entertaining is Back with Sweet, Savory and Oh So Cheesy Ideas
Real California Milk helps impress guests with the California Cheese Centerpiece and Cookie Exchange Board
(Family Features) This holiday season, entertaining is back on the table and that means endless opportunities to showcase Instagram-worthy ideas. For those looking to impress friends and family, Real California Milk has two unique culinary ideas to take holiday traditions to the next level: The Cheese Centerpiece and Cookie Exchange Board. From fresh food as bountiful décor to camera-ready cookie presentations, incorporating California dairy into your entertaining is a winning holiday strategy.
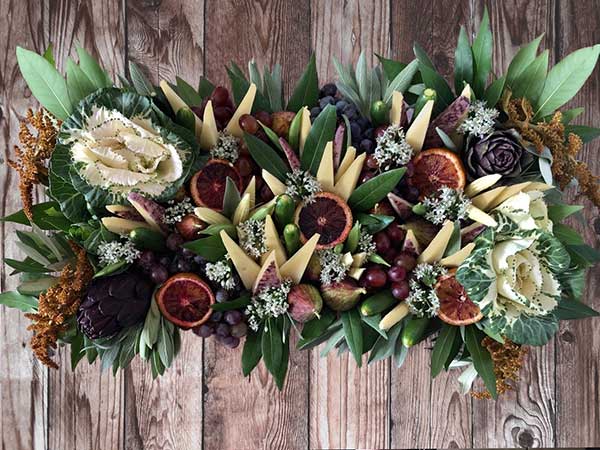
California Cheese Centerpiece
The mission? Create a holiday centerpiece but make it delicious. Real California Milk partner Jessica Lawrenz, Founder of Monger, Mold and Milk, took the challenge with the California Cheese Centerpiece, the ultimate in edible entertaining with a beautiful display of Real California Cheeses, salami, fruits and vegetables arranged with fragrant herbal garnishes in a display sure to impress family and friends. As a bonus, it creates less waste than a stand-alone floral bouquet (and you’ll have less to clean up!).
Find additional cheese displays and holiday recipes at realcaliforniamilk.com.
INGREDIENTS:
Variety of firm to medium (semi-firm) Real California Cheeses (find them here: https://www.realcaliforniamilk.com/cheese-makers)
Shown in arrangement:
- Real California Dry Jack cheese wedges
- Real California Wine-soaked Cheddar wedges
- Real California Triple Cream cheese wedges
- Salumi or salami, made into roses
Fresh fruits and vegetables:
- Mini clementines or kumquats
- Grapes or currants (both shown)
- Fresh figs
- Gooseberries
- Cucamelons or mini cucumbers
- Cherry tomatoes (tiger stripe tomatoes shown but any small tomato works)
Garnishes:
- Bay leaf stems
- Olive leaf stems
- Rosemary branches
- Lavender stems
- Sage bunches
- Chive or garlic flowers or any edible flower with a stem
Tools and Materials:
- Circular tray or plate
- Craft or flora foam (half sphere shape that is at least 1-inch smaller in diameter than your tray)
- Double-sided tape
- Plastic wrap
- Toothpicks, U-shape bamboo toothpicks (optional)
- Cookie cutter shapes (optional)
DIRECTIONS:
- Cover foam in plastic wrap to protect food from making contact with the foam.
- Use double-sided tape to secure the foam to the tray.
- Now you can start assembling the centerpiece. Start from the bottom and work your way up to the top of the sphere.
- Use the bulk of your leafy garnishment (bay leaf stems, olive leaf stems, sage bunches) on the bottom layer to create a base and coverage by poking the stems into the foam. If needed you can trim the bottom of the stem in a diagonal direction to create a more pokey end OR use a toothpick to pierce a hole in the place where you want to insert stems.
- For best visual appeal, fruits like grapes and currants should be arranged to kind of flow over the edge of the tray near the bottom as well. PRO TIP: Use “U” shaped bamboo toothpicks to secure the stems of the hanging fruits into the foam.
- From here use toothpicks to secure cheese wedges, salumi roses, fruits and vegetables into the foam. Cut shorter, triangular pieces of cheese (as opposed to longer triangular pieces used for a long/rectangular centerpiece). Use any tall wedges near the bottom where they will be easy to grab but not sticking out too far if placed near the top. You can use cookie cutter shapes as well for the cheeses, if desired.
- Finally, take any of the smaller garnish pieces you have (lavender, chive flowers, rosemary ends, loose leaves) to fill in the spaces between all the items.

Holiday Cookie Exchange Board
If a cookie exchange is on the docket for this year’s holiday or you’re simply looking to upgrade your dessert table, take some tips from this stunning cookie exchange presentation. Mix and match Real California Milk cookie recipes to create a mouthwatering arrangement and decorate with mini candy canes, holiday lollipops, various holiday décor and lights. Add napkins, cookie bags for take-away, and recipe cards for sharing, and let your guests go to town.
- Hot cocoa or coffee
- Milk shooters
- Coconut Walnut Cake Bars
- Chocolate Mint Cookies
- Stroopwafel Cookies
- Mini Gingerbread Cupcakes
- Madeleines
Dipped in melted dark chocolate and rolled in crushed peppermint candies or Holiday sprinkles
Leave out ice cream, exchange holiday sprinkles for rainbow sprinkles, and dip in melted white chocolate with color for extra festivity
California is the nation’s leading milk producer and is responsible for producing more butter, ice cream and nonfat dry milk than any other state. The state is the second-largest producer of cheese and yogurt. California milk and dairy foods can be identified by the Real California Milk seal, which certifies they are made exclusively with milk from the state’s dairy farm families.
About Real California Milk/California Milk Advisory Board
The California Milk Advisory Board (CMAB), an instrumentality of the California Department of Food and Agriculture, is funded by the state’s dairy farm families who lead the nation in sustainable dairy farming practices. With a vision to nourish the world with the wholesome goodness of Real California Milk, the CMAB’s programs focus on increasing demand for California’s sustainable dairy products in the state, across the U.S. and around the world through advertising, public relations, research, and retail and foodservice promotional programs. For more information and to connect with the CMAB, visit RealCaliforniaMilk.com, Facebook, YouTube, Twitter, Instagram and Pinterest.
Source: Real California Milk

Elevate Your Summer Grilling
(Family Features) Weekend barbecues, birthday celebrations and family reunions are in full swing, so up your grill game from basic to bold with a few ideas to leave your guests wanting more.
Step outside your comfort zone and create some “wow-worthy” dishes with big flavors with these recipes from McCormick and chef Roger Mooking from Cooking Channel’s “Man, Fire, Food.”
Get started with these ideas:
- Once ribs are grilled until tender, use a sharp knife to carefully slit skin on the back of each rib for easier bone removal.
- Make a giant cheese-stuffed burger by lining a 9-inch round cake pan with foil. Add in half of the ground beef followed by a cheese layer. Top with remaining ground beef and shake on seasoning for maximum flavor.
- Brine pork chops in the refrigerator for 8-10 hours before grilling to infuse with flavor and help make tender and juicy. Top with caramelized apples cooked in a cast-iron skillet.
Find more summer recipes and tips at GrillYourBest.com.
Smokehouse Maple-Brined Pork Chops
Servings: 4
- 1/3 cup sea salt
- 1/4 cup, plus 2 tablespoons and pinch, McCormick Grill Mates Smokehouse Maple Seasoning
- 1/2 cup packed light brown sugar, divided
- 8 cups water, divided
- 4 bone-in center-cut pork chops (3/4-inch thick, about 2 1/2-2 3/4 pounds total)
- vegetable oil
- 1 lemon, cut in half
- 3 tablespoons unsalted butter
- 2 Granny Smith apples, each peeled, cored and cut into six wedges
- 1 tablespoon finely chopped fresh chives (optional)
- In medium saucepan, whisk salt, 1/4 cup seasoning, 1/4 cup sugar and 4 cups water. Bring to simmer, whisking constantly, until salt and sugar dissolve. Pour in remaining water and mix thoroughly. Transfer brine to large container with lid and cool to room temperature. Add pork chops to brine. Cover and refrigerate 8-10 hours.
- Heat grill to medium-high heat.
- Remove pork chops from brine and pat dry with paper towels. Brush lightly with oil. Season both sides of pork with 2 tablespoons seasoning.
- Grill until bottom side of pork chops are well marked and charred, 7-9 minutes. Flip and grill 4-6 minutes, or until cooked through and internal temperature registers 145° F. Let rest under tented foil.
- Place large cast-iron skillet on grill. Juice one lemon half into small bowl. Add 1 teaspoon lemon juice and remaining sugar to skillet and stir with heatproof spatula until mixture resembles wet sand. Cook with grill open, stirring frequently, until sugar melts and deepens to amber, about 8 minutes. Add butter and stir until melted. Once foam subsides, add apples. Close grill and cook, stirring gently to coat apples in caramel, until apples are tender-crisp, about 8 minutes. Remove skillet from heat and add remaining lemon juice and pinch of seasoning; stir gently.
- Arrange pork chops on platter and top with apples. Zest remaining lemon half over dish. Sprinkle with chives, if desired.

Best-Ever Buffalo Rack O’ Ribs Sandwich
Servings: 4
Slaw:
- 1/4 cup mayonnaise
- 1 tablespoon lemon juice
- 1/2 teaspoon Lawry’s Seasoned Salt, plus additional, to taste
- 1/8 teaspoon coarsely ground black pepper, plus additional, to taste
- 2 cups shredded green cabbage
- 1/2 cup shredded carrot
- 1/4 cup diced celery, chopped
- 2 tablespoons fresh celery leaves
- 2 tablespoons fresh flat-leaf parsley, chopped
Ribs:
- 1 rack (about 2 pounds) baby back ribs
- 3 tablespoons firmly packed brown sugar
- 1 tablespoon Lawry’s Seasoned Salt
- 4 tablespoons hot sauce, divided, plus additional for spreading and serving (optional)
Sandwich:
- 1 soft French loaf (12-14 inches), split
- olive oil
- Lawry’s Seasoned Salt
- McCormick coarsely ground black pepper
- 1/4 small red onion, thinly sliced
- 1/4 cup crumbled blue cheese
- To make slaw: In medium bowl, whisk mayonnaise, lemon juice, seasoned salt and pepper. Add cabbage, carrot, celery, celery leaves and parsley; toss to combine. Sprinkle with additional seasoned salt and pepper, to taste.
- To make ribs: Prepare grill for indirect medium heat at about 350° F.
- Insert butter knife between membrane and bone on backside of ribs. Grab membrane with paper towel then pull to remove membrane; discard. Rub ribs on both sides with brown sugar and seasoned salt. Wrap ribs tightly in aluminum foil and place on indirect-heat side of grill. Grill ribs, turning once until meat is tender and pulling away from bone but not totally falling apart, about 1 hour, 15 minutes-1 hour, 30 minutes. Remove ribs from grill.
- Unwrap ribs and let cool until cool enough to handle. Using sharp knife, carefully slit skin on back of ribs and remove bones, keeping slab in one piece.
- Place boneless rib slab on direct-heat side of grill, rounded-side up, and brush top with 2 tablespoons hot sauce. Grill until underside begins to crisp, about 2 minutes. Carefully flip ribs and brush top with the remaining hot sauce. Continue to grill ribs until glossy and caramelized, about 2-3 minutes.
- To assemble sandwich: Scoop out most of soft insides of top of French bread to make room for toppings. Brush cut sides with oil and sprinkle with seasoned salt and pepper. Grill on direct-heat side of grill until bread is toasted and grill marks appear, about 3 minutes.
- Place ribs on bottom of loaf. Brush with additional hot sauce, if desired, and top with slaw, onions and blue cheese. Cover with top of loaf. Cut into four pieces.

Giant Bacon-Cheddar Juicy Lucy Burger
Servings: 8
- 2 tablespoons McCormick Grill Mates Montreal Steak Seasoning, divided
- 2 pounds 80 percent lean ground beef
- 8 ounces sliced medium or sharp white cheddar cheese
- 1/4 cup mayonnaise
- 1/4 cup yellow mustard
- 8 long pickle slices, plus 2 tablespoons brine
- 1 round loaf soft bread (10 inches), cut in half horizontally
- olive oil
- sea salt
- freshly ground black pepper
- 1 large heirloom tomato, thinly sliced
- 1 small red onion, thinly sliced
- 8 slices bacon, cooked
- 2 cups shredded iceberg lettuce
- Line 9-inch round cake pan with aluminum foil, leaving extra foil over edges of pan. Sprinkle with 2 teaspoons steak seasoning. Press half of ground beef into cake pan. Layer cheese in middle, leaving 1/2-1-inch border around sides. Sprinkle with additional 2 teaspoons seasoning. Top with remaining ground beef in even layer and press to seal in cheese. Sprinkle with remaining seasoning.
- Lift burger from cake pan using foil. Press to flatten to about 11 inches in diameter. Refrigerate until ready to cook. (Patty can be assembled up to 2 hours in advance.)
- In small bowl, whisk mayonnaise, mustard and pickle brine until smooth. Cover and refrigerate.
- Remove most of soft insides from top of bread to make hollow. Reserve insides.
- Prepare grill for indirect medium heat at about 350° F.
- Brush grill grates with oil. Hold burger on foil bottom and flip onto indirect-heat side of grill; peel off foil. Cook until sides of burger are cooked and it feels firm when lifted with spatula, about 8-10 minutes. Using two spatulas, carefully flip burger. Close grill and cook until burger is cooked through and cheese is melted, about 5-8 minutes longer. Move to direct-heat side of grill for 1-2 minutes per side for more char.
- Brush cut sides of bread with olive oil and sprinkle with salt and pepper. Grill on direct-heat side of grill until bread is toasted and grill marks appear, about 3 minutes.
- Place bottom half of bread on large cutting board. Spread with half of mustard sauce. Place burger on top and top with tomatoes, onions, pickles and bacon. Spread top of bread with remaining mustard sauce and fill with lettuce. Place top of bun on burger and cut into eight wedges.
Source: McCormick

An Affordable, Effortless Easter
(Family Features) Easter is all about festive family gatherings and good food. Whether you’re celebrating with your closest or hosting a larger crowd in your home, try these simple tips to keep everyone happy and full without blowing your budget.
Plan ahead: Don’t let the pressure of hosting the holidays stress you. A well-constructed game plan can help you stay on track with your spending goals. Before heading to the grocery store, take inventory of what you already have and create a list of the items you need. These simple steps can save you time and money in the long run.
Find affordable ingredients and supplies: Grocery shopping can be a daunting task, especially with seemingly endless options. Shopping at a grocery store like ALDI helps you find everything you need in one quick and easy shopping trip, including high-quality, fresh, affordable foods for your Easter spread. While there, you can also pick up other Easter essentials like baskets, toys, bakeware, decor and more.
Keep leftovers in mind: Food (and money) can go to waste when leftovers go uneaten. Instead of tossing out your forgotten leftovers, incorporate them into a whole new dish. Try these Holiday Ham Sliders using leftovers from main dishes such as Slow-Cooked Maple Ham.
Find more tips and recipes for an appetizing Easter at ALDI.us.
Slow-Cooked Maple Ham
Recipe courtesy of Chef Alyssa, ALDI Test Kitchen
Prep time: 5 minutes
Cook time: 5 hours, 15 minutes
Servings: 10
- 20 ounces Sweet Harvest Pineapple Chunks
- 8 pounds Appleton Farms Smoked Ham Butt
- 1 cup Specially Selected 100% Pure Maple Syrup
- 1 cup Baker’s Corner Brown Sugar
- 1/2 teaspoon Stonemill Cinnamon
- 1 tablespoon Burman’s Dijon Mustard
- 1 teaspoon Stonemill Ground Black Pepper
- Pour pineapple into large slow cooker. Place ham on top of pineapple, flat-side down.
- In small bowl, combine syrup, brown sugar, cinnamon, Dijon mustard and pepper. Pour over ham.
- Set slow cooker to low. Cook 4-5 hours.
- Remove ham; keep warm. Skim fat off top of remaining liquid in slow cooker.
- Pour liquid into small saucepan and bring to boil. Reduce heat to simmer; cook until reduced to desired consistency.
- Serve sauce on side or heat oven to broil and glaze ham. Broil 3-4 minutes for caramelized crust.

Holiday Ham Sliders
Recipe courtesy of Chef Linsey, ALDI Test Kitchen
Prep time: 10 minutes
Cook time: 25 minutes
Servings: 6
- Carlini Canola Cooking Spray
- 3 ounces Happy Farms Preferred Cranberry White Cheddar, shredded
- 3 ounces Happy Farms Preferred Plain Havarti Cheese, shredded
- 12 ounces L'oven Fresh Hawaiian Sweet Rolls
- 2 tablespoons Burman's Spicy Mustard
- 1/4 cup sliced red onion
- 12 ounces Appleton Farms Spiral Sliced Half Ham
- 1/4 cup sliced green apple
- 4 tablespoons Countryside Creamery butter, melted
- 1/2 teaspoon Stonemill Garlic Powder
- 1/4 teaspoon ground Stonemill Sea Salt
- 1/2 teaspoon Stonemill Parsley Flakes
- Heat oven to 350 F.
- Line 9-by-13-inch baking pan with aluminum foil and coat with cooking spray.
- In small bowl, combine cranberry white cheddar and havarti cheeses. Reserve.
- Remove entire package of rolls and, keeping rolls connected, slice in half horizontally.
- Place bottom half of rolls in baking pan. Spread with spicy mustard.
- Top with red onion, ham, apple, cheese mixture and bun tops.
- In small bowl, combine butter, garlic powder, salt and parsley flakes. Pour over sandwiches.
- Cover with foil and bake 15 minutes.
- Remove foil. Bake 10 minutes more.
- Remove from pan and separate sandwiches; serve immediately.
Source: ALDI

A Very Versatile Holiday
(Family Features) When planning this year’s holiday menu, consider building meals around a versatile main course that you can dress up or down and then integrate into easy leftover dishes. A ham is a perfect solution because it works equally well as the centerpiece of an elegant meal or as savory sliders to serve with chutney or hot mustard.
Beyond versatile ingredients, a winning holiday menu relies on proper preparation, and that’s why quality cookware is essential. An option like Anolon Gourmet Cookware is designed for superior performance that can help bring joy to cooking and features heavy-duty pan bodies and comfort-grip handles for safe and secure lifting and leverage. The aesthetically pleasing cookware’s premium-quality, nonstick surface provides lasting durability, effortless food release and easy clean up – perfect for the busy holiday season.
Ham it Up (or Down)
Ham is an ideal holiday protein because you can serve it as a centerpiece dish or as part of a more casual meal and still achieve great results either way. Make the most of this holiday favorite with these tips:
- Be sure to get a ham big enough for leftovers. It's just as good sliced up for sandwiches or fried with eggs as it is when presented in its full glory out of the oven.
- Think beyond the main table. A glazed ham is pretty on the table, but it's also delicious when served casually, for example on a sandwich bar with savory rolls, tangy mustards and other condiments.
- If your holiday plans are up in the air, go ahead and make a ham in advance to keep on hand for casual meals during the busy holiday season or for a quick meal with unexpected guests.
Explore more cookware options to serve up your holiday best at anolon.com.

Country Ham and Cheddar on Biscuits
Recipe courtesy of Anolon Gourmet Cookware
Servings: 24
Chutney:
- 1 tablespoon olive oil
- medium Anolon skillet
- 1 small onion, finely chopped
- 2 teaspoons fresh ginger, minced
- 3/4 teaspoon curry powder
- 1/4 teaspoon ground cinnamon
- 3/4 cup dried currants
- 3 tablespoons water
- 2 tablespoons raspberry vinegar
- 2 tablespoons sugar
- 1/4 cup apple jelly
- 1 tablespoon country Dijon mustard
- 1/4 teaspoon salt
Biscuits:
- 2 cups all-purpose flour
- 1 1/2 teaspoons baking powder
- 1 teaspoon coarse ground black pepper
- 1/4 teaspoon baking soda
- 1 teaspoon salt
- 8 tablespoons chilled unsalted butter, cut into small pieces
- 3/4 cup low-fat buttermilk, plus 2 tablespoons
- Anolon large nonstick baking sheet
- 1 large egg yolk, beaten
- 12 ounces country ham, thinly sliced
- 6 slices (about 6 ounces) sharp cheddar cheese
- To make chutney: heat oil in skillet over medium heat. Add onion and ginger; cook, stirring occasionally, until slightly softened, 3-4 minutes.
- Add curry powder and cinnamon; cook, stirring, 30 seconds. Stir in currants and cook until slightly softened, 2 minutes.
- Add water and vinegar and cook until currants plump slightly, about 3 minutes.
- Stir in sugar and cook 1 minute.
- Remove from heat and let cool 10 minutes. Stir in jelly, mustard and salt; refrigerate until ready to serve.
- To make biscuits: Heat oven to 425° F.
- In large bowl, combine flour, baking powder, pepper, baking soda and salt. Using pastry blender, cut butter into flour mixture until it resembles coarse crumbs. Stir in buttermilk until mixture is moistened.
- In bowl, knead dough 3-4 times to bring together. Press dough into disk and wrap in plastic wrap; refrigerate 20-30 minutes. On lightly floured surface, roll dough out to 1/2-inch thickness. Using 2-inch fluted biscuit cutter, start at outside edge of dough and cut out biscuits and set on baking sheet. Gently press dough scraps together and roll again to 1/2-inch thickness. Repeat to cut out 24 biscuits total. Brush tops of biscuits with egg yolk.
- Bake biscuits in center of oven until puffed and tops are golden brown. Remove from oven and cool 15 minutes.
- Split biscuits in half and set aside. Lay ham slices on cutting board in single layer. Using 2-inch fluted biscuit cutter, punch out 24 ham circles and place each on bottom half of biscuit. Lay cheese slices on cutting board and punch out 24 circles to place each on top of ham. Spoon chutney evenly on top of each biscuit then replace top half of each biscuit.
Note: Biscuits can be assembled several hours ahead of serving and kept in refrigerator.

Cola and Brown Sugar Glazed Ham
Recipe courtesy of Anolon Gourmet Cookware
Servings: 14-16
- 11-12 pounds shank half bone-in cooked ham
- large Anolon roasting pan
- 4 cups cola, divided
- 2 cups orange juice, divided
- 1/2 cup dark brown sugar
- 1/4 cup Dijon mustard
- Heat oven to 350° F.
- Trim skin and excess fat off ham. With sharp knife, score ham all over in diamond pattern. Place ham in roasting pan then pour 1 cup cola and 1 cup orange juice over it. Cover pan with aluminum foil and roast 1 hour and 15 minutes.
- While ham roasts, in medium saucepan, combine remaining cola, orange juice, brown sugar and Dijon mustard. Bring mixture to boil over medium-high heat and cook about 45-48 minutes, until reduced to 1 cup and mixture is slightly syrupy.
- After ham roasts 1 hour and 15 minutes, remove foil and baste with glaze. Continue roasting and basting ham every 15 minutes with glaze until it is glossy and instant read thermometer inserted into thickest portion registers 145° F, about 1 hour and 15-30 minutes longer. Remove from oven and let rest 15-20 minutes before slicing.
Source: Anolon Gourmet Cookware

Serve Up a Nutritious Seasonal Brunch
A perfect way to entertain around the table
(Family Features) With springtime in full bloom, brunch is the perfect way to entertain friends and family for nearly any upcoming occasion or celebration. Take advantage of the budding season with quality time spent with loved ones, more outdoor experiences and wholesome nutrition for the whole family, starting with a delicious morning meal around the table.
When it comes to the food they serve their families, moms want to provide good nutrition, especially for their kids, to help them grow up healthy and strong. Serving a nutritious meal each morning is one way to help kids get a good start to the day, so they can be their best in school, play and any other activities the day brings.
Whether moms know it or not, they are powerful role models for their children’s health and nutrition. When moms set the example and eat nutritious meals themselves, kids notice. For instance, according to a study from the U.S. National Library of Medicine, moms who drink milk are more likely to have kids who drink milk, which is a household staple that provides important nutrients such as calcium, vitamin D and potassium. Setting the example for quality nutrition can be made easy with a delicious meal served with milk to celebrate any occasion this season with guests of all ages.
This simple egg casserole is the perfect excuse to bring the family together and start a beautiful spring day with a wholesome meal and quality time together. For more recipes and reasons to bring the family together, visit milklife.com.

Easy Egg Casserole
Servings: 4
- Nonstick cooking spray
- 1 cup lean ham, cubed
- 1 cup frozen seasoned potatoes with onions and peppers
- 3/4 cup frozen spinach, chopped
- 1/2 cup lowfat cheddar or Swiss cheese, shredded
- 6 eggs
- 3/4 cup milk
- Heat oven to 375° F. Lightly coat 8-by-8-inch casserole dish with nonstick spray.
- Arrange ham, potatoes, spinach and cheese in bottom of casserole dish. In large bowl, beat eggs and milk together and pour over ingredients in casserole dish.
- Bake 25-30 minutes, or until lightly browned and puffed. Serve immediately.
- Pair each serving with 8-ounce glass of milk.
Nutritional information per serving: 350 calories; 9 g fat; 3 g saturated fat; 350 mg cholesterol; 32 g protein; 34 g carbohydrates; 2 g fiber; 630 mg sodium; 500 mg calcium (50% of daily value). Nutrition figures based on using fat free milk, and include an 8-ounce glass of milk.
Source: MilkPEP

Cheesy Chicken & Rice Bake

Cheesy Chicken & Rice Bake
Prep Time: 5 minutes
Bake Time: 45 minutes
- 1 can (10 3/4 ounces) Campbell’s Condensed Cream of Chicken Soup (regular or 98% fat free)
- 1 1/3 cups water
- 3/4 cup uncooked regular long-grain white rice
- 1/2 teaspoon onion powder
- 1/4 teaspoon ground black pepper
- 1 1/2 pounds skinless, boneless chicken breast halves (about 4)
- 1 cup shredded Cheddar cheese (4 ounces)
- MIX soup, water, rice, onion powder and black pepper in 2-quart shallow baking dish. Top with chicken. Sprinkle chicken with additional pepper. Cover.
- BAKE at 375°F for 45 minutes or until chicken is no longer pink and rice is done.
- UNCOVER. Sprinkle cheese over chicken. Remove chicken and stir rice before serving. Serves 4 to 6
Source: Campbell's Soup