
Create Quality School Day Meals with Simple Shortcuts
(Family Features) The seemingly constant rush of hectic school days and nights often leaves busy families feeling like there’s no time for a homemade meal around the table. However, taking shortcuts that don’t skip out on quality can mean more time together enjoying flavorful dishes without spending hours in the kitchen.
For starters, an easy yet filling breakfast like these Sausage, Egg and Cheese Muffins can help you begin your day the right way while calling for a simple list of ingredients and just a few steps.
Perfect for grabbing on the way out the door to power you through the day or enjoying at home as you manage double duty as parent and best teacher on the block. They’re made with ground turkey sausage, eggs, melty cheddar cheese and Success Tri-Color Quinoa, which is simplified even more by the “boil-in-bag” cooking process. Just add water to a saucepan, drop the convenient BPA-free bag into the water, boil 10 minutes and remove with a fork for a no-measure, no-mess shortcut.
When the dinner bell dings at the end of a long day of learning, feed your family an effortless recipe that allows the oven to do most of the work. The array of flavors and textures in these Vegetable and Rice Power Bowls can bring warmth to your loved ones while requiring little effort.
Sweet and buttery flavors of maple-roasted sweet potatoes, butternut squash and beets pair with the convenience, taste, texture and quality of Success Jasmine Rice, lentils, pumpkin seeds, goat cheese and balsamic vinaigrette for an abundance of flavors that help recharge and refuel with loads of nutrients combined in one comforting dish.
Find more ways to add ease to school day meals at successrice.com.
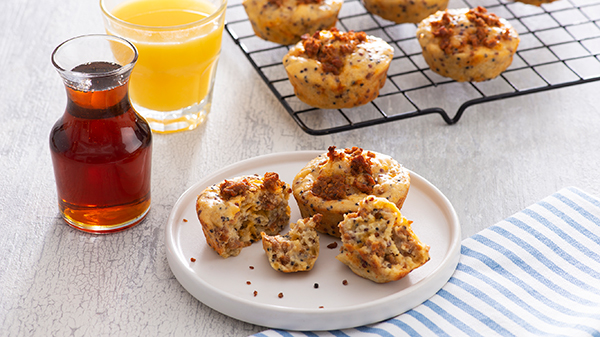
Sausage, Egg and Cheese Muffins
Total time: 30 minutes
Servings: 16
- 1 bag Success Tri-Color Quinoa
- nonstick cooking spray
- 1 package (9.6 ounces) cooked turkey sausage crumbles
- 2 cups prepared baking mix
- 1 cup cheddar cheese
- 1 cup milk
- 4 whole eggs, lightly beaten
- maple syrup (optional)
- Prepare quinoa according to package directions. Preheat oven to 400 F. Coat 16 muffin cups with nonstick cooking spray.
- In large bowl, combine quinoa, sausage, baking mix and cheese. Stir in milk and eggs; blend well.
- Pour 3/4 cup mixture into each muffin cup.
- Bake 18-20 minutes.
- Serve warm with maple syrup, if desired. Refrigerate leftovers.
Substitution: In place of baking mix, substitute 2 cups all-purpose flour plus 1 tablespoon baking powder and 1 pinch of salt.

Vegetable and Rice Power Bowls
Total time: 45 minutes
Servings: 6
- 2 cups chopped butternut squash
- 2 cups chopped sweet potatoes
- 3 tablespoons olive oil, divided
- 1 tablespoon fresh thyme leaves
- 1 tablespoon maple syrup
- 1/4 teaspoon salt
- 1/4 teaspoon pepper
- 2 cups peeled, chopped beets
- 2 bags Success Jasmine Rice
- 4 cups mixed greens
- 1 can (15 ounces) brown lentils, drained and rinsed
- 1/2 cup crumbled goat cheese
- 1/3 cup pumpkin seeds
- 1/2 cup prepared balsamic dressing
- Preheat oven to 400 F. In large bowl, toss together butternut squash, sweet potatoes, 2 tablespoons oil, thyme, maple syrup, salt and pepper. Arrange in single layer on parchment paper-lined baking sheet.
- In same bowl, toss beets with remaining oil until well coated; add to baking sheet with butternut squash and sweet potatoes. Bake 30-35 minutes, or until golden brown and tender.
- Prepare rice according to package directions; divide among six bowls. Top each with greens, roasted vegetables, lentils, goat cheese and pumpkin seeds. Drizzle with balsamic dressing.
Source: Success Rice

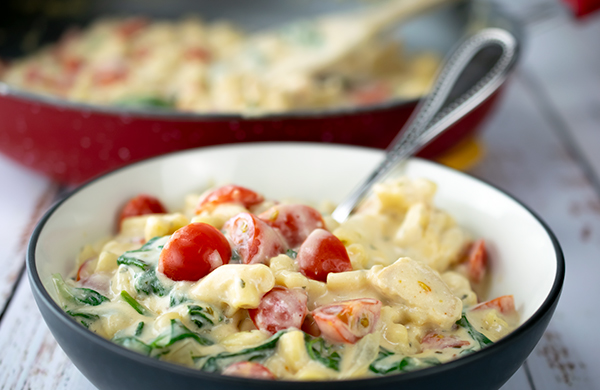
Skillet Macaroni and Cheese
(Family Features) Turning to easy recipes that require minimal cooking time can help your loved ones take the stress out of busy back-to-school evenings while increasing the opportunities for sharing family moments together.
Skip the long cook times of complicated dishes and instead turn to an option like this Skillet Macaroni and Cheese, a kid-friendly and parent-approved meal to turn hectic school nights into happy time with family.
With a slight twist on the childhood classic, this version calls for chicken to add protein along with spinach and cherry tomatoes for increased veggie intake. Plus, it’s made with milk and cheese as part of an important daily intake of dairy, an irreplaceable part of a balanced diet as a source of essential nutrients.
Visit milkmeansmore.org to find more kid-friendly meals.
Watch video to see how to make this recipe!
Skillet Macaroni and Cheese
Recipe courtesy of Katie Serbinski of “Mom to Mom Nutrition” on behalf of Milk Means More
Prep time: 5 minutes
Cook time: 25 minutes
Servings: 4-6
- 1 cup dried elbow macaroni
- 2 tablespoons olive oil
- 1 pound boneless, skinless chicken breast, cut into 1-inch pieces
- 1/2 cup onion, finely chopped
- 1 package (5 ounces) semisoft cheese with garlic and fine herbs
- 1 1/2 cups fat-free milk
- 1 tablespoon flour
- 1 teaspoon hot sauce
- 1/2 cup shredded cheddar cheese
- 2 cups fresh baby spinach
- 1 cup quartered cherry tomatoes
- Cook macaroni according to package directions; drain.
- Heat large skillet over medium-high heat. Add olive oil, chicken and onion. Cook 6-8 minutes, or until chicken is no longer pink.
- Reduce heat to medium. Stir in semisoft cheese. Gradually add milk and flour. Continue stirring and cooking until mixture is thickened and bubbly.
- Reduce heat to low. Add hot sauce, cheddar cheese and cooked macaroni. Cook and stir 1-2 minutes until cheese is melted. Stir in spinach.
- Top with cherry tomatoes and serve.
Source: United Dairy of Michigan

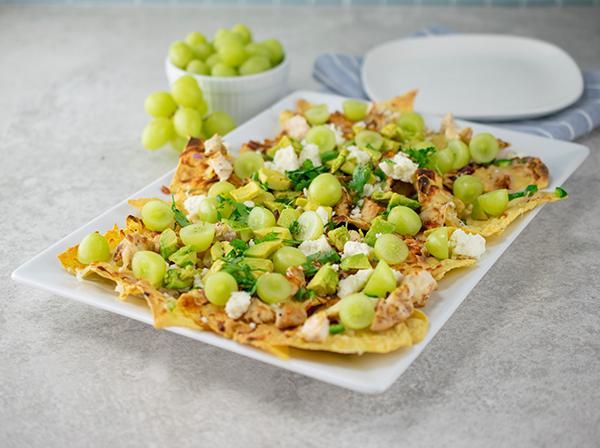
Sweet and Spicy Nachos
(Family Features) When looking to guide your family toward healthier snacks, success can be as simple as rethinking the ingredients you choose to use, including your favorite produce, such as grapes.
Fresh California grapes, for example, make for an ideal snack because they are tasty, healthy, hydrating and refreshing, but grapes can also be used to make dishes that are satisfying and delicious like these Sweet and Spicy Nachos. Grapes of all colors - red, green and black - are a natural source of beneficial antioxidants and other polyphenols. Plus, they are naturally fat-free, cholesterol-free and contain virtually no sodium.
Find more better-for-you snack ideas at GrapesFromCalifornia.com.
Watch video to see how to make this recipe!
Sweet and Spicy Nachos
Recipe courtesy of the California Table Grape Commission
Servings: 2
Chipotle Barbecue Sauce:
- 1 tablespoon canned chipotle pepper in adobo sauce
- 2 tablespoons barbecue sauce
- 2 tablespoons freshly squeezed lime juice
- 1 teaspoon honey
- 3 ounces baked tortilla chips (about 28 chips)
- 1/2 jalapeno, seeded, stemmed and finely minced (optional)
- 2 tablespoons finely diced red onion
- 4 ounces grilled chicken, diced (about 3/4 cup)
- 1/4 cup shredded Monterey Jack cheese
- 1/4 cup queso Cotija Mexican cheese, crumbled
- 1/2 avocado, halved, pitted, peeled and diced
- 1 cup halved California grapes
- 3 tablespoons chopped cilantro
- Heat oven to broil.
- In food processor or blender, puree chipotle pepper, barbecue sauce, lime juice and honey until smooth.
- Line baking sheet with aluminum foil and arrange tortilla chips in single layer.
- Sprinkle chips with jalapeno, if desired; onion; chicken; and Monterey Jack cheese. Drizzle with Chipotle Barbecue Sauce.
- Place tray in oven about 6 inches below element; broil 1-2 minutes until cheese is melted. Remove from oven, sprinkle with Cotija Mexican cheese, avocado, grapes and cilantro.
Source: California Grapes

Cookout Cravings: Appease summer appetites with grilled fare
(Family Features) The first thought that comes to mind when picturing grilling in the summer sun might be a perfectly cooked steak or a juicy burger, but no backyard barbecue is complete without the all-important sides and beverages that complete the meal.
Whether you're pairing a main protein with separate side dishes or going all-in-one by combining tender chicken with veggies on skewers, the opportunities are endless for a crave-worthy cookout.
Find more summer grilling recipes at Culinary.net.
5 Steps for Sizzling Steak
A sizzling steak is a surefire sound of summer, and the flavors achieved from one that's perfectly grilled are hard to match.
Before you fire up your grill, consider these five basics for cooking a chef-worthy steak:
Prepare Your Cut
Taste preferences (and prices) may differ among sirloins, ribeyes, T-bones and more, but the way you prepare steaks likely won't change much from cut to cut. You'll want to trim the thickness down to 1/2-1 inch for proper cooking, and setting the meat out ahead of time allows it to warm to room temperature before hitting the grill.
Add Some Salt
Feel free to add any spices you prefer, but remember a good steak typically doesn't require fancy seasoning - a pinch of salt works just fine. Add your salt anywhere between 30 minutes to a few hours before grilling time to help retain moisture and improve flavor.
Aim for High Heat
A two-zone fire is usually the way to go - one side of the grill should be hot (using direct heat) with the other side not quite as warm (indirect heat). This allows you to create a sear over direct heat before finishing cooking through - without burning - over indirect heat.
Sear and Slide
Cooking your steak over direct heat 1-2 minutes on each side is normally about right for creating a proper sear. At this point, depending on the thickness of your steak, you'll want to check for doneness. If it's not quite to the temperature you're looking to achieve, simply slide it over to the indirect heat for a finishing touch. Keep in mind these general guidelines for doneness: 120-125 F is rare, 130-135 F is medium-rare, 140-145 F is medium, 150-155 F is medium-well and 160-175 F is well done.
Let Rest
Finally, as hungry as you may be at this point, resting steaks is an important last step before diving in. Giving your steaks 5-10 minutes (foil or no foil) allows flavors to redistribute and moisture to be retained in the meat.
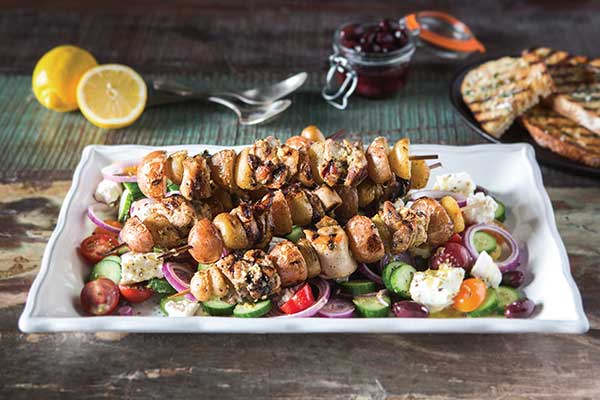
Less Prep, More Summer with a Skewered Solution
Make summer grilling easy and delicious by cooking your side dish and main dish together so you can spend more time outdoors and less time meal planning. These Grilled Greek Kebabs pair cubed chicken thighs with little potatoes on skewers, making for a classic cookout combo.
With no washing or peeling required, Creamer potatoes from The Little Potato Company require little prep, which helps make this recipe a breeze, and they cook quickly on the grill. Just marinate your chicken and potatoes with this zesty dressing and prepare for a taste bud-tingling backyard barbecue.
Visit littlepotatoes.com/summertime for more summer grilling recipes.
Grilled Greek Kebabs
Dressing/Marinade:
- 3/4 cup olive oil
- 2 lemons, zest and juice only
- 1 teaspoon dried oregano
- 2 teaspoons Dijon mustard
- 1 garlic clove, finely chopped
- 1 teaspoon sugar
- salt, to taste
- pepper, to taste
- 3 teaspoons mayonnaise
- Skewers:
- 2 cups The Little Potato Company Dynamic Duo bagged Creamer Potatoes, cut in half
- 4-6 boneless, skinless chicken thighs, cut into 1-inch cubes
- 8 wooden skewers dipped in water
- pita bread (optional)
Salad:
- 2 cups cherry tomatoes, halved
- 4 sliced Lebanese cucumbers
- 1/4 cup red onion, finely sliced
- 1 cup feta cheese
- 1 cup pitted kalamata olives
To make dressing/marinade: In measuring cup, mix olive oil, lemon juice, lemon zest, oregano, Dijon mustard, garlic and sugar. Season generously with salt and pepper, to taste. Pour 1/3 cup marinade into large bowl. Refrigerate remaining.
To prepare skewers: Add potatoes and chicken pieces to bowl with marinade. Mix well to coat and marinate 30 minutes, or as long as overnight in refrigerator.
Preheat grill to medium heat.
Skewer potatoes and chicken cubes alternately on wooden skewers. Grill 6-8 minutes on both sides. Grill pita bread, if desired.
Finish dressing by adding mayonnaise.
To make salad: In large serving dish, mix tomatoes, cucumber, onions, feta cheese and olives. Place kebabs on top and drizzle with dressing.
Serve with grilled pita bread, if desired.
Sipping on Sweetness
When it's summertime, many people crave something cold and fruity. Simply combine frozen strawberries with frozen pink lemonade concentrate to create a cool concoction perfect for a sizzling day. This fizzy summertime treat can delight your taste buds and keep you quenched while enjoying the sun's rays.
Find more summer drink recipes at Culinary.net.

Strawberry Spritzer
Recipe adapted from Taste of Home
- 1 package (10 ounces) frozen sliced strawberries, sweetened and thawed
- 2 liters lemon-lime soda, chilled
- 1 can (12 ounces) frozen pink lemonade concentrate, thawed
- In blender, process strawberries until blended thoroughly.
- Pour strawberries into large pitcher; stir in soda and pink lemonade.
A Simple Stuffed Side
Whether you need a quick appetizer or something to snack on, these Stuffed Cherry Tomatoes make for an appealing bite.
Find more snack recipes at Culinary.net.
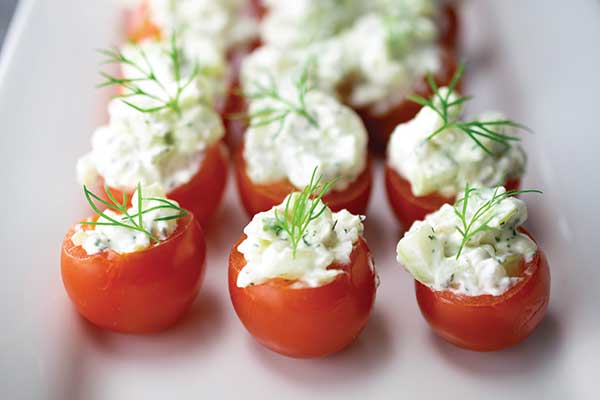
Stuffed Cherry Tomatoes
Recipe courtesy of Culinary.net
- 24-48 cherry tomatoes
- 1 package (8 ounces) cream cheese, softened
- 2 tablespoons mayonnaise
- 1 medium cucumber, peeled and diced
- 3 green onion stalks, diced
- 2 teaspoons minced dill
- fresh dill, for garnish
- Cut thin slice off top of each tomato. Scoop out pulp. Invert tomatoes on paper towel to drain.
In medium bowl, combine cream cheese and mayonnaise until smooth. Stir in cucumber, green onion and dill. Spoon mixture into tomatoes. Top with fresh dill. - Refrigerate until ready to serve.
Photo courtesy of Getty Images (Steak)
Source: The Little Potato Company

Cook Comfort Food Once, Enjoy it Twice
(Family Features) Cook once, eat twice. It’s a kitchen practice as simple as it sounds. Cook a base dish that can be enjoyed today and used for an entirely different meal tomorrow. For example, bake some fish for tonight’s dinner, and enjoy fish tacos for tomorrow’s lunch.
With so many Americans preparing meals at home, the practice of cooking once and eating twice can extend your grocery budget while also making meal planning less stressful and more comforting.
Cooking meals that feed the entire family is essential and even better if they give you a jump on a second meal. Whether your love for cooking runs deep or is being newly discovered, keep the following in mind when planning to cook once and eat twice:
Stock up on staples. Before heading out to the store, develop a list of ingredients that can be used for multiple dishes. Canned goods, such as black beans and corn, are great items to store in the pantry and have on hand for a variety of favorite family recipes. Other basics like corn tortillas can be used in multiple ways, such as tacos, casseroles and even salads.
Don’t forget produce. To increase flavor and nutrition, adding produce is key in your planning. Mushrooms are a favorite among chefs and home cooks alike for many reasons. Traditionally known for their inherent umami flavor, mushrooms are filling, healthy and versatile. Crimini and portabella are excellent sources of selenium, an antioxidant that protects cells from damage that may lead to serious chronic diseases. For example, four crimini mushrooms provide 38% of your daily recommended value. Also, the variety of mushrooms contain essential vitamins and nutrients, such as vitamins B and D and riboflavin.
Make meat go further. A three-step cooking technique called “The Blend” combines finely chopped mushrooms with ground meat to create dishes that are more nutritious while still tasting delicious. You can use the process to create multiple dishes such as tacos, pasta sauce and burgers. Mushrooms’ ability to mimic the texture of meat makes them easy to incorporate, and the addition of finely chopped mushrooms to meat dishes stretches portions, allowing the family to enjoy a meat-mushroom base two days in a row in two different ways in dishes like Mexican Lasagna and Blended Tacos, both of which include a Mexican Mushroom-Beef Blend.
For more simple and delicious recipes, visit MushroomCouncil.com
Blended Tacos
Makes: 8 tacos
- 1 cup sour cream
- 6 tablespoons cilantro, chopped
- 2 tablespoons lime juice
- 8 yellow corn tortillas
- 2 cups Mexican Mushroom-Beef Blend
- diced avocado (optional)
- shredded lettuce (optional)
- shredded cheese (optional)
- salsa (optional)
- In small bowl, mix sour cream, cilantro and lime juice. Cover and refrigerate.
- Warm tortillas in microwave or on stovetop according to package directions. Spoon 1/4 cup Mexican Mushroom-Beef Blend into each tortilla. Top with sour cream mixture and avocado, lettuce and cheese as desired.
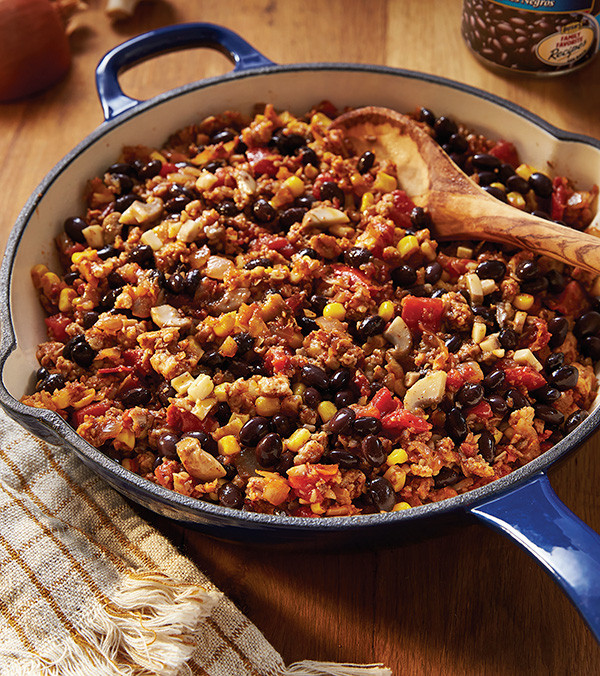
Mexican Mushroom-Beef Blend
Makes: 8 cups
- 1 medium yellow onion
- 8 ounces fresh button or crimini mushrooms
- 1 pound lean ground beef
- 1 tablespoon olive oil
- 2 cans (15 ounces each) black beans, drained
- 1 package (1 ounce) reduced-sodium taco seasoning mix
- 1 can (15 ounces) crushed tomatoes
- 1 can (11 ounces) yellow kernel corn, drained
- In food processor, pulse onion and mushrooms to coarse texture. Set aside.
- In large frying pan, brown ground beef. Drain fat. Set aside.
- In same frying pan, heat oil. Add mushroom mixture and saute 3-4 minutes, or until most moisture has been released. Add black beans and mix.
- Add beef, taco seasoning, tomatoes and corn to black bean and mushroom blend. Mix and cook until heated through.

Mexican Lasagna
Servings: 6-8
- Nonstick cooking spray
- 16 yellow corn tortillas
- 6 cups Mexican Mushroom-Beef Blend
- 1 cup shredded, low-fat Mexican cheese blend
- sour cream (optional)
- chopped cilantro (optional)
- salsa (optional)
- Heat oven to 350° F. Spray bottom of 9-by-13-inch baking dish with nonstick cooking spray. Place four corn tortillas on bottom of dish and layer 2 cups Mexican Mushroom-Beef Blend on top. Repeat layers, ending with tortillas as top layer. Top with cheese.
- Bake uncovered 25 minutes, or until cheese melts and lasagna is heated through. Top with dollops of sour cream, cilantro and salsa as desired.
Source: Mushroom Council

Bite-Sized Breakfast
(Culinary.net) Appetizer-sized portions and small bites of all sorts are ideal for breakfast spreads, and these Pastry Brunch Cups are perfect for a quick morning snack. Try baking a batch and separating into appropriate serving sizes for a simple way to meal prep heading into a new week.
Find more breakfast recipes at Culinary.net.
Watch video to see how to make this recipe!

Pastry Brunch Cups
Serves: 18
- 2 tablespoons butter
- 2 tablespoons flour
- 1 1/2 cups milk
- 1 cup shredded Swiss cheese
- 2 sheets puff pastry
- 18 eggs
- 2 cups diced ham
- chopped fresh green onions
- Heat oven 375 F.
- In small saucepan, melt butter. Whisk flour with butter. Gradually pour in milk, whisking each time. Bring to simmer, whisking until mixture starts to thicken. Remove from heat; stir in Swiss cheese. Set aside.
- Use rolling pin to thin out puff pastries. Cut each into nine squares. Line pastry squares in muffin cups, pressing bottoms down firmly and moving pastries up sides for edges to come up just over muffin tins. Fill each cup with 1 teaspoon cheese sauce. Crack one egg into each cup and sprinkle each with diced ham.
- Bake 10-15 minutes until eggs set. Sprinkle with chopped green onions.

Savor the Season with Delicious, Decorative Cheese Boards
5 tips to create holiday meal centerpieces
(Family Features) A cheese board, plate or course can be a delightful way to savor the season with family and friends, bringing together a medley of tastes and textures.
This year, try serving up a board with real, quality cheeses that also set a celebratory tone with these tips from the experts at Real California Milk, representing California's dairy farm families.
Mix it up. When selecting cheeses, create a range of flavors and textures from soft to hard and mild to sharp, and even pungent varieties. Consider these examples:
- A bloomy rind cheese such as Brie, Camembert or Formagella
- A soft or washed-rind cheese like Teleme or Crescenza
- A semi-firm cheese such as Gouda, St. George or toma
- A very hard cheese such as dry jack, aged Gouda or aged white cheddar
- A highly flavorful or pungent cheese such as blue or flavored jack
Add contrast. Flavorful breads thinly sliced or broken into smaller pieces can enhance contrast in both flavor and texture. For a simple solution, try serving breadsticks as part of this California Continental Cheese Board alongside Brie, toma and pepper jack cheeses.
Be patient (but not too patient). Aged cheeses should be allowed time to come to room temperature. Larger pieces typically take 1-2 hours for the full flavor to develop. However, fresh cheeses should be treated like milk, so don’t allow them to sit out for more than a short time.
Use simple additions. Enhance your cheese plates with olives, nuts or fruit to add flavor and texture. For example, pears go well with blue cheese, Gouda and toma; olives accompany white cheddar and pepper jack; walnuts fit with Gouda and dry jack; and dried cranberries pair nicely with cheddar, blue cheese and mushroom jack in this Red, White and Blue Cheese Board.
Consider portions. Estimate 1-1 1/2 ounces of each cheese per person. If you plan to serve three or more cheeses, consider decreasing the amount to 1 ounce (or less) of each cheese per person.
To find a variety of Real California cheeses at a store near you, visit the product locator at realcaliforniamilk.com.
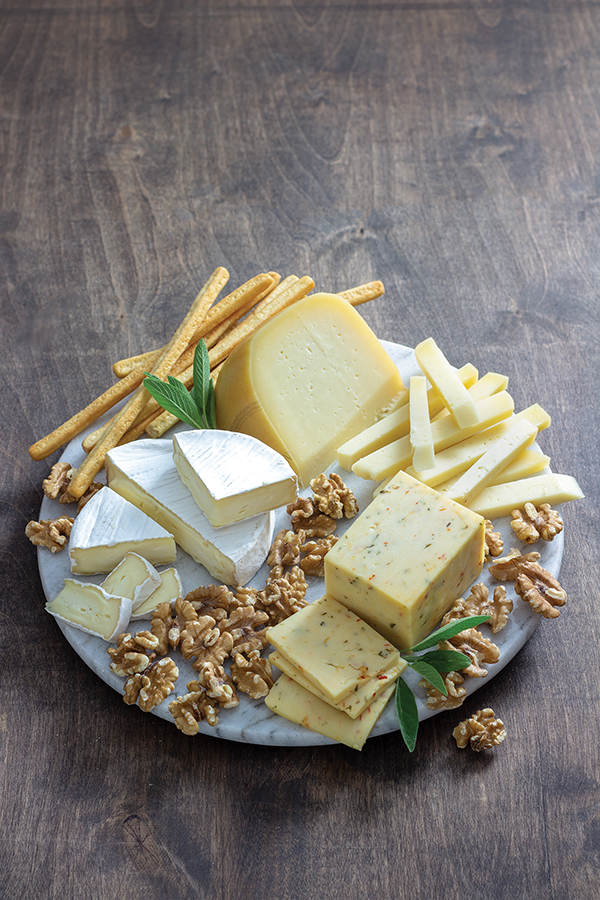
California Continental Cheese Board
Recipe courtesy of Real California Milk
- 1-2 ounces California Brie cheese per person
- 1-2 ounces California toma cheese per person
- 1-2 ounces California pepper jack cheese per person
- walnuts
- breadsticks
- fresh herbs
- On cheese plate, arrange cheeses, almonds, crackers and cherry tomatoes.
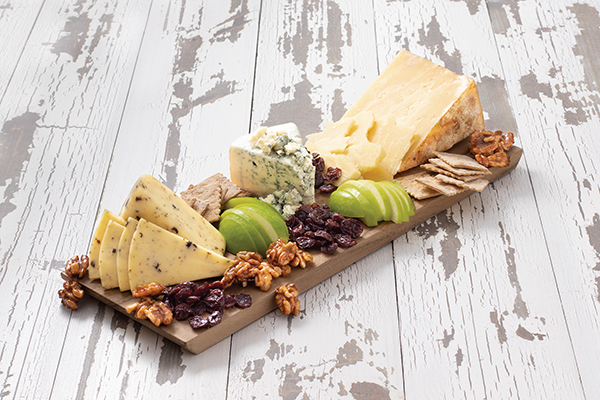
Red, White and Blue Cheese Board
Recipe courtesy of Real California Milk
- 1-2 ounces California cheddar cheese per person
- 1-2 ounces California blue cheese per person
- 1-2 ounces California mushroom jack cheese per person
- walnuts
- dried cranberries
- crackers
- fresh apple slices
- On cheese plate, arrange cheeses, walnuts, cranberries, crackers and apple slices.
Source: Real California Milk

Cheesy Baked Potato Casserole
(Culinary.net) ’Tis the season for comfort foods, and this recipe with crumbled bacon and cubed potatoes smothered in melted cheddar cheese is sure to satisfy.
Find more meal ideas at Culinary.net.
Watch video to see how to make this recipe!
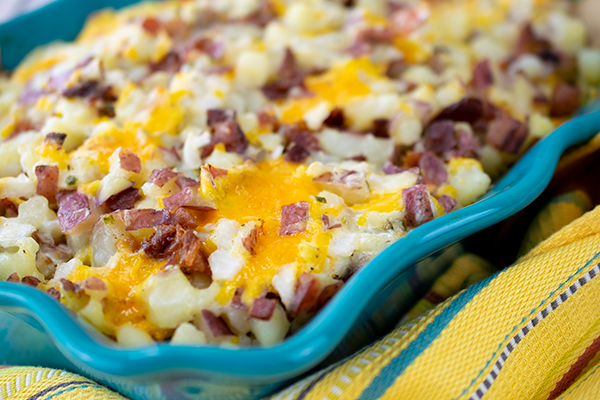
Cheesy Baked Potato Casserole
- 5 pounds red potatoes, cubed
- 1 pound bacon, cooked and crumbled
- 1 pound cheddar cheese, cubed
- 16 ounces shredded cheddar cheese
- 1 yellow onion, chopped
- 1 cup mayonnaise
- 8 ounces sour cream
- 1 tablespoon minced chives
- 1 teaspoon salt
- 1/2 teaspoon pepper
- Heat oven to 325° F.
- In large bowl, combine potatoes and bacon.
- In separate large bowl, combine cheese, onion, mayonnaise, sour cream, chives, salt and pepper. Add to potato and bacon mixture until combined.
- Pour into 9-by-13-inch baking dish. Bake 50-60 minutes until browned and bubbly.

Holiday Entertaining with 5 Sommelier-Approved Wine Pairings
(Family Features) The holiday season is all about entertaining. This year, take your holiday soiree to the next level with a palate-pleasing wine pairing experience. Invite friends and family to the kitchen for easily pairable tastes of these three favorites: wine, cheese and chocolate.
Before diving into the nearly endless pairing options, focus on delicious, affordable and high-quality ingredients like those at ALDI, where you’ll find all you need for your entertaining spread. As a go-to source for wine, cheese, chocolate and more, you can ensure you have everything you need during the holiday entertaining season.
Consider these five festive wines and tasty pairings shared by sommelier and lifestyle expert Sarah Tracey, which showcase a range of her favorite ALDI-exclusive choices for the holiday season. Find more seasonal entertaining ideas at aldi.us.
- Light and Sweet – With aromas and flavors of strawberries and cherries, the sweet finish of Arosa Sparkling Moscato Rosé pairs with soft cheeses like Emporium Selection Baking Brie with Cranberry Glaze and Specially Selected Belgian Cocoa Dusted Truffles.
- Crisp and Balanced – The Exquisite Collection Sauvignon Blanc is crisp and well-balanced. To complement the taste properly, try matching it with Emporium Selection Mini Goat Milk Brie or Moser Roth Orange & Almond Chocolate Bars.
- Rich and Full – For a bolder, more robust sip, consider Grande Alberone Rosso with flavors of cherry, blackberry and raisin. These notes make it ideal for aligning with stronger tastes like Emporium Selection Truffle Cheddar or Choceur Dark Chocolate Covered Cherries.
- Tropical and Toasty – Full-bodied, bright pear and tropical fruit flavors balance out buttery hints of toasty oak and subtle caramel highlights in William Wright Chardonnay. Pair it with sophisticated cheeses like Emporium Selection Champagne Cheddar for a complementary experience, and finish the taste with Choceur Dark Chocolate Coconut Covered Almonds.
- Lush and Silky – A medium-bodied wine like William Wright Reserve Pinot Noir, featuring cherry, blackberry and plum aromas with vanilla nuances, pairs well with flavorful cheeses. Try Emporium Selection artisan flavored cheese, like the variety “Got Tea Have It.” Choceur Dark Chocolate Covered Cranberries complement the chocolate pairing nicely.
Source: ALDI

A Classic Staple for Family Meals
(Family Features) Every day seems to bring a new food trend, and while it can be tempting to go all-in on the latest craze to hit the shelves, there are lots of tried-and-true foods that still deserve a place at the table. One of those is real, wholesome dairy milk.
If you’re thinking about passing over real milk in favor of one of the non-dairy milk alternatives, like oat, almond or coconut milk, it’s important to know they’re not a one-to-one swap. In fact, while they might have similar packaging, real milk and non-dairy alternatives differ in several key areas including nutrition, ingredients, added sugars and taste.
Starting with nutrition, few non-dairy alternatives can match the full nutrient package found in real milk, which naturally contains high-quality protein, calcium, phosphorus and B vitamins. Real milk is also the top food source of calcium, vitamin D and potassium in the American diet – three of the nutrients the current Dietary Guidelines say people most often lack – and it’s hard to get enough important nutrients without it, according to research published in the Journal of the American Dietetic Association and The FASEB Journal.
Real milk is also simple, with a short ingredient list of just milk, vitamin A and vitamin D and no added sugar. Some non-dairy milk alternatives have 10 or more ingredients, including added sugar, salt, stabilizers and emulsifiers.
On top of being a fresh, nutritious beverage, milk plays a key role in wholesome, classic recipes to share with family and friends. From this Easy Creamy Macaroni and Cheese to a classic alfredo, real milk not only boosts nutrition, it also adds dimension, accentuates flavor and serves as a creamy base to many of your favorite dishes.
For more recipe inspiration, visit milklife.com.
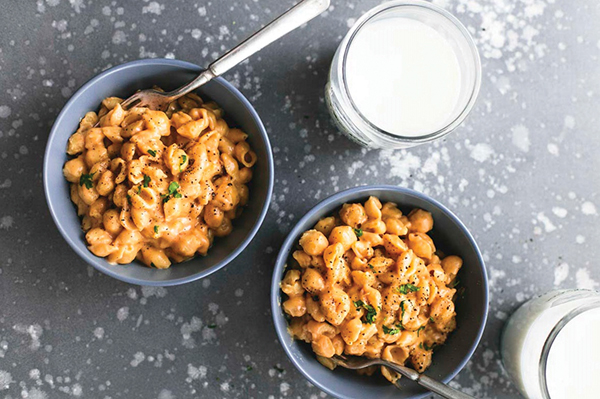
Easy Creamy Macaroni and Cheese
Servings: 4
- 12 ounces small pasta noodles, like elbows or shells
- 2 teaspoons olive oil
- 3 tablespoons unsalted butter
- 3 tablespoons flour
- 2 1/2 cups low-fat milk, divided
- 1/2 teaspoon garlic powder
- 2 cups freshly grated sharp cheddar cheese
- salt, to taste
- pepper, to taste
- chopped parsley, for garnish (optional)
- 1 glass milk (8 ounces) paired with each serving
- Add pasta to pot of boiling, salted water; boil until tender then drain and rinse with cold water. Toss pasta with olive oil and set aside.
- In large skillet, melt butter over medium-high heat. Stir in flour. Gradually whisk in 2 cups milk until smooth and creamy. Stir in garlic powder.
- Stir in cheese until completely melted and fully incorporated. Add remaining milk to thin. Season with salt and pepper, to taste.
- Stir in cooked pasta, garnish with pepper and chopped parsley, if desired, and serve with glass of real milk.
Nutritional information per serving: 660 calories; 36 g fat; 21 g saturated fat; 105 mg cholesterol; 33 g protein; 51 g carbohydrates; 2 g fiber; 540 mg sodium; 905 mg calcium. Nutrition figures include 8-ounce glass of low-fat milk.
Source: MilkPEP