
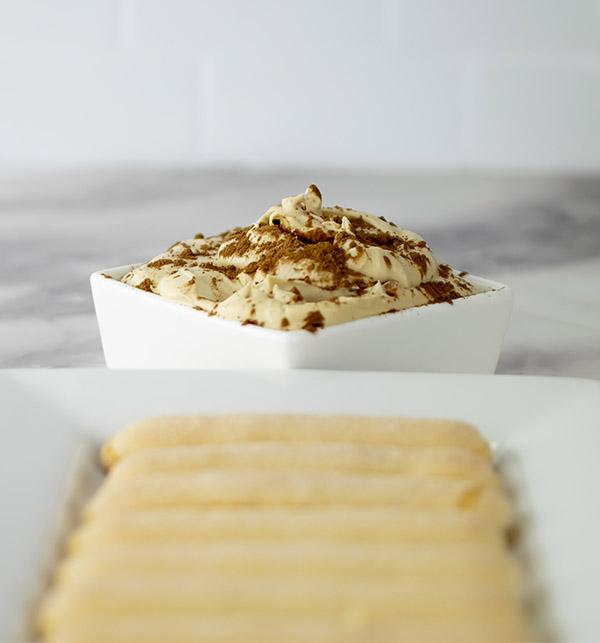
Easy Tiramisu Dip
(Culinary.net) Do you know that moment when something sweet hits your taste buds and a smile instantly spreads across your face? It’s almost magic to some. To others it’s just simply bliss. This holiday season, try something that’s simple yet sophisticated for an easy way to ensure smiles all around.
Try an Easy Tiramisu Dip because whether you’re relaxing at home, having a small get-together with friends or joining your annual family gathering virtually, this dip is sure to spread culinary cheer.
The recipe starts with “easy,” and it holds true to its name. With a short list of ingredients and only a handful of instructions, this is something you can whip up (literally) in just a few moments. Also, using minimal tools in the kitchen is always a plus for at-home chefs. The only appliance needed to make this recipe is a mixer.
The outcome is fluffy, rich and sweet with a hint of espresso. It’s not overpowering, however, so little ones or non-coffee lovers can still enjoy this delicious dip.
This is also a unique dessert because it can be served cool or chilled. If you are planning to take a sweet treat to a party this holiday season, this is nearly perfect. No oven time needed and simple to serve to kids and adults alike.
Serve with ladyfingers or fruit to bring that sweetness to a whole new level, and it’s topped with a final sprinkle of cocoa powder to give it that extra appeal. You do eat with your eyes first after all.
Give this one a try and see the faces of your loved ones light up with joy this season. This creamy, tasty dip is sure to impress.
For more easy dessert recipes, visit Culinary.net.
Watch video to see how to make this recipe!
Easy Tiramisu Dip
Servings: 4
- 1 cup heavy whipping cream
- 1 tablespoon espresso powder
- 4 ounces cream cheese, softened
- 8 ounces Mascarpone cheese
- 1/2 cup powdered sugar
- 1 teaspoon vanilla extract
- 2 teaspoons cocoa powder
- wafers or fruit, for dipping
- In medium bowl, whisk heavy whipping cream and espresso powder until blended.
- In large bowl, use hand mixer to beat cream cheese until smooth. Add Mascarpone cheese and beat until combined. Gradually add powdered sugar, beating after each addition. Add vanilla extract; beat mixture. Add espresso mixture; beat until soft peaks form.
- Keep refrigerated until ready to serve.
- Spoon mixture into serving bowl. Sprinkle with cocoa powder. Serve with wafers or fruit.

Delectable Desserts for Holiday Celebrations
(Family Features) With so many traditions and ways to celebrate the holiday season, the options are nearly endless for families looking to spend special moments together. One of the tastiest and most enjoyable activities you can engage in with family and friends is to team up and create sweet eats in the kitchen.
Whether you’re a chocolate lover or prefer traditional seasonal flavors like peppermint and gingerbread, these tasty, dairy-inspired treats from Milk Means More provide heartwarming ways to tingle your taste buds while bringing everyone together.
Cranberry Orange Bread Pudding provides a sweet, fruity, hearty dessert while Peppermint Cheesecake Brownies combine chocolatey goodness with creamy cheesecake and peppermint. Or, for a classic holiday combination, you can turn to Gingerbread Cupcakes with Whipped Vanilla Buttercream.
Find more ways to celebrate the season with sweet eats at milkmeansmore.org.
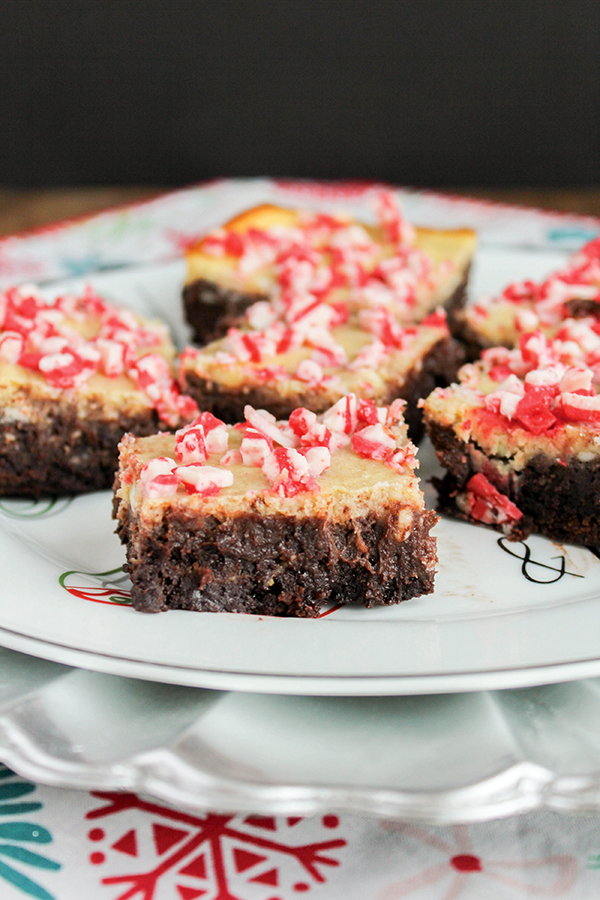
Peppermint Cheesecake Brownies
Recipe courtesy of Sarah Bates of “The Chef Next Door” on behalf of Milk Means More
Prep time: 10 minutes
Cook time: 30 minutes
Servings: 16
- Nonstick cooking spray
Cheesecake Batter:
- 8 ounces low-fat cream cheese, at room temperature
- 1/3 cup granulated sugar
- 1/2 teaspoon peppermint extract
- 2 eggs
- 1 tablespoon all-purpose flour
Brownie Batter:
- 1 cup all-purpose flour
- 1/2 cup cocoa powder
- 1/2 teaspoon salt
- 1 cup granulated sugar
- 1/4 cup vegetable oil
- 1/4 cup milk
- 2 eggs
- 1 teaspoon pure vanilla extract
Topping:
- 1/2 cup peppermint baking pieces
- Preheat oven to 350 F. Coat 8-inch square baking pan with nonstick cooking spray; set aside.
- To make cheesecake batter: Place cream cheese in bowl of stand mixer. Beat on medium speed until smooth and creamy. Add sugar and peppermint extract; beat well. Add eggs, one at a time, beating well after each addition. Add flour and beat mixture until blended.
- To make brownie batter: In medium bowl, whisk flour, cocoa powder and salt until combined. In separate bowl, whisk sugar, oil, milk, eggs and vanilla until well combined. Add wet ingredients to dry ingredients and mix until blended.
- Pour brownie batter evenly into prepared pan. Carefully pour cheesecake batter over top, spreading evenly. Carefully swirl layers together using knife tip. Bake 20 minutes.
- Sprinkle top of brownies with peppermint baking pieces and bake 10 minutes until brownies are set. Cool brownies completely in pan on wire rack before cutting into 16 squares.
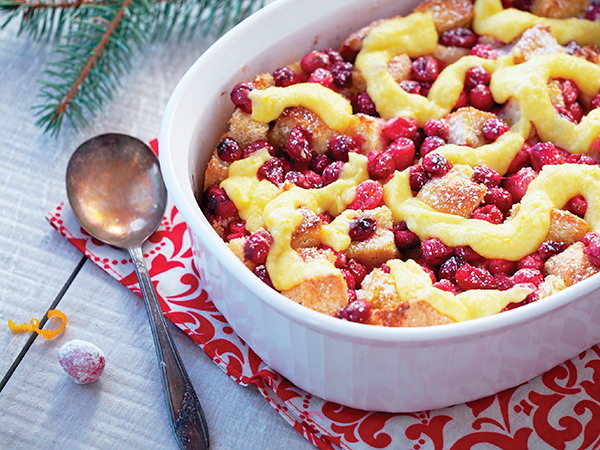
Cranberry Orange Bread Pudding
Recipe courtesy of Kirsten Kubert of “Comfortably Domestic” on behalf of Milk Means More
Prep time: 20 minutes
Cook time: 65 minutes
Servings: 12
Pudding:
- 1 loaf Texas toast or day-old bread
- 1-2 tablespoons softened butter
- 1 1/2 cups fresh cranberries
- 6 eggs
- 3/4 cup granulated sugar
- 3 1/2 cups 2% milk
- 1 teaspoon freshly grated orange zest
- 1/4 cup fresh orange juice
- 1/4 cup unsalted butter, melted and slightly cooled
- 1 1/2 teaspoons vanilla extract
- 1/8 teaspoon ground cinnamon
- 1 1/2 tablespoons coarse granulated sugar (optional)
Orange Custard Sauce:
- 3 egg yolks
- 1/4 cup granulated sugar
- 1 cup half-and-half
- 1/2 teaspoon freshly grated orange zest
- To make pudding: Cut bread into bite-sized cubes. If bread is soft and fresh, place cubes on half sheet pan and let stand at room temperature overnight to dry out.
- Preheat oven to 375 F.
- Grease 13-by-9-by-2-inch baking dish with softened butter. Place bread cubes in prepared baking pan. Scatter cranberries over bread.
- Beat eggs with sugar, milk, orange zest, orange juice, melted butter, vanilla and cinnamon until well blended. Pour evenly over bread and cranberries to coat. Sprinkle with coarse sugar, if desired. Bake 60-65 minutes, or until custard is set and edges of bread are browned.
- To make orange custard sauce: In small saucepan, whisk egg yolks with sugar until lightened to pale yellow color, about 2 minutes. Stir half-and-half into mixture until combined. Cook over low heat, stirring constantly, 15-20 minutes, or until sauce thickens enough to coat spoon. Stir orange zest into custard sauce.
- Serve bread pudding with warm custard sauce over top.
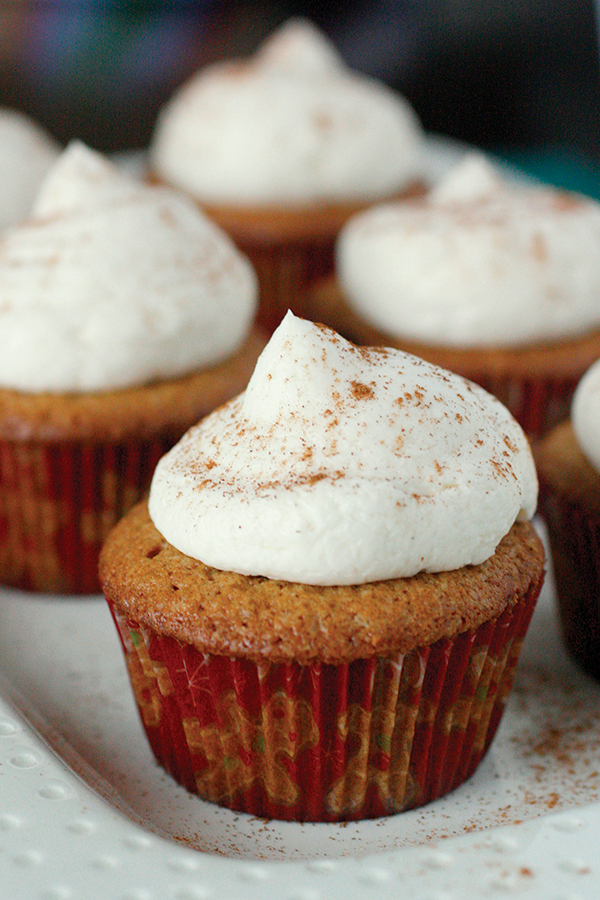
Gingerbread Cupcakes with Whipped Vanilla Buttercream
Recipe courtesy of Megan Gundy of “What Megan’s Making” on behalf of Milk Means More
Prep time: 10 minutes
Cook time: 25 minutes
Servings: 20
Cupcakes:
- 1 1/2 cups all-purpose flour
- 1 1/2 tablespoons ground ginger
- 2 teaspoons ground cinnamon
- 1/4 teaspoon ground cloves
- 1/2 teaspoon ground nutmeg
- 1/2 teaspoon salt
- 1 1/2 cups unsalted butter, at room temperature
- 1 1/2 cups granulated sugar
- 3 tablespoons molasses
- 4 large eggs
- 2 teaspoons vanilla extract
Whipped Vanilla Buttercream:
- 1 cup (2 sticks) butter, softened
- 2 teaspoons vanilla extract
- 4 cups powdered sugar
- 2-4 tablespoons heavy whipping cream
- 1 pinch salt
- cinnamon, for topping
- Adjust oven rack to lower-middle position and preheat oven to 350 F. Line muffin pan with cupcake liners. Set aside.
- To make cupcakes: In medium bowl, whisk flour, ginger, cinnamon, cloves, nutmeg and salt.
- In large bowl of stand mixer, cream butter and sugar until light and fluffy, about 3 minutes. Add molasses and beat until incorporated. Beat in eggs, one at a time, then beat in vanilla. Add flour mixture and mix on low speed until just combined.
- Divide batter evenly among muffin cups, filling each about 3/4 full. Bake 30 minutes, or until toothpick inserted in center cupcake comes out clean or with moist crumbs. Let cupcakes cool 10 minutes then transfer to wire rack to cool completely.
- To make whipped vanilla buttercream: In large bowl of stand mixer, beat butter on medium-high speed until light and fluffy, about 3 minutes. Add vanilla and, with mixer on low, slowly add in powdered sugar, cream and salt, scraping down sides of bowl as needed. Once incorporated, whip frosting at least 3 minutes on medium-high or high speed. If frosting is too thick, gradually beat in additional cream. Pipe on top of cooled cupcakes and sprinkle with cinnamon.

Rich, Flavorful Recipes for Memorable Holiday Moments
(Family Features) For many families, spending special moments with loved ones feels more important than ever this year. Whether you’re spending the holidays with family or inviting them for a virtual call from afar, you can plan ahead to enjoy the same dishes even without being at the same table.
Tap into family favorites like these seasonal sweets that include California Walnuts for rich, holiday-worthy flavor. Overnight Walnut French Toast with Cranberry Walnut Ginger Compote offers a tart-sweet combination perfect for a holiday brunch and allows you to prep the night before and simply pop in the oven when you wake up.
Drizzled with a chocolate-peppermint glaze and finished with walnuts and crushed peppermint candies, a Walnut Chocolate Peppermint Bundt Cake can provide the perfect finish to the festivities. The soft cake and crunchy walnuts contrast for an ultimate texture combination.
Find more sweet holiday recipes at walnuts.org.
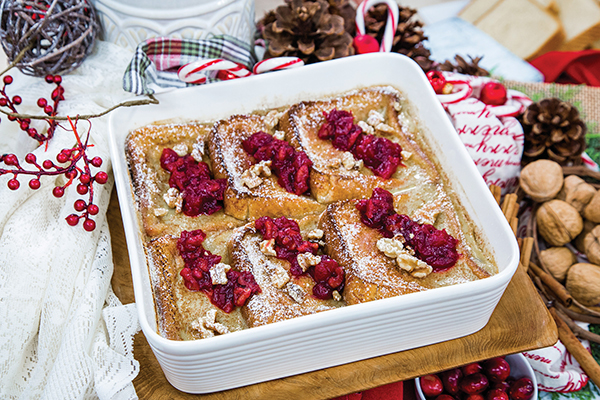
Overnight Walnut French Toast with Cranberry Walnut Ginger Compote
Total time: 1 hour
Servings: 12
Cranberry Walnut Ginger Compote:
- 1/2 cup California Walnuts
- 2 cups cranberries
- 1/2 cup orange juice
- 1/2 cup maple syrup
- 1/4 teaspoon ground ginger
- 1 orange, zest only
Overnight Walnut French Toast:
- 8 slices Texas Toast or 1-inch thick slices French bread
- 1/4 cup butter, melted, plus additional for baking dish, divided
- 2 1/2 cups milk or walnut milk
- 1/2 cup sugar
- 2 teaspoons vanilla extract
- 1 teaspoon cinnamon
- 6 eggs
- To make Cranberry Walnut Ginger Compote: Preheat oven to 350 F. Place walnuts on baking sheet and toast 8 minutes. Remove from heat and chop coarsely.
- In medium pot over medium heat, combine toasted walnuts, cranberries, orange juice, syrup, ginger and orange zest. Bring to boil and stir frequently 12-15 minutes until cranberries pop and liquid starts to reduce.
- Transfer to container and refrigerate once cooled.
- To make Overnight Walnut French Toast: Preheat oven to 350 F.
- Place bread on baking sheet and bake 5 minutes, or until lightly toasted on outside but still soft on inside. Butter 13-by-9-inch baking dish.
- In large bowl, whisk milk, sugar, 1/4 cup butter, vanilla extract, cinnamon and eggs. Dip each bread slice in mixture and let soak about 15 seconds on each side. Place in prepared baking dish, overlapping slices slightly, if necessary.
- Cover and refrigerate a few hours or overnight.
- Preheat oven to 350 F. Bake 50-60 minutes, or until golden brown and somewhat firm to touch. Serve immediately topped with Cranberry Walnut Ginger Compote.
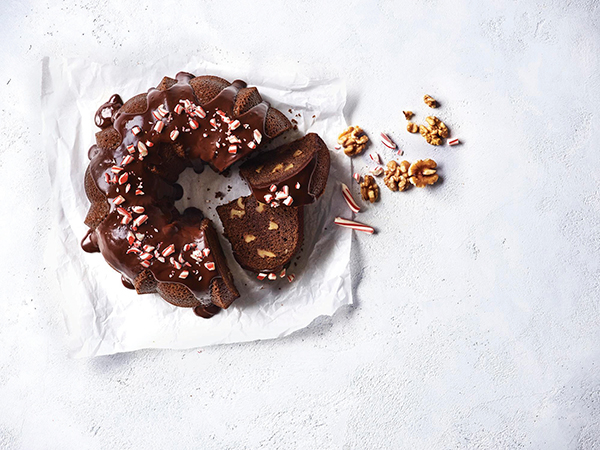
Walnut Chocolate Peppermint Bundt Cake
Total time: 1 hour, 30 minutes
Servings: 16
Cake:
- 1 cup butter, plus additional for greasing pan, divided
- 1/2 cup unsweetened cocoa powder, plus additional for dusting pan, divided
- 1 cup water
- 2 1/4 cups sugar
- 1 teaspoon peppermint extract
- 3 eggs
- 2 cups flour
- 3/4 teaspoon baking powder
- 1/2 teaspoon salt
- 1/4 teaspoon baking soda
- 1/2 cup buttermilk
- 1 cup California Walnut halves and pieces
Chocolate Peppermint Truffle Glaze:
- 1/3 cup dark chocolate chips
- 3 tablespoons butter
- 2 tablespoons milk
- 1/2 teaspoon peppermint extract
Toppings:
- 1/2 cup coarsely chopped California Walnuts
- 1/2 cup crushed peppermint candy
- To make cake: Preheat oven to 350 F. Lightly butter bundt pan then dust with cocoa powder. Turn pan, tapping, to coat on all sides; tap out excess.
- In small saucepan over low heat, melt 1 cup butter, 1/2 cup cocoa powder and water, whisking until smooth; let cool.
- Transfer to bowl of mixer and lightly beat in sugar, peppermint extract and eggs.
- In medium bowl, mix flour, baking powder, salt and baking soda. Add about 1/3 of dry ingredients to chocolate mixture and beat on low speed to combine. Add 1/4 cup buttermilk and beat again. Repeat steps ending with flour mixture, mixing only until combined. Fold in walnuts.
- Spread in prepared pan and bake 50-60 minutes, or until toothpick inserted in center comes out clean. Let cool then invert onto serving plate or platter.
- To make Chocolate Peppermint Truffle Glaze: While cake bakes, melt chocolate chips, butter, milk and peppermint extract together until smooth. Let cool slightly to thicken then drizzle over cake. Top with walnuts and peppermint candies.
Source: California Walnuts

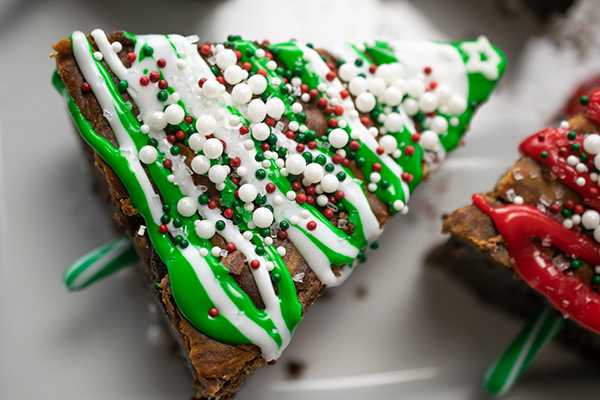
Christmas Tree Cheesecake Brownies
(Family Features) Festive fun and baking holiday treats go hand-in-hand, and these Christmas Tree Cheesecake Brownies provide a perfect way to enjoy a holiday tradition in the kitchen with loved ones.
Decorate your own version using green and white frosting, sprinkles of your choice and candy canes for “stumps” in the tree-shaped sweets.
Visit milkmeansmore.org to find more holiday inspiration.
Watch video to see how to make this recipe!
Christmas Tree Cheesecake Brownies
Recipe courtesy of Jenn Fillenworth of “Jenny with the Good Eats” on behalf of Milk Means More
Prep time: 10 minutes
Cook time: 30 minutes
Servings: 16
- Nonstick cooking spray
Cheesecake Batter:
- 8 ounces low-fat cream cheese, at room temperature
- 1/3 cup granulated sugar
- 2 eggs
- 1 tablespoon all-purpose flour
Brownie Batter:
- 1 cup all-purpose flour
- 1/2 cup cocoa powder
- 1/2 teaspoon salt
- 1 cup granulated sugar
- 1/4 cup vegetable oil
- 1/4 cup milk
- 2 eggs
- 1 teaspoon pure vanilla extract
Decorations:
- green frosting
- white frosting
- assorted sprinkles
- star-shaped sprinkles
- candy canes
- Preheat oven to 350 F.
- Coat 8-inch square baking pan with nonstick cooking spray; set aside.
- To make cheesecake batter: Place cream cheese in bowl of stand mixer. Beat at medium speed until smooth and creamy. Add sugar and beat well. Add eggs, one at a time, beating well after each addition. Add flour and beat mixture until blended.
- To make brownie batter: In medium bowl, whisk flour, cocoa powder and salt until combined. In separate bowl, whisk sugar, oil, milk, eggs and vanilla until well combined. Add wet ingredients to dry ingredients and mix until blended.
- Pour brownie batter evenly into prepared pan.
- Carefully pour cheesecake batter over top, spreading evenly. Carefully swirl layers together using knife tip.
- Bake 30 minutes until brownies are set.
- Cool brownies completely in pan on wire rack before cutting into triangle pieces.
- Decorate trees by piping green and white frosting. Top with assorted sprinkles and star-shaped sprinkles. Place 3-inch candy cane pieces in bottoms of brownies for stumps.
Source:

Make-Ahead Breakfasts for Easier Mornings
(Family Features) If you’re juggling a new set of responsibilities right now, you’re not alone. Those busy mornings may still pose challenges even if your commute no longer exists.
Making breakfast in advance can give you a few extra minutes to move your body, center your mind or simply hit the snooze button one more time and still put a delicious, nutritious breakfast on the table. Aim to use ingredients with a mix of protein, fiber and good fats to keep you full and energized for whatever the day has in store.
Take morning meal prep off your plate for days at a time by making a batch of No-Bake Walnut, Cocoa and Cherry Bars or Savory Walnut Egg Cups, which can be made with mostly pantry staples or frozen ingredients to help limit trips to the grocery store.
Find more make-ahead recipes for any meal of the day at walnuts.org/meal-prep.
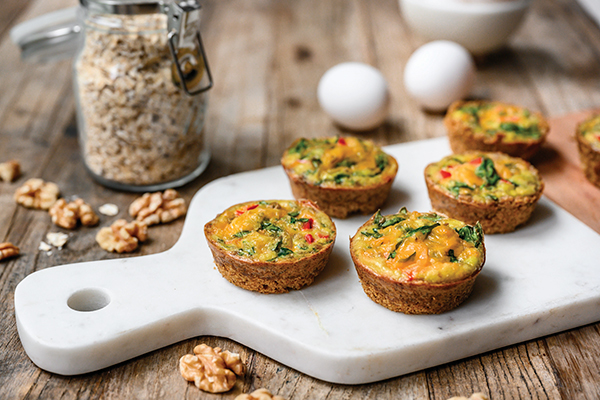
Savory Walnut Egg Cups
Total time: 1 hour, 15 minutes
Servings: 12
- Nonstick cooking spray
- 1 1/2 cups old-fashioned oats
- 3/4 cup chopped walnuts
- 1/4 cup extra-virgin olive oil
- 1/4 teaspoon salt
- 2 tablespoons cold water
- 9 large eggs
- 1/2 teaspoon garlic powder
- 1 teaspoon dried oregano leaves
- 1 tablespoon stone ground Dijon mustard
- 1 cup baby spinach, coarsely chopped
- 1 small red bell pepper, diced
- 3/4 cup extra sharp shredded cheddar cheese
- Heat oven to 350° F and generously spray 12-cup muffin pan with nonstick cooking spray.
- In bowl of food processor, pulse oats until fine and flour-like. Add walnuts and pulse until blended with oat flour. Pulse in olive oil, salt and water until mixture comes together.
- Spoon walnut-oat crust mixture evenly (about 1 1/4 tablespoons each) into each muffin cup and press into bottom and partially up sides. Bake 25 minutes until crust begins to brown. Cool on wire rack 10 minutes.
- In large bowl, whisk eggs, garlic powder, oregano and mustard until well combined. Stir in spinach, bell pepper and cheese.
- Fill each muffin cup evenly with egg-veggie mixture and bake 20 minutes, or until eggs are set. Cool slightly on wire rack before removing egg cups by carefully inserting sharp knife between crust and muffin pan.
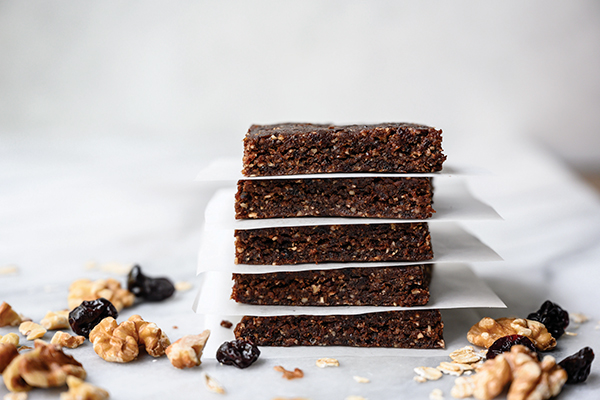
No-Bake Walnut, Cocoa and Cherry Bars
Total time:15 minutes
Servings: 9
- 1/2 cup old-fashioned oats
- 1 cup (about 12) pitted medjool dates
- 1/2 cup shelled walnuts
- 1/2 cup unsweetened dried cherries
- 2 tablespoons unsweetened cocoa powder
- 1/2 teaspoon salt
- In large food processor bowl, combine oats, dates, walnuts, cherries, cocoa powder and salt. Process 1-2 minutes, or until mixture resembles crumbly dough.
- Turn mixture onto wax paper and shape evenly into 1/2-inch thick rectangle.
- Chill at least 1 hour and cut into nine bars.
Source: California Walnuts

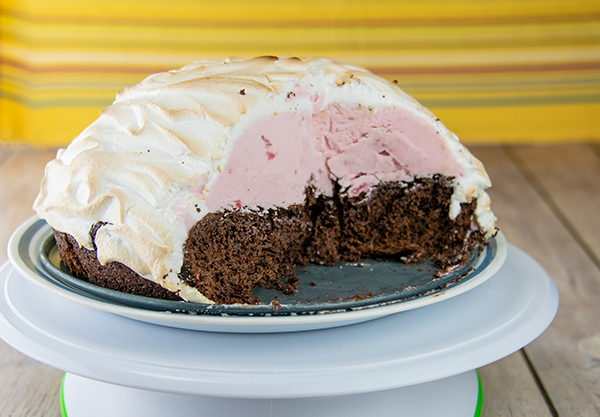
Baked Alaska
(Family Features) With its dramatic presentation, this freshly baked cake and ice cream-based dessert can impress guests at your next gathering.
Find more dessert recipes perfect for entertaining at Culinary.net.
Watch video to see how to make this delicious recipe!
Baked Alaska
Recipe adapted from Milk Means More
- 1/2 cup, plus 6 tablespoons, all-purpose flour
- 6 tablespoons unsweetened cocoa powder
- 1 cup, plus 2/3 cup, granulated sugar, divided
- 1 1/2 teaspoons baking powder
- 1/2 teaspoon baking soda
- 1/4 teaspoon salt
- 1/2 cup 2% milk
- 1/4 cup canola oil
- 2 eggs
- nonstick cooking spray
- 1 1/2 quarts ice cream, any flavor
- 3 large egg whites
- 1/8 teaspoon cream of tartar
- 1 teaspoon vanilla extract
- Heat oven to 350° F.
- In large bowl, whisk flour, cocoa powder, 1 cup sugar, baking powder, baking soda and salt. Make well in center of dry ingredients. Add milk, canola oil and eggs. Whisk until blended. Beat batter until smooth, about 3 minutes.
- Pour batter into 9-inch, round, greased cakepan. Bake 25-28 minutes. Cool completely on wire rack. Wrap in plastic wrap and freeze 1 hour.
- In glass bowl, spray with nonstick cooking spray. Layer inside of bowl with plastic wrap, draping some over edges of bowl.
- Scoop ice cream into bowl until full. Level ice cream. Place overhang of plastic wrap over ice cream. Freeze 2 hours.
- Unwrap cake and place on plate. Unwrap ice cream and place on top of cake. Wrap both together and freeze 2 hours.
- In medium bowl, beat egg whites and cream of tartar until frothy. Add remaining sugar and vanilla extract; beat mixture to form stiff peaks.
- Heat oven to 500° F.
- Unwrap stacked cake. Place on oven-safe plate. Spread meringue, creating swirl motions around cake. Bake 2-4 minutes until meringue peaks are brown and remaining meringue takes on dry appearance.
- Serve immediately or cover with plastic wrap and place in freezer.
Source: Culinary.net

Warm Up with Sweet and Savory Comfort Food
(Family Features) If chocolate for dinner sounds too good to be true, it’s because chocolate is usually associated with decadent desserts. However, it can also take comfort food to a whole new level when paired with savory ingredients like red meat.
A bit of bittersweet cocoa powder helps balance out the richness of red meats like duck. Although it’s leaner and lower in saturated fat than other red meats, duck has a bold flavor and texture similar to steak.
In this Mocha-Rubbed Duck Breast recipe, cocoa powder, ground coffee and savory spices are rubbed onto the meat before it’s seared and smothered with a luscious sweet cherry and red wine sauce. The toasty, nutty flavor of coffee complements the cocoa while dark sweet cherries, red wine and toasted almonds complete the sweet and savory dish.
Find more comfort food recipes and tips for cooking with duck at mapleleaffarms.com.
Mocha-Rubbed Duck Breast with Cherry and Red Wine Pan Sauce
Prep time: 2 hours, 10 minutes
Cook time: 35 minutes
Servings: 4
Mocha Rub:
- 2 tablespoons brown sugar
- 1/2 teaspoon sweet paprika
- 1/2 teaspoon ground coffee
- 2 teaspoons kosher salt
- 1 teaspoon ground black pepper
- 1/2 teaspoon cocoa powder
- 4 Maple Leaf Farms Duck Breasts, thawed
Cherry and Red Wine Pan Sauce:
- 2 tablespoons reserved duck fat
- 1/2 cup minced shallots
- 3/4 cup dry red wine
- 1 1/2 teaspoons balsamic vinegar
- 1 1/2 teaspoons granulated sugar
- 5 ounces frozen dark sweet cherries, thawed and halved
- 5 sprigs fresh thyme
- salt, to taste
- ground black pepper, to taste
- toasted sliced almonds, for garnish
- To make Mocha Rub: In small bowl, mix brown sugar, paprika, coffee, salt, pepper and cocoa powder. Set aside.
- Pat duck breasts dry and score according to package directions. Use half of rub on meat side of breasts. Cover breasts and refrigerate at least 2 hours or overnight.
- In cold saute pan, place duck breasts skin-side down. Place pan over low-medium heat 8-12 minutes, or until fat is rendered and skin is crisp and brown.
- Turn breasts over and sprinkle remaining rub on skin side. Cook breasts 1-2 minutes skin-side up. Turn breasts back to skin-side down 1-2 minutes to caramelize rub. Reserve approximately 2 tablespoons duck fat for sauce.
- Heat oven to 350° F.
- Place duck breasts skin-side up on rimmed baking sheet; bake 5-6 minutes, or until internal temperature reaches 155° F. Let breasts rest 4-5 minutes before slicing. Temperature will rise during resting period to reach 165° F.
- To make Cherry and Red Wine Pan Sauce: Place saute pan with reserved duck fat over medium heat. Add shallots and cook until softened. Add wine to pan to deglaze. Stir in balsamic vinegar, sugar, cherries and thyme sprigs; simmer until reduced. Remove thyme sprigs. Add salt and pepper, to taste.
- Serve sauce over cooked duck breasts. Garnish with toasted almond slices.
Source: Maple Leaf Farms

Chocolate War Cake

Chocolate War Cake
Yield: 12 slices
Serving size: 1 slice
- 3/4 cup whole-wheat pastry flour
- 3/4 cup all-purpose flour
- 1 cup granulated sugar
- 1/3 cup natural cocoa powder
- 1 teaspoon baking soda
- 1/2 teaspoon salt
- 1 cup cold water
- 1 tablespoon cider vinegar
- 1/3 cup canola oil
- 1 teaspoon pure vanilla extract
- 1/2 teaspoon confectioners’ sugar
- Preheat oven to 350°F. In 9-inch round baking pan, whisk together whole-wheat pastry flour, all-purpose flour, sugar, cocoa powder, baking soda and salt.
- In small bowl or measuring cup, combine water and vinegar.
- Make well in center of flour mixture in pan and pour canola oil and vanilla extract into well. Pour water-vinegar mixture over top of flour and then stir well to blend all ingredients.
- Bake until set and toothpick inserted into center comes out clean, about 30 to 35 minutes. Place cake on rack to cool in pan. Once cool, sprinkle with confectioners’ sugar.
Note: Whole-wheat, all-purpose flour can be substituted for whole-wheat pastry flour.
Nutritional Analysis (per Serving): Calories 180; Fat 7 g; Saturated Fat 0.5 g; Cholesterol 0 mg; Sodium 200 mg; Carbohydrates 29 g; Fiber 2 g; Protein 2 g
Source: CanolaInfo