
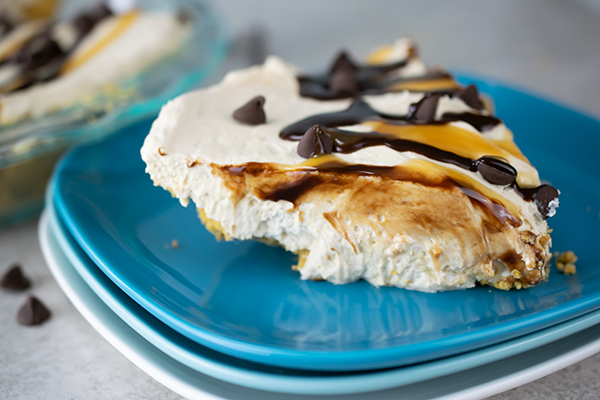
Chocolate Caramel Peanut Butter Pie
(Culinary.net) Some desserts deliver sweet taste that satisfies taste buds while others provide a rich flavor that lingers long after you’ve finished that last delicious bite. When you’re pondering which type of dessert you’d like to make at home, it may be difficult to decide which direction to take.
Instead of making that nearly impossible decision, keep in mind you can have the best of both worlds with this Chocolate Caramel Peanut Butter Pie. On top of the hard-to-beat flavor, this recipe requires a short list of ingredients and limited time in the kitchen for an easy-to-make treat to satisfy your loved ones’ dessert desires.
Just mix together cream cheese, powdered sugar, peanut butter, milk and whipped topping before layering together in a graham cracker crust that adds just enough crunch to the creamy texture. Top with chocolate chips and drizzle with chocolate and caramel syrups before freezing, serving and putting smiles on all the faces in the room.
Find more dessert recipes at Culinary.net.
Watch video to see how to make this recipe!
Chocolate Caramel Peanut Butter Pie
- 1 package (8 ounces) cream cheese, softened
- 1 cup powdered sugar
- 1 cup peanut butter
- 1/2 cup milk
- 1 container (8 ounces) whipped topping
- 1 graham cracker crust
- chocolate chips
- chocolate syrup
- caramel syrup
- In bowl of stand mixer, beat cream cheese until fluffy. Add powdered sugar and peanut butter; mix until blended. Add milk; mix until blended. Fold in whipped topping.
- Pour into crust. Sprinkle with chocolate chips. Drizzle with chocolate syrup and caramel syrup. Freeze until set.

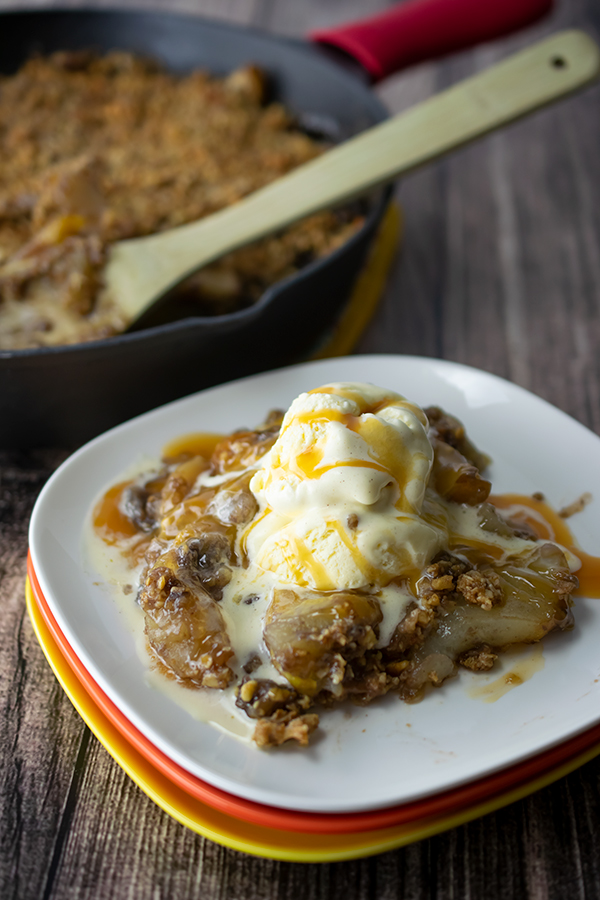
Walnut Apple Pear Crisp
(Culinary.net) Comfort food typically calls to mind soups, stews and hearty meals meant to warm you up on a chilly day. However, you can also turn to tasty treats as a way to end a cold day on a hot note.
For example, warm fruits baked into a crisp dessert provide an easy, heartwarming option for putting a smile on loved ones faces when the weather turns south. This Walnut Apple Pear Crisp combines two fall favorite fruits in a sweet and simple yet flavorful nibble.
Start by mixing the walnut crisp topping separate from the soul of the recipe: the apple pear filling. Then layer in a cast-iron pan and bake for an easy treat that cooks while you enjoy dinner with the family. In the end, the crunch of the crispy walnut crust provides a savory contrast to the sweetness of the fruity filling.
Find more comforting dessert recipes at Culinary.net.
Watch video to see how to make this recipe!
Walnut Apple Pear Crisp
Total time: 1 hour, 5 minutes
Servings: 4
Walnut Crisp Topping:
- 1 1/2 cups California walnuts, divided
- 1/4 cup all-purpose flour
- 1/4 cup brown sugar
- 1/2 cup quick-cooking oats
- 1/2 teaspoon ground cinnamon
- 1/2 cup butter, chilled and sliced into pieces
Apple Pear Filling:
- 4 apples, peeled and sliced into 1/4-inch slices
- 3 pears, peeled and sliced into 1/4-inch slices
- 1/2 cup granulated sugar
- 2 tablespoons cornstarch
- 1 teaspoon cinnamon
- 1/8 teaspoon salt
- 1 tablespoon lemon juice
- ice cream (optional)
- caramel sauce (optional)
- Heat oven to 350 F.
- To make walnut crisp topping: In food processor, pulse 1 cup walnuts until finely ground. Set aside in separate bowl. In food processor, pulse remaining 1/2 cup walnuts until chopped. Set aside.
- In medium bowl, combine ground walnuts, flour, brown sugar, oats and cinnamon. Cut butter into mixture until coarse crumb forms.
- To make apple pear filling: In large bowl, toss apples, pears, sugar, cornstarch, cinnamon, salt and lemon juice.
- Pour fruit mixture in bottom of 12-inch cast-iron pan.
- Layer walnut crisp topping mixture over fruit.
- Bake 45 minutes, or until fruit mixture is hot and bubbly and topping is golden brown.
- Top with ice cream and caramel sauce, if desired.

Spiced Pumpkin Carrot Cheesecake Cupcakes
(Culinary.net) Pumpkin is the flavor of the season when fall comes around, especially when used in heartwarming desserts and sweet treats the whole family can enjoy.
This autumn, when your loved ones start searching the kitchen for sweets, you can turn to Spiced Pumpkin Carrot Cheesecake Cupcakes for a tasty handheld way to appease those festive cravings. Combining pumpkin quick bread with a handful of household ingredients, this easy recipe makes it simple to serve up traditional tastes in a matter of minutes.
Plus, with kid-friendly instructions that call for minimal complicated tasks, the whole family can enjoy creating these cupcake masterpieces together as a celebration of moments spent together.
Find more seasonal desserts at Culinary.net.
Watch video to see how to make this recipe!

Spiced Pumpkin Carrot Cheesecake Cupcakes
Serves: 12
- 1 box (14 ounces) pumpkin quick bread, divided
- 1 cup carrots, shredded
- 3 eggs, divided
- 3/4 cup milk
- 1/2 cup golden raisins
- 2 tablespoons canola oil
- 1 package (8 ounces) cream cheese, softened
- 2 tablespoons sugar
- 1 tablespoon lemon juice
- 1 cup pecans, chopped
- 3 tablespoons butter, softened
- Heat oven to 350 F. Line muffin tin with cupcake liners.
- In large bowl, stir 1/2 pumpkin quick bread package, carrots, 1 egg, milk, raisins and oil until blended. Fill each cupcake liner 3/4 full.
- In medium bowl, beat cream cheese, remaining eggs, sugar and lemon juice until smooth. Spoon cream cheese mixture over cupcake batter.
- In medium bowl, use fork to combine remaining bread package mix, pecans and butter until crumbly. Sprinkle evenly over cream cheese in each cup.
- Bake 25 minutes. Cool completely on wire rack.

Celebrate the Flavors of Fall

Use a pantry staple to spice up comfort food classics
(Family Features) As chilly weather sets in and days get shorter, comfort food favorites once again fill menus. While traditional flavor combinations typically hold a special place in many families’ hearts and on their plates, there is almost always room to add new and exciting flavors to tried-and-true favorites.
If you’re craving cheesy scalloped potatoes, savory stuffing or juicy braised meat, an option like California Ripe Olives are an easy addition that can spruce up your go-to dishes. Their mild and unique taste lends itself well to many different flavor pairings such as Prosciutto-Wrapped Stuffed Turkey Breast, Potatoes Au Gratin with Olives and Fennel, and Green Beans with Olive Butter.
California family farms produce 95% of the ripe olives grown in the United States. Multi-generational family farmers work with family-owned canneries to produce each can and ensure only the highest quality olives make it from the farm to your table.
For more creative ways to use olives, including family recipes from growers across California, visit CalOlive.org.
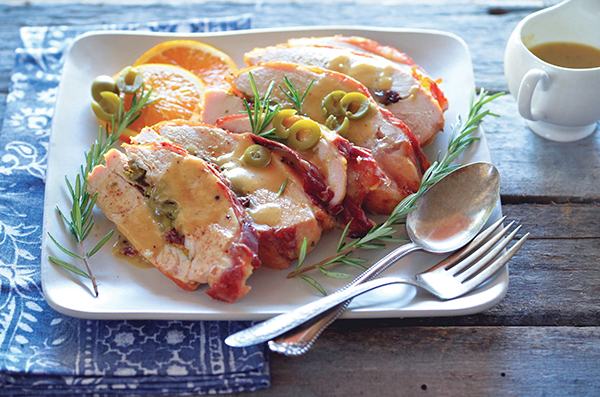
Prosciutto-Wrapped Stuffed Turkey Breast
Recipe courtesy of Karista’s Kitchen
Brine:
- 1/4 cup salt
- 1 teaspoon whole black peppercorns
- 2 bay leaves
- 2 quarts water
- 3 1/2-4 pounds turkey breast
Turkey:
- 2 tablespoons extra-virgin olive oil, divided
- salt, to taste
- pepper, to taste
- 1 tablespoon chopped fresh rosemary
- 1 tablespoon chopped fresh parsley
- 1 tablespoon orange zest
- 4 cloves garlic, minced
- 1/4-1/3 cup dried cranberries
- 3/4 cup sliced California Green Ripe Olives, divided
- 4-5 slices prosciutto
Gravy:
- 2 tablespoons butter
- 1 tablespoon all-purpose flour
- 1-1 ½ cups chicken broth
- salt, to taste
- pepper, to taste
- orange slices, for garnish
- To brine turkey breast: In large, non-reactive bowl, mix salt, peppercorns and bay leaves in water. Place turkey breast in brine and cover with additional water, if needed. Place plastic wrap over bowl and refrigerate at least 8 hours or overnight.
- To cook turkey breast: Heat oven to 375° F.
- Remove turkey breast from brine, rinse and pat dry. On large cutting board with sharp, sturdy knife, slice into thickest portion of turkey and cut lengthwise, but not all the way through.
- Brush inside of turkey breast with 1 tablespoon olive oil then sprinkle with salt and pepper, to taste, rosemary, parsley and orange zest. Spread minced garlic, cranberries and 1/2 cup sliced green olives over bottom half of turkey breast then fold top over bottom.
- Brush outside of turkey breast with remaining olive oil and place prosciutto slices over top of turkey breast. Using three pieces kitchen twine, tie turkey breast on each end and in middle.
- On baking sheet, roast turkey 15 minutes then turn heat down to 350° F and roast 35-45 minutes. Once internal temperature reaches about 155° F, remove from oven and tent foil over top to allow it to continue cooking and stay warm. Let turkey rest about 15 minutes.
- Once turkey is cool enough to handle, remove kitchen twine and slice. Arrange slices on platter.
- To make gravy: Take remaining juice from baking sheet and add to saucepan over medium heat along with butter. Once butter is melted, sprinkle in flour and whisk. While whisking, add 1 cup chicken broth. If it becomes thick, add 1/2 cup chicken broth, or more, as needed. Let gravy cook several minutes, whisking constantly.
- When gravy is done, remove from heat and drizzle over sliced turkey breast. Garnish with remaining green olives and orange slices. Serve warm.

Green Beans with Olive Butter
Recipe courtesy of Culinary Hill
- 1/4 cup (1/2 stick) unsalted butter, softened
- 20 California Black Ripe Olives, chopped
- 2 shallots, chopped
- 2 cloves garlic, chopped
- 4 quarts, plus 1/4 cup, water, divided
- 1 tablespoon salt, plus additional, to taste
- 2 pounds green beans, trimmed
- freshly ground black pepper, to taste
- In food processor, pulse butter, olives, shallots and garlic; set aside.
- In large saucepan or stockpot, bring 4 quarts water and 1 tablespoon salt to boil.
- Add green beans and boil until tender-crisp, but still bright green, about 3-5 minutes. Work in batches, if necessary. Drain well and immediately plunge into bowl of ice water to stop cooking. In large skillet, add remaining water over medium heat. Add blanched beans and toss until heated through.
- Toss beans with olive butter to coat. Season, to taste, with salt and pepper. Transfer to serving platter.

Potatoes Au Gratin with Fennel and Olives
Recipe courtesy of Heather Likes Food
- 1 bulb fennel, washed, stalks removed and cored
- 1/2 yellow onion
- 2 large russet potatoes, washed and peeled
- 1 tablespoon olive oil
- 1 tablespoon salted butter
- 1 cup, plus 2 tablespoons, heavy whipping cream, divided
- 1/2 California Ripe Black Ripe Olives, sliced
- 1/2 teaspoon kosher salt
- 1/8 teaspoon black pepper
- 3/4 cup Gruyere cheese, grated, divided
- 3/4 cup Jarlsberg cheese, grated, divided
- Heat oven to 350° F.
- Using mandoline or handheld slicer, thinly slice fennel, onion and potatoes.
- In medium pan, heat olive oil and butter then saute onion and fennel over medium-low heat 15 minutes, or until tender. Remove from heat.
- In large bowl, combine sliced potatoes with 1 cup cream, olives, salt, pepper and all but 2 tablespoons of each cheese.
- Add cooked fennel and onion to bowl and stir to combine.
- Transfer potato mixture to 8-by-8-inch baking dish or deep pie plate and flatten surface so potatoes are mostly submerged in cream.
- In small bowl, combine remaining cheese with remaining cream. Sprinkle cheese over top of potatoes evenly.
- Bake 45-60 minutes, or until potatoes are tender and top is golden brown and bubbly. If needed, tent with foil to prevent top from becoming too brown.
- Cool at least 15 minutes before serving.
Source: California Olive Committee