
Chicken Sheet Pan Dinner with Grapes, Carrots and Parsnips
(Family Features) Sharing a delicious, home-cooked meal with loved ones is something to look forward to and preparing such a meal can be easier than you think. Simple touches that add some flair make all the difference. For example, adding grapes as a signature ingredient adds a unique color and flavor accent that turns everyday meals into something special.
As a highly versatile addition to appetizers, snacks, main courses, sides and desserts, Grapes from California are an essential ingredient to keep on hand. In this Chicken Sheet Pan Dinner with Grapes, Carrots and Parsnips, the grapes – thanks to their delicate sweetness and juicy texture – enhance the savory chicken and earthy vegetables and bring all the flavors together for a delicious meal.
Visit GrapesfromCalifornia.com to find more sweet recipes fit for family gatherings.
Watch video to see how to make this recipe!

Chicken Sheet Pan Dinner with Grapes, Carrots and Parsnips
Servings: 4
- Nonstick cooking spray (optional)
- 2 tablespoons extra-virgin olive oil
- 2 1/2 teaspoons ground cumin
- 1 1/4 teaspoons turmeric
- 1/2 teaspoon sea salt
- 2 large garlic cloves, minced
- 4 bone-in chicken thighs, skin removed and visible fat trimmed
- 2 medium onions, sliced 1/3-inch thick
- 3 carrots, peeled and cut in 2-by-1/2-inch sticks
- 2 medium parsnips, peeled and cut in 2-by-1/2-inch sticks
- freshly ground pepper, to taste
- 1 1/4 cups red Grapes from California
- Heat oven to 400 F with rack in center. Line shallow baking sheet (10-by-15 inches or 11-by-17 inches) with parchment paper or foil. If using foil, spray with nonstick cooking spray.
- In large bowl, stir oil, cumin, turmeric, salt and garlic. Add chicken, turning to coat, then transfer smooth side up to baking sheet. Add onions, carrots and parsnips to bowl and toss in remaining spiced oil then distribute around chicken on baking sheet. Season with freshly ground pepper, to taste.
- Roast chicken and vegetables 25 minutes. Sprinkle grapes over vegetables and roast about 5 minutes until juices run clear when chicken is pierced with tip of small, sharp knife.
- Note: For softer roasted grapes, add to pan earlier.
- Nutritional information per serving: 410 calories; 31 g protein; 34 g carbohydrates; 17 g fat (37% calories from fat); 3.5 g saturated fat (8% calories from saturated fat); 155 mg cholesterol; 470 mg sodium; 6 g fiber.

Put Sustainability on the Family Menu
(Family Features) Cooking delicious family meals is surely the focus of many home chefs, from quick dishes on busy weeknights to homestyle favorites on the weekend. Equally important, however, is dishing up foods and ingredients you can feel good about serving to your loved ones.
The next time seafood is on the menu, consider the source of your main course. Available fresh, frozen, smoked and canned year-round and nationwide, seafood from Alaska is sustainably harvested, and you can trust it comes from a responsibly managed fishery. Utilizing a science-based approach, the state sustains the long-term vitality of species and their natural habitats, as well as the fishing communities that rely on them.
Fishermen and scientists work together to ensure they only harvest what science tells them the ecosystem can support, so that fish stocks, communities and the marine environment can thrive for generations to come.
Wild, sustainable and harvested in the USA, Alaska seafood is full of flavor and high-quality protein, vitamins, minerals and oils essential to good health, including omega-3s and vitamin D. You can feel good serving your loved ones these Blackened Alaska Cod Tacos as a classic way to spice up your dinner table, or give a sweet heat kick to Spicy Alaska Sablefish in Lettuce Cups with Korean chili paste, miso and honey.
Visit alaskaseafood.org to find more information and family-friendly recipes.
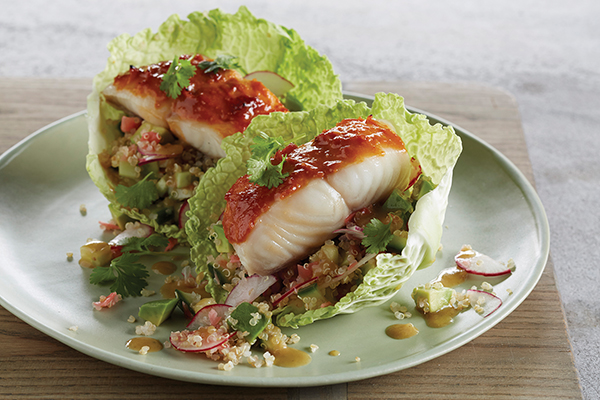
Spicy Alaska Sablefish in Lettuce Cups
Recipe courtesy of the Alaska Seafood Marketing Institute
Prep time: 20 minutes
Cook time: 10 minutes
Servings: 4 (2 lettuce cups each)
- 1/4 cup yellow or white miso
- 1 tablespoon Korean chili paste
- 1 tablespoon honey
- 1 pound Alaska sablefish (black cod), cut into 2-ounce portions
- nonstick cooking spray
- 1 small avocado, pitted, peeled and chopped
- 1-1 1/4 cups cooked sushi rice or quinoa
- 1/2 cup chopped English cucumber
- 1/4 cup thinly sliced halved radish
- 1/2 cup pickled ginger, chopped
- 1/2 cup bottled Asian-style salad dressing with wasabi and ginger
- 8 medium-large butter lettuce leaves
- 1/2 cup cilantro leaves
- Blend miso, chili paste and honey; spread onto Alaska sablefish portions. Place portions on nonstick cooking spray-coated, foil-lined baking sheet. Roast 5-7 minutes, or until fish is opaque throughout and deep golden brown; cool slightly.
- In mixing bowl, combine avocado, rice or quinoa, cucumber, radishes and ginger; pour in dressing. Toss to coat.
- To serve, place about 1/3 cup vegetable-rice mixture in each lettuce leaf. Top with one sablefish portion. Sprinkle each lettuce cup with 1 tablespoon cilantro leaves.
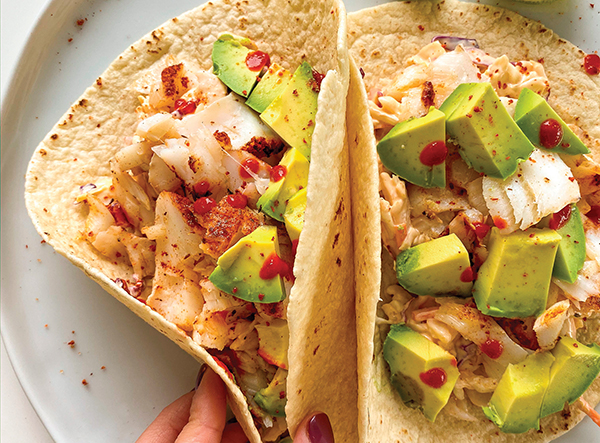
Blackened Alaska Cod Tacos
Recipe courtesy of the Alaska Seafood Marketing Institute and Sari Diskin
Prep time: 10 minutes
Cook time: 10 minutes
Servings: 2-3
- 2 cups slaw mix
- 2 tablespoons mayonnaise
- 1 teaspoon hot sauce, plus additional for serving
- 1 lime, divided
- salt, to taste
- pepper, to taste
- nonstick cooking spray
- 1/2 pound Alaska cod
- olive oil
- blackening seasoning, to taste, plus additional, divided
- sea salt, to taste
- 4 small flour tortillas
- 1 avocado, sliced
- Preheat oven to 400 F.
- In bowl, mix slaw with mayonnaise, hot sauce, juice from 1/2 lime and salt and pepper, to taste; set aside.
- Line baking dish with parchment paper and spray with nonstick cooking spray. Place Alaska cod on top and coat lightly with olive oil. Generously season with blackening seasoning and sea salt, to taste.
- Bake 5 minutes, set oven to broil and broil 3-5 minutes. When fish is done (when it flakes easily with fork and is opaque throughout), remove from oven and break into small chunks with fork.
- In flour tortillas, add avocado and slaw. Top with chunks of cod and drizzle with additional hot sauce, squeeze of lime juice from remaining 1/2 lime and additional blackening seasoning.
Photo courtesy of Sari Diskin (Blackened Alaska Cod Tacos)

Cheesy Baked Cod
(Culinary.net) During the spring months, fish can be a popular food for at-home meals. It’s a perfect nutritious option during Lent, and it’s flaky and delicious for seafood lovers and families of all kinds throughout the year.
This Cheesy Basil Cod has a light crust and a glistening center, which creates a delicious bite of texture. Serve it with rice and vegetables to complete a better-for-you dinner that’s packed with nutrients as well as flavor.
This recipe, rich with cheese and seafood delight, serves four but is easy to double for a larger crowd. It requires just a few kitchen utensils and bakes for less than 15 minutes for a quick meal that’s easy to clean up.
For more seafood recipes, visit Culinary.net.
Watch video to see how to make this recipe!
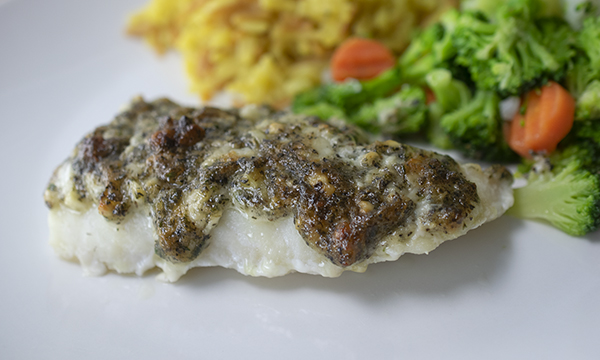
Cheesy Baked Cod
Recipe adapted from Laurenslatest.com
Servings: 4
- 3 cod fillets (12 ounces each)
- 1/2 cup mayonnaise
- 1/2 cup freshly grated Parmigiano Reggiano cheese
- 1 tablespoon parsley flakes
- 2 tablespoons basil leaves
- 2 cloves garlic, minced
- 1/4 teaspoon salt
- 1/4 teaspoon pepper
- rice, for serving (optional)
- steamed vegetables, for serving (optional)
- Preheat oven to 450 F.
- Line baking sheet with parchment paper. Place fish fillets on baking sheet and set aside.
- In small bowl, stir mayonnaise with cheese, parsley, basil, garlic, salt and pepper. Spread evenly over fillets. Bake 10-12 minutes, or until fish starts looking flaky.
- Switch oven to broil and brown tops of fish until lightly golden. Remove from oven; cool 3-5 minutes.
- Serve with rice and fresh steamed vegetables, if desired.
Source: Culinary.net

Sheet Pan Mushroom Fajitas
(Family Features) Between the time it takes to plan healthy meals and the actual minutes spent in the kitchen, it can be easy for some families to let nutrition fall by the wayside. However, all it takes is a little twist on your loved ones’ favorite meals to free up those valuable moments while taking health into account.
These Sheet Pan Mushroom Fajitas, for example, offer a meatless version of an ethnic meal many families love. Gather fresh onions and bell peppers to mix with earthy, wholesome mushrooms as the heart of this plant-forward dish. Slice, season with taco seasoning, toss with vegetable oil and bake for less than half an hour for a family dinner that’s as simple as it is flavorful. Plus, you can garnish the fajitas with any combination of avocado and lime to salsa or hot sauce for a perfectly customizable taste.
Find more ways to add mushrooms to the menu at mushroomcouncil.com.
Watch video to see how to make this recipe!
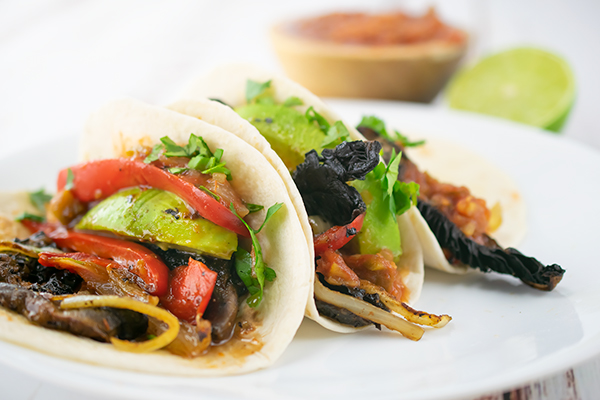
Sheet Pan Mushroom Fajitas
Total time: 30 minutes
Yield: 6 fajitas
- 2 large portobello mushroom caps, sliced into 1/4-inch strips
- 2 medium yellow onions, sliced into 1/4-inch strips
- 2 large red bell peppers, sliced into 1/4-inch strips
- 2 tablespoons vegetable oil
- 2 1/4 teaspoons taco seasoning
- 6 flour tortillas (6 inches), warmed
- 1/4 cup roughly chopped cilantro
- avocado (optional)
- salsa (optional)
- hot sauce (optional)
- lime (optional)
- Preheat oven to 400 F. Line large 18-by-13-inch baking sheet with parchment paper. Set aside.
- In large bowl, toss mushrooms, onions and peppers with oil and taco seasoning. Distribute on baking sheet. Roast 25 minutes, tossing halfway through, until veggies are fork tender and edges are slightly browned.
- Serve with warmed tortillas and garnish with cilantro. Top with avocado, salsa, hot sauce or lime, if desired.
Source: Mushroom Council

Celebrate Cinco de Mayo
(Family Features) This Cinco de Mayo, make sure you're prepared to celebrate the Mexican victory over the French at the Battle of Puebla on May 5, 1862. Gather your family on this festive day to enjoy music, dancing and, of course, great Mexican food.
As you're getting ready for this year's fiesta, keep Mama Ortega in mind. Maria Conception Jacinta Dominguez Ortega, otherwise known as Mama Ortega, raised a family of 13 children with homemade Mexican meals every night. One hundred fifty years later her traditions still live on with great Mexican foods from Ortega.
Make some of your own family traditions with great recipes such as Pasta and Grilled Vegetable Salad with Cilantro Dressing, Taco Casserole or, perhaps, a Frozen Margarita Pie. From tasty whole kernel corn taco shells and delicious salsas to authentic taco sauces and diced green chiles, Ortega offers a wide variety of Mexican food products to meet all of your family's needs.
To get some new ideas on Cinco de Mayo recipes and valuable coupons, visit www.ortega.com.

Taco Casserole
Prep Time: 10 minutes
Start to Finish: 30 minutes
Makes: 8 servings
- 1 pound lean ground beef
- 1/2 cup chopped onion
- 1 bottle (8 ounces) Ortega Taco Sauce
- 3/4 cup water
- 1 can (4 ounces) Ortega Fire-Roasted Diced Green Chiles
- 1 packet (1.25 ounces) Ortega 40% Less Sodium Taco Seasoning Mix
- 1 package (12-count) Ortega Whole Grain Corn Taco Shells, broken, divided
- 2 cups (8 ounces) shredded cheddar cheese, divided
- Chopped tomatoes, chopped green bell pepper, sour cream
- Preheat oven to 375°F. Grease 11 x 7-inch baking dish.
- Cook beef and onion in large skillet over medium heat, stirring occasionally, until beef is browned. Drain and discard excess fat.
- Stir in taco sauce, water, chiles and seasoning mix; bring to a boil. Reduce heat to low. Cook 3 to 4 minutes, stirring occasionally.
- Layer half of broken taco shells on bottom of prepared baking dish. Cover with half of meat mixture; sprinkle with 1 cup cheese.
Repeat layers with remaining ingredients. - Bake 20 to 25 minutes or until bubbly and cheese is melted. Serve with desired toppings.
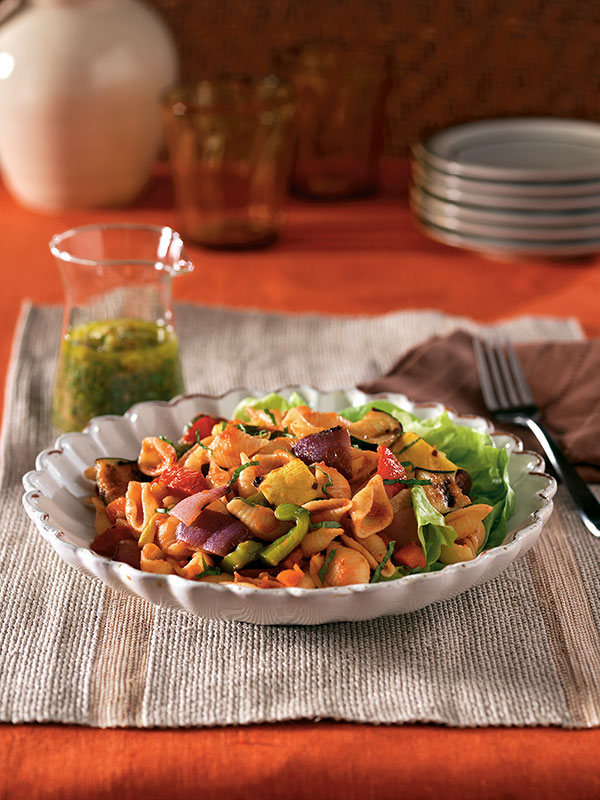
Pasta and Grilled Vegetable Salad with Cilantro Dressing
Prep Time: 15 minutes
Start to Finish: 30 minutes
Makes: 6 to 8 servings
Dressing
- 1 can (4 ounces) Ortega Fire-Roasted Diced Green Chiles
- 1/4 cup chopped fresh cilantro
- 1/4 cup olive oil
- 1 tablespoon Regina red wine vinegar
- 1/2 teaspoon Polaner minced garlic
- Salt and black pepper, to taste
Salad
- 1 red bell pepper, cored, seeded, cut in half
- 1 green bell pepper, cored, seeded, cut in half
- 1 medium zucchini, cut lengthwise into thin slices
- 1 medium yellow squash, cut lengthwise into thin slices
- 1 large red onion, cut into 1/2-inch-thick wedges
- 1 pound pasta shells or penne, cooked
- 1 jar (16 ounces) salsa
- 1/4 cup firmly packed fresh basil, cut into thin strips
- Lettuce leaves (optional)
- Combine chiles, cilantro, oil, vinegar and garlic in small bowl. Whisk until well blended. Season with salt and pepper, to taste. Set aside.
- Preheat grill to medium-high heat, about 15 minutes. Lightly brush grill grid with vegetable oil.
- Grill bell peppers, zucchini, squash and onion 3 to 5 minutes per side or until fork-tender. Remove vegetables from grill: cut into bite-size pieces.
- Toss cooked pasta, salsa, sliced vegetables and basil in large bowl or serving platter. Serve with dressing on lettuce leaves, if desired.
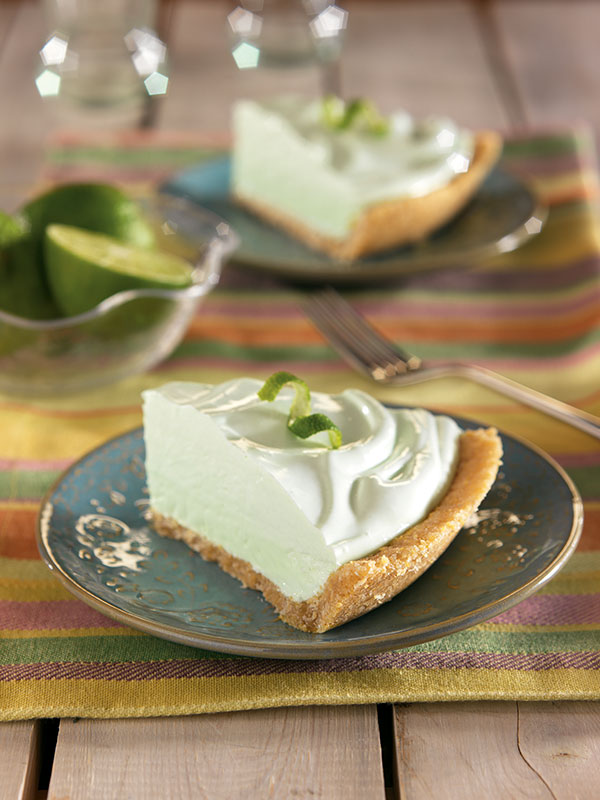
Frozen Margarita Pie
Prep Time: 15 minutes
Start to Finish: 4 hours
Makes: 8 servings
Crust
- 10 Ortega Yellow Corn Taco Shells
- 1/2 cup (1 stick) butter
- 1/2 cup granulated sugar
Filling
- 1 can (14 ounces) sweetened condensed milk
- 1/3 cup frozen limeade, thawed
- 2 tablespoons orange juice
- 1 drop green food coloring
- 1 cup whipping cream
- Lime curls (optional)
- Place taco shells in food processor and pulse until evenly ground.
- Melt butter in medium saucepan over low heat. Remove from heat. Stir in taco crumbs and sugar until well blended. Press firmly over bottom and up sides of 9-inch pie plate.
- Place in freezer until firm.
- Combine sweetened condensed milk, limeade, orange juice and food coloring in large mixing bowl.
- Whip cream until soft peaks form. Fold whipped cream gently into condensed milk mixture until blended. Pour onto prepared crust.
- Freeze uncovered, 4 hours or until firm. Let stand 10 minutes before serving. Garnish with lime curls, if desired.
Tip: To crush taco shells without a food processor, place them in a resealable plastic food storage bag and run a rolling pin over the shells until they're evenly crushed.
Source: Ortega

Celebrate Cinco de Mayo
(Family Features) Cinco de Mayo is a fun and festive holiday that's celebrated with music, dancing, family and delicious food. To bring great Mexican flavors to your fiesta, take a lesson from Maria Conception Jacinta Dominguez Ortega - also known as Mama Ortega.
In the 1800s, Mama Ortega created a loving home for her 13 children, and it centered around a tiny kitchen. From her small charcoal-burning stove, Mama created memorable meals her family loved. Everything for each meal was homegrown, handpicked and homemade.
You may not be able to grow your own ingredients, but you can take advantage of the way Mama did things - through authentic ingredients such as the line of Ortega Mexican Foods products. Fire-roasted chiles, authentic taco seasonings, crisp taco shells made with whole kernel corn and America's number one taco sauce are just a few of the ways that Ortega brings authentic Mexican flavor and fun to your family's dinner table.
For more delicious Mexican recipes to enjoy on Cinco de Mayo - or any day - visit www.ortega.com.

Slow-Cooked Shredded Beef Tacos
Prep Time: 12 minutes
Start to Finish: 6 hours
Makes: 6 to 8 servings
- 1 1/2 pounds beef chuck roast
- 1 medium onion, sliced
- 1 cup water
- 1 Ortega Grande Taco Dinner Kit
- 1 can (4 ounces) Ortega Diced Green Chiles
- Optional toppings: shredded lettuce, chopped tomato, shredded mild cheddar cheese, sour cream
- Place beef and onion in 4-quart slow cooker. Combine water and seasoning mix from kit in small bowl. Pour over beef and onion. Cover and cook on LOW 6 to 8 hours or until fork tender.
- Transfer beef to cutting board; shred beef with two forks. Place in large bowl. Stir in taco sauce from kit and chilies.
- Fill warmed taco shells and tortillas from kit with beef mixture. Top with cheese sauce from kit. Garnish with desired toppings.
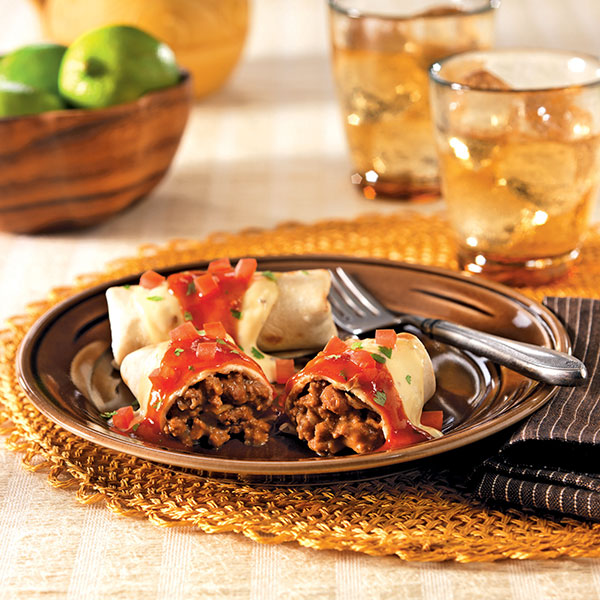
Smothered Beef and Bean Burritos
Prep Time: 10 minutes
Start to Finish: 40 minutes
Makes: 10 burritos
- 1 can (10.75 ounces) condensed cream of mushroom soup
- 1 can (10 ounces) condensed cheddar cheese soup
- 1/2 cup sour cream
- 1 tablespoon olive oil
- 1 pound lean ground beef
- 1 onion, diced
- 3/4 cup water
- 1 Ortega Soft Taco Kit
- 1 cup Ortega Refried Beans
- 2 tablespoons chopped fresh cilantro
- 1/4 cup diced tomato
- Preheat oven to 350°F. Lightly coat 13 x 9-inch baking dish with nonstick cooking spray. Combine soups and sour cream in small bowl; set aside.
- Heat oil in skillet over medium-high heat. Add beef and onion. Cook and stir 5 minutes or until beef is no longer pink. Drain and discard fat. Add water and seasoning mix from kit. Cook and stir 3 minutes. Stir in refried beans.
- Wrap tortillas from kit with clean, lightly moistened cloth or paper towels. Microwave on HIGH (100% power) 1 minute, until hot and pliable.
- Divide beef mixture evenly among tortillas. Fold ends of tortilla to middle, then roll tightly around mixture. Place in baking dish, seam side down. Repeat with remaining tortillas.
- Spread soup mixture evenly over tortillas. Bake 22 to 25 minutes or until heated through. Garnish with taco sauce from kit, cilantro and tomatoes.
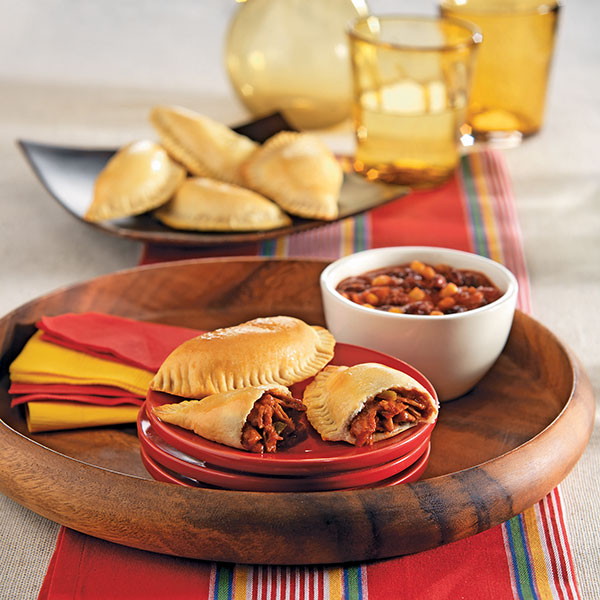
Easy Empanadas
Prep Time: 10 minutes
Start to Finish: 25 minutes
Makes: 12 empanadas
- 1 cup prepared refrigerated barbecue shredded pork
- 2 tablespoons Ortega Taco Sauce, any variety
- 1 tablespoon Ortega Fire-Roasted Diced Green Chilies
- 1 can (12-count) refrigerated biscuits
- 1 egg, well beaten
- 1 cup black bean and corn salsa
- Preheat oven to 375°F. Mix pork, taco sauce and chilies in small bowl.
- Separate biscuits into 12 pieces. Flatten each biscuit into 6-inch round, using rolling pin. Divide filling evenly among biscuits, spreading over half of each round to within 1/4 inch of edge. Fold dough over filling; press edges with fork to seal well. Place on ungreased cookie sheet. Brush tops with beaten egg.
- Bake 12 to 15 minutes or until edges are golden brown. Immediately remove from cookie sheet. Serve warm with salsa for dipping.
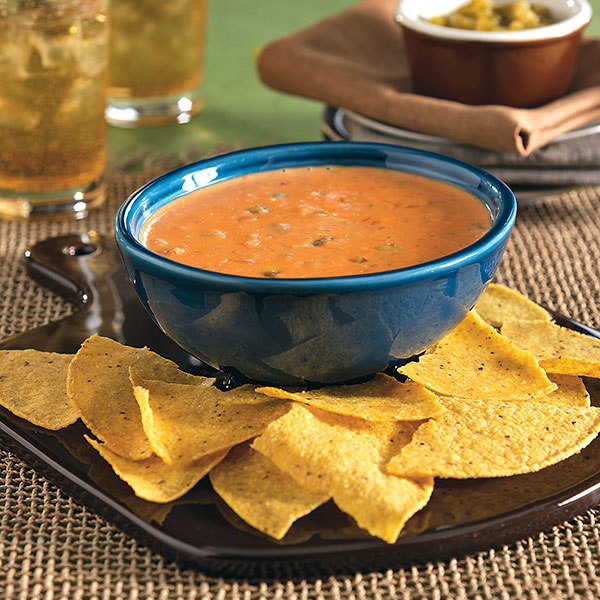
Chili Con Queso Dip
Prep Time: 3 minutes
Start to Finish: 15 minutes
Makes about 3 cups
- 1 package (16 ounces) pasteurized processed cheese spread, cut into chunks
- 1 cup Ortega Thick and Chunky Mild Salsa
- 1 can (4 ounces) Ortega Fire-Roasted Diced Green Chiles
- 1 package (10 count) Ortega Tostada Shells or 1 package (12-count)
- Ortega Taco Shells, broken into pieces
- Additional Ortega Fire-Roasted Diced Green Chiles (optional)
- Chopped tomatoes (optional)
- Combine cheese, salsa and chilies in small saucepan. Cook and stir over low heat until fully melted and blended.
- Serve warm with tostada or taco shells. Garnish with additional chilies and tomatoes, if desired.

Chocolate Chile Brownies With Spiced Frosting
Prep Time: 10 minutes
Start to Finish: 1 hour
Makes: 9 servings
Brownies
- 1 package (18 to 19 ounces) brownie mix, plus ingredients to prepare mix
- 1 can (4 ounces) Ortega Diced Green Chiles, undrained
Frosting
- 1 cup powered sugar
- 1 tablespoon Ortega Chili Seasoning Mix
- 1 1/2 to 2 tablespoons milk
- Preheat oven to 350°F. Line 8-inch square baking pan with aluminum foil, extending foil over sides of pan; lightly coat with nonstick cooking spray.
- Prepare brownies according to package directions. Stir in chilies; mix until well blended. Pour into prepared baking pan. Bake 25 to 30 minutes, or use time recommended on package. Cool on wire rack. Using foil "handles," remove from pan.
- Blend powdered sugar and seasoning mix in small bowl. Stir in milk, adding more if necessary, until desired consistency. Spread on brownies. Slice and serve.
Source: Ortega

A Fiesta of Flavor!
(Family Features) This Cinco de Mayo, gather the whole family together and enjoy a true Mexican fiesta like Mama Ortega would have thrown over 100 years ago. With mariachi music, dancing, piñatas and traditional homemade Mexican meals, Mama's fiestas were always a favorite with family, friends and especially her 13 children!
The flavors and smells of Mama's homemade meals still taste great today, but are easier to create - and more fun to eat! Her legendary meals inspired today's convenient and great tasting Ortega Mexican products. Achieve authentic fiesta flavors by using crisp and crunchy Ortega taco shells made with whole kernel corn, topped with slow simmered Ortega Taco Sauce and authentic fire-roasted green chiles. Ortega's zesty Mexican seasonings and fresh-tasting salsas are perfect for adding flavor to your favorite snack, casserole, dip or soup!
So, gather the family together and enjoy a fiesta of flavors with Ortega. For other great recipe ideas or to learn more about Ortega's line of products, visit www.ortega.com.

Taco Rice and Beans
Prep time: 5 minutes
Start to finish: 15 minutes
Serves 4
- 2 tablespoons olive oil
- 1 medium onion, diced
- 1 package (1.25 ounces) Ortega Taco Seasoning Mix
- 1 cup water
- 1 can (15 ounces) black beans, drained
- 2 cups cooked rice
- 1/4 cup Ortega Thick & Chunky Salsa
- In skillet, heat oil over medium heat. Add onion; cook 3 minutes. Add taco seasoning mix and water. Stir until combined and slightly thickened. Add beans, rice and salsa; stir. Cook 5 minutes more or until contents are heated through.
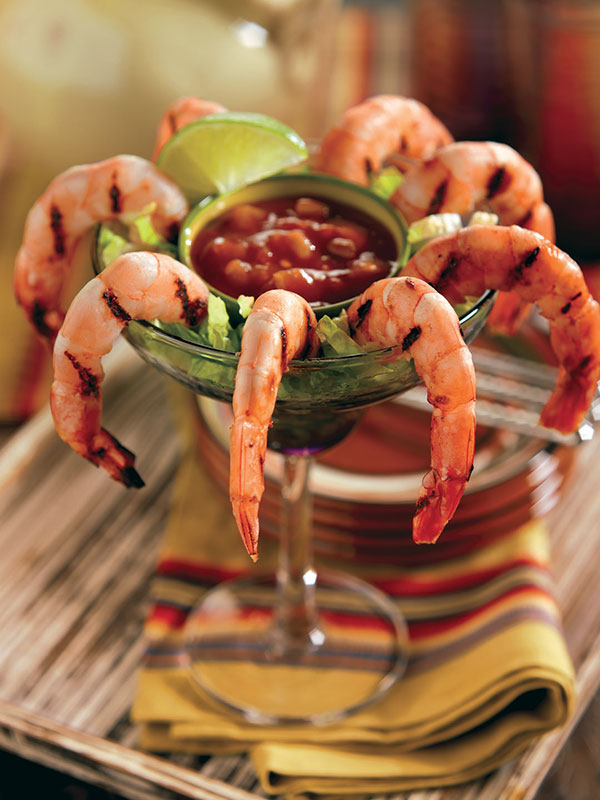
Grilled Margarita Shrimp
Prep time: 40 minutes
Start to finish: 50 minutes
Serves 6
- 1 cup margarita mix
- 1 cup Ortega Taco Sauce, divided
- 2 pounds raw shrimp (21 to 30), peeled and deveined
- 3 tablespoons Ortega Diced Green Chiles
- In large bowl, pour margarita mix and 1/2 cup taco sauce over shrimp and toss well. Marinate in refrigerator 30 minutes or up to 2 hours.
- Preheat grill until sizzling hot, about 15 minutes. Grill shrimp 4 minutes on each side or until pink.
- Combine remaining 1/2 cup taco sauce with green chiles to use as dipping sauce.
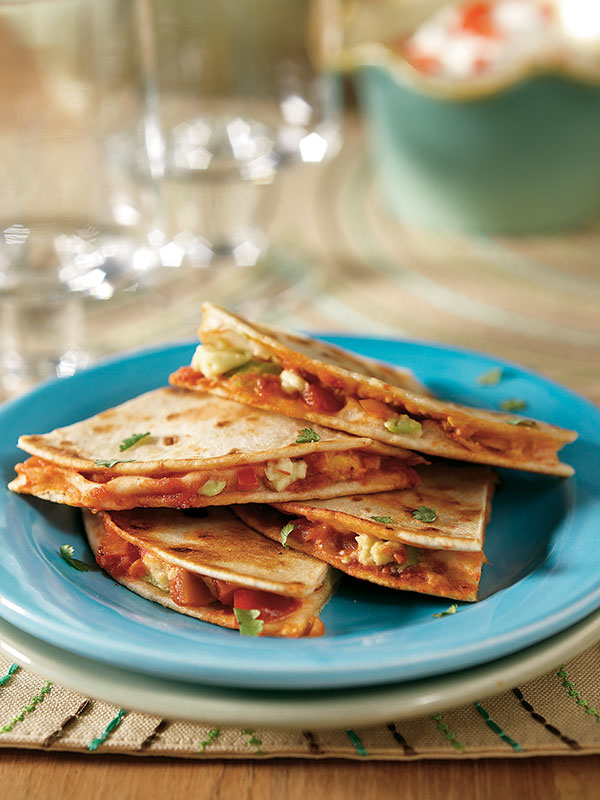
Ham and Cheese Quesadillas
Prep time: 10 minutes
Start to finish: 20 minutes
Serves 5
- 1/2 pound cooked ham, diced
- 3/4 cup cream cheese, softened
- Zest of one lime
- 2 green onions, white and green parts, diced
- 1 Ortega Soft Taco Kit - includes 10 soft tortillas, 1 package (1.25 ounces) taco seasoning mix and 1 package (3 ounces) taco sauce
- Cooking spray
- 1 tomato, diced
- 1/4 cup cilantro, chopped
- 1/2 cup sour cream
- In mixing bowl, combine diced ham, cream cheese, lime zest, green onions and half of taco seasoning packet contained in soft taco kit. Heat large skillet on medium and spray with cooking spray.
- Spread about 1 teaspoon taco sauce onto a flour tortilla and then spread about 1/4 cup ham/cream cheese mixture on top.
- Place tortilla-side down onto hot skillet and top with another flour tortilla. Heat about 4 minutes, until bottom of tortilla is browned; spray top of the other tortilla and flip. Cook another 4 minutes and repeat with remaining quesadillas. Cook two at a time if skillet is large enough.
- Cut into wedges and top with tomato, cilantro and sour cream and serve.
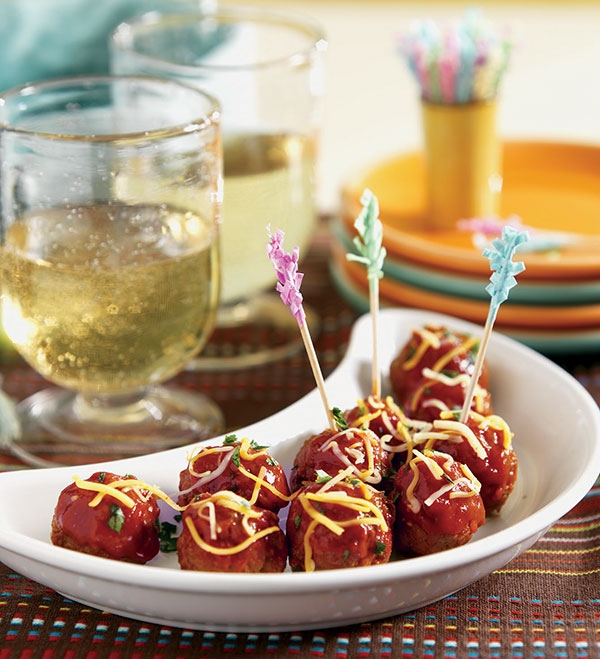
Mexican Meatballs
Prep time: 15 minutes
Start to finish: 30 minutes
Makes about 30 meatballs
- 3 Ortega Yellow Corn Taco Shells
- 1 pound (16 ounces) lean ground beef
- 1 teaspoon Ortega Chili Seasoning Mix
- 1 egg
- 2 teaspoons Ortega Diced Green Chiles
- 1 bottle (8 ounces) Ortega Taco Sauce
- 1/4 cup shredded cheddar cheese
- Cilantro, finely chopped (optional)
- Break taco shells into food processor and pulse several times to create about 1/2 cup taco shell crumbs. Place into large mixing bowl and add ground beef, seasoning mix, egg and green chiles. Mix thoroughly.
- Form mixture into 30 (1-inch) meatballs and drop into hot skillet. Cook until they begin to brown. Carefully turn over and continue browning. Add taco sauce. Coat meatballs with sauce and simmer over low heat, uncovered, 10 minutes.
- Sprinkle meatballs with cheese and garnish with cilantro, if desired. Serve with toothpicks.
Photos copyright (c) 2008 Publications International, Ltd. Used by permission.
Source: Ortega

A Savory Springtime Brunch
(Family Features) Warm breezes, blooming flowers, pretty pastels - when spring is in the air, there's plenty of reason to celebrate. It's the perfect time to bring family and friends together for a welcoming brunch.
When planning your menu, be sure to have plenty of savory dishes on hand to satisfy your guests. And rest easy, you don't have to spend hours in the kitchen to prepare your feast. Using ingredients already full of flavor, such as Johnsonville Breakfast Sausage, lets you create memorable brunch dishes without a lot of work.
These recipes are simple yet satisfying - and leave you plenty of time to enjoy the company gathered around your table.
For more savory brunch recipes, visit www.johnsonville.com.

Amazing Muffin Cups
Prep Time: 20 minutes
Cook Time: 25 minutes
Yield: 12 servings
- 3 cups refrigerated shredded hash browns
- 3 tablespoons melted butter
- 1/8 teaspoon salt
- 1/8 teaspoon pepper
- 12 links Johnsonville Original
- Breakfast Sausage
- 6 eggs
- 2 cups (8 ounces) shredded 4-cheese
- Mexican blend cheese
- 1/4 cup chopped red bell pepper
- Chopped fresh chives or green onions, for garnish
- Place 12 paper liners in a muffin pan; spray liners with cooking spray.
- In bowl, combine hash browns, butter, salt and pepper. Press hash brown mixture into the bottom and up the sides of the muffin cups.
Bake at 400°F for 12 minutes or until lightly browned. - Meanwhile, cook sausage according to package directions; cut into 1/2-inch pieces. Divide sausage between muffin cups.
- Combine eggs, cheese and bell pepper. Pour over sausage. Sprinkle with chives. Bake for 13 to 15 minutes or until set.
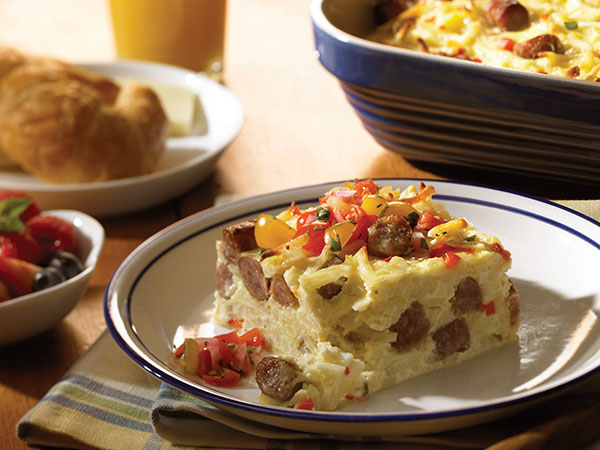
Sunrise Breakfast Casserole
Prep Time: 30 minutes
Bake Time: 70 minutes
Yield: 12 to 15 servings
- 2 packages (12 ounces each) Johnsonville Breakfast Sausage Links
- 9 eggs
- 3 cups milk
- 1 1/2 teaspoons ground mustard
- 1 teaspoon salt
- 1/2 teaspoon pepper
- 2 packages (20 ounces each) refrigerated shredded hash browns
- 2 cups (8 ounces) shredded cheddar cheese
- 1/2 cup diced sweet red pepper
- 1/3 cup thinly sliced green onions
- 2 cups salsa or picante sauce, optional
- Place sausage on a 15 x 10 x 1-inch baking pan. Bake at 375°F for 15 to 20 minutes or until sausage is no longer pink, turning once; drain and slice into 1/4-inch coins.
- In large bowl, combine eggs, milk, mustard, salt and pepper. Add hash browns, sausage, cheese, sweet red pepper and green onions; mix well. Pour into a greased 13 x 9 x 2-inch baking dish. Cover and refrigerate overnight.
- Remove from the refrigerator 30 minutes before baking. Bake, uncovered, at 350°F for 65 to 70 minutes or until set and golden brown.
Let stand 10 minutes before serving. - Serve with salsa or picante sauce if desired.
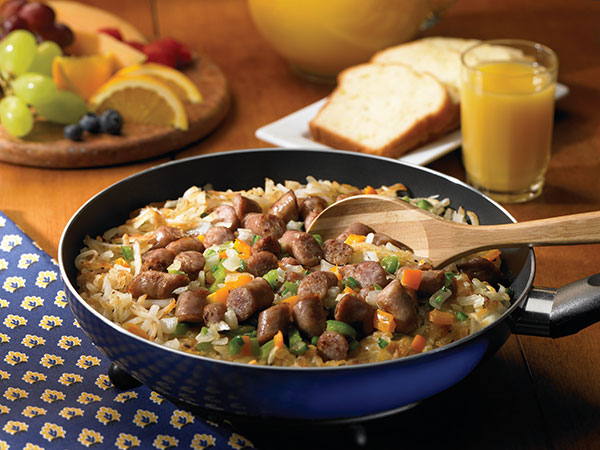
Blue Ribbon Skillet
Prep Time: 15 minutes
Cook Time: 15 minutes
Yield: 3 servings
- 7 links Johnsonville Original Breakfast Sausage
- 3 tablespoons canola oil
- 4 cups refrigerated shredded hash browns
- 1/4 cup chopped onion
- 1/4 cup chopped green pepper
- 1/4 cup chopped orange bell pepper
- 1 jalapeño pepper, seeded and chopped
- 1/8 teaspoon salt
- 1/8 teaspoon pepper
- 1 cup (4 ounces) shredded 4-cheese Mexican blend cheese
- In large skillet, cook sausage per package directions. Cut links into 1-inch pieces and set aside.
- In the same skillet, heat oil over medium-high heat. Add hash browns, onion, green and orange peppers, jalapeños, salt and pepper. Cook for about 10 minutes until hash browns are lightly browned and tender, turning occasionally.
- Return sausage to skillet and sprinkle with cheese. Cover skillet for 2 minutes until cheese is melted.
Option: This recipe can be doubled to make a "2-Skillet Breakfast." Cook sausage in one skillet and hash browns, onion and peppers in another skillet.

Easy Sausage Roll-Ups
Prep Time: 15 minutes
Cook Time: 15 minutes
Yield: 16 roll-ups
- 1 package (12 ounces) Johnsonville Breakfast Sausage Links
- 2 containers refrigerated crescent rolls (16 rolls total)
- 1/2 teaspoon cinnamon
- 2 tablespoons sugar
- Prepare sausage according to package directions. Drain and set aside.
- Unroll crescent roll dough according to directions on package. Place one cooked sausage onto one end of a dough triangle. Roll dough around sausage according to directions on dough package and place on jelly-roll pan with the seam side down. Repeat with remaining sausage and dough. (You will have 2 extra rolls. Bake and enjoy with jam.)
- Mix cinnamon and sugar together and sprinkle evenly over roll-ups. Bake according to directions on dough package. Serve hot.
Suggestion: Serve with warm maple syrup, honey or your favorite preserves for dipping.
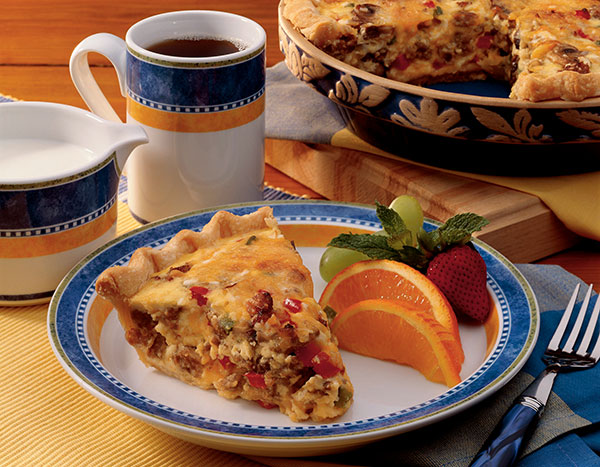
Sausage Mushroom Quiche
Yield: 8 servings
- 1 package (12 ounces) Johnsonville Original Breakfast Sausage Patties
- 1 1/2 cups sliced fresh mushrooms
- 1/4 cup chopped onion
- 1/4 cup chopped sweet red pepper
- 1/4 cup chopped green pepper
- 1 package (3 ounces) cream cheese, softened
- 4 eggs
- 1/3 cup half-and-half cream
- 1 cup (4 ounces) shredded Monterey Jack cheese
- 1 cup (4 ounces) shredded cheddar cheese
- 1/4 teaspoon salt
- 1/4 teaspoon pepper
- Dash ground nutmeg
- 1 pastry shell (9 inches), baked
- In skillet, cook sausage over medium-high heat for 3 minutes, chopping into small pieces. Add mushrooms, onion and peppers. Cook and stir 5 minutes longer or until sausage is no longer pink and the vegetables are tender; drain well and set aside.
- In mixing bowl, beat cream cheese until smooth. Gradually beat in eggs and cream.
- Stir in cheeses, salt, pepper, nutmeg and sausage mixture. Pour into baked pastry shell. Bake, uncovered, at 350°F for 40 to 45 minutes or until a knife inserted near center comes out clean. If necessary, cover edges of crust with foil to prevent over-browning. Let stand 10 minutes before serving.
Source: Johnsonville

Simple Seafood Solutions for Lent
(Family Features) With people across the country observing Lent, a religious tradition observed during the 40 days before Easter, it’s time to rethink the standard family meal menu.
This nearly eight-week period typically calls for a special diet. Specifically, red meat is cut out on Fridays for some and for the entirety of Lent for others. According to Datassential, 26 percent of consumers observe lent and of those, 41 percent said they eat fish on Fridays instead of meat.
Eating two servings of seafood per week – as recommended by the Dietary Guidelines for Americans – is one way to make a positive commitment to you and your family’s health during Lent and throughout the year. According to a study in the Journal of the American Medical Association, research shows eating seafood 2-3 times per week reduces the risk of death from any health-related cause. Seafood also provides unique health benefits as a lean protein and is a quality source for omega-3 fatty acids, which are healthy fats essential to human health and development.
With so many seafood options available, including Alaskan cod, snapper, salmon and more, it can be easy to incorporate this nutritious lean protein into your diet.
This simple recipe for Blackened Catfish with Quinoa and Citrus Vinaigrette can help you on your way to a more nutritious meal plan that includes consuming seafood twice per week. If you can’t find catfish or prefer to substitute, any white fish such as cod, mahimahi or flounder will work.
For more seafood recipes and Lenten meal inspiration, visit seafoodnutrition.org or follow #Seafood2xWk on social media.
Blackened Catfish with Quinoa and Citrus Vinaigrette
Recipe courtesy of chef Tim Hughes on behalf of the Seafood Nutrition Partnership
Servings: 4
Blackening Seasoning:
- 1 tablespoon salt
- 1 tablespoon pepper
- 1 tablespoon cayenne pepper
- 1 tablespoon garlic powder
- 1 tablespoon thyme
Quinoa Salad:
- 1 tablespoon peanut oil
- 1 cup corn, canned and drained or frozen and thawed to room temperature
- salt, to taste
- pepper, to taste
- 1/2 cup edamame, shelled and thawed to room temperature
- 3 cups quinoa, cooked
Blackened Catfish:
- 1 tablespoon peanut oil
- 1 pound catfish, cut into four fillets
- 5 tablespoons Blackening Seasoning
Citrus Vinaigrette:
- 2 tablespoons lemon juice
- 1 teaspoon lemon zest
- 1 tablespoon honey
- 1/2 teaspoon thyme
- 2 tablespoons olive oil
- To make Blackening Seasoning: Combine salt, pepper, cayenne pepper, garlic powder and thyme.
- To make Quinoa Salad: Heat and oil skillet. Add corn; salt and pepper, to taste, and saute until golden brown. Add edamame and sauteed corn to quinoa and set aside.
- To make Blackened Catfish: Heat cast-iron skillet to medium-high heat with 1 tablespoon peanut oil added. Coat both sides of catfish fillets with Blackening Seasoning. Add catfish to skillet and cook 5-6 minutes per side, or until well done.
- To make Citrus Vinaigrette: Whisk together lemon juice, lemon zest, honey and thyme. Slowly add olive oil, whisking until dressing is formed.
- Serve Blackened Catfish on top of Quinoa Salad and drizzle with Citrus Vinaigrette.
Photo courtesy of Getty Images
Source: Seafood Nutrition Partnership

Easy Tuna Casserole
(Culinary.net) From work to homework, weekdays can often be extremely busy and sometimes stressful for many families, especially if you have little ones running around. If family means everything to you but time spent with those loved ones feels slim with the chaos of the modern-day world, one easy fix is to simplify your dinner routine.
Sometimes a family dinner is not the first thing on your mind, but you can bring everyone together with something quick and effortless when you’re in pinched for time. It’s a one-pot meal, and less mess means more time to focus on your daily tasks at hand.
With this Easy Tuna Casserole, you can call everyone to the table with a classic and simple meal that is sure to have everyone asking for a second helping. It features soft, perfectly cooked noodles, cheese and veggies, plus a hint of seafood.
This recipe needs only a handful of ingredients and requires just a few steps to make a full meal for your hungry family in a few moments.
Start by boiling the vegetables and noodles together in one pot then add dairy products, mix in your protein (a flavorful, hearty tuna) and top with crackers for some crunch. It has texture, vegetables to provide nutrients for growing kids and meets pretty much every mark for family dinner time.
Kids typically love the cheesy flavor and crunch provided by the cracker topping. Plus, it’s a great way to get them to try foods they normally wouldn’t eat, like tuna.
It’s a classic, easy meal that can leave you wishing that making dinner was that simple every night. Cook this delicious meal and get it on the table so you can enjoy what matters most: the ones you love.
Find more recipes and family meals at Culinary.net.
Watch video to see how to make this recipe!

Easy Tuna Casserole
- 6 cups boiling water
- 3 cups uncooked macaroni
- 1 cup frozen vegetables (corn, carrots and peas)
- 4 TBS butter
- 1/2 cup milk
- 1 cheese powder packet
- 1 can of tuna in water (drained)
- 8 - 10 buttery crackers rounds (crushed)
- Boil water in sauce pan, then add in macaroni. Stirring ocassionaly. Boiling 8-10 minutes.
- Add frozen vegetables 2 minutes before the end of boil time.
- Drain and return to sauce pan.
- Add in butter, milk and cheese. Stir until mixed.
- Pour into casserole dish.
- Add tuna and stir into macaroni mixture.
- Sprinkle crushed buttery crackers over macaroni mixture.
- Serve immediately.