
Ghostly Graveyard Cake
(Family Features) For a frighteningly fun time in the kitchen this Halloween, gather your family around the cauldron to create a sweet, spooky dessert. Tricks and treats may provide thrills, but a homemade concoction can be the star of your hauntingly happy evening.
This Ghostly Graveyard Cake takes imagination and creativity from everyone with tombstones, skulls and spooky icing daring all to try a bite. With looks this chilling, it’s a perfect treat to enjoy while watching everyone’s favorite scary movie.
Find more deliciously devious desserts at Culinary.net.
Watch video to see how to make this recipe!

Ghostly Graveyard Cake
- 1 box chocolate cake mix
- 10 chocolate creme cookies
- 1 cup black melting chips
- 1 cup red melting chips
- 1 cup heavy whipping cream
- 3 cans buttercream icing
- 1 purple food coloring
- 1 black food coloring
- skull sprinkles
- tombstones and bones candies
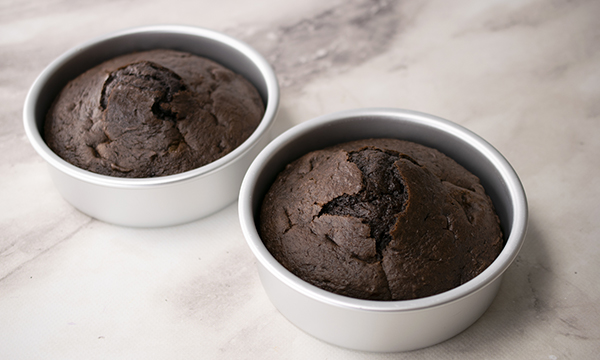
1. Prepare cake mix according to package instructions in three 6-inch baking pans. Once baked, allow to completely cool outside of pans.
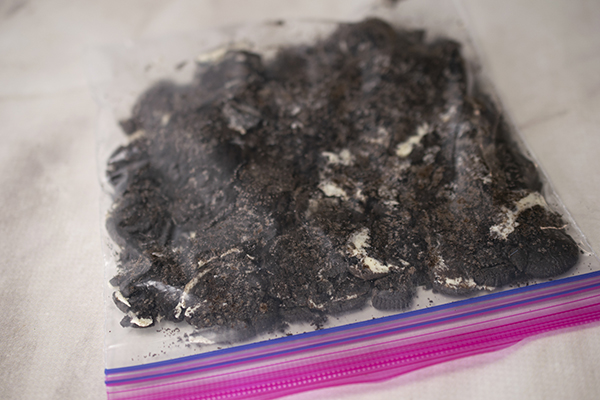
2. In zip-top bag, using rolling pin, crush chocolate creme cookies; set aside.
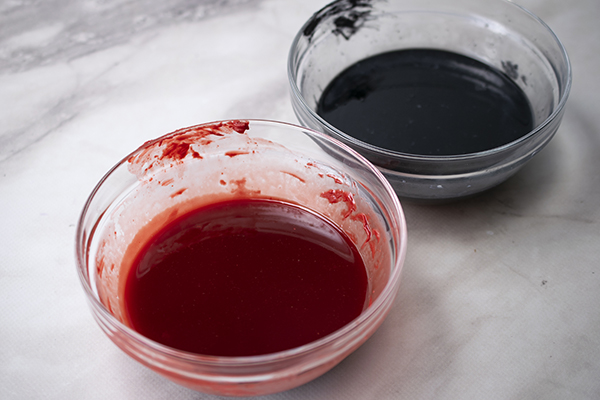
3. In separate small bowls, add black melting chips and red melting chips.
4. In microwave, heat heavy whipping cream 1 1/2 minutes. Pour half the mixture into one bowl of chips and other half into other bowl of chips. Stir until chips are completely melted; set aside.
5. After cakes cool, on cake board, add small amount of buttercream icing so cake sticks. Using bread knife, level cakes.
6. Place one cake on cake board and add thin layer of icing on top. Place second layer of cake on top and add thin layer of icing on top. Place final layer of cake on top and add thin layer of icing on top. Add thin layer of icing to entire cake. Freeze 15 minutes.
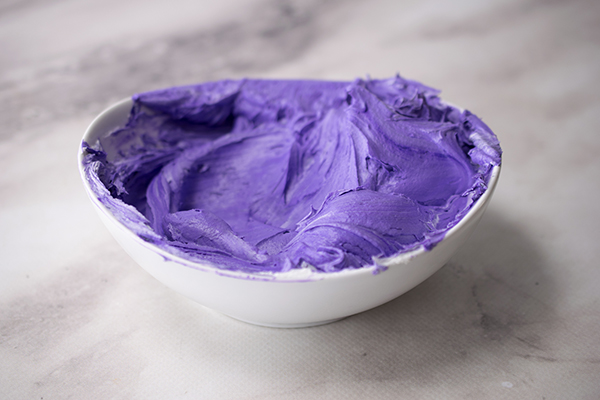
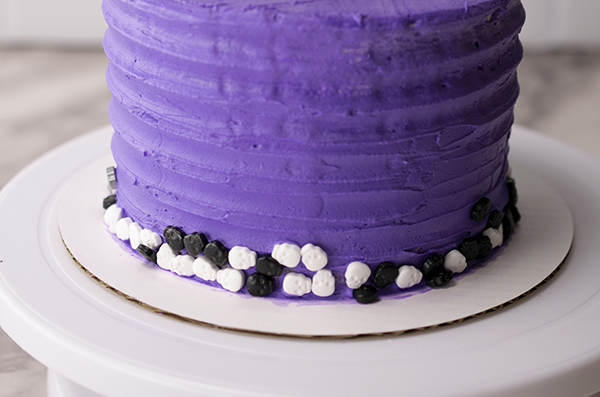
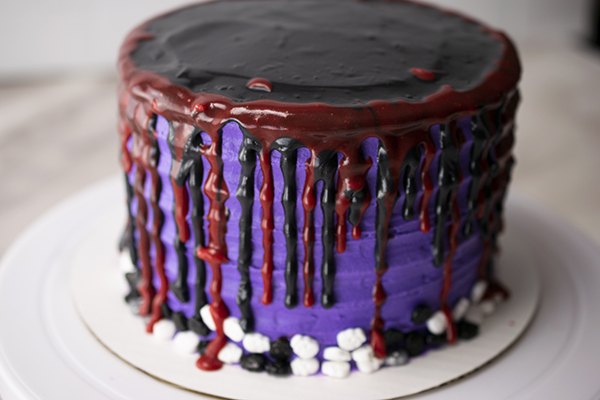
7. In small bowl, mix two parts purple food coloring to one part black food coloring. Ice cake with deep purple icing. Using grooved scraper, scrape along sides of cake. Using angled spatula, smooth top of cake.
8. Add skull sprinkles around edges of cake. Using piping bag with small opening at tip, drip black drip mixture around top edges of cake. Repeat using red drip mixture.
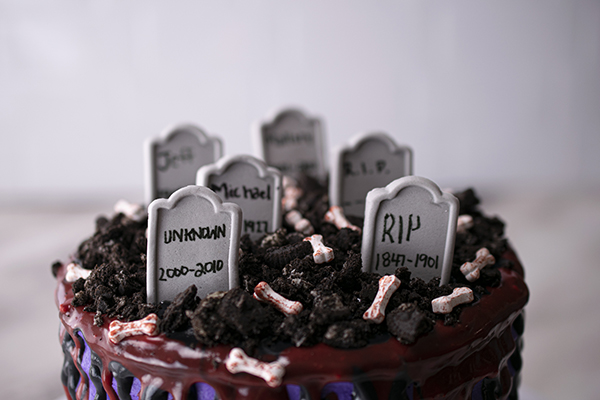
9. Add chocolate creme cookie crumbs to top of cake. Add tombstones and bone sprinkles to top of cake.

Add Fruity Flavor and Fun to Holiday Desserts
(Family Features) Making the holiday season special is an important tradition for many families, and it’s likely to take on heightened importance this year with gatherings, celebrations and festivities taking on a different look than years past. One family-favorite way to create holiday magic is through delicious desserts that can be made and enjoyed together.
Don’t be afraid to try something new this year by turning to foods typically associated with warmer weather. For example, watermelon is available year-round and makes a surprisingly nutritious, flavorful addition to your seasonal spread, whether it’s the main ingredient or included in recipes from entrees to sides and drinks to desserts.
For a kid-friendly, tasty treat, ask your little ones to help make these Holiday Watermelon Cutouts. Because they only require a few ingredients and plenty of creativity, they’re perfect for getting the whole family involved. Or try this Watermelon and Blueberry Cheesecake as the highlight at your dessert table with its creamy, fruity flavor and eye-popping looks.
To find more holiday dessert solutions and other sweet recipe ideas, visit watermelon.org.
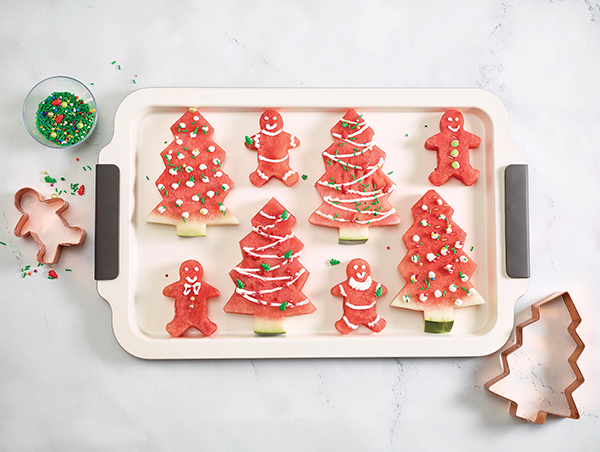
Holiday Watermelon Cutouts
Recipe courtesy of the National Watermelon Promotion Board
- 1/2 watermelon, cut into 1/2-inch thick disks
- vanilla frosting or yogurt
- sprinkles, for decorating
- Using holiday cookie cutters, cut shapes out of watermelon disks.
- Decorate watermelon shapes with yogurt.
- Top with sprinkles.

Watermelon and Blueberry Cheesecake
Recipe courtesy of the National Watermelon Promotion Board
Servings: 12
Cheesecake:
- Nonstick cooking spray
- 1/3 cup graham cracker crumbs (2 graham crackers)
- 24 ounces fat-free cream cheese, at room temperature
- 8 ounces low-fat cream cheese, at room temperature
- 1 cup white sugar
- 3/4 cup no-calorie sugar substitute
- 3/4 cup fat-free half-and-half
- 1/4 cup fresh lemon juice
- 2 tablespoons lemon peel, finely grated
- 2 teaspoons vanilla extract
- 1 1/2 cups liquid egg substitute (equivalent of 6 eggs)
Watermelon-Blueberry Sauce:
- 3 cups watermelon juice, with pulp
- 6 teaspoons cornstarch
- 6 tablespoons lemon juice
- 3 tablespoons sugar
- 3 tablespoons no-calorie sugar substitute
- 1-1 1/2 teaspoons lemon extract
- 2 cups diced watermelon
- 3 cups blueberries
- To make cheesecake: Preheat oven to 350 F.
- Spray bottom and sides of 9-inch springform pan. Sprinkle graham cracker crumbs in pan and tilt to spread evenly over bottom and sides, leaving extra crumbs on bottom.
- Using electric mixer, beat fat-free cream cheese, low-fat cream cheese, sugar and sugar substitute until creamy and well-blended. Slowly add half-and-half, lemon juice, lemon peel and vanilla; continue beating. Add egg substitute until mixture is thoroughly blended and creamy. Pour into crumb-lined pan.
- Place springform pan in large roasting pan. Pour enough water into roasting pan to come halfway up sides of springform pan. Bake cheesecake until firm, slightly golden and top is cracked, about 1 hour, 25 minutes. Remove springform pan from water and refrigerate, uncovered, until cold, about 3 hours or overnight.
- To make watermelon-blueberry sauce: In blender, whip watermelon juice, cornstarch, lemon juice, sugar and sugar substitute until smooth. Pour into small saucepan over medium-high heat and bring to gentle boil until topping begins to thicken. Remove from heat and place in refrigerator to cool. Just before serving, add lemon extract, diced watermelon and blueberries; stir to thoroughly blend.
- To serve, run knife around sides of cheesecake and remove springform pan sides. Top each slice with generous helping of watermelon-blueberry sauce.

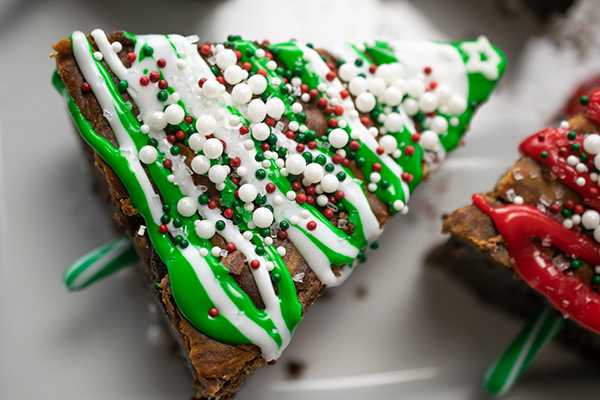
Christmas Tree Cheesecake Brownies
(Family Features) Festive fun and baking holiday treats go hand-in-hand, and these Christmas Tree Cheesecake Brownies provide a perfect way to enjoy a holiday tradition in the kitchen with loved ones.
Decorate your own version using green and white frosting, sprinkles of your choice and candy canes for “stumps” in the tree-shaped sweets.
Visit milkmeansmore.org to find more holiday inspiration.
Watch video to see how to make this recipe!
Christmas Tree Cheesecake Brownies
Recipe courtesy of Jenn Fillenworth of “Jenny with the Good Eats” on behalf of Milk Means More
Prep time: 10 minutes
Cook time: 30 minutes
Servings: 16
- Nonstick cooking spray
Cheesecake Batter:
- 8 ounces low-fat cream cheese, at room temperature
- 1/3 cup granulated sugar
- 2 eggs
- 1 tablespoon all-purpose flour
Brownie Batter:
- 1 cup all-purpose flour
- 1/2 cup cocoa powder
- 1/2 teaspoon salt
- 1 cup granulated sugar
- 1/4 cup vegetable oil
- 1/4 cup milk
- 2 eggs
- 1 teaspoon pure vanilla extract
Decorations:
- green frosting
- white frosting
- assorted sprinkles
- star-shaped sprinkles
- candy canes
- Preheat oven to 350 F.
- Coat 8-inch square baking pan with nonstick cooking spray; set aside.
- To make cheesecake batter: Place cream cheese in bowl of stand mixer. Beat at medium speed until smooth and creamy. Add sugar and beat well. Add eggs, one at a time, beating well after each addition. Add flour and beat mixture until blended.
- To make brownie batter: In medium bowl, whisk flour, cocoa powder and salt until combined. In separate bowl, whisk sugar, oil, milk, eggs and vanilla until well combined. Add wet ingredients to dry ingredients and mix until blended.
- Pour brownie batter evenly into prepared pan.
- Carefully pour cheesecake batter over top, spreading evenly. Carefully swirl layers together using knife tip.
- Bake 30 minutes until brownies are set.
- Cool brownies completely in pan on wire rack before cutting into triangle pieces.
- Decorate trees by piping green and white frosting. Top with assorted sprinkles and star-shaped sprinkles. Place 3-inch candy cane pieces in bottoms of brownies for stumps.
Source:

Sweet, Luscious Snacks for Loved Ones
Valentine’s Day eats and treats
(Family Features) Valentine’s Day naturally brings thoughts of hearts, flowers, sweetness and love. Because it also occurs during American Heart Month, it’s a perfect opportunity to start taking care of your own heart and the hearts of loved ones.
Part of the charm of the day’s celebrations is in giving family and friends flavorful foods to enjoy from chocolates and candies to other sugary treats. However, the festivities don’t have to be completely focused on unhealthy bites in order to make someone feel special.
This year, it can be easy to share in the fun of Valentine’s Day by serving those you love with sweet, seasonal treats. For example, these Frosted Watermelon Cutouts make for ideal snacks for children and adults alike whether it’s an after-school treat or a sweet dessert with just three ingredients, heart-shaped cookie cutters and minimal time spent in the kitchen.
If you’re really looking to impress that special someone, this Watermelon and Chocolate Dessert Board calls for creativity and plenty of tasty morsels like berries, cashews, almonds and dark chocolate. Without any baking or cooking required, simply spread out the ingredients for a platter that’s just as visually appealing as it is appetizing.
Both recipes include the benefits of watermelon, which boasts plenty of vitamin C to boost the immune system’s defenses as a cholesterol-free, fat-free and sodium-free food. Plus, watermelon draws its red color from the powerful antioxidant lycopene (12.7 mg per serving), which may help protect cells from damage, and the healthy treat is American Heart Association Heart-Check Certified with just 80 calories per serving, making it the perfect centerpiece for Valentine’s Day recipes.
Find more Valentine’s Day inspiration and recipes at watermelon.org.

Frosted Watermelon Cutouts
- 1 seedless watermelon, cut into 1/2-3/4-inch thick slices
- 4 brownie bites
- 1 cup frosting (any flavor)
- Using heart-shaped cookie cutters, cut shapes out of watermelon slices or simply use cut watermelon wedges, if desired. Top heart shapes with brownie bites and add frosting as desired.
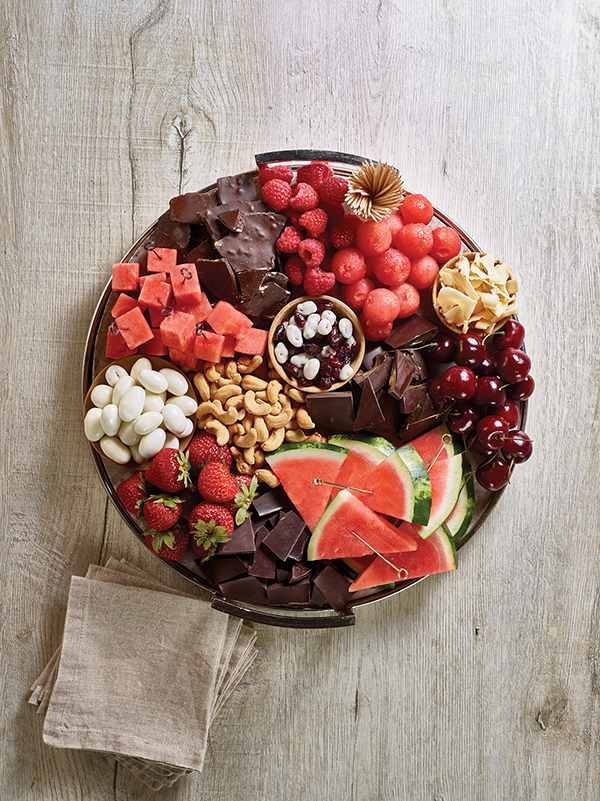
Watermelon and Chocolate Dessert Board
Servings: 6-8
- 1/2 medium seedless watermelon, cut into wedges and cubes
- 1 cup fresh raspberries
- 1 cup fresh red cherries
- 1 cup strawberries, trimmed and halved
- 1/4 cup dried cranberries
- 1/3 cup roasted, salted cashews
- 1 cup chocolate covered almonds
- 1 bar dark chocolate, broken into squares
- 1 cup coconut chips
- mint leaves, for garnish
- On serving board, arrange watermelon in center and surround with raspberries, cherries, strawberries, cranberries, cashews, almonds, chocolate and coconut chips. Scatter mint leaves around board for garnish.
Source: Watermelon Board

Eeek, Eat and Be Scary
(Family Features) Brew up a witch’s cauldron of fun this Halloween with special spooky treats. The Haunted House Cake looks almost too spooky to eat, but this masterpiece will disappear as if by magic. Invite guests to tread through the graveyard of creative chocolatey treats you’ve conjured up with some of your favorite candies.

Haunted House Cake
Prep time: 20 minutes
Decoration time: 40 minutes
Makes: 1 cake
2 cans (16 ounces each) vanilla frosting
orange food coloring
2 frozen pound cakes (16 ounces each), thawed
1 box thin chocolate wafer cookies
1 tube (.68 ounces) black decorating gel
1 bag Twix Fun Size Bars
1 bag M&M’S Milk Chocolate Candies Pumpkin Patch Mix
1 bag M&M’S Peanut Chocolate Candies Pumpkin Patch Mix
In bowl, tint frosting orange using food coloring; set aside.
Spread 1/2 cup frosting on bottom of both pound cakes; press together. Stand cakes vertically on serving plate.
Create pitch of roof by trimming top of one cake at slight angle. Trim other cake at steeper angle to make roof look tipsy.
Completely cover cake with remaining frosting. For roof tiles, break chocolate wafers in half and arrange, overlapping slightly.
Pipe black decorating gel for windows. Add candy bars for door and chimney. Use broken wafer cookies for shutters. Use chocolate candies to outline top of roof and sides of house.
In food processor, grind remaining cookies along with a few candy bars. Spread mixture around base of house for “dirt” and scatter chocolate candies on top.

Holiday Guesting 101
(Family Features) If you manage to avoid hosting duties this holiday season, you may be dodging some of the hardest work, but remember that being a good guest goes beyond arriving on time and taking your shoes off at the door. This holiday season, ensure your host gets to enjoy the festivities by putting these ideas to practice – it may earn you an invitation for years to come.
Make a holiday playlist. Offer to put together a holiday playlist for the host who will undoubtedly have his or her hands full prepping for the holiday celebration. Try to choose songs specific to the guests, host and overall theme. A good playlist can be a conversation starter for everyone at the party.
Don't arrive empty-handed. Even if your host shrugs off an offer for help, a gesture of appreciation is always appropriate. It may be a bottle of wine, a seasonal flower arrangement or, better yet, an appetizer or dessert to share, such as this mouthwatering Slow Cooker Banana Cake. This crowd-pleasing cake is made using a Crock-Pot® Cook & Carry Slow Cooker, which has a locking lid and travel clips to help you get to your holiday celebration without making a mess. The 6-quart, removable pot can be used as a serving dish, and is dishwasher safe to make clean-up a breeze.
Stay off your phone. It may seem obvious, but these days, looking at your phone is almost as habitual as breathing, and chances are you don’t mean to appear standoffish or rude by sneaking a quick peek. However, playing with your phone can detract from time you get to spend with family and friends, many of whom you probably don’t get to see often. Tuck away your phone for the party and live in the moment.
Pitch in to help clean. No host likes to be stuck in the kitchen while the rest of the party carries on. After the meal, offer your help to clear the table, put away perishable items and get the kitchen back in order so your host can join the merry-making. If you’ll be opening gifts, grab a garbage bag and collect debris to help keep the mess under control.
Find more holiday recipes and tips at Crock-Pot.com.

Slow Cooker Banana Cake
Prep time: 15 minutes
Cook time: 4 hours
Servings: 12
- Crock-Pot® Cook & Carry Slow Cooker
- nonstick cooking spray
- 3 cups flour
- 1 1/2 teaspoons baking soda
- pinch of salt
- 3-4 ripe bananas
- 2 lemon wedges, juice only
- 3/4 cup butter, softened
- 1 1/2 cups honey or 2 cups white sugar
- 3 eggs
- 1 teaspoon vanilla
- 1 1/2 cups almond milk
- cream cheese frosting
- Grease slow cooker with nonstick spray.
- In medium bowl, combine flour, baking soda and salt; set aside.
- In small bowl, mash bananas and lemon juice together; set aside.
- In large bowl, use mixer to cream butter and honey. Add eggs and mix well. Stir in vanilla then milk. Gradually add flour mixture. Once combined, stir in mashed bananas.
- Pour into slow cooker. Cover; cook on low 6 hours or high 4 hours, or until center of cake no longer looks gooey.
- Uncover and let cake cool. Once completely cooled, frost cake and, if desired, top with sliced bananas and walnuts.
Notes: If adding bananas, do so just before serving or they will brown. If using a non-oval slow cooker, cook 1 hour less on high heat or 2 hours less on low heat.
Photo courtesy of Getty Images
Source: Crock-Pot

Fire Up the Fourth with Tasty Backyard Recipes
(Family Features) Fireworks, family and food are what the Fourth of July is all about. This year, add some spark to backyard staples like grilled chicken and potato salad with a little help from tangy condiments, smoky rubs and your cast-iron skillet.
For a main dish that’s sure to be a crowd pleaser, smother grilled chicken with a white barbecue sauce – the South’s tangy little secret. It’s made with simple pantry ingredients like mayonnaise, cider vinegar and mustard.
Make a one-pan side dish next to the cooking chicken by placing your cast-iron skillet directly on the grates. Smash whole potatoes in the pan then top with bacon, cheese and a chipotle seasoning. Let it all melt together and then top with sour cream for a smoking side.
Round out the meal with a festive cake that looks as impressive as it tastes. Dye white cake mix batter red and blue using food color then assemble in a flag shape with whipped cream and berries.
Find more recipes and ideas to fire up your Fourth of July at McCormick.com.

White Barbecue Sauce with Smoky Chicken
Prep time: 15 minutes
Cook time: 45 minutes
Servings: 6
White Barbecue Sauce:
- 1 cup mayonnaise
- 1/2 cup cider vinegar
- 2 tablespoons Zatarain’s Creole Mustard
- 1 teaspoon prepared horseradish
- 1/2 teaspoon McCormick Coarse Ground Black Pepper
- 1/2 teaspoon McCormick Garlic Powder
- 1/4 teaspoon salt
Smoky Chicken:
- 1 cup hickory wood chips
- 2 pounds bone-in chicken parts
- 2 tablespoons McCormick Grill Mates Applewood Rub
- To make sauce: In medium bowl, mix mayonnaise, vinegar, creole mustard, horseradish, black pepper, garlic and salt until well blended. Cover. Refrigerate at least 2 hours before serving to blend flavors.
- To make chicken: Cover wood chips in water and soak 30 minutes. Season chicken with rub. Drain wood chips. Fill smoker box with wet wood chips. Place smoker box under grill rack on one side of grill before lighting. Close grill.
- Prepare grill for indirect medium heat (350-375° F). Heat grill by turning all burners to medium. Once cooking temperature is reached, turn off burner(s) on one side. Place chicken on unlit side of grill. Close grill cover.
- Grill, turning occasionally, 30-40 minutes, or until internal temperature of thickest part of chicken is 165° F. Move chicken to lit side of grill with skin side down. Turn lit side of grill to high.
- Grill, uncovered, 3-5 minutes longer, or until chicken is charred. Serve chicken with White Barbecue Sauce.
Test Kitchen Tip: Refrigerate any leftover sauce and use as salad dressing, condiment for burgers or dipping sauce for pretzels and vegetables.

Grilled and Loaded Smashed Potatoes
Prep time: 15 minutes
Cook time: 25 minutes
Servings: 12
- 1 1/2 pounds medium Yukon gold potatoes
- 1 tablespoon vegetable oil
- 5 teaspoons McCormick Grill Mates Bacon Chipotle Seasoning, divided
- 6 slices Applewood smoked bacon, cut into 1/4-inch pieces
- 1 cup chopped yellow onion
- 1/2 cup chopped red bell pepper
- 1/2 cup shredded cheddar cheese
- 2 tablespoons finely chopped green onions
- 1/4 cup sour cream
- Heat grill to medium.
- Place potatoes on microwavable plate. Pierce potatoes with fork several times. Microwave on high 5-6 minutes, or until fork-tender but still firm. Let stand until cool enough to handle. In large bowl, toss potatoes, oil and 3 teaspoons seasoning until well coated.
- Place potatoes on grill and cook, turning frequently, 4-5 minutes or until skin is crispy. In large cast-iron skillet on grill, cook and stir bacon 8-10 minutes, or until crisp. Add yellow onion and bell pepper; cook and stir 2-3 minutes, or until tender-crisp.
- Push bacon mixture to one side of skillet. Add potatoes to other side of skillet. Smash each potato with heavy spatula, bottom of small sturdy bowl or meat pounder. Sprinkle potatoes with remaining seasoning. Spoon bacon mixture over potatoes. Sprinkle with cheese.
- Cover pan or close grill. Cook 3-5 minutes, or until cheese is melted. To serve, sprinkle with green onions and dollops of sour cream.
Test Kitchen Tip: Cooking potatoes before grilling reduces overall grill time.

Red, White and Blue Cake
Prep time: 25 minutes
Cook time: 30 minutes
Servings: 12
- 1 package (2-layer size) white cake mix
- 2 teaspoons McCormick Pure Vanilla Extract
- 1/2 teaspoon Blue McCormick Assorted Neon Food Colors & Egg Dye
- 2 tablespoons unsweetened cocoa powder
- 2 teaspoons McCormick Red Food Color
- nonstick spray
- 1 container (16 ounces) white frosting
- 1 cup raspberries
- 1/2 cup blueberries
- Heat oven to 350° F.
- Prepare cake mix as directed on package, adding vanilla. Transfer 1 1/2 cups batter to small bowl and tint with neon blue food color. Tint remaining batter red by adding cocoa powder and red food color. Pour each color batter into separate 9-by-5-inch loaf pans sprayed with nonstick cooking spray.
- Bake blue-tinted cake 20-25 minutes; red-tinted cake 30-35 minutes. Cool cakes in pans 10 minutes. Remove from pans; cool completely.
- Trim cakes to remove rounded tops and edges. Slice red cake in half horizontally to form two thin layers. Place one layer on platter. Slice remaining red cake layer in half lengthwise. Slice blue cake in half lengthwise. (Blue and red cakes should be same dimensions.)
- Frost red cake layer on platter with 1/3 frosting. Top with lengthwise slices of red and blue cake side-by-side. Frost with 1/3 frosting. Repeat cake layer and frosting. Garnish with raspberries and blueberries to resemble flag.
Source: McCormick Spice

Impress Spring Party Guests with Surprise Sweets
(Family Features) Transform an ordinary cupcake into something extraordinary with a peek-a-boo filling. These simple cupcakes are an easy addition to any spring celebration. You’ll want to serve every variety of these turned up treats for Easter and beyond.
The best part about this party trick? It’s easy. You’ll be digging this one out of your recipe repertoire for every spring soiree.
Hop to Easter
Who said Easter baskets are just for the kids? Treat your holiday guests to take-home cupcakes served in individual cupcake boxes. They’ll be delighted to find a surprise inside these icing-filled cupcakes.
The Garden Party
Spring into the season and host an outdoor party on the patio or in the garden. Your guests will enjoy the fresh air and the sweetly decorated desserts.
Add Fresh Flavor
Shake things up with a refreshing new twist. Try filling your cupcakes with refreshing lemon meringue, raspberry mousse or peanut butter and jelly cupcake fillings.
No matter how you slice it, fill it or serve it, these cupcakes are a party pleaser that’s guaranteed to impress. Find tasty filling recipes, fresh ideas and easy decorating projects at www.wilton.com.

Carrot Garden Easter Cupcakes
Servings: 1 dozen cupcakes
- Favorite chocolate cake mix or recipe
- Creamy Decorator Icing
- Chocolate Decorator Icing
- Leaf Green Icing Color
- Orange Icing Color
- Crushed chocolate sandwich cookies
- Preheat oven to 350°F. Place Color Wheel baking cups in standard muffin pan.
- Prepare cake mix following package instructions. Bake in prepared muffin pan 18-20 minutes or until toothpick inserted in center comes out clean. Cool completely in pan on cooling grid.
- To decorate, tint small amount of creamy decorator icing green; tint remaining orange. Use spatula and chocolate icing to ice tops of cupcakes smooth. Sprinkle with cookie crumbs. Chill until set, about 15 minutes.
- Use knife to cut out center of cupcakes almost to bottom of cupcake. Use tip 2A and orange icing to fill in center of cupcake and pipe about 1/4 inch above cupcake; pat smooth. Use tip 352 and green icing to pipe pull-out leaf carrot tops.
Source: Wilton

Pair Like a Pro

(Family Features) When it comes to pairing wine with food, even experts agree that desserts can pose a challenge. A wide variety of flavor combinations can make it hard to find the perfect selection to serve with your sweet treat. While there’s no exact science to wine pairing, these simple tips can help you make your selection.
Sweet Cheesecake
A good rule: the lighter the dessert, the lighter the wine. Avoid heavy reds for a sweeter dessert and instead pair with a crisp white like Chardonnay, such as Joseph Carr from Sonoma, California.
Citrusy Lemon Meringue Pie
Lemon flavors can sometimes be polarizing, but complementing this dessert with an equally citrusy wine can work wonders. Try pairing with a food-friendly pinot grigio or a sauvignon blanc.
Rich Chocolate Cake
Red wine with chocolate seems like a no-brainer, but not all red wines are created equal. For a richer delicacy like this devil’s food cake, try something like Villa Pozzi Nero D’avola, a more fruit-forward, easy-drinking red varietal.
For more tips and wine selections, visit winefix.com

New York-Style Honey Cheesecake
Recipe courtesy of the National Honey Board
- 2 cups graham cracker crumbs
- 1/2 cup butter or margarine, melted
- 4 packages (8 ounces each) cream cheese
- 3/4 cup honey
- 1/4 cup flour
- 5 eggs
- 1/3 cup heavy cream
- 1 tablespoon lemon zest, grated
- 1 teaspoon vanilla
- fresh berries, for garnish
- fresh mint, for garnish
- To make crust: In small bowl, stir together graham cracker crumbs and butter until well blended. Press mixture evenly onto bottom and sides of greased 9-inch springform pan; set aside.
- Heat oven to 350° F.
- To make filling: In electric mixer bowl, combine cream cheese, honey and flour. Beat until smooth. Add eggs one at a time, beating well after each. Beat in cream, lemon zest and vanilla.
- Pour cream cheese mixture over crust; bake 15 minutes. Lower oven temperature to 200° F and bake 1 hour and 30 minutes longer, or until center no longer looks wet or shiny.
- With oven off and door ajar, let cheesecake cool 1 hour in oven. Remove cheesecake to rack to cool completely.
- Cover and refrigerate cheesecake at least 4 hours before serving. Garnish with fruit and fresh mint. Pair with chardonnay like Joseph Carr.

Honey Devil’s Food Cake with Rich Chocolate Frosting
Recipe courtesy of the National Honey Board
- 1 1/2 cups all-purpose flour
- 1 1/2 cups unsweetened cocoa powder, divided
- 2 teaspoons baking soda
- 1 teaspoon baking powder
- 1/2 teaspoon salt
- 2 cups honey, divided
- 1/2 cup 2 percent low-fat milk
- 1/2 cup vegetable oil
- 2 eggs
- 3 teaspoons vanilla extract, divided
- 1 cup boiling water
- 1 cup heavy whipping cream
- milk chocolate shavings, for garnish
- To prepare cake: Heat oven to 350° F. Grease and flour two 9-inch cake pans.
- In large bowl, combine flour, 1 cup cocoa powder, baking soda, baking powder and salt. Add 1 1/2 cups honey, milk, oil, eggs and 2 teaspoons vanilla; beat 2 minutes. Gradually beat in water.
- Divide batter between pans. Bake 25-30 minutes, or until sides pull away slightly from pan and toothpick inserted in center comes out clean. Cool 10 minutes. Turn onto wire racks and cool completely.
- To prepare frosting: In medium bowl, combine remaining cocoa powder, honey and vanilla, and cream. Beat until just thick and fluffy.
- To assemble: Spread frosting evenly over sides and top of one cake layer. Place second cake layer on top. Spread remaining frosting evenly over sides and top.
- Garnish with milk chocolate shavings. Pair each serving with a glass of prosecco, like Nero D’avola from Villa Pozzi.
Photo courtesy of 275847/Shutterstock.com (cheesecake)
Photo courtesy of Barnaby Chambers/Shutterstock.com (chocolate cake with wine)
Source: Deutsch Family Wines

Beehive Cupcakes

Beehive Cupcakes
- 1 (13-ounce) bag Snickers Miniatures for Easter, chopped
- 24 cupcake paper liners
- 1 (18-ounce) box favorite cake mix
- 2 (16-ounce) cans classic vanilla frosting
- Yellow food coloring
- 1 (14-ounce) bag Starburst Jellybeans Original Fruits
- 1/4 cup sliced almonds
- 1 tube chocolate decorating frosting, with plain tip
- 2 resealable plastic bags
- Unwrap and chop all miniatures, set aside.
- Line 24 muffin cups with paper liners. Prepare cake mix, fold in chopped miniatures and bake according to package directions.
- Let cupcakes come to room temperature.
- In the meantime, tint frosting with yellow food coloring to desired shade. Frost top of each cupcake to cover.
- Spoon remaining frosting into resealable plastic bag. Cut off 1/4-inch from tip. To create a “hive” on each cupcake, pipe on frosting in spiral fashion, starting with bottom of hive and working up to top.
- Separate orange jellybeans from package. Arrange 3 to 4 jellybeans on each frosting hive. Gently squeeze chocolate frosting through tip in zigzag pattern over jellybeans.
- Angle an almond slice on each side of jellybeans as bee wings.
Makes 24 servings
Source: M&M’S®