
Breaking Better-for-You Bread: Quick and easy keto-friendly meal ideas
(Family Features) For many looking to make healthy dietary changes, weight loss is a primary concern. Because the Dietary Guidelines for Americans recommend 45-65% of daily calories come from carbohydrates, an eating plan like the ketogenic diet (or keto, for short), which involves consuming a low amount of carbs and replacing them with healthy fats, can be a popular choice for achieving weight loss goals.
Replacing carb intake with fat can put your body in a metabolic state called ketosis, which makes you more efficient at burning fat for energy. The keto diet can also help reduce blood sugar and insulin levels and lower risk for certain diseases.
Those following the keto eating plan typically significantly reduce or avoid consuming bread, pasta, rice and baked goods, which are all traditionally high in carbohydrates. However, Toufayan Bakeries introduced a line of keto-friendly wraps, pitas and flatbreads that are high in fiber and protein while containing no sugar and being lower in carbs than traditional bread.
“We take great pride in baking our family’s favorite breads for families across the U.S.,” said Karen Toufayan, VP of marketing for Toufayan. “Across the country, people following the keto diet have been missing their favorite bread products. We are thrilled to introduce Toufayan’s first line of keto-friendly breads and hope they love them as much as we do.”
Try serving these satisfyingly light solutions as the base ingredients in these delicious recipes for a Keto Egg and Sausage Flatbread or Keto Enchilada Quesadilla from chef George Duran.
Find more recipes to support a ketogenic eating plan at Toufayan.com.
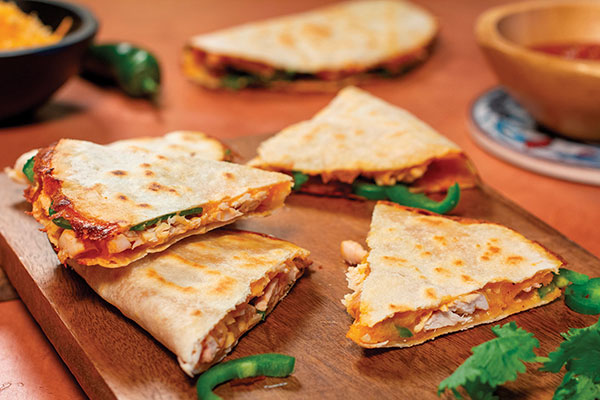
Keto Enchilada Quesadilla
Recipe courtesy of chef George Duran
Yield: 1 quesadilla
- Rotisserie chicken, pulled and chopped
- enchilada Sauce
- olive oil
- Toufayan Bakeries Keto Wraps
- Tex-Mex cheese, grated
- jarred or fresh jalapenos, thinly sliced
- cilantro, chopped
- salsa, for serving
- In bowl, mix pulled chicken and enchilada sauce until fully covered. Set aside.
- Spray or brush olive on both sides of keto wrap and place on nonstick pan or skillet over medium heat. Once wrap is heated on one side, flip and heavily top entire wrap with grated cheese. Allow cheese to melt then disperse chicken mixture, sliced jalapenos and chopped cilantro on half of wrap. Fold wrap over ingredients and cook until quesadilla is golden brown on both sides.
- Cut into three triangles and serve with salsa.

Keto Egg and Sausage Flatbread
Yield: 1 flatbread
- 1 Toufayan Keto Flatbread
- 1/4 cup shredded mozzarella cheese
- 2 cooked sausage links (approximately 2 ounces each), cut into pieces
- 1/4 cup thinly sliced red bell pepper
- 1 large egg
- 1 tablespoon fresh chives
- salt, to taste
- pepper, to taste
- Preheat oven to broil.
- On foil-lined baking sheet, place flatbread and top with mozzarella cheese; add sausage pieces and bell pepper.
- Crack egg in center of flatbread and broil 5-8 minutes, or until egg is cooked to desired firmness.
- Remove from oven and top with chives.
- Season with salt and pepper, to taste, and serve.
Nutritional information per serving (1 flatbread): 435 calories; 29.1 g protein; 25.6 g fat; 8.6 net carbs.
Source: Toufayan

Fuel for Full Days of Learning
(Family Features) Between morning routines, days spent in the classroom, extracurriculars and homework, it may seem like there’s never enough time in the day during the school year. However, making time for tasty meals and snacks doesn’t have to be another burden on jam-packed schedules.
These quick recipes for a flavorful twist on a breakfast favorite, easy-to-make sliders featuring kid-friendly flavors and delightful treats to enjoy at the end of the day can help keep little learners (and older family members, too) fueled up and ready to tackle all the school year throws their way.
Find more recipes to get you through busy back-to-school season at Culinary.net.
Simple, Kid-Friendly Sliders
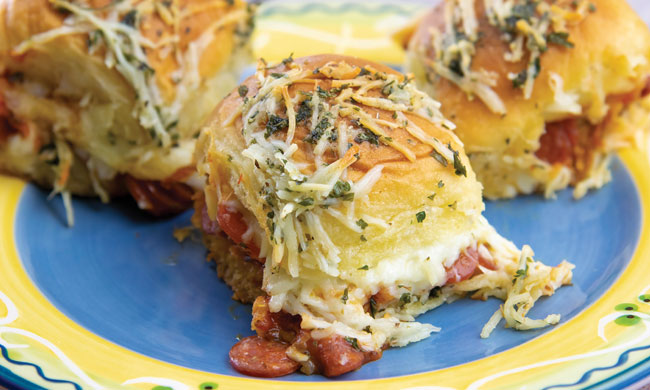
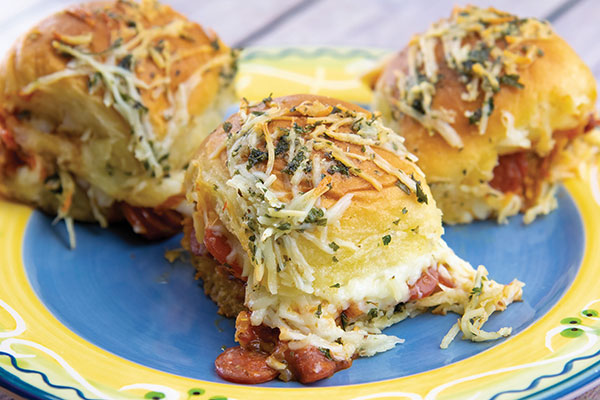
For those busy school nights when time is at a premium and you need to get a meal on the table quickly, these simple yet savory Pepperoni Pizza Sliders can be a perfect solution. A modified take on a kid favorite – pizza – they’re easy to make after work and extracurricular activities to steal a few moments of family time enjoying the cheesy pepperoni goodness before completing homework and beginning preparations for a new day.
Pepperoni Pizza Sliders
Recipe adapted from MilkMeansMore.org
- 1 package slider rolls
- 1/2 cup pizza sauce
- 1/2 cup mini pepperoni
- 1 1/2 cups shredded, low-moisture, part-skim mozzarella cheese
- 1/4 cup butter, melted
- 1 teaspoon parsley flakes
- 1/2 teaspoon dried oregano
- 1/2 teaspoon garlic powder
- 1/2 cup shredded Parmesan cheese
- nonstick cooking spray
- Heat oven to 350 F.
- Keeping rolls connected, cut sheet of rolls horizontally, separating tops from bottoms. Place bottom halves of rolls in baking dish.
- Spread pizza sauce evenly over bottom halves. Sprinkle pepperoni over sauce. Sprinkle mozzarella over pepperoni and cover with top halves of rolls.
- Mix melted butter with parsley flakes, dried oregano, garlic powder and shredded Parmesan cheese. Spoon evenly over sliders.
- Cover baking dish with aluminum foil sprayed with nonstick cooking spray to keep cheese from sticking.
- Bake 20 minutes.
- Remove foil and bake additional 5-10 minutes, or until Parmesan is melted and golden brown.
Cut sliders and serve immediately.
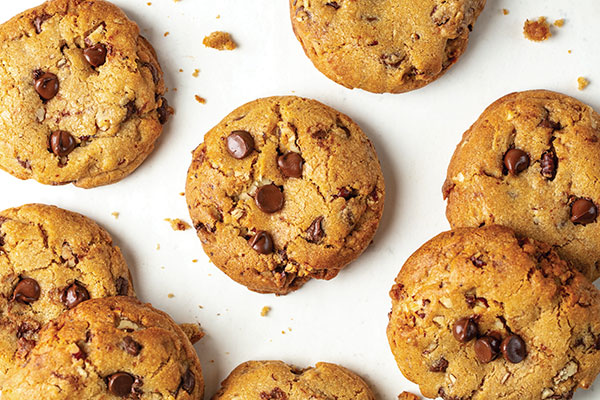
A Fresh-Baked After-School Sweet
After a long day of learning or a tough homework assignment, many kids love a warm, chocolatey homemade cookie. Once your kiddos pack away the calculators and put their pencils down, serve up an ooey-gooey delight as a reward for all that hard work.
These Brown Butter Chocolate Chip Cookies are ready in just 30 minutes and made with high-quality ingredients you can count on like C&H Dark Brown Sugar for that familiar homemade flavor.
Find more sweet after-school desserts at chsugar.com.
Brown Butter Chocolate Chip Cookies
Prep time: 15 minutes
Cook time: 15 minutes
Yield: 18 cookies
- 1 cup (2 sticks) unsalted butter, softened
- 2 cups all-purpose flour
- 1 teaspoon baking powder
- 1/2 teaspoon baking soda
- 1/2 teaspoon salt
- 1 1/4 cups C&H Dark Brown Sugar
- 2 large eggs, at room temperature
- 2 teaspoons pure vanilla extract
- 1 cup chopped pecans, toasted
- 1 1/2 cups semisweet chocolate chips
- In medium saucepan over medium heat, melt butter and cook until foaming and golden brown. Remove from heat and transfer to heatproof bowl. Place in refrigerator until solidified, about 45 minutes.
- In medium bowl, whisk flour, baking powder, baking soda and salt. Set aside.
- Once butter has solidified, remove from refrigerator. In bowl of electric stand mixer, using paddle attachment, beat butter and sugar at medium speed 2-3 minutes until light and fluffy. Add eggs, one at a time, and vanilla. Mix until combined. Scrape sides of bowl as needed. Reduce speed, add flour mixture and beat to combine. Add pecans and chocolate chips; mix at low speed until combined. Place dough in refrigerator and rest 30 minutes.
- Preheat oven to 350 F and line baking sheets with parchment paper.
- Using 2-ounce ice cream scoop, portion out dough on prepared baking sheets, spacing about 3 inches apart. Gently flatten dough balls using palm.
- Bake 13-15 minutes, or until golden brown. Allow cookies to cool on baking sheets 10 minutes then transfer to wire rack. Serve warm.
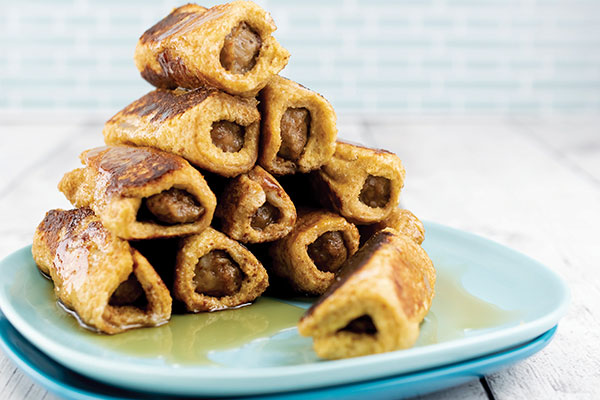
A Traditional Breakfast with a Twist
The same bowl of cereal can get boring after eating it for breakfast day in and day out. You may find yourself looking for something new and exciting to start school day mornings on the right foot.
Kids can be picky when it comes to breakfast foods, but this recipe for Sausage French Toast Roll-Ups is a quick and easy way to fill their bellies with a taste of several flavors they may already love. A sizzling sausage link wrapped with French toast, it combines a favorite breakfast protein and traditional deliciousness in one roll.
Sausage French Toast Roll-Ups
Servings: 12
- 12 sausage links
- 2 eggs
- 2/3 cup milk
- 3 teaspoons almond extract
- 1/2 teaspoon ground cinnamon
- 6 bread slices, crust removed, cut in half
- 3 tablespoons butter
- syrup
- In skillet, cook sausage links according to package directions. Set aside.
- In medium bowl, whisk eggs, milk, almond extract and cinnamon.
- Dip bread slice in egg mixture. Wrap bread slice around cooked sausage link, pressing seam to keep from unrolling. Repeat with remaining bread slices and sausage links.
- In large skillet over medium-high heat, melt butter. Place roll-ups in skillet, seam-sides down, and cook until all sides are browned, approximately 10 minutes.
- Drizzle with syrup.
Source: C&H Sugar

Stress-Free Steps Toward Self-Care
(Family Features) Over the last few years, self-care has taken on heightened importance for moms across the country.
That is why Mrs. T’s Pierogies is partnering with actress, entrepreneur and mom JoAnna Garcia Swisher for its “All-Star Moms” campaign to spotlight the importance of finding ways to recharge and help these real-life superheroes prioritize me-time.
 Simplifying self-care for All-Star Moms everywhere can be as easy as designating a “recharging room” in the home, which offers a personal space to reset and relax. When creating your recharging room, keep these tips from Garcia Swisher in mind:
- Balance Beautiful with Functional: Find hosting staples like cutting boards, utensils and napkins that match the vibe of your personal space so the area can double as an entertaining space.
- Keep it Easy to Clean: Choose furniture and decor that can handle a little mess from snacks, like Mrs. T’s Mini Pierogies and your favorite dip, which are perfect for enjoying while binge-watching favorite shows.
- Add a Personal Touch: Showcase a piece that tells a story, like a favorite embroidered pillow, piece of meaningful jewelry or framed photo of an amazing memory.
- Bring In Something Cozy: Add cozy touches like a blanket, fluffy pillow or favorite slippers for something comfortable.
- Make a Statement: Let your inner designer shine by taking a chance on something bold that represents a part of your personality you don’t normally indulge.
- Plan an Anchor Piece: This item is the foundation for everything, such as a vintage armchair, comfy couch or storage piece that tells a story. Choose this item first then build around it.
Moms can also prioritize self-care by whipping up an easy-to-make recipe, like these Margherita Pizza Pierogy Skewers, for themselves, a gathering of friends or an afternoon family snack. Pasta pockets filled with creamy mashed potatoes, cheesy goodness and other big, bold flavors, Mrs. T’s Pierogies are simple to prepare. This means more time for moms to do the stuff they love like unwinding from the day with favorite foods in their recharging spaces.
Visit MrsTsPierogies.com for more recipe inspiration.
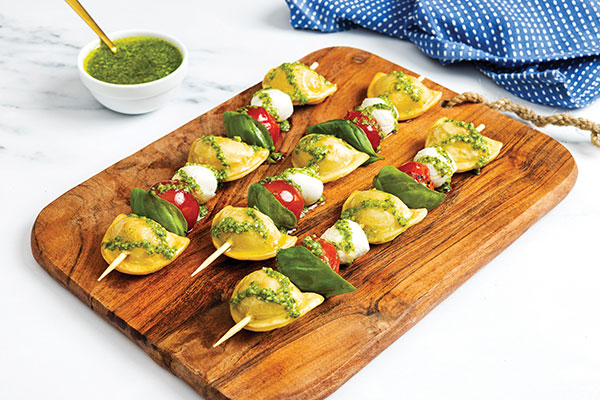
Margherita Pizza Pierogy Skewers
Prep time: 10 minutes
Total time: 35 minutes
Servings: 9
Pizza Skewers:
- 1 box (12.8 ounces) Mrs. T's Mini Classic Cheddar Pierogies
- 3 cups cherry tomatoes
- 2 tablespoons olive oil, plus additional for brushing pierogies, divided
- 1 teaspoon salt
- 1/2 teaspoon ground black pepper
- 1/2 teaspoon oregano
- 1-2 cups mozzarella balls (18 total)
- fresh basil leaves
- bamboo skewers (10 inches)
Fresh Pesto:
- 2 cups fresh basil
- 2 garlic cloves, peeled
- 1/2 cup olive oil
- 1/4 cup pine nuts
- 1/4 grated Parmesan cheese
- salt, to taste
- ground black pepper, to taste
- Preheat air fryer to 400 F.
- To make pizza skewers: In small bowl, combine cherry tomatoes, olive oil, salt, ground black pepper and oregano; toss to coat. Transfer tomatoes to air fryer tray or basket. Cook in air fryer 10 minutes, or until tomatoes are slightly charred; remove and set aside.
- Lay pierogies on same tray or basket. Make sure not to overlap. Lightly brush each side with olive oil. Cook about 12 minutes, or until golden brown and crispy. Flip halfway through cooking.
- To make pesto: In food processor, process basil; garlic; olive oil; pine nuts; Parmesan cheese; salt, to taste; and pepper, to taste, until smooth. (If preferred, use store-bought pesto.)
- Add one pierogy to bamboo skewer followed by one tomato, one mozzarella ball and one basil leaf. Repeat with ingredients until each skewer is filled. Drizzle with pesto.
Source: Mrs. T’s Pierogies

French Onion Baked Chicken
(Family Features) Many families crave those memorable moments together at the dinner table, and in spite of frenetic schedules and seemingly never-ending to-do lists, there are easy ways to make those meals a reality. Take the challenge out of bringing everyone together with a simple yet special recipe made for sharing.
This flavorful French Onion Baked Chicken can become a family favorite and weekly menu staple, and with 6-8 servings, it’s perfect for seconds or saving to reheat for weekday lunches. Sweet, jammy, caramelized onions are placed atop juicy chicken breasts and baked to tender deliciousness for an aroma that brings loved ones running to grab a plate.
Starring TX1015 Sweet Onions, this tasty meal relies on their mild sweetness, appetizing caramelization and versatility without the bite compared to other onion varieties. Available from early-spring through mid-summer, the varying climates of Texas allow for a range of growing seasons: March-June in deep south areas and May-July in the south-central region.
Take advantage of your opportunity to add sweet flavor to family meals this year by finding more recipe ideas at tx1015.com.
Watch video to see how to make this recipe!

French Onion Baked Chicken
Recipe courtesy of South Texas Onions
Servings: 6-8
- 1 tablespoon olive oil
- 4 boneless, skinless chicken breasts
Caramelized Onions:
- 2 tablespoons butter
- 1 tablespoon olive oil
- 3 medium sweet onions, sliced
- 1/2 teaspoon salt
- 2 sprigs fresh thyme
- 3 garlic cloves, minced
- 1 tablespoon balsamic vinegar
- 1 tablespoon Worcestershire
- 2/3 cup beef broth
- 2 teaspoons Dijon mustard
- 1 cup shredded mozzarella, gruyere or fontina cheese
- Preheat oven to 400 F. In large pan over medium-high heat, heat oil. Sear chicken breasts 2-3 minutes on each side. Remove from pan.
- To make caramelized onions: In separate pan over medium-high heat, heat butter and olive oil. Once butter is melted and bubbling, add onions. Let sit 5 minutes.
- Turn heat to low and cover onions. Cook 20 minutes, stirring halfway through.
- Stir in salt, fresh thyme and garlic; cover onions. Cook 10 minutes.
- Stir in balsamic vinegar, Worcestershire, beef broth and Dijon mustard. Cover and cook 10-15 minutes, or until onions are brown and jammy. Stir onions every 10 minutes.
- Place chicken breasts in greased baking dish. Top with onions then cheese. Place any additional onions in bottom of dish.
- Bake 30-35 minutes, or until chicken reaches internal temperature of 165 F.
Source: South Texas Onions

Savory Solutions for Slider Sunday
(Family Features) Enjoying a meal as a family might seem farfetched with schedules full of work, activities and social commitments. However, you can make bringing everyone together a bit easier (and more delicious) with a weekly tradition like Slider Sunday that gets the whole crew excited about time around the kitchen table.
No matter what your loved ones crave, you can savor a different flavor and enjoy the soft, fluffy, melt-in-your-mouth goodness of King’s Hawaiian Rolls and Slider Buns, including Pretzel Slider Buns, each and every Sunday. Plus, toppings can be customized so everyone’s favorites are on the menu.
Put a spin on your next Slider Sunday with Chicken Parm-eroni Sliders or Lobster Knuckle Sliders with Spicy Mayo from Guy Fieri.
Discover more slider recipe inspiration by visiting SliderSunday.com.

Chicken Parm-eroni Sliders
Recipe courtesy of Guy Fieri
Prep time: 30 minutes
Cook time: 30 minutes
Servings: 6
- 1 cup unsalted butter
- 1/2 cup minced garlic
- 1 package King's Hawaiian Pretzel Slider Buns
- 3 cups vegetable oil
- 2 cups pepperoni, julienned
- 1 1/4 cups marinara sauce
- 9 breaded chicken tenders, cooked crispy
- 5 slices fresh mozzarella
- 5 slices provolone cheese
- 9 teaspoons grated Parmesan cheese
- 2 tablespoons finely chopped Italian parsley
- In small saucepot over medium heat, melt butter and add minced garlic. Cook 3-4 minutes until garlic softens but does not brown. Remove from heat and set aside.
- Separate pretzel slider buns and brush inside halves with melted garlic butter. Toast rolls on griddle until golden brown; flip and slightly toast outside of rolls. Set aside.
- In 4-quart saucepot with thermometer, heat oil to 350 F. Fry pepperoni until bubbles start to slow. Carefully remove from oil and place on plate with paper towel.
- In small saucepot, heat marinara sauce. Place 1 tablespoon sauce on bottom halves of slider buns.
- On lined sheet pan, place one chicken tender on each slider bun. Place 1 tablespoon marinara sauce on top of each tender followed by half slice mozzarella then half slice provolone. Top each slider with 1 teaspoon grated Parmesan. Place baking sheet in broiler and melt cheese.
- Top cheese with 1 tablespoon crispy pepperoni on each slider.
- Top sliders with other halves of toasted slider buns. Brush tops with garlic butter and sprinkle with chopped parsley. Use bamboo picks to secure.

Lobster Knuckle Sliders with Spicy Mayo
Recipe courtesy of Guy Fieri
Prep time: 15 minutes
Cook time: 15 minutes
Servings: 6
- 1 package King's Hawaiian Slider Buns
- 3 tablespoons unsalted butter, melted
- 1 tomato, finely diced
- 1 celery stalk, finely diced
- 1/2 cup Japanese mayonnaise
- 1 tablespoon sriracha
- kosher salt, to taste
- freshly ground black pepper, to taste
- 1 lemon, cut in half
- 1 package tempura flour mixture
- 1 teaspoon seafood seasoning
- 9 ounces cooked lobster knuckle meat
- 2 1/2 cups white cabbage, shredded fine
- 2 tablespoons extra-virgin olive oil
- 3 tablespoons chives, finely chopped
- Separate slider buns and brush inside halves with melted butter. Toast rolls on griddle until golden brown; flip and slightly toast outsides of rolls.
- In mixing bowl, combine diced tomatoes, celery, mayonnaise and sriracha. Season with salt and pepper, to taste; add juice and zest from 1/2 lemon. Mix well to fully incorporate. Place in refrigerator to chill.
- Mix tempura batter per package instructions and season with seafood seasoning.
- Preheat deep fryer to 350 F.
- Pat lobster dry with paper towels. Place lobster in tempura batter and allow to sit 30-60 seconds.
- Remove lobster one piece at a time, allowing excess batter to drip off. Working in batches, fry until golden brown, about 3 minutes.
- While lobster is frying, place cabbage in mixing bowl; add extra-virgin olive oil and juice from remaining 1/2 lemon. Season with salt and pepper, to taste. Mix well to incorporate evenly.
- Place 2 tablespoons cabbage mixture on each bun, making bed on each bun to hold lobster in place.
- Remove lobster from fryer and allow excess oil to drain completely. Toss lobster in mayonnaise mixture and sprinkle with chopped chives. Place lobster on cabbage mixture then add top buns and secure with bamboo skewers.
Source: King’s Hawaiian

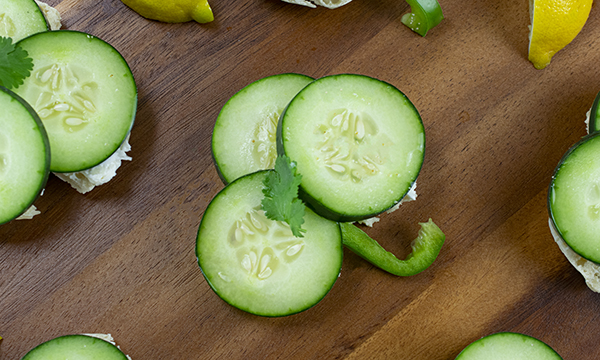
St. Patrick's Day Sandwiches
(Culinary.net) Freshen up your St. Patrick’s Day menu with easy, light sandwiches inspired by the traditional color of the festivities. These open-faced noshes can be perfect for lunch, snack time or even as an appetizer for get-togethers with friends and family.
Layered with a smooth cream cheese and mozzarella mixture then topped with crisp cucumber and a stem of green bell pepper, these St. Patrick’s Day Sandwiches are easy and cute, which makes them a fan favorite at nearly any green gathering. They’re also sprinkled with lemon juice to add a little acidity and create a nice, light bite.
Plus, this recipe is quick to make. When you’re in a rush to get everything on the table for the party, it’s easy to throw together and get on the platter in next to no time.
The sandwiches pop off the plate with their bright, seasonal garnishes. While sure to attract attention and have your loved ones asking “Where did you get this idea?” they’re also an easy way to sneak a few vegetables into your kids’ diets.
For more festive recipes and ideas at Culinary.net.
Watch video to see how to make this recipe!
St. Patrick’s Day Sandwiches
Yield: 8 sandwiches
- 8 ounces plain cream cheese spread, softened
- 1 cup finely shredded mozzarella cheese
- salt
- 4 English muffins
- 24 slices cucumber
- 8 thin slices green pepper
- fresh cilantro leaves
- lemon juice
- lemon slices, for garnish (optional)
- In bowl, mix cream cheese spread, mozzarella cheese and salt well.
- Split English muffins in half. Cut each muffin half into shamrock shape.
- Spread cheese mixture over each muffin half.
- Place three cucumbers on each “shamrock,” one on each “leaf.” Use green pepper slice as stem. Place cilantro leaf on top of each sandwich.
- Sprinkle sandwiches with lemon juice and add lemon slices, for garnish, if desired.
Source: Culinary.net

Deliciously Healthy Dishes from Sweet to Savory
(Family Features) Supplementing meals and snacks with powerful, versatile ingredients can take healthy eating from bland and boring to delicious and adventurous.
Take your breakfasts, appetizers, dinners and desserts to new heights while maintaining nutrition goals with naturally nutritious and surprisingly versatile California Prunes. Rich and smooth with an ability to enhance both sweet and savory flavors, they can expand your menu with nearly endless powerful pairing options.
One serving of 4-5 prunes packs a powerful punch of vitamins, minerals, antioxidants and fiber. Together, these nutrients form a web of vital functions that support overall health.
Whole, diced or pureed, the versatility of prunes allows you to enhance the flavor of recipes from morning to night in dishes like Citrus Breakfast Toast, which brings together vitamin B6 and copper from prunes and vitamin C from citrus to support a healthy immune system.
Try Caramelized Onion, Mozzarella, Prune and Thyme Flatbreads for a tasty family meal, and while you wait for dinner to cook, you can serve up Prune, Mozzarella and Basil Skewers. These easy appetizers provide several key nutrients. Mozzarella is a good source of calcium and prunes provide vitamin K and copper, all of which support overall bone health.
Make dessert a bit better for you but equally delectable with a vegan option like gluten-free, plant-based Prune and Almond Truffles. The soluble fiber in prunes helps lower serum cholesterol and blunt the effects of excessive sodium in the diet. Nuts like almonds provide good fats that help lower the risk for heart disease.
Find more recipe ideas at CaliforniaPrunes.org.
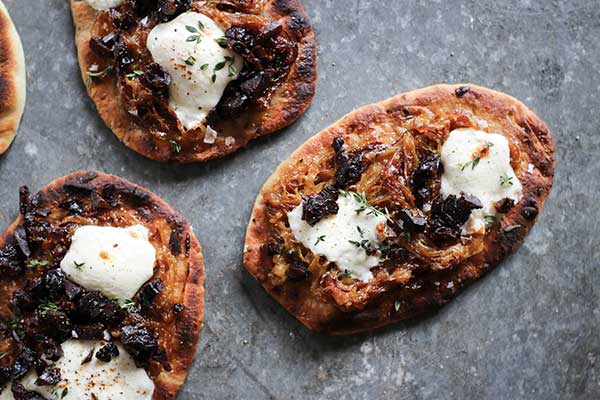
Caramelized Onion, Mozzarella, Prune and Thyme Flatbreads
Prep time: 15 minutes
Cook time: 1 hour, 30 minutes
Yield: 4 flatbreads
Caramelized Onions:
- 2 tablespoons olive oil
- 1/2 cup butter
- 6 large yellow sweet onions, sliced into thin half circles
- 3 sprigs fresh thyme
- coarse kosher salt, to taste
Flatbreads:
- 4 personal flatbreads
- 1 cup caramelized onions
- 4 ounces fresh mozzarella
- 10 California Prunes, diced small
- 1 tablespoon fresh thyme leaves
- sea salt, to taste
- coarsely ground black pepper, to taste
- To make caramelized onions: Preheat oven to 400 F.
- In large stockpot over medium-low heat, warm oil and melt butter. Add onions and cover; cook 20-25 minutes, stirring occasionally. Add thyme sprigs and season with salt, to taste; turn pan lid slightly ajar. Place pot in oven 1 hour, stirring occasionally.
- To make flatbreads: Preheat oven to broil. On sheet pan, toast flatbreads under broiler 4 minutes, or until toasted, flipping halfway through.
- Spread 1/4 cup of caramelized onions over each toasted flatbread. Refrigerate leftover onions.
- Tear mozzarella and place over onions. Divide prunes among flatbreads and place flatbreads under broiler 4-6 minutes until cheese has melted and is beginning to brown.
- Sprinkle flatbreads with fresh thyme and season with salt and pepper, to taste.
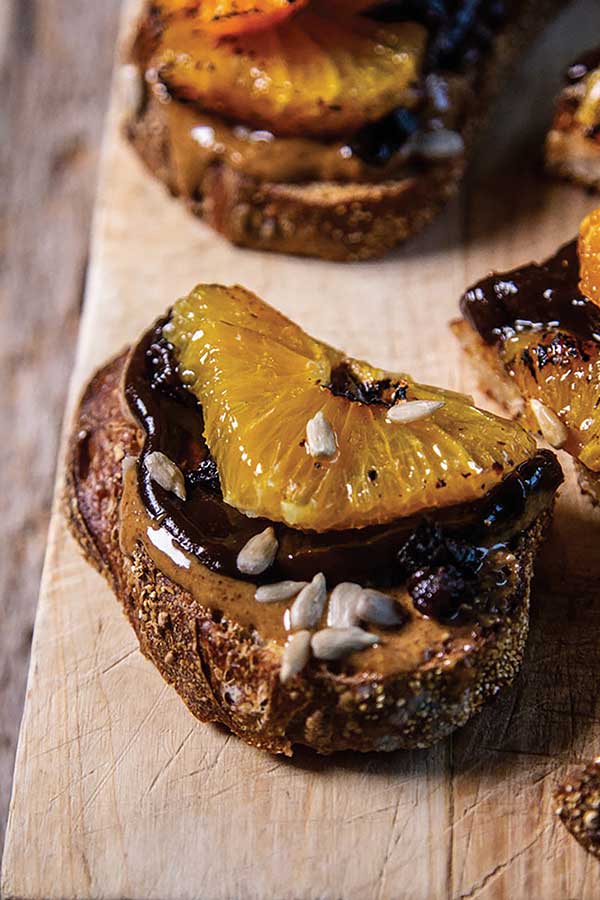
Citrus Breakfast Toast
Prep time: 13 minutes
Cook time: 2 minutes
Servings: 2
Prune Puree:
- 16 ounces pitted California Prunes
- 1/2 cup hot water
- 1 large citrus fruit, peels and piths removed with knife, sliced into rounds
- 1 1/2 tablespoons raw sugar
- 4 tablespoons sunflower butter
- 2 slices whole-grain sourdough bread, toasted to desired darkness
- 2 tablespoons prune puree
- 1 tablespoon sunflower seeds
- 2 California Prunes, finely diced
- To make prune puree: In blender, pulse prunes and water to combine then blend until smooth, pourable consistency forms, scraping sides, if necessary.
- Store in airtight container up to 4 weeks.
- To make bruleed citrus wheels: Place citrus wheels on baking sheet and divide sugar evenly among each piece.
- Using circular motion, pass flame of culinary torch repeatedly over sugar until it boils and turns lightly charred and amber.
- To build toast: Spread 2 tablespoons sunflower butter on each piece of toast. Top each with 1 tablespoon prune puree spread evenly across sunflower butter. Sprinkle each evenly with sunflower seeds and diced prunes. Top each with half broiled citrus and serve.
- Alteration: Use broiler set on high instead of culinary torch to caramelize sugar.
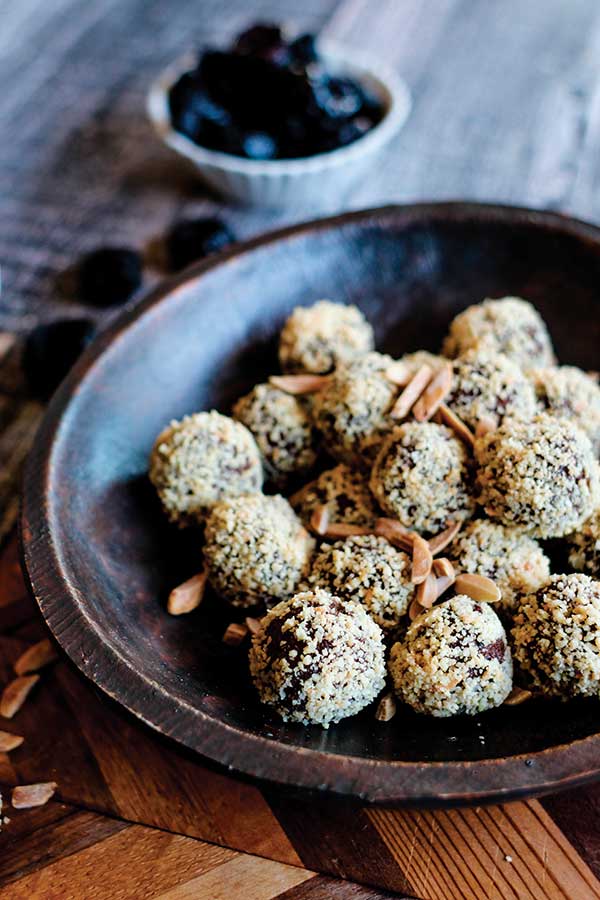
Prune and Almond Truffles
Recipe courtesy of Meg of "This Mess is Ours"
Prep time: 45 minutes
Servings: 24
- Water
- 1 cup California Prunes
- 1 1/2 cups toasted slivered almonds, divided
- 1/4 teaspoon coarse kosher salt, plus additional, to taste, divided
- 1 tablespoon cocoa powder
- 1 1/2 tablespoons vanilla paste or extract
- 1/4 teaspoon almond extract
- Boil water and pour over prunes. Soak 30 minutes; drain.
- In food processor fitted with "S" blade, pulse 1/2 cup toasted almonds with salt, to taste, until fine crumbs form. Transfer to shallow bowl and set aside.
- Add remaining almonds to food processor with 1/4 teaspoon salt and cocoa powder. Pulse 30 seconds to combine. Add prunes, vanilla paste and almond extract; process until combined. Mixture should be creamy with slight texture from almond crumbs. Transfer prune mixture to bowl and refrigerate 1 hour.
- Once chilled, use small cookie scoop to portion out individual truffles on parchment-lined baking sheet. Gently roll each truffle in reserved toasted almond crumbs. Store on parchment-lined plate in refrigerator up to 2 weeks. Serve chilled.

Prune, Mozzarella and Basil Skewers
Prep time: 5 minutes
Servings: 5
- 5 pieces prosciutto, halved lengthwise (optional)
- 10 California Prunes
- 10 basil leaves
- 10 cherry-size mozzarella balls
- If using prosciutto, fold each half in half lengthwise so width of prune is wider than width of prosciutto. Starting at one end of prosciutto, wrap one prune; repeat with remaining prosciutto. Set aside.
- Wrap one basil leaf around each mozzarella ball then thread onto skewer. Thread one prune or prosciutto-wrapped prune onto each skewer.
Source: California Prunes

Cheesy Spinach Ravioli
(Family Features) One of the easiest ways to warm up at the end of a winter day – both inside and out – is by sharing a comforting meal with loved ones.
Getting your whole family to the table can be surprisingly easy when a savory dish like Cheesy Spinach Ravioli awaits. This recipe offers a kid-friendly way to get a serving of greens along with favorite flavors. Originally started by an Italian mother more than 80 years ago, having a delicious jar of RAGÙ sauce in hand, with its distinctive yellow cap, can help anyone create this mouthwatering recipe and quick real-world dishes at home.
Having a go-to jar of sauce in your pantry offers an invaluable resource for at-home cooks who want to “cook like a mother” and create delicious, homemade recipes regardless of culinary skill. With a wide array of flavor varieties, the rich heritage of these familiar sauces can quickly help you make cold days feel far away while elevating everyday meals at the family table.
Visit Ragu.com to find more winter recipe inspiration.
Watch video to see how to make this recipe!
Cheesy Spinach Ravioli
Prep time: 10 minutes
Total time: about 1 hour
Yield: 17-20 ravioli
Dough:
- 3 cups all-purpose flour, divided
- 1 pinch salt
- 1/4 teaspoon garlic powder
- 1/2 teaspoon olive oil
- 4 whole eggs
- 2 egg yolks
- water
Filling:
- 1/2 teaspoon olive oil
- 2 cups chopped spinach, fresh or frozen
- 1 pinch salt
- 1 pinch pepper
- 1 container (15 ounces) ricotta cheese
Toppings:
- 1 jar (24 ounces) RAGÙ Old World Style Traditional Sauce
- shredded mozzarella cheese
- 2 chopped basil leaves
- 2 chopped sprigs rosemary
- grated Parmesan cheese (optional)
- To make dough: Place 2 1/2 cups flour in bowl and make hole in center. Add salt, garlic powder, olive oil, eggs and egg yolks to hole. Slowly bring flour into middle and knead into ball. Cover with bowl and let rest 20 minutes.
- To make filling: In pan over medium heat, add olive oil; add spinach, salt and pepper then saute until spinach is wilted. Let cool then mix in ricotta cheese; set aside.
- Cut dough in half. Sprinkle remaining flour on large cutting board and roll dough to 1/8-inch thickness. Cut into rectangle then cut into 2-3-inch squares. Set scraps aside. Brush water on squares then spoon 1 teaspoon spinach-ricotta filling in center of every other square. Top with remaining squares. Use fork to crimp edges. Repeat with remaining dough. Form scraps into ball and repeat.
- Put ravioli in boiling water, 8-10 minutes; they will rise to top when done.
- In saucepan over medium heat, heat sauce until simmering.
- Place ravioli on plate and top with warm sauce, mozzarella cheese, basil and rosemary. Grate Parmesan cheese on top, if desired.
Source: Ragu Foods

Warm Up Winter with Comforting Classics
(Family Features) Whipping up family favorites all winter long is a perfect activity to keep loved ones warm in the kitchen while avoiding the bitter chill outdoors. Delicious, heartwarming snacks offer a simple and savory way to bring everyone in from the cold while enjoying comforting flavors together.
Lean on beloved ingredients like go-to RAGÚ sauces when it’s time to come together for quick bites. The possibilities are nearly endless with delicious recipes using classics like the RAGÚ Old World Style Traditional or RAGÚ Simply Traditional options.
Hearty flavors can take away the chill of winter in recipes like Snowman Pizza Bombs, Polenta Bites and Baked Tomato Goat Cheese Dip. Easy to make and fun to create together, these simple snacks are perfect for a cold afternoon spent together in the kitchen or watching a family-movie marathon.
Originally started by an Italian mother more than 80 years ago, RAGÚ sauce, known for its distinctive yellow cap, is the perfect have-on-hand pantry staple to help you create easy and delicious home cooking. As an invaluable resource and family favorite since 1937, RAGÚ sauces easily allow anyone, regardless of gender or culinary skillset, to “cook like a mother” and serve up delicious, homemade favorites. The brand’s rich heritage and array of sauce choices ensures that your next cold-weather day spent inside will be elevated with family-favorite snacks and easy and taste-tempting meals made with RAGÚ.
Find more recipes perfect for warming up this winter at Ragu.com.
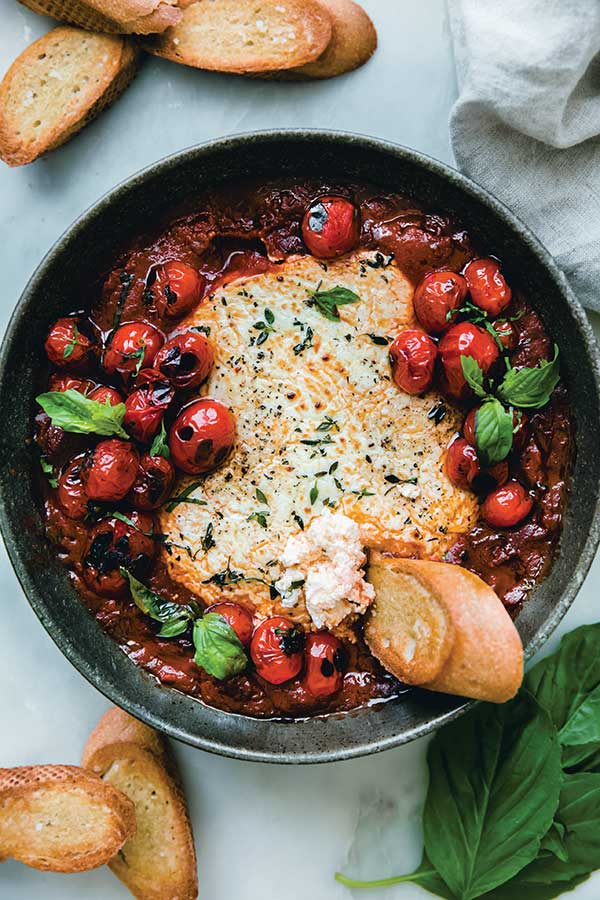
Baked Tomato Goat Cheese Dip
Recipe courtesy of Marzia Aziz of "Little Spice Jar"
Prep time: 10 minutes
Cook time: 20 minutes
Servings: 4-6
- Nonstick cooking spray
- 2 cups RAGÚ Simply Traditional Sauce
- 3 cloves garlic, divided
- 1/ 4 cup fresh basil, chopped, divided
- 1/8-1/4 teaspoon red pepper flakes
- 1 log (10-10 1/2 ounces) goat cheese, softened at room temperature
- 2 teaspoons olive oil, plus additional for brushing, divided
- 1/4 teaspoon fresh thyme
- kosher salt, divided
- pepper
- 1 large baguette, sliced on bias
- blistered tomatoes, for serving (optional)
- Position one rack in upper third of oven and one in lower third. Preheat oven to 375 F. Spray small, round baking dish with nonstick cooking spray; set aside.
- Add sauce to small bowl. Grate in two garlic cloves then add 1/8 cup basil and red pepper flakes. Stir to combine then pour sauce into baking dish.
- Smash goat cheese log into ball. Place ball between two sheets plastic wrap. Using hands, flatten cheese into thick, round disc about 1 inch smaller in diameter than baking dish. Remove goat cheese from plastic wrap and place in center of sauce. Drizzle cheese with 2 teaspoons olive oil. Sprinkle with fresh thyme, kosher salt and pepper. Bake on lower rack, uncovered, 20-25 minutes, or until sauce is bubbly and cheese is warmed through.
- Place baguette slices on baking sheet. Drizzle or brush with olive oil and sprinkle with kosher salt. Bake crostini on upper rack 10-12 minutes, flipping halfway through. When bread is done, remove from oven, cut last garlic clove in half and rub cut side on bread.
- Top dip with remaining basil and blistered tomatoes, if desired, and serve with crostini.
Note: To make blistered tomatoes: Heat skillet over medium-high heat until almost smoking. Add 1 pint cherry tomatoes to dry skillet and let sit 1 minute. Lower heat to low, toss tomatoes with 2 teaspoons olive oil and cook 2-3 minutes, or until tomatoes are about to burst. Remove from heat; sprinkle with pinch of salt and pepper.
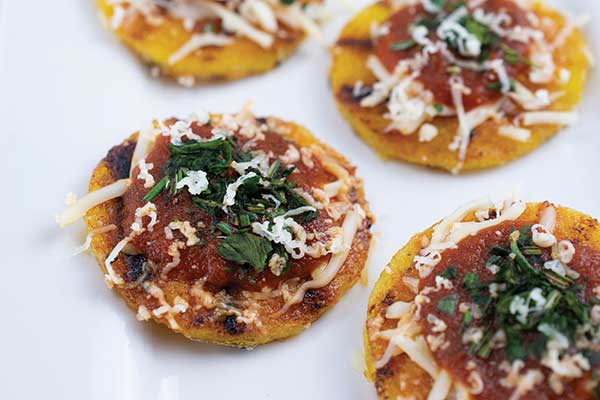
Polenta Bites
- 1 tube (18 ounces) polenta
- 1 1/2 teaspoons olive oil
- 1 jar (24 ounces) RAGÚ Chunky Tomato, Garlic and Onion Sauce
- 1 package (8 ounces) shredded mozzarella
- 2 sprigs, rosemary, destemmed and chopped
- 3 basil leaves, chopped
- 1 block (8 ounces) hard Parmesan cheese
- Cut polenta into slices. In skillet, heat olive oil over medium-high heat; fry polenta slices 10-12 minutes on each side until crispy and golden brown.
- In saucepan over medium heat, warm sauce.
- Place polenta slices on tray and sprinkle with mozzarella. Place 1/2 teaspoon warm sauce on each slice then sprinkle with chopped rosemary and basil. Grate hard Parmesan onto each slice for topping.
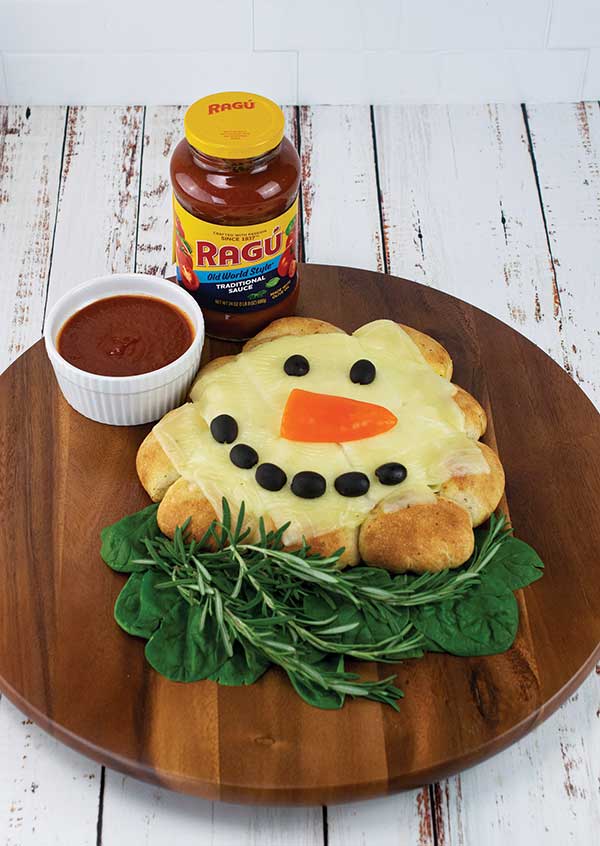
Snowman Pizza Bombs
- 1 tube (11.8 ounces) pizza dough
- 1 jar (24 ounces) RAGÚ Old World Style Traditional Sauce
- 1 package (6 ounces) pepperoni slices
- 1 package (6 ounces) Canadian bacon slices
- 1 package (8 ounces) shredded cheddar cheese
- 4 tablespoons melted butter
- 1 teaspoon garlic powder
- 1 1/2 teaspoons Italian seasoning
- 1 package (8 ounces) mozzarella cheese slices
Decorative vegetables (optional):
- multicolored sweet peppers
- olives
- spinach
- mushrooms
- cherry tomatoes
- Preheat oven to 400 F.
- Cut pizza dough into 12 squares. On each square, place 1/2 teaspoon sauce and evenly top with pepperoni, Canadian bacon and cheddar cheese.
- Pinch corners of dough together to round into balls then place in muffin tins.
- In small bowl, mix melted butter, garlic powder and Italian seasoning; brush generously over dough balls.
- Bake 15-20 minutes until golden brown.
- Remove from muffin tin and carefully shape dough balls into circles; place on baking sheet. Cover with mozzarella slices and bake until melted.
- Create snowman faces by decorating each with peppers, olives, spinach, mushrooms and cherry tomatoes, if desired. Use remaining sauce for dipping.
Source: RAGÚ

Pesto Caprese Veal Cutlets
(Family Features) Celebrating a special moment with your special someone this Valentine’s Day starts with a romantic meal. Cooking an elegant dish in your own kitchen offers a way to impress your valentine while enjoying the comforts of home.
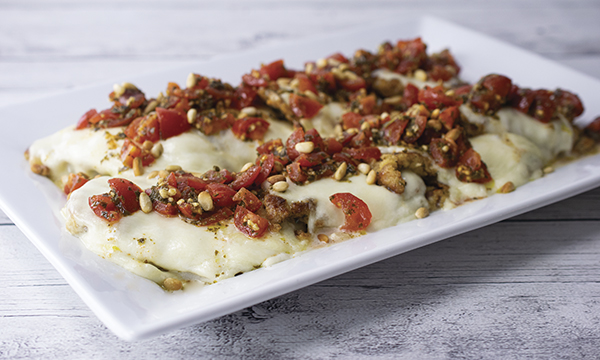
Easy to make and ready in 30 minutes, these Pesto Caprese Veal Cutlets showcase the versatility and beauty of humanely raised veal in a flavor-packed recipe. One bite can transport you and your loved one from the kitchen to a garden in Italy.
For added fun, try making homemade pesto to mix with grape tomatoes for a burst of flavor. Top with pine nuts and serve alongside a fresh salad or your favorite pasta for an unforgettably romantic meal.
Find more Valentine’s Day dinner ideas at Veal.org.
Watch video to see how to make this recipe!
Pesto Caprese Veal Cutlets
Funded by Beef Farmers and Ranchers
Prep time: 15 minutes
Cook time: 15 minutes
Servings: 6
- 1 pound veal cutlets (about 2 ounces each)
- 1 pint grape tomatoes, chopped
- 4 tablespoons prepared pesto
- 1/2 cup flour
- 2 large eggs
- 2 tablespoons whole or 2% milk
- kosher salt, to taste
- freshly ground black pepper, to taste
- 1/2 cup seasoned breadcrumbs
- 2 tablespoons butter, divided
- 6 ounces regular or part-skim fresh mozzarella, sliced into 1/4-inch slices
- 3 tablespoons toasted pine nuts (optional)
- Preheat oven to 350 F. Pound veal cutlets to 1/8-inch thickness.
- In small bowl, toss tomatoes and pesto to mix well; set aside.
- Place flour in shallow dish. In second shallow dish, beat eggs, milk, salt and pepper, to taste, until blended. Place breadcrumbs in third shallow dish. Dip each cutlet into flour then egg mixture then breadcrumbs to coat both sides.
- In large nonstick skillet over medium heat, heat 1 tablespoon butter until hot. Place half of cutlets in skillet; cook 3-5 minutes, or until golden brown and veal is cooked through, turning once. Remove cutlets; place on baking sheet.
- Wipe out skillet with paper towel. Repeat with remaining butter and cutlets.
- Place one slice cheese on each cutlet. Bake 3-5 minutes until cheese is melted. Transfer cutlets to plate and evenly top with tomato mixture; sprinkle with pine nuts, if desired.
Source: New York Beef Council