
New Year Nutrition
Take on 2021 with a sustainable, low-carb eating plan
(Family Features) A new year brings with it new opportunities to better yourself in all kinds of ways, including your health. Start by evaluating your at-home menu to make sure it aligns with your nutritional goals.
These recipes for Vegetarian Ramen Zoodle Bowls, Broccolini and Bacon Egg Bites and Flourless Salted Peanut Butter Chocolate Chip Cookies from Atkins offer better-for-you options that fit within a low-carb lifestyle that can help you eat right and make smarter choices in your kitchen. Each option offers a balanced approach to eating comprised of high-fiber carbohydrates, optimal protein and healthy fats. Plus, they’re easily personalized, allowing each recipe to help you meet your goals regardless of what eating plan you’re following and whether you’re looking to achieve weight loss, maintain your weight or achieve optimal health.
An Easy-to-Follow Food Guide
The latest science continues to support the many health benefits of a low-carb approach to eating beyond just weight loss. Simply reducing your carb and sugar intake by two-thirds over the “Standard American Diet” helps avoid the development of obesity, metabolic syndrome and type 2 diabetes.
While many eating approaches can be vague in their approach, “The Atkins 100 Eating Solution’s” fan-favorite program provides a clear-cut way to control your carb intake with 100 grams of net carbs (the total carbohydrate content of the food minus the fiber content and sugar alcohols) and shows you how to make delicious and satisfying food choices that lessen their impact on your blood sugar. This personalized approach is a way of eating you can follow for life.
With cutting-edge research and delicious recipes, this book provides a variety of foods with plenty of room for personalization. This easy-to-use guide, written by Colette Heimowitz, the company’s vice president of nutrition and education, can also show you how the plan can be modified to fit in with most ways of eating, including vegetarian, Paleo, Mediterranean and more regardless of food preferences, lifestyle or cooking abilities.
Visit atkins.com/atkins-100-eating-solution-book to purchase the book.

Vegetarian Ramen Zoodle Bowls
Recipe courtesy of “The Atkins 100 Eating Solution”
Total time: 30 minutes
Servings: 4
- 4 large eggs
- ice water
- 2 cups fresh water
- 1 quart vegetable broth
- 5 ounces (3 cups) broccoli florets, cut into bite-size pieces
- 10 ounces (4 cups) spiralized zucchini
- 5 ounces (5 packed cups) baby spinach
- 1 tablespoon, plus 2 teaspoons, white miso paste
- 1/4 teaspoon kosher salt, plus additional, to taste, divided
- 1 tablespoon toasted sesame oil, plus additional for garnish, to taste
- 2 cups mung bean sprouts, for garnish
- chili garlic sauce, for garnish
- 1 cup shredded raw carrot, for garnish
- 4 tablespoons crushed peanuts, for garnish
- In large saucepan of gently boiling water, cook eggs 7 minutes then transfer to bowl of ice water.
- Drain cooking water from saucepan then add broth and fresh water. Bring to simmer over medium-high heat. Add broccoli and cook 3 minutes then add zucchini and spinach. Continue cooking until spinach is wilted and zucchini is crisp-tender, 2-3 minutes. Remove from heat.
- Ladle about 1/2 cup broth from saucepan into small bowl. Add miso paste and 1/4 teaspoon salt; whisk to combine. Return mixture to soup, add sesame oil and stir to combine. Add additional salt, to taste. Cover to keep warm.
- Remove eggs from ice bath; peel then cut in half lengthwise. Ladle 2 cups soup into four serving bowls. Top each portion with one egg and 1/2 cup sprouts. Drizzle with chili garlic sauce and additional sesame oil, to taste. Top each serving with 1/4 cup shredded carrot and 1 tablespoon crushed peanuts.
Nutritional information per serving: 10 grams net carbs; 17 grams total carbs; 7 grams fiber; 16 grams protein; 13 grams fat; 253 calories.
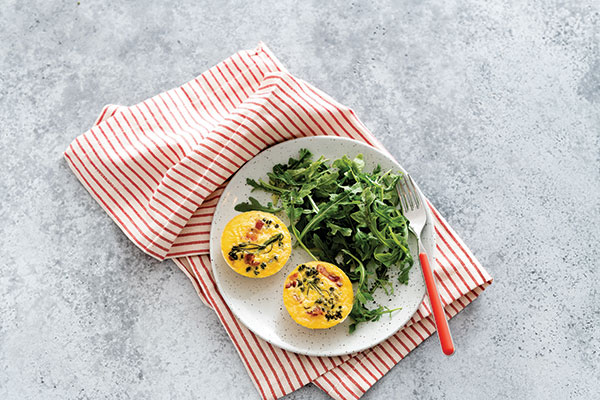
Broccolini and Bacon Egg Bites
Recipe courtesy of “The Atkins 100 Eating Solution”
Total time: 45 minutes
Servings: 4
- Nonstick cooking spray
- 5 slices (4 ounces) no-sugar- added bacon
- 5 large eggs
- 3 ounces cream cheese
- 2 tablespoons feta cheese
- 1 tablespoon hot sauce
- 1/2 teaspoon kosher salt, plus additional, to taste, divided
- 4 1/2 ounces broccolini (5-7 stalks), stalks and florets thinly sliced
- 1 tablespoon water
- 1 1/2 cups baby arugula
- 1 tablespoon lemon juice
- 1 tablespoon extra-virgin olive oil
- freshly ground black pepper, to taste
- 1 cup fresh blueberries
- Preheat oven to 350 F. Lightly coat eight silicone egg-bite mold cups or eight cups of standard nonstick muffin tin with nonstick cooking spray and set in large baking pan.
- In large nonstick skillet, cook bacon over medium heat until golden, about 5 minutes per side. Transfer to paper towel-lined plate to drain. Chop bacon into small pieces.
- In blender, puree eggs, cream cheese, feta cheese, hot sauce and 1/4 teaspoon salt until smooth.
- Pour off all but 1 tablespoon fat from skillet. Add broccolini, water and 1/4 teaspoon salt. Cook over medium-high heat, stirring frequently, until broccolini is tender, 3-5 minutes. Remove from heat.
- Fill each egg cup with 1 teaspoon bacon and 1 tablespoon broccolini. Top with egg mixture, filling cups to about 1/8 inch from top. Add just enough boiled water to baking pan to come halfway up sides of molds.
- Bake egg bites until set, 20-25 minutes. Take pan from oven then take molds from water bath. Let egg bites cool then remove from molds.
- In medium bowl, toss arugula, lemon juice, oil and salt and pepper, to taste. Place 3/4 cup salad, two egg bites and 1/4 cup blueberries on four plates and serve.
Nutritional information per serving: 9 grams net carbs; 11 grams total carbs; 2 grams fiber; 14 grams protein; 34 grams fat; 400 calories.
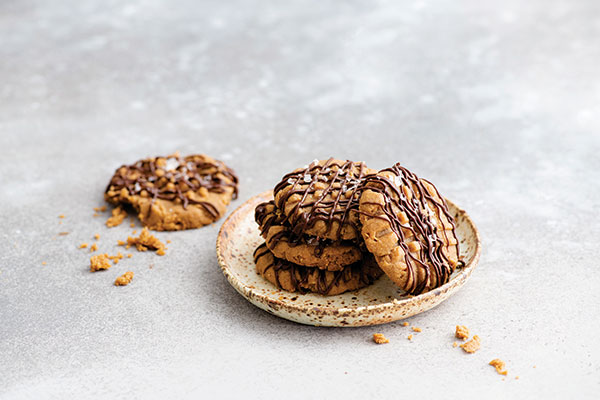
Flourless Salted Peanut Butter Chocolate Chip Cookies
Recipe courtesy of “The Atkins 100 Eating Solution”
Total time: 50 minutes
Yield: 24 cookies
- 1 cup sugar-free smooth or creamy peanut butter
- 2 teaspoons stevia extract powder
- 1/2 teaspoon baking soda
- 1/4 teaspoon kosher salt
- 1 large egg
- 1 teaspoon vanilla extract
- 1/2 cup sugar-free semisweet chocolate chips
- 1 teaspoon flaky sea salt
- Set oven racks in upper- and lower-third positions. Preheat oven to 350 F. Line two cookie sheets with parchment paper.
- In medium bowl, use handheld electric mixer on medium speed to beat peanut butter, stevia, baking soda and salt, scraping down sides if needed, until well combined, about 1 minute. Reduce speed to low, add egg and vanilla extract; beat until combined.
- Shape dough into 24 balls (about 1 tablespoon each) and place 2 inches apart on prepared cookie sheets. Using tines of fork, carefully flatten each ball, creating crisscross pattern.
- Bake, rotating cookie sheets from top to bottom and back to front halfway through, until edges begin to brown and cookies are set, 7-9 minutes. Cookies should not be browned. Let cool 10 minutes on cookie sheets then carefully transfer to cooling rack to cool completely.
- In small microwave-safe bowl, add chocolate chips and microwave on high in 20-second increments, stirring after each, until melted, about 1 minute.
- Dip dry fork into chocolate then drizzle over cookies. Sprinkle with sea salt.
Nutritional information per serving (1 cookie): 1.5 grams net carbs; 3 grams total carbs; 1.5 grams fiber; 3 grams protein; 6.5 grams fat; 79 calories.
Source: Atkins

Popping Up Festive Holiday Fun
(Family Features) During a holiday season that may not quite feel the same for many families, you can add a magic touch to at-home festivities with activities and treats that get everyone involved. Creating decorative holiday sweets allows little ones and grown-ups alike to take part in the fun, and the end result is delicious desserts for all to enjoy.
Start with a main ingredient like whole-grain, freshly popped popcorn. At 30 calories a cup, it’s naturally low in fat, non-GMO and gluten-free for a nutritious alternative to traditional holiday indulgences. It’s a clever way to create artsy representations of the season at hand that celebrate festive flavors like peppermint, coconut, chocolate and other sweet eats.
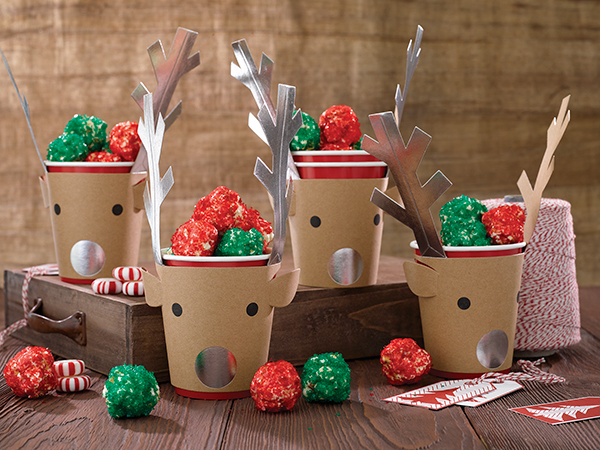
For example, Coconut Popcorn Snowballs add fun and flavor to wintertime with a coat of sweetened coconut “snow” and candy cane handle while easy-to-construct Holiday Popcorn Snowmen are sure to be a hit with your children. Add to the holiday spirit throughout your home with wintery Jingle Balls that call for colored sugars to create a magical sparkling effect then take the creativity to the next level by encouraging kids to make their own red-nosed, sleigh-pulling team of Chocolate Popcorn Reindeer.
Discover more decorative dessert recipes at popcorn.org.
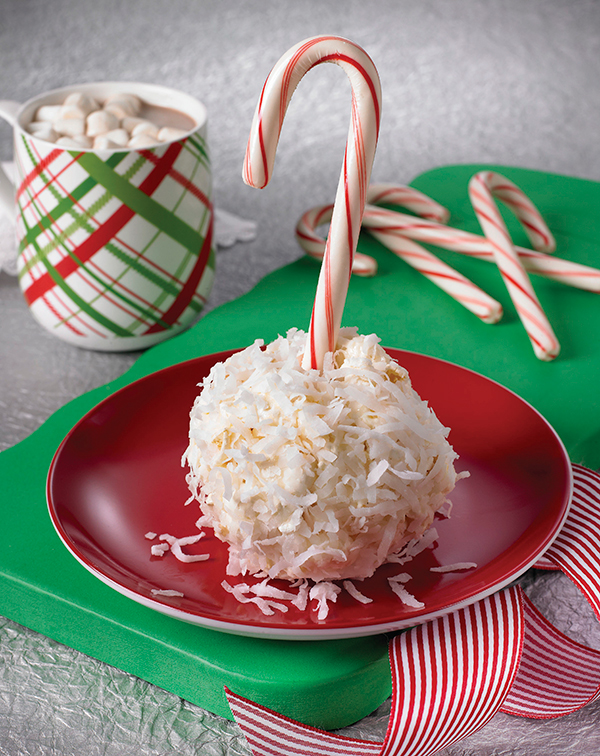
Coconut Popcorn Snowballs
Yield: 8 balls (4 inches)
- 2 cups shredded or flaked sweetened coconut
- nonstick cooking spray
- 3 quarts popped popcorn
- 4 tablespoons (1/2 stick) butter or margarine
- 3 cups miniature marshmallows
- 1 teaspoon coconut or vanilla extract
- 8 candy canes or candy cane sticks (about 3-4 inches)
- Place large sheet wax or parchment paper over work surface. Spread coconut on paper.
- Spray large mixing bowl lightly with nonstick cooking spray and place popcorn inside.
- In medium saucepan, melt butter over low heat. Stir in marshmallows until melted and mixture is smooth. Pour over popcorn and mix well until coated.
- Spray hands with cooking spray and press mixture firmly to form into balls. Place balls on coconut; roll and press coconut to coat. While holding popcorn balls, gently press candy cane into each ball.
- Serve immediately or wrap individually in plastic wrap for storage.
Jingle Balls
Yield: 12 cups
- Nonstick cooking spray
- 12 cups popped popcorn
- 6 tablespoons butter or margarine
- 3 cups mini marshmallows
- 1/2 teaspoon peppermint extract
- assorted colored sugars
- Spray large mixing bowl lightly with nonstick cooking spray. Add popcorn.
- Spread plastic wrap on cookie sheet; set aside.
- In medium saucepan, melt butter and marshmallows; stir until mixture is smooth. Stir in peppermint extract. Pour over popcorn, mixing until well coated. Let cool 2 minutes.
- Spray hands with nonstick cooking spray and form popcorn mixture into 3-inch balls. Gently press colored sugar onto balls. Let sit on prepared cookie sheet until cool and set.

Chocolate Popcorn Reindeer
Servings: 8
- 8 cups unsalted, unbuttered, popped popcorn
- 2 1/2 cups mini marshmallows
- 1/2 cup chopped dark chocolate or dark chocolate chips
- 2 tablespoons butter or light olive oil
- 1/4 teaspoon salt
- 16 pretzel sticks
- 16 eyeball candies
- 8 red candy-coated
- chocolate candies
- Place popcorn in large mixing bowl.
- In saucepan over medium heat, heat marshmallows, chocolate, butter and salt, stirring often, until smooth. Toss marshmallow mixture with popcorn until well combined.
- Scoop 3/4 cup popcorn mixture into ball. Repeat with remaining mixture to make eight balls. Place each ball in paper muffin cup liner.
- Insert one pretzel stick on each side of ball to resemble antlers, attach two eyeball candies for “eyes” and one red chocolate candy for “nose.” Repeat with remaining balls. Let cool completely.
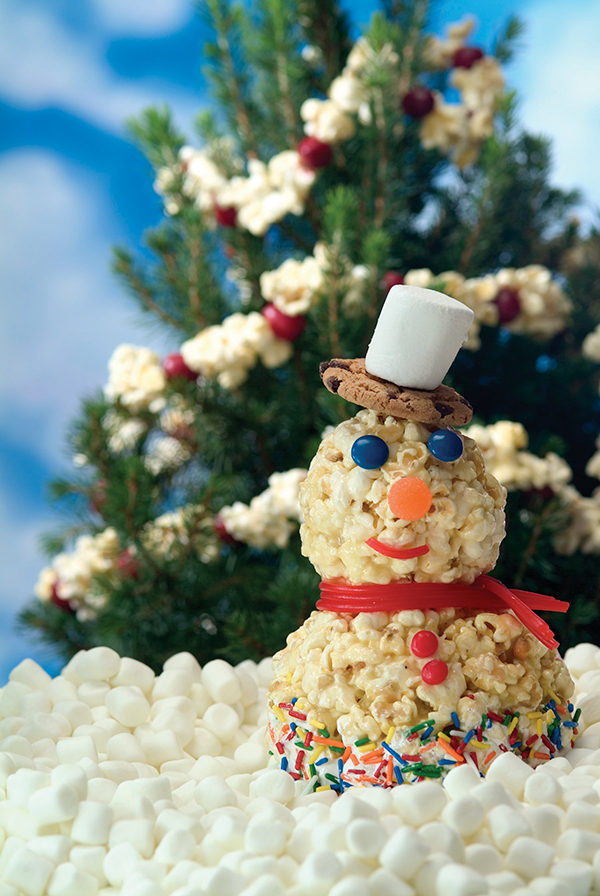
Holiday Popcorn Snowmen
Yield: 5 snowmen
- 1 package (1 pound) large marshmallows
- 1/4 cup (1/2 stick) butter or margarine, plus additional for greasing hands
- 1 teaspoon vanilla
- 10 cups popped popcorn
- sprinkles (optional)
- licorice (optional)
- gum drops (optional)
- cinnamon candies (optional)
- In large saucepan, melt marshmallows and 1/4 cup butter. Remove from heat and stir in vanilla. Let stand 5 minutes.
- Pour marshmallow mixture over popcorn and stir. Butter hands well and form into balls.
- Decorate with sprinkles, licorice, gum drops and cinnamon candies, if desired.
Popcorn Board

Festive and Flavorful Holiday Snacks
(Family Features) The holidays are filled with delicious food - from indulgent breakfasts to decadent desserts - but snacks can get overlooked. Spice up this holiday season with festive snacks that are perfect for a quick on-the-go bite or a taste of your favorite holiday dessert.
Although beloved in pie, pecans are a versatile nut that can be used beyond the pie shell - add them to a snack mix, incorporate them into granola or munch on them straight from the bag. Delicious and nutritious, 1 ounce of pecans offers 3 grams of plant-based protein and 3 grams of fiber, plus 12 grams of "good" monounsaturated fats and only 2 grams of saturated fat - perfect to power you through long days of holiday shopping.
This holiday season, nosh on a handful of these spiced Gingerbread Pecans for a sweet and savory snack while decorating the house or wrapping presents late at night, or set out a bowl for the family to enjoy.
You can also make snack-sized versions of your favorite holiday desserts to have on-hand when you're craving a quick and tasty treat. Chopped pecans add a flavorful and nutrient-dense crunch to these paleo-friendly No-Bake Pumpkin Pecan Pie Bites, while pecan halves provide a festive touch to these Reindeer Pecan Brownies.
Discover more nutritious, delicious and festive recipes at AmericanPecan.com.
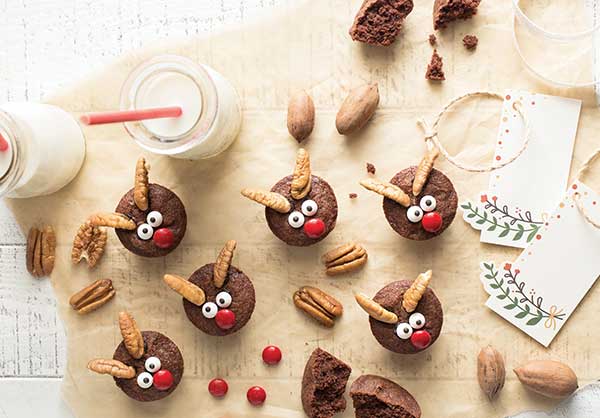
Reindeer Pecan Brownies
Prep time: 20 minutes
Cook time: 15 minutes
Yield: 20 brownies
- Nonstick cooking spray
- 1 stick (1/2 cup) unsalted butter, melted
- 1 tablespoon pecan or canola oil
- 1 cup, plus 2 tablespoons, granulated sugar
- 2 large eggs
- 1 teaspoon vanilla extract
- 1/2 cup all-purpose flour
- 1/2 cup cocoa powder
- 1 teaspoon espresso powder (optional)
- 1/4 teaspoon kosher salt
- 20 raw pecan halves, cut in half
- 40 candy eyeballs
- 20 red chocolate candies
- 1/4 cup chocolate chip
- Preheat oven to 350 F. Spray mini muffin tin with nonstick cooking spray.
- In large bowl, whisk melted butter, oil and sugar until well combined. Add eggs and vanilla extract; beat until mixture is thick and pale in color, about 1 minute.
- Sift in flour and cocoa powder. Add espresso powder, if desired, and salt. Using rubber spatula, fold dry ingredients into butter mixture until just combined. Batter should be thick.
- Using 1-tablespoon cookie scoop, transfer batter to prepared mini muffin tin. Bake 13-15 minutes until toothpick inserted in center comes out mostly clean, with some lingering crumbs.
- Add chocolate chips to heat-proof bowl; microwave until smooth and melted. Pour melted chocolate into sandwich bag and cut off small portion of one corner to use as tip. Use melted chocolate to "glue" on pecan antlers, candy eyeballs and red candy noses to brownies.
- Allow chocolate to set before transferring brownies to airtight container.
Note: Brownies will stay fresh for up to three days.
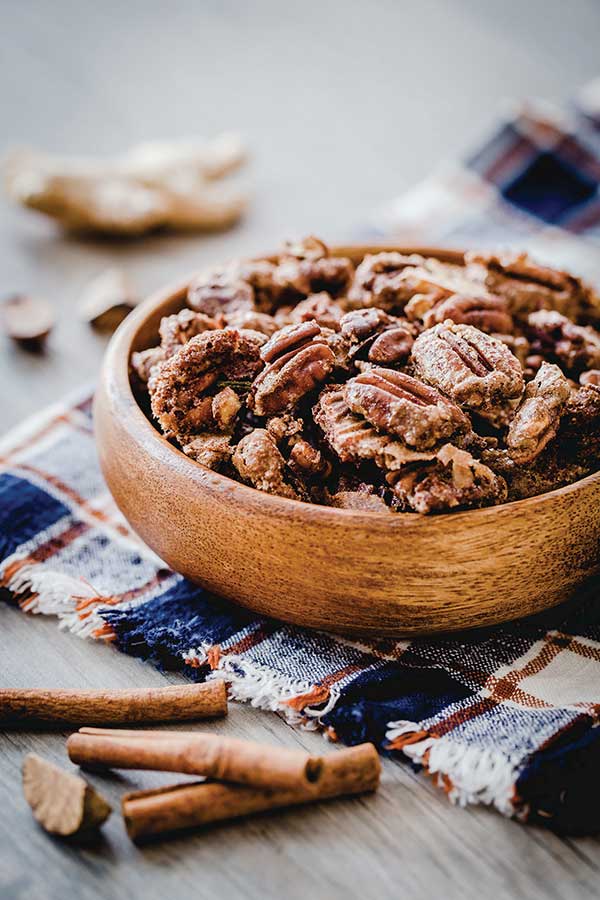
Gingerbread Pecans
Prep time: 5 minutes
Cook time: 40 minutes
Yield: 2 cups (6 servings)
- 1 large egg white, beaten
- 2 cups raw pecan halves
- 2 tablespoons granulated sugar
- 2 tablespoons light brown sugar
- 2 teaspoons gingerbread spice blend
- 1 pinch salt
- Preheat oven to 300 F. Line baking sheet with parchment paper; set aside.
- In large bowl, use fork to whisk beaten egg until frothy. Add pecans and stir until coated. Sprinkle pecans with granulated sugar, brown sugar, gingerbread spice and salt. Stir to coat evenly. Spread pecans in even layer on prepared baking sheet.
- Bake pecans 40 minutes, stirring halfway through. Allow pecans to cool completely.
Note: Pecans can be stored in airtight container for up to four days.
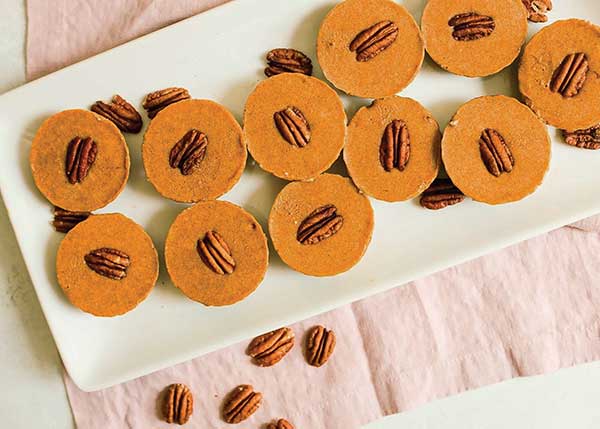
No-Bake Pumpkin Pecan Pie Bites
Prep time: 15 minutes
Chill time: 1 hour
Yield: 12 bites (6 servings)
Crust:
- 1 1/2 cups raw pecan pieces
- 3/4 cup pitted medjool dates (about 7 dates), soaked in hot water 10 minutes
- 1 pinch pink salt
Filling:
- 1/3 cup pumpkin puree
- 1/3 cup full fat coconut milk
- 1 teaspoon pumpkin spice
- 1/4 cup maple syrup
- 1 pinch pink salt
- 1 scoop collagen peptides (optional)
- 12 raw pecan halves, for topping
- To make crust: In food processor, process pecan pieces, drained dates and salt until combined and "dough" starts to form into ball.
- To make filling: In bowl, combine pumpkin puree, coconut milk, pumpkin spice, maple syrup, pink salt and collagen peptides, if desired. Whisk until smooth.
- Line cupcake tin and evenly distribute crust mixture, about 1 1/2 tablespoons in each cupcake opening. Use fingers to press crust into even layer.
- Evenly disperse pumpkin pie filling among openings until tins are about half full.
- Top each with one pecan half and place in freezer at least one hour.
Source: American Pecan Council

Delectable Desserts for Holiday Celebrations
(Family Features) With so many traditions and ways to celebrate the holiday season, the options are nearly endless for families looking to spend special moments together. One of the tastiest and most enjoyable activities you can engage in with family and friends is to team up and create sweet eats in the kitchen.
Whether you’re a chocolate lover or prefer traditional seasonal flavors like peppermint and gingerbread, these tasty, dairy-inspired treats from Milk Means More provide heartwarming ways to tingle your taste buds while bringing everyone together.
Cranberry Orange Bread Pudding provides a sweet, fruity, hearty dessert while Peppermint Cheesecake Brownies combine chocolatey goodness with creamy cheesecake and peppermint. Or, for a classic holiday combination, you can turn to Gingerbread Cupcakes with Whipped Vanilla Buttercream.
Find more ways to celebrate the season with sweet eats at milkmeansmore.org.
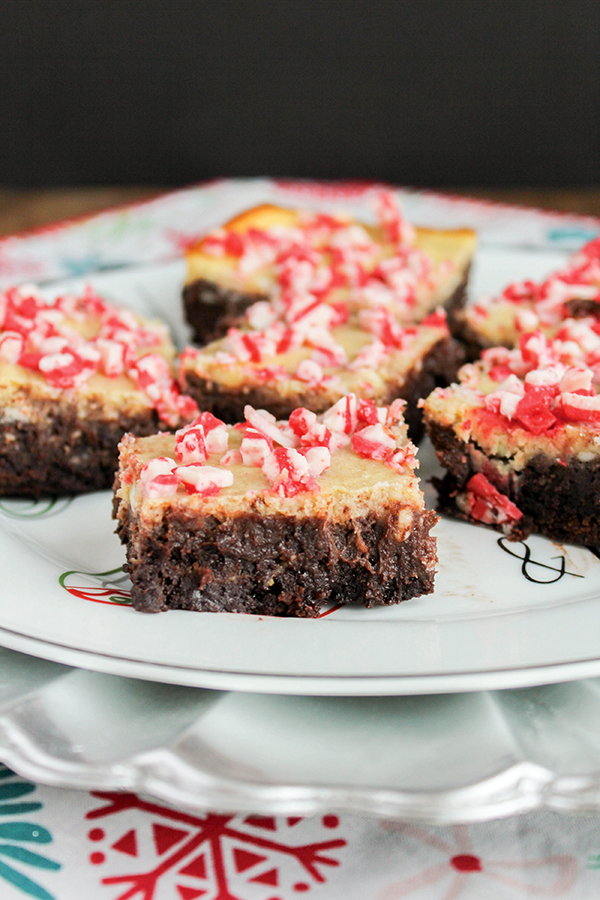
Peppermint Cheesecake Brownies
Recipe courtesy of Sarah Bates of “The Chef Next Door” on behalf of Milk Means More
Prep time: 10 minutes
Cook time: 30 minutes
Servings: 16
- Nonstick cooking spray
Cheesecake Batter:
- 8 ounces low-fat cream cheese, at room temperature
- 1/3 cup granulated sugar
- 1/2 teaspoon peppermint extract
- 2 eggs
- 1 tablespoon all-purpose flour
Brownie Batter:
- 1 cup all-purpose flour
- 1/2 cup cocoa powder
- 1/2 teaspoon salt
- 1 cup granulated sugar
- 1/4 cup vegetable oil
- 1/4 cup milk
- 2 eggs
- 1 teaspoon pure vanilla extract
Topping:
- 1/2 cup peppermint baking pieces
- Preheat oven to 350 F. Coat 8-inch square baking pan with nonstick cooking spray; set aside.
- To make cheesecake batter: Place cream cheese in bowl of stand mixer. Beat on medium speed until smooth and creamy. Add sugar and peppermint extract; beat well. Add eggs, one at a time, beating well after each addition. Add flour and beat mixture until blended.
- To make brownie batter: In medium bowl, whisk flour, cocoa powder and salt until combined. In separate bowl, whisk sugar, oil, milk, eggs and vanilla until well combined. Add wet ingredients to dry ingredients and mix until blended.
- Pour brownie batter evenly into prepared pan. Carefully pour cheesecake batter over top, spreading evenly. Carefully swirl layers together using knife tip. Bake 20 minutes.
- Sprinkle top of brownies with peppermint baking pieces and bake 10 minutes until brownies are set. Cool brownies completely in pan on wire rack before cutting into 16 squares.
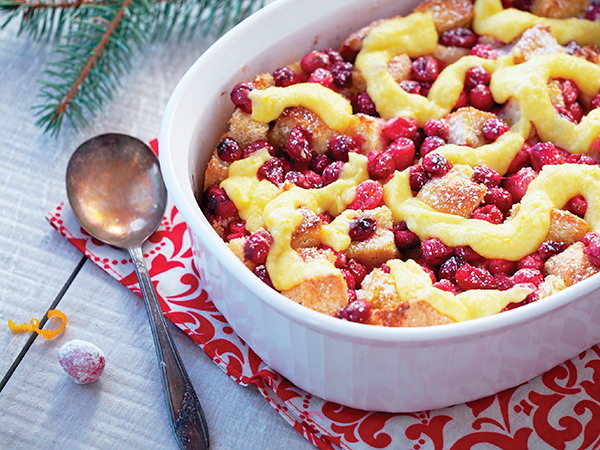
Cranberry Orange Bread Pudding
Recipe courtesy of Kirsten Kubert of “Comfortably Domestic” on behalf of Milk Means More
Prep time: 20 minutes
Cook time: 65 minutes
Servings: 12
Pudding:
- 1 loaf Texas toast or day-old bread
- 1-2 tablespoons softened butter
- 1 1/2 cups fresh cranberries
- 6 eggs
- 3/4 cup granulated sugar
- 3 1/2 cups 2% milk
- 1 teaspoon freshly grated orange zest
- 1/4 cup fresh orange juice
- 1/4 cup unsalted butter, melted and slightly cooled
- 1 1/2 teaspoons vanilla extract
- 1/8 teaspoon ground cinnamon
- 1 1/2 tablespoons coarse granulated sugar (optional)
Orange Custard Sauce:
- 3 egg yolks
- 1/4 cup granulated sugar
- 1 cup half-and-half
- 1/2 teaspoon freshly grated orange zest
- To make pudding: Cut bread into bite-sized cubes. If bread is soft and fresh, place cubes on half sheet pan and let stand at room temperature overnight to dry out.
- Preheat oven to 375 F.
- Grease 13-by-9-by-2-inch baking dish with softened butter. Place bread cubes in prepared baking pan. Scatter cranberries over bread.
- Beat eggs with sugar, milk, orange zest, orange juice, melted butter, vanilla and cinnamon until well blended. Pour evenly over bread and cranberries to coat. Sprinkle with coarse sugar, if desired. Bake 60-65 minutes, or until custard is set and edges of bread are browned.
- To make orange custard sauce: In small saucepan, whisk egg yolks with sugar until lightened to pale yellow color, about 2 minutes. Stir half-and-half into mixture until combined. Cook over low heat, stirring constantly, 15-20 minutes, or until sauce thickens enough to coat spoon. Stir orange zest into custard sauce.
- Serve bread pudding with warm custard sauce over top.
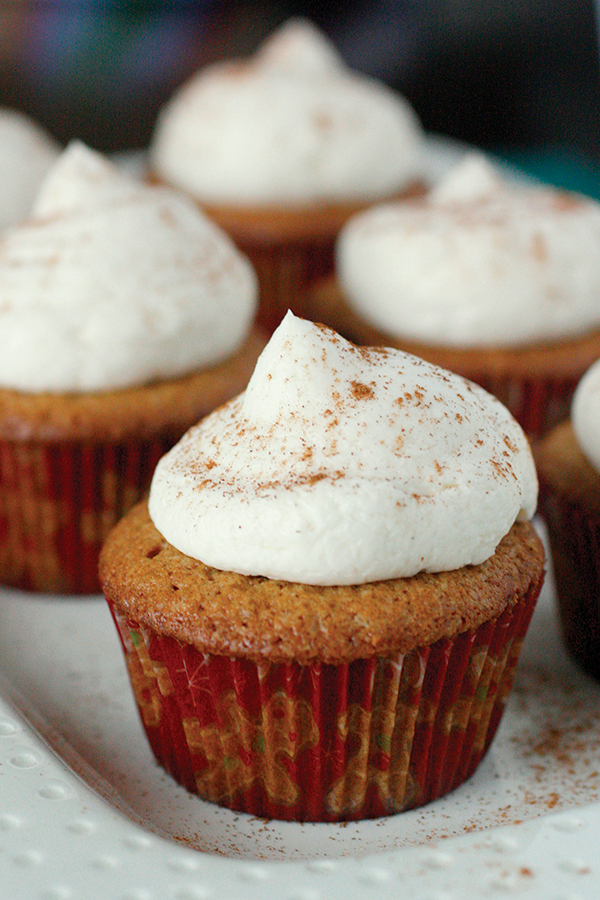
Gingerbread Cupcakes with Whipped Vanilla Buttercream
Recipe courtesy of Megan Gundy of “What Megan’s Making” on behalf of Milk Means More
Prep time: 10 minutes
Cook time: 25 minutes
Servings: 20
Cupcakes:
- 1 1/2 cups all-purpose flour
- 1 1/2 tablespoons ground ginger
- 2 teaspoons ground cinnamon
- 1/4 teaspoon ground cloves
- 1/2 teaspoon ground nutmeg
- 1/2 teaspoon salt
- 1 1/2 cups unsalted butter, at room temperature
- 1 1/2 cups granulated sugar
- 3 tablespoons molasses
- 4 large eggs
- 2 teaspoons vanilla extract
Whipped Vanilla Buttercream:
- 1 cup (2 sticks) butter, softened
- 2 teaspoons vanilla extract
- 4 cups powdered sugar
- 2-4 tablespoons heavy whipping cream
- 1 pinch salt
- cinnamon, for topping
- Adjust oven rack to lower-middle position and preheat oven to 350 F. Line muffin pan with cupcake liners. Set aside.
- To make cupcakes: In medium bowl, whisk flour, ginger, cinnamon, cloves, nutmeg and salt.
- In large bowl of stand mixer, cream butter and sugar until light and fluffy, about 3 minutes. Add molasses and beat until incorporated. Beat in eggs, one at a time, then beat in vanilla. Add flour mixture and mix on low speed until just combined.
- Divide batter evenly among muffin cups, filling each about 3/4 full. Bake 30 minutes, or until toothpick inserted in center cupcake comes out clean or with moist crumbs. Let cupcakes cool 10 minutes then transfer to wire rack to cool completely.
- To make whipped vanilla buttercream: In large bowl of stand mixer, beat butter on medium-high speed until light and fluffy, about 3 minutes. Add vanilla and, with mixer on low, slowly add in powdered sugar, cream and salt, scraping down sides of bowl as needed. Once incorporated, whip frosting at least 3 minutes on medium-high or high speed. If frosting is too thick, gradually beat in additional cream. Pipe on top of cooled cupcakes and sprinkle with cinnamon.

Rich, Flavorful Recipes for Memorable Holiday Moments
(Family Features) For many families, spending special moments with loved ones feels more important than ever this year. Whether you’re spending the holidays with family or inviting them for a virtual call from afar, you can plan ahead to enjoy the same dishes even without being at the same table.
Tap into family favorites like these seasonal sweets that include California Walnuts for rich, holiday-worthy flavor. Overnight Walnut French Toast with Cranberry Walnut Ginger Compote offers a tart-sweet combination perfect for a holiday brunch and allows you to prep the night before and simply pop in the oven when you wake up.
Drizzled with a chocolate-peppermint glaze and finished with walnuts and crushed peppermint candies, a Walnut Chocolate Peppermint Bundt Cake can provide the perfect finish to the festivities. The soft cake and crunchy walnuts contrast for an ultimate texture combination.
Find more sweet holiday recipes at walnuts.org.
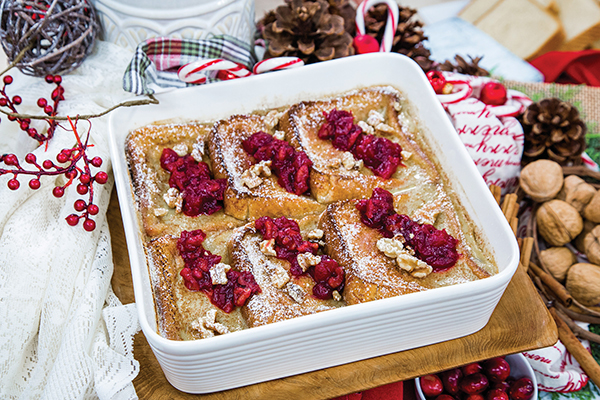
Overnight Walnut French Toast with Cranberry Walnut Ginger Compote
Total time: 1 hour
Servings: 12
Cranberry Walnut Ginger Compote:
- 1/2 cup California Walnuts
- 2 cups cranberries
- 1/2 cup orange juice
- 1/2 cup maple syrup
- 1/4 teaspoon ground ginger
- 1 orange, zest only
Overnight Walnut French Toast:
- 8 slices Texas Toast or 1-inch thick slices French bread
- 1/4 cup butter, melted, plus additional for baking dish, divided
- 2 1/2 cups milk or walnut milk
- 1/2 cup sugar
- 2 teaspoons vanilla extract
- 1 teaspoon cinnamon
- 6 eggs
- To make Cranberry Walnut Ginger Compote: Preheat oven to 350 F. Place walnuts on baking sheet and toast 8 minutes. Remove from heat and chop coarsely.
- In medium pot over medium heat, combine toasted walnuts, cranberries, orange juice, syrup, ginger and orange zest. Bring to boil and stir frequently 12-15 minutes until cranberries pop and liquid starts to reduce.
- Transfer to container and refrigerate once cooled.
- To make Overnight Walnut French Toast: Preheat oven to 350 F.
- Place bread on baking sheet and bake 5 minutes, or until lightly toasted on outside but still soft on inside. Butter 13-by-9-inch baking dish.
- In large bowl, whisk milk, sugar, 1/4 cup butter, vanilla extract, cinnamon and eggs. Dip each bread slice in mixture and let soak about 15 seconds on each side. Place in prepared baking dish, overlapping slices slightly, if necessary.
- Cover and refrigerate a few hours or overnight.
- Preheat oven to 350 F. Bake 50-60 minutes, or until golden brown and somewhat firm to touch. Serve immediately topped with Cranberry Walnut Ginger Compote.
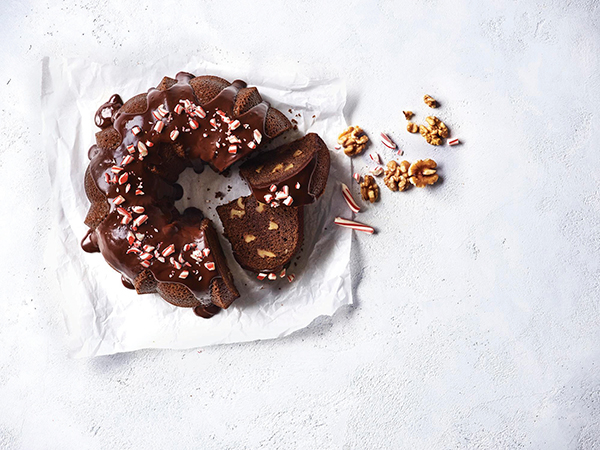
Walnut Chocolate Peppermint Bundt Cake
Total time: 1 hour, 30 minutes
Servings: 16
Cake:
- 1 cup butter, plus additional for greasing pan, divided
- 1/2 cup unsweetened cocoa powder, plus additional for dusting pan, divided
- 1 cup water
- 2 1/4 cups sugar
- 1 teaspoon peppermint extract
- 3 eggs
- 2 cups flour
- 3/4 teaspoon baking powder
- 1/2 teaspoon salt
- 1/4 teaspoon baking soda
- 1/2 cup buttermilk
- 1 cup California Walnut halves and pieces
Chocolate Peppermint Truffle Glaze:
- 1/3 cup dark chocolate chips
- 3 tablespoons butter
- 2 tablespoons milk
- 1/2 teaspoon peppermint extract
Toppings:
- 1/2 cup coarsely chopped California Walnuts
- 1/2 cup crushed peppermint candy
- To make cake: Preheat oven to 350 F. Lightly butter bundt pan then dust with cocoa powder. Turn pan, tapping, to coat on all sides; tap out excess.
- In small saucepan over low heat, melt 1 cup butter, 1/2 cup cocoa powder and water, whisking until smooth; let cool.
- Transfer to bowl of mixer and lightly beat in sugar, peppermint extract and eggs.
- In medium bowl, mix flour, baking powder, salt and baking soda. Add about 1/3 of dry ingredients to chocolate mixture and beat on low speed to combine. Add 1/4 cup buttermilk and beat again. Repeat steps ending with flour mixture, mixing only until combined. Fold in walnuts.
- Spread in prepared pan and bake 50-60 minutes, or until toothpick inserted in center comes out clean. Let cool then invert onto serving plate or platter.
- To make Chocolate Peppermint Truffle Glaze: While cake bakes, melt chocolate chips, butter, milk and peppermint extract together until smooth. Let cool slightly to thicken then drizzle over cake. Top with walnuts and peppermint candies.
Source: California Walnuts

Oatmeal Cream Cookie Sandwiches
Cooler weather often brings about nostalgic cravings for seasonal dishes and desserts. From grandma’s classic pies, to the sweet taste of apple cider touching your tongue, Fall is full of flavor, spice, sweets and treats, just waiting to be devoured with family and loved ones alike.
Home chefs will know it’s time to tap into the flavor of fall once that first leaf drops to the ground. The pumpkins are set on porches and little ones all bundle up to go outside and play in the cool breeze. Nearly everyone can tell when the warm and cozy delight is here to stay for the season.
The kitchen is often known as the “heart of the home” and homes all over the country will smell and taste like fall festivities all season long with this recipe for Oatmeal Cream Cookie Sandwiches.
The best part about this timeless recipe is that it’s known to evoke memories from childhood and can help introduce a new generation to a treat many generations before them have enjoyed.
Easy to make and pretty to look at, these cookies are great to make with little ones after a long day of pumpkin carving. Let the kids help with the preparation. They can use many ingredients you may already have in your pantry especially the ones they can reach with their little hands.
The result are a soft and slightly chewy, cinnamon-spiced oatmeal cookies sandwiched around a fluffy layer of vanilla bean cream filling that can keep each member of the family reaching for another.
Serve them to friends, neighbors, kids and adults and you will notice the delight spread across their faces with the very first bite. This recipe is something scrumptious that makes a statement for the upcoming season.
Find more seasonal dessert recipes and fall flavors for your family at Culinary.net.
Watch video to see how to make this recipe!
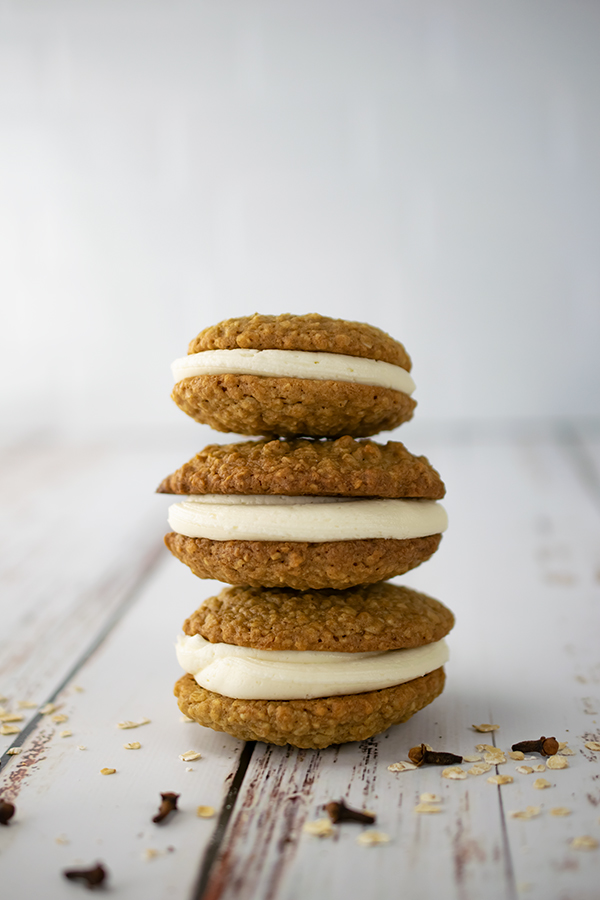
Oatmeal Cream Cookie Sandwiches
Servings: 10-12
Oatmeal Cookies:
- 1 cup unsalted butter, softened
- 1 cup dark brown sugar
- 1/2 cup light brown sugar
- 2 large eggs
- 2 teaspoons vanilla extract
- 1 1/2 cups flour
- 1 teaspoon baking soda
- 1/2 teaspoon salt
- 1 teaspoon cinnamon
- 1/4 teaspoon ground cloves
- 3 cups rolled old-fashioned oats
Vanilla Bean Cream Filling:
- 3/4 cup unsalted butter, softened
- 2 1/2 cups powdered sugar
- 1 teaspoon vanilla extract
- 1 tablespoon heavy cream
- Heat oven to 350 F. Line baking sheet with parchment paper and set aside.
- To make oatmeal cookies: with a mixer, cream butter, dark brown sugar and light brown sugar on medium-high speed until creamy. Add eggs and vanilla extract; mix until combined.
- In medium bowl, whisk flour, baking soda, salt, cinnamon, cloves and oats. Gradually add oat mixture to wet ingredients, mixing until just combined.
- Spoon dough into hands and roll into balls. Flatten balls and place onto prepared baking sheet, leaving about 2 inches between each cookie. Bake 10-12 minutes, or until lightly golden brown around edges. Move cookies to wire rack to cool completely.
- To make vanilla bean cream filling: with a mixer, cream butter on medium-high speed until light and fluffy. Gradually add powdered sugar, vanilla extract and heavy cream; mix until combined.
- Pipe or spoon a large dollop of filling on bottom sides of half the cookies; top each with second cookie.

Add Fruity Flavor and Fun to Holiday Desserts
(Family Features) Making the holiday season special is an important tradition for many families, and it’s likely to take on heightened importance this year with gatherings, celebrations and festivities taking on a different look than years past. One family-favorite way to create holiday magic is through delicious desserts that can be made and enjoyed together.
Don’t be afraid to try something new this year by turning to foods typically associated with warmer weather. For example, watermelon is available year-round and makes a surprisingly nutritious, flavorful addition to your seasonal spread, whether it’s the main ingredient or included in recipes from entrees to sides and drinks to desserts.
For a kid-friendly, tasty treat, ask your little ones to help make these Holiday Watermelon Cutouts. Because they only require a few ingredients and plenty of creativity, they’re perfect for getting the whole family involved. Or try this Watermelon and Blueberry Cheesecake as the highlight at your dessert table with its creamy, fruity flavor and eye-popping looks.
To find more holiday dessert solutions and other sweet recipe ideas, visit watermelon.org.
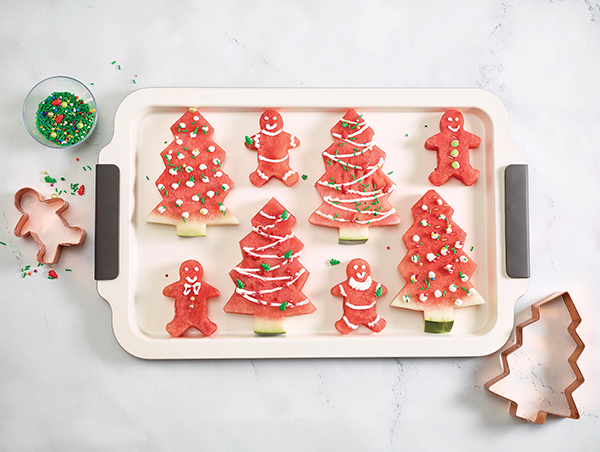
Holiday Watermelon Cutouts
Recipe courtesy of the National Watermelon Promotion Board
- 1/2 watermelon, cut into 1/2-inch thick disks
- vanilla frosting or yogurt
- sprinkles, for decorating
- Using holiday cookie cutters, cut shapes out of watermelon disks.
- Decorate watermelon shapes with yogurt.
- Top with sprinkles.

Watermelon and Blueberry Cheesecake
Recipe courtesy of the National Watermelon Promotion Board
Servings: 12
Cheesecake:
- Nonstick cooking spray
- 1/3 cup graham cracker crumbs (2 graham crackers)
- 24 ounces fat-free cream cheese, at room temperature
- 8 ounces low-fat cream cheese, at room temperature
- 1 cup white sugar
- 3/4 cup no-calorie sugar substitute
- 3/4 cup fat-free half-and-half
- 1/4 cup fresh lemon juice
- 2 tablespoons lemon peel, finely grated
- 2 teaspoons vanilla extract
- 1 1/2 cups liquid egg substitute (equivalent of 6 eggs)
Watermelon-Blueberry Sauce:
- 3 cups watermelon juice, with pulp
- 6 teaspoons cornstarch
- 6 tablespoons lemon juice
- 3 tablespoons sugar
- 3 tablespoons no-calorie sugar substitute
- 1-1 1/2 teaspoons lemon extract
- 2 cups diced watermelon
- 3 cups blueberries
- To make cheesecake: Preheat oven to 350 F.
- Spray bottom and sides of 9-inch springform pan. Sprinkle graham cracker crumbs in pan and tilt to spread evenly over bottom and sides, leaving extra crumbs on bottom.
- Using electric mixer, beat fat-free cream cheese, low-fat cream cheese, sugar and sugar substitute until creamy and well-blended. Slowly add half-and-half, lemon juice, lemon peel and vanilla; continue beating. Add egg substitute until mixture is thoroughly blended and creamy. Pour into crumb-lined pan.
- Place springform pan in large roasting pan. Pour enough water into roasting pan to come halfway up sides of springform pan. Bake cheesecake until firm, slightly golden and top is cracked, about 1 hour, 25 minutes. Remove springform pan from water and refrigerate, uncovered, until cold, about 3 hours or overnight.
- To make watermelon-blueberry sauce: In blender, whip watermelon juice, cornstarch, lemon juice, sugar and sugar substitute until smooth. Pour into small saucepan over medium-high heat and bring to gentle boil until topping begins to thicken. Remove from heat and place in refrigerator to cool. Just before serving, add lemon extract, diced watermelon and blueberries; stir to thoroughly blend.
- To serve, run knife around sides of cheesecake and remove springform pan sides. Top each slice with generous helping of watermelon-blueberry sauce.

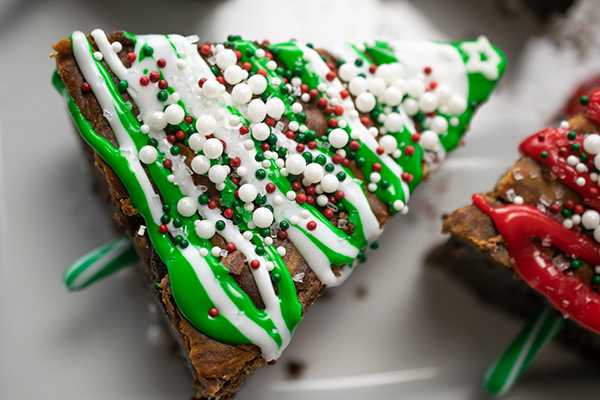
Christmas Tree Cheesecake Brownies
(Family Features) Festive fun and baking holiday treats go hand-in-hand, and these Christmas Tree Cheesecake Brownies provide a perfect way to enjoy a holiday tradition in the kitchen with loved ones.
Decorate your own version using green and white frosting, sprinkles of your choice and candy canes for “stumps” in the tree-shaped sweets.
Visit milkmeansmore.org to find more holiday inspiration.
Watch video to see how to make this recipe!
Christmas Tree Cheesecake Brownies
Recipe courtesy of Jenn Fillenworth of “Jenny with the Good Eats” on behalf of Milk Means More
Prep time: 10 minutes
Cook time: 30 minutes
Servings: 16
- Nonstick cooking spray
Cheesecake Batter:
- 8 ounces low-fat cream cheese, at room temperature
- 1/3 cup granulated sugar
- 2 eggs
- 1 tablespoon all-purpose flour
Brownie Batter:
- 1 cup all-purpose flour
- 1/2 cup cocoa powder
- 1/2 teaspoon salt
- 1 cup granulated sugar
- 1/4 cup vegetable oil
- 1/4 cup milk
- 2 eggs
- 1 teaspoon pure vanilla extract
Decorations:
- green frosting
- white frosting
- assorted sprinkles
- star-shaped sprinkles
- candy canes
- Preheat oven to 350 F.
- Coat 8-inch square baking pan with nonstick cooking spray; set aside.
- To make cheesecake batter: Place cream cheese in bowl of stand mixer. Beat at medium speed until smooth and creamy. Add sugar and beat well. Add eggs, one at a time, beating well after each addition. Add flour and beat mixture until blended.
- To make brownie batter: In medium bowl, whisk flour, cocoa powder and salt until combined. In separate bowl, whisk sugar, oil, milk, eggs and vanilla until well combined. Add wet ingredients to dry ingredients and mix until blended.
- Pour brownie batter evenly into prepared pan.
- Carefully pour cheesecake batter over top, spreading evenly. Carefully swirl layers together using knife tip.
- Bake 30 minutes until brownies are set.
- Cool brownies completely in pan on wire rack before cutting into triangle pieces.
- Decorate trees by piping green and white frosting. Top with assorted sprinkles and star-shaped sprinkles. Place 3-inch candy cane pieces in bottoms of brownies for stumps.
Source:

Family Foods to Fuel Education
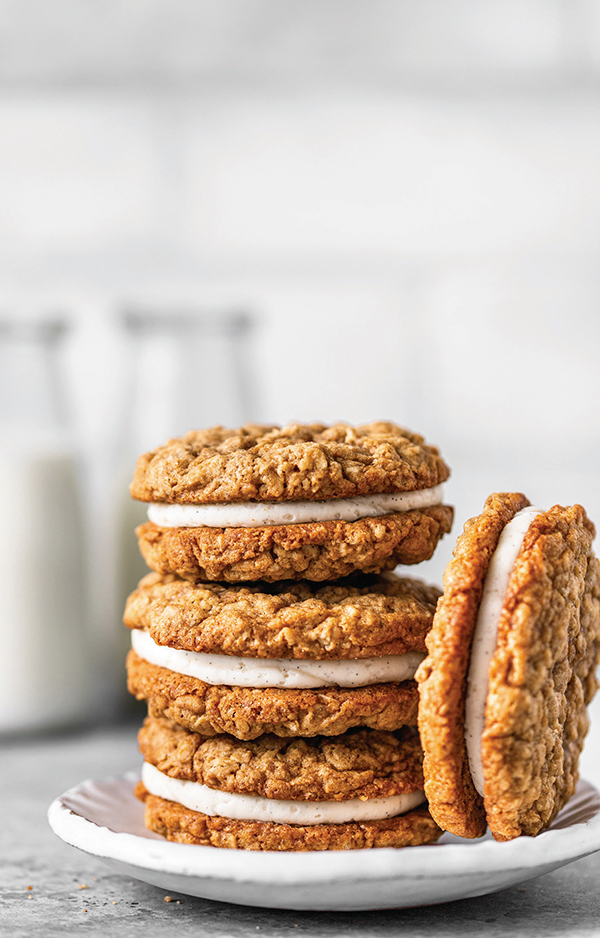
A Sweet School Day Treat
A long day of learning and activities calls for a well-deserved snack, and cookies are just the solution for many families.
Soft, chewy oatmeal cookies sandwiched together with a fluffy vanilla bean buttercream create the perfect treat with these Homemade Oatmeal Creme Cookies. Because they take just an hour to create using flavor-boosting ingredients like Domino sugars, you’re left with plenty of time for helping with homework or simply enjoying moments together with loved ones.
Find more dessert inspiration at DominoSugar.com.
Homemade Oatmeal Creme Cookies
Recipe courtesy of Michael Johnson on behalf of Domino Sugar
Prep time: 45 minutes
Cook time: 15 minutes
Servings: 10-12
Oatmeal Cookies:
- 1 cup unsalted butter, room temperature
- 1 cup Domino Dark Brown Sugar
- 1/2 cup Domino Golden Sugar
- 2 large eggs
- 2 teaspoons vanilla extract
- 1 1/2 cups all-purpose flour
- 1 teaspoon baking soda
- 1/2 teaspoon coarse sea salt
- 3/4 teaspoon ground cinnamon
- 1/4 teaspoon ground cloves
- 3 cups rolled old-fashioned oats
Vanilla Bean Creme Filling:
- 3/4 cup unsalted butter, room temperature
- 2 1/2 cups Domino Confectioners’ Sugar
- 1 teaspoon vanilla bean paste or vanilla extract
- 1 tablespoon heavy cream
- To make Oatmeal Cookies: Preheat oven to 350 F. Line baking sheet with parchment paper and set aside.
- In bowl of stand mixer fitted with paddle attachment or in large bowl with electric mixer, cream butter, brown sugar and golden sugar on medium-high speed until light and creamy, about 2 minutes. Add eggs and vanilla; mix until combined, scraping down sides of bowl as needed. Set aside.
- In medium bowl, whisk flour, baking soda, salt, cinnamon, cloves and oats. With mixer on low, slowly add oat mixture to wet ingredients, mixing until just combined.
- Using large cookie scoop, scoop dough onto prepared baking sheet, leaving about 2 1/2 inches between each cookie. Bake 12-14 minutes, or until lightly golden brown around edges. Allow cookies to sit on pan about 3 minutes before removing to wire rack to cool completely.
- To make Vanilla Bean Creme Filling: In bowl of stand mixer fitted with paddle attachment or in large bowl with electric mixer, beat butter on medium-high speed until light and fluffy, about 5 minutes.
- Turn speed to low and gradually add confectioners’ sugar, mixing until completely incorporated. Add vanilla bean paste and heavy cream; mix until combined.
- Turn mixer to medium-high speed and beat 3-5 minutes until buttercream is fluffy. If necessary, add cream 1 teaspoon at a time until desired consistency.
- To fill and assemble, pipe or spread about 1 1/2 tablespoons Vanilla Bean Creme Filling on bottom halves of Oatmeal Cookies; top with remaining halves.
Source: Domino Sugar

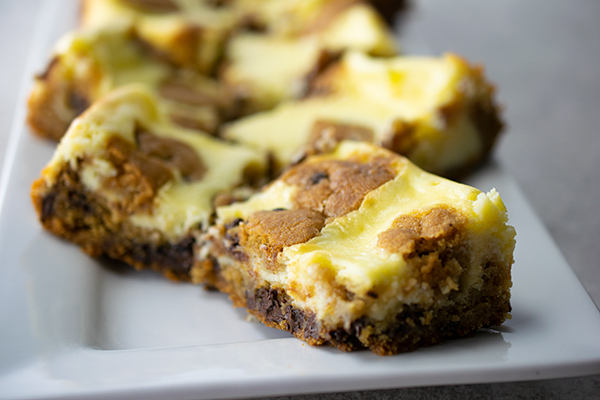
Chocolate Chip Cream Cheese Bars
Simple, sweet treats are always a win with the family when you need to change things up a bit. Enjoy some decadence with this dessert recipe including creamy cheesecake filling coupled with chocolate cookie dough for a truly rich delight.
Find more dessert ideas at Culinary.net.
Watch video to see how to make this recipe!
Chocolate Chip Cream Cheese Bars
- 2 rolls chocolate chip cookie dough, divided
- 2 packages cream cheese (8 ounces each), softened
- 1/2 cup sugar
- 2 eggs, at room temperature
- 1 teaspoon vanilla extract
- Heat oven to 350 F.
- Prepare 9-by-13-inch baking pan with parchment paper.
- Press 1 1/4 cookie dough rolls into bottom of pan.
- In large bowl, mix cream cheese until fluffy. Add sugar, mix well. Add eggs and vanilla extract; beat until combined. Pour cheesecake filling over cookie dough base.
- Crumble remaining cookie dough over cream cheese filling.
- Bake 35-40 minutes.
- Cool completely before cutting. Store in refrigerator.