
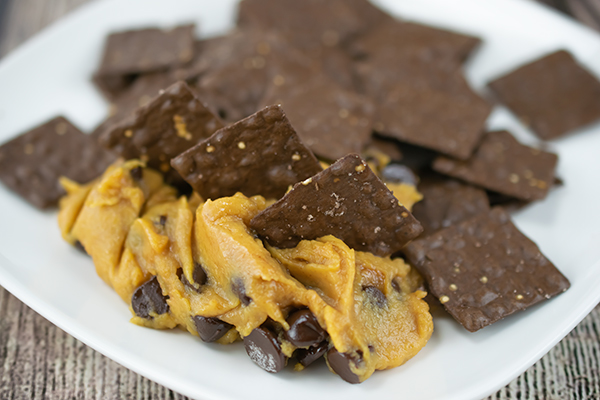
Peanut Butter Chocolate Chickpea Cookie Dip
(Family Features) For many families, the summer months offer a break in routine, and that extra time around the house or gathering with loved ones can lead to increased snacking opportunities. However, that warmer weather can also be accompanied by a desire for sweet treats.
To satisfy that sweet tooth without sacrificing nutrition, consider an option like Crunchmaster Protein Brownie Thins. The bite-size snacks – available in Dark Chocolate, Homestyle Milk Chocolate and Salted Caramel – pack the warm and gooey taste of baked brownies with a boost of 8 grams of protein per serving plus black bean and quinoa nutrition. Plus, they are free of gluten, artificial flavors, colors, cholesterol and trans-fat, and are non-GMO and kosher.
You can elevate your summer snacks by pairing them with this Peanut Butter Chocolate Chickpea Cookie Dip. Made using only eight ingredients, including chickpeas and peanut butter, it’s a healthier alternative to help satisfy those warm weather cravings.
Find more nutritious summer snack recipes that pack a crunch at crunchmaster.com.
Watch video to see how to make this recipe!
Peanut Butter Chocolate Chickpea Cookie Dip
- 1 can (19 ounces) chickpeas, drained and rinsed
- 1/2 cup peanut butter
- 1/4 cup packed brown sugar
- 2 tablespoons maple syrup
- 2 tablespoons olive oil
- 2 teaspoons vanilla extract
- 1/4 teaspoon salt
- 1/2 cup chocolate chips
- 1 package (4 ounces) Crunchmaster Protein Brownie Thins Homestyle Milk Chocolate
- In food processor or blender, puree chickpeas, peanut butter, brown sugar, maple syrup, olive oil, vanilla and salt until smooth.
- Stir in chocolate chips. Spoon into serving dish. Serve dip with brownie thins.
Substitution: Nut butter or nut-free butter can be used in place of peanut butter.
Source: Crunchmaster

Warm Up This Winter with Easy Mug Desserts
(Family Features) Need a little warming up after a day out in the cold and snow? The McCormick Kitchens are sharing “hug in a mug”-themed desserts perfect for coming together after a day outside in a winter wonderland. Completely customizable, these treats are a delicious way for the whole family to stay warm this winter.
This Fudgy Raspberry Mug Brownie for two is made in the microwave in less than 10 minutes and topped with whipped cream and raspberries. To enjoy cool mint flavor instead, use peppermint and vanilla extracts in place of raspberry.
For more mug dessert recipes – from candy bar blondies to hot chocolate – visit www.McCormick.com and check out McCormick Spice on Facebook and Pinterest.
Fudgy Raspberry Mug Brownie
Servings: 2
- 3 tablespoons miniature chocolate chips
- 1 tablespoon butter
- 2 tablespoons packed brown sugar
- 2 tablespoons flour
- 1 egg yolk
- 1 teaspoon milk
- 3/4 teaspoon McCormick Raspberry Extract
- Microwave chocolate chips and butter in microwavable coffee mug on high 30 seconds or until melted. Stir. Add remaining ingredients; mix well.
- Microwave on high 45 seconds to 1 minute or until center looks almost set. Let stand 5 minutes before serving.
Note: For a Fudgy Peppermint Mug Brownie, replace Raspberry Extract with 1 teaspoon McCormick Pure Vanilla Extract and 1/4 teaspoon McCormick Pure Peppermint Extract.
Caution: Mug may be hot. Use pot holders when removing from microwave.

Decadent Treat-Filled Desserts

(Family Features) Creating one-of-a-kind desserts doesn’t have to take hours in the kitchen or even exceptional baking skills. With a little imagination and the right tools, you can whip up surprisingly delicious sweets that will surprise and delight your friends and family.
Focus on flavor
If your baking repertoire typically consists of white cake and chocolate frosting, spice things up a bit by experimenting with new fillings and flavor combinations. Opt for complementary or contrasting tastes for a truly delectable dessert. For example, pair fudgy chocolate cake with tangy berries, or see how a bold flavor like lemon adds a new dimension to a mild vanilla.
Add a special touch
Infusing new flavors into your favorite cake or brownie recipe is surprisingly easy when you use bakeware made for the purpose. Baker’s Advantage Fillables Bakeware helps home bakers easily create “treat-filled” desserts. Each bakeware set comes with two pans: One pan creates the bottom half of the cake and forms indentations in the cake you can fill with fruit, puddings, candy and more, while the second pan creates the top half of the cake, which hides the surprise fillings.
Shape it up
Artfully applied frosting and other decorations can instantly dress up a basic cake, but another option is upgrading the shape of the cake itself. In addition to traditional square, round and sheet cake pans, the Baker’s Advantage Fillables Bakeware collection includes mini heart cakes, fluted cakes, mini loaf cakes and a cake cones pan. These special shapes make it easy to create enviable desserts out of classic recipes.
Bake In the Fun
Making a cake with a treat hidden inside is as easy as 1-2-3 with Fillables Bakeware from Baker’s Advantage. Because the bakeware does all of the work for you, there are no special baking skills required; just pour in the batter and bake. Then, fill the pockets in the cake with any treat you like and spread icing to cover the surprise. Next, add the top cake layer, ice the whole cake, slice and serve.
Find more surprisingly easy dessert ideas at FillablesbyBakersAdvantage.com.

Brownie Cake Cones
Recipe courtesy of Baker’s Advantage/Alissa Wallers
- 3 ounces unsweetened chocolate
- 2 sticks butter
- 1/2 cup cocoa powder
- 2 1/2 cups sugar
- 3 eggs
- 1 tablespoon vanilla extract
- 1 1/2 cups flour
- 1/2 teaspoon salt
- 2 teaspoons baking powder
- nonstick cooking spray
- Vanilla Frosting (recipe below) or ice cream
- Heat oven to 350° F.
- In double boiler, melt chocolate and butter.
When melted, place in large bowl and whisk in cocoa powder until smooth. Add sugar and mix. - Combine eggs and vanilla; gently mix with fork or whisk to break up eggs. Add eggs and vanilla to batter.
- Sift together flour, salt and baking powder. Fold in flour until just combined.
- Spray Fillables 8 Cup Cake Cone Pan with nonstick cooking spray. Fill bottom pan with batter to line in middle of pan then place insert on top and snap together.
- Place on middle of rack in oven and bake 15-18 minutes. Allow to cool before removing from pan.
Filling suggestions:
• Graham crackers, chocolate chips and marshmallows
• Whipped cream and berries
• Ice cream or pudding
- Add fillings inside cone, top with Vanilla Frosting or ice cream, and serve.
Vanilla Frosting
Recipe courtesy of Baker’s Advantage/Alissa Wallers
- 3 sticks butter, unsalted and at room temperature
- 6 cups powdered sugar
- 2 teaspoons vanilla extract
- 1/2 teaspoon salt
- 1/4 cup heavy cream
- Using handheld or stand mixer, cream butter on high, about 3 minutes.
- Add powdered sugar 1/2 cup at a time, mixing on medium between each addition.
- Scrape bowl well. Add remaining ingredients; mix on low until incorporated.
- Turn mixer to high and beat frosting until light and fluffy, about 5 minutes.
- Use immediately or store in airtight container in refrigerator.
Note: Frosting must be at room temperature prior to using.

Berries and Cream Fluted Pound Cake
Recipe courtesy of Baker’s Advantage/Alissa Wallers
- 4 sticks butter, room temperature
- 3 cups sugar
- 6 eggs
- 4 teaspoons vanilla extract
- 3 1/2 cups flour
- 2 teaspoons baking powder
- 1 teaspoon salt
- 1/2 cup milk, at room temperature
- nonstick cooking spray
- Heat oven to 350° F.
- With stand or handheld mixer, cream butter and sugar until light and fluffy. Add eggs one at a time, scraping between each egg. Add vanilla extract.
- Sift flour, baking powder and salt together. Add flour mixture to mixing bowl and slowly add milk while mixing. Mix until just combined.
- Spray Fillables Fluted Cake Pan with nonstick cooking spray. Fill bottom of both pans with batter to three-quarters full.
- Bake on middle rack in oven 20-25 minutes. Allow to cool before removing from pan.
Filling suggestions:
• Blueberries, plus additional for topping
• Raspberries, plus additional for topping
• Strawberries, stem removed and cut into small pieces, plus additional for topping
• Vanilla Frosting (recipe below)
- Fill pockets in bottom layer of pound cake with different berries.
- Carefully spread Vanilla Frosting over top of berries and cake.
- Place top layer of cake on top of frosting.
- Drizzle warmed up Vanilla Frosting over top of cake.
- Decorate top with berries.
Vanilla Frosting
Recipe courtesy of Baker’s Advantage/Alissa Wallers
- 3 sticks butter, unsalted and at room temperature
- 6 cups powdered sugar
- 2 teaspoons vanilla extract
- 1/2 teaspoon salt
- 1/4 cup heavy cream
- Using handheld or stand mixer, cream butter on high, about 3 minutes.
- Add powdered sugar 1/2 cup at a time, mixing on medium between each addition.
- Scrape bowl well. Add remaining ingredients; mix on low until incorporated.
- Turn mixer to high and beat frosting until light and fluffy, about 5 minutes.
- Use immediately or store in airtight container in refrigerator.
Note: Frosting must be at room temperature prior to using.
Source: Lifetime Brands

Salted Caramel Cheesecake Brownie Bars
These Salted Caramel Cheesecake Brownie Bars call for cream cheese, sweetened condensed milk, vanilla, caramel and chocolate syrups and pecans.
Ingredients
- Crisco® Original No-Stick Cooking Spray
- 1 (19.5-ounce) package Pillsbury® Mocha Flavored Fudge Brownie Mix
- 1 (8-ounce) package cream cheese, softened
- 2 tablespoons butter, softened
- 1 tablespoon cornstarch
- 1 (14-ounce) can Eagle Brand Sweetened Condensed Milk
- 1 egg
- 1 teaspoon vanilla extract
- Smucker's Sundae Syrup(tm) Caramel Flavored Syrup
- Smucker's Sundae Syrup Chocolate Flavored Syrup
- Pecan chips for sprinkling
- Sea salt crystals for sprinkling
Preparation
- HEAT oven to 350°F. Spray a 13 x 9 baking pan with no-stick cooking spray and set aside. Prepare brownie mix according to package directions. Spread into baking pan.
- COMBINE cream cheese, butter and cornstarch in a small bowl and using a mixer, beat until fluffy. Gradually add sweetened condensed milk, egg and vanilla beating until smooth. Pour evenly over brownie batter. Bake for 45 minutes or until the top is slightly golden brown.
- REMOVE from the oven and let cool. Using generous amounts of caramel and chocolate flavored syrups to create a lattice pattern over the entire pan. Sprinkle with pecan chips and lightly sprinkle with sea salt.
- CUT into bars and store covered in the refrigerator.
Cook Time
45 minutes
Serves
Servings 40
Notes, Tips & Suggestions
Rebecca F., Bartlett, Ill.