
Guilt-Free, Superfruit Snacking: Sweet treats made to permissibly indulge
(Family Features) For many, enjoying a small indulgence can serve as a reward for a job well done or a mood-boosting pick-me-up. In fact, mindful snacking is on-trend for a majority of consumers.
According to Mondelez International’s Fourth Annual State of Snacking Global Consumer Trends Study, 78% are choosing small indulgences to pamper themselves and 68% are checking nutrition labels on snacks.
With today’s changing palates and the growing demand for sour, less sweet foods and beverages, a superfruit like tart cherries can help snackers permissibly indulge without the guilt. Primarily grown on small family farms in the United States, Montmorency tart cherries – also referred to as sour cherries – are available year-round in dried, juice and juice concentrate, canned and frozen forms.
More than 110 scientific research studies show Montmorency tart cherries are a superfruit. In addition to their sweet-sour taste and unique nutrient profile, research suggests tart cherries – one of the few natural food sources of melatonin – may help improve sleep, aid in exercise recovery, reduce inflammation, ease arthritis symptoms, improve gut health and promote heart health. In fact, in one study published in the “European Journal of Nutrition,” adults who drank Montmorency tart cherry juice slept about 40 minutes longer on average and had up to a 6% increase in sleep efficiency.
While increasingly featured in functional beverages and health-positioned foods, tart cherries can also add drool-worthy flavor to superfruit-infused snacks, such as these Tart Cherry Superfood Banana Splits and Tart Cherry Brownie Bites. Plus, using tart cherries as a favorite ingredient in recipes like these adds a health halo to sweets – reinforcing the trend of permissible indulgences.
As an ideal superfruit snack that makes snacking more satisfying, tart cherries provide delicious flavor and potential health benefits in these recipes and beyond so you can savor the moment and cherish every bite.
Find more tart cherry snack recipes at ChooseCherries.com.
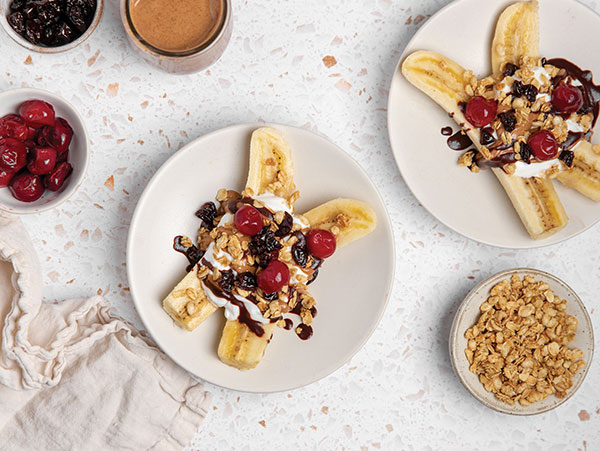
Tart Cherry Superfood Banana Splits
Recipe courtesy of Hannah Zimmerman of Bite Sized Studio on behalf of the U.S. Tart Cherry Industry
Prep time: 15 minutes
Cook time: 20 minutes
Servings: 2
- 1/2 cup dark chocolate chips
- 2 cups tart cherry juice
- 2 ripe bananas
- 1 cup vanilla Greek yogurt
- 1/4 cup almond butter
- 1/4 cup granola
- 1/4 cup dried tart cherries
- 1/2 cup frozen tart cherries, thawed
- Place chocolate chips in bowl.
- In saucepan over medium heat, bring tart cherry juice to simmer about 20 minutes until reduced to 2/3 cup.
- Pour juice into bowl and mix until chocolate chips are melted and sauce is smooth.
- Cut bananas in half lengthwise and place on two plates. Spoon 1/2 cup Greek yogurt on each banana then drizzle with 2 tablespoons almond butter and 2 tablespoons tart cherry chocolate sauce.
- Sprinkle 2 tablespoons granola, 2 tablespoons dried tart cherries and 1/4 cup thawed frozen tart cherries on top of each banana split.
Note: Leftover tart cherry chocolate sauce can be stored in airtight container in refrigerator for later use.
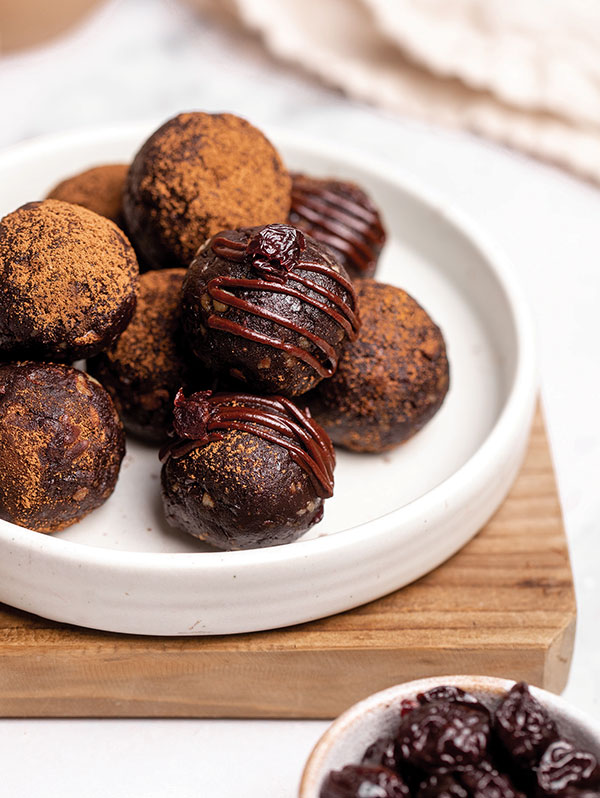
Tart Cherry Brownie Bites
Recipe courtesy of Hannah Zimmerman of Bite Sized Studio on behalf of the U.S. Tart Cherry Industry
Prep time: 10 minutes
Yield: 12 bites
- 10 medjool dates, pitted
- 1/2 cup dried tart cherries
- 1/4 cup walnuts
- 2 tablespoons rolled oats
- 1/4 cup cocoa powder
- 1 tablespoon chia or hemp seeds (optional)
- 1/4 teaspoon salt
- 2 tablespoons peanut or almond butter
- 4 tablespoons tart cherry juice
- 1/4 cup mini chocolate chips
- cocoa powder (optional)
- melted chocolate (optional)
- In bowl of food processor, combine dates; dried tart cherries; walnuts; oats; cocoa powder; seeds, if desired; salt; and nut butter. Pulse 30-60 seconds until ingredients are ground into tiny pieces.
- Add tart cherry juice in 1 tablespoon additions, pulsing mixture after each addition, until crumbly dough forms.
- Transfer dough to bowl and fold in chocolate chips.
- Roll dough into 12 balls. Serve plain or finish balls with dusting of cocoa powder or drizzle of melted chocolate, if desired.
Source: Cherry Marketing Institute

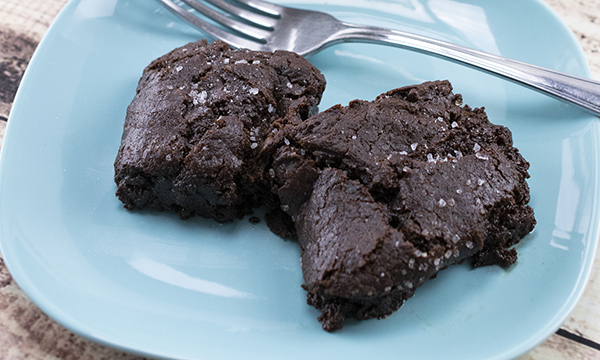
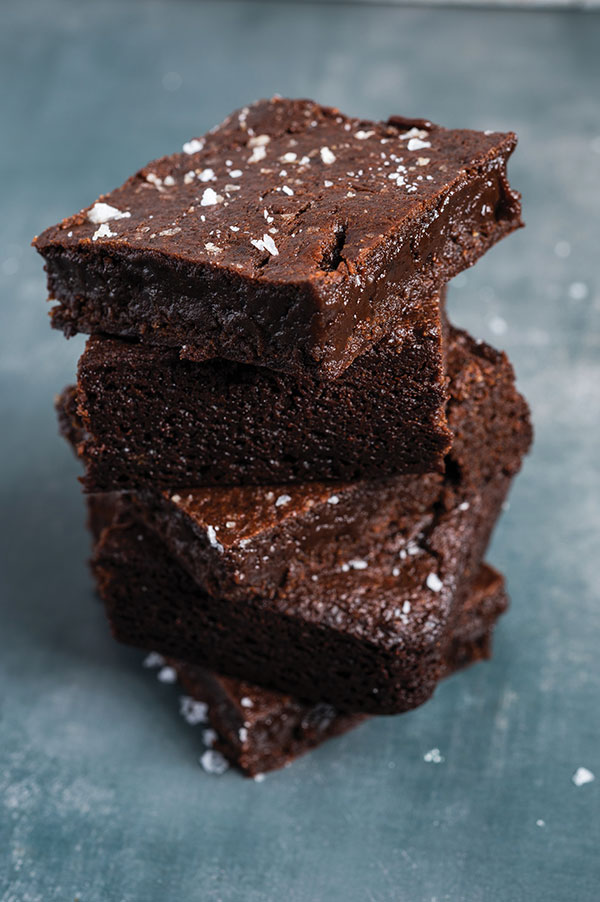
Vegan Brownies
(Family Features) The next time a healthy conscience keeps you from enjoying that sweet treat you’re craving, remember that making healthy swaps is all it takes to make those favorite desserts a little better for you.
These Vegan Brownies, for example, are perfect for chocolate lovers looking for a sweet they can enjoy without ditching healthy eating habits. By using versatile California Prunes as a natural sweetener, you can replace processed sugar, fats and eggs in all kinds of recipes. Plus, prunes also add nutrients important for bone and gut health to your everyday diet.
With copper that aids in bone structure along with boron and polyphenols that help with the regulation of bone building and bone breakdown, you can feel good enjoying your family’s favorites while staying on track with health goals. Prunes are also known as a “good gut food,” meaning a single serving (4-5 prunes) can help support a healthy microbiome. High in vitamin K, they can also help improve calcium balance and promote bone mineralization.
Visit californiaprunes.org to find more delicious, better-for-you desserts.
Watch video to see how to make this recipe!
Vegan Brownies
Prep time: 10 minutes
Cook time: 25 minutes
Servings: 9
Prune Puree:
- 16 ounces pitted California prunes
- 1/2 cup hot water
Brownies:
- 2 teaspoons vanilla extract
- 1/4 cup cocoa powder
- 1 tablespoon baking powder
- 1 1/2 cups all-purpose flour
- 10 ounces California prune puree
- 2 cups light brown sugar
- 1/2 cup California extra-virgin olive oil
- 6 ounces unsweetened chocolate
- nonstick cooking spray
- flaky sea salt, for garnish
- To make prune puree: In blender, combine prunes and water. Pulse to combine then blend until smooth, pourable consistency forms, scraping sides, if necessary.
- Store puree in airtight container in fridge up to 4 weeks.
- To make brownies: Preheat oven to 350 F. Line 9-by-9-inch baking pan with parchment paper then lightly grease with nonstick cooking spray.
- Using double boiler, melt chocolate and olive oil. Whisk in sugar and prune puree; mix until dissolved.
- Into large bowl, sift flour, baking powder and cocoa powder. Gently fold in chocolate and prune mixture then add vanilla.
- Spread batter in prepared pan, sprinkle with flaky sea salt and bake 20-25 minutes, or until top starts to look dry and brownies are just beginning to pull away from sides of pan.
- Cool in pan. Remove then cut brownies into 3-inch squares.
Source: California Prunes

Bring On Dessert with Better-for-You Sweets
(Family Features) If healthier eating holds a prominent spot on your list of goals, you may feel it’s necessary to eliminate some of your sweetest favorites. However, committing to a nutritionally friendly way of life doesn’t have to leave desserts by the wayside.
Instead, rethinking nighttime treats with better-for-you ingredients like California Prunes as a quick substitution can make healthier eating easy. As a versatile ingredient that can replace added sugar, fats and eggs in all kinds of recipes, prunes can also add nutrients important for bone and gut health.
Plus, the copper in prunes inhibits bone breakdown, while boron plays a role in calcium metabolism and polyphenols can help decrease bone breakdown through their antioxidant power. As a fruit that’s high in vitamin K, which helps improve calcium balance and promotes bone mineralization, prunes are also a “good gut food,” meaning a single serving (roughly 4-6 prunes) can help support a healthy microbiome.
They’re easy to use in recipes that can become favorites in your household such as these Chocolate Energy Balls. Enjoyed as an easy, on-the-go snack, they’re a perfect way to refuel for an adventure, recharge after a workout or to simply savor as a healthy snack.
Chocolate lovers rejoice: This rich, delicious, gluten-free, grain-free Chocolate Covered Prune Fudge Cake is naturally sweetened using prunes instead of added sugar. If brownies are more your style, prunes can also take the place of eggs in these Vegan Brownies for a family-friendly treat that won’t wreck your eating plan.
To find more better-for-you desserts, visit californiaprunes.org.
Vegan Brownies
Prep time: 10 minutes
Cook time: 25 minutes
Servings: 9
Prune Puree:
- 16 ounces pitted California prunes
- 1/2 cup hot water
Brownies:
- nonstick cooking spray
- 6 ounces unsweetened chocolate
- 1/2 cup California extra-virgin olive oil
- 2 cups light brown sugar
- 10 ounces California prune puree
- 1 1/2 cups all-purpose flour
- 1 tablespoon baking powder
- 1/4 cup cocoa powder
- 2 teaspoons vanilla extract
- flaky sea salt, for garnish
- To make prune puree: In blender, combine prunes and water. Pulse to combine then blend until smooth, pourable consistency forms, scraping sides, if necessary.
- Store puree in airtight container in fridge up to 4 weeks.
- To make brownies: Preheat oven to 350 F. Line 9-by-9-inch baking pan with parchment paper then lightly grease with nonstick cooking spray.
- Using double boiler, melt chocolate and olive oil. Whisk in sugar and prune puree; mix until dissolved.
- Into large bowl, sift flour, baking powder and cocoa powder. Gently fold in chocolate and prune mixture then add vanilla.
- Spread batter in prepared pan, sprinkle with flaky sea salt and bake 20-25 minutes, or until top starts to look dry and brownies are just beginning to pull away from sides of pan.
- Cool in pan. Remove then cut brownies into 3-inch squares.
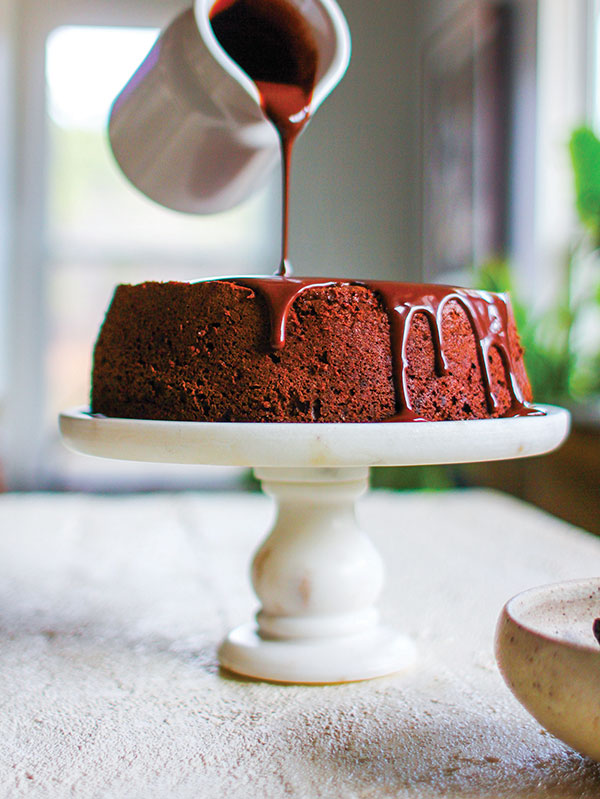
Chocolate Covered Prune Fudge Cake
Prep time: 15 minutes
Cook time: 55 minutes
Yield: 1 cake (8 inches)
Cake:
- Coconut oil spray
- 14 tablespoons butter, chopped
- 2 teaspoons vanilla extract
- 3/4 cup cocoa powder
- 10 soft, pitted prunes, chopped small
- 1/3 cup maple syrup
- 6 eggs
- 1/2 cup coconut sugar
- 1 cup almond meal
Ganache:
- 1 cup full-fat coconut milk
- 1 1/3 cups dark chocolate morsels
- To make cake: Preheat oven to 300 F. Lightly spray bottom and sides of 8-inch springform pan with coconut oil spray. Place round piece of parchment paper in bottom of pan and lightly spray with coconut oil spray.
- In small saucepan over low heat, place butter and vanilla. Use sieve to sift cocoa into saucepan. Stir with spatula until completely smooth. Remove from heat and set aside.
- In bowl of food processor fitted with "S" blade, place prunes and syrup. Top with cooled butter mixture then process until smooth. Transfer to large mixing bowl, scraping all chocolate mixture from food processor with spatula.
- In bowl of stand mixer fitted with whisk attachment, whip eggs and coconut sugar on high speed 7 minutes, or until tripled in volume.
- Add one-third of egg mixture to bowl with chocolate mixture. Using spatula, gently fold together until completely combined. Add almond meal and remaining egg mixture to bowl and gently fold to combine.
- Pour batter into prepared pan and bake 55 minutes, or until set. Once cooked through, transfer cake to cooling rack and cool completely in pan.
- To make ganache: In top of double boiler, melt coconut milk and dark chocolate until completely smooth. Pour prepared ganache over cake. Serve immediately for molten fudge effect or allow to completely set.
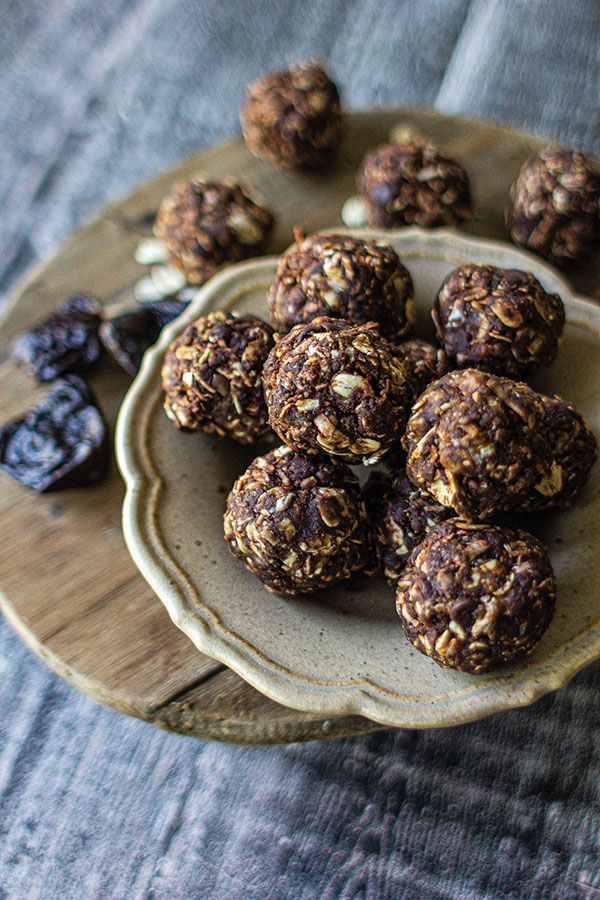
Chocolate Energy Balls
Recipe courtesy of Meg van der Kruik on behalf of California Prunes
Prep time: 10 minutes
Cook time: 30 minutes
Yield: 24 pieces
Prune Puree:
- 16 ounces pitted California prunes
- 1/2 cup hot water
Energy Balls:
- 1 cup old-fashioned or gluten-free oats
- 2/3 cup toasted, unsweetened shredded coconut
- 1/2 cup creamy natural nut butter (peanut or almond)
- 1/2 cup pecan meal
- 1/2 cup prune puree
- 1/4 cup unsweetened cocoa powder
- 1 teaspoon vanilla extract
- To make prune puree: In blender, combine prunes and water. Pulse to combine then blend until smooth, pourable consistency forms, scraping sides, if necessary.
- Store puree in airtight container in fridge up to 4 weeks.
- To make energy balls: In mixing bowl, stir oats, coconut, nut butter, pecan meal, prune puree, cocoa powder and vanilla until completely combined.
- Cover and chill in refrigerator 30 minutes. Once chilled, use small cookie scoop or measuring spoon to measure equal-sized amounts of mixture then form into balls by applying gentle pressure to dough using palms. Do not roll as balls will break apart.
- Store covered in airtight container in refrigerator up to 1 week.
Source:

Mint Brownies
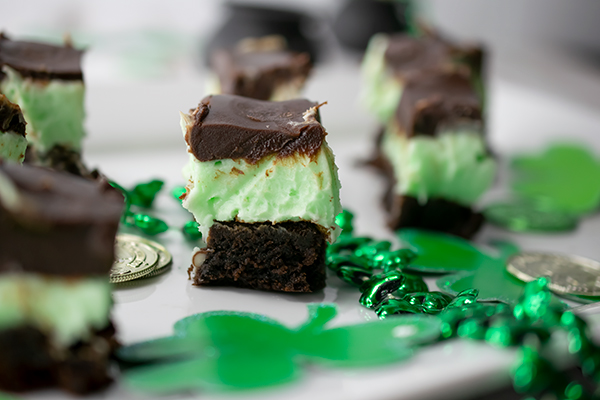
(Culinary.net) How lucky you must be to come across this recipe just in time for St. Patrick’s Day. This one is a twisted combination of mint and sweet chocolate that’s sure to have almost anyone’s taste buds screaming “yum.” This dessert might just be the pot of gold at the end of your rainbow this year.
These Mint Brownies have three delicious layers. First, a supreme brownie on bottom. Then a fluffy, green mint layer that’s full of flavor and color. Last, but definitely not least, a chocolate layer on top made with chocolate chips, butter and a little whipping cream.
All of these layers create a smooth, sweet, minty, bite-sized dessert perfect for any occasion but especially St. Patrick’s Day. The green mint color really pops off the plate, giving it some extra flare and an appetizing glow.
To start, create the soft, chocolate filled brownie. Combine brownie mix, vegetable oil, one egg, water and the chocolate syrup pouch. Bake and cool completely.
Then it’s time for some colorful, festive fun. Make the filling with powdered sugar, butter, whipping cream, softened cream cheese, a splash of peppermint extract and a few drops of green food coloring. Beat and pour over the cooled brownie pan.
The last layer is simple. In a saucepan, melt whipping cream, chocolate chips and butter until smooth. When it’s cooled to lukewarm, pour it over the filling for the final layer.
Refrigerate the Mint Brownies for two hours before serving. Cut them into bite-size pieces for small chunks that will melt in your mouth.
Find more seasonal dessert recipes at Culinary.net.
Watch video to see how to make this recipe!
Mint Brownies
Servings: 9-12
- Nonstick cooking spray
- 1 box supreme brownie mix with chocolate syrup pouch
- 3 tablespoons water
- 1/3 cup vegetable oil
- 1 egg
Filling:
- 3 1/2 cups powdered sugar
- 1/4 cup butter, softened
- 1/4 cup whipping cream
- 5 ounces cream cheese, softened
- 1/2 teaspoon peppermint extract
- 5 drops green food color
Topping:
- 1/2 cup whipping cream
- 1 bag (12 ounces) chocolate chips
- 1/2 cup butter
Heat oven to 350 F.
- Spray 8-by-8-inch pan with nonstick cooking spray.
- In large bowl, mix brownie mix, water, oil and egg until combined. Pour into prepared baking pan. Bake 35 minutes. Cool completely, about 1 hour.
- To make filling: In large bowl, beat powdered sugar, butter, whipping cream, cream cheese, peppermint extract and food coloring. Spread over cooled brownies. Refrigerate 1 hour, or until set.
- To make topping: In saucepan, melt whipping cream, chocolate chips and butter until smooth. Cool until lukewarm, about 10 minutes. Pour over filling; spread to cover. Refrigerate 2 hours, or until set.
- Before serving, let brownies set 10 minutes at room temperature.
Tips: Cut brownies with wet knife for cleaner cuts. Store covered in refrigerator.

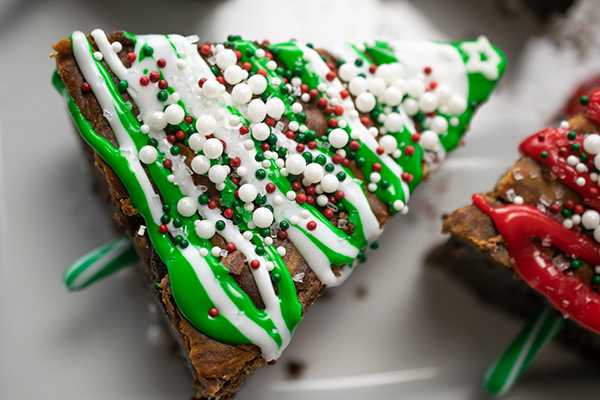
Christmas Tree Cheesecake Brownies
(Family Features) Festive fun and baking holiday treats go hand-in-hand, and these Christmas Tree Cheesecake Brownies provide a perfect way to enjoy a holiday tradition in the kitchen with loved ones.
Decorate your own version using green and white frosting, sprinkles of your choice and candy canes for “stumps” in the tree-shaped sweets.
Visit milkmeansmore.org to find more holiday inspiration.
Watch video to see how to make this recipe!
Christmas Tree Cheesecake Brownies
Recipe courtesy of Jenn Fillenworth of “Jenny with the Good Eats” on behalf of Milk Means More
Prep time: 10 minutes
Cook time: 30 minutes
Servings: 16
- Nonstick cooking spray
Cheesecake Batter:
- 8 ounces low-fat cream cheese, at room temperature
- 1/3 cup granulated sugar
- 2 eggs
- 1 tablespoon all-purpose flour
Brownie Batter:
- 1 cup all-purpose flour
- 1/2 cup cocoa powder
- 1/2 teaspoon salt
- 1 cup granulated sugar
- 1/4 cup vegetable oil
- 1/4 cup milk
- 2 eggs
- 1 teaspoon pure vanilla extract
Decorations:
- green frosting
- white frosting
- assorted sprinkles
- star-shaped sprinkles
- candy canes
- Preheat oven to 350 F.
- Coat 8-inch square baking pan with nonstick cooking spray; set aside.
- To make cheesecake batter: Place cream cheese in bowl of stand mixer. Beat at medium speed until smooth and creamy. Add sugar and beat well. Add eggs, one at a time, beating well after each addition. Add flour and beat mixture until blended.
- To make brownie batter: In medium bowl, whisk flour, cocoa powder and salt until combined. In separate bowl, whisk sugar, oil, milk, eggs and vanilla until well combined. Add wet ingredients to dry ingredients and mix until blended.
- Pour brownie batter evenly into prepared pan.
- Carefully pour cheesecake batter over top, spreading evenly. Carefully swirl layers together using knife tip.
- Bake 30 minutes until brownies are set.
- Cool brownies completely in pan on wire rack before cutting into triangle pieces.
- Decorate trees by piping green and white frosting. Top with assorted sprinkles and star-shaped sprinkles. Place 3-inch candy cane pieces in bottoms of brownies for stumps.
Source:

Celebrate Cinco de Mayo
(Family Features) Cinco de Mayo is a fun and festive holiday that's celebrated with music, dancing, family and delicious food. To bring great Mexican flavors to your fiesta, take a lesson from Maria Conception Jacinta Dominguez Ortega - also known as Mama Ortega.
In the 1800s, Mama Ortega created a loving home for her 13 children, and it centered around a tiny kitchen. From her small charcoal-burning stove, Mama created memorable meals her family loved. Everything for each meal was homegrown, handpicked and homemade.
You may not be able to grow your own ingredients, but you can take advantage of the way Mama did things - through authentic ingredients such as the line of Ortega Mexican Foods products. Fire-roasted chiles, authentic taco seasonings, crisp taco shells made with whole kernel corn and America's number one taco sauce are just a few of the ways that Ortega brings authentic Mexican flavor and fun to your family's dinner table.
For more delicious Mexican recipes to enjoy on Cinco de Mayo - or any day - visit www.ortega.com.

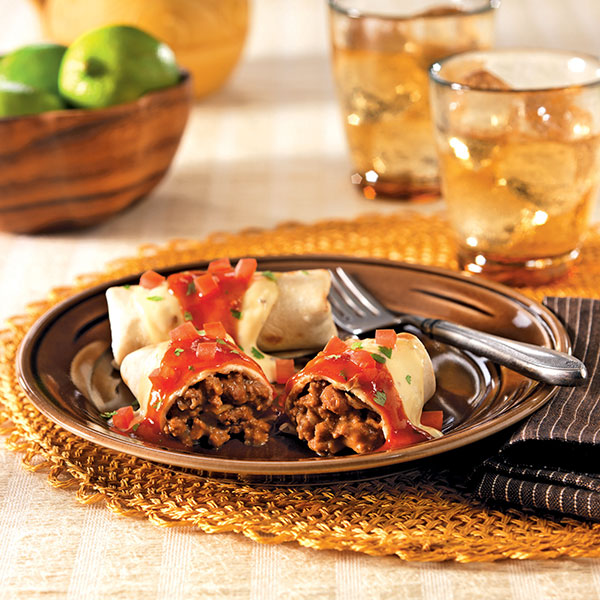
Slow-Cooked Shredded Beef Tacos
Prep Time: 12 minutes
Start to Finish: 6 hours
Makes: 6 to 8 servings
- 1 1/2 pounds beef chuck roast
- 1 medium onion, sliced
- 1 cup water
- 1 Ortega Grande Taco Dinner Kit
- 1 can (4 ounces) Ortega Diced Green Chiles
- Optional toppings: shredded lettuce, chopped tomato, shredded mild cheddar cheese, sour cream
- Place beef and onion in 4-quart slow cooker. Combine water and seasoning mix from kit in small bowl. Pour over beef and onion. Cover and cook on LOW 6 to 8 hours or until fork tender.
- Transfer beef to cutting board; shred beef with two forks. Place in large bowl. Stir in taco sauce from kit and chilies.
- Fill warmed taco shells and tortillas from kit with beef mixture. Top with cheese sauce from kit. Garnish with desired toppings.
Smothered Beef and Bean Burritos
Prep Time: 10 minutes
Start to Finish: 40 minutes
Makes: 10 burritos
- 1 can (10.75 ounces) condensed cream of mushroom soup
- 1 can (10 ounces) condensed cheddar cheese soup
- 1/2 cup sour cream
- 1 tablespoon olive oil
- 1 pound lean ground beef
- 1 onion, diced
- 3/4 cup water
- 1 Ortega Soft Taco Kit
- 1 cup Ortega Refried Beans
- 2 tablespoons chopped fresh cilantro
- 1/4 cup diced tomato
- Preheat oven to 350°F. Lightly coat 13 x 9-inch baking dish with nonstick cooking spray. Combine soups and sour cream in small bowl; set aside.
- Heat oil in skillet over medium-high heat. Add beef and onion. Cook and stir 5 minutes or until beef is no longer pink. Drain and discard fat. Add water and seasoning mix from kit. Cook and stir 3 minutes. Stir in refried beans.
- Wrap tortillas from kit with clean, lightly moistened cloth or paper towels. Microwave on HIGH (100% power) 1 minute, until hot and pliable.
- Divide beef mixture evenly among tortillas. Fold ends of tortilla to middle, then roll tightly around mixture. Place in baking dish, seam side down. Repeat with remaining tortillas.
- Spread soup mixture evenly over tortillas. Bake 22 to 25 minutes or until heated through. Garnish with taco sauce from kit, cilantro and tomatoes.
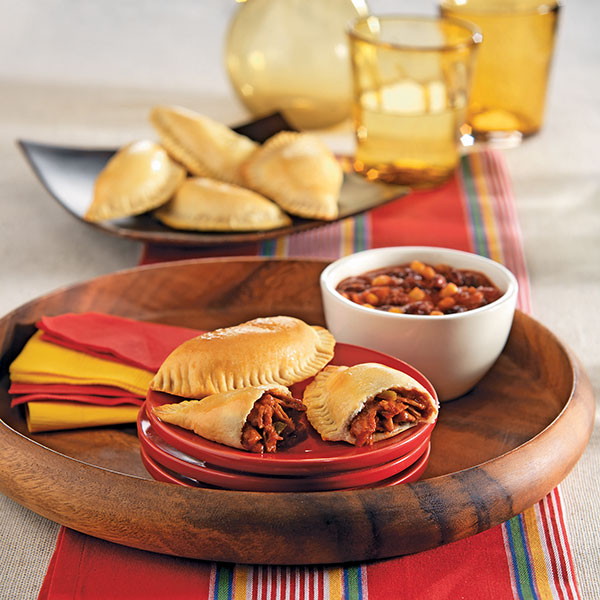
Easy Empanadas
Prep Time: 10 minutes
Start to Finish: 25 minutes
Makes: 12 empanadas
- 1 cup prepared refrigerated barbecue shredded pork
- 2 tablespoons Ortega Taco Sauce, any variety
- 1 tablespoon Ortega Fire-Roasted Diced Green Chilies
- 1 can (12-count) refrigerated biscuits
- 1 egg, well beaten
- 1 cup black bean and corn salsa
- Preheat oven to 375°F. Mix pork, taco sauce and chilies in small bowl.
- Separate biscuits into 12 pieces. Flatten each biscuit into 6-inch round, using rolling pin. Divide filling evenly among biscuits, spreading over half of each round to within 1/4 inch of edge. Fold dough over filling; press edges with fork to seal well. Place on ungreased cookie sheet. Brush tops with beaten egg.
- Bake 12 to 15 minutes or until edges are golden brown. Immediately remove from cookie sheet. Serve warm with salsa for dipping.
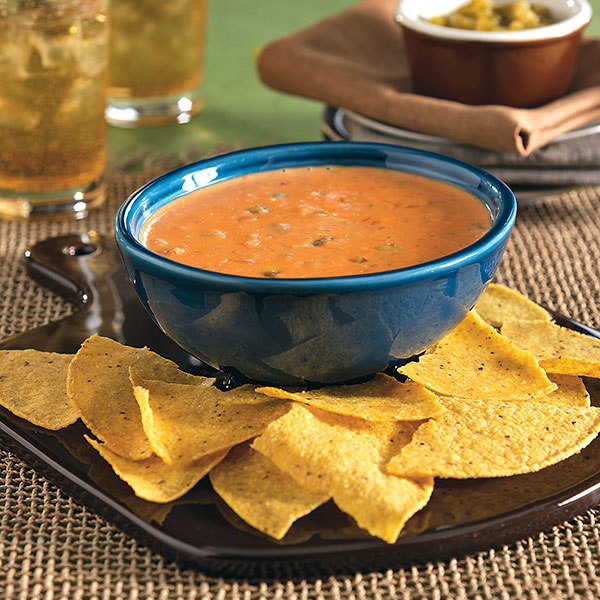
Chili Con Queso Dip
Prep Time: 3 minutes
Start to Finish: 15 minutes
Makes about 3 cups
- 1 package (16 ounces) pasteurized processed cheese spread, cut into chunks
- 1 cup Ortega Thick and Chunky Mild Salsa
- 1 can (4 ounces) Ortega Fire-Roasted Diced Green Chiles
- 1 package (10 count) Ortega Tostada Shells or 1 package (12-count)
- Ortega Taco Shells, broken into pieces
- Additional Ortega Fire-Roasted Diced Green Chiles (optional)
- Chopped tomatoes (optional)
- Combine cheese, salsa and chilies in small saucepan. Cook and stir over low heat until fully melted and blended.
- Serve warm with tostada or taco shells. Garnish with additional chilies and tomatoes, if desired.

Chocolate Chile Brownies With Spiced Frosting
Prep Time: 10 minutes
Start to Finish: 1 hour
Makes: 9 servings
Brownies
- 1 package (18 to 19 ounces) brownie mix, plus ingredients to prepare mix
- 1 can (4 ounces) Ortega Diced Green Chiles, undrained
Frosting
- 1 cup powered sugar
- 1 tablespoon Ortega Chili Seasoning Mix
- 1 1/2 to 2 tablespoons milk
- Preheat oven to 350°F. Line 8-inch square baking pan with aluminum foil, extending foil over sides of pan; lightly coat with nonstick cooking spray.
- Prepare brownies according to package directions. Stir in chilies; mix until well blended. Pour into prepared baking pan. Bake 25 to 30 minutes, or use time recommended on package. Cool on wire rack. Using foil "handles," remove from pan.
- Blend powdered sugar and seasoning mix in small bowl. Stir in milk, adding more if necessary, until desired consistency. Spread on brownies. Slice and serve.
Source: Ortega

Festive Fiesta Flavors
Serve up some spice with fun party dishes
(Family Features) Make your next fiesta one to remember with colorful decor, festive touches and, perhaps most importantly, unique and mouthwatering recipes that bring guests back for seconds.
To achieve the ideal flavors of a fiesta done right, try bringing something new to the table with recipes like these party-pleasing Tortilla Pizzas for a special main dish, crunchy and refreshing Coleslaw with Green Chile Dressing on the side and, for a decadently unique dessert, Jalapeno Brownies.
These party-perfect recipes can help you take flavors to new heights while adding a kick of spice when you incorporate quality ingredients like Rio Luna Organic Peppers. The peppers are cultivated by a company with more than three decades of experience. They manage the whole pepper process from annual seed selection to grower partnerships, cultivation and packing.
Available in four spicy varieties – Diced Jalapenos, Nacho Sliced Jalapenos, Diced Green Chiles and Large Chopped Green Chiles – you can add a pop of peppers to your next celebration. Because the peppers are organic certified, non-GMO, fat free, cholesterol free, low calorie and kosher, you’ll be able to pack an extra punch of spice without serving up unnecessary ingredients.
Tantalizing Toppings For Tasty Tacos
When it comes to supplying fiesta foods that fit almost anyone’s taste, tacos are a go-to party favorite. That is because it can be fun for party-goers to customize their own tacos while making food prep easier and less hands-on for hosts who don’t want to spend a lot of time in the kitchen.
However, trying to list all the possible taco-topping options can be an overwhelming task for many hosts. Along with your choice of taco filling, consider these toppings when building the perfect taco bar at your next fiesta:
- Shredded cheese
- Sour cream
- Beans (black, pinto or refried)
- Salsa
- Shredded lettuce
- Rice
- Rio Luna Organic Peppers
- Chopped tomatoes
- Chopped onions
- Diced avocado or guacamole
- Sliced black olives
- Corn
- Cilantro
- Lime wedges
To find more ways to spice up your fiestas as well as everyday recipes, visit riolunapeppers.com/our-meals, and find Rio Luna Organics on Facebook and Instagram.

Tortilla Pizzas
Prep time: 15 minutes
Cook time: 10 minutes
Servings: 4
- 4 flour tortillas (8 inches)
- 1 can (15 ounces) refried black beans
- 4 fresh plum tomatoes, chopped
- 1 can (4 ounces) Rio Luna Organic Nacho Sliced Jalapenos, drained
- 1 1/3 cups shredded Mexican cheese blend
- 1 tablespoon chopped fresh cilantro
- chipotle-ranch dressing (optional)
- Heat oven to 400° F.
- Bake tortillas directly on oven rack 2 minutes. Cool. Spread 1/4 cup beans onto each tortilla. Top evenly with tomatoes, jalapenos and cheese.
- Bake 8 minutes, or until cheese is melted. Sprinkle with cilantro just before serving.
Tip: For added flavor, drizzle pizzas with chipotle-ranch dressing.
Jalapeno Brownies
Prep time: 15 minutes
Cook time: 15 minutes
Servings: 16
- 1/2 cup vegetable oil
- 1 cup sugar
- 2 eggs
- 1 can (4 ounces) Rio Luna Organic Diced Jalapenos, pureed
- 1 teaspoon vanilla
- 1/2 cup, plus 3 tablespoons, all-purpose flour
- 1/3 cup cocoa powder
- 1/4 teaspoon baking powder
- 1/4 teaspoon salt
- powdered sugar (optional)
- Heat oven to 350° F.
- In medium bowl, whisk oil, sugar, eggs, jalapenos and vanilla until blended.
- In separate bowl, combine flour, cocoa powder, baking powder and salt; add to egg mixture. Mix just until combined. Pour into greased 8-by-8-inch baking pan.
- Bake 15-20 minutes, or until brownies pull away from sides of pan easily. Cool in pan on wire rack.
Tip: Dust with powdered sugar before serving for added flavor and enhanced presentation.
Coleslaw with Green Chile Dressing
Prep time: 20 minutes
Servings: 6
- 1 1/2 cups mayonnaise
- 1 cup sour cream
- 3/4 cup Rio Luna Organic Diced Green Chiles, drained
- 6 tablespoons apple cider vinegar
- 2 tablespoons Dijon mustard
- 2 tablespoons Sriracha sauce
- 2 tablespoons agave nectar
- 2 cups shredded napa cabbage
- 1 cup shredded red cabbage
- 1 cup shredded carrots
- 1/2 cup thinly sliced white onions
- 2 1/4 teaspoons kosher salt, plus additional, to taste
- 1/2 teaspoon ground black pepper, plus additional, to taste
- In medium bowl, whisk mayonnaise, sour cream, chiles, apple cider vinegar, Dijon mustard, Sriracha and agave nectar until well blended.
- In large bowl, combine napa cabbage, red cabbage, carrots, onions, salt and pepper. Add mayonnaise mixture; toss until well coated. Season with additional salt and pepper, if desired, to taste.
Tip: Coleslaw can be prepared ahead of time and refrigerated up to 1 day. Toss before serving.
Source: Rio Luna

New Stars of the Barbecue
(Family Features) Nothing says summer quite like a barbecue. While the grill might be the main attraction, it’s deliciously simple to put a personal spin on classic summer dishes and desserts.
From Same-Old Salads to Inspired Surprises
There are a number of quick and easy ways to add your signature touch to the standard summer barbecue fare. First, trade in the predictable potato salad for a refreshing pasta sensation. Build a delicious, personalized creation your family will enjoy with easy mixes such as Suddenly Salad mixes by Betty Crocker. “Each pasta salad mix comes with pasta, special seasoning and vegetables — only oil or mayonnaise needs to be added,” said Karen Schiemo of the Betty Crocker Kitchens. “Throw in a little culinary creativity and your favorite ingredients, such as additional fresh vegetables or diced meat, and you can even create your own recipe that’s sure to be in high-demand for seconds.”
Sweet Summer Barbecue Endings
Deliver a sweet ending to the perfect barbecue. With a few ingredients, such as sprinkles, marshmallows and nuts, you can add your own twist to brownies and transform them into a customized confection. Not only are they easy to make ahead of time, but a pan of brownies is easy to carry to the festive affair, requiring only one dish from baking to the barbecue. With no utensils necessary, they score huge “brownie points” with adults and kids alike.
Between the perfect main course and delectable side dishes, barbecues will surely be a family favorite. For more ideas to make your barbecue sizzle, go to BettyCrocker.com.

S’more Brownies
Makes 24 brownies
Prep Time: 25 minutes
Start to Finish: 1 hour 25 minutes
- 1 box Betty Crocker Original Supreme brownie mix
- Water, vegetable oil and eggs called for on brownie mix box
- 3 cups miniature marshmallows
- 4 graham crackers, broken into small pieces
- 2 bars (1.55 ounces each) milk chocolate candy, broken into 1-inch squares
- Heat oven to 350°F. Grease bottom only of 13 x 9-inch pan with cooking spray or shortening. Make and bake brownies as directed on box for 13 x 9-inch pan, using water, oil and eggs.
- Set oven to broil. Immediately sprinkle marshmallows and graham crackers over warm brownies. Broil about 4 to 5 inches from heat 30 to 60 seconds or until marshmallows are golden brown. (Watch carefully — marshmallows and graham crackers will brown quickly.) Sprinkle with chocolate candy. To serve warm, cool about 30 minutes. For brownies, cut into 6 rows by 4 rows.

Stars and Stripes Brownies
Makes 24 brownies
Prep Time: 30 minutes
Start to Finish: 2 hours
- 1 box Betty Crocker Original Supreme brownie mix (with chocolate syrup pouch)
- Water, vegetable oil and eggs called for on brownie mix box
- 1 container (12 ounces) whipped fluffy white frosting
- 1 tube (0.68 ounce) red decorating gel
- 1 tube (0.68 ounce) blue decorating gel
- 1 tube (0.68 ounce) white decorator icing
- Decorating Decors stars
- Heat oven to 350°F. Line 13 x 9-inch pan with foil so foil extends about 2 inches over sides of pan. Spray foil with cooking spray. Make and bake brownies as directed on box for 13 x 9-inch pan, using water, oil and eggs. Cool completely, about 1 hour.
- Remove brownies from pan by lifting foil; peel foil from sides of brownies. Continue as desired with options below.
- Flag Brownies: Frost brownies. Using red decorating gel, pipe stripes onto frosted brownie. Add decors in upper left corner of brownie.
- Fire Cracker Brownies: Using 1-inch round cookie cutter, cut out brownie rounds. Stack 2 brownie rounds together, spreading frosting between rounds and on top. Garnish with decors.
- Star Brownies: Using 2 1/2-inch, star-shaped cookie cutter, cut brownies. Place frosting in resealable food-storage bag; cut off one bottom corner of bag. Pipe frosting on star-shaped brownies. Sprinkle with decors.
Fresh Vegetable Pasta Salad
15 servings (1/2 cup each)
Prep Time: 25 minutes
Start to Finish: 1 hour 25 minutes
- 1 box Betty Crocker Suddenly Salad classic pasta salad mix
- 1/4 cup cold water
- 3 tablespoons vegetable or olive oil
- 1 tablespoon vinegar
- 2 cups small fresh broccoli florets
- 1 small red bell pepper, coarsely chopped
- 1 small yellow bell pepper, coarsely chopped
- 1/4 cup red onion cut into thin wedges
- Cook and drain pasta as directed on box. Meanwhile, in large bowl, stir together seasoning mix, cold water, oil and vinegar.
- Stir drained pasta and remaining ingredients into seasoning mixture. Refrigerate at least 1 hour.

Greek Tossed Pasta Salad
Makes 12 servings (1 cup each)
Prep Time: 15 minutes
Start to Finish: 30 minutes
- 1 box Betty Crocker Suddenly Salad Caesar pasta salad mix
- 1/3 cup cold water
- 3 tablespoons vegetable oil
- 4 cups torn romaine lettuce
- 2 medium tomatoes, coarsely chopped (1 1/2 cups)
- 1 small cucumber, coarsely chopped (1 cup)
- 1/2 cup thinly sliced red onion, slices cut in half
- 4 ounces crumbled feta cheese (1 cup)
- 1 can (2 1/4 ounces) sliced ripe olives, drained
- Cook and drain pasta as directed on box. Meanwhile, in large bowl, stir together seasoning mix, cold water and oil.
- Add drained pasta and remaining ingredients to seasoning mixture. Toss with croutons and Parmesan topping (from salad mix). Serve immediately or refrigerate.
Source: Betty Crocker

Luck of the Irish
Family Festivities for St. Patrick’s Day
(Family Features) This St. Patrick’s Day, entertain your little leprechauns with delicious treats and fun activities that will lead them to their pot of gold.
Every year in March, families celebrate the annual Irish tradition of St. Patrick’s Day with a variety of celebrations. Whether it’s attending a parade or preparing and enjoying an elaborate Irish meal, everyone has their own favorite ways to celebrate the holiday. Set your own unique traditions and rituals with some ideas below.
Pass Along the Luck
Have kids put together lucky treat bags to pass along to neighbors. These treat bags could include cut-out, decorated and customized four-leaf clovers, chocolate coins and other goodies. Then, on St. Patrick’s Day, walk around as a family and surprise neighbors with these bags.
Treasure Hunt
Set up a treasure hunt for family and friends by placing chocolate gold coins around the house. Give them a series of clues and riddles to help them figure out where to look for the coins. Equip each “hunter” with their own pot or basket for collecting the gold coins. At the end of the hunt, reward them for their hard work with some festive brownies. These delicious Chocolate Mint Brownies can be decorated with green gumdrops formed into shamrocks or other holiday candies. Use a shamrock-shaped cookie cutter to make these treats even more festive.

Chocolate Mint Brownies
Prep Time: 25 minutes
Start to Finish: 3 hours 25 minutes
Makes: 32 brownies
Brownie Base
- 1 box Betty Crocker® Original Supreme brownie mix (with chocolate syrup pouch) water, vegetable oil and eggs called for on brownie mix box
Filling
- 3 1/2 cups powdered sugar
- 1/4 cup butter or margarine, softened
- 1/4 cup whipping cream
- 1 package (3 ounces) cream cheese, softened
- 1/4 teaspoon mint extract
- 4 drops green food color
Topping
- 1/2 cup whipping cream
- 1 bag (12 ounces) semisweet chocolate chips (2 cups)
- 1/2 cup butter (do not use margarine)
- Heat oven to 350°F. Grease only bottom of 13 x 9-inch pan with shortening or cooking spray. Make and bake brownie mix as directed on box for 13 x 9-inch pan, using water, oil and eggs. Cool completely, about 1 hour.
- In large bowl, beat filling ingredients with electric mixer on medium speed until smooth. Spread over cooled brownies. Refrigerate about 1 hour or until set.
- Meanwhile, in 2-quart nonstick saucepan, heat topping ingredients over medium-low heat, stirring constantly, until melted and smooth. Cool about 10 minutes or until lukewarm.
- Pour topping over filling; spread to cover. Refrigerate uncovered about 2 hours or until set. Before cutting into bars, let stand 10 minutes at room temperature. For bars, cut into 8 rows by 4 rows. For easier cutting, cut brownies with a wet knife. Store covered in refrigerator.
For more delicious baking ideas, visit www.BettyCrocker.com.
Betty Crocker® is a registered trademark of General Mills.
Source: Betty Crocker

Love is in the Air – Every Day!
(Family Features) Chocolates? Roses? Been there, done that. Everyone wants to make sure the special someone in their lives knows how much they care. Here are some easy and fun ways to prove that he or she is number one in your book.
Make a Playlist of “Your Songs”
Whether it was playing when you first met or is the soundtrack to your favorite movie, every couple has songs that mean something special to them. In the car, leave a CD or MP3 player stocked with your most memorable tunes as a special surprise and a suddenly-better commute.
Do the house chores. Seriously.
Fix that item you’ve been saying you would fix forever. Empty the dishwasher and clean the bathroom. When they get home, have all the chores done, that way the only thing left to do is enjoy each other’s company.
Put Pen to Paper
Hide little notes with heartfelt sentiments on the refrigerator, on the nightstand, taped to the computer screen – any place they might stumble upon it throughout a typical day. Your note might be found after a long meeting or last-minute deadline, providing a moment of reprieve and happiness during a hectic day.
Raise a Glass and Indulge – Together
Toast each other with some tasty treats. Pop some bubbly, then enjoy mixing these recipes together.
For more romantic wines and recipes, visit www.barefootwines.com.

Sweetheart Dark Chocolate Brownies
Prep: 20 minutes
Cook: 25 minutes
Makes: 10+ servings
For the brownies:
- 1/2 cup butter, cut into pieces
- 4 ounces dark chocolate, chopped
- 2 eggs, at room temperature
- 3/4 cup white sugar
- 1 teaspoon vanilla
- 1/2 cup all-purpose flour
- 1/4 cup unsweetened cocoa powder
- 1/2 teaspoon kosher salt
For the glaze:
- 2 ounces semisweet chocolate
- 1 tablespoon unsalted butter
- Preheat the oven to 350°F.
- In small pot over low heat, melt 1/2 cup of butter and 4 ounces of dark chocolate together until smooth.
- Add eggs one at a time, and whisk to combine after each addition.
- Add sugar and vanilla and stir to combine.
- Add flour, cocoa powder and salt and stir until smooth.
- Transfer batter into a 9 x 9 aluminum foil lined baking pan and place it into the oven for 25 minutes and bake until done.
- While brownies are baking, melt together semisweet chocolate and 1 tablespoon of unsalted butter for the glaze. Once melted, set aside.
- When brownies are done, let them cool.
- Once cooled, drizzle glaze over brownies, and spread it on top using an offset spatula.

Barefoot Bubbly Ruby Red Bliss
Makes: 2 servings
- 3 ounces cranberry juice
- 1/2 ounce lime juice
- 6 ounces Barefoot Red Moscato Champagne
- 2 skewer cranberries for garnish
- Place chilled juices in flutes. Top with Barefoot Bubbly Red Moscato. Garnish with cranberries.
Cheers!
Photo courtesy of Getty Images (brownie image)
Source: Barefoot Wines