
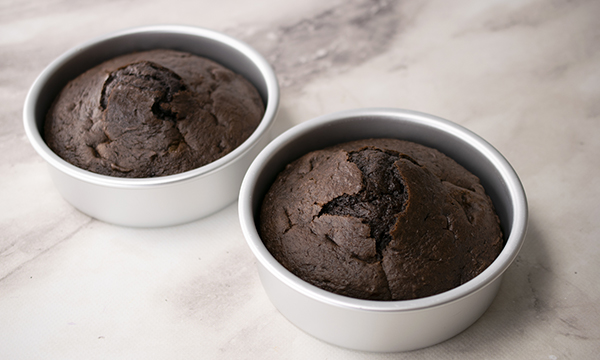
Ghostly Graveyard Cake
(Family Features) For a frighteningly fun time in the kitchen this Halloween, gather your family around the cauldron to create a sweet, spooky dessert. Tricks and treats may provide thrills, but a homemade concoction can be the star of your hauntingly happy evening.
This Ghostly Graveyard Cake takes imagination and creativity from everyone with tombstones, skulls and spooky icing daring all to try a bite. With looks this chilling, it’s a perfect treat to enjoy while watching everyone’s favorite scary movie.
Find more deliciously devious desserts at Culinary.net.
Watch video to see how to make this recipe!

Ghostly Graveyard Cake
- 1 box chocolate cake mix
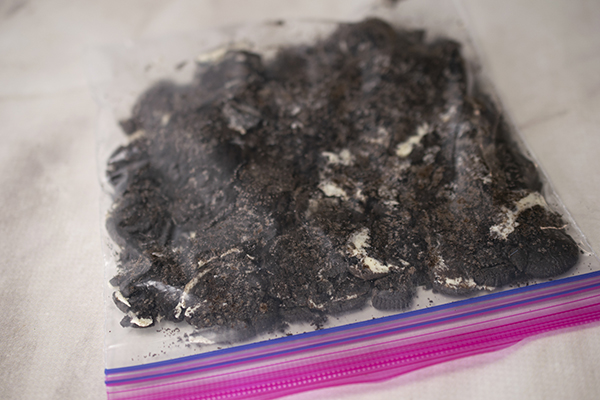
- 10 chocolate creme cookies
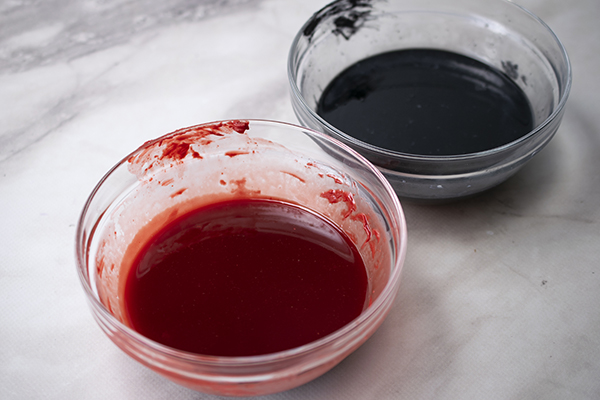
- 1 cup black melting chips
- 1 cup red melting chips
- 1 cup heavy whipping cream
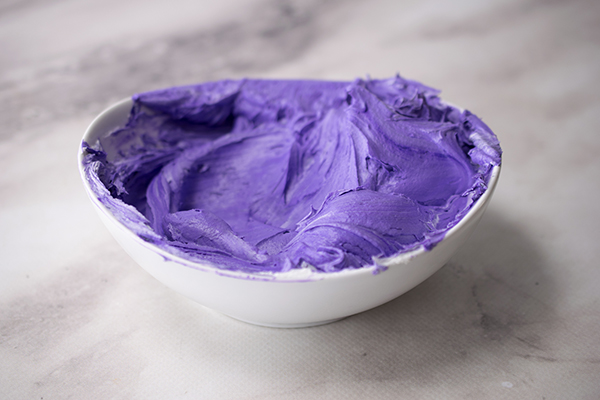
- 3 cans buttercream icing
- 1 purple food coloring
- 1 black food coloring
- skull sprinkles
- tombstones and bones candies
1. Prepare cake mix according to package instructions in three 6-inch baking pans. Once baked, allow to completely cool outside of pans.
2. In zip-top bag, using rolling pin, crush chocolate creme cookies; set aside.
3. In separate small bowls, add black melting chips and red melting chips.
4. In microwave, heat heavy whipping cream 1 1/2 minutes. Pour half the mixture into one bowl of chips and other half into other bowl of chips. Stir until chips are completely melted; set aside.
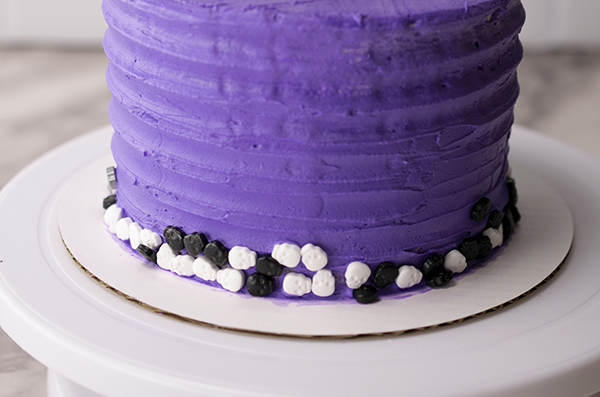
5. After cakes cool, on cake board, add small amount of buttercream icing so cake sticks. Using bread knife, level cakes.
6. Place one cake on cake board and add thin layer of icing on top. Place second layer of cake on top and add thin layer of icing on top. Place final layer of cake on top and add thin layer of icing on top. Add thin layer of icing to entire cake. Freeze 15 minutes.
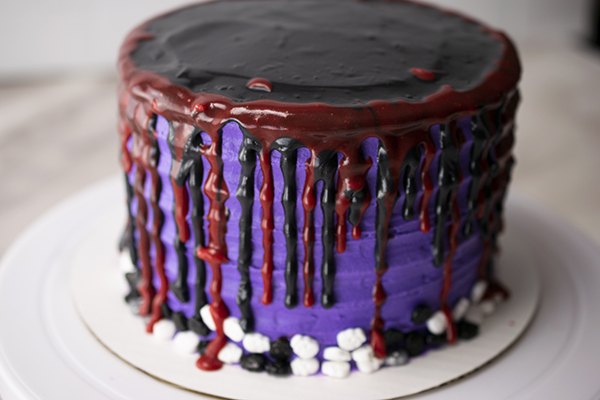
7. In small bowl, mix two parts purple food coloring to one part black food coloring. Ice cake with deep purple icing. Using grooved scraper, scrape along sides of cake. Using angled spatula, smooth top of cake.
8. Add skull sprinkles around edges of cake. Using piping bag with small opening at tip, drip black drip mixture around top edges of cake. Repeat using red drip mixture.
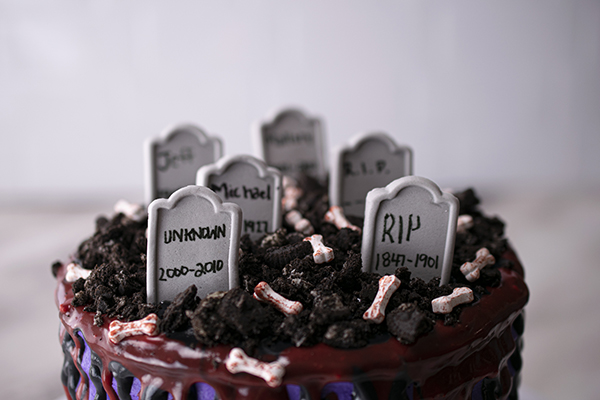
9. Add chocolate creme cookie crumbs to top of cake. Add tombstones and bone sprinkles to top of cake.

All-Day Holiday Delights
(Family Features) The holiday season and all its celebrating often means full days of visiting family and friends, opening gifts and enjoying moments with loved ones, even if much of that interaction may take place virtually this year. With all the laughter and happiness, you’re bound to get hungry, and feeding the family throughout the day means you’ll need recipe ideas ready for the occasion.
Starting the big day with a bountiful breakfast helps begin the festivities on a high note, while appetizers help hold everyone over for the main course, sides and, of course, dessert. Consider these tasty dishes to take your holiday gatherings to new heights from morning to night.
Visit Culinary.net to find more holiday meal ideas.
One Terrific Turkey
Centering your holiday meal around a turkey cooked to golden perfection is the ideal way to serve a feast. Without the right preparation and execution, however, your bird could fall short. To ensure your holiday dinner centerpiece lives up to expectations, follow these simple tips, from purchase to plate:
1. Buy the right bird. Finding a turkey that’s just the right size for your expected party is the start to a successful gathering. One common rule of thumb is the buy 1 pound of turkey per person – so, for a 10-person meal, purchase a 10-pound turkey. Don’t forget that nearly everyone loves leftovers, so you may consider buying a few pounds more than necessary.
2. Be patient. If you opt for a frozen turkey, don’t rush the thawing process. For larger turkeys, it can take days to defrost properly.
3. Timing is everything. Finding the right amount of time for your turkey to spend in the oven is crucial but not always the easiest thing to do. For an 8-12-pound bird, aim for 2.5-3.5 hours; 12-16 pounds for 3.5-4 hours; 16-20 pounds for 4-4.5 hours, and so on. The key is bringing the turkey to a temperature reading of 170 F.
4. Let it rest. Instead of pulling the turkey out of the oven and immediately carving it, give it a chance to rest for 20-30 minutes, which allows the juices to soak into the meat and moisten it up.
An Easy and Cheesy Holiday Appetizer
If you need a last-minute appetizer or want to impress your friends, but don’t have the time to spend hours making something, consider this easy-to-make, easy-to-eat cheesy treat.
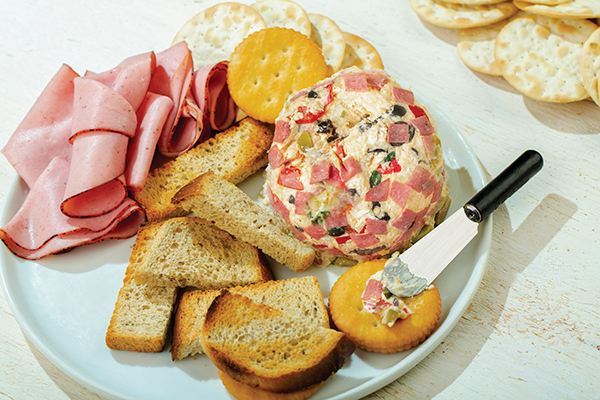
This Cheeseball recipe calls for a handful of common household ingredients like cream cheese, cheddar cheese, vegetables and Worcestershire sauce rolled together and chilled for a tasty dip served with crackers. For added flavor, it’s made using Buddig Beef, which has been feeding traditions for more than 75 years with its time-tested appetizer.
Find more holiday recipe ideas at buddig.com/recipes.
Cheeseball
Total time: 30 minutes
Servings: 10
- 1 package (8 ounces) cream cheese, softened
- 2 cups (8 ounces) finely shredded cheddar cheese
- 1 can (2 1/4 ounces) sliced black olives, drained
- 2 tablespoons minced green onion
- 2 tablespoons minced red bell pepper
- 1 teaspoon Worcestershire sauce
- 1/8 teaspoon pepper
- 2 packages (4 ounces) Buddig Beef or Ham, chopped, divided
- 1 package assorted crackers
- In large bowl of mixer on medium speed, beat cream cheese and cheddar cheese until creamy.
- Mix in black olives, green onion, red bell pepper, Worcestershire sauce, pepper and 2 ounces chopped beef until well combined.
- Form into ball. Wrap in plastic wrap.
- Chill at least 2-3 hours to allow flavors to blend.
- Just before serving, roll in remaining chopped beef until completely coated.
- Serve with assorted crackers.
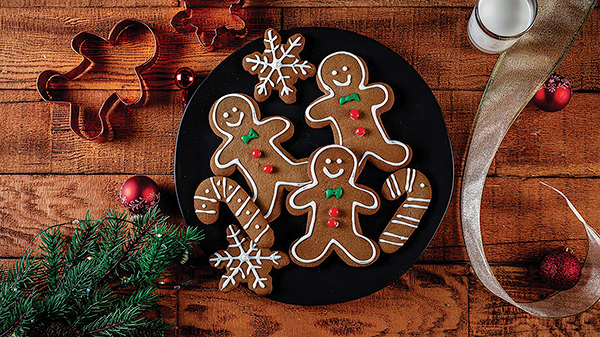
Call Together Loved Ones with Cookies
A true holiday celebration calls for sharing moments with loved ones and creating memories that can last a lifetime. Crafting a sweet dessert to cap off the festivities is a perfect way to come together in the kitchen and enjoy the moment with those who matter most.
These Gingerbread Cookies made with C&H sugar can be a hallmark holiday treat that allow kids to help in the process. Once they’re out of the oven, ask little ones to help decorate the festive and delightful cookies.
Visit chsugar.com to find recipes perfect for entertaining and celebrating with family throughout the year.
Gingerbread Cookies
Recipe courtesy of
Bernice Baran
Prep time: 30 minutes
Cook time: 10-12 minutes
Yield: 24 cookies
- 1/2 cup (1 stick) unsalted butter, softened
- 1/2 cup C&H® Dark Brown Sugar
- 1 large egg
- 1/4 cup molasses
- 1 3/4 cups all-purpose flour
- 1/2 teaspoon baking soda
- 1/8 teaspoon salt
- 1 teaspoon ground ginger
- 1/2 teaspoon ground cinnamon
- 1/4 teaspoon ground nutmeg
- 1/8 teaspoon ground cloves
- royal icing
- In large bowl of electric mixer fitted with paddle attachment, cream butter and sugar about 2 minutes on medium speed until light and fluffy. Add egg and molasses; mix until well incorporated.
- In separate bowl, whisk flour, baking soda, salt, ginger, cinnamon, nutmeg and cloves. Use mixer on low speed to add to butter mixture until combined and dough is formed.
- Divide dough in half, wrap with plastic film and refrigerate at least 1 hour.
- Preheat oven to 350 F and line baking sheets with parchment paper.
- Flour clean work surface. Roll dough 1/8-1/4 inches thick. Cut out shapes with desired cookie cutters.
- Transfer cookies to lined baking sheets and bake 10-12 minutes, or until firm. Let cookies cool on baking sheets 2-3 minutes then transfer to cooling rack. Cool completely.
- Decorate cookies with royal icing.
A Memorable Morning Breakfast
Holiday mornings are iconic for those moments spent together opening gifts, sharing stories and enjoying a meal. Skip the cereal and frozen foods for a spread like these Orange Eggs Benedict with a homemade hollandaise sauce.
With six servings, it’s perfect for a family breakfast to fill empty stomachs after a morning of gift-giving. Plus, kids can join in on the fun by helping make the hollandaise, which simply requires mixing a few ingredients before pouring over the completed dish.
Find more breakfast recipes at Culinary.net.

Orange Eggs Benedict
Serves: 6
Orange Hollandaise:
- 2 egg yolks
- 1 orange, juice only
- 1/2 teaspoon kosher salt
- 1/2 cup unsalted butter, melted
- water
- 1 tablespoon white vinegar
- 8 eggs
- 1/2 cup butter, softened
- 6 French baguette slices, 3/4-inch thick each
- 6 thick slices ham
- 1/2 cup orange marmalade
- orange zest, for garnish
- To make Orange Hollandaise: In small bowl, blend egg yolks, orange juice and salt until combined. Gradually add melted butter into egg mixture while blending. Set aside.
- In skillet, add water halfway up sides. Add vinegar. Bring to simmer. Break eggs into water to poach. Cook 3-4 minutes until whites are cooked through and yolks are still runny. Using slotted spoon, remove eggs and drain on paper towels.
- Spread butter on one side of bread slices. Place bread in skillet and cook until golden brown. Add ham to same skillet and cook until browned on both sides.
- To assemble, spread bread slices with orange marmalade. Top each with one slice cooked ham and one poached egg. Pour hollandaise over eggs and garnish with orange zest.
Photo courtesy of Getty Images (Holiday table)

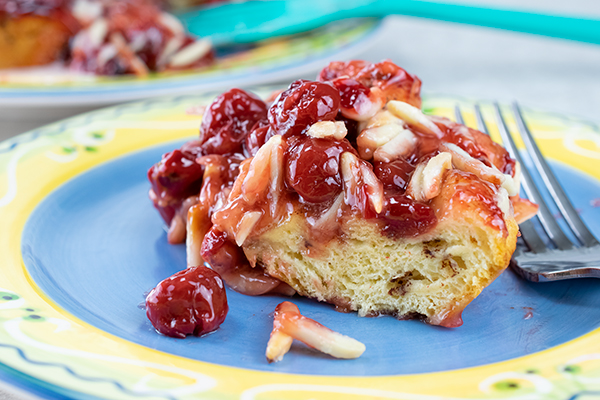
Cherry Coffee Cake
Add some sweetness to your breakfast routine with this delicious and easy-to-make Cherry Coffee Cake.
Find more breakfast recipes at Culinary.net.
Watch video to see how to make this recipe!
Cherry Coffee Cake
- Nonstick cooking spray
- 1 can (12.4 ounces) refrigerated cinnamon rolls with icing
- 1 1/2 cups (21-ounce can) cherry pie filling
- 1/2 cup slivered almonds or pecans (optional)
- Heat oven to 375° F.
- Spray 9-inch round cake pan with nonstick cooking spray.
- Separate cinnamon roll dough into eight rolls; cut each roll into quarters.
- Place dough rounded-side down in pan.
- Spoon pie filling over rolls. Sprinkle almond slivers or pecans over cherry filling, if desired.
- Bake 25-35 minutes, or until golden brown.
- Invert onto plate or cutting board. Invert again onto serving plate.
- Remove lid from icing. Microwave 3-10 seconds. Stir icing and drizzle over warm coffee cake.
- Serve warm.
Source: Culinary.net

Forecast: Showers
(Family Features) These, though, are happy showers filled with good wishes, gifts and a celebration of events to come, like weddings or babies.
Such special occasions deserve special food, says Nancy Siler, vice president of consumer affairs and public relations at Wilton. She suggests cupcakes for dessert, but not just any cupcake. These are unique - shower-ready, decorated theme-appropriately with umbrellas.
They can be prepared from a mix or from scratch and baked and served in color-coordinated silicone baking cups. Siler suggests incorporating a grouping of cupcakes as part of the shower décor. Use them as the table centerpiece, arranged on a tray, or a tiered cupcake stand. Or if it's a sit-down meal, place a cupcake at each setting.
Construct the umbrella decorations from ready-to-use fondant that is tinted in the colors selected for the occasion. Step-by-step instructions ensure foolproof results, plus they can be made several days in advance, so on party day there's no last-minute mad rush. Cupcakes can be baked, iced and sprinkled a day in advance. Place the umbrellas on the mini cakes the day of the party.
Umbrellas in place, let the showers begin!
For additional shower and party ideas, baking and decorating tips or to order supplies, visit www.wilton.com.

Ready for Showers
Each serves 1
- 1 package (24 ounces) White Ready-To-Use Rolled Fondant
Rose, Royal Blue, Lemon Yellow Icing Color
Round Fondant Cut-Outs
Lollipop Sticks
Fondant Adhesive* - 1 package (about 18 ounces) cake mix, any flavor
Water, vegetable oil and eggs to prepare cake mix - 1 can (16 ounces) White Decorator Icing
Heart Drops Sprinkles
- Several days in advance, tint fondant rose, blue and yellow; roll out 1/8-inch thick. Cut circles using largest Round Cut-Out; cut across circle, slightly more than halfway. Using smallest Round Cut-Out, cut scalloped edge; with spatula, score umbrella rib lines. Let dry on waxed paper covered cake boards. Reserve remaining tinted fondant. Attach dried fondant pieces to lollipop sticks with Fondant Adhesive. Roll a 1/4-inch ball of matching fondant; attach to umbrella top with adhesive. Let dry.
- Preheat oven to 350°F. Prepare cake mix following package instructions; place batter in Pastel Silicone Baking Cups supported by cookie sheet. Bake 18-20 minutes or until toothpick inserted in center comes out clean; cool completely. Ice cupcakes smooth with icing; sprinkle with Heart Drops. Insert fondant umbrella. If desired, tie ribbon around stick.
* To make Fondant Adhesive for attaching dried fondant decorations to lollipop sticks, knead 1/4 teaspoon water into 1 ounce (1-1/2-inch ball) rolled fondant until it becomes soft and sticky. Apply to fondant decoration with brush or place in decorating bag and pipe it onto decoration.
Source: Wilton Products

Better, Healthier Baking
(Family Features) Olive oil is a flavorful and versatile cooking oil that is often trusted in popular cooking methods such as sauteing, stir-frying, dressing, marinating and grilling. It can also earn your trust when it comes to baking.
With seven olive oil varieties to fit almost any need, each Filippo Berio olive oil has its own distinct color, aroma and flavor characteristics. Among those seven, the Extra Light Olive Oil offers a delicate aroma and subtle flavor that can complement your favorite baked goods. Its high smoke point helps keep those goodies moist, and with strong flavors like chocolate, it also lets the sweetness come through.
Additionally, it provides high levels of mono-unsaturated fat (“good” fat) and low levels of saturated fat (“bad” fat), making it a more nutritional choice when compared to butter or margarine. Because you need less olive oil than butter in baking, you’ll save calories as well.
One easy way to incorporate olive oil in your baked goods is during the prep work: where recipes call for buttering or flouring pans, instead brush the pan with olive oil and dust with flour for the same effect as butter.
Avoid Olive Oil Enemies
Maintain olive oil’s flavor and quality by avoiding exposure to heat, light and air. Be sure to store olive oil in a cool, dark place and not over or near the oven.
Explore more tips and recipes using olive oil at filippoberio.com.
Dark Chocolate Souffle
Prep time: 10 minutes
Cook time: 18 minutes
Servings: 2
- 1/2 tablespoon Filippo Berio Extra Light Olive Oil, plus additional for coating pan
- 1/4 cup granulated sugar, plus additional for coating pan
- 4 ounces 70 percent cocoa dark chocolate
- 1 ounce 30 percent heavy cream
- 3 egg whites
- 2 egg yolks
- pinch of cream of tartar
- Heat oven to 375° F. Grease two 6-ounce ramekins with olive oil and dust with sugar.
- In double boiler, melt chocolate, 1/2 tablespoon olive oil and cream; let cool. Using electric mixer, beat egg whites until soft peaks form.
- Whisk egg yolks into cooled chocolate mixture; fold in egg whites, 1/4 cup sugar and cream of tartar. Pour into prepared ramekins; bake 15 minutes.
Tips: This recipe can be easily doubled. Garnish with fresh berries, if desired.
Double-Chocolate Olive Oil Cake with Salted Chocolate Caramel Icing
Recipe courtesy of Chef Sharon Sanders
Prep time: 15 minutes
Cook time: 35 minutes
Servings: 8-10
- 1/2 cup, plus 2 tablespoons, Filippo Berio Extra Light Olive Oil, divided, plus additional for coating pan
- 1 cup all-purpose flour
- 1 cup granulated sugar
- 1/4 cup unsweetened cocoa
- 1/2 teaspoon baking powder
- 1/4 teaspoon baking soda
- 1/4 teaspoon table salt
- 1/2 cup half-and-half
- 1 teaspoon pure vanilla extract
- 1 large egg, lightly beaten
- 1/4 cup, plus 1/3 cup, mini dark chocolate chips, divided
- 1 cup canned dulce de leche
- flaky sea salt (optional)
- Position rack in center of oven and heat to 350° F. Lightly coat 9-inch round cake pan with olive oil and line bottom with parchment paper. Lightly coat parchment with olive oil.
- In large mixing bowl, combine flour, sugar, cocoa, baking powder, baking soda and salt. Stir in half-and-half, 1/2 cup olive oil and vanilla. With electric mixer, beat in egg until well blended. Scrape batter into prepared cake pan and sprinkle top with 1/4 cup mini chips.
- Bake cake 25-30 minutes, or until toothpick inserted into center comes out clean. Place cake on cooling rack 10 minutes then turn cake out onto rack and let cool completely.
- In medium saucepan, heat dulce de leche over medium heat, stirring occasionally, until softened. Add remaining olive oil and chocolate chips and stir until chocolate has melted and mixture is smooth. Remove pan from heat.
- Transfer cake to serving plate. Pour icing over cooled cake, sprinkle with flaky salt, if desired, and serve.

Double-Chocolate Biscotti
Prep time: 30 minutes
Cook time: 25 minutes
Servings: 40
- 3 cups all-purpose flour
- 1/2 cup cocoa powder
- 1 1/2 teaspoons baking powder
- 1/4 teaspoon ground cinnamon
- 1/4 teaspoon salt
- 1/2 cup Filippo Berio Extra Light Olive Oil, plus 1 tablespoon for coating pans
- 1 cup packed light brown sugar
- 2 eggs, plus 1 egg yolk
- 1/3 cup milk
- 1 tablespoon balsamic vinegar
- 1 cup semisweet or bittersweet chocolate morsels
- On sheet of waxed paper, combine flour, cocoa powder, baking powder, cinnamon and salt; set aside.
- Using electric mixer, beat olive oil with sugar until smooth and light. Add eggs and egg yolk, one at a time, beating until smooth. Add milk and vinegar; beat until smooth. With mixer on low speed, gradually add flour mixture, beating until just combined. Stir in chocolate morsels with large spoon; cover with plastic wrap. Refrigerate at least 4 hours.
- Heat oven to 325° F. Grease two large baking sheets with 1/2 tablespoon olive oil each. On lightly floured surface, divide dough into quarters. Roll each piece of dough into log, about 1 1/2 inches in diameter. Place logs on baking sheets, leaving space in between. Bake about 30 minutes, or until golden and set. Transfer to rack; let cool 10 minutes.
- Reduce oven temperature to 300° F. On cutting board using serrated knife, cut each log into 3/4-inch-wide slices diagonally. Place slices, cut-side down, on baking sheets. Bake 15-18 minutes, or until toasted. Transfer to racks; let cool.
Source: Filippo Berio

Impress Spring Party Guests with Surprise Sweets
(Family Features) Transform an ordinary cupcake into something extraordinary with a peek-a-boo filling. These simple cupcakes are an easy addition to any spring celebration. You’ll want to serve every variety of these turned up treats for Easter and beyond.
The best part about this party trick? It’s easy. You’ll be digging this one out of your recipe repertoire for every spring soiree.
Hop to Easter
Who said Easter baskets are just for the kids? Treat your holiday guests to take-home cupcakes served in individual cupcake boxes. They’ll be delighted to find a surprise inside these icing-filled cupcakes.
The Garden Party
Spring into the season and host an outdoor party on the patio or in the garden. Your guests will enjoy the fresh air and the sweetly decorated desserts.
Add Fresh Flavor
Shake things up with a refreshing new twist. Try filling your cupcakes with refreshing lemon meringue, raspberry mousse or peanut butter and jelly cupcake fillings.
No matter how you slice it, fill it or serve it, these cupcakes are a party pleaser that’s guaranteed to impress. Find tasty filling recipes, fresh ideas and easy decorating projects at www.wilton.com.

Carrot Garden Easter Cupcakes
Servings: 1 dozen cupcakes
- Favorite chocolate cake mix or recipe
- Creamy Decorator Icing
- Chocolate Decorator Icing
- Leaf Green Icing Color
- Orange Icing Color
- Crushed chocolate sandwich cookies
- Preheat oven to 350°F. Place Color Wheel baking cups in standard muffin pan.
- Prepare cake mix following package instructions. Bake in prepared muffin pan 18-20 minutes or until toothpick inserted in center comes out clean. Cool completely in pan on cooling grid.
- To decorate, tint small amount of creamy decorator icing green; tint remaining orange. Use spatula and chocolate icing to ice tops of cupcakes smooth. Sprinkle with cookie crumbs. Chill until set, about 15 minutes.
- Use knife to cut out center of cupcakes almost to bottom of cupcake. Use tip 2A and orange icing to fill in center of cupcake and pipe about 1/4 inch above cupcake; pat smooth. Use tip 352 and green icing to pipe pull-out leaf carrot tops.
Source: Wilton