
Bring Joy Back to Family Meals
(Family Features) While meals savored with loved ones are intended to produce smiles and shared moments, the process of grocery shopping, planning and cooking has become a chore for many families. Take the first step toward bringing back the joy and magic of making your favorite foods with tools that do the work for you.
For example, the all-in-one Albertsons Meal Plans and Recipes tool allows you to focus on what you want to eat rather than what you need to buy as it empowers everyday home cooks to plan, shop and prepare personalized recipes based on dietary preferences, allergies or family likes and dislikes. The app features a library of 9,000 exclusive recipes created by professional chefs (with new recipes added each month) and includes tasty dishes such as Sheet Pan Cajun Shrimp Fajitas with Bell Pepper, Onion and Spicy Ranch; Cheese Tortellini and Cauliflower with Creamy Spinach Marinara; and Garlic-Parmesan Chicken Tenders with Green Beans and Honey Mustard Dip.
The free digital tool also includes an artificial intelligence-powered “Scan Your Own Recipe” feature that allows you to snap a photo with your phone of grandma’s handwritten, not-so-secret recipe and transforms it into a digital version saved in the app. Recipes are instantly turned into shoppable ingredients and added to your cart for quick, convenient checkout. Now, you can turn all of your recipes into a digital library for quick and easy access in one place. No more flipping through cookbooks or recipe cards searching for your favorites.
Designed to provide culinary inspiration throughout the week while saving time and money, the app also features a budget tracker and hands-free cooking mode with a step-by-step timer.
“The Albertsons Meal Plans tool is the ultimate life hack,” said Jill Pavlovich, senior vice president of digital customer experience for Albertsons Cos. “This all-in-one app makes it simple for anyone to plan, shop and prepare inspiring recipes from anywhere – whether it is an old family favorite, a best-seller from a favorite food blogger or one of our 9,000 delicious recipes. Best of all, it’s completely free to use on our grocery app and website.”
The tool is available on the store apps and websites across the Albertsons Cos. banner of stores including Albertsons, Safeway, Vons, Jewel-Osco, Shaw’s, Acme, Tom Thumb, Randalls, United Supermarkets, Pavilions, Star Market, Haggen, Carrs, Kings Food Markets and Balducci’s Food Lovers Market.
Find more information and a seemingly endless collection of recipes at Albertsons.com.
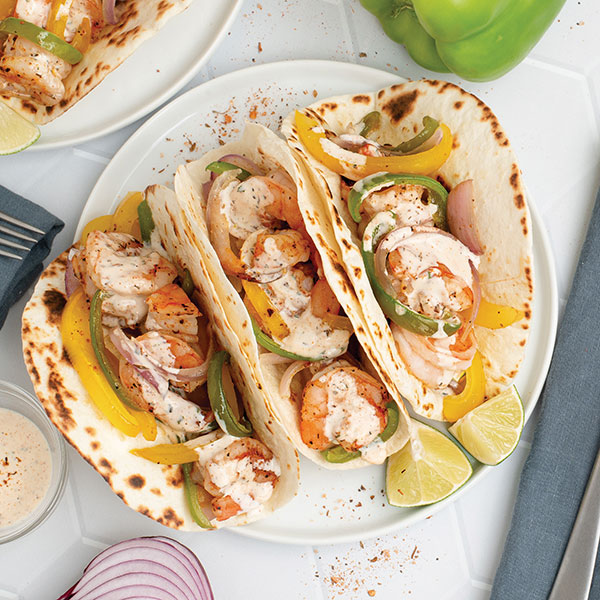
Sheet Pan Cajun Shrimp Fajitas with Bell Pepper, Onion and Spicy Ranch
Recipe courtesy of Albertsons
Total time: 30 minutes
Servings: 4
- 2 green bell peppers
- 2 yellow bell peppers
- 1 lime
- 1 medium red onion
- 2 tablespoons extra-virgin olive oil
- 1 1/2 pounds raw, peeled shrimp, fresh or frozen
- 5 teaspoons Cajun seasoning, divided
- 1 teaspoon salt
- 1/2cup ranch dressing
- 12 small flour tortillas
- Preheat oven to 450 F.
- Wash and dry green bell peppers, yellow bell peppers and lime.
- Trim, seed and slice bell peppers lengthwise into thin strips; transfer to large baking sheet.
- Peel, halve and slice onion lengthwise into thin pieces; add to baking sheet with bell peppers.
- Drizzle veggies with oil, toss to combine and spread in even layer. Bake until veggies have softened slightly, about 5 minutes.
- If using frozen shrimp, place them in colander and run under cold water to thaw slightly. Place shrimp on clean towel or paper towels and pat dry.
- Remove baking sheet from oven. Arrange shrimp over veggies then sprinkle with 4 teaspoons Cajun seasoning and salt; toss to combine and spread in even layer.
- Bake until veggies are tender and shrimp are cooked through, 5-7 minutes. Remove from oven.
- Cut lime into wedges.
- In small bowl, stir ranch dressing and remaining Cajun seasoning.
- Warm tortillas in skillet, oven or microwave, if desired.
- Divide tortillas between plates and fill with shrimp and veggies; drizzle with spicy ranch and serve with squeeze of lime.
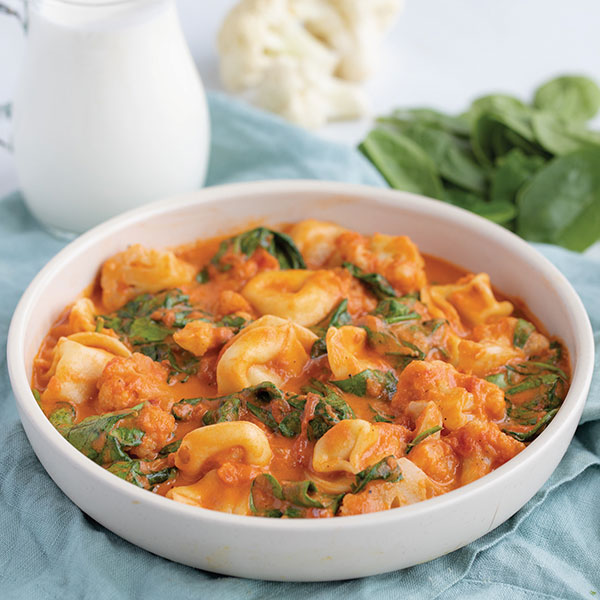
Cheese Tortellini and Cauliflower with Creamy Spinach Marinara
Recipe courtesy of Albertsons
Total time: 20 minutes
Servings: 4
- 2 bags (10 ounces each) cauliflower florets
- 18 ounces cheese tortellini, fresh or frozen
- 1/2 tablespoon salt
- 1 jar (24 ounces) marinara sauce
- 8 fluid ounces heavy whipping cream
- 1/2 teaspoon basil, dried
- 1/4 teaspoon black pepper
- 2 packages (5 ounces each) baby spinach
- Fill large pot halfway with hot water, cover and bring to boil. Uncover then add cauliflower, tortellini and salt; stir for a few seconds. Cook, stirring occasionally, until just tender, about 5 minutes, or cook according to package instructions.
- In separate large pot over medium heat, stir marinara sauce, cream, basil and black pepper to combine and bring sauce to simmer. Once simmering, reduce heat to medium-low and cook until slightly thickened, 3-4 minutes.
- Wash and dry spinach.
- When sauce has thickened, add spinach to pot in handfuls, waiting for spinach to wilt slightly before adding next handful. Remove from heat and cover to keep warm.
- When cauliflower and tortellini are done, drain and add to pot with creamy marinara sauce; stir to combine.
- To serve, divide pasta between plates or bowls.
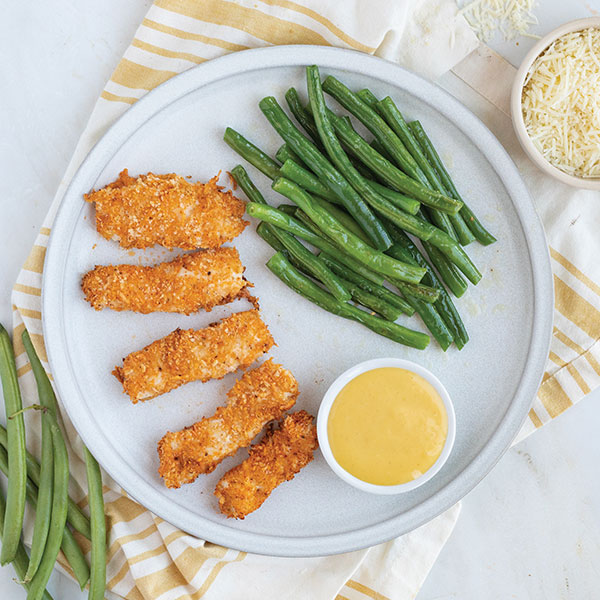
Garlic-Parmesan Chicken Tenders with Green Beans and Honey Mustard Dip
Recipe courtesy of Albertsons
Total time: 30 minutes
Servings: 4
- 2 tablespoons extra-virgin olive oil, divided
- 1/4 cup mayonnaise
- 1 teaspoon garlic powder
- 1 teaspoon salt, divided
- 2/3 cup Parmesan cheese, shredded
- 1/2 cup panko breadcrumbs
- 1/2 teaspoon paprika
- 1 1/2 pounds boneless, skinless chicken breasts
- 1 1/2 pounds green beans
- 1/2 cup honey mustard dressing
- Preheat oven to 450 F. Coat baking sheet with 2 teaspoons oil.
- In medium bowl, stir mayo, garlic powder and 1/2 teaspoon salt to combine.
- In separate medium bowl, stir Parmesan, breadcrumbs and paprika to combine.
- Pat chicken dry with paper towels and slice into 3/4-inch tenders. Add to bowl with mayo mixture and toss to coat.
- Working in batches, dredge tenders in breadcrumb coating, pressing to adhere. Transfer to baking sheet.
- Bake until tenders start to turn golden, about 10 minutes.
- On clean cutting board, wash, dry and trim green beans. Set aside.
- When chicken is golden, flip and bake until cooked through, 6-8 minutes. Remove from oven.
- Preheat large skillet over medium-high heat.
- Add remaining oil and swirl to coat bottom. Add green beans and remaining salt; cook, stirring occasionally, until tender-crisp, 4-5 minutes. Remove from heat.
- Divide chicken tenders and green beans between plates. Serve with dressing for dipping.
Source: Albertsons

Crunchy Buffalo Baked Veal Cutlet Sandwiches
(Family Features) On those busy evenings when brainstorming a meal the whole family agrees on seems like a tall task, turning to a versatile protein can open a bevy of options. The next time your loved ones are stuck in a dinnertime rut, discover the versatility of veal to present a list of new meal possibilities.
Pairing your favorite traditional mealtime flavors with veal can allow you to uncover family-friendly dishes with familiar taste. Add excitement to the weekly menu with a recipe like these Crunchy Buffalo Baked Veal Cutlet Sandwiches, which offers the classic combination of Buffalo sauce and blue cheese in a dish that requires less than an hour in the kitchen.
Thin veal cutlets are dredged in flour, hot sauce and breadcrumbs before hitting the oven. Once baked, the cutlets are added to your favorite type of roll and topped with blue cheese broccoli slaw and as much additional Buffalo sauce as you desire for a flavor-packed meal your loved ones can savor together.
Find more ways to discover veal’s versatility at Veal.org.
Watch video to see how to make this recipe!
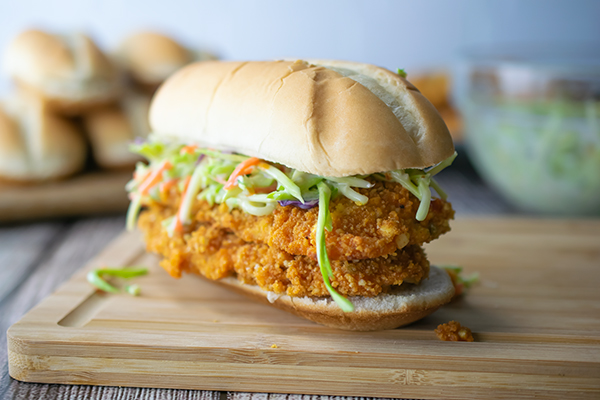
Crunchy Buffalo Baked Veal Cutlet Sandwiches
Prep time: 15 minutes
Cook time: 20 minutes
Servings: 4
- 1 package broccoli slaw
- 1/2 cup blue cheese dressing
- 1 teaspoon salt
- 1 teaspoon black pepper
- 1 cup flour
- 4-6 tablespoons butter, melted
- 1/3 cup Buffalo-style hot sauce, plus additional for serving, divided
- 1 cup panko breadcrumbs
- 3/4 cup blue cheese crumbles
- 8 veal cutlets, pounded about 1/8-inch thick
- 4 sub rolls
- Preheat oven to 400 F. Line rimmed baking sheet with parchment paper; set aside.
- In medium bowl, using tongs, lightly toss broccoli slaw and blue cheese dressing.
- In shallow bowl, stir together salt, pepper and flour.
- In separate shallow bowl, whisk melted butter and hot sauce until combined.
- In bowl of food processor, pulse panko and blue cheese crumbles until combined. Transfer mixture to plate.
- Pat veal cutlets dry with paper towels. Dredge one veal cutlet in seasoned flour then coat with hot sauce and butter mixture. Place cutlet on top of panko blue cheese crumbs and gently press down to coat one side. Turn cutlet over and press down again gently to coat, including edges. Place on prepared baking sheet. Repeat with remaining cutlets
- Bake 10-15 minutes, or until internal temperature reaches 160 F.
- Cut rolls in half, add two cutlets per roll, top each with broccoli slaw mixture and drizzle lightly with Buffalo-style hot sauce.
Substitution: Ranch may be used for blue cheese.
Source: Veal.org

Family Meals Cooked with Convenience in Mind
(Family Features) Part of the fun of family meals is finding inspiration in the variety of dinner ideas you can create together. From a tangy twist on traditional tacos to a favorite to-go flavor in the comfort of your own kitchen, the options are nearly endless when you use versatile, ready-to-use ingredients.
When you include protein that’s prepared, seasoned and precooked, you can cut down on time in the kitchen, while adding precious seconds to spend with loved ones. For example, Chef’s Craft® Gourmet Chicken offers a line of gluten-free, preservative-free, all-natural chicken skillfully crafted by experts and perfectly suited for culinary creations. The varieties are always fresh and perfect for preparing in 30 minutes or less. They can be enjoyed on their own or in an array of family dishes.
Consider these Barbecue Ranch Breaded Chicken Tacos to call loved ones to the table with chunks of tender chicken piled high with homemade spicy vinegar slaw, fried onions and avocado drizzled with barbecue sauce and ranch dressing.
Or, for a taste of takeout you can make in your own home, turn to Honey Soy Chicken Stir-Fry. If you don’t own a wok, don’t fret – this dish can easily be made in a skillet. Just be sure to give the veggies enough room as a crowded skillet is likely to result in steamed veggies.
Find more quick, convenient family meal ideas, as well as a store locator, at chefscraftgourmet.com.
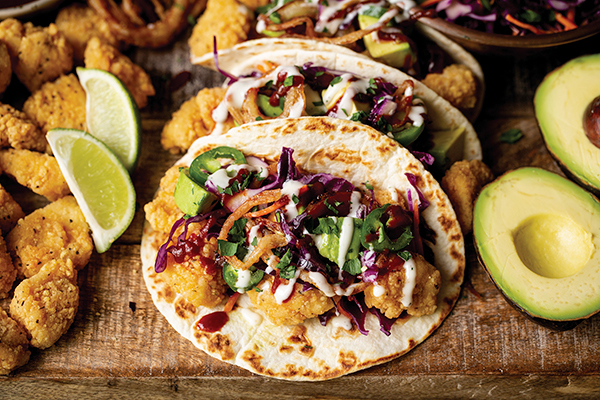
Barbecue Ranch Breaded Chicken Tacos
Servings: 4
Spicy Vinegar Slaw:
- 2 1/2 cups shredded purple cabbage
- 1/2 cup shredded carrot
- 2 jalapenos, thinly sliced
- 1 1/2 tablespoons canola or vegetable oil
- 2 tablespoons apple cider vinegar
- 1 teaspoon sugar
- kosher salt
- freshly ground black pepper
Fried Onions:
- canola or vegetable oil, for frying
- 1/2 cup all-purpose flour
- kosher salt
- freshly ground black pepper
- 1 yellow or Vidalia onion, cut into 1/4-inch slices
- 8 taco-sized flour tortillas, warmed
- 1 package Chef’s Craft® Breaded Chicken Chunks, cooked according to package directions
- spicy vinegar slaw
- 1 avocado, chopped
- fried onions
- 1/2 cup barbecue sauce
- 1/2 cup ranch dressing
- chopped cilantro (optional)
- To make spicy vinegar slaw: In medium mixing bowl, combine cabbage, carrot and jalapenos.
- In separate small bowl, whisk oil, vinegar and sugar; season generously with salt and pepper.
- Drizzle over coleslaw mix and stir to combine. Let sit at least 10 minutes before serving.
- To make fried onions: In small skillet over medium-high heat, heat 1/2 inch oil.
- In small bowl, season flour well with salt and pepper. Coat onion slices in flour mixture and shake to remove excess flour.
- Fry in batches until golden brown and crisp, about 30-45 seconds per batch. Remove to paper towel-lined plate and immediately sprinkle with salt.
- Top each tortilla with cooked breaded chicken chunks, spicy vinegar slaw, chopped avocado, fried onions, barbecue sauce and ranch dressing. Garnish with cilantro, if desired.
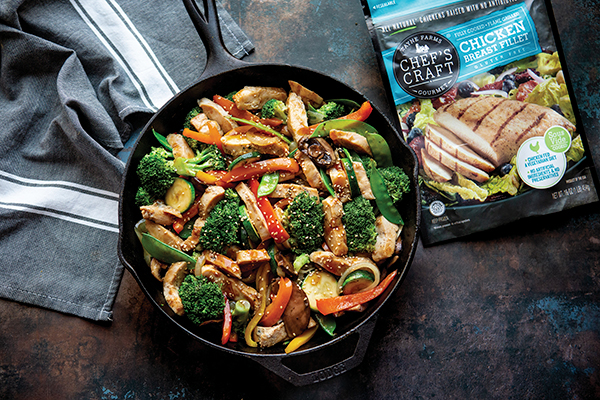
Honey Soy Chicken Stir-Fry
Prep time: 15 minutes
Cook time: 15 minutes
Total time: 30 minutes
Serves: 4
Honey Soy Glaze:
- 1/2 cup chicken broth
- 1/2 cup soy sauce
- 6 tablespoons honey
- 1/2 teaspoon granulated garlic
- 1/2 teaspoon dried ground ginger
- 4 teaspoons cornstarch
- 3 teaspoons water
- 2 tablespoons canola or vegetable oil
- 1 large yellow onion, sliced
- 3 bell peppers, sliced
- 1 large zucchini, sliced
- 4 ounces snow peas
- 10 ounces sliced mushrooms
- 2-3 cups broccoli florets, steamed to tender crisp
- 1 package Chef’s Craft® Chicken Breast Fillets, cooked according to package directions, sliced
- sesame seeds, for garnish
- To make honey soy glaze: In small saucepan over medium heat, combine chicken broth, soy sauce, honey, garlic and ginger. Bring to simmer. In small bowl, combine cornstarch and water; stir into honey soy sauce and let cook approximately 1 minute, stirring occasionally, until sauce thickens.
- In large skillet or wok over medium-high heat, heat oil. Add onion, pepper and zucchini; cook 2-3 minutes. Add snow peas and mushrooms; cook 2 minutes until vegetables are crisp tender but maintain texture.
- Add broccoli and chicken to pan; stir all but 3 tablespoons sauce; cook 1 minute, stirring frequently. Drizzle with remaining sauce and garnish with sesame seeds.
Source: Wayne Farms

Encourage Healthy Eating Habits in Kids
(Family Features) As a parent, instilling healthy eating habits in your children at an early age can aid in proper growth and development. Eating well goes a long way toward maintaining a healthy weight, increasing energy levels and improving moods while also reducing risk of obesity and other chronic issues such as heart disease and diabetes later in life.
Set your children on a path to making lifelong nutritious choices with these tips:
Foster independence. Allowing your children to help with shopping and meal prep can aid in them taking ownership of what they’re eating. Start by divvying up easier tasks such as setting the table then work toward creating snacks and meals on their own. These Rainbow Fruit Parfaits are simple for kids to assemble – just set the ingredients out and let them layer – and can serve as a healthful on-the-go breakfast or after-school snack.
Offer balanced options. Children require balanced diets made up of all three major food groups, including fruits and vegetables, for proper development. Looking for the Produce for Kids logo next to nutritional, family-friendly items at the grocery store is an easy way to identify healthy food choices while also supporting local organizations that help children and families in need.
Be a role model. Typically, your children will follow your behaviors, which includes the types of foods they select at mealtimes. Eating a rainbow of fruits and vegetables can help ensure your family is getting a complete range of nutrients. For example, a recipe like this Rainbow Buddha Bowl provides a combination of fresh and roasted vegetables that can be customized to meet your family’s tastes. Thinking about how many colors you eat in a day may inspire your kids to do the same, which can foster a lifetime of healthy eating habits.
To find more healthy meal inspiration, including more than 500 registered dietitian- and family-tested recipes, visit produceforkids.com.
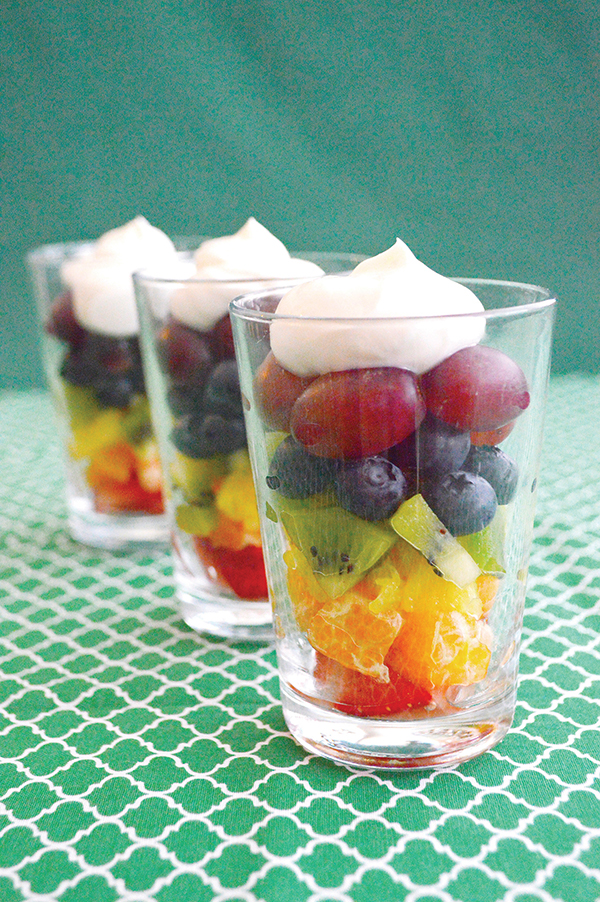
Rainbow Fruit Parfaits
Recipe courtesy of Produce for Kids
Prep time: 10 minutes
Servings: 3
- 1/2 cup sliced strawberries
- 2 mandarins, peeled and segmented
- 1/2 cup chopped pineapple
- 2 kiwis, peeled and chopped
- 1/2 cup blueberries
- 1/2 cup red seedless grapes
- 1 cup vanilla Greek yogurt
- In parfait glasses, layer strawberries, mandarins, pineapple, kiwis, blueberries and grapes.
- Top each fruit parfait with yogurt.
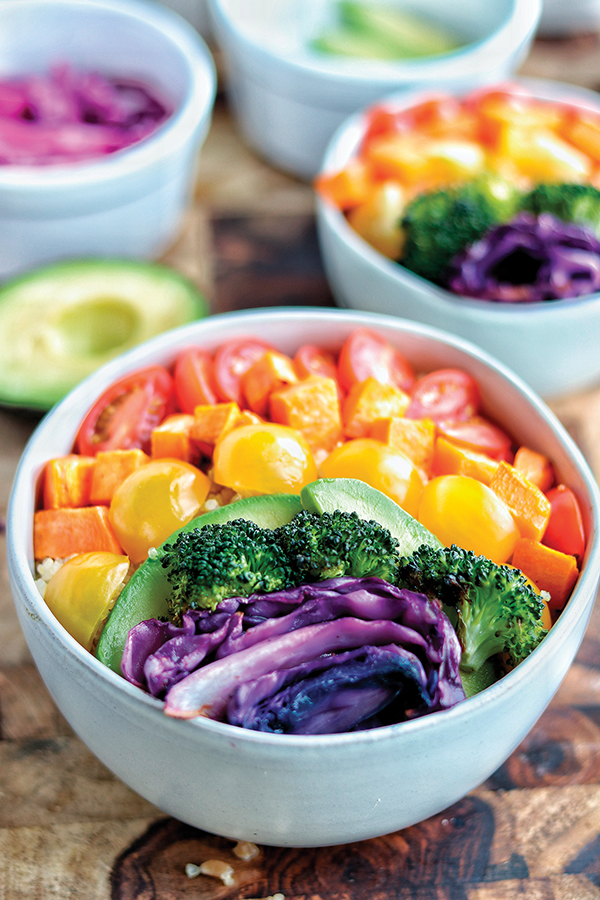
Rainbow Buddha Bowl
Recipe courtesy of Jodi of Create Kids Club on behalf of Produce for Kids
Prep time: 30 minutes
Servings: 4
- 1 medium sweet potato, peeled and diced
- 1 cup broccoli florets
- 1/2 small purple cabbage, sliced
- 1 tablespoon olive oil
- salt, to taste
- pepper, to taste
- 2 cups quinoa, cooked according to package directions
- 1 cup red cherry tomatoes, quartered
- 1/2 cup yellow cherry tomatoes, quartered
- 1 avocado, sliced
- 4 tablespoons yogurt ranch dressing
- Heat oven to 425° F.
- Place sweet potatoes, broccoli and cabbage on baking sheet lined with parchment paper. Toss with oil and season with salt and pepper, to taste. Bake 15-20 minutes, or until potatoes are soft.
- Divide cooked quinoa into four bowls. Top with roasted sweet potatoes, broccoli, cabbage, red tomatoes, yellow tomatoes and avocado.
- Drizzle with dressing.
Source: Produce for Kids

Back-to-School Meals in Minutes
Mexican menu ideas for simple family dinners
(Family Features) When the school year is back in full swing, families often find themselves battling the mealtime crunch. Mexican-inspired meals bursting with flavor are known family-friendly picks that can be easily prepared and put on the table on those frenzied weeknights.
These simple ideas from the experts at Ortega can help make “taco night” and other Mexican meals better than ever.
Encourage kids to get hands-on. It’s no secret that kids like finger foods, and many Mexican dishes are best enjoyed by hand. Tacos are an obvious favorite, but other options like quesadillas, taquitos and Ortega Fiesta Flats are also easy to enjoy sans silverware.
Step outside of tradition. If you’re looking for something that makes mealtime feel extra special, skip the basic taco and choose a meal kit that lets you serve up a restaurant-style experience at home. For example, Ortega’s Bakeable Tortilla Bowl Kits bring a new and simple way to change up your Mexican meals. Just bake and fill with your favorite ingredients.
Offer a variety of ingredients. One of the benefits of a Mexican meal is all the ways each family member can customize plates to their own tastes. Try setting out a wide range of ingredients and encourage the kids to experiment with toppings they may not have tried before, like olives and guacamole.
Don’t forget the sauce. Taco sauces can bring unique, unexpected flavor to recipes. One to try is Ortega’s line of bold and creamy Flavor Craver Taco Sauces. Varieties include Taco Ranch, Chipotle and Jalapeno Lime, all perfect for tacos, taco salads, dips, burgers and more.
Stock Your Pantry for Mexican Cooking
You can enjoy the flavors of a Mexican cantina in your kitchen anytime if you’re stocked up with the right goods.
Pantry and Dry Goods
- Keep dried or canned chiles of all sorts on-hand. Dried chiles include ancho, chipotle, guajillo, negro and mulato.
- Expand your spice rack with Mexican staples like chili powder, cayenne pepper and paprika, as well as oregano and cumin.
- Buy white rice in bulk so you can create Spanish rice to accompany any dish.
- Stock up on canned refried beans, black beans and pinto beans for use in your favorite Mexican dishes.
Refrigerator and Produce
- Keep ready-made salsa and spicy sauces chilled and serve them alongside chips, tacos and other Mexican dishes.
- Always have garlic, onions and fresh cilantro handy. Keep lemons and limes within reach to add bright flavor to your dishes. Also, buy fresh chiles like jalapeno and pasilla to spice up a variety of dishes. If possible, grow them yourself.
- Store flour and corn tortillas in your cupboard or refrigerator to create burritos, tacos, enchiladas and wraps.
- Keep Monterey Jack, queso fresco and cotija cheese on-hand to include in enchiladas and burritos.
Find more recipes and ideas to add a unique twist to any Mexican meal at Ortega.com.
Poblano Ranch Tacos
Makes: 8 tacos
- 2 tablespoons olive oil
- 4 poblano peppers, sliced
- 1 yellow onion, sliced
- 1 tablespoon fresh lime juice (optional)
- 1 box Ortega Yellow Corn Taco Shells
- 6 radishes, sliced
- 1 cup corn kernels
- 1 cup cotija cheese
- 1 bottle Ortega Flavor Craver Ranch Taco Sauce, to taste
- Add olive oil to skillet over medium heat. Add sliced poblano peppers and yellow onion to pan. Saute until cooked through. Add squeeze of lime to pepper and onion mixture, if desired.
- Bake taco shells according to package directions. To assemble tacos, add poblano and onion mixture to base of taco. Top with sliced radishes, corn and cotija cheese. Finish with taco sauce.

Steak Fajita Burrito Bowl
Makes: 4 bowls
3 tablespoons olive oil, divided
1 pound skirt steak
1 red pepper, sliced
1 yellow pepper, sliced
1 package instant rice
1 tablespoon fresh lime juice
1/2 packet Ortega Original Taco Seasoning
1 Ortega Bakeable Tortilla Bowl Kit
3 cups green leaf lettuce, sliced
2 avocados, diced
1 cup corn kernels
1/2 cup cotija cheese
1 bottle Ortega Green Taco Sauce, to taste
- Add 2 tablespoons oil to skillet over medium-high heat. Cook skirt steak 5 minutes on each side. Remove steak from pan and let rest. When cooled, slice into strips.
- Add remaining olive oil to skillet over medium-high heat. Saute red and yellow peppers until cooked through.
- Prepare rice as directed on package. Add squeeze of lime and taco seasoning. Stir to combine.
- Prepare tortilla bowls as directed on package. Fill with rice, shredded lettuce, sliced steak and peppers. Top with diced avocado, corn and cotija cheese. Finish with taco sauce.

Southwest Chicken Salad
Makes: 4 bowls
- 2 tablespoons olive oil
- 4 chicken breasts
- 2 teaspoons chili powder
- 1 Ortega Bakeable Tortilla Bowl Kit
- 3 cups green leaf lettuce, sliced
- 1 can Ortega Black Beans
- 1 cup corn kernels
- 2 avocados, diced
- 1 tomato, diced
- 1 cup cotija cheese
- 1 bottle Ortega Flavor Craver Ranch Taco Sauce, to taste
- Add olive oil to skillet over medium heat. Coat chicken with chili powder. Cook chicken 8 minutes on each side, or until cooked through. Remove chicken from pan and let rest. Slice chicken into strips when cooled.
- Prepare tortilla bowls as directed on package. Fill with shredded lettuce, black beans, corn and sliced chicken. Top with diced avocado, tomato and cotija cheese. Finish with taco sauce.
Source: Ortega

Picnics With Panache
Swing into summer with a basketful of delicious picnic fare ready to share in minutes
(Family Features) Good friends, great food, and the best season for outdoor entertaining add up to one thing — a glorious picnic season. If you’re just warming up to the idea of planning a picnic at the park or a backyard potluck, it’s the prime time to prepare and make your plans.
First set the date with your best mates. Then grab the gingham tablecloth and break out the picnic basket. What to serve? Start simple with a menu that’s casual, delicious, and easy to make and take, especially if you’re off to the perfect picnic destination.
Choose light, flavorful pasta salads that combine summertime flavors, such as creamy ranch and Dijon mustard, or chicken with marinated artichoke hearts. Be prepared to pass the deviled eggs more than once. Bring along fresh fruit for a refreshing dessert. And, try a cool lemonade that combines two favorite summertime flavors — watermelon and kiwi. All that’s left is to savor every moment and every bite!
Picnic Season’s Top Tips
Consider these hints for summer gatherings:
- An “eggs-cellent” way to tote deviled eggs: sandwich two halves with filling sides together, wrap well with plastic wrap, and place in a chilled, insulated box.
- When the ants begin their march, reach for a natural deterrent — vinegar. Fill a spray bottle with white vinegar to have at the ready.
- Cooking for a crowd? Streamline your menu by choosing convenience products, such as boxed salad mixes that only require a few on-hand ingredients. Reach for prewashed, precut veggies. And, sprinkle a bit of flavor onto grilled potatoes and salads by adding a tasty topper, such as Bac~Os (an easy option that is less messy than frying bacon).
- Got sunscreen? Make sure it’s in your pack.
For more great summertime recipes and tips, visit www.bettycrocker.com.

Creamy Ranch Pasta Salad
Makes: 6 servings
- 1 box Betty Crocker Suddenly Salad ranch and bacon pasta salad mix
- 1/2 cup mayonnaise or salad dressing
- 1 tablespoon Dijon mustard
- 4 medium green onions, chopped
- 1 medium stalk celery, thinly sliced
- 3 hard-cooked eggs, coarsely chopped
- 1 hard-cooked egg, sliced
- Paprika
- Empty pasta into 3-quart (or larger) saucepan 2/3 full of boiling water. Gently boil uncovered 15 minutes, stirring occasionally. Drain pasta; rinse with cold water. Shake to drain well.
- In large bowl, stir together seasoning mix, mayonnaise, mustard, onions and celery. Add pasta and chopped eggs and stir until evenly coated. Garnish with egg slices and paprika.
- Store in refrigerator.

Chicken and Artichoke Pasta Salad
Makes: 6 servings
- 1 box Betty Crocker Suddenly Salad classic pasta salad mix
- 3 tablespoons cold water
- 2 tablespoons vegetable oil
- 1 cup cubed, cooked chicken
- 1 6-ounce jar marinated artichoke hearts, drained
- 1/4 cup sliced ripe olives
- 2 tablespoons grated Parmesan cheese
- Empty pasta into 3-quart (or larger) saucepan 2/3 full of boiling water. Gently boil uncovered 12 minutes, stirring occasionally. Drain pasta; rinse with cold water. Shake to drain well.
- In large bowl, stir together seasoning mix, cold water, and oil. Stir in pasta, chicken, artichokes, olives, and cheese. Store in refrigerator.

Watermelon Lemonade With Kiwifruit Splash
Makes: 6 1-cup servings
- 2 kiwifruit, peeled and cut into fourths
- 1 1/2 teaspoons sugar
- 4 cups cubed, seedless watermelon
- 1 12-ounce can frozen lemonade concentrate
- 2 cups water
- Place kiwifruit and sugar in blender; cover and blend on medium just until smooth. Pour into another container; freeze 1 to 2 hours or until firm.
- Place watermelon in blender; cover and blend on medium until smooth. Place frozen lemonade concentrate and water in large pitcher. Add watermelon mixture; mix well.
- Pour watermelon lemonade into glasses. Spoon a dollop of frozen kiwifruit mixture on top. Serve immediately.

Poppy Seed Salad
Makes: 6 servings
- 1/4 cup honey
- 1/4 cup frozen limeade concentrate, thawed
- 2 teaspoons poppy seeds
- 1 cup strawberries, halved
- 1 cup cubed pineapple
- 1 cup fresh blueberries
- 1 cup cubed watermelon
- In large bowl, mix honey, limeade concentrate, and poppy seeds.
- Carefully toss in fruits.
Devilishly Good Eggs
Makes: 6 servings
- 6 hard-cooked eggs
- 1/4 cup mayonnaise or salad dressing
- 2 tablespoons Betty Crocker Bac~Os bacon-flavored bits or chips
- 2 teaspoons lemon juice
- 1 1/2 teaspoons Worcestershire sauce
- 1 teaspoon Dijon or yellow mustard
- 1/4 teaspoon salt
- 1/8 teaspoon pepper
- Cut eggs lengthwise in half. In small bowl, slip out yolks and mash with fork.
- Stir in remaining ingredients except egg white halves.
- Fill egg white halves with egg yolk mixture, heaping it lightly.
Source: Suddenly Salad

A Simple Twist on After School Snacks
(Family Features) We all know it's important to start the day off with a healthy breakfast. As a parent, you also have lunch covered for your hungry student, whether it's packed in a brown bag or eaten in the cafeteria. But after a busy day of learning, young tummies often need a wholesome after-school snack to tide them over until dinner.
Keeping a stash of kid-friendly snacks handy is a sure-fire way to keep snack time manageable, while making sure kids don't have a full afternoon meal, which would spoil their appetite for dinner.
Instead of potato chips or cookies, try crunchy veggies paired with a flavorful dip. As an added (and educational) bonus, invite kids to help make snacks ahead of time, assigning them age-appropriate tasks like measuring and mixing. This introduces them to family meal prep and helps teach them about healthy eating habits at an early age.
Kick off your new after-school snack routine with a recipe like this one for Ranch Pimento Cheese Celery Logs, created by country music star and busy mom of seven, Sara Evans, on behalf of Hidden Valley. For a little kick, Evans suggests substituting with Hidden Valley® Spicy Ranch Salad Dressing & Seasoning Mix. If your kids resist celery or you want a little variety, this spread also makes great finger sandwiches when layered between two slices of sandwich bread and cut into small triangles.
For more kid-friendly after-school snack ideas, visit www.HiddenValley.com.
Ranch Pimento Cheese Celery Logs
Ingredients
- 8 ounces shredded cheddar cheese
- 1/2 cup mayonnaise
- 1 teaspoon Hidden Valley® Original Ranch Salad Dressing & Seasoning Mix
- 1 (4-ounce) jar pimentos, drained
- 30 (2-inch) celery logs, cut from about 1 bunch of celery
Preparation
- Place cheese, mayonnaise, seasoning mix and pimentos in bowl of food processor. Pulse a few times until well combined but still chunky, taking care not to over mix. Alternatively, you can mix by hand, but it won't be quite as spreadable.
- Divide cheese mixture among celery logs (about 2 teaspoons per log), mounding it into cavity.
- Serve cold.
Preparation Time
15-20 minutes
Serves
30 filled celery logs
SOURCE: Hidden Valley