
Cool Lemon Lush
Celebrate warm weather outdoors with a refreshing treat like Cool Lemon Lush.
Find more desserts at Culinary.net.
Watch video to see how to make this recipe!
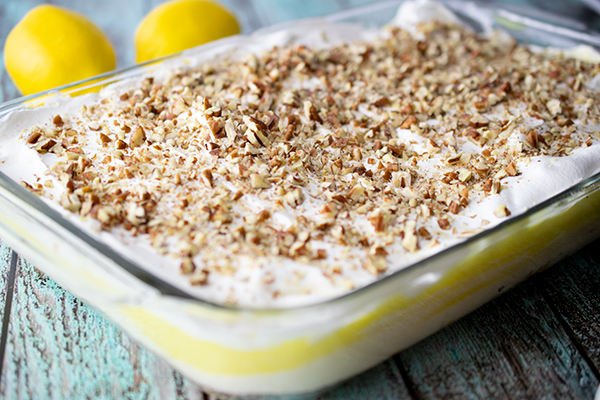
Cool Lemon Lush
- Nonstick cooking spray
- 2 cups flour
- 1 cup butter, softened
- 2 packages (8 ounces each) cream cheese
- 1 cup sugar
- 1 lemon, juice only
- 2 instant lemon pudding mix packages (3 ounces each)
- 4 cups milk
- 1 container (12 ounces) frozen whipped topping, thawed
- chopped pecans
- Heat oven to 350 F. Grease 9-by-13-inch baking pan with nonstick cooking spray.
- In medium bowl, combine flour and butter using pastry cutter. Press into bottom of baking pan. Bake 25 minutes, or until golden brown. Cool completely.
- In medium bowl, beat cream cheese and sugar until smooth. Juice lemon into mixture; continue mixing until blended.
- Pour mixture over cooled crust. Set aside.
- In medium bowl, whisk pudding mix and milk until thickened. Spread over cream cheese mixture. Spread whipped topping over pudding layer. Sprinkle with chopped pecans.

Easy, No-Bake Goodies
(Family Features) Summer is a great time to get kids into the kitchen to make some snacks and desserts. Whether you need something to take to a picnic or just something to do on a rainy day, making easy, no-bake goodies like Rice Krispies Treats(r) can show kids just how fun cooking can be.
Even young children can be kitchen helpers, so the whole family can get involved. What can your child do to help prepare a recipe?
2 to 3-year-olds can
-Wash and scrub fruits and vegetables
-Name and count foods
3 to 4-year-olds can
-Shape foods
-Mix dry ingredients together
-Pour pre-measured liquids into batter
4 to 5-year-olds can
-Help measure ingredients
-Open packages
-Pour cereal
-Mash soft fruits and vegetables
-Press cookie cutters into dough or soft food
6 years old and up can
-Beat recipe ingredients with a whisk
-Help locate ingredients in a spice rack or pantry
Make some summer magic with these tasty no-bake recipes for Choco P'Nutty Bars, Itsy Bitsy Fruit Pies, and Ice Cream Sandwich Treats. For even more kid-friendly recipes you can make together, visit www.Ricekrispies.com.
Note: The following recipes should be made with adult supervision.
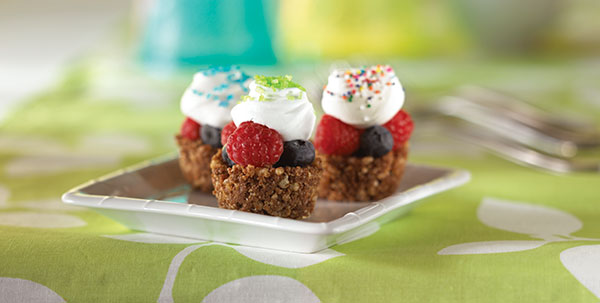
Itsy Bitsy Fruit Pies
Prep Time: 25 minutes
Total Time: 30 minutes
Servings: 24
- 1/2 cup butter or margarine
- 1 cup milk chocolate morsels
- 1/4 teaspoon cinnamon
- 4 cups Kellogg's® Rice Krispies® cereal
- 2 cups assorted fresh chopped fruits
- Frozen non-dairy whipped topping, thawed
- Assorted sprinkles
- In medium saucepan, melt butter over low heat. Stir in chocolate morsels until melted. Remove from heat. Stir in cinnamon.
- Place cereal in large bowl. Carefully pour melted chocolate mixture over cereal. Gently stir until cereal is completely coated with chocolate.
- Spoon cereal mixture into twenty-four 1 1/2-inch muffin-pan cups coated with cooking spray. Using your finger or thumb, press cereal mixture onto bottoms and up the sides of each cup, forming crusts.
- Place crusts in freezer for 30 minutes. Remove from freezer. Refrigerate, covered, until ready to serve.
- Before serving, fill each crust with fresh fruit. Dollop with whipped topping. Decorate with sprinkles. Serve immediately.
Note: Extra unfilled crusts may be frozen in air-tight container for up to a month. Let stand at room temperature for 15 minutes before serving.
Kid-friendly Kitchen Tips:
-Children of all ages should have an adult assistant with them at all times when cooking.
-Chefs 7 and older can measure the ingredients and help stir the melted chocolate into the cereal.
-Little ones, ages 3 to 6, will enjoy pressing the mixture into the muffin cups and decorating with the fruits and whipped cream.
-Make sure to have plenty of extra fruits for snacking while making these little pies.
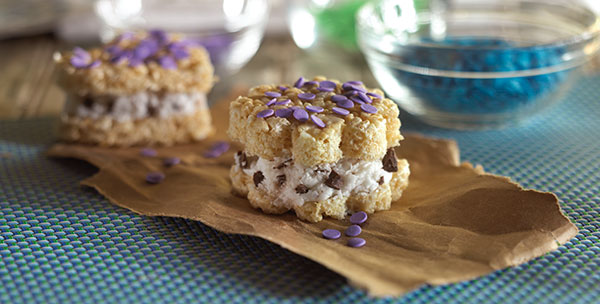
Ice Cream Sandwich Treats
Prep Time: 15 minutes
Total Time: 3 hours
Servings: 10 to 12
- 3 tablespoons butter or margarine
- 1 10 ounce-package (about 40) marshmallows, or 4 cups miniature marshmallows
- 2 teaspoons vanilla
- 6 cups Kellogg's Rice Krispies cereal
- 1/2 cup assorted sprinkles
- 2 pints desired flavor ice cream, frozen yogurt, sorbet or gelato
- In large saucepan melt butter over low heat. Add marshmallows and stir until completely melted. Remove from heat. Stir in vanilla.
- Add cereal. Stir until well coated.
- Using buttered spatula or wax paper, evenly press mixture to 1/4-inch thickness on baking sheet coated with cooking spray. Decorate with sprinkles. Refrigerate for 15 minutes.
- Remove from refrigerator. Using 2-inch cookie cutters coated with cooking spray, cut into desired shapes. Place small scoop of ice cream on undecorated side of one cut-out. Top with another cut-out, decorated side up. Gently press together. Return to baking sheet. Repeat with remaining cut-outs and remaining ice cream.
- Freeze for 30 minutes. Transfer to airtight container. Freeze for 2 hours to 1 week. Let stand at room temperature for 10 minutes before serving.
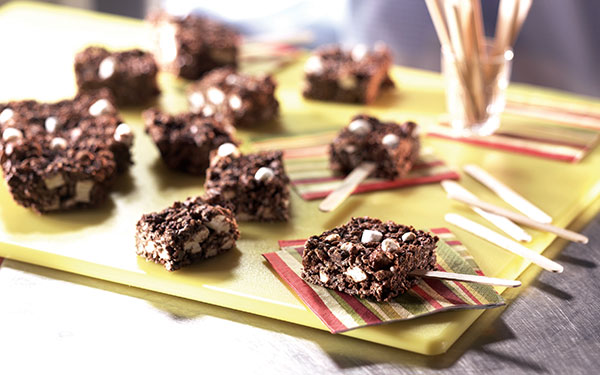
Choco P'Nutty Bars
Prep Time: 15 minutes
Total Time: 1 hour
Servings: 18
- 1 12-ounce package (2 cups) semi-sweet chocolate morsels
- 2/3 cup peanut butter
- 6 cups Kellogg's Rice Krispies cereal
- 3 cups miniature marshmallows
- 18 wooden or plastic sticks
- In large saucepan, melt chocolate morsels and peanut butter over low heat; stirring constantly. Remove from heat. Stir in cereal and marshmallows.
- Using buttered spatula or waxed paper, press mixture evenly into 13 x 9 x 2-inch baking pan coated with cooking spray. Chill in refrigerator about 45 minutes.
- Cut into 18 bars. Serve by inserting plastic or wooden stick into each bar.
Microwave Directions: In large microwave safe bowl, melt chocolate morsels and peanut butter at medium power for 2 to 2 1/2 minutes. Stir until smooth. Add remaining ingredients, stirring until well coated. Continue with recipe directions.
Source: Rice Krispies

Holiday Pairing Perfection
Festive flavors and seasonal sips
(Family Features) The holidays are the perfect time to gather with friends and family to celebrate the season.
Take the stress out of hosting by shopping at a store like ALDI for your holiday must-haves, including everything from food and wine to holiday decor and even gifts for nearly anyone on your list, helping you to save time and money.
Toast to the holidays with an impressive appetizer spread, paired with award-winning wines, with recipes like Cranberry Shrimp Ceviche Cups paired with the creamy and tropical taste of William Wright Chardonnay. Or whip up quick and easy Party Poppers made with dates, Brie cheese and bacon to mesh with the fruit, vanilla and spicy fall notes of Peaks & Tides Cabernet Sauvignon.
Blue Cheese and Walnut Mousse provides a savory finish when matched with La Rue Côtes de Provence Rosé and its hints of lavender, rosemary and thyme. Finally, add a little something sweet to your spread by pairing the refreshingly ripe Landshut Riesling with a festive Gingerbread Trifle.
Find more holiday recipes and shopping solutions at ALDI.us .
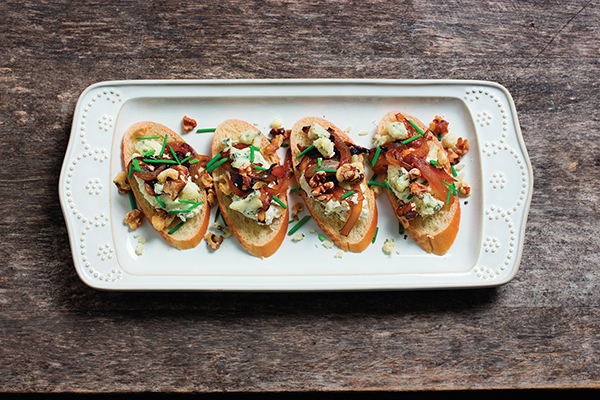
Blue Cheese and Walnut Mousse
Recipe courtesy of Chef Scott, ALDI Test Kitchen
Prep time: 5 minutes
Cook time: 15 minutes
Yield: 10 servings
- 2 tablespoons Simply Nature 100% Pure Avocado Oil
- 3 large yellow onions, sliced
- 5 ounces Happy Farms Preferred Blue Cheese Crumbles
- 8 ounces Happy Farms Cream Cheese
- Stonemill Ground Black Pepper, to taste
- 1 cup Friendly Farms Heavy Whipping Cream
- 8 ounces Southern Grove Chopped Walnuts, divided
- 5 cucumbers, thinly sliced
- In large pan, heat oil and saute onions until brown and caramelized.
- In food processor, combine blue cheese crumbles and cream cheese. Process until smooth. Season with pepper, to taste.
- In medium bowl, using hand mixer, whisk cream until soft peaks form. Fold in cheese mixture and 4 ounces chopped walnuts.
- Top cucumber slices with mousse, caramelized onions and remaining chopped walnuts. Finish by grinding black pepper over top for garnish.
- Pair each serving with glass of La Rue Cotes de Provence Rosé.
Tip: Mousse can also be served as a dip with baguette slices.
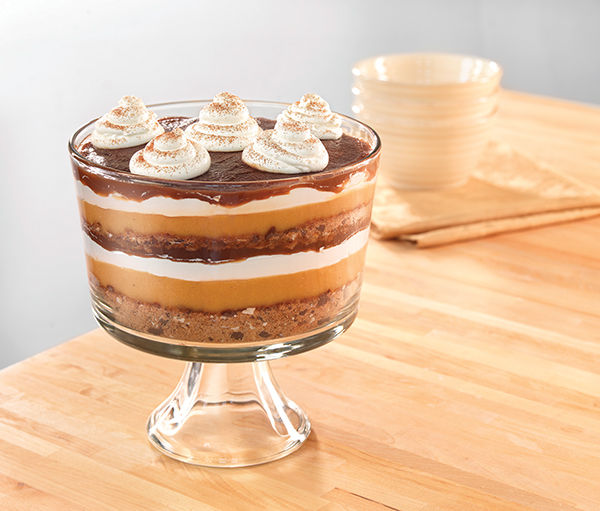
Gingerbread Trifle
Recipe courtesy of the ALDI Test Kitchen
Prep time: 20 minutes
Yield: 12 servings
- 1 package (3.4 ounces) Baker’s Corner Vanilla Pudding
- 1 3/4 cups Specially Selected Premium Eggnog
- 1/2 teaspoon Stonemill Pumpkin Pie Spice
- 7 ounces Café Bistro Soft Gingerbread, crumbled, divided
- 1 1/4 cups Friendly Farms Whipped Topping, divided
- 1 cup Berryhill Apple Butter, divided
- 2 teaspoons Stonemill Ground Cinnamon
- Whisk vanilla pudding mix and eggnog. Add pumpkin pie spice and beat 2 minutes. Chill in refrigerator 10 minutes.
- In large glass bowl, layer one-third of gingerbread cookies, one-third of pudding, one-third of whipped topping and 1/2 cup apple butter; repeat two more times.
- The third layer will end with whipped topping. Garnish with cinnamon.
- Chill in refrigerator 2 hours.
- Pair each serving with glass of Landshut Riesling.
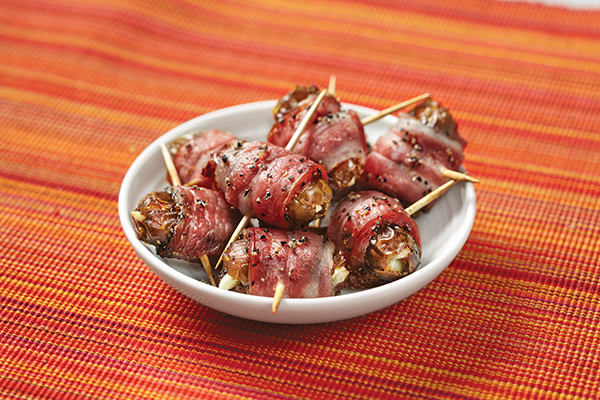
Party Poppers
Recipe courtesy of Chef Alyssa, ALDI Test Kitchen
Prep time: 25 minutes
Cook time: 15 minutes
Yield: 36 poppers
- 8 ounces Southern Grove Pitted Dates
- 4 ounces Specially Selected Brie Cheese Round
- 6 ounces Southern Grove Slivered Almonds
- 1 1/2 pounds Specially Selected Thick Sliced Hickory Bacon
- 2 teaspoons Stonemill Ground Black Pepper
- Heat oven to 375° F.
- Cut dates in half, lengthwise.
- Cut brie into bite-size pieces, about the size of peanuts.
- Place one piece of Brie and four almond pieces on each open date half. Place other half on top.
- Quarter bacon slices, wrap tightly around stuffed dates and secure with toothpicks. Sprinkle with pepper.
- Line baking sheet with foil and place wrapped dates on top. Bake 15 minutes, or until bacon is crispy. Serve warm.
- Pair each serving with glass of Peaks & Tides Cabernet Sauvignon.
Cranberry Shrimp Ceviche Cups
Recipe courtesy of Chef Kates, ALDI Test Kitchen
Prep time: 20 minutes, plus 1 hour chill time
Cook time: 3 minutes
Yield: 16 ceviche cups
- 1 1/2 teaspoons Stonemill Iodized Salt, divided
- 16 ounces Specially Selected Black Tiger Shrimp, thawed
- 1 cup Southern Grove Dried Cranberries
- 1/2 red onion, roughly chopped
- 1/2 cup fresh parsley
- 1/2 jalapeno, roughly chopped
- 1/4 cup fresh lemon juice
- 1/4 cup fresh lime juice
- 1/4 teaspoon Stonemill Crushed Red Pepper or Ground Black Pepper
- 1 teaspoon Stonemill Oregano
- 13 ounces Simply Nature Organic Tortilla Chips, for garnish
- 2 limes, cut into wedges, for garnish
- fresh cranberries, for garnish (optional)
- Bring medium pot of water to boil. Season with 1 teaspoon salt. Add shrimp and cook 3 minutes. Immediately plunge cooked shrimp into ice water bath. Peel shrimp and place in flat dish.
- In food processor, combine dried cranberries, red onion, parsley and jalapeno. Pulse until finely chopped. Add cranberry mixture to shrimp.
- Add lemon juice, lime juice, remaining salt, pepper and oregano. Stir to combine thoroughly. Refrigerate 1 hour.
- To assemble: Spoon ceviche (about 4-5 shrimp each) into small clear cups or glasses. Garnish with tortilla chips, lime wedges and fresh cranberries, if desired.
- Pair each serving with glass of William Wright Chardonnay.
Source: ALDI

Sweet Ways to Welcome Warmer Days
(Family Features) Warmer, longer days are made for quality time with friends and family. There’s no better way to cap off an afternoon in the sun than a good meal followed by a great dessert. Plan to end your next gathering on a sweet note with these fruity desserts to conclude a day spent with loved ones.
Fruity treats are hard to resist, especially when paired with tasty, complementary flavors and textures. If you’re looking for a treat that travels a bit off the beaten path, this pie may be just the answer. A crushed pretzel crust and creamy peanut butter filling provide a salty, savory background for plump, sweet strawberries. Or serve up a taste of the tropics with a cream pie that celebrates a medley of textures and flavors from lively blueberries to toasted coconut.
When you make fruit the star of the dessert, there’s no question you need top-quality ingredients. Each of these desserts features Lucky Leaf Fruit Fillings, which are made from fresh fruit, contain no high-fructose corn syrup and are GMO-free, for a delicious dessert every time. With a variety of flavors to choose from, including apple, blueberry, cherry, peach and strawberry, there are plenty of convenient, versatile dessert options for any occasion.
Find more tasty treats for entertaining and beyond at luckyleaf.com.

Strawberry Peanut Butter Pie
- 1 1/4 cups crushed pretzels
- 1/4 cup granulated sugar
- 1/2 cup butter, melted
- 1 cup creamy peanut butter
- 1 package (8 ounces) cream cheese
- 1/2 cup powdered sugar
- 1 1/2 cups frozen whipped dessert topping, thawed
- 1 can (21 ounces) Lucky Leaf Premium Strawberry Fruit Filling and Topping
- Combine pretzels and granulated sugar then stir in butter. Press crumb mixture onto bottom and sides of 10-inch pie plate. Cover and chill.
- With electric mixer on medium speed, beat together peanut butter, cream cheese and powdered sugar. Fold in whipped dessert topping.
- Spoon 1/2 cup pie filling into crust-lined pie plate. Carefully spread peanut butter filling over top. Top with remaining pie filling. Cover and chill 2 hours before serving.

Fluffy Blueberry Cream Pie with Toasted Coconut
- 1 package (8 ounces) cream cheese, softened
- 1/3 cup sugar
- 1 tablespoon milk
- 2 cups frozen whipped topping, thawed
- 1 can (21 ounces) Lucky Leaf Premium or Organic Blueberry Fruit Filling or Topping
- 1/2 cup toasted coconut flakes, plus additional for topping, if desired
- 1 graham cracker crust (9 inches)
- In large bowl, beat together cream cheese, sugar and milk until creamy, about 1-2 minutes. Add whipped topping, pie filling and coconut; carefully fold together until no streaks remain.
- Spoon filling mixture into graham cracker crust. Sprinkle top with additional coconut flakes, if desired. Cover and chill 2 hours, or until firm.
Source: Lucky Leaf

Watergate Salad
It only takes 5 ingredients to make this creamy delight that is so simple to make and so delicious. You’ll want to double or even triple the recipe because it will not last long.

Watergate Salad
- 1 package instant pistachio pudding mix
- 1 (8oz) can crushed pineapple, with juice
- 1 cup minature marshmallows
- 1/2 cup chopped pecans
- 1/2 (8oz) container frozen whipped topping, thawed
- In a large bowl mix all ingredients together. Chill.
Recipe adapted from Allrecipes.com

Impressive Fruit Pies and Tarts Made Easy
(Family Features) Berry season means colors, tastes and aromas that are sure to please. With a variety of gorgeous fresh fruits at your fingertips, why not whip up a fabulous fruit pie or tart to surprise family or share with friends? From family dinners to spur-of-the-moment picnics, pies are easy to make and easy for family and friends to appreciate.
To save time in the kitchen, start with Pillsbury Refrigerated Pie Crusts for a flaky, tender base. Just unroll it into your favorite pie plate or tart pan, spoon in a delicious fruit filling, bake and enjoy. Pillsbury has updated the packaging with a fresh, contemporary look and features a recipe for Perfect Apple Pie. For more delicious recipes, visit www.pillsbury.com/pie.
Make Crusts Extra Special
When making a top crust for pies, these tips can help you make them look extra special.
Glossy Upper Crust: Brush the dough with slightly beaten egg white (if desired, sprinkle with sugar, too) before baking.
Sweet Glazed Top: Brush the top pastry with a small amount of water, and sprinkle with granulated or coarse sugar before baking.
Pretty Cutouts: Cut shapes from the top crust with a canapé cutter or a knife before placing the top crust over the filling. With water or beaten egg, moisten the back of each cutout and set the design, moistened side down, on the crust.

Perfect Apple Pie
8 servings
Prep time: 30 minutes
Ready in: 3 hours
Crust
- 1 box (14.1 ounces) Pillsbury refrigerated pie crusts, softened as directed on box
Filling
- 6 cups thinly sliced, peeled apples (6 medium)
- 3/4 cup sugar
- 2 tablespoons all-purpose flour
- 3/4 teaspoon ground cinnamon
- 1/4 teaspoon salt
- 1/8 teaspoon ground nutmeg
- 1 tablespoon lemon juice
- Heat oven to 425°F. Place 1 pie crust in ungreased 9-inch glass pie plate. Press firmly against side and bottom.
- In large bowl, gently mix filling ingredients; spoon into crust-lined pie plate. Top with second crust. Wrap excess top crust under bottom crust edge, pressing edges together to seal; flute. Cut slits or shapes in several places in top crust.
- Bake 40 to 45 minutes or until apples are tender and crust is golden brown. Cover edge of crust with 2- to 3-inch-wide strips of foil after first 15 to 20 minutes of baking to prevent excessive browning. Cool on cooling rack at least 2 hours before serving.
Tip: Two cans (21 ounces each) apple pie filling can be substituted for the filling.

Lemon Raspberry Pie
8 servings
Prep time: 45 minutes
Start to finish: 3 hours 45 minutes
Crust
- 1 Pillsbury refrigerated pie crust (from 14.1-ounce box), softened as directed on box
- 1 teaspoon flour
- 2 tablespoons finely chopped pecans
Filling
- 1/2 cup sugar
- 2 tablespoons cornstarch
- 1/2 cup water
- 2 tablespoons margarine or butter
- 1 egg yolk, beaten
- 1/4 to 1/3 cup lemon juice
Topping
- 2 3-ounce packages cream cheese, softened
- 1/4 cup powdered sugar
- 1/2 teaspoon lemon extract
- 1 8-ounce carton frozen whipped topping, thawed
- 1 tablespoon milk
- 3 cups fresh raspberries or frozen raspberries without syrup, thawed, dried on paper towels
- Mint sprigs, if desired
- Heat oven to 450°F. Prepare crust according to package directions for unfilled one-crust pie using 9-inch pie pan. Press pecans into bottom of pie crust-lined pan. Generously prick crust with fork. Bake for 9 to 11 minutes or until light golden brown. Cool completely.
- In small saucepan, combine sugar and cornstarch; blend well. Stir in water, margarine and egg yolk. Cook over medium heat until mixture boils and thickens, stirring constantly. Boil 1 minute. Remove from heat. Stir in lemon juice. Pour into cooled crust. Refrigerate 1 hour.
- In small bowl, beat cream cheese, powdered sugar and lemon extract until smooth. Beat in whipped topping at low speed until well blended. Add milk; mix until smooth and of spreading consistency. Spread thin layer of topping mixture around edge of crust. Reserve 4 raspberries for garnish. Arrange remaining raspberries over top of filling. Spread remaining topping over raspberries. Garnish with mint sprigs and reserved raspberries. Refrigerate 2 hours before serving. Store in refrigerator.

Fresh Berry Cream Tart
8 servings
Prep time: 15 minutes
Start to finish: 2 hours 55 minutes
Crust
- 1 Pillsbury refrigerated pie crust (from 14.1-ounce box), softened as directed on box
Filling
- 1 8-ounce package cream cheese, softened
- 1/3 cup sugar
- 1 tablespoon orange-flavored liqueur or orange juice
- 4 cups assorted fresh whole berries (small strawberries, blueberries, raspberries, and/or blackberries)
- 1/3 cup red currant jelly, melted
- Heat oven to 450°F. Prepare pie crust as directed on package for one-crust baked shell using 9-inch tart pan with removable bottom. Bake for 9 to 11 minutes or until light golden brown. Cool completely.
- In small bowl, combine cream cheese, sugar and liqueur; beat until smooth and well blended. Spread cream cheese mixture evenly in cooled baked shell. Top with berries; brush berries with melted jelly to glaze. Refrigerate at least 2 hours before serving. Store in refrigerator.
Source: Pillsbury

Mucho Choco Tacos

Mucho Choco Tacos
Prep Time: 20 Minutes
Start to Finish: 40 Minutes
Makes: 8 tacos
- 8 Old El Paso Stand 'N Stuff taco shells (from 4.7-oz box)
- 1 (24-ounce) package chocolate-flavored candy coating (almond bark)
- 2 cups sliced fresh strawberries
- 2 cups sliced bananas
- 3/4 cup hot fudge ice cream topping
- 1/2 teaspoon ground cinnamon
- 1/2 teaspoon vanilla
- 1 aerosol can whipped cream topping
- 8 mint leaves, if desired
- Heat oven to 325°F. Heat taco shells as directed on box. Meanwhile, melt chocolate candy coating as directed on package.
- Carefully dip each taco shell into melted chocolate, using spoon to get chocolate on inside of shell; hold shells above bowl to let excess chocolate drip off. Stand shells upright on waxed paper; let stand until chocolate hardens, 10 to 15 minutes.
- In medium bowl, mix strawberries and bananas. Divide fruit evenly into taco shells.
- In small microwavable bowl, microwave fudge topping on High 30 to 45 seconds or until soft. Stir in cinnamon and vanilla. Drizzle topping over fruit in shells. Top with whipped cream; garnish with mint leaves. Serve immediately.
Source: General Mills Inc.

Sweet Spring Desserts
(Family Features) When the scent of fresh blooms begins to fill the air, it’s a sure sign that spring has sprung. It’s the perfect time of year to gather loved ones for a leisurely meal, then linger over dessert as you enjoy this season of refreshment.
No dessert menu is complete without an array of treats, and these creamy, homemade Blueberry Key Lime Cheesecake Bars are the perfect way to put a sweet finishing touch on your celebrations. Or go for a crowd pleaser with this Cherry Cheesecake Lush Dessert and its smooth, velvety texture and plump, juicy cherries.
The secret ingredient in each of these desserts is Lucky Leaf Fruit Fillings, which are GMO-free and contain plenty of fruit – and no high-fructose corn syrup – for exceptional tasting desserts every time. With popular flavors like apple, blueberry, cherry and strawberry, you have plenty of convenient, versatile ways to dress up desserts.
Find more tasty treats for all your spring entertaining at luckyleaf.com.

Blueberry Key Lime Cheesecake Bars
Recipe courtesy of Inside BruCrew Life blog
Prep time: 25 minutes
Cook time: 45 minutes
Servings: 24
- Nonstick cooking spray
- 30 vanilla cream-filled cookies
- 1/4 cup butter, melted
- 3 packages (8 ounces each) cream cheese, softened
- 3/4 cup sugar
- 3/4 cup sour cream
- 1/3 cup key lime juice
- 1 tablespoon key lime zest
- 1/4 cup flour
- 3 eggs
- green gel food coloring (optional)
- 1 can (21 ounces) Lucky Leaf Blueberry Pie Filling, divided
- 1 container (8 ounces) whipped topping, thawed
- key lime slices (optional)
- Place baking sheet on bottom rack of oven. Fill halfway with water. Heat oven to 325° F. Line 9-by-13-inch pan with foil and spray with nonstick spray.
- Using food processor, pulse cookies until crumbly. Stir together crumbs and butter. Press evenly into bottom of prepared pan.
- Beat cream cheese until creamy. Add sugar and sour cream, and beat again until smooth. Add key lime juice, zest and flour, and beat until mixed thoroughly. Add eggs, one at a time, and beat gently after each. Add green food coloring to cheesecake mixture, if desired.
- Spread cheesecake batter evenly over crust in pan. Add 1 cup of blueberry pie filling over top of cheesecake. Use butter knife to gently swirl pie filling into cheesecake. Do not let knife go through to crust.
- Place pan on oven rack above tray of water. Bake 45-48 minutes. Remove immediately and place on wire rack for 1 hour then place in refrigerator until completely chilled.
- Cut into 24 squares and serve with whipped topping, remaining pie filling and key lime wedges.

Cherry Cheesecake Lush Dessert
Recipe courtesy of Lemon Tree Dwelling blog
Prep time: 15 minutes
Cook time: 15 minutes
Servings: 12
- 1 cup vanilla wafer crumbs
- 1 cup finely chopped pecans
- 1 cup butter, melted
- 8 ounces cream cheese, softened
- 1 cup powdered sugar
- 16 ounces whipped topping, divided
- 2 small boxes cheesecake-flavored pudding
- 3 cups milk
- 1 can (21 ounces) Lucky Leaf Cherry Pie Filling
- 1/2 cup. chopped pecans
- Heat oven to 350° F.
- In medium mixing bowl, combine vanilla wafer crumbs, finely chopped pecans and butter.
- Press into 9-by-13-inch baking pan; bake 15 minutes. Remove from oven and cool.
- In separate mixing bowl, combine cream cheese, powdered sugar and 1 1/2 cups whipped topping. Mix until smooth; spread evenly over cooled crust.
- Combine cheesecake pudding mix, milk and 1 1/2 cups whipped topping, and mix until smooth. Spread evenly over cream cheese layer in pan.
- Top with pie filling, remaining whipped topping and chopped pecans.
Source: Lucky Leaf

Classic Banana Cream Pie
Ingredients
- 3 tablespoons cornstarch
- 1 1/3 cups water
- 1 (14-ounce) can Eagle Brand Sweetened Condensed Milk (NOT evaporated milk)
- 3 egg yolks, beaten
- 2 tablespoons butter or margarine
- 1 teaspoon vanilla extract
- 3 medium bananas, sliced and dipped in lemon juice from concentrate and drained
- 1 (9-inch) baked pastry shell or 1 (9-inch) graham cracker crust
- Whipping cream, whipped
Preparation
- In heavy saucepan, dissolve cornstarch in water; stir in sweetened condensed milk and egg yolks. Cook and stir until thickened and bubbly.
- Remove from heat; add margarine and vanilla. Cool slightly. Arrange 2 sliced bananas on bottom of prepared pastry shell.
- Pour filling over bananas; cover.
- Chill 4 hours or until set. Spread top with whipped cream; garnish with remaining banana slices. Refrigerate leftovers.
Preparation Time
15 minutes
Cook Time
10 minutes
Serves
Makes one 9-inch pie
Source

Low Fat Raspberry Mousse
Ingredients
- 2 (10-ounce) packages frozen red raspberries in syrup, thawed, divided
- 2 1/2 teaspoons cornstarch
- 1 (14-ounce) can Eagle Brand Low Fat Sweetened Condensed Milk (NOT evaporated milk)
- 1 teaspoon lemon juice from concentrate
- Red food coloring, optional
- 1 (8-ounce) container frozen light whipped topping, thawed
Preparation
- In saucepan, combine one package undrained raspberries and cornstarch; cook and stir until thickened and clear. Chill while making mousse mixture.
- In blender, combine remaining package drained raspberries, sweetened condensed milk and lemon juice; blend until smooth. Place in bowl; stir in small amount of food coloring if desired. Fold in whipped topping.
- Spoon half mousse mixture into dessert dishes; top with equal portions of raspberry sauce then remaining mousse mixture. Chill at least 1 hour. Refrigerate leftovers.
Preparation Time
20 minutes
Chill Time
1 hour
Serves
Makes 12 servings
Notes, Tips & Suggestions
*Option: Use Eagle Brand Fat Free instead of Eagle Brand Low Fat Sweetened Condensed Milk
Variations
Replace frozen raspberries with strawberries or blueberries.