
Sweeten the Holiday Season with Deliciously Creamy Desserts
(Family Features) Once the table is cleared and gifts are put away, it’s often time for one of the favorite moments of holiday gatherings. The taste (and smell) of those divine desserts you may only make once a year is enough to keep guests hungry even after the main course.
Put a new staple on holiday menus for years to come with this Cran-Raspberry Quinoa Pudding Trifle that combines fresh raspberries, vibrant cranberry sauce, orange juice and orange zest for a unique dessert. Ready in 30 minutes, it can be an easy way to impress everyone at the table with a creamy pudding base inspired by favorite winter flavors.
As a tasty treat that’s ideal for just about any occasion, this take on rice pudding is made using Success Boil-in-Bag Tri-Color Quinoa, which offers a heat-safe, BPA-free and FDA-approved bag and is easily prepared in just 10 minutes. Its light, nutty flavor and versatility creates a pudding that’s perfect for a wide range of pairings, from satisfying chocoholics or pumpkin-spice fanatics to whipping up a sweet, simple dessert.
For a comforting dish full of familiar cold-weather flavors, serve Pumpkin Pecan Rice Pudding Bars. Pumpkin-spice fanatics can enjoy their favorite ingredient mixed into a rice pudding base sweetened with coconut milk, brown sugar, vanilla extract, whipping cream and maple syrup.
This holiday-inspired dessert relies on the fluffiness of Success Boil-in-Bag White Rice as a high-quality, precooked solution. The boil-in-bag rice is quick and easy with no measuring and no mess, and it’s ready in 10 minutes to make seasonal recipes a cinch.
Find more sweet holiday recipe inspiration at SuccessRice.com.
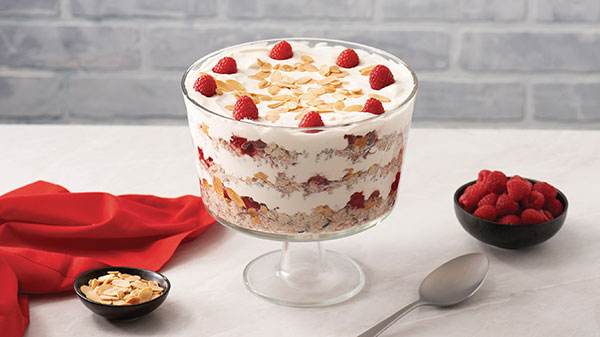
Cran-Raspberry Quinoa Pudding Truffle
Prep time: 25 minutes
Cook time: 5 minutes
Servings: 6
Quinoa Pudding:
- 2 bags Success Tri-Color Quinoa
- 4 cups almond milk
- 3 tablespoons honey
- 1 teaspoon vanilla extract
- 1/2 teaspoon ground cinnamon
Creamy Yogurt Layer:
- 2 cups plain Greek yogurt
- 3 tablespoons honey
- 1 teaspoon vanilla extract
- 1/2 cup heavy cream
Cran-Raspberry Layer:
- 1/2 cup cranberry sauce
- 1/4 cup orange juice
- 1 teaspoon orange zest
- 2 cups fresh raspberries
- 1/2 cup sliced almonds, toasted
- 2 cups gluten-free vanilla cookies, chopped
- 1/2 cup fresh raspberries
- To make quinoa pudding: Prepare quinoa according to package directions, substituting almond milk for water. Drain, reserving almond milk.
- Remove quinoa from bags and stir into almond milk in saucepan over medium heat. Stir in honey, vanilla and cinnamon. Bring to simmer. Cook, stirring constantly, 5-8 minutes, or until thickened slightly. Refrigerate 45-60 minutes, or until well chilled.
- To make creamy yogurt layer: In large bowl, stir yogurt, honey and vanilla. In separate bowl, beat cream until stiff peaks form. Stir whipped cream into yogurt mixture until blended. Refrigerate until ready to use.
- To make cran-raspberry layer: In medium bowl, stir cranberry sauce, orange juice and orange zest. Gently fold in raspberries.
- To assemble: In 10-cup trifle dish, layer 1/3 quinoa mixture, 2 tablespoons almonds, 1/3 cran-raspberry mixture, 1/3 vanilla cookies and 1/3 yogurt mixture. Repeat layers twice. Garnish with remaining raspberries and almonds.
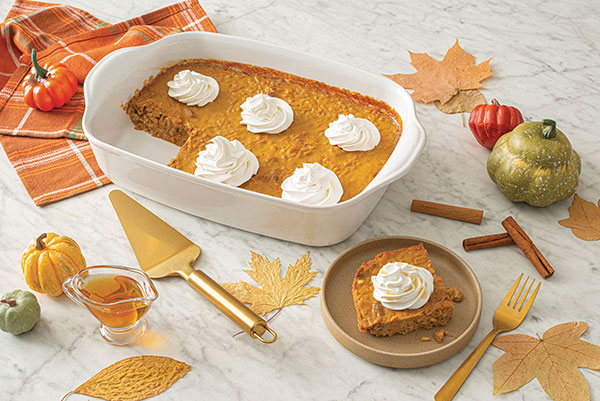
Pumpkin Pecan Rice Pudding Bars
Prep time: 10 minutes
Cook time: 40 minutes
Servings: 4-6
- 1 bag Success White Rice
- 1 cup pecans
- 4 cups coconut milk
- 1 can (15 ounces) pumpkin puree
- 3/4 cup brown sugar
- 2 teaspoons pumpkin pie spice
- 1/2 teaspoon salt
- 3 eggs
- 1/2 teaspoon vanilla extract
- 1 cup heavy whipping cream
- 2 tablespoons maple syrup
- Prepare rice according to package directions. Preheat oven to 350 F. Spread pecans on baking sheet and toast 8-10 minutes. Cool then chop.
- In large saucepan over medium-high heat, combine milk, pumpkin, brown sugar, pumpkin pie spice and salt. Bring to boil, stirring constantly. Slowly add about 1/2 cup hot liquid to eggs and beat well. Stir egg mixture back into saucepan and cook over medium-high heat 2 minutes. Remove from heat and stir in cooked rice, vanilla and pecans.
- Pour mixture into greased 13-by-9-inch baking dish. Bake, uncovered, 30 minutes, or until knife inserted near center comes out clean.
- Whip heavy cream to soft peaks then add maple syrup and continue beating until peaks form. Serve with warm pudding.
Tip: For sweeter pudding, increase brown sugar to 1 1/2 cups.
Source:

Elevate Your Tailgate with Easy-to-Make Recipes
(Family Features) Concoct a winning game plan, gather the parking lot games and call the biggest fans you know – it’s tailgating season. This year, before you root on your favorite team, make sure your pregame party matches the intensity of the fourth quarter with recipes that really fire up the crowd.
For a pregame meal that gives diehards the energy they’ll need to stay on their feet, turn to easy-to-prepare Kielbasa and Veggie Kebabs. This tailgate-friendly recipe relies on smoked pork sausage from Coleman Natural Foods that’s blended with flavorful spices, naturally cured with cultured celery powder and sea salt then slow-smoked for rich flavor.
If a morning kickoff at your alma mater calls for a breakfast-friendly beverage, these Chile Bacon Straws offer a perfect complement to a Bloody Mary. With a perfect touch of pizazz, they’re a simple yet impressive garnish that pairs well with other toppings like olives, pickles, peppers and more.
As a delicious way to add bursts of flavor to favorite dishes, pork from Coleman Natural Foods provides premium quality you can feel good about serving to your family and friends whether you’re tailgating in the parking lot or home-gating in your own backyard. It’s humanely raised by family farmers in the U.S. with no antibiotics, added hormones or artificial ingredients to give fans countless ways to elevate favorite game day dishes.
Visit ColemanNatural.com to find more easy-to-prepare tailgate recipes.
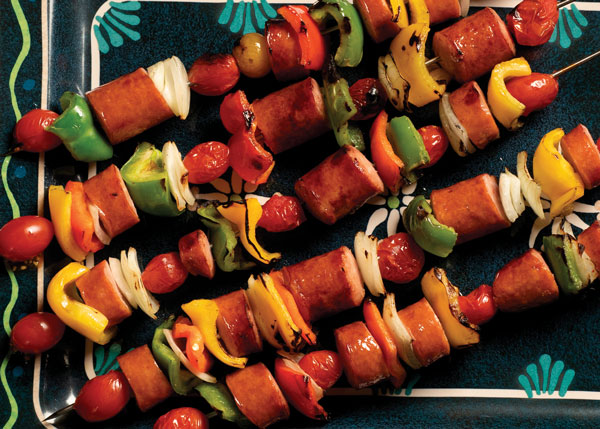
Kielbasa and Veggie Kebabs
Prep time: 30 minutes
Cook time: 20 minutes
Servings: 4
- 4 wooden skewers
- 1 red onion
- 2 bell peppers
- 2 ears of corn, cut crosswise into 2-inch rounds
- 1 package Coleman Natural Polish Kielbasa, sliced thick
- 12 whole mushrooms
- 12 cherry tomatoes
- Soak skewers in water 30 minutes to prevent burning. Preheat grill to 300 F.
- Cut red onion, peppers and corn into bite-sized chunks.
- Alternate placing kielbasa slices, onion, peppers, corn, mushrooms and tomatoes on skewers.
- Grill, rotating every few minutes until veggies are tender, about 20 minutes.
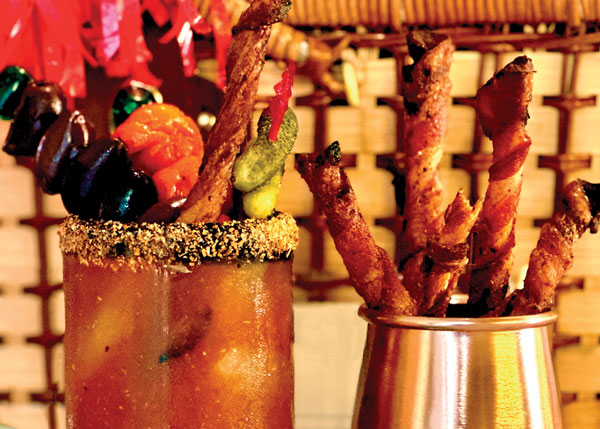
Chile Bacon Straws
Prep time: 10 minutes
Cook time: 30 minutes
Servings: 6
- 6 slices Coleman Natural Hickory Smoked Bacon
- 6 wooden skewers
- 1 teaspoon Mexican spice blend
- prepared Bloody Marys
- Preheat oven to 400 F.
- Wrap one bacon slice diagonally around each skewer, making sure to overlap edges of bacon so there are no gaps. Don’t wrap too tightly or it will be difficult to remove skewers; try to ensure each end of bacon ends up on same side of skewer.
- Place each wrapped skewer on wire rack set over sheet pan with end seams down. Sprinkle spice blend over each skewer.
- Bake 25-30 minutes until bacon is brown, crispy and fully cooked to give straws their shape. Remove from oven and allow to cool.
- Gently slide skewers out of each straw using twisting motion.
- Insert straws into Bloody Marys.
Source: Coleman Natural Foods

'Fall' In Love with Family-Favorite Autumn Recipes
(Family Features) With temperatures cooling and cravings leaning toward comforting flavors, fall offers a perfect time for families to explore adventurous twists on favorite foods. As you and your loved ones rework the menu for autumn, turn to versatile ingredients that provide fresh tastes and new ways to enjoy classic recipes.
One star ingredient that can be used for appetizers, main courses, sides, snacks and desserts alike is watermelon. In fact, using the entire watermelon (rind included) means you’ve discovered a sustainable way to create nutritious meals without food waste.
Consider these simple, delicious ways to use the entire watermelon in your kitchen.
Watermelon Flesh
In the fall, whole watermelon is still available in many areas. You can also find mini watermelon in the fresh cut produce section at many local grocers. The flesh is often the favorite (and most-used) part of the watermelon. Served on its own as a hydrating snack or as part of a recipe for tasty entrees, the flesh offers something for nearly every appetite so no watermelon goes to waste.
Watermelon Juice
Watermelon is 92% water, making it a sweet choice for staying hydrated. Even if your watermelon is overripe, don’t throw it out – instead, juice or puree it to retain value and nutrition. Use it to sweeten this Watermelon Bourbon Glaze then drizzle over a perfectly grilled flank steak and serve with mashed potatoes and grilled vegetables for an ideal fall meal.
Watermelon Rind
The rind is often thrown out – many people don’t realize you can eat it, too. The rind absorbs flavors added to it and adds an unexpected texture to this Watermelon Walnut Currant Chutney. Try serving over brie with crackers or simply dip with naan or baguettes.
Find more flavorful fall solutions to avoid food waste at Watermelon.org.
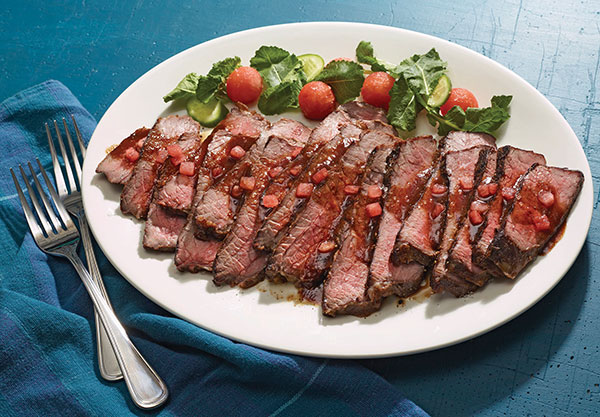
Watermelon Bourbon Glaze with Grilled Flank Steak
Servings: 6
- 1 1/2 cups watermelon juice (approximately 2 1/2 cups chopped watermelon, blended)
- 2 tablespoon minced garlic
- 1/4 cup soy sauce
- 1/4 cup brown sugar
- 2 teaspoon hot sauce
- 1/4-1/2 cup bourbon
- 2 pounds flank steak or London broil
- 1/4 teaspoon cornstarch
- In medium saucepan over medium-high heat, reduce watermelon juice to 2/3 cup. Toward end of reduction, add garlic. Remove from heat, cool 10 minutes then add soy sauce, brown sugar, hot sauce and bourbon. Mix well.
- Place watermelon-bourbon glaze in large zip-top bag. Add steak and massage to cover meat. Close bag and refrigerate 3-4 hours.
- Heat grill to high heat. Remove steak from plastic bag and gently shake to remove excess glaze.
- Grill steak 4-6 minutes; turn, grill 4-6 minutes, depending on thickness of steak. Remove from heat. Steak should be pink in center.
- Allow steak to rest on platter or cutting board 10 minutes.
- Mix small amount of watermelon-bourbon glaze with cornstarch. In small saucepan over medium-high heat, add cornstarch mixture to remaining glaze and simmer 3-5 minutes. Reduce to medium heat until mixture thickens. Remove from heat.
- Cut flank steak on bias into thin strips. Drizzle watermelon-bourbon glaze over top.
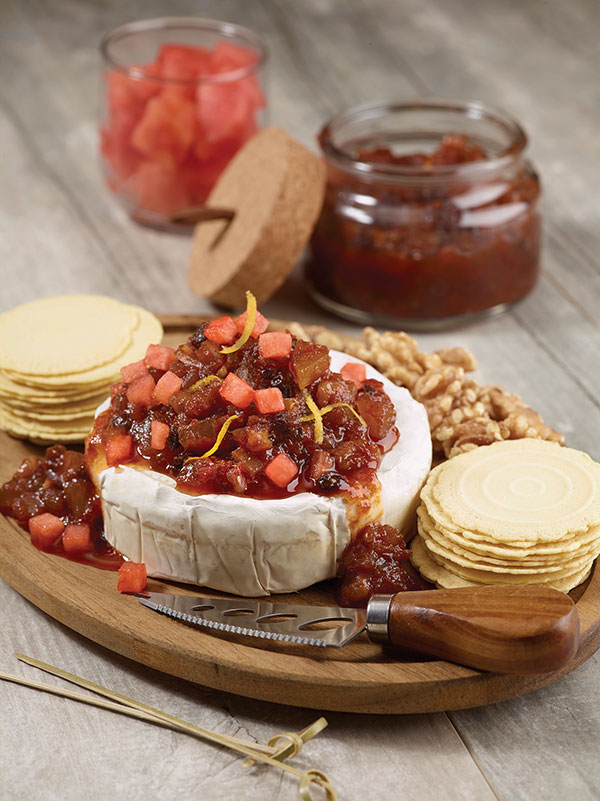
Watermelon Walnut Currant Chutney
Servings: 16
- 4 cups watermelon, juiced
- 2 cups watermelon rind (white part), diced small
- 2 tablespoons apple cider vinegar
- 1 1/2 cups packed brown sugar
- 1/2 medium white onion, sliced
- 1 tablespoon minced garlic
- 1/2 teaspoon nutmeg
- 1/4 teaspoon cloves, ground
- 1 teaspoon lemon zest
- 1 lemon, juice only
- 2 tablespoons currants
- 2 tablespoons roasted walnuts
- 1 wheel brie cheese, for serving
- crackers, for serving
- In saucepan over medium heat, reduce watermelon juice to 2 cups. Combine with watermelon rind, apple cider vinegar, brown sugar, white onion, garlic, nutmeg, cloves, lemon zest, lemon juice, currants and walnuts; simmer until almost dry.
- Chill and serve over brie with crackers.

Spooky Snacks that Make Halloween Pop
(Family Features) From watching scary movies to dressing up as ghouls and goblins, spooky season means it’s time to pop up your loved ones’ favorite snacks for a ghostly good time. Before heading out to trick-or-treat, gather your minions in the kitchen for some family-friendly fun crafting these haunting yet tasty treats.
Throughout October, you can honor National Popcorn Poppin’ Month with eerie, delicious eats like Spooky Popcorn Spider Web, Green Halloween Zombies, Witchy Popcorn Balls and Popcorn Caramel Apples that add festive fun to the Halloween excitement.
As a perfect ingredient in treats of all types, popcorn is beloved for its seed-to-snack simplicity as a non-GMO, vegan, gluten-free, sugar-free snack that’s naturally low in fat and calories. Add in its irresistible smell, taste and versatility, and it’s easy to see why it pairs so well with spooky celebrations.
Find more Halloween treats at popcorn.org.
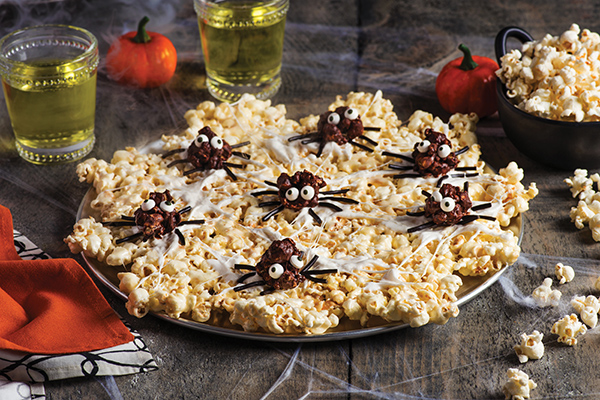
Spooky Popcorn Spider Web
Yield: 1 spider web
- 1/4 cup butter
- 8 cups mini marshmallows, divided
- 1 tablespoon vanilla extract
- 9 cups popped popcorn, divided
- 1 cup semisweet chocolate chips, divided
- black string licorice
- candy eyes
- Line round pizza pan with parchment paper; set aside. In large saucepan over low heat, melt butter; stir in 5 cups marshmallows, stirring constantly, 3-4 minutes, or until completely melted. Stir in vanilla. Remove from heat. Stir in 8 cups popcorn until coated. Spread onto prepared pizza pan in irregular round shape, about 1-inch thick, to resemble spider web. Refrigerate about 15 minutes, or until firm.
- In microwave, melt remaining marshmallows about 20 seconds, or until melted. Using spatula, string strands of melted marshmallow over popcorn spider web to create cobweb effect.
- In heatproof bowl set over saucepan of hot (not boiling) water, melt 3/4 cup chocolate chips; cool slightly. In large bowl of remaining popcorn, pour chocolate over popcorn, folding gently to coat. Spread mixture on waxed paper-lined baking sheet, separating into eight small clusters. Affix two candy eyes to each popcorn cluster. Refrigerate 10-15 minutes, or until set.
- Melt remaining chocolate chips. Cut licorice into 1-inch lengths. Using small spoon, dab circles of chocolate onto spider web. Affix chocolate-coated popcorn onto chocolate circles. Affix licorice lengths to chocolate popcorn clusters to resemble spider legs.
- Refrigerate 15 minutes, or until set. To serve, cut into smaller pieces.
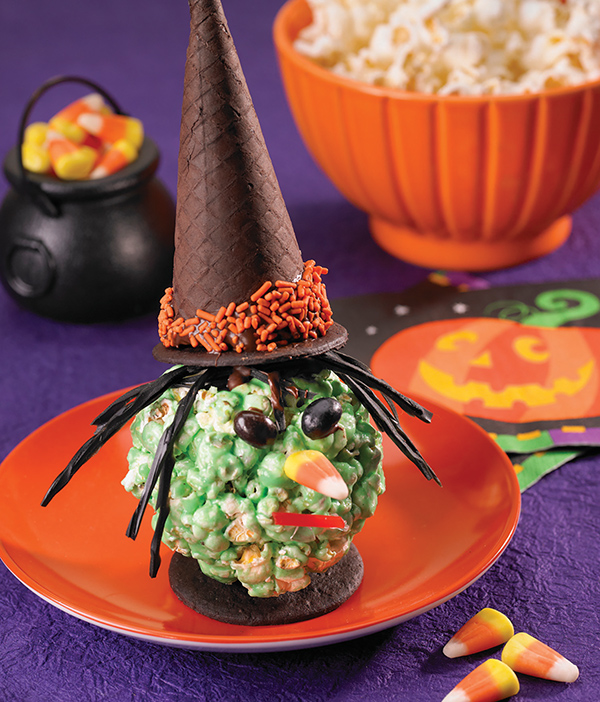
Witchy Popcorn Balls
Yield: 8 popcorn balls
- 16 chocolate wafer cookies
- nonstick cooking spray
- 3 quarts popped popcorn
- 4 tablespoons (1/2 stick) butter or margarine
- 3 cups miniature marshmallows
- 3 tablespoons (1/2 of 3-ounce box) lime gelatin dessert mix
- green food color (optional)
- 3/4 cup chocolate chips
- licorice strings
- 8 chocolate ice cream cones
- orange sugar sprinkles, placed in small dish
- jelly beans
- candy corns
- Spread sheet of waxed or parchment paper over work surface and place wafer cookies on it.
- Spray large mixing bowl with nonstick cooking spray and place popcorn inside.
- In medium saucepan over low heat, melt butter. Stir in marshmallows and gelatin powder until marshmallows are melted and mixture is smooth. Adjust color with 1-2 drops food color, if desired. Pour mixture over popcorn and mix until coated.
- Spray hands with nonstick cooking spray and press firmly to form into eight balls. Place balls on eight wafer cookies. Press candy decorations into popcorn balls to form "eyes," "nose" and "mouth."
- In small, microwave-safe bowl, heat chocolate chips, covered, 10 seconds. Stir to aid melting. Repeat as needed until chocolate is melted and smooth.
- Spoon about 1/2 teaspoon melted chocolate on top of each popcorn ball. Press licorice strings into chocolate to form "hair."
- Dip cone edges into melted chocolate then orange sugar sprinkles. Place on remaining wafer cookies to form "witches' hats." Place hats on popcorn balls. Allow chocolate to set about 45 minutes before serving.
- Serve or seal individually in plastic wrap.
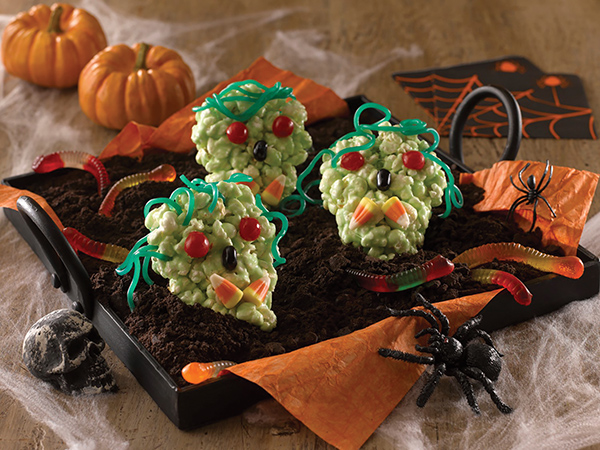
Green Halloween Zombies
Yield: about 7 pieces
- 2 1/2 quarts popped popcorn
- 6 tablespoons butter or margarine
- 3 cups mini marshmallows
- 4 tablespoons lime gelatin powder
- red gum balls
- candy corn
- flat green candy strips or fruit leather
- green sugar sprinkles
- Place popcorn in large bowl; set aside.
- In medium saucepan over medium heat, melt butter. Stir marshmallows into butter until melted. Stir in gelatin powder until evenly colored.
- Pour melted mixture over popcorn and stir until evenly coated. With buttered hands, shape popcorn into seven ovals.
- Flatten one oval slightly and squeeze one end to form "skull" shape. Place on parchment-lined baking sheet. Repeat with remaining ovals.
- To decorate: Press two gumballs into each skull to form "eyes." Press candy corn into skull to form "teeth." Use scissors to trim candy strips and press into top for "hair." Sprinkle with sugar sprinkles.
- Allow "zombies" to set about 20 minutes before wrapping individually in plastic wrap or serve immediately.
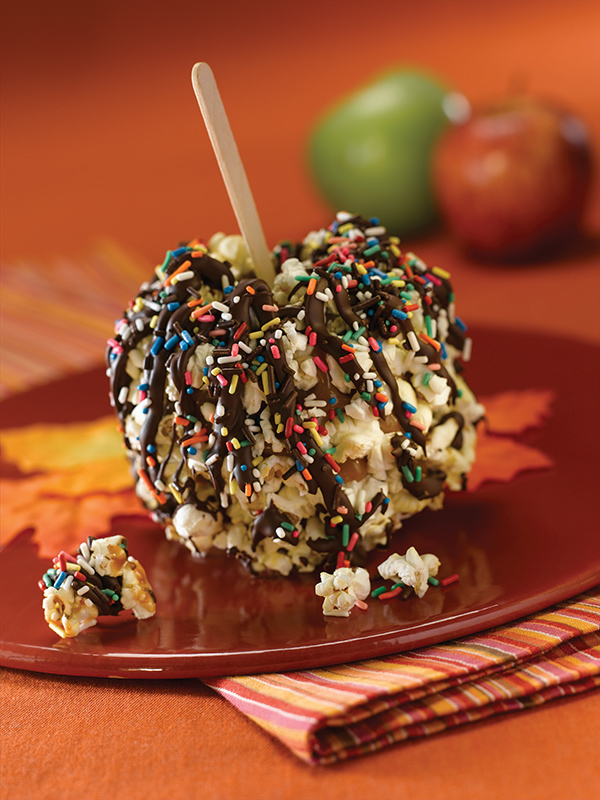
Popcorn Caramel Apples
Yield: 4 apples
- 1 quart freshly popped popcorn
- 1 package (9 1/2 ounces, 35 total) caramels, unwrapped
- 1/4 cup light cream or half-and-half
- 4 lollipop sticks or wooden candy apple sticks
- 4 apples
- 1/2 cup chocolate chips
- sugar sprinkles
- decorative ribbon (optional)
- Place popcorn in large bowl; set aside. Place sheet of waxed paper on work surface.
- In small saucepan over medium-low heat, heat caramels and cream. Stir frequently until caramels are melted and cream is blended into caramels.
- Push one stick into apple center and dip into caramel. Spoon caramel over apple to coat. Repeat with remaining apples
- Place caramel-coated apple in bowl of popcorn and press popcorn onto caramel to cover. Place apple on waxed paper to set; repeat with remaining apples.
- In small, resealable plastic bag, microwave chocolate chips 10 seconds and press chips to aid melting. Repeat, heating at 10-second intervals, until chips are completely melted. Cut small corner off bag and squeeze chocolate onto each apple, allowing chocolate to drip down sides. Sprinkle with sugar sprinkles.
- Tie bow to each apple stick, if desired. To serve, cut apples into slices.
Source: Popcorn Board

From Orchard to Pie: Apple Pies Made Easy!
(Family Features) Crisp air, changing colors, orchards teeming with ripe apples - all sure signs of autumn. Usher in the fall harvest season by spending an afternoon with the family picking apples, and then rewarding yourself with a delectable home-baked pie.
It's easy to save time in the kitchen by starting with Pillsbury Refrigerated Pie Crusts. Just unroll a crust into your favorite pie plate, spoon in a sweet apple filling, bake and serve. Add a delicious twist to the classic apple pie with a number of complementary and favorite fall flavors - such as cinnamon, nutmeg, caramel, streusel, pecans and even cranberries.
From picking apples to baking a pie and enjoying it with family and friends, all in a matter of hours - any way you slice it, it's a delicious time of year. Here are a few Pillsbury pie recipes to get you started baking apple pies now. For more ideas, visit www.pillsbury.com/pie.
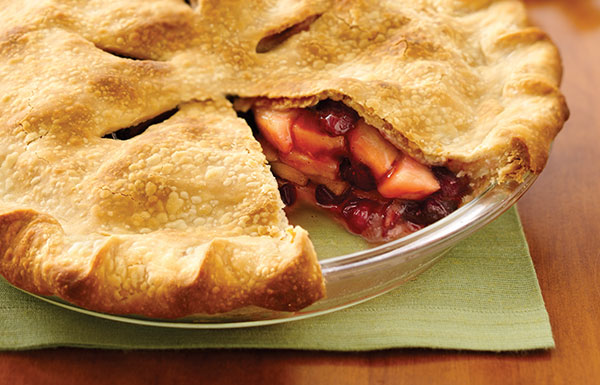
Festive Apple-Berry Pie
- 2 cups fresh or frozen cranberries
- 1 1/2 cups sugar, divided
- 4 tablespoons cornstarch, divided
- 2 tablespoons water
- 1 box (14.1 ounces) Pillsbury refrigerated pie crusts, softened as directed on box
- 5 to 6 cups sliced peeled apples (5 to 6 medium)
- 1/2 teaspoon ground cinnamon
- 1/4 teaspoon ground nutmeg
- In 1-quart saucepan, mix cranberries, 1 cup sugar, 1 tablespoon cornstarch and water. Heat to boiling. Boil 5 minutes. Cool 15 minutes.
- Heat oven to 425°F. Make pie crusts as directed on box for Two-Crust Pie using 9-inch glass pie pan.
- In large bowl, mix apples, remaining 1/2 cup sugar, remaining 3 tablespoons cornstarch, cinnamon and nutmeg until apples are coated.
Stir in cooled cranberry mixture. Spoon into crust-lined pan. Top with second crust; seal edge and flute. Cut slits in several places in top crust. - Bake 40 to 50 minutes or until golden brown. After 15 to 20 minutes of baking, cover crust edge with strips of foil to prevent excessive browning.
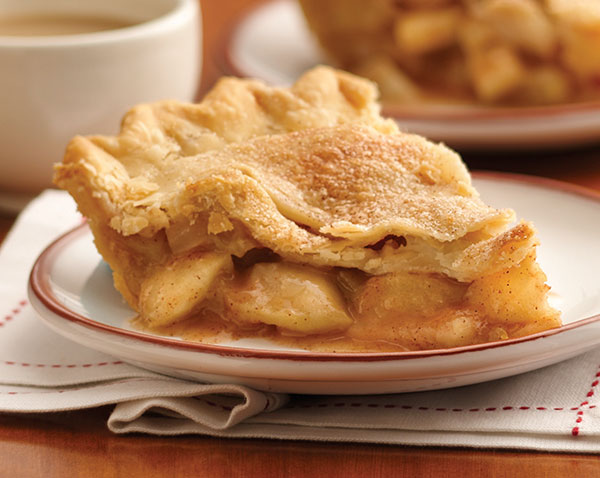
Perfect Apple Pie
Prep Time: 30 minutes
Ready in: 3 hours
8 servings
- 1 box (14.1 ounces) Pillsbury refrigerated pie crusts, softened as directed on box
Filling
- 6 cups thinly sliced, peeled apples (6 medium)
- 3/4 cup sugar
- 2 tablespoons all-purpose flour
- 3/4 teaspoon ground cinnamon
- 1/4 teaspoon salt
- 1/8 teaspoon ground nutmeg
- 1 tablespoon lemon juice
- Heat oven to 425°F. Place 1 pie crust in ungreased 9-inch glass pie plate. Press firmly against side and bottom.
- In large bowl, gently mix filling ingredients; spoon into crust-lined pie plate. Top with second crust.
- Wrap excess top crust under bottom crust edge, pressing edges together to seal; ?ute. Cut slits or shapes in several places in top crust.
- Bake 40 to 45 minutes or until apples are tender and crust is golden brown. Cover edge of crust with 2- to 3-inch-wide strips of foil after first 15 to 20 minutes of baking to prevent excessive browning. Cool on cooling rack at least 2 hours before serving.
Tip: Two cans (21 ounces each) apple pie filling can be substituted for the filling.
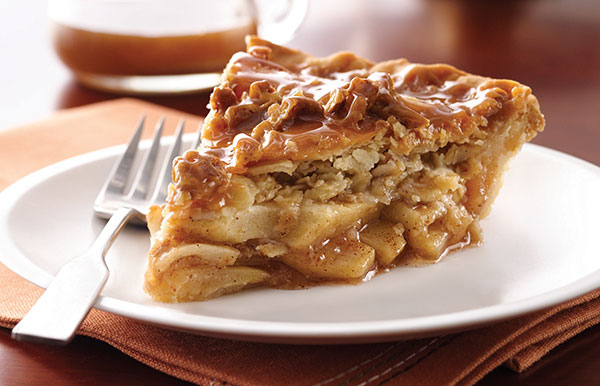
Caramel-Apple Streusel Pie
Prep Time: 30 minutes
Start to Finish: 3 hours
8 servings
- 6 cups sliced peeled ripe apples
- 1 tablespoon lemon juice
- 1/2 cup sugar
- 2 tablespoons quick-cooking tapioca
- 3/4 teaspoon ground cinnamon
- 1/4 teaspoon salt
- 1/4 teaspoon ground nutmeg
- 1 box (14.1 ounces) Pillsbury refrigerated pie crusts, softened as directed on box
- 3/4 cup old-fashioned oats
- 1 tablespoon all-purpose flour
- 3 tablespoons sugar
- 1/4 cup cold butter or margarine
- 18 caramels, unwrapped
- 5 tablespoons milk
- 1/4 cup chopped pecans
- Heat oven to 400°F. In large bowl, mix apples and lemon juice. In small bowl, mix 1/2 cup sugar, tapioca, cinnamon, salt and nutmeg.
Add to apples; stir gently. Let stand 15 minutes. Place 1 pie crust in ungreased 9-inch glass pie plate. Pour apple mixture into pastry-lined pie plate. - In small bowl, mix oats, flour and 3 tablespoons sugar. Cut in butter until crumbly. Sprinkle over apples. Cut second crust into wedges; arrange wedges in an alternate pattern across the mixture.
- Bake 45 minutes. Meanwhile, in 1-quart saucepan, heat caramels and milk over low heat until caramels are melted. Stir until smooth; add pecans. Drizzle over pie. Bake 8 to 10 minutes longer or until crust is golden brown and filling is bubbly. Cool completely on cooling rack, about 2 hours.
Source: Pillsbury

Make the Most of Your Morning with Seasonal Flavors
Entertain guests with a wholesome morning meal
(Family Features) Bring the harvest straight to the table with farm-fresh ingredients fit for entertaining family and friends. Whether sharing stories passed from generation to generation, celebrating traditions – old and new – or simply treasuring time with loved ones, you can enjoy fragrant autumn flavors with a delicious and nutritious morning meal.
With savory elements coming from butternut squash, freshly ground nutmeg and hints of sage, this homemade frittata embraces seasonal favorites rich in nutrients. Guests of all ages can enjoy a meal made with an abundance of wholesome, farm-to-table ingredients – including milk – which provide essential vitamins and minerals to fuel everyone at the table.
Whether starting off a quiet weekend morning with brunch or prepping for a busy day with a make-ahead breakfast the night before, this recipe offers a creative, tasty way to kick-off the day. Plus, when paired with an 8-ounce glass of milk, everyone can get essential nutrients, like calcium and protein, to help them be their best.
To find more family-friendly recipes and information about milk’s nutrients, visit milklife.com.

Butternut Squash Sage Frittata
Servings: 6
Crispy Sage Leaves:
- 3 tablespoons extra-virgin olive oil
- 6-8 small fresh sage leaves
- pinch kosher salt
Frittata:
- 2 teaspoons extra-virgin olive oil
- 1 1/2 cups (about 8 ounces) butternut squash, diced
- 1 clove garlic, minced
- 2 large sage leaves, chopped
- 6 large eggs
- 1/2 cup fat free milk
- 1/4 teaspoon freshly ground black pepper
- 1/4 teaspoon kosher salt
- 1/8 teaspoon freshly ground nutmeg
- To prepare crispy sage leaves: In small skillet, heat olive oil until shimmering. Fry sage leaves in oil until crispy, about 5 seconds. Remove sage leaves from oil and drain on paper towel. Sprinkle with salt while hot.
- To prepare frittata: Heat oven to 425° F. In 10-inch cast-iron skillet, heat oil over medium-high heat. Add butternut squash; stir to coat in oil. Spread butternut squash in single layer and cook 2-3 minutes before stirring. Repeat until squash becomes tender and begins to caramelize, about 10 minutes total.
- Add garlic and chopped sage; stir until fragrant, about 60 seconds.
- In large bowl, whisk together eggs, milk, pepper, salt and nutmeg. Pour mixture into skillet and stir gently, about 15 seconds, to distribute squash evenly around pan. Transfer skillet to oven and cook 10 minutes, or until egg is puffed and set. Remove from oven and let cool about 3-5 minutes before cutting and serving with crispy sage leaves.
- Pair each serving with 8-ounce glass of milk
Notes: To prepare butternut squash: Separate round end from long portion of squash; save round end for a separate recipe. With vegetable peeler, peel long portion. With sharp check’s knife, thinly slice squash. Cut slices into long matchsticks then chop into cubes. Pre-cut, store-bought butternut squash can be used in place of cutting entire squash.
Nutritional information per serving: 200 calories; 7 g fat; 2 g saturated fat; 195 mg cholesterol; 15 g protein; 18 g carbohydrates; 1 g fiber; 290 mg sodium; 375 mg calcium (40% of daily value). Nutrition figures based on using fat free milk, and include an 8-ounce glass of milk.
Source: MilkPEP