A Grownup Twist on a Childhood Favorite
(Family Features) When you’re looking for recipe inspiration, don’t be afraid to take things back to your childhood with a little home cooking. Even better, now you can enjoy those kid favorites as the main course (with an adult touch, to boot) in this Baked Broccoli Mac.
It’s a warm, cozy solution that pairs with bread and a salad for dinner or can be halved and served as a side.
Visit Culinary.net for more ways to turn childhood classics into family dinners.

Baked Broccoli Mac
Recipe courtesy of "Cookin' Savvy"
Servings: 4-6
- 1 box (1 pound) pasta noodles, such as cellentani, elbow or penne
- 2 cups chopped broccoli
- 2 cups chicken broth
- 1 cup heavy whipping cream or half-and-half
- 2 cups mozzarella
- 1/2 block pasteurized cheese product, cubed
- 1 tablespoon garlic powder
- 1 tablespoon onion powder
- salt, to taste
- pepper, to taste
Topping:
- 2 cups breadcrumbs
- 1/2 stick butter
- 1/2 cup grated Parmesan cheese
- In large pot, cook pasta according to package instructions. Drain well then add broccoli, chicken broth, cream, mozzarella, pasteurized cheese product, garlic powder and onion powder. Season with salt and pepper, to taste. Mix well.
- To make topping: In bowl, mix breadcrumbs, butter and Parmesan cheese.
- Pour macaroni mixture into large baking dish then sprinkle with breadcrumb mixture. Bake 30 minutes.
Source: Culinary.net
Power Up Family Mealtimes
(Family Features) Between juggling work, family, friends and social activities, powering through busy day-to-day schedules requires a lot of energy. Building meals around recipes packed with a plant-based protein such as peanuts or peanut butter can help your family come together to refuel.
In fact, at 7 grams per serving, a nutrient-rich powerhouse like peanuts delivers the most protein of any nut and contains six essential vitamins – vitamin E, folate, riboflavin, thiamin, niacin and vitamin B6 – and seven essential minerals – phosphorus, iron, magnesium, potassium, zinc, copper and calcium.
As a versatile ingredient that can be enjoyed as a standalone snack or part of a variety of recipes from morning to night, peanuts can take center stage at the family table when it’s time to recharge at the end of long days. Start with an appetizer like Broccoli and Edamame Salad with Peanut Dressing, which can be on the table in 10 minutes, to hold over hunger ahead of a protein-packed main course like Chicken with Peanut Sauce in Lettuce Wraps. Finish off the evening meal with Peanut Butter Cottage Cheese Cheesecake as a better-for-you dessert.
Find more delicious ideas for keeping your family energized at gapeanuts.com.

Chicken with Peanut Sauce in Lettuce Wraps
Recipe courtesy of Parker’s Plate on behalf of the Georgia Peanut Commission
Prep time: 10 minutes
Cook time: 15 minutes
Servings: 4
- 2 pounds ground chicken
- 2 tablespoons sesame oil
- 3/4 cup diced shiitake mushrooms
- 1 small onion, diced
- 2 garlic cloves, grated
- 1 1/2 tablespoons fresh grated ginger
- 1/2 cup hoisin sauce
- 1/2 cup water chestnuts, diced
- 3 green onions (both white and green parts), chopped
- 2 garlic cloves, grated
- 1/4 cup cilantro, chopped, for garnish
- 1/4 cup crushed peanuts, for garnish
- iceberg or butter lettuce, for wraps
Peanut Sauce:
- 3 tablespoons creamy peanut butter
- 2 teaspoons brown sugar
- 1 tablespoon fresh lime juice
- 2 tablespoons chili garlic sauce
- 1 teaspoon fresh grated ginger
- 1 tablespoon soy sauce
- In pan, saute ground chicken in sesame oil until cooked through. Drain if mixture is watery.
- Add shiitake mushrooms and onion; saute until mushrooms have softened and appear caramel colored.
- Add garlic, ginger, hoisin, water chestnuts and green onions. Let chicken mixture simmer on low.
- To make peanut sauce: In saucepan over medium-low heat, mix peanut butter, brown sugar, lime juice, chili garlic sauce, ginger and soy sauce until smooth, warm and thinned slightly.
- Fold into chicken mixture. Stir until combined and simmer on low until peanut sauce is evenly distributed.
- Garnish with fresh cilantro and crushed peanuts. Serve in lettuce wraps.

Broccoli and Edamame Salad with Peanut Dressing
Recipe courtesy of Parker’s Plate on behalf of the Georgia Peanut Commission
Prep time: 10 minutes
Cook time 5 minutes
Servings: 4
Dressing:
- 1/2 fresh lime, juice only
- 1/4 cup toasted sesame seed oil
- 3 tablespoons honey
- 2 tablespoons tahini
- 3 tablespoons creamy peanut butter
- 1 teaspoon chili oil
- 1 garlic clove, grated
- 1 teaspoon fresh ginger, grated
- kosher salt, to taste
- 1 tablespoon hot water, plus additional for thinner consistency (optional)
Salad:
- 2 cups broccoli slaw
- 1 cup shelled edamame, cooked
- 1 1/2 cups chopped raw broccoli
- 1/2 cup English cucumber, quartered and chopped
- 1/4 cup fresh mint, chopped
- 1/4 cup fresh cilantro, chopped
- 1/4 cup salted peanuts, roughly chopped
- toasted sesame seeds, for garnish (optional)
- To make dressing: In bowl, whisk lime juice, toasted sesame seed oil, honey, tahini, peanut butter, chili oil, garlic, ginger and salt, to taste. Add hot water, adding additional, if necessary, until dressing reaches desired consistency. Set aside.
- To make salad: In large bowl, combine broccoli slaw, edamame, broccoli, cucumber, mint, cilantro and peanuts. Toss with dressing to combine and garnish with toasted sesame seeds, if desired.

Peanut Butter Cottage Cheese Cheesecake
Recipe courtesy of Parker’s Plate on behalf of the Georgia Peanut Commission
Prep time: 25 minutes
Cook time: 2 hours
Servings: 8 (1 slice each)
Crust:
- 2 cups pretzels
- 1 1/2 cups vanilla-flavored wafer-style cookies
- 1/2 cup peanuts
- 12 tablespoons unsalted butter
- nonstick cooking spray
Filling:
- 1/2 cup cottage cheese
- 1 cup heavy whipping cream
- 3 tablespoons sugar
- 3 tablespoons creamy peanut butter
- 1/2 cup roughly chopped dark chocolate
- 1/2 cup roughly chopped peanuts
- 1 pinch sea salt
- To make crust: In food processor, pulse pretzels, wafer-style cookies and peanuts until chopped but not powdery.
- In skillet, melt butter. Add pretzel mixture until combined with butter.
- Spray pie pan with nonstick cooking spray and spread mixture on bottom of pan and slightly up sides; press down until even.
- To make filling: In bowl using hand mixer, whip cottage cheese until lumps are smoother, 3-4 minutes.
- In separate bowl, use hand mixer to whip heavy cream and sugar until stiff peaks form.
- Add cottage cheese and peanut butter to heavy cream mixture; whip until combined, about 1 minute.
- Top pie with chopped chocolate and peanuts and freeze 2 hours. Remove from freezer 15 minutes before ready to serve.
- Before serving, sprinkle with sea salt.
Source:
Scrumptious Ways to Simplify Springtime Meals: Make weekday dining a breeze with easy, delicious recipes
(Family Features) From everyday weeknight dinners to picnics in the park, warmer weather and longer days mean families want to spend more time together and less time in the kitchen. This spring, look for kitchen hacks that can make fresh and healthy weeknight seasonal recipes a cinch.
Skipping complicated prep work is the first step toward simplifying springtime meals. Rather than recipes that call for a lot of prep or cooking time, consider easy dishes that require only a handful of steps and use everyday ingredients you may already have in your pantry, fridge or freezer.
For example, these Shrimp, Broccoli and Potato Skewers with Lemon and Thyme can let you put a little spring in your weeknight dinners. Grilled skewers keep the whole family happy and come together in less than 30 minutes, making them perfect for quick and healthy meals without the hassle. The versatility of potatoes means you can grill them, and this version calls for a 5-minute microwave steam first to cut down on grill time.
With easy-to-prepare potatoes, The Little Potato Company makes family dinners like this one a breeze as they come pre-washed, require no peeling and are small enough they don’t need to be cut. This allows for less time in the kitchen and more time for outdoor play to enjoy a little moment of happiness. Plus, the Microwave and Roast or Grill Ready kits come with their own seasoning packs for added convenience.
Grown on family farms, Little Potatoes are a fresh whole food packed with nutrients you can feel good about serving your family and are ideal for this Easy as 1-2-3 Potato Salad. With just three ingredients and minimal prep time, this delightful dish becomes an ultimate springtime solution for busy families. Plus, it’s easy enough that little ones can join in on the fun of preparing it.
Simply pop the tray of Microwave Ready Little Potatoes in the microwave for 5 minutes then add the included Savory Herb seasoning pack, chopped green onions and mayonnaise for a delicious side – no potato boiling or peeling required.
To find more ways to savor springtime meals outdoors with your family, visit littlepotatoes.com.
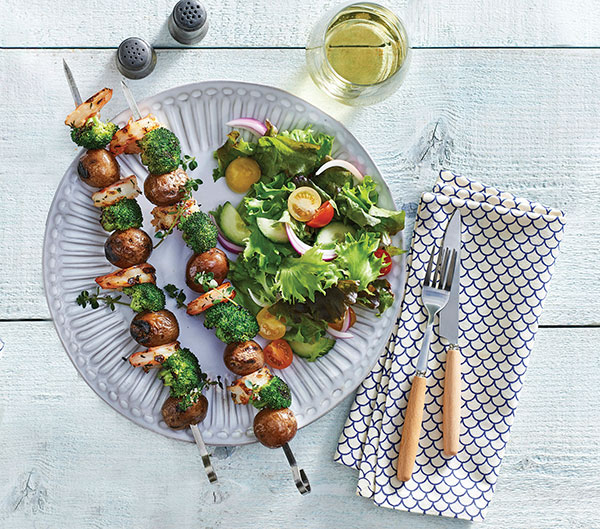
Shrimp, Broccoli and Potato Skewers with Lemon and Thyme
Prep time: 5 minutes
Cook time: 20 minutes
Servings: 4
- 1 pound bagged Little Potatoes
- 1 bunch broccoli
- 12 large shrimp, peeled and deveined
- 1 1/2 lemons, juice only
- 3 tablespoons fresh thyme, chopped
- 2 tablespoons olive oil
- salt, to taste
- pepper, to taste
- In large, microwave-safe bowl, microwave potatoes on high 5 minutes.
- Chop broccoli into large pieces.
- Add broccoli and shrimp to bowl once potatoes are steamed.
- Add lemon juice, thyme and olive oil; evenly coat potatoes, shrimp and broccoli. Season with salt and pepper, to taste.
- Build skewers and grill 10-15 minutes on medium-high heat, until shrimp is cooked through.
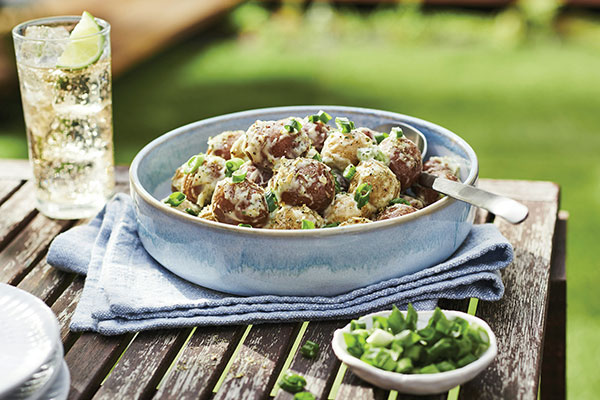
Easy as 1-2-3 Potato Salad
Prep time: 2 minutes
Cook time: 5 minutes
Servings: 4
- 1 packageA Little Savory Herb Microwave Ready Little Potatoes, with included seasoning pack
- 2-3 tablespoons green onions, chopped
- 1/2 cup mayonnaise or plain Greek yogurt
- In microwave, cook potatoes 5 minutes according to package directions.
- Combine seasoning pack, chopped green onions and mayonnaise or Greek yogurt.
- Pour dressing over cooled potatoes. Stir gently and serve.
Source: The Little Potato Company
3 Steps Toward a Healthier Heart
(Family Features) All aspects of health are important, but heart health is a crucial component of overall well-being. Heart disease is the leading cause of death among Americans but it doesn’t need to be – lifestyle choices play a key role in heart health and it’s never too soon to adopt healthful habits.
From exercising and getting proper sleep to healthy eating – including heart-friendly snacks like grapes – consider these simple steps.
Eat Right
Adopting a balanced and nutritious diet rich in fruits, vegetables, whole grains, lean proteins and healthy fats can impact heart health. One way you may lower your risk for heart disease is by
As an easy, convenient, heart-healthy food, grapes are a perfect ingredient for a heart-friendly eating plan that includes recipes like Grape, Broccoli and Avocado Salad with Toasty Oat Topping. Savory broccoli slaw pairs with the delicate sweetness of crisp, juicy Grapes from California while the toasted oat topping provides a crunchy finish.
Grapes are low in sodium and a good source of vitamin K, which promotes heart health, and contain 7% of the daily recommended intake of potassium, a nutrient critical to heart health. Grapes are a natural source of beneficial antioxidants and other polyphenols and help maintain healthy circulation by promoting the relaxation of blood vessels.
In fact, according to a study published in the “Journal of Nutrition,” men with metabolic syndrome who consumed 1 1/2 cups of grapes every day showed reduced blood pressure, improved blood vessel function and a decrease in a key marker of inflammation.
Women who consumed 1 1/4 cups of grapes every day as part of a separate study published in the “Journal of Nutrition” benefited from reduced blood triglyceride levels, LDL cholesterol levels, inflammatory proteins and other markers of heart disease.
Get Quality Sleep
Sleep is also critical for a healthy heart. Most experts recommend 7-9 hours of sleep per night for adults. To help achieve that goal, create a bedtime routine by waking up and going to sleep at consistent times. Also ensure a comfortable sleep space by turning off electronics and setting the thermostat to a cozy temperature.
Exercise
A regular exercise routine can have a positive impact on many areas of health. It can be especially beneficial for heart health by lowering blood pressure, reducing inflammation and aiding in maintaining a healthy weight. At least 150 minutes per week of moderate-intensity aerobic activity or 75 minutes of vigorous aerobic activity is recommended by the American Heart Association. Fuel your workout and recovery with heart-healthy and hydrating foods such as grapes.
Find more heart-healthy recipes at GrapesFromCalifornia.com.
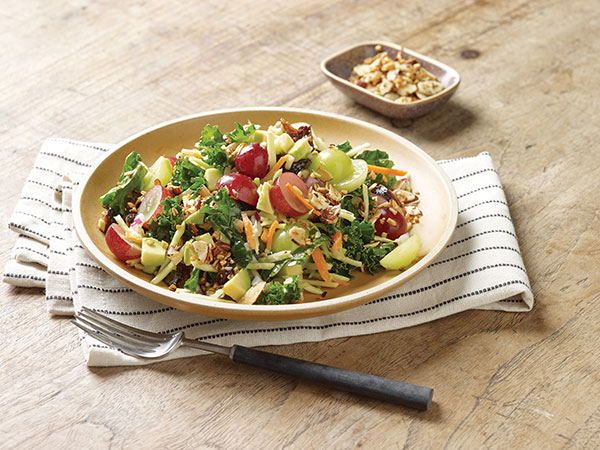
Grape, Broccoli and Avocado Salad with Toasty Oat Topping
Prep time: 30 minutes
Cook time: 5 minutes
Servings: 6
Toasted Oat Topping:
- 1/2 tablespoon butter
- 1/3 cup sliced almonds, coarsely chopped
- 3 tablespoons steel-cut oats
- 1/8 teaspoon seasoned salt
- 1/4 teaspoon Italian herb seasoning
Dressing:
- 6 tablespoons extra-virgin olive oil
- 1/3 cup quartered red or green Grapes from California
- 1/4 cup wine vinegar
- 1 tablespoon honey
- 1/4 teaspoon sea salt
- freshly ground pepper, to taste
Salad:
- 1 bag (12 ounces) broccoli slaw
- 2 cups lightly packed torn curly kale
- 1 1/2 cups halved Grapes from California
- 1/2 cup minced red onion
- 1/3 cup chopped dried figs
- freshly ground pepper, to taste
- 1 large, firm but ripe avocado, diced
- To make toasted oat topping: In medium skillet over medium-low heat, cook butter, almonds, oats, salt and Italian herb seasoning about 5 minutes, or until lightly toasted and fragrant, stirring frequently.
- To make dressing: In small blender, puree olive oil, grapes, wine vinegar, honey, sea salt and pepper, to taste, until smooth.
- To make salad: In large bowl, mix broccoli slaw, kale, grapes, red onion and figs; season with pepper, to taste, and drizzle with dressing; toss well to coat. Add avocado and toss lightly. Transfer to six serving plates or bowls and sprinkle with toasted oat topping.
Nutritional information per serving: 320 calories; 5 g protein; 29 g carbohydrates; 22 g fat (62% calories from fat); 3.5 g saturated fat (10% calories from saturated fat); 5 mg cholesterol; 160 mg sodium; 7 g fiber.
Source: California Table Grape Commission
5 Steps Toward Heart-Healthy Eating
(Family Features) As the leading cause of death among Americans, according to the Centers for Disease Control and Prevention, heart disease often results from uncontrolled high blood pressure, high cholesterol, diabetes, overweight and obesity. However, a heart-healthy eating plan can help lower or control these risk factors and put you and your family on a path toward better heart health.
With back-to-school season adding stress to already busy schedules, it’s important for families to make time for healthy eating decisions. Consider these five steps recommended by The Heart Truth program of the National Heart, Lung, and Blood Institute (NHLBI):
Eat Smart
One way to get started on a path toward heart-healthy eating is to change your way of thinking about how and what you eat. For example, use smaller plates to help limit portion sizes. Chew food slowly and consider the textures and flavors of different food as you eat.
Plan to Eat Heart Healthy
Put together an eating plan that offers a balance of calories and nutrients including vegetables, fruits, whole grains and low-fat or fat-free dairy. Consider make-at-home favorites like Heart-Healthy Pita Pizzas, which include grilled chicken as a better-for-you alternative to methods such as frying.
Choose Healthy Snacks
After a full day of learning or working, it’s tempting for children and adults to grab a quick snack that may not be healthy. Swap out sugary or salty snacks and instead enjoy lower-calorie after-school treats that fit into your daily eating plan. Try options like a cup of seedless grapes, small banana, cup of cherry tomatoes, handful of unsalted nuts or half cup of low-fat or fat-free yogurt.
Find Heart-Healthy Menus
How you eat day after day can make a difference in your heart health over time. Developed through research by NHLBI, the Dietary Approaches to Stop Hypertension (DASH) eating plan emphasizes vegetables, fruits, whole grains, fish, poultry, beans, nuts, low-fat dairy and healthy oils to help keep your blood pressure in a healthy range. DASH focuses on lowering sodium and limiting foods that are high in saturated fat, including fatty meats, full-fat dairy and tropical oils.
Stay On Track When Dining Out
It is possible to eat healthy foods in restaurants. To control portion sizes, try tactics like eating half your entree and taking leftovers home for another meal. Choose foods that are broiled, baked or roasted to limit calories. Ask for low-sodium menu options and request butter, gravy, sauces and salad dressings on the side or leave them off completely.
Visit hearttruth.gov to find more healthy eating inspiration and find DASH-friendly back-to-school recipes at healthyeating.nhlbi.nih.gov.
Watch video to see how to make this recipe!
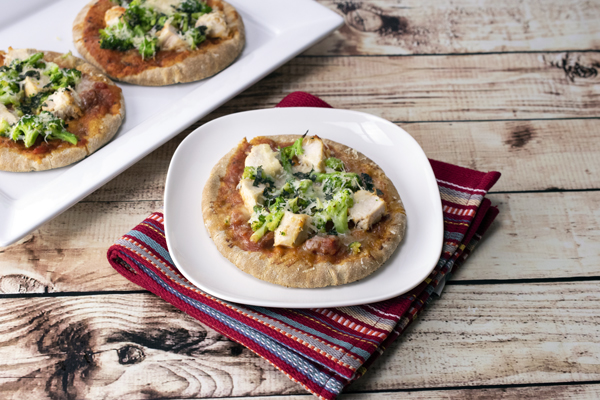
Heart-Healthy Pita Pizzas
Prep time: 10 minutes
Cook time: 8 minutes
Servings: 4
- 4 whole-wheat pitas (6 1/2 inches each)
- 1 cup chunky tomato sauce
- 1 cup grilled boneless, skinless chicken breast, diced (about 2 small breasts)
- 1 cup broccoli, rinsed, chopped and cooked
- 2 tablespoons grated Parmesan cheese
- 1 tablespoon fresh basil, rinsed, dried and chopped (or 1 teaspoon dried)
- Preheat oven or toaster oven to 450 F.
- On each pita, spread 1/4 cup tomato sauce and top with 1/4 cup chicken, 1/4 cup broccoli, 1/2 tablespoon Parmesan cheese and 1/4 tablespoon chopped basil.
- Place pitas on nonstick baking sheet and bake 5-8 minutes until pitas are golden brown and chicken is heated through.
Go Whole Grain for Heart Health
(Family Features) Eating healthy is a priority for many Americans but knowing where to start and with what foods may be a little trickier. One way to level up the nutritional value of your meals is to better understand whole grains and why they are important for a heart-healthy diet.
As a key feature of heart-healthy diets, whole grains like sorghum, oatmeal and brown rice are rich sources of dietary fiber, may improve blood cholesterol levels and provide nutrients that help the body form new cells, regulate the thyroid and maintain a healthy immune system.
However, according to a survey by The Harris Poll on behalf of the American Heart Association, U.S. adults are least knowledgeable about refined vs. whole grains compared to other foods like fruits, vegetables and proteins. Also, when asked to identify whole grains and refined grains, most adults incorrectly believe multi-grain bread is a whole grain and only 17% believe sorghum is an example of a whole grain when it is, in fact, a nutritious whole-grain option.
If you’re looking to try more whole grains, sorghum is a primary ingredient in these heart-healthy recipes for Pancakes with Blueberry Vanilla Sauce, Raspberry Streusel Muffins and Garden Vegetable Stir-Fried Sorghum. These flavorful dishes can be part of an overall healthy diet as recommended by the American Heart Association’s Healthy for Good initiative, supported by the Sorghum Checkoff.
Find more heart-healthy meal ideas at Heart.org/healthyforgood.
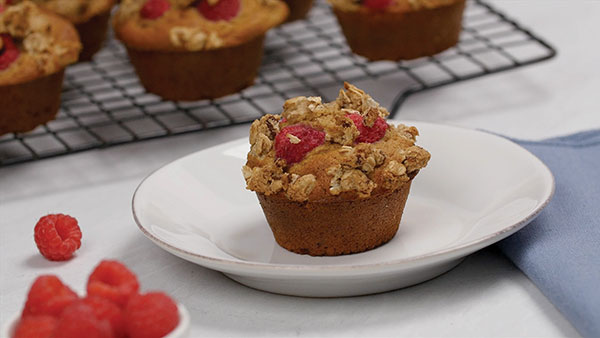
Raspberry Streusel Muffins
Recipe courtesy of the American Heart Association and Sorghum Checkoff
Servings: 12 (1 muffin per serving)
Muffins:
- Nonstick cooking spray
- 1 1/2 cups whole grain sorghum flour
- 1 teaspoon ground cinnamon
- 3/4 teaspoon baking soda
- 3/4 cup low-fat buttermilk
- 1/3 cup firmly packed light brown sugar
- 3 large egg whites
- 1/4 cup canola or corn oil
- 2 teaspoons grated lemon zest
- 1 teaspoon vanilla extract
- 1 cup fresh or frozen unsweetened raspberries, thawed if frozen
Streusel:
- 2 tablespoons whole grain sorghum flour
- 2 tablespoons light brown sugar
- 2 tablespoons uncooked quick-cooking rolled oats
- 2 tablespoons chopped pecans
- 2 tablespoons light tub margarine
- 1/2 teaspoon ground cinnamon
- To make muffins: Preheat oven to 400 F. Lightly spray 12-cup muffin pan with nonstick cooking spray.
- In large bowl, stir sorghum flour, cinnamon and baking soda.
- In medium bowl, whisk buttermilk, brown sugar, egg whites, oil, lemon zest and vanilla. Stir into flour mixture until batter is just moistened and no flour is visible without overmixing. Spoon batter into muffin cups. Top each muffin with raspberries.
- To make streusel: In small bowl, stir sorghum flour, brown sugar, oats, pecans, margarine and cinnamon to reach texture of coarse crumbs. Sprinkle over muffins, gently pushing into batter. Bake 16 minutes, or until wooden toothpick inserted in center comes out clean. The USDA recommends cooking egg dishes to 160 F.
- Transfer pan to cooling rack. Let stand 5 minutes. Carefully transfer muffins to rack. Let cool completely, about 20 minutes.
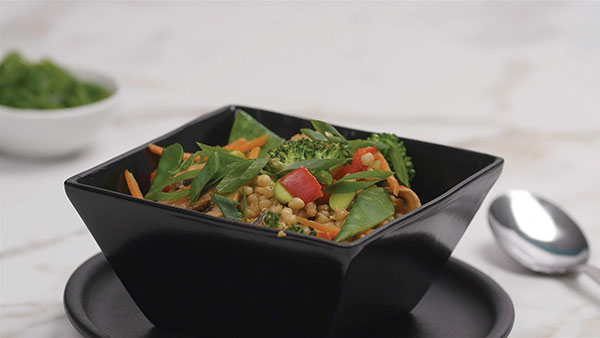
Garden Vegetable Stir-Fried Sorghum
Recipe courtesy of the American Heart Association and Sorghum Checkoff
Servings: 4 (1 1/2 cups per serving)
- 1 cup uncooked whole-grain sorghum
- 2 teaspoons toasted sesame oil
- 2 medium garlic cloves, minced
- 1 teaspoon gingerroot, peeled and minced
- 1 cup fresh or frozen broccoli florets, chopped, thawed if frozen
- 1 cup snow peas, trimmed and halved
- 1/2 cup carrot strips, sliced into matchsticks
- 1/2 cup red bell pepper, diced
- 1/2 cup button mushrooms, thinly sliced
- 1/2 cup frozen shelled edamame, thawed
- 2 large eggs
- 2 tablespoons low-sodium soy sauce, divided
- 1/2 cup water chestnuts, rinsed and drained
- 1/4 cup green onions, diagonally sliced
- Prepare sorghum using package directions, omitting salt. Once cooked, spread sorghum in even layer on rimmed baking sheet or 13-by-9-by-2-inch baking dish. Let stand 5-10 minutes at room temperature. Refrigerate, uncovered, 20 minutes, or until cool.
- In large nonstick skillet over medium heat, heat oil, swirling to coat bottom. Cook garlic and gingerroot 30 seconds, stirring frequently. Increase heat to medium-high. Cook broccoli, snow peas, carrots, bell pepper, mushrooms and edamame 10-12 minutes, or until vegetables are tender-crisp, stirring frequently.
- In small bowl, using fork, beat eggs and 1 tablespoon soy sauce.
- Reduce heat to medium. Stir water chestnuts and sorghum into vegetable mixture. Push mixture to sides of skillet. Pour egg mixture into center of skillet. Using heatproof rubber scraper, stir 1-2 minutes, or until partially set.
- Stir vegetable mixture into partially cooked egg mixture. Cook 1 minute, or until eggs are cooked through and sorghum is heated through, stirring constantly. The USDA recommends cooking egg dishes to 160 F.
- Remove from heat. Stir in remaining soy sauce. Sprinkle with green onions.
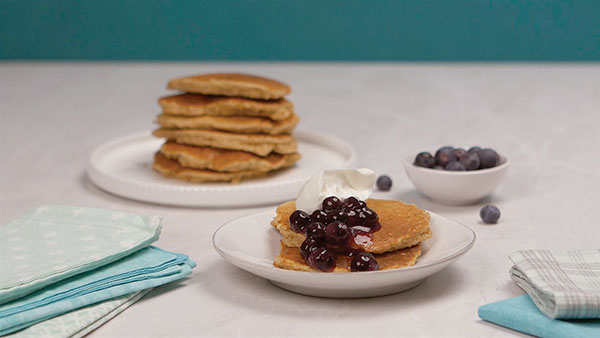
Pancakes with Blueberry Vanilla Sauce
Recipe courtesy of the American Heart Association and Sorghum Checkoff
Servings: 4 (2 pancakes, 1/4 cup sauce and 2 tablespoons yogurt per serving)
Sauce:
- 2 teaspoons cornstarch
- 1/3 cup water
- 1 cup blueberries
- 1 tablespoon sugar
- 1 1/2 teaspoons vanilla extract
Pancakes:
- 1/2 cup quick-cooking rolled oats
- 1/2 cup whole grain sorghum flour
- 1 1/2 tablespoons firmly packed light brown sugar
- 1 1/2 teaspoons baking powder
- 1/2 teaspoon ground cinnamon
- 1/2 cup fat-free milk
- 1/2 cup unsweetened applesauce
- 1 large egg
- 1 tablespoon canola or corn oil
Topping:
- 1/2 cup fat-free plain Greek yogurt
- To make sauce: Put cornstarch in medium saucepan. Add water, stirring to dissolve. Stir in blueberries and sugar. Bring to boil over medium-high heat. Boil 1-2 minutes, or until sauce thickens slightly. Remove from heat. Stir in vanilla. Cover to keep warm. Set aside.
- To make pancakes: In medium bowl, stir oats, sorghum flour, brown sugar, baking powder and cinnamon.
- In small bowl, whisk milk, applesauce, egg and oil. Stir into flour mixture until batter is just moistened and no flour is visible without overmixing.
- Heat nonstick griddle over medium heat. Test temperature by sprinkling drops of water on griddle. Griddle is ready when water evaporates quickly.
- Pour 1/4 cup batter for each pancake on griddle. Cook 2-3 minutes, or until tiny bubbles appear on surface and bottoms are golden brown. Flip pancakes. Cook 1-2 minutes, or until cooked through and golden brown on bottoms. The USDA recommends cooking egg dishes to 160 F.
- Transfer pancakes to plates. Spoon sauce over pancakes. Top each serving with 2 tablespoons yogurt.
Source: American Heart Association
Give Quick and Easy Meals a Fun Spin
(Family Features) Work, school, extracurricular activities, social events and more can make the winter months feel frantic and it can often seem like you’re running out of time. This seasonal time crunch makes it even more difficult to answer the age-old, mealtime question kids are always asking: “What are we having?”
 To help solve that daily meal dilemma and discover family-pleasing recipes that take 35 minutes or less, the RAGÚ Meal Wheel lets the entire family take an active role in choosing what’s on the menu. Simply ask one of your kids to click the “spin” button to find delicious, quick-and-easy recipes like Chicken and Broccoli Alfredo with Fettuccine and Mini Turkey Sloppy Joes.
Both easy-to-make recipes take 35 minutes or less and feature RAGÚ sauces, which come in a variety of taste-tempting classic flavors and styles, perfect for any mealtime occasion. Created 85 years ago by an Italian mother using a family recipe she brought to the United States from Naples, Italy, the sauces are made from quality ingredients like vine-ripened tomatoes, hearty vegetables, Italian cheeses, herbs and spices, allowing home cooks to “Cook Like a Mother” and quickly create affordable, crowd-pleasing meals for their busy families.
To find more quick and mouthwatering recipes to feed your family during the chilly winter months, visit RAGU.com/meal-wheel.
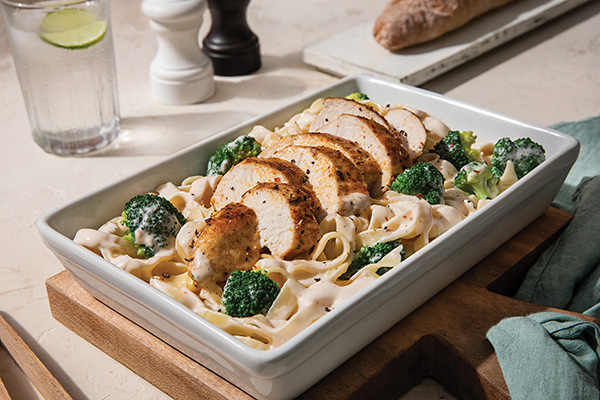
Chicken and Broccoli Alfredo with Fettuccine
Prep time: 20 minutes
Cook time: 15 minutes
Servings: 4
- 1 tablespoon butter
- 1 1/2 pounds boneless, skinless chicken breasts, cut into strips
- 1 jar RAGÚ Classic Alfredo Sauce
- 1 package (12 ounces) frozen broccoli florets, thawed
- 1 package (12 ounces) fettuccine pasta
- grated Parmesan cheese, for topping (optional)
- In large nonstick skillet over medium-high heat, melt butter. Cook chicken, in batches if necessary, stirring occasionally, until chicken is thoroughly cooked. Remove chicken and set aside.
- In same skillet, add sauce and broccoli; stir. Bring to boil over medium-high heat. Reduce heat to low and simmer, covered, stirring occasionally, until broccoli is heated through, about 5 minutes. Stir in chicken and cook, stirring occasionally, until cooked through, about 2 minutes.
- In separate pan, cook fettuccine according to package instructions.
- Serve chicken, broccoli and sauce over hot fettuccine and sprinkle grated Parmesan cheese on top, if desired.
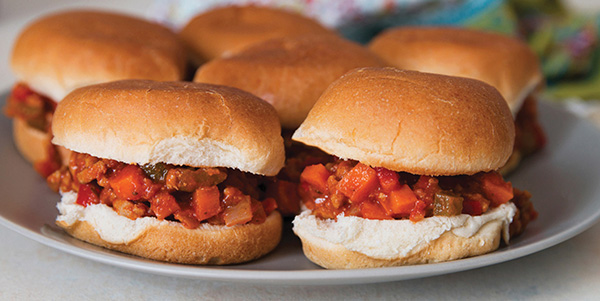
Mini Turkey Sloppy Joes
Recipe courtesy of "Honey and Birch" on behalf of RAGÚ
Prep time: 10 minutes
Cook time: 20 minutes
Servings: 4
- 1 teaspoon extra-virgin olive oil
- 1 cup diced onion
- 3 cloves garlic, minced
- 1 pound ground turkey
- 1 cup finely diced carrots
- 1 medium green pepper, diced
- 1 medium red pepper, diced
- 1 jar RAGÚ Simply Chunky Marinara Sauce
- 1 tablespoon Worcestershire sauce
- 1 teaspoon ground mustard
- 1/2 teaspoon kosher salt
- 1/2 teaspoon black pepper
- 4 mini buns
- In large skillet over medium heat, heat extra-virgin olive oil. When hot, add onion and garlic; sauté until onion is translucent.
- Add ground turkey. Break up meat and stir frequently until browned. Add carrots, green pepper and red pepper. Cook 5 minutes until vegetables begin to soften.
- Add marinara sauce, Worcestershire sauce, ground mustard, salt and pepper. Stir and bring to boil. Reduce heat to simmer and partially cover pan. Cook 10 minutes.
- Serve on mini buns.
Source: RAGÚ
Serve Up Smiles with Favorite Holiday Sides
(Family Features) Turkey and ham may sit centerstage, but classic holiday sides can make the season truly special. You can bring smiles to your loved ones’ faces by dishing out those favorite recipes everyone asks for year after year.
Made with a delicious combination of rice, cheddar cheese, cream of mushroom soup and broccoli florets, this quick and easy version of Broccoli and Cheese Rice Casserole is an ideal one-pot dish to keep the holidays simple. With three easy steps and everyday ingredients, it comes together with minimal effort for traditional casserole taste.
When it comes to feeding a crowd, it’s often best to let your oven do the work. This Brussels Sprouts and Ham Rice Gratin recipe allows you to serve up a filling favorite with little effort using pantry staples. Plus, it’s a kid-friendly way to encourage veggies at this year’s holiday meal with gooey cheese providing tempting taste bud motivation.
These seasonal classics and more are made quick and easy with an option like Success Boil-in-Bag Rice, a pre-measured, mess-free way to make fluffy, high-quality rice. It’s cooked by simply dropping a bag of rice in a pot of water or broth then boiling it for 10 minutes. BPA-free and FDA-approved, the bags are safe to use and made to withstand high temperatures.
An added bonus: If you’re aiming to achieve a particular flavor, just season the rice by cooking in water infused with herbs, spices, broth, coconut milk or other liquids like juice for sweeter recipes.
Visit SuccessRice.com to find more holiday recipe inspiration.
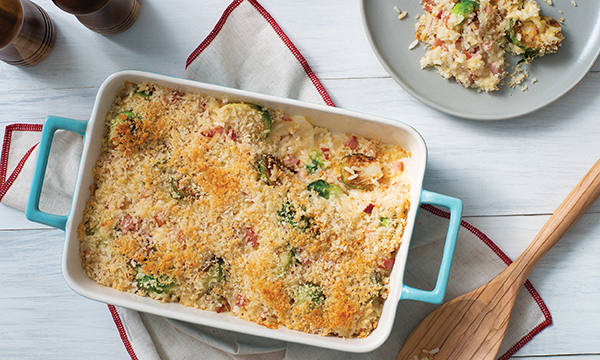
Brussels Sprouts and Ham Rice Gratin
Prep time: 20 minutes
Cook time: 25 minutes
Servings: 4
- 1 bag Success White Rice
- 1/2 pound Brussels sprouts, trimmed and halved
- 1/3 cup diced ham
- 1 clove garlic, minced
- 1 tablespoon olive oil
- 3/4 teaspoon salt, divided
- 3/4 teaspoon black pepper, divided
- 1 cup heavy cream
- 2 tablespoons finely chopped fresh chives
- 2 tablespoons Dijon mustard
- 1 cup shredded sharp cheddar cheese
- 1/2 cup grated Parmesan cheese, divided
- 1/3 cup breadcrumbs
- 2 tablespoons butter, melted
- Preheat oven to 450 F. Prepare rice according to package directions.
- In large bowl, toss Brussels sprouts, ham, garlic, olive oil, 1/4 teaspoon salt and 1/4 teaspoon pepper. Place on parchment paper-lined baking tray and roast 12-15 minutes, or until caramelized. Decrease oven temperature to 425 F.
- In large bowl, toss rice, Brussels sprouts mixture, cream, chives, Dijon mustard, remaining salt and remaining pepper. Stir in cheddar and 1/3 cup Parmesan cheese. Transfer mixture to greased, 2-quart baking dish.
- In small bowl, stir breadcrumbs, remaining Parmesan and melted butter. Sprinkle over rice mixture.
- Bake 12-15 minutes, or until golden brown and bubbling.
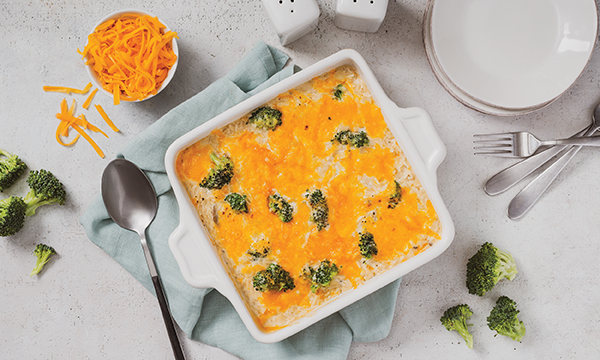
Broccoli and Cheese Rice Casserole
Prep time: 5 minutes
Cook time: 30 minutes
Servings: 4-6
- 1 bag Success White Rice or Brown Rice
- nonstick cooking spray
- 1 can (10 3/4 ounces) condensed cream of mushroom soup
- 2 cups frozen broccoli florets, thawed and drained
- 1 1/2 cups shredded cheddar cheese, divided
- 1/2 cup evaporated milk
- 3 tablespoons butter, melted
- 1 tablespoon grated onion
- 1/2 teaspoon salt
- 1/2 teaspoon black pepper
- Prepare rice according to package directions. Preheat oven to 350 F.
- Coat 2-quart casserole dish with nonstick cooking spray. In medium bowl, combine soup, broccoli, 1 cup cheddar cheese, evaporated milk, butter, onion, salt and pepper. Fold in rice.
- Pour mixture into prepared dish and top with remaining cheddar cheese. Bake 20 minutes.
5 Steps to Boost Students' Immunity
(Family Features) Heading to the classroom means opening doors to opportunities for educational and social growth, but to keep students at school day after day, it’s important to keep health top of mind. When close proximity to other children exposes them to illnesses like common colds, strong immune systems can be the difference between perfect attendance and a few days of absences.
To help boost your children’s immunity, consider these tips from the experts at Healthy Family Project.
Eat Healthy Foods
Focusing on foods that are rich in antioxidants and vitamins can help boost immunity by protecting the body from free radicals that cause inflammation and damage cells. For example, vitamin C boosts the function of immune cells and foods high in fiber help keep the digestive system healthy.
Broccoli provides a good source of vitamin C, but if your kids aren’t big fans of the green veggie, turn to these Broccoli Tater Tots for an easy way to sneak some greens onto the family table. Due to their high vitamin C content, mandarins are another perfect addition to family diets. Their small size makes them easy to pack in lunches, toss in a bag or enjoy in a sweet treat like Frozen Creamsicle Yogurt Bites.
Get Plenty of Sleep
The Sleep Foundation recommends 9-11 hours of sleep each night for kids ages 6-13. Proper sleep helps regulate the body’s biological rhythms, helping people stay healthy.
Exercise Regularly
Whether your children participate in sports or just enjoy playtime, encourage exercise to help boost the immune response, particularly during colder months when they may spend more time indoors.
Reduce Stress
Adults aren’t the only ones who experience stress. Talk to your children about anxiety, stress and mental health, as stress can leave them feeling run down while weakening the immune system, leading to less energy for fighting illnesses.
Drink Water
Hydration plays a major role in keeping immune systems functioning properly by aiding the production of white blood cells, which are important for fighting off infection.
Find more immunity-boosting recipes at HealthyFamilyProject.com.

Frozen Creamsicle Yogurt Bites
Recipe courtesy of Healthy Family Project
Prep time: 10 minutes
Total time: 1 hour, 10 minutes
- 1 mandarin
- vanilla Greek yogurt
- sprinkles
- Place one piece of parchment paper on baking sheet that fits in freezer.
- Peel mandarin and separate into individual slices. Place one big scoop yogurt in small bowl.
- Dip each mandarin slice in yogurt, covering about half of each slice. Place individual mandarin slices on parchment paper. Add sprinkles.
- Freeze at least 1 hour or overnight if adding to lunchboxes.
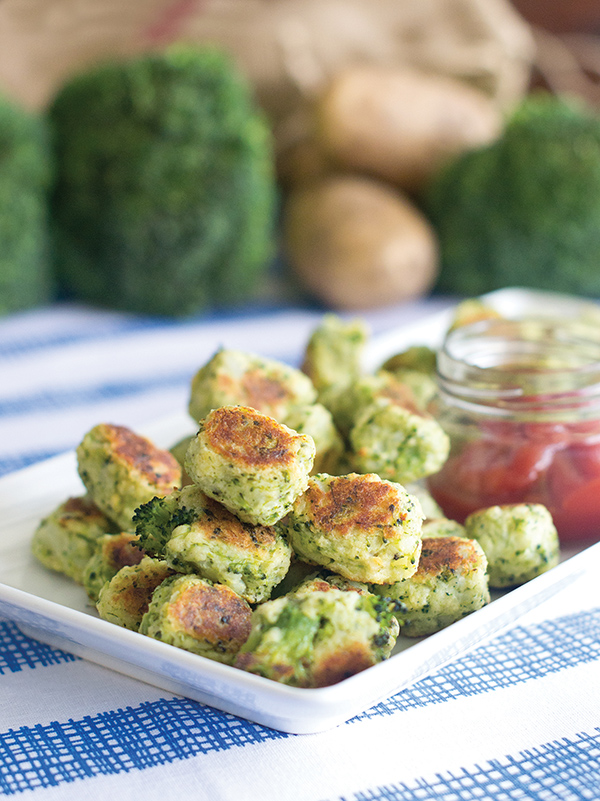
Broccoli Tater Tots
Recipe courtesy of Healthy Family Project
Prep time: 10 minutes
Cook time: 25 minutes
Servings: 4
- 2 russet potatoes, peeled, cut into 1/2-inch cubes
- cold water
- 2 cups broccoli florets
- 1 large egg
- 1/2 cup panko breadcrumbs
- 1/8 teaspoon salt
- 1/8 teaspoon pepper
- 1/8 teaspoon garlic powder
- Preheat oven to 400 F.
- In large stockpot, cover potatoes with cold water. Cover and bring to boil over high heat. Reduce to low and simmer 3 minutes. Add broccoli; don't stir. Cover and cook 4-5 minutes, or until tender. Drain.
- In large bowl, mix egg, breadcrumbs, salt, pepper and garlic powder until just combined.
- In food processor, pulse potatoes and broccoli 8-10 times until finely grated. Add to breadcrumb mixture and stir to combine.
- Use tablespoon to scoop potato mixture into 40 mounds. Shape each into oval and place on parchment-lined baking sheet.
- Bake 10 minutes; flip and bake 10 minutes, or until golden brown.
Source: Healthy Family Project
Sheet Pan Hawaiian Veal Meatballs
(Family Features) While the first step to a successful family meal is finding a recipe everyone loves, a second important piece to the puzzle is creating a dish that leaves enough time for special moments together at the table. You can skip complicated prep by serving easy-to-make favorites that call for versatile ingredients and simple instructions.
These Sheet Pan Hawaiian Veal Meatballs are a perfect example of a quick yet delicious meal your loved ones can enjoy without committing an entire evening to the kitchen. With veal as a key ingredient that cooks fast and easy, it’s ideal for weeknights and meal prepping ahead of busy weeks.
Plus, it’d be a cinch to double the meatballs and freeze half of them to make prep even easier the next time your family craves the sweet and savory combination of pineapple, fresh veggies and tender veal.
To find more quick, flavorful dinner inspiration, visit Veal.org.
Watch video to see how to make this recipe!

Sheet Pan Hawaiian Veal Meatballs
Funded by Beef Farmers and Ranchers
Prep time: 15 minutes
Cook time: 30 minutes
Servings: 6
Meatballs:
- 2 pounds ground veal
- 1/2 cup plain breadcrumbs
- 1/4 cup milk
- 3 green onions, chopped
- 1 large egg
- 2 teaspoons garlic powder
- 1 1/2 teaspoons ground ginger
- 2 teaspoons kosher salt
- 1 cup Hawaiian barbecue sauce, plus additional for serving, divided
Vegetables:
- 1 small head broccoli, cut into florets
- 1 small red bell pepper, seeded and cut into 1/2-inch slices
- 1 small yellow bell pepper, seeded and cut into 1/2-inch slices
- 1 small red onion, cut into 1/2-inch slices
- 1 small pineapple, cut into 1-inch chunks
- 2 tablespoons olive oil
- kosher salt, to taste
- freshly ground black pepper, to taste
- 2 green onions, for garnish
- 2 teaspoons sesame seeds, for garnish
- 6 cups cooked long-grain white rice
- To make meatballs: Preheat oven to 450 F and line two rimmed baking sheets with parchment paper. In large bowl, mix veal, breadcrumbs, milk, green onions, egg, garlic powder, ginger and salt until just combined. Portion veal mixture into 2-inch balls. Place in even layer on prepared baking sheets.
- Bake about 15 minutes. Remove from oven.
- To make vegetables: Toss broccoli, bell peppers, red onion, pineapple and oil together until coated. Season with salt and pepper, to taste.
- Arrange vegetables in single layer on baking sheets with meatballs. Flip meatballs and brush with sauce. Bake until vegetables are tender and meatballs are golden-brown, or until internal temperature reaches 160 F, about 15 minutes.
- Drizzle with barbecue sauce. Top with green onions and sesame seeds. Serve with rice.
Source: New York Beef Council


