
Go Gluten-Free with Family Favorites
(Family Features) Time available to cook, your family's preferred dishes, ingredients you have in the pantry - there are plenty of considerations that may limit your options for an at-home menu. Add in a gluten allergy, or simply a desire to avoid it, and it may feel impossible to appease everyone.
However, all it takes is simple ingredient swaps to turn a family favorite into a gluten-free recipe. From pizza at dinnertime to a chocolatey dessert, these dishes offer easy, flavorful ways to make your menu gluten-free.
A Healthier Homemade Pizza
Creating a gluten-free dinner can be as easy as tweaking some of your loved ones' favorite meals. Even pizza can offer a gluten-free solution when you rethink the ingredients included.
Satisfy your family's needs with an option like Toufayan Gluten-Free Wraps in place of traditional crust in this Gluten-Free Barbecue Skillet Pizza. Made from wholesome, all-natural ingredients with no cholesterol or trans fats, these easily foldable wraps are available in four flavors, making them perfect for homemade pizza.
Visit Toufayan.com to find more mealtime solutions.
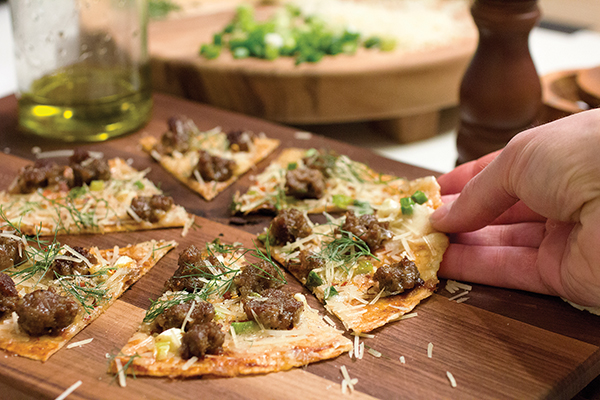
Gluten-Free Barbecue Skillet Pizza
Servings: 6
- 1 tablespoon olive oil, divided
- 1 Toufayan Gluten-Free Original Wrap
- 3 tablespoons gluten-free barbecue sauce
- 4 cooked sausage links, crumbled
- 2 cups diced Mozzarella cheese
- 2 tablespoons chopped green onion
- fresh Parmesan cheese, for garnish (optional)
- fresh fennel fronds, for garnish (optional)
- crushed red pepper, for garnish (optional)
- salt, to taste
- pepper, to taste
- Heat oven to broil.
- Heat cast-iron skillet over medium heat. Add 1-2 teaspoons olive oil; spread to cover bottom of skillet.
- Place wrap in skillet, brush with barbecue sauce and add sausage, Mozzarella and green onion.
- Fry 2-3 minutes, or until bottom of wrap is golden and crispy.
- Place skillet under broiler until cheese is melted and bubbly, about 2 minutes.
- Remove from broiler, place on cutting board and sprinkle with Parmesan, fennel fronds and crushed red pepper, if desired.
- Season with salt and pepper, to taste; drizzle with remaining olive oil, cut and serve.
Dish Up a Dynamic Dessert
Going gluten-free isn't just for meals from breakfast to dinner - you can cut gluten from delicious desserts, too.
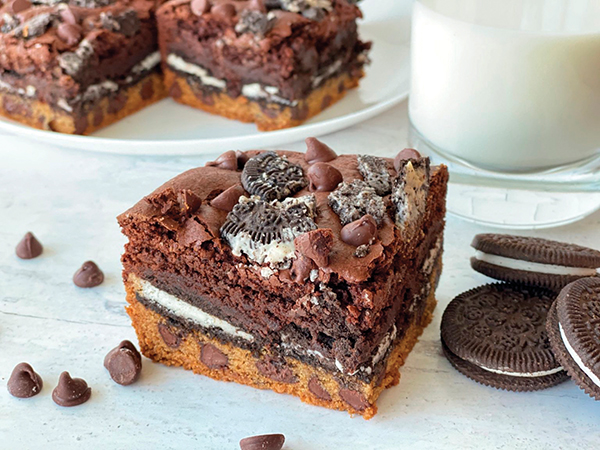
This Cookie Brownie Supreme calls for layers of cookie dough, cookies and brownies for a taste bud tempting way to round out a meal with those you love. One of the key ingredients is Goodie Girl Chocolate Creme Sandwich Cookies, made with real cocoa and a sweet cream filling between two chocolate wafers. They're made without artificial flavors, colors or preservatives for a gluten-free, vegan and peanut-free treat.
Find more varieties and dessert ideas at goodiegirl.com.
Cookie Brownie Supreme
Recipe courtesy of glutenfreewith3.com
Cookie Dough Layer:
- 1 stick softened butter
- 1/2 cup brown sugar
- 1/4 cup sugar
- 1 1/4 teaspoons vanilla extract
- 1 egg
- 1/2 teaspoon baking soda
- 1/4 teaspoon salt
- 1 1/4 cups gluten-free flour
- 1 cup semi-sweet chocolate chip
Cookie Layer:
- 25 Goodie Girl Chocolate Creme Sandwich Cookies
Brownie Layer:
- 1 stick butter
- 1 1/2 cups sugar
- 1/2 teaspoon salt
- 1 teaspoon vanilla extract
- 3/4 cup cocoa powder
- 3 eggs
- 3/4 cup gluten-free flour
- 1 teaspoon baking powder
- 6 Goodie Girl Chocolate Creme Sandwich Cookies, crushed
- 1/4 cup semi-sweet chocolate chips
- vanilla ice cream (optional)
- chocolate syrup (optional)
- Preheat oven to 350 F. Prepare 9-by-9-inch cake pan with parchment paper.
- To make cookie dough layer: In large bowl, combine softened butter, brown sugar, sugar and vanilla. Mix with handheld mixer until combined and creamy. Add egg and beat until combined.
- In small bowl, combine baking soda, salt and flour. Beat flour mixture gradually into sugar mixture. Once completely combined, fold in chocolate chips. Add cookie dough layer to bottom of prepared pan and spread evenly.
- To make cookie layer: Layer cookies on top of cookie dough layer.
- To make brownie layer: In saucepan, melt butter, sugar and salt until completely combined. Remove from heat and transfer to large bowl. Add vanilla, cocoa and eggs; mix. Slowly add flour and baking powder. Mix until completely combined.
- Pour brownie mixture over cookie layer. Spread evenly.
- Top with crushed cookies and chocolate chips.
- Bake 50 minutes. Let cool completely before removing from pan. Slice and top with vanilla ice cream and chocolate syrup, if desired.
Source: Toufayan

Horseradish Mashed Potatoes
(Culinary.net) Almost every get together – whether it’s family, friends or neighbors – always has one dish that’s the star of the show time after time. It’s usually a staple dish, but that doesn’t always mean it’s the main course.
It can be a side dish that pairs with almost everything else on the table. The kids gobble it up, and the adults ask “Can I have that recipe?”
Side dishes can be some of the most enjoyed foods at every meal. There is a large variety of options and a multitude of possibilities and variations of almost each and every classic side dish.
There are a lot of elements that go into making a stellar side, however. It must have lots of flavor and the seasoning needs to be on point.
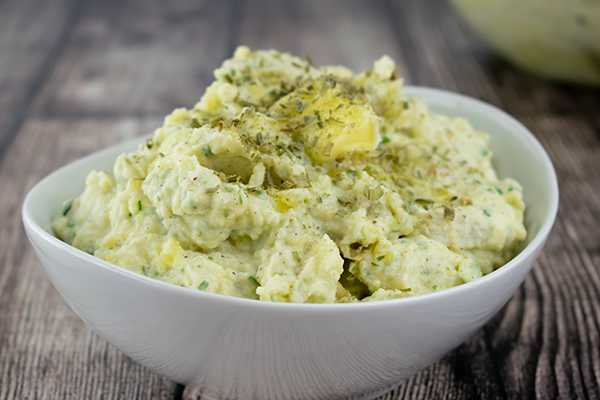
Next time you’re looking for a versatile, delicious side dish nearly everyone will love, try these Horseradish Mashed Potatoes. They have a perfect potato texture and are full of creamy goodness with a horseradish kick to savor.
To make these potatoes, start with 2 quarts of water in a large pot. Add 1 teaspoon of salt and 3 pounds of Yukon Gold potatoes then boil 15-20 minutes. Reserve 1/2 cup of water from the pot.
In a separate mixing bowl, whisk 16 ounces of sour cream, 1/4 cup of horseradish, salt and pepper.
Add butter to warm potatoes then mash. Add sour cream mixture, chives and reserved water halfway through mashing.
Once you have the desired consistency, your potatoes are ready to serve with additional butter chives.
Once you sink your spoon into a bowl of these flavor-packed potatoes, you’ll understand why there are never any leftovers. These potatoes can satisfy almost any appetite with a unique flavor combination and appealing aroma.
Find more side dish recipes at Culinary.net.
Watch video to see how to make this recipe!
Horseradish Mashed Potatoes
Servings: 4-6
- 2 quarts water
- 1 1/4 teaspoons salt, divided
- 3 pounds Yukon Gold potatoes, halved
- 1 stick of unsalted butter, cut into 8 slices, divided
- 16 ounces sour cream
- 1/4 cup horseradish, prepared and squeezed of moisture
- 1/2 teaspoon pepper
- 1/4 cup chopped chives, plus additional for topping
- In saucepan, bring water and 1 teaspoon salt to boil. Add potatoes and boil 15-20 minutes. Reserve 1/2 cup liquid.
- Drain potatoes and place in bowl. Add six slices of butter and mash potatoes coarsely.
- In medium bowl, whisk together sour cream, horseradish, remaining salt, pepper and chives. Add mixture to mashed potatoes. Add reserved water. Mash to combine.
- Transfer to serving bowl and top with remaining butter pieces and additional chives.

Pro Tips for Perfecting Pasta
(Family Features) Next time hunger calls in your home, turn to a filling family favorite: pasta. With a nearly endless variety of pasta types, sauce pairings and recipe ideas, the options are aplenty, and cooking is often a breeze.
Consider these pasta cooking tips from Rouxbe, an online culinary school training people of all abilities to become better, more confident cooks.
- Use a large, straight-sided pot with 6 quarts of water for every 1 pound of pasta. Bring to a boil, add 1 teaspoon of salt for each quart of water and stir to dissolve.
- Wait for rapidly boiling water before adding pre-made pasta then cook according to package instructions for al dente, which means the pasta offers a slight resistance. For stuffed or fresh pasta, aim for a gentle boil and cook 1-5 minutes. Reserve 1 cup of pasta water for use in sauces then drain (never rinse) your pasta.
- Add pasta to your sauce; never the other way around. Pair thin pastas like angel hair with lighter sauces, seafoods, basil and light oils. Fettucine, penne and rigatoni complement spicy sausage, heavy creams and chunky ragu. When in doubt, spaghetti offers a versatile option.
Pasta is a natural fit for fresh veggies, and you can put your skills to the test with Pappardelle with Garden Vegetables or create Homemade Potato Gnocchi to freeze and enjoy later.
For more information, visit rouxbe.com.
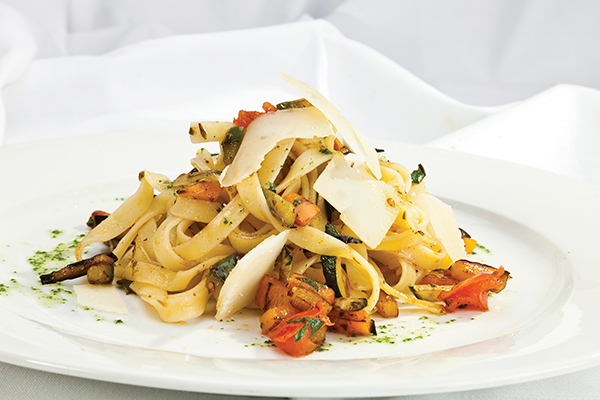
Pappardelle with Garden Vegetables
Total time: 1 hour
Servings: 3-4
- Salted water
- 3 tablespoons olive oil
- 3 tablespoons shallots or white onion, minced
- 2 cloves garlic, minced
- 1/4 teaspoon chili flakes
- 1 cup white wine
- 2 cups pappardelle noodles
- 3/4 cup vegetable stock
- 3 tablespoons capers (optional)
- 2 vine-ripened tomatoes, sliced in wedges
- 1 handful baby kale
- 1 fresh lemon, juice only
- 2 tablespoons butter (optional)
- sea salt, to taste
- freshly ground black pepper, to taste
- 1 handful fresh basil, torn
- Bring large pot of salted water to boil.
- In fry pan on medium-high heat, add olive oil and onions; saute 2 minutes. Lower heat slightly and add garlic and chile flakes. Saute on medium heat 2-3 minutes. Add white wine and deglaze pan. Cook 3 minutes. Remove from heat and keep warm until ready to add freshly cooked pasta.
- In pot of boiling water, add pappardelle. Cook according to package instructions then drain.
- Place fry pan back on medium heat. Add drained pasta; vegetable stock; capers, if desired; tomatoes; baby kale; and lemon juice. Add butter, if desired, and toss well. Cook 2-3 minutes, tossing occasionally, and season with salt and pepper, to taste, and fresh basil.
- Toss again, remove from heat and serve.
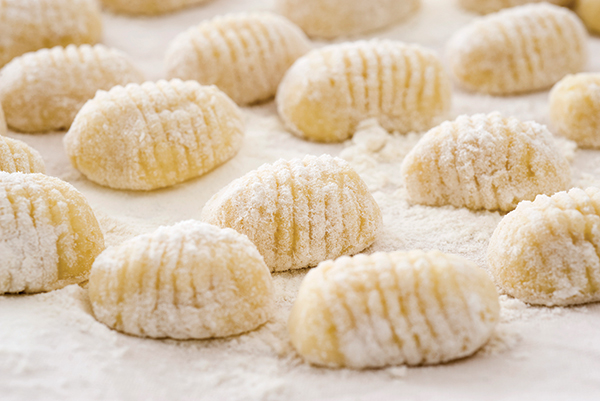
Homemade Potato Gnocchi
Total time: 2 hours
Servings: 2-4
- 2 medium Yukon Gold or russet potatoes
- 3/4 teaspoon sea salt, divided
- 2 teaspoons water
- 1 cup all-purpose flour, divided, plus additional, for surface
- 1/4 teaspoon freshly grated nutmeg
- 1/8 teaspoon white pepper
- 2 large egg yolks
- Preheat oven to 400 F. Place potatoes on sheet of foil, add 1/2 teaspoon salt and water; wrap. Bake 40 minutes, or until cooked through.
- Peel potatoes while hot. Cut and rice potatoes. Let potatoes cool completely.
- To make dough, sprinkle potatoes with flour. Aerate with bench scraper then add remaining salt, nutmeg and white pepper.
- Break up egg yolks and pour over potatoes. Cover surface with flour. Continue cutting and gently lifting dough.
- Test dough by squeezing gently; it shouldn’t stick. Add flour, if needed.
- Shape dough into rectangle and fold several times, using fingertips to bring together. Flatten dough out until it reaches finger thickness. Sprinkle with flour and let rest 5-10 minutes.
- Cut finger-width strips of dough and sprinkle strips with flour. Roll out each strip and cut ropes into 3/4-inch pieces. Separate slightly and flour well.
- Fresh gnocchi can sit at room temperature 30 minutes before cooking.
- To freeze: Place gnocchi on tray, making sure they aren’t touching. Once frozen, transfer to plastic freezer bag and freeze up to 2 months. Cook gnocchi from frozen and serve with desired sauce.
Photos courtesy of Getty Images
Source: Rouxbe

A Brunch Spread Fit for Spring
From tasty small bites to a filling feast and even dessert for breakfast, brunch options are nearly endless. Take your spring brunch to the next level with recipes that appease appetites of all kinds.
First, start with portioned pastry cups perfect for appetizers. Bring out the protein-packed breakfast burritos for the main course then, for a final touch of sweet deliciousness, offer up lemony doughnuts to cap off the feast.
Find more brunch recipes at Culinary.net.

Bite-Sized Breakfast
Appetizer-sized portions and small bites of all sorts are ideal for breakfast spreads, and these Pastry Brunch Cups are perfect for starting a morning meal with loved ones. Or, if a busy schedule looms, try baking a batch and separating into appropriate serving sizes for a simple way to meal prep heading into a new week.
Find more breakfast recipes at Culinary.net.
Pastry Brunch Cups
Servings: 18
- 2 tablespoons butter
- 2 tablespoons flour
- 1 1/2 cups milk
- 1 cup shredded Swiss cheese
- 2 sheets puff pastry
- 18 eggs
- 2 cups diced ham
- chopped fresh green onions
Heat oven 375 F.
- In small saucepan, melt butter. Whisk flour with butter. Gradually pour in milk, whisking each time. Bring to simmer, whisking until mixture starts to thicken. Remove from heat; stir in Swiss cheese. Set aside.
- Use rolling pin to thin out puff pastries. Cut each into nine squares. Line pastry squares in muffin cups, pressing bottoms down firmly and moving pastries up sides for edges to come up just over muffin tins. Fill each cup with 1 teaspoon cheese sauce. Crack one egg into each cup and sprinkle each with diced ham.
- Bake 10-15 minutes until eggs set. Sprinkle with chopped green onions.
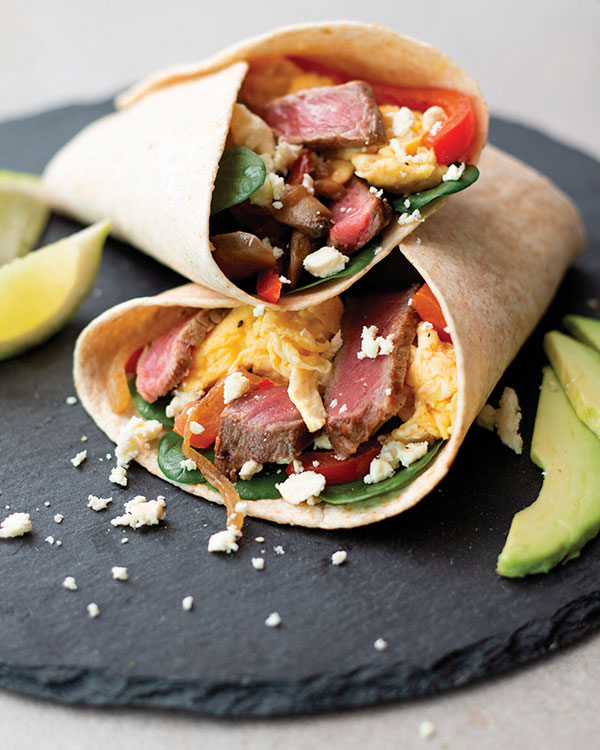
Power Brunch with a Protein-Packed Burrito
A well-rounded brunch calls for a multitude of dishes and beverages, but it wouldn’t be complete without a protein-packed recipe to get the day started.
This delicious Breakfast Burrito is loaded with colorful veggies and Silver Fern Farms 100% grass-fed strip steak. Hailing from New Zealand, home to some of the world’s most natural tasting beef and lamb, this premium cut of beef is aged 21 days and minimally processed with no added growth hormones or antibiotics. The animals are grass-fed year-round and allowed to roam and graze freely, so the beef offers a lean, flavorful texture that tastes just as nature intended.
Visit silverfernfarms.com to find more at-home brunch inspiration.
Breakfast Burrito
- 1 Silver Fern Farms New Zealand 100% Grass-Fed New York Strip Steak (10 ounces)
- oil
- salt, to taste
- pepper, to taste
- 1/2 onion, finely chopped
- 1 red bell pepper, sliced lengthwise
- 4 large mushrooms, sliced
- 1 teaspoon cumin
- 1 teaspoon paprika
- 1/2-1 teaspoon chili powder
- 1 tomato, finely chopped
- 8 eggs
- 1/2 cup milk
- 4 large tortillas
- 1 cup spinach
- 1 1/2 ounces feta cheese, crumbled
- 1/4 cup cilantro
- 1 avocado
- lime wedges (optional)
- hot sauce (optional)
- Remove steak from packaging and set aside 10 minutes. Once steak reaches room temperature, heat pan over medium-high heat.
- Rub steak with oil and season with salt and pepper, to taste.
- Cook until medium-rare, approximately 3-4 minutes each side. Remove from pan and cover loosely with tinfoil to rest 5 minutes.
- Reduce heat to medium and add splash of oil. Add onion; cook 1 minute. Add red bell pepper and mushrooms; cook 1 minute.
- Add cumin, paprika and chili powder; stir through.
- When veggies are tender (about 2 minutes), add tomato and cook until soft. Season with salt and pepper, to taste.
- In large bowl, whisk eggs, milk and salt and pepper, to taste.
- Heat pan to medium heat and add splash of oil.
- Pour egg mixture into pan and cook, lifting and folding eggs until thickened and no visible liquid egg remains. Do not stir constantly.
- Lay tortillas on flat surface or plate.
- In center of tortilla, add cooked veggies and top with thinly sliced beef. Add handful of spinach, scrambled eggs, crumbled feta, cilantro and avocado. Fold bottom of tortilla and roll.
- Serve with lime wedges and hot sauce, if desired.
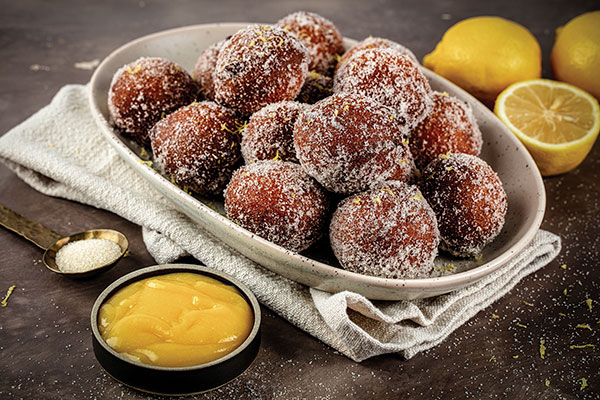
Dine on Deliciously Sweet Doughnuts
Brunch is never complete without something sweet to cap off the morning feast, and doughnuts are often the perfect complement to an array of main courses.
These Lemon Ricotta Doughnuts pair the bite-sized morsels with lemon curd (if that suits your style) for a sweet-tart combination. They’re made using Domino Golden Sugar, which is made from pure cane sugar and is less processed than white granulated sugar, as one you can always trust in your favorite recipes. It works cup-for-cup just like white sugar but with a golden color and distinct hint of molasses flavor.
Visit dominosugar.com to find recipes perfect for entertaining and celebrating throughout the year.
Lemon Ricotta Doughnuts
Prep time: 20 minutes
Cook time: 7 minutes
Doughnuts:
- Vegetable oil, for frying
- 2 cups all-purpose flour
- 1 3/4 cups Domino Golden Sugar, divided
- 2 tablespoons baking powder
- 1/4 teaspoon salt
- 2 tablespoons lemon zest
- 5 large eggs
- 1 3/4 cups ricotta cheese
- 1 tablespoon pure vanilla extract
Lemon Curd (optional):
- 1 stick unsalted butter, softened
- 1 1/2 cups Domino Golden Sugar
- 2 large eggs
- 2 egg yolks
- 4 lemons, zest and juice only
- 1/8 teaspoon salt
- To make doughnuts: In large saucepan, preheat oil to 350 F. Prepare cookie sheet with paper towel to drain doughnuts once out of hot oil.
- In bowl, mix flour, 3/4 cup sugar, baking powder and salt. Add lemon zest, eggs, ricotta cheese and vanilla extract; mix until well combined.
- Use ice cream scoop to scoop small amounts dough into oil, 4-5 pieces at a time. Fry each batch until golden brown, about 7 minutes. Keep oil at or near 350 F; if oil is too hot, doughnuts will turn golden brown but centers may still be raw. Remove from oil and drain in paper towel. Repeat with remaining dough.
- While still hot, toss doughnuts with remaining sugar.
- To make lemon curd, if desired: In large bowl of stand mixer, cream butter and sugar until light and fluffy. Add eggs and egg yolks, one at a time. Add lemon zest, lemon juice and salt.
- Transfer mixture to saucepan and cook at low-medium heat until thick and creamy, stirring constantly. Remove from heat and let cool before serving with doughnuts.

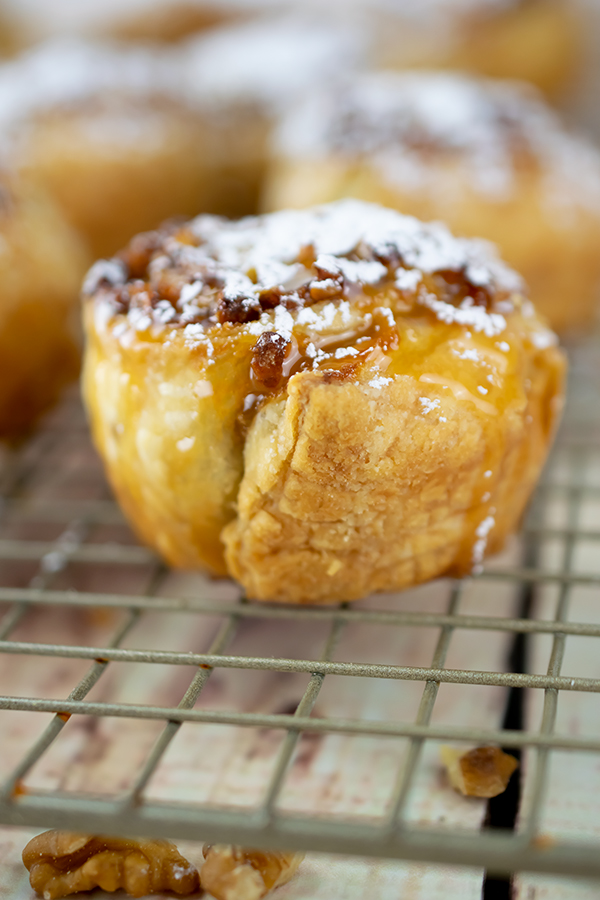
Caramel Sticky Rolls
There are no alarms set and you are cuddled up in bed after a good night’s sleep. It’s late morning and there is nowhere to go, no rushing around to do. No school bus, no work to be done, just relaxing at home with loved ones. However, breakfast is calling your name.
Your stomach rumbles as your stumble toward the kitchen. You need something quick and effortless. The kids will be up soon and you know food will be on their minds.
When you’re in a pinch, there is nearly nothing better to make than something sweet and filling for a weekend family breakfast.
Try these simple and delicious Caramel Sticky Rolls for an easy breakfast for all. The rolls are fluffy, a little crunchy and drizzled with caramel topping.
Start by sprinkling some flour on the countertop. Roll out one sheet of puff pastry. Drizzle and spread caramel sauce on the puff pastry.
Sprinkle 1/2 cup of chopped walnuts on top then roll up the puff pastry and cut it into about nine pieces to place inside a muffin tin.
Bake for 22 minutes and cool. If you like your rolls super sweet, drizzle with some extra caramel sauce.
The result is a pan full of warm, gooey and delightful rolls that are perfect for a large family or to save leftovers to enjoy throughout the week.
Next time you slept in a little too late or your family wants something more than the daily norm for breakfast, try this scrumptious and tasty recipe.
Your family will love it and don’t be surprised if you get a request or two for this breakfast again.
Find more quick weekend recipes at Culinary.net.
Caramel Sticky Rolls
Servings: 9
- Nonstick cooking spray
- flour, for rolling pastry
- 1 frozen puff pastry, thawed
- caramel sauce, divided
- 1/2 cup walnuts, chopped
- powdered sugar
- Heat oven to 400 F.
- Spray muffin tin with nonstick cooking spray.
- Sprinkle flour on work surface. Flatten pastry sheet and roll into rectangle.
- Drizzle caramel sauce over pastry and spread within 1/2 inch of edges.
- Sprinkle chopped walnuts over caramel sauce.
- Starting on short end, evenly roll pastry with filling to other end.
- Cut pastry into nine pieces. Place pastries cut side up into muffin cups.
- Bake 22 minutes, or until golden brown. Immediately remove from pan to wire rack. Let cool 10 minutes. Drizzle with additional caramel sauce and dust with powdered sugar.

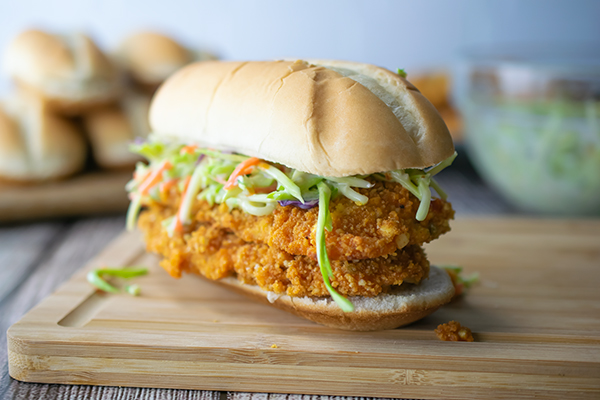
Crunchy Buffalo Baked Veal Cutlet Sandwiches
(Family Features) On those busy evenings when brainstorming a meal the whole family agrees on seems like a tall task, turning to a versatile protein can open a bevy of options. The next time your loved ones are stuck in a dinnertime rut, discover the versatility of veal to present a list of new meal possibilities.
Pairing your favorite traditional mealtime flavors with veal can allow you to uncover family-friendly dishes with familiar taste. Add excitement to the weekly menu with a recipe like these Crunchy Buffalo Baked Veal Cutlet Sandwiches, which offers the classic combination of Buffalo sauce and blue cheese in a dish that requires less than an hour in the kitchen.
Thin veal cutlets are dredged in flour, hot sauce and breadcrumbs before hitting the oven. Once baked, the cutlets are added to your favorite type of roll and topped with blue cheese broccoli slaw and as much additional Buffalo sauce as you desire for a flavor-packed meal your loved ones can savor together.
Find more ways to discover veal’s versatility at Veal.org.
Watch video to see how to make this recipe!
Crunchy Buffalo Baked Veal Cutlet Sandwiches
Prep time: 15 minutes
Cook time: 20 minutes
Servings: 4
- 1 package broccoli slaw
- 1/2 cup blue cheese dressing
- 1 teaspoon salt
- 1 teaspoon black pepper
- 1 cup flour
- 4-6 tablespoons butter, melted
- 1/3 cup Buffalo-style hot sauce, plus additional for serving, divided
- 1 cup panko breadcrumbs
- 3/4 cup blue cheese crumbles
- 8 veal cutlets, pounded about 1/8-inch thick
- 4 sub rolls
- Preheat oven to 400 F. Line rimmed baking sheet with parchment paper; set aside.
- In medium bowl, using tongs, lightly toss broccoli slaw and blue cheese dressing.
- In shallow bowl, stir together salt, pepper and flour.
- In separate shallow bowl, whisk melted butter and hot sauce until combined.
- In bowl of food processor, pulse panko and blue cheese crumbles until combined. Transfer mixture to plate.
- Pat veal cutlets dry with paper towels. Dredge one veal cutlet in seasoned flour then coat with hot sauce and butter mixture. Place cutlet on top of panko blue cheese crumbs and gently press down to coat one side. Turn cutlet over and press down again gently to coat, including edges. Place on prepared baking sheet. Repeat with remaining cutlets
- Bake 10-15 minutes, or until internal temperature reaches 160 F.
- Cut rolls in half, add two cutlets per roll, top each with broccoli slaw mixture and drizzle lightly with Buffalo-style hot sauce.
Substitution: Ranch may be used for blue cheese.
Source: Veal.org

Power Family Meals with Protein-Packed Peanuts
(Family Features) Starting fresh with a new year is a chance to hit the reset button for many people, and your family can use this opportunity to rethink homemade meals while striving for nutritious (and still delicious) dishes. From snacks to the main course each evening, the options are nearly endless for planning a revamped menu with healthier ingredients.
Dinnertime can be a cinch with Peanut Butter Chicken, a simple dish that takes less than 20 minutes to make when busy evenings call for a quick solution. If a veggie-based option aligns better with your family's desires, try Veggie Sammies with Peanut Butter Satay Sauce or go full-on comfort food with Very Vegan Peanut Butter Jackfruit Chili. Snacking doesn't have to mean forgoing your dedication to nutritious choices either - these Peanut Granola Bars can be your made-at-home masterpiece for adults and children to enjoy.
These recipes from the Georgia Peanut Commission are powered by peanuts, a nutrient-rich superfood that delivers 19 vitamins and 7 grams of protein per serving for a health benefit punch in each bite.
Discover more nutritious recipe ideas at gapeanuts.com.

Veggie Sammies with Peanut Butter Satay Sauce
Prep time: 30 minutes
Servings: 2
- 4 tablespoons creamy peanut butter
- 3 tablespoons lime juice
- 2 tablespoons water
- 4 teaspoons hoisin sauce
- 2 teaspoons soy sauce
- 2 teaspoons sriracha
- 2 French baguette rolls (6 inches each)
- 1/2 cup cucumber, sliced
- 1/2 cup white onion, sliced into thin strips
- 1/2 cup red bell pepper, sliced into thin strips
- 1/2 cup purple cabbage
- 1/2 cup fresh cilantro
- In small bowl, combine peanut butter, lime juice, water, hoisin sauce, soy sauce and sriracha; mix well.
- Spread sauce on both sides of each roll then layer with cucumber, onion and bell pepper. Top with cabbage and cilantro.
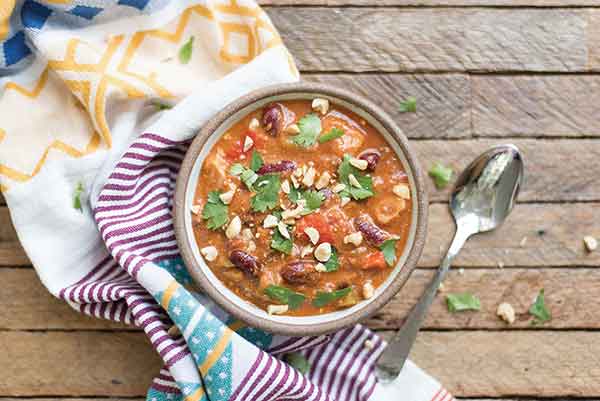
Very Vegan Peanut Butter Jackfruit Chili
Recipe courtesy of the National Peanut Board
Prep time: 5 minutes
Cook time: 35 minutes
Servings: 8
- 2 teaspoons oil
- 1/2 large white onion, chopped
- 1/2 green bell pepper, chopped
- 1/2 red bell pepper, chopped
- 2 garlic cloves, chopped
- 1/2 teaspoon salt
- 1 teaspoon cumin
- 1 teaspoon chili powder
- 1 tablespoon tomato paste
- 1 can crushed tomatoes
- 1 can whole tomatoes
- 2 cups water
- 1 can red kidney beans, drained and rinsed
- 1 can green jackfruit, drained and chopped
- 1/4 cup peanut butter
- cornbread (optional)
- tortilla chips (optional)
- cinnamon rolls (optional)
- eat large, heavy-bottomed pot over medium heat. Add oil, onion and peppers; cook 3 minutes, stirring often. Add garlic, salt, cumin, chili powder and tomato paste, stirring to coat. Cook 1-2 minutes, stirring constantly, then stir in crushed tomatoes, whole tomatoes, water, kidney beans and jackfruit; bring to boil then reduce heat to medium-low. Simmer 25-30 minutes. Stir in peanut butter and simmer 5 minutes.
- Serve with cornbread, tortilla chips or cinnamon rolls, if desired.
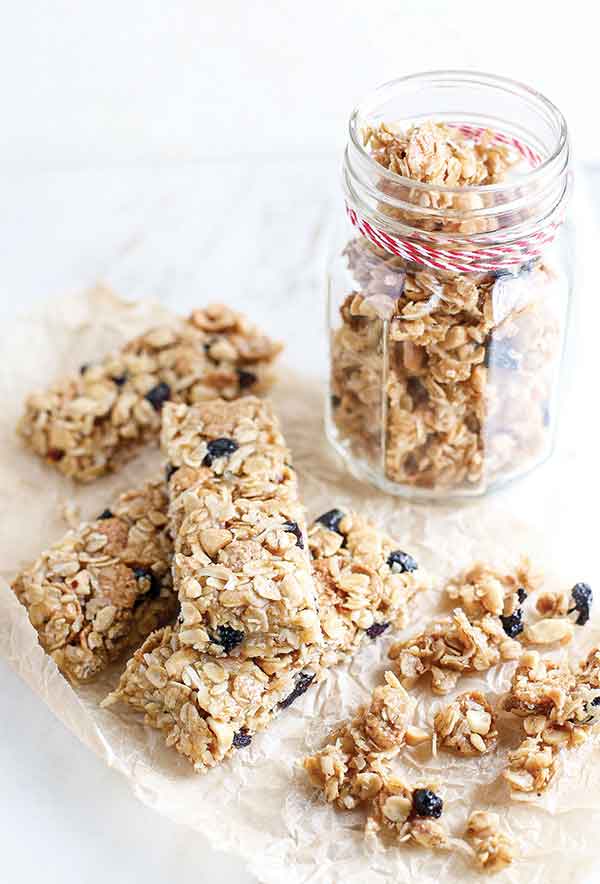
Peanut Granola Bars
Prep time: 10 minutes
Cook time: 6 minutes, plus 30-45 minutes cooling time
Servings: 12-14
- 1/2 cup honey
- 6 tablespoons unsalted butter
- 2 tablespoons creamy peanut butter
- 1/2 cup light brown sugar, firmly packed
- 1 teaspoon vanilla
- 1/4 teaspoon salt
- 2 cups rolled oats (quick or regular)
- 1 cup bran flakes
- 1 cup sweetened coconut flakes
- 1 cup dried fruit (raisins, blueberries or cranberries)
- 1 cup roasted peanuts, chopped
- In large, shallow, microwavable dish, combine honey, butter, peanut butter, brown sugar, vanilla and salt. Microwave at 50% power 2 minutes then whisk to combine and microwave at 50% power 2 minutes.
- Add oats, bran flakes, coconut flakes, dried fruit and peanuts; stir to combine. Microwave on high 1 minute. Stir and microwave 30 seconds.
- Press mixture into 13-by-9-inch baking dish lined with parchment or wax paper with some extra hanging over edges to easily lift bars out. Use bottom of glass wrapped with plastic wrap to press granola mixture firmly into pan. Allow to cool completely 30-45 minutes. Cut into 12-14 bars.
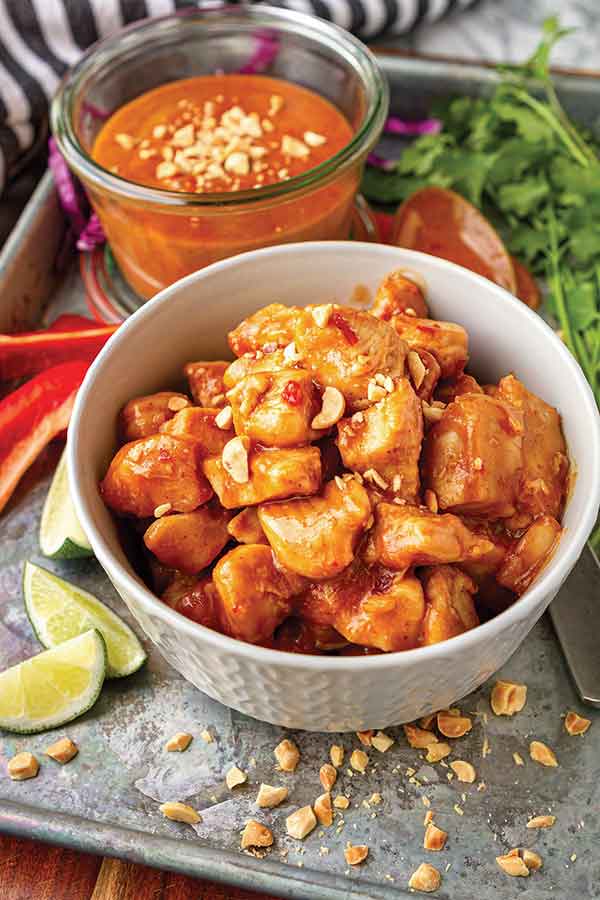
Peanut Butter Chicken
Recipe courtesy of "Unsophisticook"
Prep time: 5 minutes
Cook time: 12 minutes
Yield: 6 cups
Peanut Sauce:
- 1/2 cup creamy natural peanut butter
- 3 tablespoons sweet red chili sauce
- 1 tablespoon apple cider vinegar
- 1 tablespoon soy sauce
- 1 tablespoon honey
- 1/8-1/4 cup hot water (optional)
- chopped unsalted roasted peanuts (optional)
- 2 tablespoons olive oil or avocado oil
- 1 1/2 pounds boneless skinless chicken breasts, diced into 1-inch cubes
- 1 tablespoon soy sauce
- 3/4 cup peanut sauce
- cooked brown rice
- assorted bell peppers, sliced
- chopped unsalted roasted peanuts (optional)
- To make peanut sauce: In small glass bowl, whisk peanut butter, sweet red chili sauce, apple cider vinegar, soy sauce and honey until blended smoothly.
- Thin sauce with hot water to desired consistency. Garnish with chopped unsalted roasted peanuts, if desired.
- To make chicken: In large skillet over medium-high heat, drizzle oil. Add diced chicken then pour soy sauce over top. Saute about 10-12 minutes until chicken is fully cooked.
- Serve with peanut sauce, brown rice and colorful sliced veggies. Garnish with chopped unsalted roasted peanuts, if desired.
Source: Georgia Peanut Commission

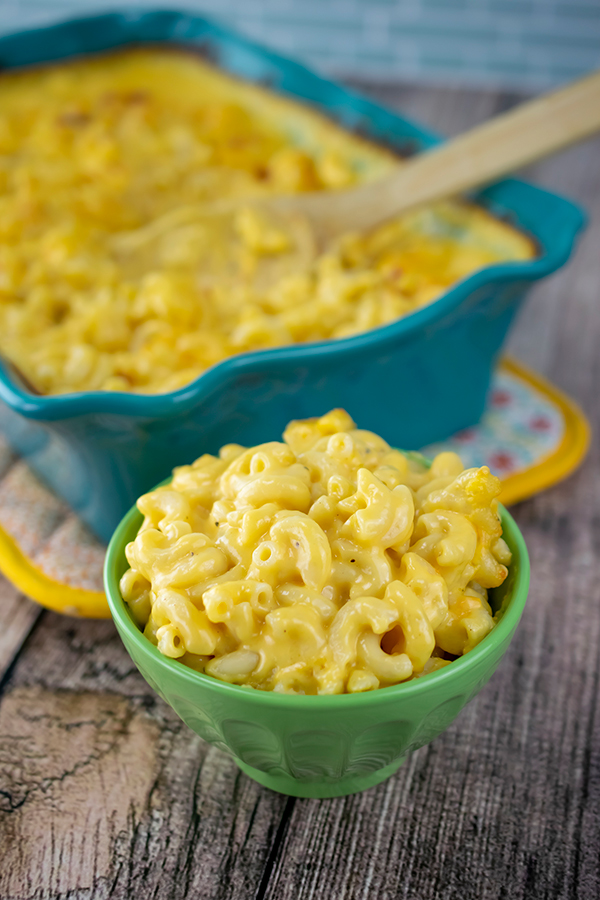
Creamy Macaroni and Cheese Casserole
(Culinary.net) There’s almost nothing better than keeping warm and cozy on cold winter days. One thing that can help make staying indoors more enjoyable is delicious, warm, perfectly baked food. Casseroles are hearty options for cold, brisk winter days with mixed ingredients baked in a hot oven and served in large scoops.
This Creamy Macaroni and Cheese Casserole is a twist on a childhood favorite (adult-approved, too). Adding a hint of seasoning, like dry mustard and onion powder, and making the cheese sauce with dairy and lots of shredded cheeses gives it just the right amount of flavor and kick.
This recipe is fairly simple, and kids will devour it in seconds. It’s creamy, cheesy and rich with ingredients that combine to create one spectacularly cozy comfort food. It’s baked to meld all those wonderful ingredients into one large masterpiece.
Start by following the package instructions to cook your noodles. Then melt butter, whisk in flour and stir. Next add your dairy and seasonings. Then it’s time for cheese. Combine the noodles and cheese sauce then bake. It only requires a few steps, with one cooking pot and one baking pan, and it’s guaranteed deliciousness.
Next time your family is stuck at home, try this recipe and see the smiles appear on your little ones’ faces as they gobble down every bite. It’s almost impossible to resist a recipe with 4 cups of shredded cheddar cheese and 1 cup of shredded Parmesan cheese. It’s what makes this recipe so gooey and delectable.
So when the wind is howling and there is snow on the ground, don’t fret about making a filling and satisfying dinner. This Creamy Macaroni and Cheese Casserole has you and your family covered.
Find more recipes and comfort food favorites at Culinary.net.
Watch video to see how to make this recipe!
Creamy Macaroni and Cheese Casserole
Servings: 4-6
- 12 ounces dry elbow macaroni
- 1/4 cup butter
- 1/4 cup flour
- 2 cups milk
- 1 cup heavy whipping cream
- 1/2 teaspoon dry mustard
- 1 teaspoon onion powder
- 1/2 teaspoon salt
- 1/8 teaspoon pepper
- 4 cups shredded sharp cheddar cheese, divided
- 1 cup shredded Parmesan cheese
- Heat oven to 425 F.
- Cook macaroni according to package directions. Drain and set aside.
- In large saucepan, melt butter over medium heat. Whisk in flour and cook 2 minutes, stirring continuously. Slowly whisk in milk, cream, mustard, onion powder, salt and pepper. Whisk and cook until thickened. Remove from heat and stir in cheeses until melted.
- In large bowl, add cooked macaroni and cheese sauce. Mix well and pour into greased 9-by-13-inch baking pan.
- Bake 18-24 minutes, or until bubbly. Cool slightly before serving.

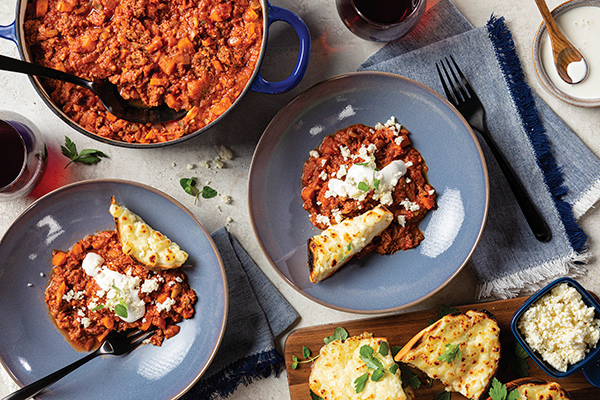
Uncovering the Top Mexican Food Trends for 2021
(Family Features) Many families constantly search for meal inspiration, and one of the best ways is to look toward trendy tastes for new options to add to the menu.
One of the country’s top Hispanic food brands, Cacique, tapped culinary experts and chefs Aarón Sánchez, Bricia Lopez and Santiago Gomez to curate the third annual “What’s Next in Mexican Cuisine” trends forecast uncovering popular flavors, techniques and dishes to expect in the coming year.
“One way we can all honor the impact of Latin culture in America is through food,” Sánchez said. “One easy step you can take to connect with a culture is by using authentic ingredients, like in this Chorizo Ragu with Cheesy Toast, which uses three staple Mexican ingredients – queso fresco, crema Mexicana and chorizo. It’s inspired by my prediction that Mexican comfort foods and deep, rich sauces made from scratch will rise in popularity.”
Consider these top Mexican food trends for 2021 according to Sánchez, Lopez and Gomez along with findings from a survey conducted by OnePoll on behalf of Cacique:
- The bread baking craze of 2020 will now include homemade corn and flour tortillas with 55% of Americans reaching for masa harina, flour and tortilla presses to make their own.
- Americans have a thirst for dehydrated chiles with varieties ranging from pasillas to anchos set to become more popular in American kitchens.
- Dried chiles, beans and cheeses such as queso fresco will find their way into more American kitchens as people adopt a “from scratch” approach and back-to-basics techniques.
- Coziness, meet Cozumel as Mexican comfort foods reign supreme and people gravitate toward nostalgic “homemade” style favorites like enchiladas.
- Get ready to dive into deep, rich sauces, including mole, which will continue to grow in popularity.
- Salsa macha will share the spotlight thanks to exploration of the breadth of salsa varieties that exist within Mexican cuisine.
- Food exploration will satisfy Americans’ wanderlust as 55% plan to travel less in 2021, and the same percentage report they’re looking to learn the stories behind famous Mexican recipes.
To find more trend-inspired recipes, visit caciqueinc.com.
Chorizo Ragu with Cheesy Toast
Recipe courtesy of chef Aarón Sánchez
- 3 bolillo-style rolls or 1 long baguette
- 2 tablespoons olive oil
- 1 yellow or white onion, chopped
- 2-3 carrots, chopped
- 1⁄2 teaspoon salt
- 6 cloves garlic, divided
- 8 ounces white or cremini mushrooms, chopped
- 2 tablespoons tomato paste
- 1 tablespoon dried oregano
- 1 teaspoon ground cumin
- 1 1⁄4 pounds ground beef
- 1 package (9 ounces) Cacique Pork Chorizo
- 1 can (28 ounces) crushed or pureed tomatoes
- 6 tablespoons unsalted butter, softened
- 9 tablespoons Cacique Crema Mexicana, plus additional for serving
- 1 1⁄2 cups crumbled Cacique Ranchero Queso Fresco
- Preheat oven to 400 F. Halve bread lengthwise.
- In heavy-bottomed pot, warm olive oil over medium heat. Add onions, carrots and salt then cook, stirring occasionally, until vegetables just start to soften, 3-4 minutes. Mince 2 garlic cloves and add to pot with mushrooms; cook about 3 minutes.
- Use spoon to push vegetables to edges of pan then add tomato paste, oregano and cumin to center of pan; saute until fragrant, 1-2 minutes.
- Increase heat to high and add beef and pork chorizo. Break meat up with spoon but don’t over-stir. When beef is no longer pink, pour in tomatoes and bring to simmer. Decrease heat to medium-high and let simmer, stirring occasionally.
- While ragu simmers, use fork to mash or whip butter with crema until smooth. Mince or finely grate remaining garlic cloves then stir into crema mixture.
- Spread crema mixture evenly over bread, trying to cover as much area as possible. Sprinkle crumbled queso fresco all over and place bread on rimmed baking sheet, cheese side up. Toast 4-5 minutes until cheese is melted and bubbling. Finish under broiler 30-60 seconds for deeper browning, if desired. Cut bread into individual portions.
- After about 20 minutes of simmering, ragu should thicken and flavors meld. Swirl in additional crema then serve ragu in bowls with cheesy toast or ladle over pieces of toast.
Source: Cacique

Popping Up Festive Holiday Fun
(Family Features) During a holiday season that may not quite feel the same for many families, you can add a magic touch to at-home festivities with activities and treats that get everyone involved. Creating decorative holiday sweets allows little ones and grown-ups alike to take part in the fun, and the end result is delicious desserts for all to enjoy.
Start with a main ingredient like whole-grain, freshly popped popcorn. At 30 calories a cup, it’s naturally low in fat, non-GMO and gluten-free for a nutritious alternative to traditional holiday indulgences. It’s a clever way to create artsy representations of the season at hand that celebrate festive flavors like peppermint, coconut, chocolate and other sweet eats.
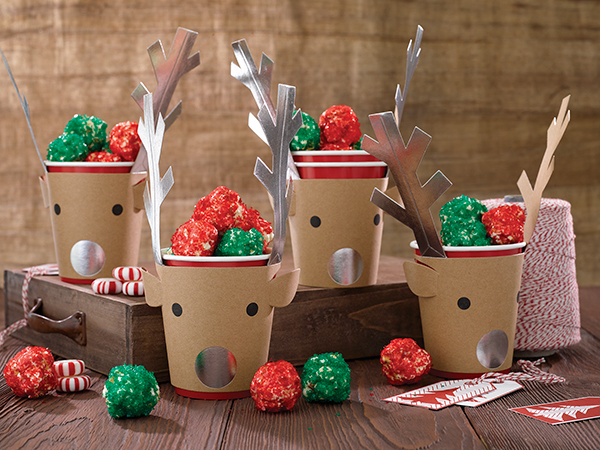
For example, Coconut Popcorn Snowballs add fun and flavor to wintertime with a coat of sweetened coconut “snow” and candy cane handle while easy-to-construct Holiday Popcorn Snowmen are sure to be a hit with your children. Add to the holiday spirit throughout your home with wintery Jingle Balls that call for colored sugars to create a magical sparkling effect then take the creativity to the next level by encouraging kids to make their own red-nosed, sleigh-pulling team of Chocolate Popcorn Reindeer.
Discover more decorative dessert recipes at popcorn.org.
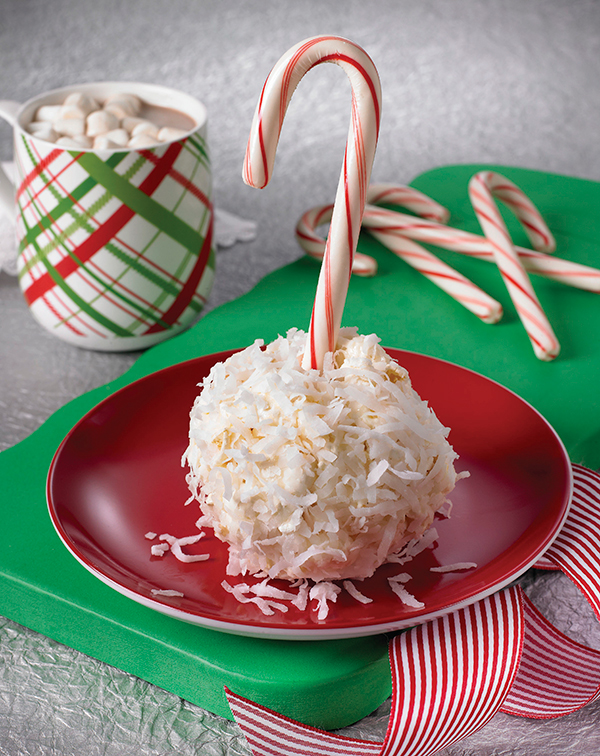
Coconut Popcorn Snowballs
Yield: 8 balls (4 inches)
- 2 cups shredded or flaked sweetened coconut
- nonstick cooking spray
- 3 quarts popped popcorn
- 4 tablespoons (1/2 stick) butter or margarine
- 3 cups miniature marshmallows
- 1 teaspoon coconut or vanilla extract
- 8 candy canes or candy cane sticks (about 3-4 inches)
- Place large sheet wax or parchment paper over work surface. Spread coconut on paper.
- Spray large mixing bowl lightly with nonstick cooking spray and place popcorn inside.
- In medium saucepan, melt butter over low heat. Stir in marshmallows until melted and mixture is smooth. Pour over popcorn and mix well until coated.
- Spray hands with cooking spray and press mixture firmly to form into balls. Place balls on coconut; roll and press coconut to coat. While holding popcorn balls, gently press candy cane into each ball.
- Serve immediately or wrap individually in plastic wrap for storage.
Jingle Balls
Yield: 12 cups
- Nonstick cooking spray
- 12 cups popped popcorn
- 6 tablespoons butter or margarine
- 3 cups mini marshmallows
- 1/2 teaspoon peppermint extract
- assorted colored sugars
- Spray large mixing bowl lightly with nonstick cooking spray. Add popcorn.
- Spread plastic wrap on cookie sheet; set aside.
- In medium saucepan, melt butter and marshmallows; stir until mixture is smooth. Stir in peppermint extract. Pour over popcorn, mixing until well coated. Let cool 2 minutes.
- Spray hands with nonstick cooking spray and form popcorn mixture into 3-inch balls. Gently press colored sugar onto balls. Let sit on prepared cookie sheet until cool and set.

Chocolate Popcorn Reindeer
Servings: 8
- 8 cups unsalted, unbuttered, popped popcorn
- 2 1/2 cups mini marshmallows
- 1/2 cup chopped dark chocolate or dark chocolate chips
- 2 tablespoons butter or light olive oil
- 1/4 teaspoon salt
- 16 pretzel sticks
- 16 eyeball candies
- 8 red candy-coated
- chocolate candies
- Place popcorn in large mixing bowl.
- In saucepan over medium heat, heat marshmallows, chocolate, butter and salt, stirring often, until smooth. Toss marshmallow mixture with popcorn until well combined.
- Scoop 3/4 cup popcorn mixture into ball. Repeat with remaining mixture to make eight balls. Place each ball in paper muffin cup liner.
- Insert one pretzel stick on each side of ball to resemble antlers, attach two eyeball candies for “eyes” and one red chocolate candy for “nose.” Repeat with remaining balls. Let cool completely.

Holiday Popcorn Snowmen
Yield: 5 snowmen
- 1 package (1 pound) large marshmallows
- 1/4 cup (1/2 stick) butter or margarine, plus additional for greasing hands
- 1 teaspoon vanilla
- 10 cups popped popcorn
- sprinkles (optional)
- licorice (optional)
- gum drops (optional)
- cinnamon candies (optional)
- In large saucepan, melt marshmallows and 1/4 cup butter. Remove from heat and stir in vanilla. Let stand 5 minutes.
- Pour marshmallow mixture over popcorn and stir. Butter hands well and form into balls.
- Decorate with sprinkles, licorice, gum drops and cinnamon candies, if desired.
Popcorn Board