Sloppy Joe Mini Tacos
(Family Features) Liven up your mealtime routine with the fresh global flavors of an at-home fiesta for a memorable way to rethink your menu. With nearly countless ways to spice up the kitchen using inspiration from around the world, it’s easy to find something new and exciting.
For example, these Sloppy Joe Mini Tacos from “The New York Times” bestselling cookbook author Stephanie Banyas offer a true flavor fusion. The lively blend of ground turkey or pork chorizo, cheeses, spices and veggies pop when combined with the high-quality ingredients of Fresh Cravings Salsa.
These boldly flavored salsas are made with vine-ripened tomatoes, crisp onions, zesty peppers and spices. Plus, they’re never cooked or pasteurized, meaning you’re enjoying a vibrant dip that’s never soggy or dull. Available in a range of heat levels among restaurant style, chunky and pico de gallo, they complement any at-home fiesta.
“This is the ultimate mashup of two school lunch favorites: Sloppy Joes and Tacos,” Banyas said. “It includes some serious attitude thanks to Fresh Cravings Salsa’s hearty blend of diced tomatoes, onions, fragrant cilantro and Anaheim and Serrano chili peppers.”
Visit freshcravings.com for more ways to spice up your at-home fiesta.
Watch video to see how to make this recipe!

Sloppy Joe Mini Tacos
Recipe courtesy of Stephanie Banyas
Yield: 12-15 tacos
- 1 container (16 ounces) Fresh Cravings Restaurant Style Salsa (mild or medium)
- 3 tablespoons ketchup
- 2 tablespoons yellow, brown or Dijon mustard
- 2 teaspoons Worcestershire sauce
- 2 heaping tablespoons light brown sugar
- 2 tablespoons vegetable oil
- 8 ounces ground turkey or pork chorizo
- 8 ounces 90% lean ground chuck or turkey
- salt, to taste
- freshly ground black pepper, to taste
- 1/4 cup water
- 15 tortillas
- 1/4 cup finely chopped fresh cilantro leaves
- 1 cup crumbled cotija cheese
- 1 cup shredded Mexican blend cheese (optional)
- 1/2 red onion, thinly sliced, soaked in ice water 30 minutes and drained
Avocado Mash:
- 1 ripe Haas avocado, halved, pitted and removed from skin
- 2 tablespoons finely diced red onion
- 1/2 lime, juice only
- salt, to taste
- pepper, to taste
- Preheat oven to 300 F.
- In blender or food processor, process salsa until smooth. Remove 1/2 cup processed salsa and set aside for garnish.
- In medium bowl, mix remaining salsa, ketchup, mustard, Worcestershire sauce and brown sugar until combined.
- In large saute pan over high heat, heat oil until it begins to shimmer. Add chorizo and ground meat; season with salt and pepper, to taste. Cook, breaking up meat with wooden spoon, until golden brown and just cooked through, about 8 minutes.
- Add salsa mixture and water; bring to boil, reduce heat to medium and cook, stirring occasionally, until mixture thickens, about 10 minutes. Taste for seasoning.
- Wrap tortillas tightly in foil and heat in oven 10 minutes. Remove and keep wrapped tightly until ready to serve.
- To make avocado mash: In medium bowl, coarsely smash avocado halves with fork. Add onion and lime juice then season with salt and pepper, to taste, and gently mix to combine.
- Place tortillas on flat surface, top each with meat mixture and garnish as desired with reserved salsa, avocado mash, cotija, Mexican cheese and sliced red onion.
Source: Fresh Cravings
Cheesy Baked Cod
(Culinary.net) During the spring months, fish can be a popular food for at-home meals. It’s a perfect nutritious option during Lent, and it’s flaky and delicious for seafood lovers and families of all kinds throughout the year.
This Cheesy Basil Cod has a light crust and a glistening center, which creates a delicious bite of texture. Serve it with rice and vegetables to complete a better-for-you dinner that’s packed with nutrients as well as flavor.
This recipe, rich with cheese and seafood delight, serves four but is easy to double for a larger crowd. It requires just a few kitchen utensils and bakes for less than 15 minutes for a quick meal that’s easy to clean up.
For more seafood recipes, visit Culinary.net.
Watch video to see how to make this recipe!
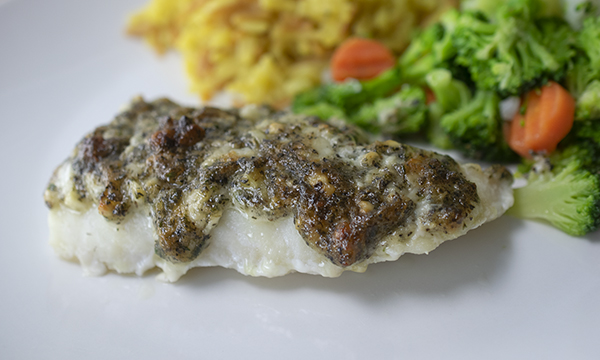
Cheesy Baked Cod
Recipe adapted from Laurenslatest.com
Servings: 4
- 3 cod fillets (12 ounces each)
- 1/2 cup mayonnaise
- 1/2 cup freshly grated Parmigiano Reggiano cheese
- 1 tablespoon parsley flakes
- 2 tablespoons basil leaves
- 2 cloves garlic, minced
- 1/4 teaspoon salt
- 1/4 teaspoon pepper
- rice, for serving (optional)
- steamed vegetables, for serving (optional)
- Preheat oven to 450 F.
- Line baking sheet with parchment paper. Place fish fillets on baking sheet and set aside.
- In small bowl, stir mayonnaise with cheese, parsley, basil, garlic, salt and pepper. Spread evenly over fillets. Bake 10-12 minutes, or until fish starts looking flaky.
- Switch oven to broil and brown tops of fish until lightly golden. Remove from oven; cool 3-5 minutes.
- Serve with rice and fresh steamed vegetables, if desired.
Source: Culinary.net
Step Into Spring with a Sweet, Fresh Meal
Family Features) As the weather turns the corner and temperatures rise, opportunities for dining outdoors and soaking up the sunshine abound. Patio meals often mean fresh flavors, making spring a perfect time for heading outside with your favorite seasonal dishes.
The freshness of Texas 1015 Sweet Onions is an ideal starting point for recipes that heighten the enjoyment of al fresco dining. As the first spring sweet onion of the season, they’re harvested and packed fresh, meaning they’re never stored. Plus, with no burning sensation when you cut them, you can skip the tears for more enjoyable meal prep.
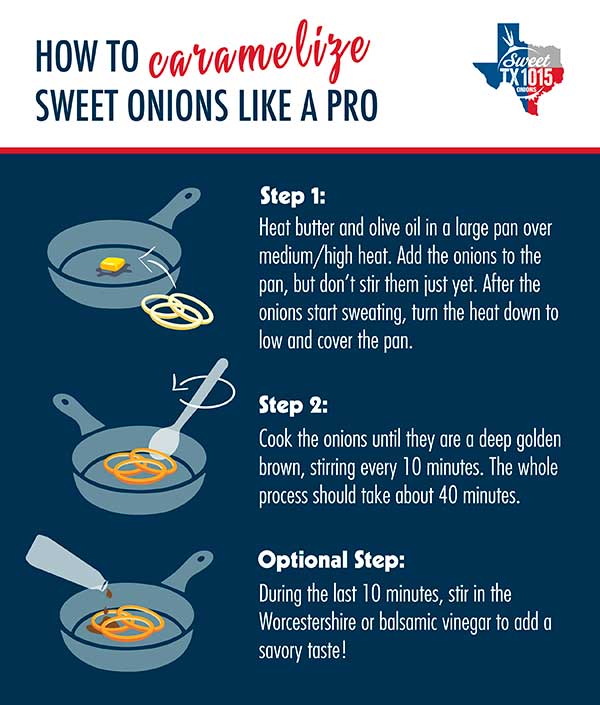
It’s a versatile veggie that can be grilled, roasted, eaten fresh or caramelized for delightful recipes like this Flatbread with Caramelized Onions, Bacon and Arugula. Start by heating butter and olive oil then allow the onions to rest in the mixture; once they’re sweating, turn the heat down and cover the pan. Stirring every 10 minutes, cook for about 40 minutes until the onions reach a deep golden brown. In the final 10 minutes, stir in balsamic vinegar for savory flavor.
Layer the sweet, caramelized concoction along with cheese and bacon on a flatbread. Bake (or grill, if the weather allows) for 15 minutes before topping with fresh arugula for a lighter dish that reminds you springtime has arrived.
Find more recipes to celebrate spring at tx1015.com.
Storage Tips for Sweet Onions
Short-term storage for sweet onions is simple: If using them within a week, just leave them out on the counter. However, if you’re stocked up and thinking beyond a handful of days, consider these tips for keeping them fresh long-term.
- Wrap and separate. If you plan to store in the refrigerator, wrap each bulb individually in a paper towel. Place the bulbs in the crisper with the vents closed.
- Break out the pantyhose. Because sweet onions can be preserved if stored in a cool, dry place with air circulation, you can put one onion in each leg of clean pantyhose then tie a knot above the onion. Keep adding onions until each leg is full. Each time you need one, simply cut the sections based on the number of onions you need.
- Keep away from spuds. Although they pair perfectly in dozens of recipes, for storage purposes, onions and potatoes don’t play nice. Storing together can cause onions to go bad quicker.
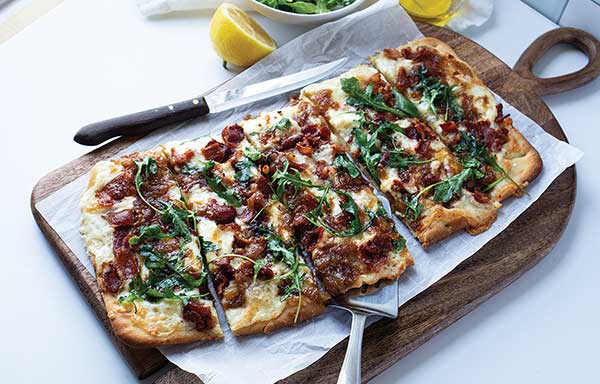
Flatbread with Caramelized Onions, Bacon and Arugula
Recipe courtesy of South Texas Onions
Servings: 2-3
- 1 tablespoon butter
- 1/2 tablespoon olive oil
- 1 large sweet onion, sliced
- 1/2 teaspoon balsamic vinegar
- 1 naan flatbread (rectangular shape)
- 1 cup cheddar cheese, shredded
- 1 cup fontina cheese, shredded
- 4 slices bacon
- arugula
- olive oil (optional)
- lemon juice (optional)
- To make caramelized onions: In pan over medium-high heat, heat butter and olive oil. Add onions and let sit about 5 minutes. Once onions start sweating, turn heat to low and cover pan. Cook onions to deep golden brown, stirring every 10-15 minutes. With 10 minutes left, stir in balsamic vinegar.
- To make flatbread: Preheat oven to 425 F.
- On flatbread, layer cheese, bacon and caramelized onions. Bake 13-15 minutes, or until cheese is bubbly and edges are golden brown.
- Toss arugula with olive oil and lemon juice, if desired, before placing on flatbread.
Source: South Texas Onions
5 Steps for Mastering Family Meal Planning
(Family Features) As you and your family embark on a mission to create delicious, nutritious meals all while saving money, it’s key to remember meal planning is essential for success. From tracking a list of ingredients you’ll need to noting your loved ones’ favorite foods, there are some easy steps you can take to make dinners at home enjoyable and budget friendly.
Getting on track with your own plan can start with these tips from Healthy Family Project’s Mission for Nutrition, which aims to help families find weekly meal success with an internationally inspired e-cookbook including grocery lists, recipe ideas and cooking hacks.
Work together. Before heading to the store or heating up the oven, sit down with your loved ones and make a list of easy-to-make recipes you all enjoy. Each time you discover a new favorite, add it to the list so you’ll have a reference guide when it’s time to plan a week’s worth of meals.
Stick to a schedule. Set a day and time each week your family can meet and plan out dinners. This also offers an opportunity to bring to light any newfound favorites or fresh ideas while bringing everyone to the same room for quality time together.
Plan time-saving processes. Think ahead while planning meals and consider the equipment you’ll need. Saving time while cooking can be as easy as sticking to recipes that call for hands-off appliances like a slow cooker or pressure cooker and using a food processor rather than a knife and cutting board.
Schedule a “leftovers night.” When you prep dinners that call for crossover ingredients, it’s easier to turn one meal into two. For example, buying sweet onions and chicken breast to make Chicken Apple Enchiladas means you’ll have those ingredients on hand for Greek Chicken Bowls later in the week.
Make a list. Once you’ve decided on recipes for the week, create a list of all the ingredients you’ll need. While you’re at the store, stick to your plan and avoid impulse buys to help stay on track while getting in and out quicker.
Find more recipes and meal planning tips by downloading the free e-cookbook at healthyfamilyproject.com/mission-for-nutrition and join the conversation by following #missionfornutrition on social media.
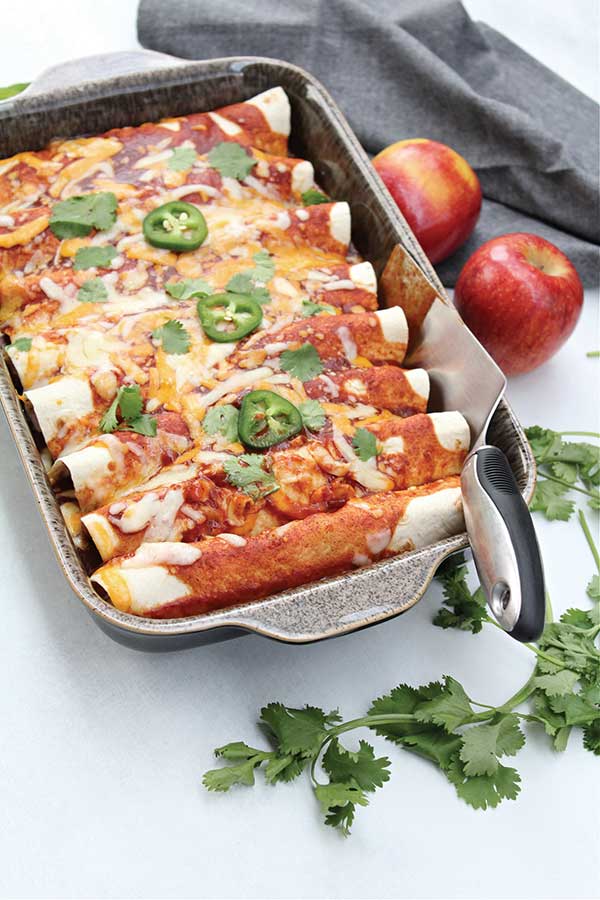
Chicken Apple Enchiladas
Recipe courtesy of Healthy Family Project's Mission for Nutrition
- 1/2 sweet onion, diced
- 1 jalapeno, diced
- 1 Envy or Jazz apple, diced
- 2 cups cooked shredded chicken
- 8 flour tortillas
- 6 ounces shredded Mexican blend cheese, divided
- 1 can red enchilada sauce
- cilantro (optional)
- Heat oven to 350 F.
- In skillet, cook onions until translucent. Add jalapeno and apple; saute 2-3 minutes.
- Add cooked chicken and mix well. Remove from heat.
- Lay out tortillas and sprinkle cheese on each. Add chicken mixture and roll. Place in baking dish and cover with enchilada sauce.
- Bake 20 minutes, or until heated throughout.
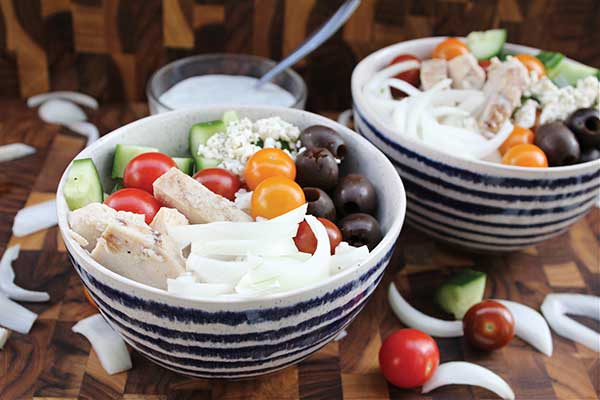
Greek Chicken Bowls
Recipe courtesy of Healthy Family Project's Mission for Nutrition
- 1 cup cooked white or brown rice
- 1 grilled chicken breast, sliced
- 1 RealSweet onion, sliced
- 1 cup cherry tomatoes
- 1 cucumber, cut into quarters
- 1/2 cup black olives
- 1 tablespoon feta cheese
- 2 tablespoons tzatziki sauce
- Place cooked rice and chicken in bowls.
- Top each bowl with sweet onions, tomatoes, cucumbers and black olives. Sprinkle each with feta cheese. Drizzle each with tzatziki sauce.
Source: Healthy Family Project
St. Patrick's Day Sandwiches
(Culinary.net) Freshen up your St. Patrick’s Day menu with easy, light sandwiches inspired by the traditional color of the festivities. These open-faced noshes can be perfect for lunch, snack time or even as an appetizer for get-togethers with friends and family.
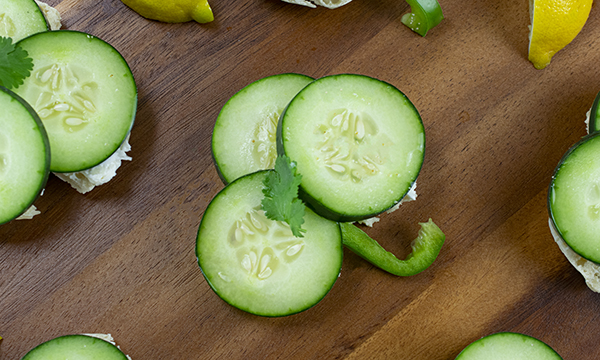
Layered with a smooth cream cheese and mozzarella mixture then topped with crisp cucumber and a stem of green bell pepper, these St. Patrick’s Day Sandwiches are easy and cute, which makes them a fan favorite at nearly any green gathering. They’re also sprinkled with lemon juice to add a little acidity and create a nice, light bite.
Plus, this recipe is quick to make. When you’re in a rush to get everything on the table for the party, it’s easy to throw together and get on the platter in next to no time.
The sandwiches pop off the plate with their bright, seasonal garnishes. While sure to attract attention and have your loved ones asking “Where did you get this idea?” they’re also an easy way to sneak a few vegetables into your kids’ diets.
For more festive recipes and ideas at Culinary.net.
Watch video to see how to make this recipe!
St. Patrick’s Day Sandwiches
Yield: 8 sandwiches
- 8 ounces plain cream cheese spread, softened
- 1 cup finely shredded mozzarella cheese
- salt
- 4 English muffins
- 24 slices cucumber
- 8 thin slices green pepper
- fresh cilantro leaves
- lemon juice
- lemon slices, for garnish (optional)
- In bowl, mix cream cheese spread, mozzarella cheese and salt well.
- Split English muffins in half. Cut each muffin half into shamrock shape.
- Spread cheese mixture over each muffin half.
- Place three cucumbers on each “shamrock,” one on each “leaf.” Use green pepper slice as stem. Place cilantro leaf on top of each sandwich.
- Sprinkle sandwiches with lemon juice and add lemon slices, for garnish, if desired.
Source: Culinary.net
Stuffed Peppers
(Family Features) Gear up for a game day experience to remember with satisfying snacks that energize your crowd. As almost everyone’s favorite part of homegating, the foods you serve can elevate your watch party from benchwarmer to all star status.
Delicious snacks that include salsa offer an easy-to-make option that keeps fans cheering the entire game. According to the Game Day Eats Report from Fresh Cravings, 22% of guests would insist on running out to pick up salsa if it wasn’t available for the feast; 18% would even be devastated and consider leaving.
Consider these Stuffed Peppers from chef Anthony Serrano, a simple snack he makes for his family on game day for a crowd-pleasing solution that scores high fives from the opening play to the final whistle.
Made with the bold flavors of Fresh Cravings Salsa and its combination of vine-ripened tomatoes, crisp vegetables, zesty peppers and spices, it’s a vibrant way to add some authentic homemade taste to the table.
Visit FreshCravings.com for more homegating appetizers and snacks.
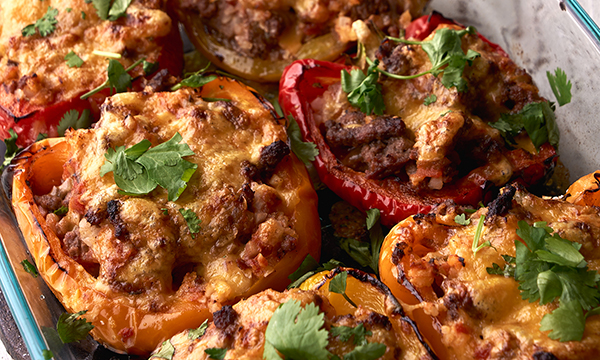
Stuffed Peppers
Recipe courtesy of chef Anthony Serrano
- 6 bell peppers, halved lengthwise and deseeded
- 1 tablespoon avocado oil
- 1 teaspoon sea salt
- 16 ounces Fresh Cravings Chunky Style Salsa
- 2 cups riced cauliflower (fresh or frozen)
- 2 cups shredded cheddar cheese, divided
- 2 pounds 80% lean ground beef, cooked, lightly seasoned and drained
- 1 bunch cilantro, chopped
- Heat grill to medium-high heat.
- Brush both sides of bell peppers with avocado oil and season with salt. Grill peppers on each side 2-3 minutes, or until grill marks appear. Remove from heat and allow to cool slightly.
- Add salsa, riced cauliflower and 1 cup cheddar cheese to cooked ground beef. Stir and return to heat until cheese begins to melt.
- Place bell peppers on sheet pan or casserole dish. Use large spoon to fill peppers with ground beef mixture. Top stuffed peppers with remaining cheese.
- Return to grill and grill approximately 15-20 minutes, or until cheese begins to caramelize.
- Remove from heat and let cool slightly. Garnish with cilantro.
Source: Fresh Cravings
Alaskan Salmon Burgers with Peppered Bacon
(Family Features) Warm weather and grilling go hand-in-hand, and few dishes say summer like burgers. While traditional beef patties come to mind for many, there are also healthy protein options to satisfy that burger craving without sacrificing flavor.
For example, salmon is a nutritionally well-rounded alternative that offers a variety of health benefits, and an option like gluten-free Trident Seafoods Alaska Salmon Burgers are made with wild, sustainable, ocean-caught whole filets with no fillers and are lightly seasoned with a “just-off-the-grill,” smoky flavor. Topped with melted cheddar then piled on top of fresh arugula, peppered bacon and zesty mayo, these Alaskan Salmon Burgers with Peppered Bacon are a twist on tradition that can help you put a protein-packed, flavorful meal on the table in minutes.
Find more healthy seafood recipes at tridentseafoods.com.
Watch video to see how to make this recipe!
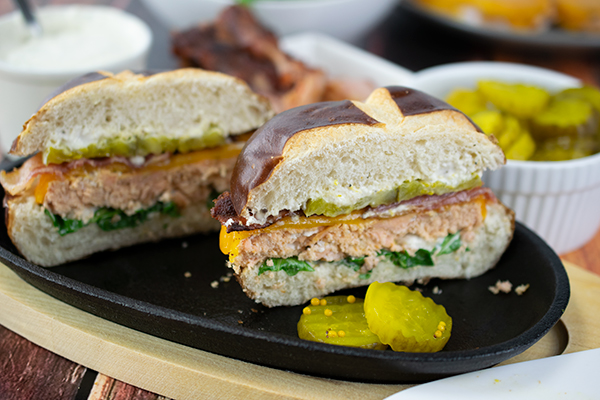
Alaskan Salmon Burgers with Peppered Bacon
Prep time: 13 minutes
Servings: 4
- 1/2 cup mayonnaise
- 1 1/2 tablespoons lemon juice
- 1/2 teaspoon lemon zest
- salt
- pepper
- 1 box (11.2 ounces) Trident Seafoods Alaska Salmon Burgers
- 4 cheddar cheese slices
- 4 seeded burger buns, split and toasted
- 4 cups arugula
- 6 strips peppered bacon, cooked
- 12 bread-and-butter pickles, drained
- In small bowl, combine mayonnaise, lemon juice and lemon zest. Season with salt and pepper. Set aside.
- Cook salmon burgers according to package directions. When almost cooked through, top each with slice of cheese, cover and cook until melted.
- Spread cut sides of buns with mayonnaise and top bottom buns with arugula. Cover with salmon burgers, bacon, pickles and top buns.
Source: Trident Seafoods
Build a Better-for-You Menu in 2022
(Family Features) Committing to healthier habits in the new year often starts in the kitchen. Adding better-for-you recipes to your arsenal is the start of a more nutrition-focused lifestyle, and whether you’re a true home chef or just learning the basics, these dishes can be the gateway to a healthier you.
From fresh spins on family night and quick solutions in a pinch to homemade lunches and satisfying salads, consider these delicious and nutritious ways to enhance your homemade meals in 2022.
Visit Culinary.net to find more health-conscious recipe ideas.
A Fresh Take on Family Dinner
If your family gets stuck in a dinner routine rut, it can feel like you’re eating the same recipes over and over again.
However, this fresh and unique recipe for Cuban Chicken with Salsa Fresca might inspire you to think outside the culinary box and give your family members the satisfactory flavor they desire at dinnertime. With fresh ingredients and a wholesome flavor, this meal is perfect to add to your menu.
Find more recipes and family dinner ideas at Culinary.net.
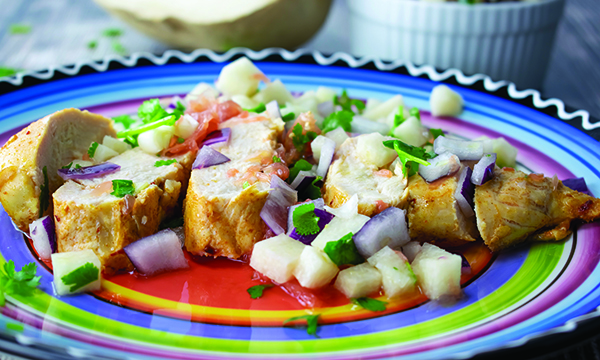
Cuban Chicken with Salsa Fresca
Servings: 5
- 1 cup grapefruit juice
- 2 tablespoons olive oil
- 2 teaspoons garlic powder
- 2 teaspoons cumin
- 2 teaspoons paprika
- 1 teaspoon crushed red pepper
- 1 1/4 pounds boneless, skinless chicken breasts
Salsa Fresca:
- 1 cup grapefruit segments
- 1/2 jicama, cubed
- 1/2 red onion, chopped
- 3/4 cup grapefruit juice
- 4 tablespoons olive oil
- 1/2 cup fresh cilantro, chopped
- 1 jalapeno pepper, chopped
- Heat oven to 400 F.
- In large bowl, mix grapefruit juice, oil, garlic powder, cumin, paprika and red pepper until combined. Add chicken to bowl and turn to coat. Refrigerate 30 minutes or longer.
- To make salsa fresca: In medium bowl, mix grapefruit segments, jicama, red onion, grapefruit juice, olive oil, cilantro and jalapeno pepper until combined. Refrigerate until ready to serve.
- Remove chicken from marinade. Place chicken in baking dish. Bake 25-30 minutes until chicken is cooked through.
- Serve chicken with salsa fresca.
Take Your Salad from Bland to Bold
Step aside, boring salads. A new year and a healthier eating plan can include better-for-you greens and dressings that hit the spot.
Veggies roasted with aromatic spices served on Fresh Express 5-Lettuce Mix are drizzled with lemon tahini dressing in this Moroccan Roasted Vegetable Salad, a delicious vegetarian way to turn a bland meal into a bona fide delight. With green leaf lettuce, red leaf lettuce, butter lettuce, romaine and radicchio, the mix of greens offers a bold combination of textures and flavors for those who love variety and color.
Find more ways to enhance your at-home salads at FreshExpress.com.
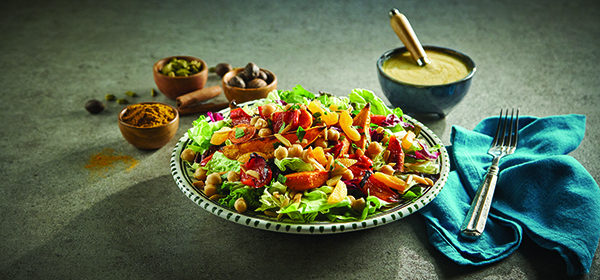
Moroccan Roasted Vegetable Salad
Prep time: 20 minutes
Cook time: 20 minutes
Servings: 4
Lemon Tahini Dressing:
- 1/4 cup tahini
- 1/4 cup olive oil
- 3 tablespoons lemon juice
- 3 teaspoons maple syrup
- 2 teaspoons Dijon mustard
- 1/4 teaspoon salt
- 2 tablespoons cold water
- nonstick cooking spray
- 6 tablespoons olive oil
- 2 teaspoons ras el hanout or garam masala
- 1/2 teaspoon salt
- 1/4 teaspoon pepper
- 4 sweet potatoes, peeled and cut into long wedges
- 4 whole large carrots, chopped
- 2 red bell peppers, cored and cut into 1-inch pieces
- 2 packages (6 ounces each) Fresh Express 5-Lettuce Mix
- 1 can (15 1/2 ounces) chickpeas, rinsed and drained
- 1/3 cup dried apricots, sliced
- 1/3 cup slivered almonds, toasted
- 2 tablespoons Italian parsley, chopped
- To make lemon tahini dressing: In small bowl, whisk tahini, olive oil, lemon juice, maple syrup, Dijon mustard and salt. Add cold water; mix well. If dressing thickens, mix in more cold water.
- Heat oven to 400 F. Spray two baking sheets with nonstick cooking spray.
- In large bowl, mix olive oil, ras el hanout, salt and pepper. Add sweet potatoes; toss to coat. Transfer to first prepared baking sheet. Add carrots and peppers to leftover oil; toss to coat. Transfer to second prepared baking sheet. Bake 15-20 minutes, or until vegetables are tender. Let cool.
- Arrange lettuce mix on four plates. Top each with sweet potatoes, carrots, red pepper, chickpeas, apricots and almonds. Drizzle with dressing and sprinkle with parsley.
A Lean, Nutritious Lunch
Meal prepping is one of the most common strategies for improving eating habits, however, this tactic is often focused primarily on nutritious breakfasts and family dinners. Don’t let lunch go by the wayside; you can skip the fast food breaks by opting for a recipe you can make quickly at home.
Made with nutritious Wisconsin Potatoes loaded with goodness, low in calories, high in fiber and a good source of vitamin B6, potassium, vitamin C and antioxidants, a Turkey-Potato Wrap provides a simple solution for swapping out saltier foods for a lean lunch. By making four at a time in just half an hour, lunch is served for most of your work week to help save time on busy mornings while adding vitamins, nutrients and antioxidants to your afternoon meal.
Find more better-for-you recipe ideas at eatwisconsinpotatoes.com.
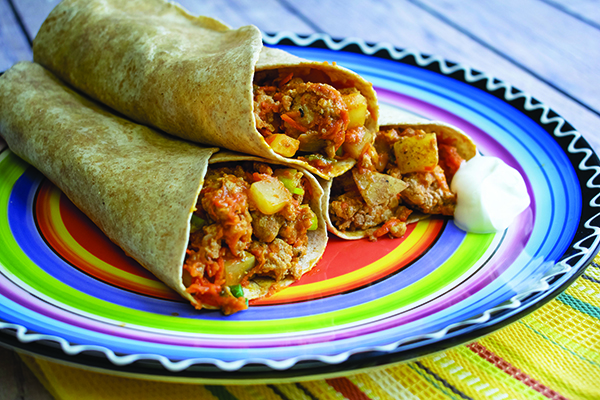
Turkey-Potato Wrap
Recipe courtesy of Wisconsin Potatoes
- 3/4 pound Wisconsin russet potatoes, cut into 1/2-inch pieces
- 1 tablespoon water
- 1 tablespoon canola oil
- 3/4 pound ground lean turkey
- 1 large carrot, shredded
- 1/3 cup sliced green onions with tops
- 1 can (8 ounces) tomato sauce
- 2/3 cup shredded cheddar cheese
- 1 teaspoon dried Italian seasoning or basil
- salt, to taste
- pepper, to taste
- 4 large whole-wheat or high-fiber tortillas
- light sour cream (optional)
- Place potatoes in microwave-safe bowl; sprinkle with water. Cover, venting one corner. Microwave on high 5-8 minutes until potatoes are tender.
- In large nonstick skillet over medium-high heat, heat oil. Add and break up turkey; cook 5 minutes, tossing occasionally. Mix in carrot; cook 2 minutes. Add potatoes and onions; toss and cook 2 minutes. Reduce heat to medium; mix in tomato sauce, cheese and Italian seasoning.
- Cook, stirring occasionally, 4-5 minutes until mixture is hot and most sauce is absorbed. Season with salt and pepper, to taste. On work surface, lay out tortillas. Place 3/4 cup hot turkey mixture on each; fold and roll for burritos.
- Cut in halves. Serve each with sour cream, if desired.
- Eating Well When You’re Short on Time
- Committing to a better eating plan doesn’t change the fact there are simply times when a hectic schedule calls for a quick solution.
- When you need an easy-to-make lunch or dinner, opt for this Loaded Smoked Salmon Rice Bowl that takes just 5 minutes for a satisfying meal. With Minute’s fully cooked Ready to Serve Brown Rice, it’s easy to add whole grains to your diet even when you’re short on time. One cup of cooked brown rice is equal to two servings of whole grains, making it a nutritious option when time is of the essence.
- Packaged in convenient, single-serve, BPA-free cups, the brown rice cups provide a quick, easy solution for dishes from breakfast to dessert. Ready in just 1 minute, they’re non-GMO, gluten free and cholesterol free with no preservatives.
Find more easy-to-assemble recipes at MinuteRice.com.
Eating Well When You’re Short on Time
Committing to a better eating plan doesn’t change the fact there are simply times when a hectic schedule calls for a quick solution.
When you need an easy-to-make lunch or dinner, opt for this Loaded Smoked Salmon Rice Bowl that takes just 5 minutes for a satisfying meal. With Minute’s fully cooked Ready to Serve Brown Rice, it’s easy to add whole grains to your diet even when you’re short on time. One cup of cooked brown rice is equal to two servings of whole grains, making it a nutritious option when time is of the essence.
Packaged in convenient, single-serve, BPA-free cups, the brown rice cups provide a quick, easy solution for dishes from breakfast to dessert. Ready in just 1 minute, they’re non-GMO, gluten free and cholesterol free with no preservatives.
Find more easy-to-assemble recipes at MinuteRice.com.
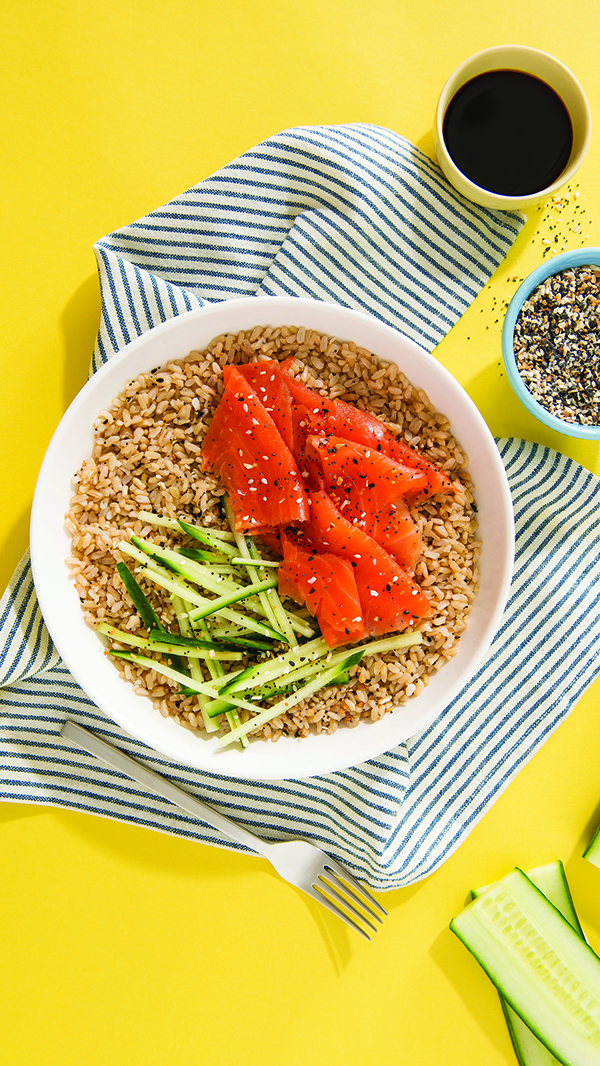
Loaded Smoked Salmon Rice Bowl
Prep time: 4 minutes
Cook time: 1 minute
Servings: 1
- 1 cup Minute Ready to Serve Brown Rice
- 2 ounces smoked salmon
- 1/2 cup julienned cucumber
- 1 teaspoon soy sauce
- 1 tablespoon everything bagel seasoning mix
- Heat rice according to package directions.
- Top rice with smoked salmon and cucumbers. Drizzle with soy sauce and sprinkle with seasoning mix.
A Hall of Fame Feast for Homegating Fans
(Family Features) Gathering your team to plan for a truly memorable game day at home starts with almost everyone’s favorite part of the festivities: the food. From meaty meals and zesty appetizers to sweet, long-lasting snacks, fuel your crowd with recipes that keep them coming back from kickoff to overtime.
One superstar of the menu at many homegating parties is salsa, whether it’s used as a finishing touch in recipes or as a standalone snack to enjoy with chips, veggies or other pairings. In fact, according to the Game Day Eats Report from Fresh Cravings, 22% of guests would insist on running out to pick up salsa if it wasn’t available for the feast; 18% would even be devastated and consider leaving.
Chef Anthony Serrano recommends these all-American recipes he makes for his family on game day. Pulled Beef and Slaw Sliders are perfect for piling high with delicious toppings before hitting the couch just in time for kickoff. Snacking throughout the action is a preferred approach for many fans, making Cast-Iron Smoked Queso Dip and Hummus Deviled Eggs go-to options for armchair quarterbacks.
These crowd-pleasers make game day worth celebrating, especially if you use a salsa with high-quality ingredients like vine-ripened tomatoes, crisp vegetables, zesty peppers and spices found in Fresh Cravings Salsas. Their flavor-packed, vibrant recipe offers a homemade-tasting alternative to the softer, duller blends of jarred salsa.
To find more championship-level game day recipe inspiration, visit FreshCravings.com.
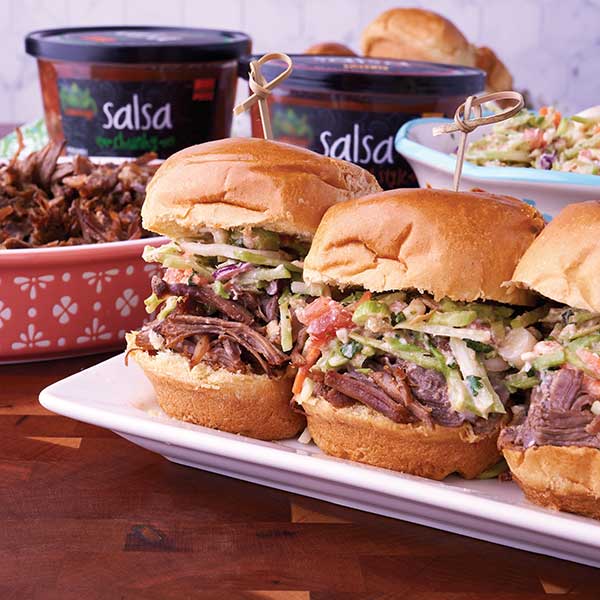
Pulled Beef and Slaw Sliders
Recipe courtesy of chef Anthony Serrano
Pulled Beef:
- 2 pieces (about 3 pounds each) beef chuck roast
- 2 tablespoons taco seasoning or barbecue rub
- 1 cup beef bone broth
- 16 ounces Fresh Cravings Chunky Mild Salsa
Salsa and Queso Slaw:
- 16 ounces Fresh Cravings Chunky Mild Salsa
- 16 ounces broccoli slaw blend
- 1/4 cup green onions, sliced
- 1 teaspoon salt
- 1 cup crumbled queso fresco
- 1 tablespoon Dijon mustard
- 1/2 cup mayo
- 2 tablespoons apple cider vinegar
- 2 tablespoons cilantro (optional)
- slider buns
- Fresh Cravings Salsa
- barbecue sauce
- pickles
- jalapenos
- sliced cheese
- roasted peppers
- onions
- To make pulled beef: Season both sides of beef with taco seasoning. Wrap with plastic wrap and place in fridge 2-12 hours before cooking.
- Place meat, beef bone broth and salsa in pressure cooker; seal according to pressure cooker directions. Cook on high 60 minutes. Once pressure cooker is safe to open according to instructions, open and let meat rest in liquid 15 minutes.
- Remove meat from liquid and place in large bowl. Carefully shred meat. Pour liquid, up to half, over meat while shredding to keep it juicy.
- To make salsa and queso slaw: In large bowl, mix salsa, slaw blend, green onions, salt, queso fresco, Dijon mustard, mayo, apple cider vinegar and cilantro, if desired. Cover with plastic wrap and refrigerate until needed.
- To assemble sliders, place pulled beef and salsa and queso slaw on buns. Top with salsa, barbecue sauce, pickles, jalapenos, sliced cheese, roasted peppers and onions.

Cast-Iron Smoked Queso Dip
Recipe courtesy of chef Anthony Serrano
- 2 cups cheddar cheese
- 1 cup Monterey Jack cheese
- 1 teaspoon almond flour
- 1 cup heavy cream
- 1 cup Fresh Cravings Restaurant Style Salsa
- 1 teaspoon paprika
- 1 teaspoon sea salt
- 1/4 cup cooked chorizo
- 1 teaspoon liquid smoke
- cilantro, for garnish
- diced bell pepper, for garnish
- In cast-iron pan, mix cheddar cheese, Monterey Jack cheese and almond flour. Pour in heavy cream and salsa; bring to gentle simmer. Whisk while simmering 5-7 minutes, or until queso dip begins to thicken. Add paprika, salt, chorizo and liquid smoke; adjust seasoning as necessary.
- Garnish with cilantro and bell pepper.
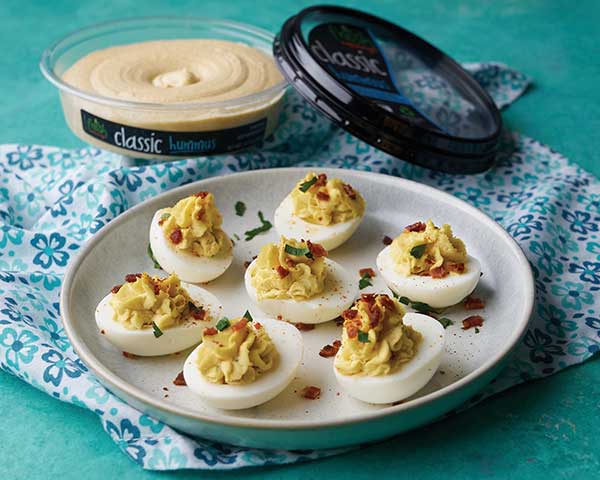
Hummus Deviled Eggs
Recipe courtesy of chef Anthony Serrano
- 6 hard-boiled eggs, peeled
- 1/4 cup Fresh Cravings Classic Hummus
- 1/4 cup smoked cheddar cheese
- 2 tablespoons bacon, cooked and crumbled
- 1 teaspoon yellow mustard
- 1 teaspoon salt
- smoked Spanish paprika, for garnish
- parsley, for garnish
- Cut hard-boiled eggs in half lengthwise. Remove yolks and place in bowl. Using fork, mash yolks into fine crumble.
- Add hummus, cheese, bacon, mustard and salt; mix well.
- Evenly disperse teaspoons of yolk mixture into egg whites. Sprinkle with any remaining bacon, paprika and parsley.
Source: Fresh Cravings
Hearty, Wholesome Winter Meals
(Family Features) Seeking comfort from the cold in the form of a wholesome meal is a perfect way to cap off a day with loved ones. During the winter months when brisk temperatures chill you to the bone, warming up with hearty dishes at the family table can bring everyone together.
- Full of seasonal flavors with top-notch taste, Pecan-Crusted Pork Tenderloin offers a delicious main course you don’t have to feel guilty about. This easy yet elegant entree puts a unique spin on a dinnertime staple thanks to a crunchy pecan crust.
- With cheddar and ricotta cheeses, sour cream and cavatappi noodles, this Mac and Cheese with Pecan Breadcrumbs is an extra creamy, creative twist on the kid-friendly classic. Pair this family favorite with the pork tenderloin for an easy weeknight combination that little ones can help with in the kitchen by stirring together the cheesy goodness.
This family dinner is made possible with tasty pecans, which are among the lowest in carbs and highest in fiber compared to other tree nuts, helping you stay fuller longer. As a nutrient-dense powerhouse, they have 3 grams of plant-based protein and 3 grams of fiber per 1-ounce serving with 12 grams of “good” monounsaturated fat and only 2 grams of saturated fat. Essential nutrients like thiamin, zinc, copper and manganese – a mineral that’s essential for metabolism and bone health – mean you can feel good about serving pecan-infused dishes to your loved ones.
Visit americanpecan.com to find more winter weeknight recipe inspiration.
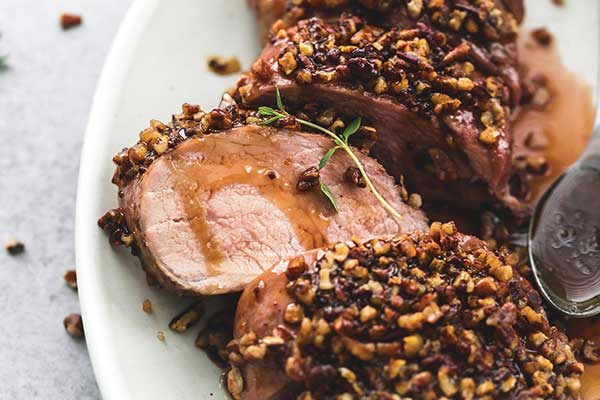
Pecan-Crusted Pork Tenderloin
Total time: 35 minutes
Servings: 6
- 1 pork tenderloin (about 1 1/2 pounds)
- salt, to taste
- pepper, to taste
- 1/2 cup brown sugar, divided
- 2 tablespoons soy sauce, divided
- 2 teaspoons minced garlic
- 1/2 cup pecan pieces
- 1/4 cup pineapple juice
- 2 tablespoons Dijon mustard
- Preheat oven to 400 F and lightly grease large baking dish. Season pork tenderloin with salt and pepper, to taste; set aside.
- In small bowl, stir 1/4 cup brown sugar, 1 tablespoon soy sauce and minced garlic. Spread mixture over pork.
- Press pecan pieces into brown sugar mixture on pork. Bake, uncovered, 20 minutes.
- In medium saucepan over medium-high heat, combine remaining brown sugar, remaining soy sauce, pineapple juice and Dijon mustard. Bring mixture to boil; reduce to simmer 3-5 minutes then remove from heat.
- Slice pork, spoon sauce over top and serve.
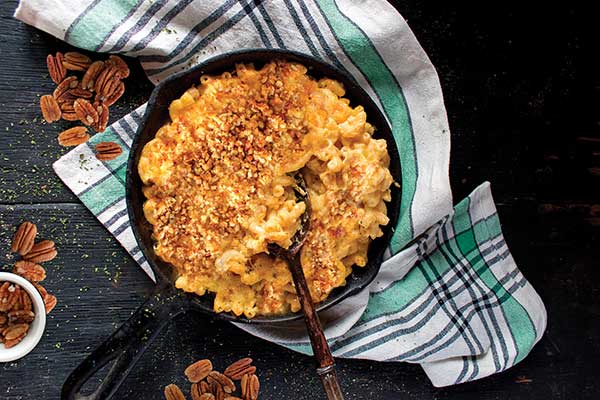
Mac and Cheese with Pecan Breadcrumbs
Total time: 50 minutes
Servings: 6
- 8 ounces cavatappi pasta
- 1 tablespoon butter
- 1 block (8 ounces) cheddar cheese
- 1/2 cup raw pecan pieces
- 15 ounces part-skim ricotta cheese
- 4 tablespoons sour cream
- 1 teaspoon salt
- 1/4 teaspoon ground pepper
- 1 large egg, lightly beaten
- Preheat oven to 375 F.
- In salted boiling water, cook pasta according to package instructions. Drain, reserving 1/2 cup pasta cooking water. Return pasta to pot and stir in butter.
- Using box grater, shred cheddar cheese.
- Using food processor, process 1/4 cup shredded cheese with pecans to coarse breadcrumb consistency.
- Add remaining cheddar cheese, ricotta, sour cream, salt and pepper to warm pasta. Stir until thoroughly combined. Add egg; stir. Add reserved pasta water to loosen mixture; stir until smooth.
- Pour into buttered 9-inch square or round casserole dish and top evenly with pecan topping.
- Bake 30 minutes.
Source: American Pecan Council


