Take Back Busy School Days with Simplicity and Creativity
(Family Features) Ease and convenience are the name of the game during the school year as parents and students alike adapt to overwhelming schedules, mounds of homework and seemingly never-ending after-school activities. Oftentimes it’s school day meals that take a hit with families opting for quick bites or drive-thru dining, but that doesn’t have to be the case.
Sharing meals that are filling and flavorful can still be a quick endeavor – you just need creative recipes that help simplify school day schedules. In fact, with kids, more imagination can mean more deliciousness. This playful Caterpillar Sandwich is a ham and cheese spinoff crafted to excite little ones and their little taste buds at lunchtime.
It’s made with Kretschmar’s premium deli meats and cheeses that are crafted for quality. From uniquely smoked ham to hand-trimmed fine cuts of beef and poultry, the off-the-bone deli meats come from the leanest, most tender cuts. Plus, the more than 16 flavors of award-winning deli cheeses are expertly handcrafted by Wisconsin cheesemakers.
These high-quality ingredients are made for more than just sandwiches, however. They’re destined for flavors beyond sliced bread, such as Spiced Pineapple Skewers that are perfect for adding a dash of island delicacy to your midweek dinner menu. A sweet and spicy celebration of tropical flavors, this recipe is perfect for lighting the grill and taking a break from busy season.
Discover more delicious recipes to take back hectic school days at KretschmarDeli.com.

Caterpillar Sandwich
Total time: 20 minutes
Servings: 1
- 2 slices whole-wheat bread
- mayonnaise, divided
- 1 slice Kretschmar American Cheese
- 2 slices Kretschmar Off the Bone Ham
- 1 leaf iceberg lettuce
- 1 cherry tomato
- 1 carrot, shaved
- 1 slice Kretschmar Provolone Cheese
- black decorating gel
- On two slices whole-wheat bread, spread thin layer of mayonnaise on each.
- Lay American cheese, ham and lettuce leaf on one bread slice then top with other bread slice.
- Using biscuit cutter, punch four holes into sandwich, removing crust from sandwich, then set aside.
- Using toothpick or knife, poke two holes into cherry tomato. Insert small cores of carrot into tomato for "antennae."
- Using pastry tip, cut "eyes" out of provolone cheese. Cut out sliver of provolone cheese for "mouth."
- Dab mayo on back of "eyes" and "mouth" then attach to cherry tomato.
- Use black decorating gel to add tiny dots to eyes for pupils; set aside.
- Place four mini sandwich circles on plate to form caterpillar body then place cherry tomato face at one end.

Spiced Pineapple Skewers
Total time: 30 minutes
Servings: 4
- 8-10 stainless steel or wooden skewers
- 16 ounces pineapple,
- 1 1/2 pounds Kretschmar Spiced Pineapple Ham
- 1/2 cup Hawaiian-style barbecue sauce
- 1 green bell pepper
- 1 red bell pepper
- 1 small red onion
- 1/4 cup canola oil
- 1 teaspoon salt
- black pepper, to taste
- oil, for grates
- Prepare skewers. If using wooden skewers, soak in water 30 minutes.
- Heat grill to 300 F.
- Trim and cut pineapple and ham steak into 1-inch cubes, 1/2-inch thick, and lay on paper towel to pat dry before placing in mixing bowl. Add barbecue sauce to bowl. Toss to combine.
- Cut bell peppers and red onion into equal-sized, 1-inch cubes. Place in small bowl and coat with canola oil, salt and black pepper, to taste.
- To assemble skewers: Alternate threading ham, pineapple, bell peppers and onion onto skewers then place on baking sheet.
- Using paper towel, apply oil to grill grates or grill pan then place skewers on grill uncovered, turning every few minutes until charred, no longer than 6-7 minutes.
Source: Kretschmar
Take Family Favorites Al Fresco: Advice for enjoying easy meals outdoors
(Family Features) Bright sunshine, warm patios and fresh foods go hand in hand. As warm weather and sunny days call you outdoors, bring the whole family along with favorite meals that blend perfectly with a soft breeze and the subtle sounds of nature.
Al fresco dining doesn’t have to be difficult. Just gather a few supplies, whip up a favorite recipe or two and ask for a hand in heading outside. Take these tips into account to help ensure your backyard dining goes off without a hitch.
Create a Cozy Spot
Dinner in the backyard means convenience and the comfort of your own patio furniture, but you can always enhance the experience with an umbrella to add a touch of shade or a small fan on those still, steamy evenings. If a busy day means a later dinner, hanging strings of soft lighting can help illuminate the table.
Make It Fresh
Salad season means fresh ingredients from lettuce and veggies to favorite toppings and beyond. Add a crisp bite to your next al fresco occasion with this Southwest Ranch Taco Salad featuring Newman’s Own’s Southwest Ranch Dressing. The dressing is creamy and smoky with a kick of spice and features no artificial flavors, no colors from artificial sources and no MSG, making it a perfect companion for salads and dips. In fact, you can enjoy this seasonal salad even more knowing that 100% of profits from the sale of the dressing goes toward helping nourish and transform the lives of children facing adversity.
Don’t Forget the Essentials
No outdoor meal is complete without a few must-have utensils. Avoid trips back and forth from the house by writing a list of everything you need so you don’t head to the deck without forks to share a salad or napkins to help clean up the mess. Bring the basics like plates, cups, utensils, napkins and a cloth to rest food on. Don’t leave behind serving spoons, trash bags and other convenience items that make al fresco dining a breeze.
Serve a Perfect Salad Partner
While a hearty salad alone is enough for a filling al fresco meal, you can take your backyard dining to the next level with the perfect partner for satisfying salads: crudites. Arranged neatly on a platter or board, a seasonal variety of sliced or whole raw vegetables such as snap peas, celery, carrots, cucumbers, cherry tomatoes, mini bell peppers, broccoli and more can make for a perfect accompaniment to nearly any outdoor meal. Serve with a dip or two, such as Newman’s Own’s Southwest Ranch Dressing, to complete your al fresco appetizer.
To find more al fresco food options that give back, visit NewmansOwn.com.
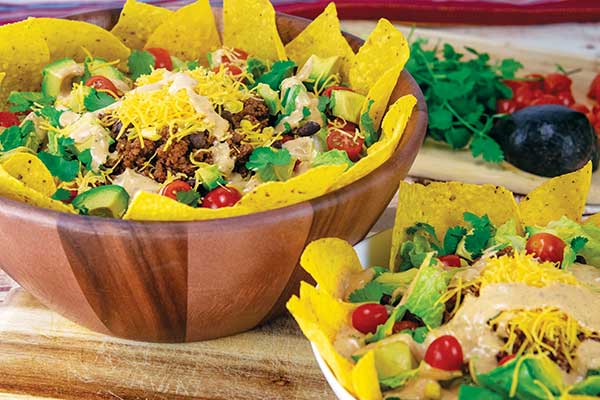
Southwest Ranch Taco Salad
Total time: 25 minutes
- 1/2 head romaine lettuce
- 1 pint cherry tomatoes
- 2 small avocados
- 1 tablespoon extra-virgin olive oil
- 1 pound ground beef (80/20 ground chuck)
- 2 teaspoons Newman's Own Mild Taco Seasoning
- 1/4 cup water
- 1 can (15 1/2 ounces) black beans
- 1 1/2 cups canned corn
- 1 cup shredded sharp cheddar cheese
- 2 tablespoons chopped fresh cilantro, plus additional for serving (optional), divided
- 1 cup Newman's Own Southwest Ranch Dressing
- 6 ounces tortilla chips
- Coarsely chop lettuce, halve cherry tomatoes and pit, peel and slice avocados. Set aside.
- In large frying pan over medium-high heat, heat olive oil. Brown ground beef, stirring occasionally, 4-5 minutes. Add taco seasoning and water; cook according to package directions, 5-8 minutes, or until meat is thoroughly cooked.
- Drain and rinse black beans. Set aside.
- Divide lettuce among serving bowls or plates. Top with ground beef, tomatoes, avocados, black beans, corn, cheese and 2 tablespoons cilantro. Tuck in tortilla chips.
- Drizzle with southwest ranch dressing and sprinkle with additional cilantro, if desired.
Source: Newman’s Own
Simple, Convenient Salads to Celebrate Spring
(Family Features) Letting in a little fresh air with an open window or a screen door is a sure sign of spring, allowing the natural sights and smells of the outdoors to accompany you at the dinner table. Take that open-air freshness to new heights this spring by pairing it with your own signature spins on salad season.
For example, this Tuna and Rice Nicoise Salad offers a new take on tuna salad with olive tapenade, capers, tomatoes, green beans and cherry tomatoes. Its calling card: swapping out potatoes in favor of Minute Yellow Rice Cups, which cook up fast as a convenient and flavorful alternative that saves the chore of washing, peeling and boiling potatoes. Fully cooked and packaged in BPA-free cups, it features white rice lightly seasoned with onion powder, garlic powder and turmeric for a delightful taste ready in just 1 minute.
As a perfect recipe for those who love veggies, this dish combines classic salad freshness with olive tapenade for a briny bite in every mouthful. Canned tuna mixes with bursts of capers, hard-boiled egg, crisp green beans and sweet cherry tomatoes capped off with tart balsamic dressing to round out the dish.
If you love the taste of crisp, peppery arugula, this Pomegranate and Arugula Rice Salad is practically perfect. Your favorite green shines alongside a delicious mix of sweet pomegranate seeds, crisp almonds and tart balsamic dressing that’s ideal for a starter or side, or you can add a preferred protein to turn it into a satisfying main course.
Incredibly colorful with a lively taste, bright flavors mingle with fluffy grains of Minute Instant Jasmine Rice, ready in just 5 minutes to keep your dinner schedule on track. Aromatic white rice provides a distinct scent, perfect texture and delicious taste that’s fast, fragrant, flavorful and fluffy. It’s simply precooked then dried with nothing added but convenience to help you get tasty meals on the table quickly.
Requiring just 15 minutes to prepare, this salad is ready in an instant and serves up to eight people, making it a solution for anything from family gatherings to meal prepping for a busy week ahead.
Find more spring salads and other flavorful, convenient recipes by visiting MinuteRice.com.
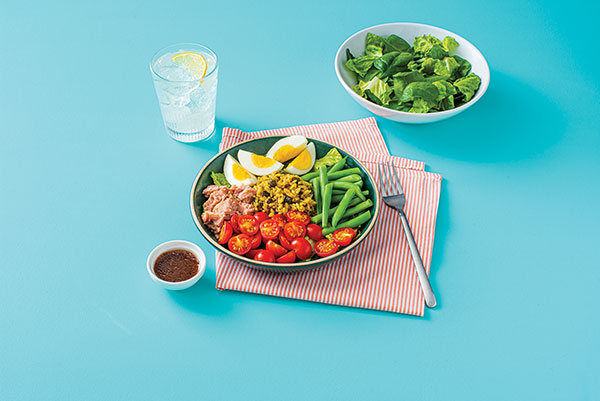
Tuna and Rice Nicoise Salad
Prep time: 4 minutes
Cook time: 1 minute
Servings: 1
- 1 cup Minute Yellow Rice Cups
- 2 tablespoons balsamic dressing
- 2 tablespoons olive tapenade
- 1 teaspoon capers, drained well
- 1/2 cup halved cherry tomatoes
- 1/2 cup frozen green beans, thawed
- 1 can (3 ounces) tuna, drained and flaked
- 1 hard-boiled egg, cut into wedges
- Heat rice according to package directions.
- In medium bowl, combine rice, balsamic dressing, tapenade and capers. Mix well.
- Top with cherry tomatoes, green beans, tuna and hard-boiled egg.
- Tip: Serve salad over bed of mixed greens, if desired.
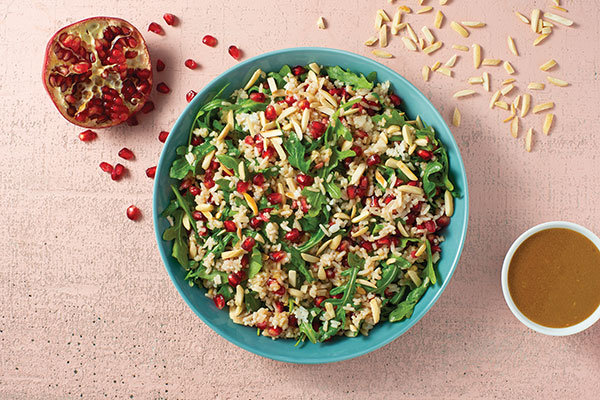
Pomegranate and Arugula Rice Salad
Prep time: 10 minutes
Cook time: 5 minutes
Servings: 8
- 2 cups Minute Instant Jasmine Rice
- 1/3 cup olive oil
- 3 tablespoons balsamic vinegar
- 2 tablespoons minced red onion
- 1 tablespoon Dijon mustard
- 1 teaspoon honey
- 1/2 teaspoon salt
- 1/4 teaspoon black pepper
- 1 bag (5 ounces) arugula
- 1 cup pomegranate seeds
- 1/3 cup slivered almonds, toasted
- Prepare rice according to package directions. Cool completely, about 10 minutes.
- In large bowl, whisk oil, vinegar, red onion, mustard, honey, salt and pepper.
- Add rice, arugula and pomegranate seeds to bowl; toss to coat thoroughly. Sprinkle with almonds.
Tips: For added flavor, top salad with crumbled goat or blue cheese.
To cool rice quickly, spread evenly on parchment paper-lined baking sheet.
Source: Minute Rice
Elevate Your Tailgate with Easy-to-Make Recipes
(Family Features) Concoct a winning game plan, gather the parking lot games and call the biggest fans you know – it’s tailgating season. This year, before you root on your favorite team, make sure your pregame party matches the intensity of the fourth quarter with recipes that really fire up the crowd.
For a pregame meal that gives diehards the energy they’ll need to stay on their feet, turn to easy-to-prepare Kielbasa and Veggie Kebabs. This tailgate-friendly recipe relies on smoked pork sausage from Coleman Natural Foods that’s blended with flavorful spices, naturally cured with cultured celery powder and sea salt then slow-smoked for rich flavor.
If a morning kickoff at your alma mater calls for a breakfast-friendly beverage, these Chile Bacon Straws offer a perfect complement to a Bloody Mary. With a perfect touch of pizazz, they’re a simple yet impressive garnish that pairs well with other toppings like olives, pickles, peppers and more.
As a delicious way to add bursts of flavor to favorite dishes, pork from Coleman Natural Foods provides premium quality you can feel good about serving to your family and friends whether you’re tailgating in the parking lot or home-gating in your own backyard. It’s humanely raised by family farmers in the U.S. with no antibiotics, added hormones or artificial ingredients to give fans countless ways to elevate favorite game day dishes.
Visit ColemanNatural.com to find more easy-to-prepare tailgate recipes.
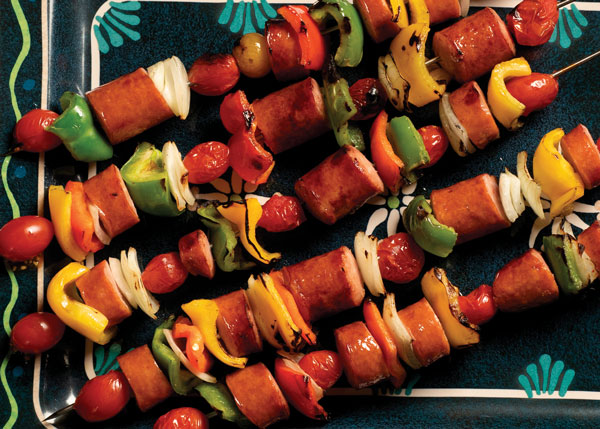
Kielbasa and Veggie Kebabs
Prep time: 30 minutes
Cook time: 20 minutes
Servings: 4
- 4 wooden skewers
- 1 red onion
- 2 bell peppers
- 2 ears of corn, cut crosswise into 2-inch rounds
- 1 package Coleman Natural Polish Kielbasa, sliced thick
- 12 whole mushrooms
- 12 cherry tomatoes
- Soak skewers in water 30 minutes to prevent burning. Preheat grill to 300 F.
- Cut red onion, peppers and corn into bite-sized chunks.
- Alternate placing kielbasa slices, onion, peppers, corn, mushrooms and tomatoes on skewers.
- Grill, rotating every few minutes until veggies are tender, about 20 minutes.
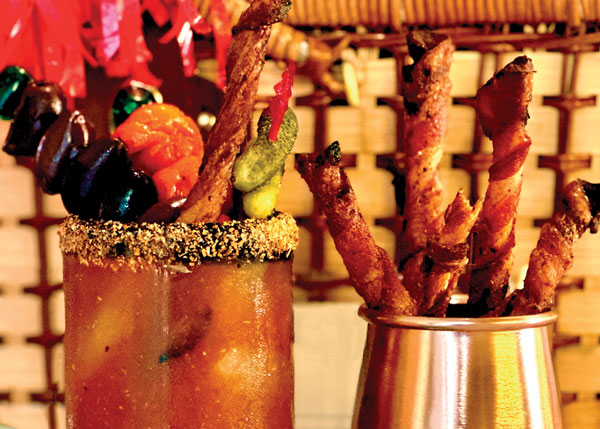
Chile Bacon Straws
Prep time: 10 minutes
Cook time: 30 minutes
Servings: 6
- 6 slices Coleman Natural Hickory Smoked Bacon
- 6 wooden skewers
- 1 teaspoon Mexican spice blend
- prepared Bloody Marys
- Preheat oven to 400 F.
- Wrap one bacon slice diagonally around each skewer, making sure to overlap edges of bacon so there are no gaps. Don’t wrap too tightly or it will be difficult to remove skewers; try to ensure each end of bacon ends up on same side of skewer.
- Place each wrapped skewer on wire rack set over sheet pan with end seams down. Sprinkle spice blend over each skewer.
- Bake 25-30 minutes until bacon is brown, crispy and fully cooked to give straws their shape. Remove from oven and allow to cool.
- Gently slide skewers out of each straw using twisting motion.
- Insert straws into Bloody Marys.
Source: Coleman Natural Foods
Stress-Free Steps Toward Self-Care
(Family Features) Over the last few years, self-care has taken on heightened importance for moms across the country.
That is why Mrs. T’s Pierogies is partnering with actress, entrepreneur and mom JoAnna Garcia Swisher for its “All-Star Moms” campaign to spotlight the importance of finding ways to recharge and help these real-life superheroes prioritize me-time.
 Simplifying self-care for All-Star Moms everywhere can be as easy as designating a “recharging room” in the home, which offers a personal space to reset and relax. When creating your recharging room, keep these tips from Garcia Swisher in mind:
- Balance Beautiful with Functional: Find hosting staples like cutting boards, utensils and napkins that match the vibe of your personal space so the area can double as an entertaining space.
- Keep it Easy to Clean: Choose furniture and decor that can handle a little mess from snacks, like Mrs. T’s Mini Pierogies and your favorite dip, which are perfect for enjoying while binge-watching favorite shows.
- Add a Personal Touch: Showcase a piece that tells a story, like a favorite embroidered pillow, piece of meaningful jewelry or framed photo of an amazing memory.
- Bring In Something Cozy: Add cozy touches like a blanket, fluffy pillow or favorite slippers for something comfortable.
- Make a Statement: Let your inner designer shine by taking a chance on something bold that represents a part of your personality you don’t normally indulge.
- Plan an Anchor Piece: This item is the foundation for everything, such as a vintage armchair, comfy couch or storage piece that tells a story. Choose this item first then build around it.
Moms can also prioritize self-care by whipping up an easy-to-make recipe, like these Margherita Pizza Pierogy Skewers, for themselves, a gathering of friends or an afternoon family snack. Pasta pockets filled with creamy mashed potatoes, cheesy goodness and other big, bold flavors, Mrs. T’s Pierogies are simple to prepare. This means more time for moms to do the stuff they love like unwinding from the day with favorite foods in their recharging spaces.
Visit MrsTsPierogies.com for more recipe inspiration.
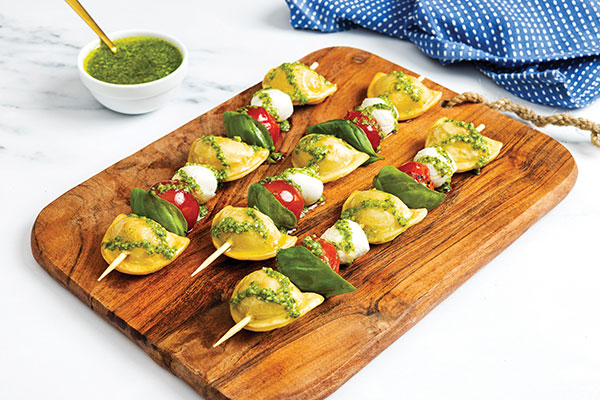
Margherita Pizza Pierogy Skewers
Prep time: 10 minutes
Total time: 35 minutes
Servings: 9
Pizza Skewers:
- 1 box (12.8 ounces) Mrs. T's Mini Classic Cheddar Pierogies
- 3 cups cherry tomatoes
- 2 tablespoons olive oil, plus additional for brushing pierogies, divided
- 1 teaspoon salt
- 1/2 teaspoon ground black pepper
- 1/2 teaspoon oregano
- 1-2 cups mozzarella balls (18 total)
- fresh basil leaves
- bamboo skewers (10 inches)
Fresh Pesto:
- 2 cups fresh basil
- 2 garlic cloves, peeled
- 1/2 cup olive oil
- 1/4 cup pine nuts
- 1/4 grated Parmesan cheese
- salt, to taste
- ground black pepper, to taste
- Preheat air fryer to 400 F.
- To make pizza skewers: In small bowl, combine cherry tomatoes, olive oil, salt, ground black pepper and oregano; toss to coat. Transfer tomatoes to air fryer tray or basket. Cook in air fryer 10 minutes, or until tomatoes are slightly charred; remove and set aside.
- Lay pierogies on same tray or basket. Make sure not to overlap. Lightly brush each side with olive oil. Cook about 12 minutes, or until golden brown and crispy. Flip halfway through cooking.
- To make pesto: In food processor, process basil; garlic; olive oil; pine nuts; Parmesan cheese; salt, to taste; and pepper, to taste, until smooth. (If preferred, use store-bought pesto.)
- Add one pierogy to bamboo skewer followed by one tomato, one mozzarella ball and one basil leaf. Repeat with ingredients until each skewer is filled. Drizzle with pesto.
Source: Mrs. T’s Pierogies
Eat the Rainbow: Pair seafood and seasonal produce for colorful, healthy recipes
(Family Features) Focusing your menus on health-conscious recipes that look as good as they make you feel is key to making positive lifestyle changes. Adding big flavors that satisfy cravings to easy, go-to recipes can be a big step toward reaching health goals throughout the year.
“Eating the rainbow” refers to adding fruits and veggies of varying colors to your diet, such as red tomatoes and beets, green cucumbers and avocados, orange carrots and pumpkins and beyond. Complementing fresh produce with the nutritional benefits of tuna and salmon – like heart-healthy omega-3 fatty acids, protein, vitamin D and potassium – can take your meal planning one step further.
Whether you’re commemorating a special occasion, hosting a gathering of friends and family or simply enjoying a night in, good food shouldn’t mean ditching good eating habits. With new packaging but a continued focus on flavor, wild-caught Low-Sodium Pink Salmon from Chicken of the Sea is a perfect complement to vibrant, rainbow-inspired recipes.
Try these Salmon Chili Bites for a quick and delicious snack option. They can easily be doubled, tripled or more for a party appetizer. Feature the recipe with a “rainbow” of veggies, crackers, meats and cheeses on a charcuterie board for a crowd favorite that can satisfy guests with big, bold flavor.
Ditch boring salads and find joy in food while maintaining healthy eating goals by upping your salad game. Say goodbye to bland, boring greens and enjoy salads with your favorite toppings, like a colorful combination of protein-packed tuna and fiber-rich veggies in this Mediterranean Tuna Salad, which is completed with a bright dressing and topped with feta cheese and parsley.
For more than 100 years, Chicken of the Sea has provided fresh, tasty seafood straight from the ocean, so whether you’re reaching for wild-caught tuna for this homemade salad or another option like salmon or sardines, you can enjoy a high-quality product that’s delicious on its own or used to elevate favorite recipes.
To find more health-focused snacks, appetizers, meals and more, visit chickenofthesea.com.
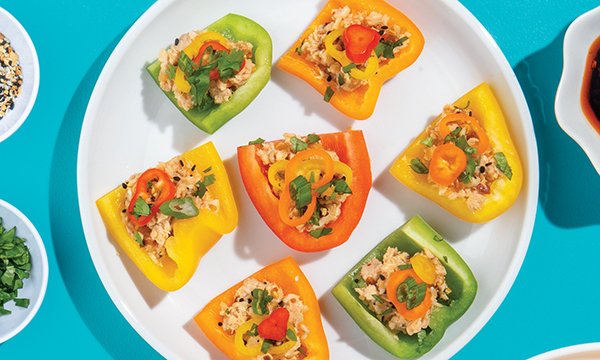
Salmon Chili Bites
Prep time: 15 minutes
Servings: 2
- 2 pouches (2.5 ounces each) Chicken of the Sea Low Sodium Wild-Caught Alaska Pink Salmon
- 1 tablespoon chili crisp
- 2 teaspoons rice wine vinegar
- 1 teaspoon toasted sesame oil
- 2 bell peppers, cored and cut into 2-inch squares
- 1 green onion, thinly sliced
- minced cilantro
- black sesame seeds
- In bowl, combine salmon, chili crisp, vinegar and sesame oil.
- To serve, top each bell pepper square with some salmon, green onion, cilantro and sesame seeds. If leftover pieces of bell pepper remain, chop and add as additional garnish.
- Note: If serving with cheese plate, place salmon mixture in small bowl and garnish with green onion and sesame seeds.
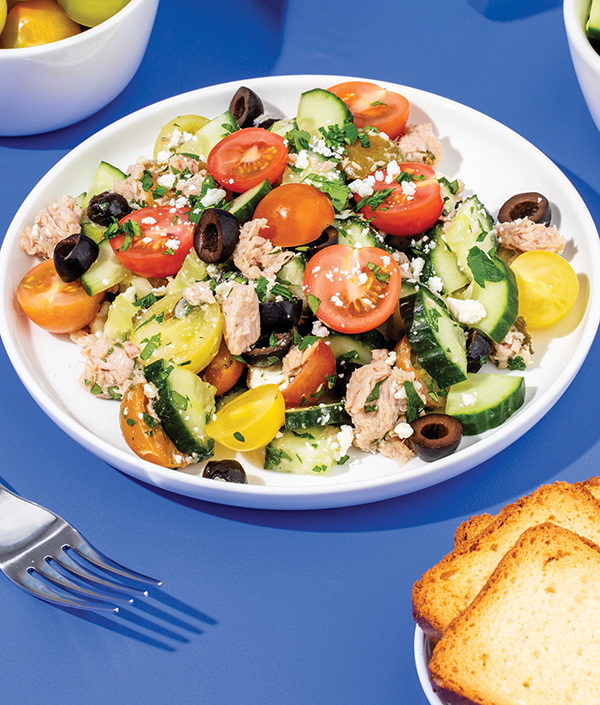
Mediterranean Tuna Salad
Prep time: 20 minutes
Servings: 1-2
Dressing:
- 2 tablespoons lemon juice
- 1 tablespoon extra-virgin olive oil
- 1/4 teaspoon dried oregano
Salad:
- 1 can (5 ounces) Chicken of the Sea Chunk Light Tuna, drained
- 1 cup halved cherry tomatoes
- 1/3 cup sliced Kalamata olives
- 1 cup chopped English cucumber (about 1/2 cucumber)
- 1/4 cup feta
- 1 tablespoon minced parsley
- pita chips (optional)
- crackers (optional)
- To make dressing: In large bowl, whisk lemon juice, olive oil and oregano.
- To make salad: In dressing bowl, add tuna, tomatoes, olives and cucumber. Gently toss to cover salad with dressing then top with feta and parsley.
- Serve with pita chips or crackers, if desired.
Source: Chicken of the Sea
Accomplish Health Goals with Better-for-You Family Meals
(Family Features) Setting out on a mission to eat healthier starts with creating goals and working to achieve them with those you love. To help make nutritious eating more manageable, call together your family and work with one another to create a menu everyone can enjoy while staying on track.
Connecting an array of recipes that all can agree on starts with versatile ingredients like dairy. Gathering at the table with your loved ones while enjoying delicious, nutritious recipes featuring yogurt, cheese and milk can nourish both body and soul.
For example, the key dairy ingredients in these recipes from Milk Means More provide essential nutrients for a healthy diet. The cheese varieties in Feta Roasted Salmon and Tomatoes and 15-Minute Weeknight Pasta provide vitamin B12 for healthy brain and nerve cell development and are a good source of calcium and protein, which are important for building and maintaining healthy bones.
To find more nutritious meal ideas to fuel your family’s health goals, visit MilkMeansMore.org.
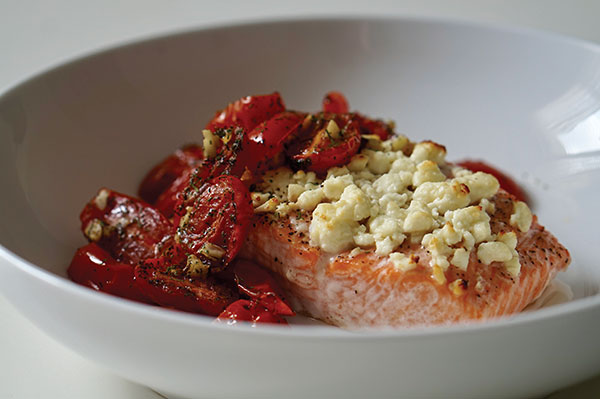
Feta Roasted Salmon and Tomatoes
Recipe courtesy of Marcia Stanley, MS, RDN, Culinary Dietitian, on behalf of Milk Means More
Prep time: 15 minutes
Cook time: 15 minutes
Servings: 4
- Nonstick cooking spray
- 3 cups halved cherry tomatoes
- 2 teaspoons olive oil
- 1 teaspoon minced garlic
- 1/2 teaspoon dried oregano or dried dill weed
- 1/4 teaspoon salt
- 1/2 teaspoon coarsely ground black pepper, divided
- 1 1/2 pounds salmon or halibut fillets, cut into four serving-size pieces
- 1 cup (4 ounces) crumbled feta cheese
- Preheat oven to 425 F. Line 18-by-13-by-1-inch baking pan with foil. Lightly spray foil with nonstick cooking spray. Set aside.
- In medium bowl, toss tomatoes, olive oil, garlic, oregano or dill weed, salt and 1/4 teaspoon pepper.
- Place fish pieces, skin side down, on one side of prepared pan. Sprinkle with remaining pepper. Lightly press feta cheese on top of fish. Pour tomato mixture on other side of prepared pan. Bake, uncovered, 12-15 minutes, or until fish flakes easily with fork.
- Place salmon on serving plates. Spoon tomato mixture over top.
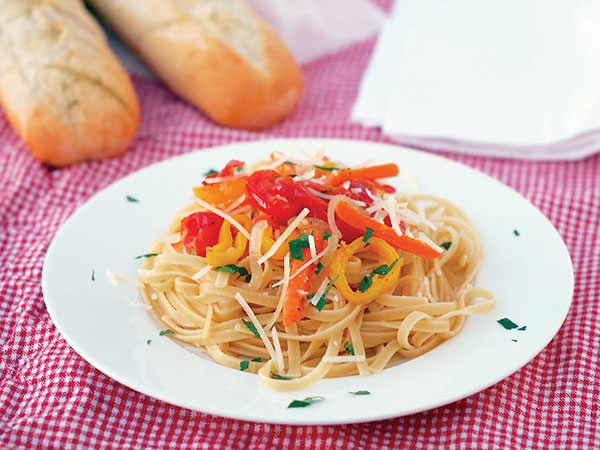
15-Minute Weeknight Pasta
Recipe courtesy of Kirsten Kubert of "Comfortably Domestic" on behalf of Milk Means More
Prep time: 5 minutes
Cook time: 10 minutes
Servings: 6
- 6 quarts water
- 16 ounces linguine or penne pasta
- 2 tablespoons unsalted butter
- 1/2 cup thinly sliced onion
- 1 cup thinly sliced carrots
- 1 cup thinly sliced sweet bell pepper
- 1/2 cup grape tomatoes, halved
- 1 teaspoon kosher salt
- 1/4 teaspoon black pepper
- 2 cloves garlic, peeled and minced
- 1 cup reserved pasta water
- 1 teaspoon finely grated lemon zest
- 1/2 cup smoked provolone cheese, shredded
- 1/4 cup chopped fresh parsley (optional)
- Parmesan cheese (optional)
- Bring water to rolling boil and prepare pasta according to package directions for al dente texture, reserving 1 cup pasta water.
- In large skillet over medium heat, melt butter. Stir in onions, carrots and sweet bell peppers. Saute vegetables about 5 minutes, or until they brighten in color and begin to soften. Add tomatoes, salt, pepper and garlic. Cook and stir 1 minute to allow tomatoes to release juices.
- Pour reserved pasta water into skillet, stirring well. Bring sauce to boil. Reduce heat to medium-low and simmer 3 minutes. Taste sauce and adjust seasonings, as desired.
- Transfer drained pasta to skillet along with lemon zest and smoked provolone cheese, tossing well to coat. Serve immediately with fresh parsley and Parmesan cheese, if desired.
Warm Up Winter with Comforting Classics
(Family Features) Whipping up family favorites all winter long is a perfect activity to keep loved ones warm in the kitchen while avoiding the bitter chill outdoors. Delicious, heartwarming snacks offer a simple and savory way to bring everyone in from the cold while enjoying comforting flavors together.
Lean on beloved ingredients like go-to RAGÚ sauces when it’s time to come together for quick bites. The possibilities are nearly endless with delicious recipes using classics like the RAGÚ Old World Style Traditional or RAGÚ Simply Traditional options.
Hearty flavors can take away the chill of winter in recipes like Snowman Pizza Bombs, Polenta Bites and Baked Tomato Goat Cheese Dip. Easy to make and fun to create together, these simple snacks are perfect for a cold afternoon spent together in the kitchen or watching a family-movie marathon.
Originally started by an Italian mother more than 80 years ago, RAGÚ sauce, known for its distinctive yellow cap, is the perfect have-on-hand pantry staple to help you create easy and delicious home cooking. As an invaluable resource and family favorite since 1937, RAGÚ sauces easily allow anyone, regardless of gender or culinary skillset, to “cook like a mother” and serve up delicious, homemade favorites. The brand’s rich heritage and array of sauce choices ensures that your next cold-weather day spent inside will be elevated with family-favorite snacks and easy and taste-tempting meals made with RAGÚ.
Find more recipes perfect for warming up this winter at Ragu.com.
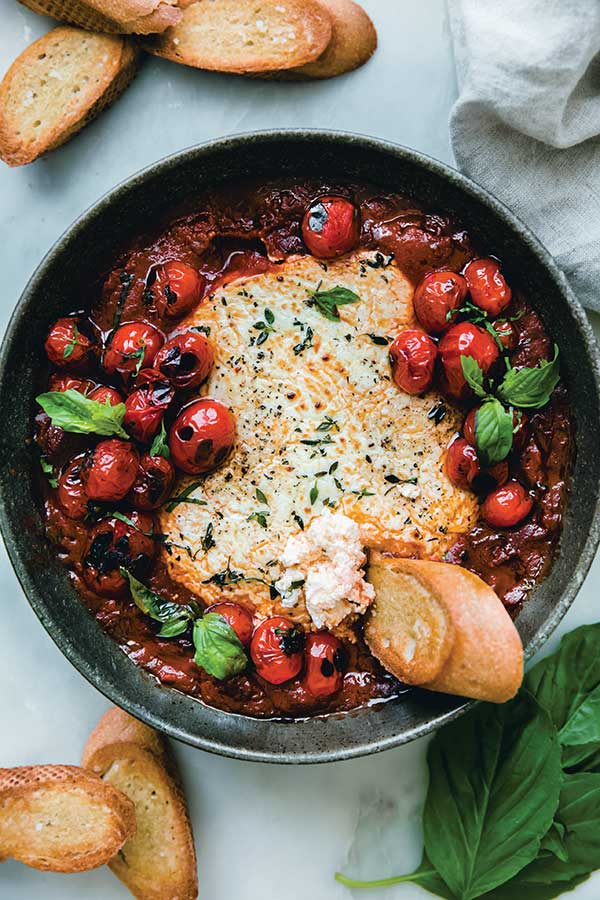
Baked Tomato Goat Cheese Dip
Recipe courtesy of Marzia Aziz of "Little Spice Jar"
Prep time: 10 minutes
Cook time: 20 minutes
Servings: 4-6
- Nonstick cooking spray
- 2 cups RAGÚ Simply Traditional Sauce
- 3 cloves garlic, divided
- 1/ 4 cup fresh basil, chopped, divided
- 1/8-1/4 teaspoon red pepper flakes
- 1 log (10-10 1/2 ounces) goat cheese, softened at room temperature
- 2 teaspoons olive oil, plus additional for brushing, divided
- 1/4 teaspoon fresh thyme
- kosher salt, divided
- pepper
- 1 large baguette, sliced on bias
- blistered tomatoes, for serving (optional)
- Position one rack in upper third of oven and one in lower third. Preheat oven to 375 F. Spray small, round baking dish with nonstick cooking spray; set aside.
- Add sauce to small bowl. Grate in two garlic cloves then add 1/8 cup basil and red pepper flakes. Stir to combine then pour sauce into baking dish.
- Smash goat cheese log into ball. Place ball between two sheets plastic wrap. Using hands, flatten cheese into thick, round disc about 1 inch smaller in diameter than baking dish. Remove goat cheese from plastic wrap and place in center of sauce. Drizzle cheese with 2 teaspoons olive oil. Sprinkle with fresh thyme, kosher salt and pepper. Bake on lower rack, uncovered, 20-25 minutes, or until sauce is bubbly and cheese is warmed through.
- Place baguette slices on baking sheet. Drizzle or brush with olive oil and sprinkle with kosher salt. Bake crostini on upper rack 10-12 minutes, flipping halfway through. When bread is done, remove from oven, cut last garlic clove in half and rub cut side on bread.
- Top dip with remaining basil and blistered tomatoes, if desired, and serve with crostini.
Note: To make blistered tomatoes: Heat skillet over medium-high heat until almost smoking. Add 1 pint cherry tomatoes to dry skillet and let sit 1 minute. Lower heat to low, toss tomatoes with 2 teaspoons olive oil and cook 2-3 minutes, or until tomatoes are about to burst. Remove from heat; sprinkle with pinch of salt and pepper.
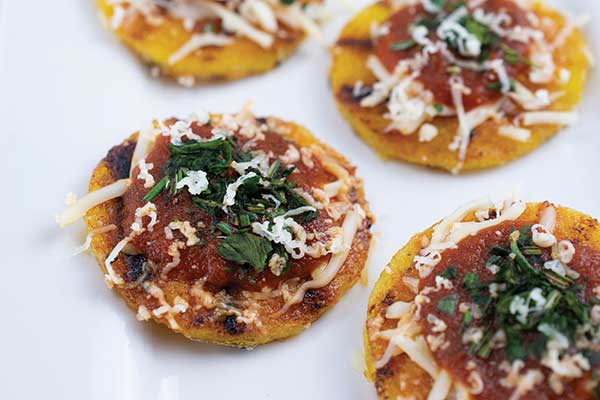
Polenta Bites
- 1 tube (18 ounces) polenta
- 1 1/2 teaspoons olive oil
- 1 jar (24 ounces) RAGÚ Chunky Tomato, Garlic and Onion Sauce
- 1 package (8 ounces) shredded mozzarella
- 2 sprigs, rosemary, destemmed and chopped
- 3 basil leaves, chopped
- 1 block (8 ounces) hard Parmesan cheese
- Cut polenta into slices. In skillet, heat olive oil over medium-high heat; fry polenta slices 10-12 minutes on each side until crispy and golden brown.
- In saucepan over medium heat, warm sauce.
- Place polenta slices on tray and sprinkle with mozzarella. Place 1/2 teaspoon warm sauce on each slice then sprinkle with chopped rosemary and basil. Grate hard Parmesan onto each slice for topping.
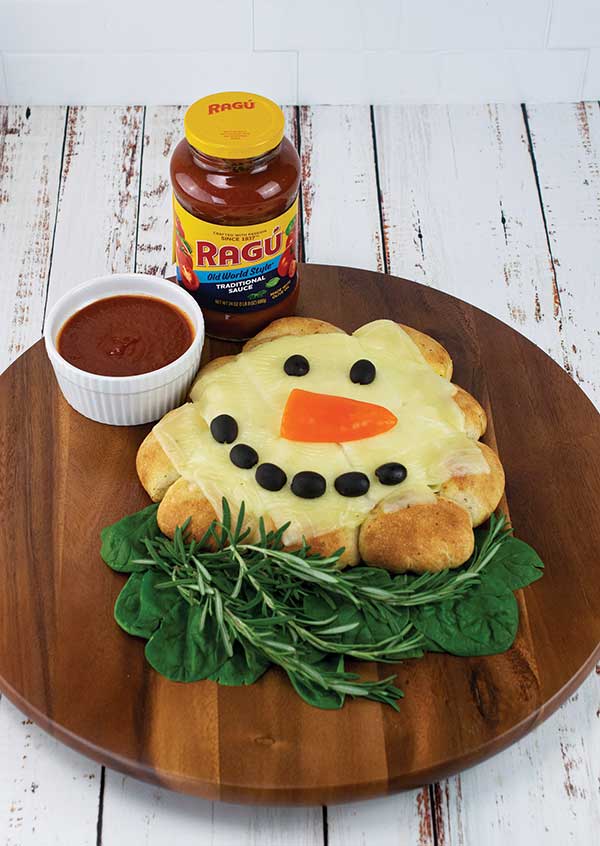
Snowman Pizza Bombs
- 1 tube (11.8 ounces) pizza dough
- 1 jar (24 ounces) RAGÚ Old World Style Traditional Sauce
- 1 package (6 ounces) pepperoni slices
- 1 package (6 ounces) Canadian bacon slices
- 1 package (8 ounces) shredded cheddar cheese
- 4 tablespoons melted butter
- 1 teaspoon garlic powder
- 1 1/2 teaspoons Italian seasoning
- 1 package (8 ounces) mozzarella cheese slices
Decorative vegetables (optional):
- multicolored sweet peppers
- olives
- spinach
- mushrooms
- cherry tomatoes
- Preheat oven to 400 F.
- Cut pizza dough into 12 squares. On each square, place 1/2 teaspoon sauce and evenly top with pepperoni, Canadian bacon and cheddar cheese.
- Pinch corners of dough together to round into balls then place in muffin tins.
- In small bowl, mix melted butter, garlic powder and Italian seasoning; brush generously over dough balls.
- Bake 15-20 minutes until golden brown.
- Remove from muffin tin and carefully shape dough balls into circles; place on baking sheet. Cover with mozzarella slices and bake until melted.
- Create snowman faces by decorating each with peppers, olives, spinach, mushrooms and cherry tomatoes, if desired. Use remaining sauce for dipping.
Source: RAGÚ
Holiday Entertaining is Back with Sweet, Savory and Oh So Cheesy Ideas
Real California Milk helps impress guests with the California Cheese Centerpiece and Cookie Exchange Board
(Family Features) This holiday season, entertaining is back on the table and that means endless opportunities to showcase Instagram-worthy ideas. For those looking to impress friends and family, Real California Milk has two unique culinary ideas to take holiday traditions to the next level: The Cheese Centerpiece and Cookie Exchange Board. From fresh food as bountiful décor to camera-ready cookie presentations, incorporating California dairy into your entertaining is a winning holiday strategy.

California Cheese Centerpiece
The mission? Create a holiday centerpiece but make it delicious. Real California Milk partner Jessica Lawrenz, Founder of Monger, Mold and Milk, took the challenge with the California Cheese Centerpiece, the ultimate in edible entertaining with a beautiful display of Real California Cheeses, salami, fruits and vegetables arranged with fragrant herbal garnishes in a display sure to impress family and friends. As a bonus, it creates less waste than a stand-alone floral bouquet (and you’ll have less to clean up!).
Find additional cheese displays and holiday recipes at realcaliforniamilk.com.
INGREDIENTS:
Variety of firm to medium (semi-firm) Real California Cheeses (find them here: https://www.realcaliforniamilk.com/cheese-makers)
Shown in arrangement:
- Real California Dry Jack cheese wedges
- Real California Wine-soaked Cheddar wedges
- Real California Triple Cream cheese wedges
- Salumi or salami, made into roses
Fresh fruits and vegetables:
- Mini clementines or kumquats
- Grapes or currants (both shown)
- Fresh figs
- Gooseberries
- Cucamelons or mini cucumbers
- Cherry tomatoes (tiger stripe tomatoes shown but any small tomato works)
Garnishes:
- Bay leaf stems
- Olive leaf stems
- Rosemary branches
- Lavender stems
- Sage bunches
- Chive or garlic flowers or any edible flower with a stem
Tools and Materials:
- Circular tray or plate
- Craft or flora foam (half sphere shape that is at least 1-inch smaller in diameter than your tray)
- Double-sided tape
- Plastic wrap
- Toothpicks, U-shape bamboo toothpicks (optional)
- Cookie cutter shapes (optional)
DIRECTIONS:
- Cover foam in plastic wrap to protect food from making contact with the foam.
- Use double-sided tape to secure the foam to the tray.
- Now you can start assembling the centerpiece. Start from the bottom and work your way up to the top of the sphere.
- Use the bulk of your leafy garnishment (bay leaf stems, olive leaf stems, sage bunches) on the bottom layer to create a base and coverage by poking the stems into the foam. If needed you can trim the bottom of the stem in a diagonal direction to create a more pokey end OR use a toothpick to pierce a hole in the place where you want to insert stems.
- For best visual appeal, fruits like grapes and currants should be arranged to kind of flow over the edge of the tray near the bottom as well. PRO TIP: Use “U” shaped bamboo toothpicks to secure the stems of the hanging fruits into the foam.
- From here use toothpicks to secure cheese wedges, salumi roses, fruits and vegetables into the foam. Cut shorter, triangular pieces of cheese (as opposed to longer triangular pieces used for a long/rectangular centerpiece). Use any tall wedges near the bottom where they will be easy to grab but not sticking out too far if placed near the top. You can use cookie cutter shapes as well for the cheeses, if desired.
- Finally, take any of the smaller garnish pieces you have (lavender, chive flowers, rosemary ends, loose leaves) to fill in the spaces between all the items.

Holiday Cookie Exchange Board
If a cookie exchange is on the docket for this year’s holiday or you’re simply looking to upgrade your dessert table, take some tips from this stunning cookie exchange presentation. Mix and match Real California Milk cookie recipes to create a mouthwatering arrangement and decorate with mini candy canes, holiday lollipops, various holiday décor and lights. Add napkins, cookie bags for take-away, and recipe cards for sharing, and let your guests go to town.
- Hot cocoa or coffee
- Milk shooters
- Coconut Walnut Cake Bars
- Chocolate Mint Cookies
- Stroopwafel Cookies
- Mini Gingerbread Cupcakes
- Madeleines
Dipped in melted dark chocolate and rolled in crushed peppermint candies or Holiday sprinkles
Leave out ice cream, exchange holiday sprinkles for rainbow sprinkles, and dip in melted white chocolate with color for extra festivity
California is the nation’s leading milk producer and is responsible for producing more butter, ice cream and nonfat dry milk than any other state. The state is the second-largest producer of cheese and yogurt. California milk and dairy foods can be identified by the Real California Milk seal, which certifies they are made exclusively with milk from the state’s dairy farm families.
About Real California Milk/California Milk Advisory Board
The California Milk Advisory Board (CMAB), an instrumentality of the California Department of Food and Agriculture, is funded by the state’s dairy farm families who lead the nation in sustainable dairy farming practices. With a vision to nourish the world with the wholesome goodness of Real California Milk, the CMAB’s programs focus on increasing demand for California’s sustainable dairy products in the state, across the U.S. and around the world through advertising, public relations, research, and retail and foodservice promotional programs. For more information and to connect with the CMAB, visit RealCaliforniaMilk.com, Facebook, YouTube, Twitter, Instagram and Pinterest.
Source: Real California Milk
Add Powerful Pairings to Your Plate
(Family Features) Joining loved ones at the family table is an important moment for many, both as a filling way to enjoy a meal and an emotionally satisfying way to catch up on all the day’s events. Make those moments count by combining nutritious ingredients and creating recipes that can quickly become favorites.
As part of the Powerful Pairings initiative – launched by the United Sorghum Checkoff Program, National Pork Board and USA Pulses – these recipes call for pulses, which include lentils, chickpeas dry peas, and beans; sorghum, similar to rice or quinoa filled with nutrients, texture and taste; and pork, rich in flavor, versatile and sustainable with nutritious qualities.
Combined, these three ingredients can work together in sweet and savory dishes alike, and they shine with a multitude of herbs, spices and sauces from around the world. A powerhouse nutritional trio, they include foods from the protein, vegetable and grain groups outlined in MyPlate, a template for balance, variety and moderation.
Plus, the taste and versatility of these ingredients make it easier to achieve more family meals, which promotes cohesion, communication and relationships, helping loved ones celebrate simple joys together and be more prepared for uncertainty and difficult life moments.
Find more information, resources and recipes at powerfulpairings.com.
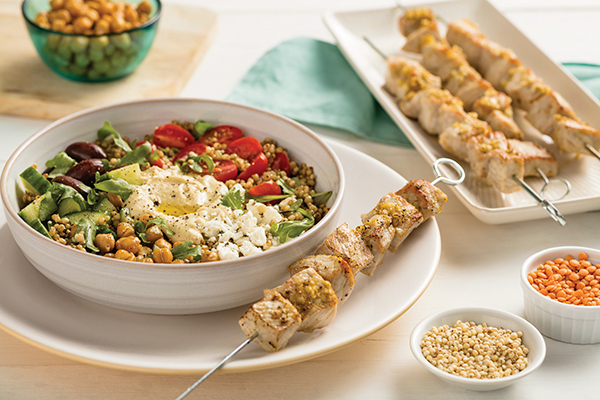
Mediterranean Grain Bowl with Pork Skewers
Recipe courtesy of the United Sorghum Checkoff Program, National Pork Board and USA Pulses
Prep time: 45 minutes, plus 2 hours marinate time
Cook time: 75 minutes
Servings: 6 (1 pork skewer, 2/3 cup sorghum, 2 tablespoons hummus)
Red Lentil Hummus:
- 1 1/3 cups water
- 1/3 cup dried red lentils
- 1 tablespoon olive oil
- 1 tablespoon tahini
- 1 tablespoon lemon juice
- 1/2 teaspoon minced garlic
- 1/2 teaspoon cumin
- 1/4 teaspoon salt
- 1/4 teaspoon black pepper
- 12 ounces pork loin roast, trimmed of fat
- 4 tablespoons olive oil, divided
- 2 teaspoons minced garlic
- 1 teaspoon lemon zest
- 1 teaspoon ground cumin
- 1 teaspoon salt
- 1/2 teaspoon black pepper
- 1 sweet onion, chopped
- 3 cups no-salt-added chicken stock
- 3/4 cup whole-grain sorghum, rinsed and drained
- 1 cup canned garbanzo beans (chickpeas), rinsed, drained and dried with paper towels
- 1 1/2 cups halved cherry tomatoes
- 1 cup arugula
- 1 cup chopped cucumber
- 2/3 cup crumbled feta cheese
- 1/2 cup kalamata olives
- To make Red Lentil Hummus: In small saucepan, combine water and dried red lentils; bring to boil over medium-high heat. Reduce heat to low and simmer, covered, stirring occasionally, about 30 minutes, or until lentils split and become soft. Cool and transfer to food processor. Add olive oil, tahini, lemon juice, minced garlic, cumin, salt and black pepper; process 30-60 seconds, or until smooth, stopping to scrape down sides as needed. Transfer to airtight container and store in refrigerator up to 5 days until serving time.
- Cut pork loin into 1-inch cubes. Place in re-sealable plastic bag set in shallow dish. In small bowl, combine 3 tablespoons olive oil, garlic, lemon zest, cumin, salt and black pepper. Pour half olive oil mixture over meat, reserving remaining half. Seal bag; turn to coat meat. Marinate in refrigerator 2 hours, turning bag occasionally.
- In medium saucepan, heat remaining olive oil over medium-high heat. Add onion, cook and stir 6-8 minutes, or until tender. Add stock and bring to boil. Add sorghum. Reduce heat and simmer, covered, 45-60 minutes, or until sorghum is tender, stirring occasionally.
- Preheat oven to 400 F.
- Arrange chickpeas on foil-lined 15-by-10-by-1-inch baking pan. Drizzle with reserved olive oil mixture; toss to coat. Roast 20-30 minutes, or until chickpeas are toasted and crispy, stirring occasionally. Remove from oven and increase oven to 500 F.
- Drain meat, discarding marinade. Divide among six wooden or metal skewers. Arrange skewers on wire rack on baking sheet and bake 10 minutes, or until meat is slightly pink in center, turning once halfway through.
- To serve, divide cooked sorghum between six shallow bowls. Top with tomatoes, arugula, cucumber, feta cheese, olives, chickpeas and Red Lentil Hummus. Serve with pork skewers.
Nutritional information per serving: 505 calories; 28 g total fat (8 g saturated fat); 14 mg cholesterol; 528 mg sodium; 43 g total carbohydrates (8 g dietary fiber, 6 g sugars); 23 g protein; 1% vitamin D; 15% calcium; 19% iron; 16% potassium; 361 mg phosphorus (29%).
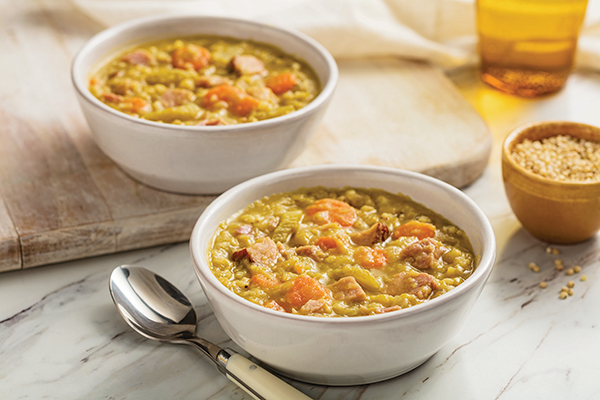
Sorghum Split Pea Soup
Recipe courtesy of the United Sorghum Checkoff Program, National Pork Board and USA Pulses
Prep time: 20 minutes
Cook time: 60 minutes
Servings: 6 (1 1/4 cup each)
- 1 1/2 tablespoons olive oil
- 1 onion, chopped
- 3/4 cup sliced carrots
- 3/4 cup sliced celery
- salt, to taste
- pepper, to taste
- 1 1/2 teaspoons minced garlic
- 6 cups no-salt-added chicken stock
- 1 1/4 cups green split peas
- 1 small ham bone
- 2/3 cup chopped ham
- 2/3 cup pearled sorghum
- 4 sprigs thyme
- 2 bay leaves
- 1 1/2 tablespoons Worcestershire sauce
- chopped fresh thyme (optional)
- cracked black pepper (optional)
- In 4-quart stock pot or large pot, heat oil over medium heat. Add onion, carrots, celery and garlic; season with salt and pepper, to taste, and cook, stirring occasionally, 10-12 minutes, or until onion is tender. Add chicken stock, split peas, ham bone, ham, sorghum, thyme sprigs and bay leaves. Bring to boil; reduce heat and simmer, covered, 45-60 minutes, or until split peas are soft and sorghum is tender.
- Remove ham bone, thyme sprigs and bay leaves from soup. Remove ham from bone, chop ham and return to pot. Discard bone, thyme sprigs and bay leaves. Add Worcestershire sauce and season with salt and pepper, to taste.
- Garnish with chopped fresh thyme and cracked black pepper, if desired.
Nutritional information per serving: 336 calories; 8 g total fat (2 g saturated fat); 22 mg cholesterol; 573 mg sodium; 48 g total carbohydrates (12 g dietary fiber, 7 g sugars); 20 g protein; 3% vitamin D; 5% calcium; 17% iron; 19% potassium; 227 mg phosphorus (18%).
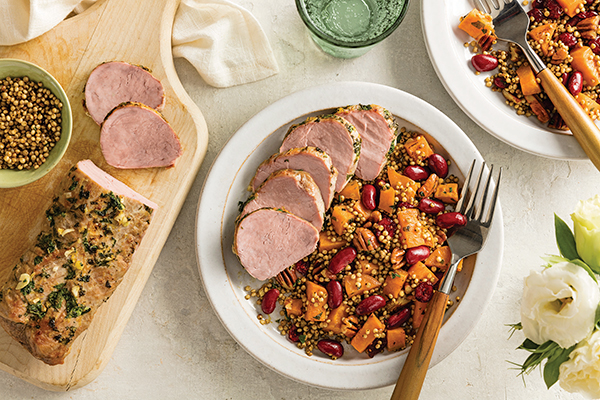
Lemon-Garlic Tenderloin with Warm Sorghum Salad
Recipe courtesy of the United Sorghum Checkoff Program, National Pork Board and USA Pulses
Prep time: 25 minutes
Cook time: 70 minutes
Servings: 6 (2 ounces pork, 3/4 cup sorghum salad)
- 2 cups vegetable broth
- 2 cups water
- 1 cup whole-grain sorghum
- 2 tablespoons olive oil
- 1 tablespoon minced garlic
- 1 tablespoon minced fresh parsley
- 1 1/2 teaspoons lemon zest
- 1/2 teaspoon salt
- 1/2 teaspoon pepper
- 1 pork tenderloin (16 ounces), trimmed of fat
- 1 medium sweet potato, peeled and cut into 1/2-inch pieces
- 1 cup kidney beans, rinsed and drained
- 1/2 cup dried cranberries
- 1/2 cup pecan halves
- Preheat oven to 425 F. In medium saucepan, combine vegetable broth and water. Bring to boil. Add sorghum. Reduce heat to simmer and cook, covered, 45-60 minutes, or until tender.
- In medium bowl, combine olive oil, garlic, parsley, lemon zest, salt and pepper. Drizzle half oil mixture on pork; rub in with fingers. Place pork in shallow roasting pan. Add sweet potatoes to bowl with remaining oil mixture. Toss to coat and set aside.
- Roast pork, uncovered, 10 minutes. Arrange sweet potatoes around pork and roast 15-20 minutes, or until pork reaches 145 F internal temperature and potatoes are tender. Remove pork from pan. Cover; let stand 10 minutes.
- Stir roasted sweet potatoes, beans, cranberries and pecan halves into cooked sorghum and heat through.
- Slice pork tenderloin and serve with warm sorghum salad.
Nutritional information per serving: 436 calories; 15 g total fat (2 g saturated fat); 55 mg cholesterol; 369 mg sodium; 55 g total carbohydrates (8 g dietary fiber, 16 g sugars); 25 g protein; 2% vitamin D; 6% calcium; 20% iron; 20% potassium; 377 mg phosphorus (30%).
Source: Powerful Pairings


