
No Bake Chocolate Caramel Cheesecake
Add the rich flavor of caramel to your dessert table with a recipe like this No Bake Chocolate Caramel Cheesecake for a tempting, tasty treat.
Find more dessert recipes at Culinary.net.
Watch video to see how to make this recipe!
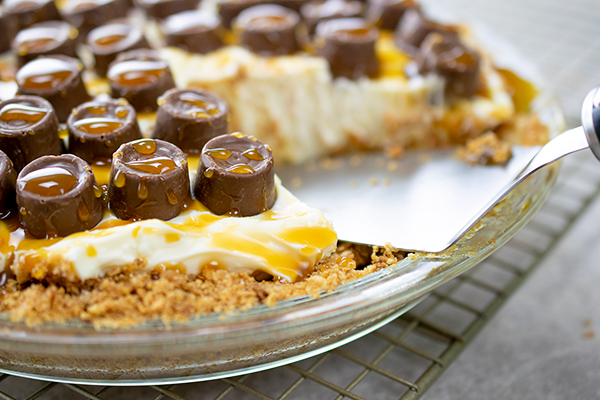
No Bake Chocolate Caramel Cheesecake
- 10 graham crackers, crumbled
- 7 tablespoons butter, melted
- 1/4 cup sugar
- 1 tablespoon cinnamon
- caramel sauce, divided
- 16 ounces cream cheese
- 7 tablespoons powdered sugar
- 1 cup whipping cream
- chocolate covered caramels
- Place graham crackers in re-sealable plastic bag. Using rolling pin or soup can, roll graham crackers into fine crumbs.
- In medium bowl, add cracker crumbs, melted butter, sugar and cinnamon; stir until combined. Press into bottom of pie plate. Drizzle caramel sauce over crust; set aside.
- In medium bowl, combine cream cheese, powdered sugar and whipping cream. Pour over graham cracker crust. Refrigerate 24 hours.
- Place chocolate caramel candy pieces around pie. Drizzle with caramel sauce. Refrigerate leftovers.

A Tasty Holiday Treat
(Family Features) When family and friends come together in celebration of the holiday season, tasty treats are a must-have for the festivities. You can also celebrate the season of giving with a special giveaway at the end of your gathering to show your gratitude to loved ones.
A simple yet delicious treat, Chocolate Bacon Bark is a sweet-and-salty snack with Gwaltney Bacon as the centerpiece of a crowd-pleaser for nearly any celebration. Try pairing with these creative giveaway bags as a personalized memento to offer a unique memory even after the season comes to a close. The bite-sized morsels are also perfect for individual grab bags by the door as guests make their way home following holiday celebrations.
Visit gwaltneyfoods.com for more holiday recipe ideas.

Chocolate Bacon Bark and Giveaway Bags
Prep time: 10 minutes
Servings: 24
Chocolate Bacon Bark:
- 1 bag (12 ounces) chocolate candy melts
- 1 package (12 ounces) Gwaltney Bacon
- toppings such as pretzels, candies and sprinkles (optional)
Giveaway Bags:
- Scissors
- Card stock or construction paper
- 24 brown paper lunch bags
- Coloring or drawing materials
- Hole puncher
- Ribbon
- To make Chocolate Bacon Bark: Line baking sheet with parchment paper. In bowl, melt chocolate candy in microwave in 30-second increments; stir every 30 seconds.
- Pour chocolate into pan and spread evenly.
- Top with bacon and pretzels, candies and sprinkles, if desired; freeze until hardened (about 12 hours).
- Break into bite-sized pieces.
- To make Giveaway Bags: Using scissors, cut one piece of card stock or construction paper to match width of paper bag.
- Cut length of card stock or construction paper into “V” shape so point comes about 3/4 down bag.
- Decorate card stock or construction paper with sayings or drawings.
- Stuff paper bag with Chocolate Bacon Bark.
- Hold decorated card stock or construction paper to top of paper bag, “V” shape pointed down, and punch two centered holes about 1/2 inch from top and 1/2 inch away from each other.
- Using scissors, cut one piece of ribbon about 6 inches long.
- With holes aligned and decorated card stock or construction paper facing out, insert end of ribbon from back side of bag; tie loose enough knot or bow so paper bag doesn’t rip.
- Repeat process with remaining bags.
Source: Gwaltney

A DIY Halloween Creation
(Family Features) When it comes to family fun, it’s hard to beat Halloween, and with all the candy flying around, it’s an opportunity to add something nutritiousand delicious to festive celebrations.
Chocolate milk can provide the best of both worlds. It satisfies kids’ sweet tooth while providing all the nutrients of classic white milk, like calcium, vitamin D and high-quality protein to help keep little skeletons strong, making it a Halloween hit for kids and parents alike.
Carve out some quality time to make memories during the eeriest time of the year with this Scary Sweet Cemetery – including chocolate pudding, gummy worms and sandwich cookies – to get kids cooking and crafting, all while nourishing their bodies and bones with nutritious chocolate milk.
Visit MilkLife.com for more kid-friendly, DIY Halloween treats.
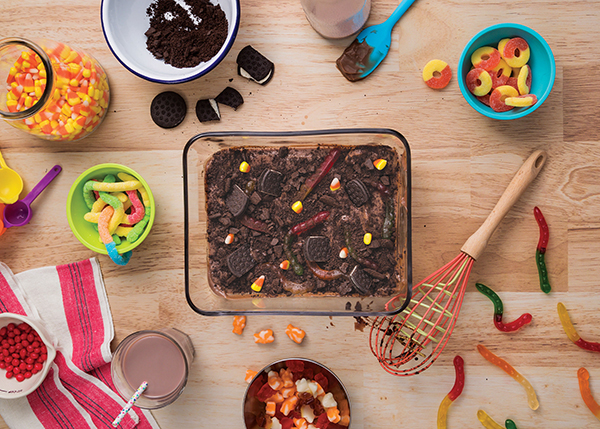
Scary Sweet Cemetery
Recipe courtesy of MilkPEP
Servings: 6
Pudding:
- 2 tablespoons unsweetened cocoa powder
- 2 tablespoons cornstarch
- 2 cups cold chocolate milk
- 1 pinch salt
- 1 large egg
- 4 ounces chopped semisweet chocolate (about 3/4 cup)
- 10 ounces chocolate vanilla sandwich cookies (about 20 cookies)
- 12 gummy worms
- In large saucepan over high heat, stir cocoa powder, cornstarch, chocolate milk and salt to incorporate dry ingredients into milk. Cook until mixture starts to boil then reduce heat to simmer until mixture starts to thicken, about 3-5 minutes.
- In large bowl, using whisk, beat egg, slowly drizzling hot chocolate mixture into bowl, whisking continuously. Fold in chopped chocolate and stir until chocolate has completely melted.
- Pour pudding mixture into glass baking dish. Place piece of parchment paper on top of surface of pudding. Chill in refrigerator 3 hours, or overnight.
- To prepare “dirt,” place chocolate vanilla sandwich cookies in large re-sealable bag. Using rolling pin, crush cookies into crumbs.
- When ready to serve, sprinkle cookie crumbs over pudding and place gummy worms on cookie crumb layer, making sure to “bury” parts of gummy worm ends as if worms are coming out of dirt.
Nutritional information per serving: 460 calories; 18 g fat; 8 g saturated fat; 35 mg cholesterol; 6 g protein; 75 g carbohydrates; 4 g fiber; 250 mg sodium; 104 mg calcium. Nutrition figures based on using low-fat chocolate milk.
Source: MilkPEP

Busy Season Solutions
Quick and tasty meals and snacks
(Family Features) For those who are always on the go, it can be difficult to find time to whip up meals and snacks that are both nutritious and tasty. However, with some simple changes – and timesaving recipes – you can create delicious dishes and meals that will keep you feeling energized to fuel your busy lifestyle.
For example, these quick and easy recipes for a main course, snacks and even desserts are all part of the Atkins low-carb lifestyle, a long-term, healthy eating approach focused on high-fiber 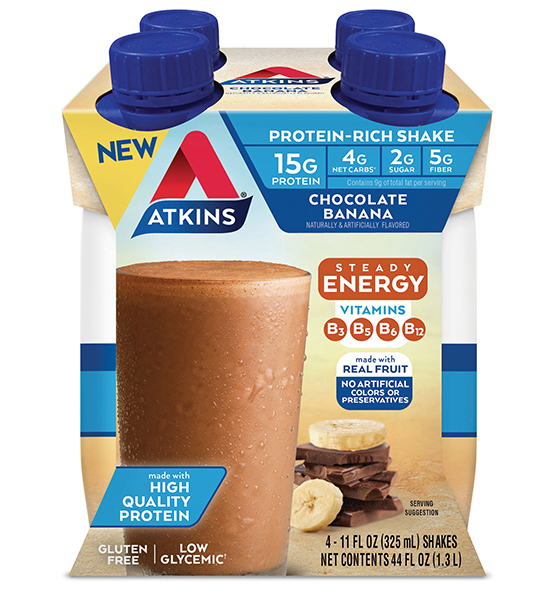 carbohydrates, optimal protein and healthy fats. The eating approach, which is a more flexible version of the popular ketogenic diet, offers a balanced mix of foods containing fiber-rich and nutrient-dense carbohydrates while focusing on reduced levels of refined carbohydrates, added sugars and the “hidden sugar effect” – when carbohydrates convert to sugar when digested. You don’t see the sugar, but your body does.
An On-the-Go Morning Treat
Busy mornings can lead to breakfast being put on the backburner or skipped altogether. However, with an option like the Atkins Chocolate Banana Shake, which is made with real fruit, you can enjoy the most important meal of the day on-the-go or anytime you need a snack break.
A beneficial source of B vitamins, these protein-rich shakes can satisfy hunger with 5 grams of fiber and provide steady energy all day long. Made to easily fit into a busy lifestyle, they’re also gluten-free with no artificial colors or preservatives, and low-glycemic with 4 net carbs and 2 grams of sugar.
Kickstart a nutritious eating plan at Atkins.com
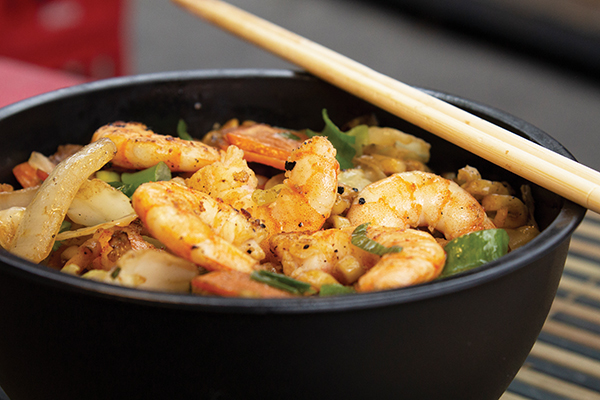
Egg Roll Bowl with Shrimp
Recipe courtesy of Atkins
Prep time: 5 minutes
Cook time: 10 minutes
Servings: 4
- 5 cups frozen cauliflower rice
- 3 tablespoons canola oil
- 3 tablespoons sesame oil
- 4 teaspoons minced or pressed garlic
- 2 teaspoons ginger paste
- 6 cups pre-cut coleslaw (cabbage and carrots)
- 1 cup sliced red bell pepper
- 1/2 cup thinly sliced scallions, root and tips trimmed
- 1 teaspoon Chinese five-spice blend
- 1/4 cup tamari soy sauce
- 2 tablespoons mirin rice cooking wine
- 1 pound cooked and peeled shrimp, thawed
- 4 teaspoons sesame seeds
- In microwave, steam cauliflower according to package instructions.
- While cauliflower is cooking, warm large, nonstick skillet with lid over medium heat. Add oils, swirl to coat pan and, when shimmering, add garlic and ginger. Sauté until sizzling and fragrant, stirring constantly, about 30 seconds.
- Add coleslaw, bell pepper and scallions; continue sautéing, stirring frequently, until cabbage just begins to wilt, about 3 minutes.
- Sprinkle on five-spice blend and stir to incorporate. Add soy sauce and mirin rice cooking wine to pan and stir to evenly coat cabbage. Add shrimp to skillet; toss to evenly distribute. Reduce heat to medium-low, cover with lid and allow shrimp to warm, about 3 minutes.
- Measure about 1 cup cooked cauliflower rice into bottom of four bowls. Top evenly with shrimp and cabbage mixture, about 1 cup vegetables and 9-11 large shrimp per serving, drizzling with pan sauce evenly. Sprinkle each bowl with 1 teaspoon sesame seeds and serve while hot.
Notes: To help meal come together quickly, use frozen cauliflower rice, pre-grated ginger paste, pre-minced jarred garlic and bagged coleslaw mix. Green onions and bell pepper can also be pre-sliced.
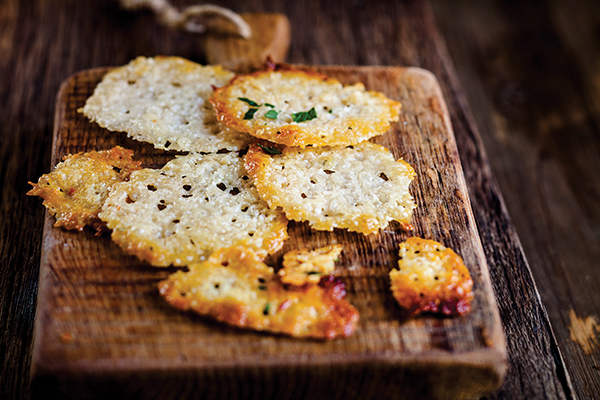
Parmesan Crisps
Recipe courtesy of Atkins
Prep time: 2 minutes
Cook time: 8 minutes
Servings: 6
- 3/4 cup shredded Parmesan cheese
- 1/2 teaspoon Italian seasoning blend
- Heat oven to 325° F. Line baking sheet with parchment paper.
- Use large cup or mug to draw six roughly 4-inch circles on parchment paper. Fill each circle with 2 tablespoons Parmesan cheese, smoothing shreds out and creating slightly thicker outer edge. Sprinkle each with pinch of Italian seasoning and bake 7 1/2 minutes, or until outer edges and bottoms are golden but not burned.
- Remove from oven and let cool at least 1 minute before eating. Store in airtight container at room temperature up to 1 day.
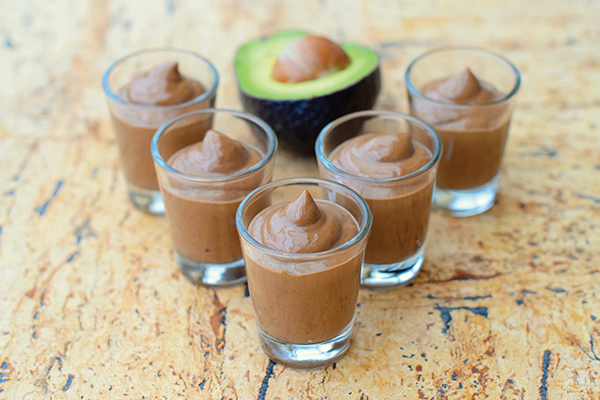
Avocado Chocolate Mousse
Recipe courtesy of Atkins
Servings: 4
- 3 avocados
- 1/2 cup unsweetened coconut milk
- 1/2 cup sugar-free chocolate chips
- 2 1/2 tablespoons cocoa powder
- 2 tablespoons Erythritol (low-carb sweetener)
- 3 teaspoons stevia-based sugar substitute
- 2 teaspoons vanilla extract
- 1/8 teaspoon salt
- Mash avocado and place in blender with coconut milk. Blend until smooth.
- In microwave-safe bowl, heat chocolate chips 20 seconds, stir well and heat in 10-second intervals until melted, stirring in-between. Once melted, add to avocado mixture and continue to blend while scraping down sides of bowl.
- Add cocoa powder, sweetener, sugar substitute, vanilla and salt. Blend and scrape down sides of bowl until all ingredients are well combined and mousse is smooth and creamy. Add additional sugar substitute 1/4 teaspoon at a time if sweeter mousse is desired.
Note: All ingredients should be at room temperature to make blending smooth and easy.
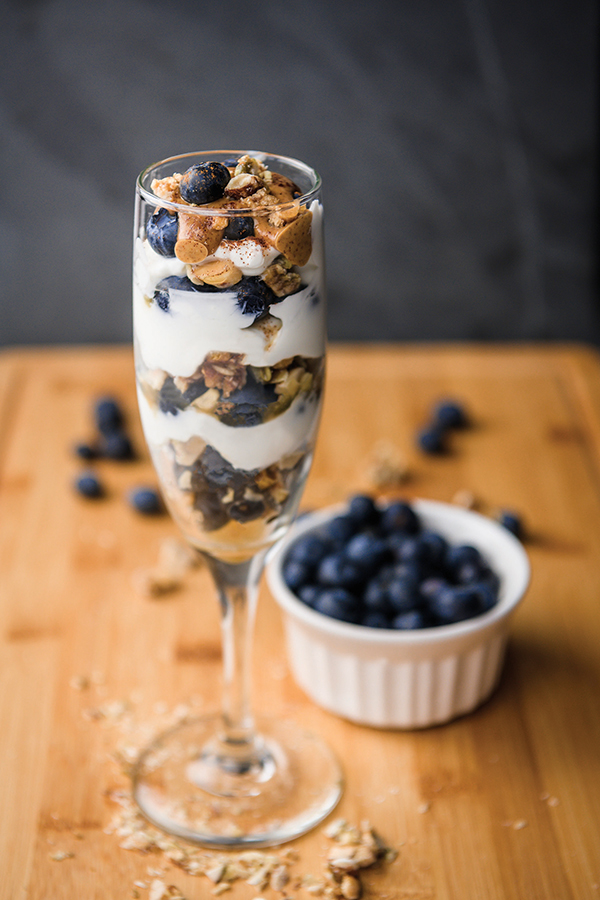
Yogurt Parfait
Prep time: 5 minutes
Servings: 1
- 13 pieces Atkins Honey Almond Vanilla Crunch Bites
- 1/4 cup fresh blueberries
- 1/4 cup plain, unsweetened whole milk Greek yogurt
- 1 tablespoon almond butter
- 1 pinch cinnamon
- 1 pinch sugar substitute
- Roughly chop crunch bites.
- In small glass, layer blueberries, crunch bites and yogurt. Swirl almond butter on top and finish with sprinkle of cinnamon and sugar substitute.
Photos courtesy of Getty Images (Egg Roll Bowl with Shrimp, Parmesan Crisps and Avocado Chocolate Mousse)
Source: Atkins

Chocolate Caramel Pie
When it comes to dessert, it’s hard to beat chocolate as the main ingredient for dishes of all kinds. Add a twist to your next treat with the sweet taste of caramel in this Chocolate Caramel Pie.
Find more dessert recipes at Culinary.net.
Watch video to see how to make this recipe!
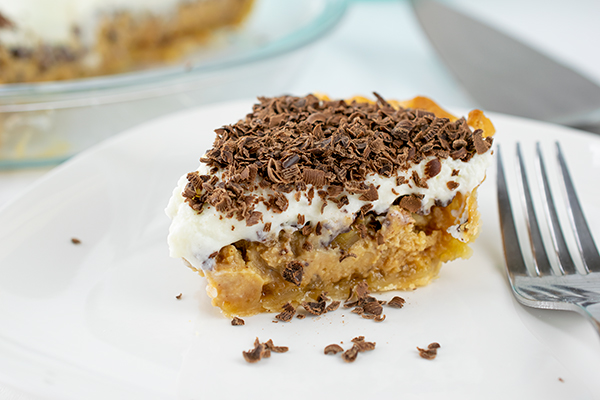
Chocolate Caramel Pie
- 1 package (15 ounces) pie crust
Filling:
- 24 caramels, unwrapped
- 1/3 cup water
- 2/3 cup brown sugar
- 2/3 cup sour cream
- 1 teaspoon vanilla extract
- 2 eggs, beaten
- 1/2 cup walnuts, chopped
- 1/3 cup grated sweet baking chocolate, divided
Topping:
- 1 cup white chocolate chip morsels
- 1/4 cup milk
- 1 cup whipping cream
- 2 tablespoons grated sweet baking chocolate
- Heat oven to 450° F. Prepare pie crust in 9-inch glass pie dish. Bake 8-9 minutes, or until lightly brown.
- To make filling: In medium bowl, combine caramels and water. Melt in microwave, stirring frequently. Stir in brown sugar, sour cream, vanilla extract, eggs and walnuts.
- Reduce oven to 350° F. Pour filling into cooled pie shell. Return to oven. Bake 30-40 minutes, or until edges of filling are set.
- Cool 15 minutes. Sprinkle 3/4 cup grated chocolate over pie. Refrigerate 2 hours.
- To make topping: In small glass bowl, combine white chocolate morsels and milk. Melt in microwave, stirring frequently. Set aside.
- In small bowl, beat whipping cream until peaks form. Fold in melted white chocolate mixture. Spread over cooled filling. Sprinkle with remaining grated chocolate.
- Refrigerate until ready to serve.

A Father's Day to Remember
(Family Features) While Father's Day is for honoring dads, it's also a great opportunity to honor the men who have been father figures to us - stepfathers, grandfathers, uncles, even friends who have played that role in our lives.
This year, take some extra time to tell those men how much they've meant to you. A card or letter, a phone call or a face to face conversation - you'll give them a Father's Day gift they'll never forget.
To show them your appreciation, have them over for a special dinner. Grill up some chicken and top it with this Cilantro Cream Sauce. Serve with some southwestern-inspired rice and follow it all up with these Double Chocolate Warm Pudding Cakes for a homey dessert.
For more Father's Day dinner and dessert ideas, visit VeryBestBaking.com.
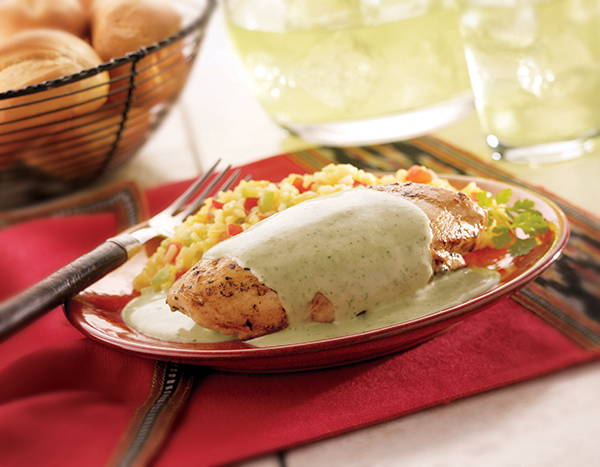
Cilantro Cream Sauce over Chicken
Makes 6 to 8 servings
- 6 to 8 boneless, skinless chicken breast halves, cooked and kept warm
- 2 cups loosely packed fresh cilantro
- 1 can (12 fluid ounces) Nestlé Carnation Evaporated Milk
- 1 cup water
- 2 teaspoons granulated chicken flavor bouillon
- 3 tablespoons butter or margarine
- 3 tablespoons all-purpose flour
- Ground black pepper to taste
- PLACE cilantro, evaporated milk, water and bouillon in blender; cover. Blend until smooth.
- MELT butter in medium saucepan over medium heat. Remove from heat. Stir in flour, stirring constantly until smooth. Stir in cilantro mixture. Cook over medium-low heat, stirring constantly, until mixture comes to a boil and thickens slightly. Season to taste with pepper.
- POUR sauce over chicken breasts.
Nutrition Information per serving: 330 calories; 120 calories from fat; 14g total fat; 8g saturated fat; 130mg cholesterol; 380mg sodium; 9g carbohydrate; 0g fiber; 6g sugars; 40g protein; 10% Vitamin A; 20% Calcium
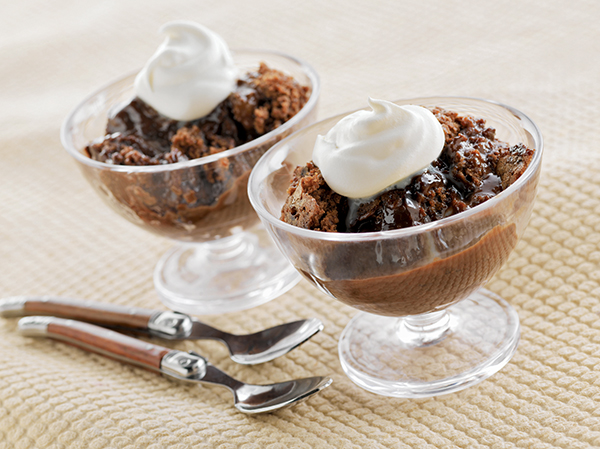
Double Chocolate Warm Pudding Cakes
Makes 8 servings
- Nonstick cooking spray
- 1 cup all-purpose flour
- 1 1/4 cups granulated sugar, divided
- 3 tablespoons plus 1/4 cup Nestlé Toll House Baking Cocoa, divided
- 2 teaspoons baking powder
- 1/4 teaspoon salt
- 1 can (12 fluid ounces) Nestlé Carnation Evaporated Lowfat 2% Milk, divided
- 1 tablespoon vegetable oil
- 1 teaspoon vanilla extract
- 2 tablespoons water
- Lowfat whipped topping or ice cream (optional)
- PREHEAT the oven to 350° F. Spray 8-inch-square baking pan or dish with nonstick cooking spray.
- COMBINE flour, 3/4 cup sugar, 3 tablespoons cocoa, baking powder and salt in medium bowl. Add 1/2 cup evaporated milk, oil and vanilla extract; whisk until just blended. Spread batter into prepared baking pan.
- COMBINE remaining 1/2 cup sugar and 1/4 cup cocoa in small bowl. Microwave remaining 1 cup evaporated milk and 2 tablespoons water in small, uncovered microwave-safe bowl on HIGH (100%) power for 1 minute. With wire whisk, stir in sugar-cocoa mixture into milk mixture until blended. Gently pour over chocolate batter in pan.
- BAKE for 20 to 25 minutes (25 to 30 minutes if using glass dish) or until cake layer forms on top and edges are bubbly. Let stand for 10 minutes. Spoon into serving dishes, spooning chocolate sauce over cake. Top with whipped topping.
TIP: Individual servings can be reheated in microwave for 10 seconds.
Nutrition Information per serving: 250 calories; 25 calories from fat; 3g total fat; 1g saturated fat; 5mg cholesterol; 220mg sodium; 45g carbohydrate; 1g fiber; 32g sugars; 5g protein; 15% Calcium
Source: VeryBestBaking.com

Celebrate Cinco de Mayo
(Family Features) Cinco de Mayo is a fun and festive holiday that's celebrated with music, dancing, family and delicious food. To bring great Mexican flavors to your fiesta, take a lesson from Maria Conception Jacinta Dominguez Ortega - also known as Mama Ortega.
In the 1800s, Mama Ortega created a loving home for her 13 children, and it centered around a tiny kitchen. From her small charcoal-burning stove, Mama created memorable meals her family loved. Everything for each meal was homegrown, handpicked and homemade.
You may not be able to grow your own ingredients, but you can take advantage of the way Mama did things - through authentic ingredients such as the line of Ortega Mexican Foods products. Fire-roasted chiles, authentic taco seasonings, crisp taco shells made with whole kernel corn and America's number one taco sauce are just a few of the ways that Ortega brings authentic Mexican flavor and fun to your family's dinner table.
For more delicious Mexican recipes to enjoy on Cinco de Mayo - or any day - visit www.ortega.com.

Slow-Cooked Shredded Beef Tacos
Prep Time: 12 minutes
Start to Finish: 6 hours
Makes: 6 to 8 servings
- 1 1/2 pounds beef chuck roast
- 1 medium onion, sliced
- 1 cup water
- 1 Ortega Grande Taco Dinner Kit
- 1 can (4 ounces) Ortega Diced Green Chiles
- Optional toppings: shredded lettuce, chopped tomato, shredded mild cheddar cheese, sour cream
- Place beef and onion in 4-quart slow cooker. Combine water and seasoning mix from kit in small bowl. Pour over beef and onion. Cover and cook on LOW 6 to 8 hours or until fork tender.
- Transfer beef to cutting board; shred beef with two forks. Place in large bowl. Stir in taco sauce from kit and chilies.
- Fill warmed taco shells and tortillas from kit with beef mixture. Top with cheese sauce from kit. Garnish with desired toppings.
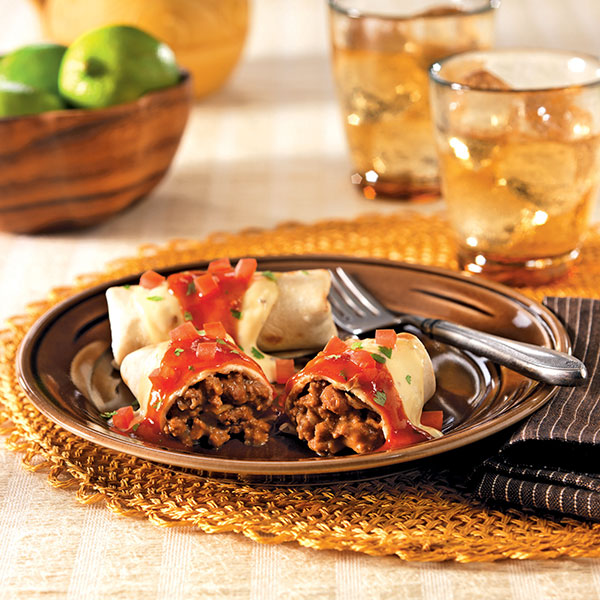
Smothered Beef and Bean Burritos
Prep Time: 10 minutes
Start to Finish: 40 minutes
Makes: 10 burritos
- 1 can (10.75 ounces) condensed cream of mushroom soup
- 1 can (10 ounces) condensed cheddar cheese soup
- 1/2 cup sour cream
- 1 tablespoon olive oil
- 1 pound lean ground beef
- 1 onion, diced
- 3/4 cup water
- 1 Ortega Soft Taco Kit
- 1 cup Ortega Refried Beans
- 2 tablespoons chopped fresh cilantro
- 1/4 cup diced tomato
- Preheat oven to 350°F. Lightly coat 13 x 9-inch baking dish with nonstick cooking spray. Combine soups and sour cream in small bowl; set aside.
- Heat oil in skillet over medium-high heat. Add beef and onion. Cook and stir 5 minutes or until beef is no longer pink. Drain and discard fat. Add water and seasoning mix from kit. Cook and stir 3 minutes. Stir in refried beans.
- Wrap tortillas from kit with clean, lightly moistened cloth or paper towels. Microwave on HIGH (100% power) 1 minute, until hot and pliable.
- Divide beef mixture evenly among tortillas. Fold ends of tortilla to middle, then roll tightly around mixture. Place in baking dish, seam side down. Repeat with remaining tortillas.
- Spread soup mixture evenly over tortillas. Bake 22 to 25 minutes or until heated through. Garnish with taco sauce from kit, cilantro and tomatoes.
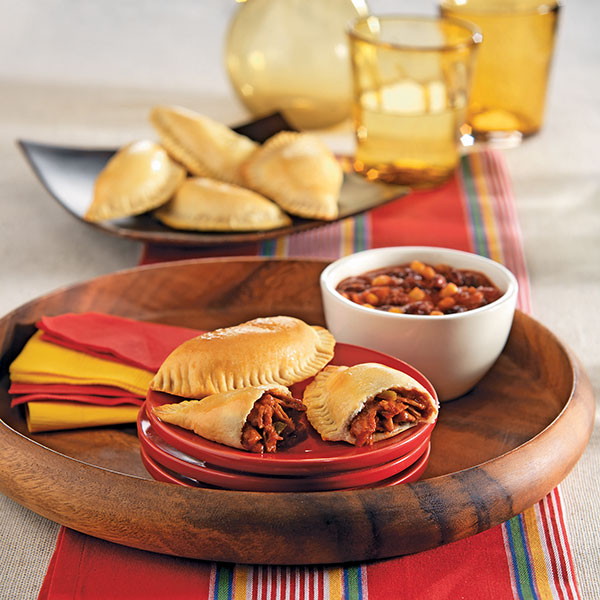
Easy Empanadas
Prep Time: 10 minutes
Start to Finish: 25 minutes
Makes: 12 empanadas
- 1 cup prepared refrigerated barbecue shredded pork
- 2 tablespoons Ortega Taco Sauce, any variety
- 1 tablespoon Ortega Fire-Roasted Diced Green Chilies
- 1 can (12-count) refrigerated biscuits
- 1 egg, well beaten
- 1 cup black bean and corn salsa
- Preheat oven to 375°F. Mix pork, taco sauce and chilies in small bowl.
- Separate biscuits into 12 pieces. Flatten each biscuit into 6-inch round, using rolling pin. Divide filling evenly among biscuits, spreading over half of each round to within 1/4 inch of edge. Fold dough over filling; press edges with fork to seal well. Place on ungreased cookie sheet. Brush tops with beaten egg.
- Bake 12 to 15 minutes or until edges are golden brown. Immediately remove from cookie sheet. Serve warm with salsa for dipping.
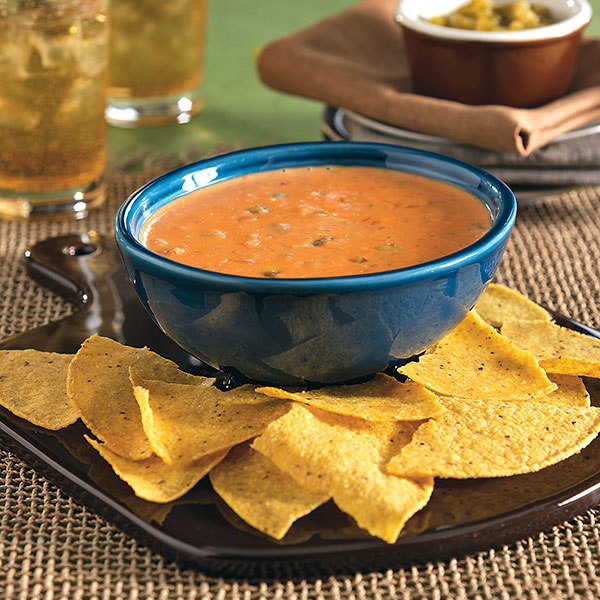
Chili Con Queso Dip
Prep Time: 3 minutes
Start to Finish: 15 minutes
Makes about 3 cups
- 1 package (16 ounces) pasteurized processed cheese spread, cut into chunks
- 1 cup Ortega Thick and Chunky Mild Salsa
- 1 can (4 ounces) Ortega Fire-Roasted Diced Green Chiles
- 1 package (10 count) Ortega Tostada Shells or 1 package (12-count)
- Ortega Taco Shells, broken into pieces
- Additional Ortega Fire-Roasted Diced Green Chiles (optional)
- Chopped tomatoes (optional)
- Combine cheese, salsa and chilies in small saucepan. Cook and stir over low heat until fully melted and blended.
- Serve warm with tostada or taco shells. Garnish with additional chilies and tomatoes, if desired.

Chocolate Chile Brownies With Spiced Frosting
Prep Time: 10 minutes
Start to Finish: 1 hour
Makes: 9 servings
Brownies
- 1 package (18 to 19 ounces) brownie mix, plus ingredients to prepare mix
- 1 can (4 ounces) Ortega Diced Green Chiles, undrained
Frosting
- 1 cup powered sugar
- 1 tablespoon Ortega Chili Seasoning Mix
- 1 1/2 to 2 tablespoons milk
- Preheat oven to 350°F. Line 8-inch square baking pan with aluminum foil, extending foil over sides of pan; lightly coat with nonstick cooking spray.
- Prepare brownies according to package directions. Stir in chilies; mix until well blended. Pour into prepared baking pan. Bake 25 to 30 minutes, or use time recommended on package. Cool on wire rack. Using foil "handles," remove from pan.
- Blend powdered sugar and seasoning mix in small bowl. Stir in milk, adding more if necessary, until desired consistency. Spread on brownies. Slice and serve.
Source: Ortega

Easy, No-Bake Goodies
(Family Features) Summer is a great time to get kids into the kitchen to make some snacks and desserts. Whether you need something to take to a picnic or just something to do on a rainy day, making easy, no-bake goodies like Rice Krispies Treats(r) can show kids just how fun cooking can be.
Even young children can be kitchen helpers, so the whole family can get involved. What can your child do to help prepare a recipe?
2 to 3-year-olds can
-Wash and scrub fruits and vegetables
-Name and count foods
3 to 4-year-olds can
-Shape foods
-Mix dry ingredients together
-Pour pre-measured liquids into batter
4 to 5-year-olds can
-Help measure ingredients
-Open packages
-Pour cereal
-Mash soft fruits and vegetables
-Press cookie cutters into dough or soft food
6 years old and up can
-Beat recipe ingredients with a whisk
-Help locate ingredients in a spice rack or pantry
Make some summer magic with these tasty no-bake recipes for Choco P'Nutty Bars, Itsy Bitsy Fruit Pies, and Ice Cream Sandwich Treats. For even more kid-friendly recipes you can make together, visit www.Ricekrispies.com.
Note: The following recipes should be made with adult supervision.
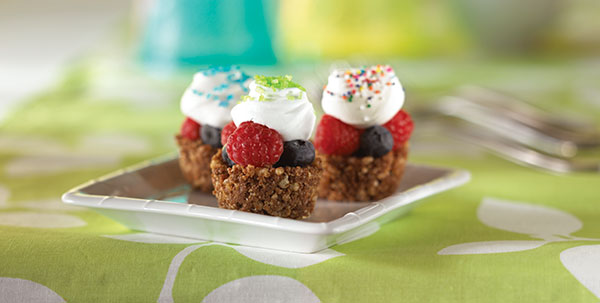
Itsy Bitsy Fruit Pies
Prep Time: 25 minutes
Total Time: 30 minutes
Servings: 24
- 1/2 cup butter or margarine
- 1 cup milk chocolate morsels
- 1/4 teaspoon cinnamon
- 4 cups Kellogg's® Rice Krispies® cereal
- 2 cups assorted fresh chopped fruits
- Frozen non-dairy whipped topping, thawed
- Assorted sprinkles
- In medium saucepan, melt butter over low heat. Stir in chocolate morsels until melted. Remove from heat. Stir in cinnamon.
- Place cereal in large bowl. Carefully pour melted chocolate mixture over cereal. Gently stir until cereal is completely coated with chocolate.
- Spoon cereal mixture into twenty-four 1 1/2-inch muffin-pan cups coated with cooking spray. Using your finger or thumb, press cereal mixture onto bottoms and up the sides of each cup, forming crusts.
- Place crusts in freezer for 30 minutes. Remove from freezer. Refrigerate, covered, until ready to serve.
- Before serving, fill each crust with fresh fruit. Dollop with whipped topping. Decorate with sprinkles. Serve immediately.
Note: Extra unfilled crusts may be frozen in air-tight container for up to a month. Let stand at room temperature for 15 minutes before serving.
Kid-friendly Kitchen Tips:
-Children of all ages should have an adult assistant with them at all times when cooking.
-Chefs 7 and older can measure the ingredients and help stir the melted chocolate into the cereal.
-Little ones, ages 3 to 6, will enjoy pressing the mixture into the muffin cups and decorating with the fruits and whipped cream.
-Make sure to have plenty of extra fruits for snacking while making these little pies.
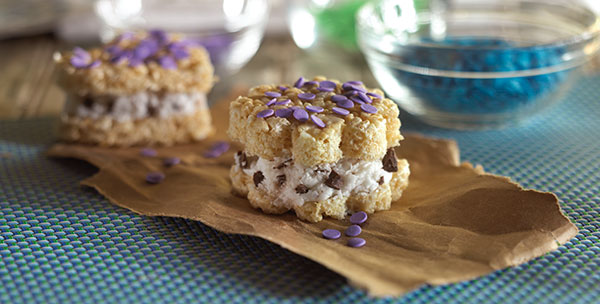
Ice Cream Sandwich Treats
Prep Time: 15 minutes
Total Time: 3 hours
Servings: 10 to 12
- 3 tablespoons butter or margarine
- 1 10 ounce-package (about 40) marshmallows, or 4 cups miniature marshmallows
- 2 teaspoons vanilla
- 6 cups Kellogg's Rice Krispies cereal
- 1/2 cup assorted sprinkles
- 2 pints desired flavor ice cream, frozen yogurt, sorbet or gelato
- In large saucepan melt butter over low heat. Add marshmallows and stir until completely melted. Remove from heat. Stir in vanilla.
- Add cereal. Stir until well coated.
- Using buttered spatula or wax paper, evenly press mixture to 1/4-inch thickness on baking sheet coated with cooking spray. Decorate with sprinkles. Refrigerate for 15 minutes.
- Remove from refrigerator. Using 2-inch cookie cutters coated with cooking spray, cut into desired shapes. Place small scoop of ice cream on undecorated side of one cut-out. Top with another cut-out, decorated side up. Gently press together. Return to baking sheet. Repeat with remaining cut-outs and remaining ice cream.
- Freeze for 30 minutes. Transfer to airtight container. Freeze for 2 hours to 1 week. Let stand at room temperature for 10 minutes before serving.
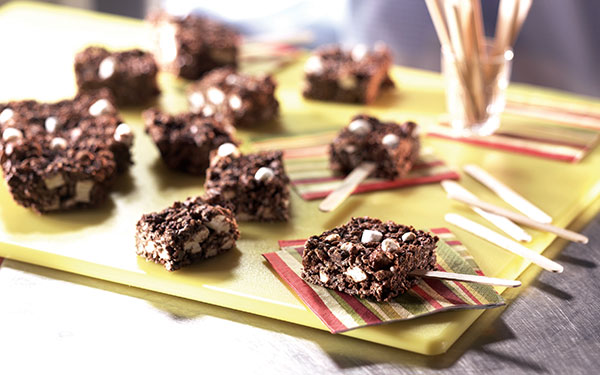
Choco P'Nutty Bars
Prep Time: 15 minutes
Total Time: 1 hour
Servings: 18
- 1 12-ounce package (2 cups) semi-sweet chocolate morsels
- 2/3 cup peanut butter
- 6 cups Kellogg's Rice Krispies cereal
- 3 cups miniature marshmallows
- 18 wooden or plastic sticks
- In large saucepan, melt chocolate morsels and peanut butter over low heat; stirring constantly. Remove from heat. Stir in cereal and marshmallows.
- Using buttered spatula or waxed paper, press mixture evenly into 13 x 9 x 2-inch baking pan coated with cooking spray. Chill in refrigerator about 45 minutes.
- Cut into 18 bars. Serve by inserting plastic or wooden stick into each bar.
Microwave Directions: In large microwave safe bowl, melt chocolate morsels and peanut butter at medium power for 2 to 2 1/2 minutes. Stir until smooth. Add remaining ingredients, stirring until well coated. Continue with recipe directions.
Source: Rice Krispies

6 Simple, Festive Cocktails for the Holidays
(Family Features) Eggnog Martini and Maple Amaretto Sour are two holiday cocktails that could easily be found on a festive bar menu. However, you can make them yourself in the comfort of your own home. Dazzle guests with an easy, simple trick: extracts.
A simple drop of an extract – peppermint, maple, rum or almond – can transform a holiday cocktail or warm drink into a truly special experience. Add rum extract and nutmeg to white chocolate liqueur and cream for an Eggnog Martini. Or try a few drops of maple extract with coffee, whiskey and half and half for a festive Irish Coffee.
Find these cocktails and more recipes at McCormick.com or on Facebook and Pinterest.

-
Chocolate Coconut Martini
A dusting of delicious coconut and rich chocolate syrup makes for a drink that’s a dessert and cocktail in one. Coconut extract takes the decadent flavor to the next level.

-
Eggnog Martini
There’s no taste that says “holiday” quite like eggnog. Swap the actual rum or bourbon for rum extract then mix with white chocolate liqueur and cream for a less alcoholic version. Top with snowy whipped cream and a sprinkle of nutmeg.

-
Maple Amaretto Sour
Give the sweet-tart Amaretto Sour – made with amaretto, simple syrup and lemon juice – the seasonal treatment with warming maple extract.

-
Almond Ale Shandy
This nutty riff on a shandy calls for almond extract, which joins pale ale and cilantro in this lemony, fizzy drink. For a non-alcoholic version, just replace the beer with micro-brewed ginger ale.
-
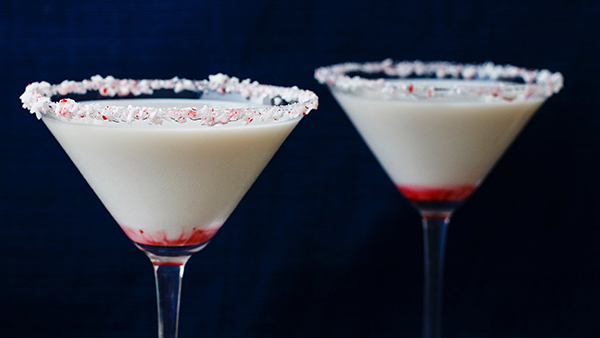
Peppermint Martini
The crisp bite of peppermint extract and the smooth sweetness of white chocolate liqueur unite in this quintessential winter martini. Be sure to use colorful mints for a candy-dipped rim that’s both pretty and tasty.

-
Maple Irish Coffee
For a seasonal twist on Irish coffee, add a few drops of maple extract. It brings authentic maple flavor to this warm favorite when combined with hot coffee and whiskey.
Source: McCormick

How to Use Turmeric From Morning to Night
(Family Features) From the celebrity on TV to your coworker at the watercooler, everyone is talking about turmeric. That’s because scientific evidence has been building around the potential health benefits, including anti-inflammatory properties, of curcumin, a compound in turmeric. These six tempting recipes – from a morning shake to baked chicken – will quickly make turmeric the new star of your spice cabinet. Find more tips for using turmeric at McCormick.com.
-
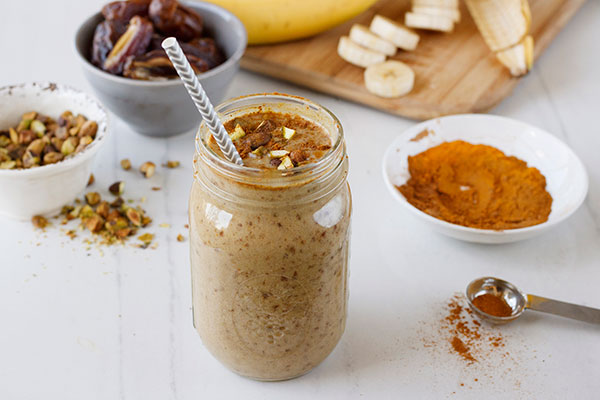
Chocolate Banana Shake with Turmeric and Cinnamon
Take breakfast to go with a scrumptious shake made with a turmeric cocoa spice blend, roasted pistachios, frozen bananas and sweet dates.
-
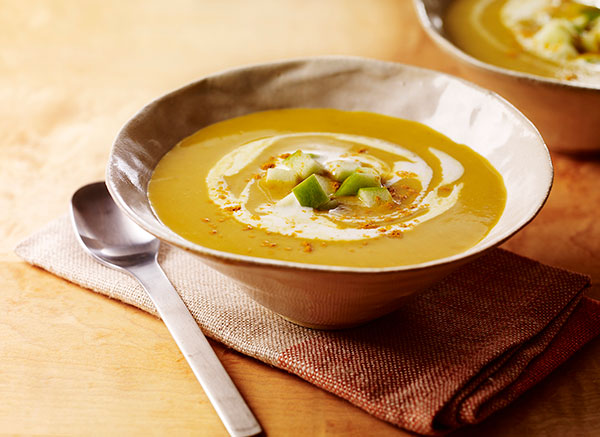
Creamy Coconut Butternut Squash Soup
This cozy classic balances the sweet and savory flavors of coconut milk and butternut squash.
-
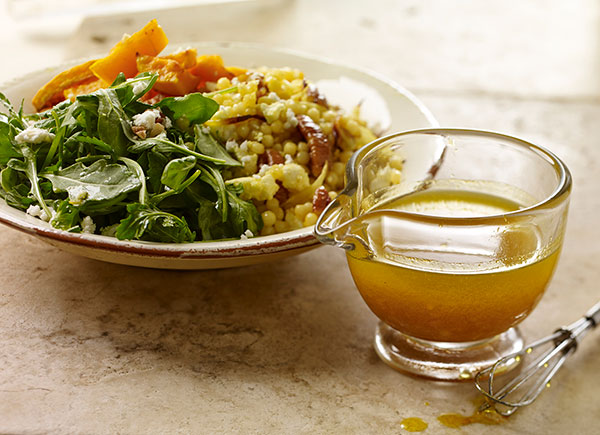
Turmeric Vinaigrette
Add earthy goodness to an everyday salad with this simple vinaigrette, made with turmeric, ginger, honey and sea salt.
-
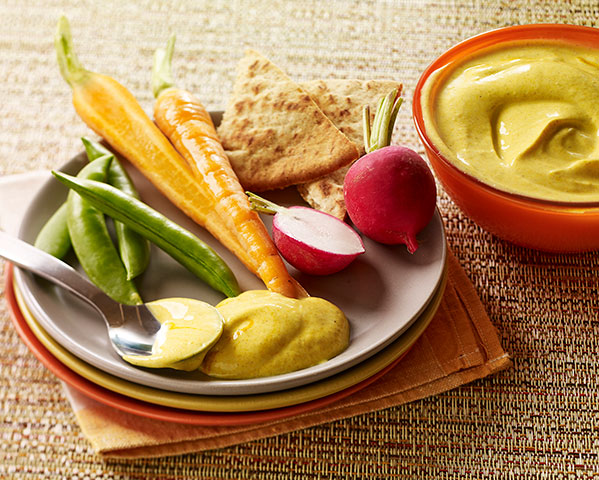
Creamy Turmeric Dip
Turmeric, sea salt, cinnamon, lemon juice and low-fat yogurt come together for a tasty dip that’s ready in just 5 minutes. Pack with vegetables and pita chips and take to work for a mid-afternoon snack.
-
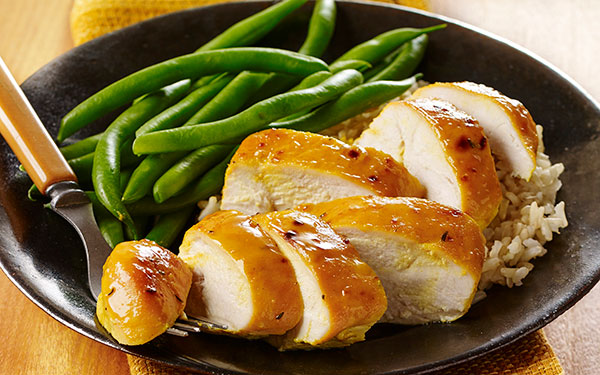
Honey Mustard Turmeric Chicken
Take baked chicken up a notch with a twist on everyone’s favorite sweet and tangy honey mustard marinade.
-
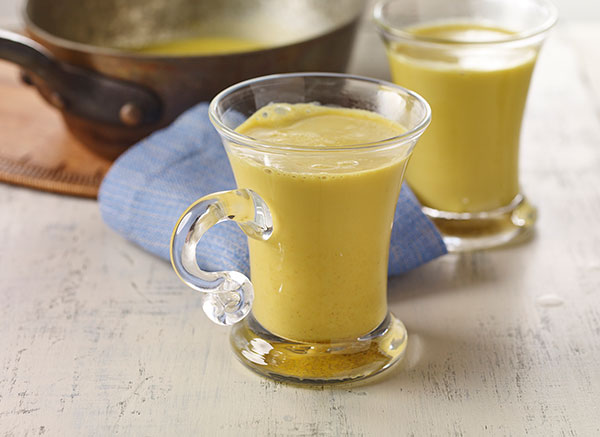
Golden Turmeric Milk
Combine coconut milk, turmeric, vanilla and pumpkin pie spice to make this popular pick-me-up beverage.
Source: McCormick