
Bring the Taste of Takeout Home
(Family Features) Some nights, especially when schedules are jam packed, the allure of grabbing takeout or swinging through a drive-thru between activities may sound more appealing than spending time in the kitchen. You can skip the to-go boxes, however, with these tasty Asian-inspired dishes that come together almost as fast as delivery while allowing you to get creative at mealtime.
Packed with fresh shrimp and crispy veggies, this Crab and Shrimp Sushi Burrito fuses some favorite takeout dishes together to satisfy cravings in half an hour. Using Success Boil-in-Bag Jasmine Rice, which cooks up soft and fluffy, provides a flavorful and aromatic base. This combination of seafood, homemade sauces and flavorful veggies makes for an unforgettable taste experience comparable to your favorite quick-serve restaurant.
Or let your kitchen appliances help create a satisfying, soothing take on a Thai classic. A quick and easy bowl of deliciousness that’s sure to comfort the whole family, this Thai Red Curry Chicken and Rice Soup features chicken, lime juice, Thai red curry and coconut milk mixed with basmati rice.
Ready in just 10 minutes, Success Boil-in-Bag Basmati Rice is quick, easy and mess-free, and it’s guaranteed to always cook right – just place the bag in chicken broth to experience the long-grain rice’s subtle, nutty flavor and unique texture. Plus, Success Rice is free from artificial additives and unprocessed ingredients, so you can feel good about serving it with a variety of dishes.
Find more recipe inspiration to tackle takeout cravings and more at SuccessRice.com.

Crab and Shrimp Sushi Burrito
Prep time: 20 minutes
Cook time: 10 minutes
Servings: 4
- 1 bag Success Jasmine Rice
- 1/2 cup unseasoned rice vinegar
- 2tablespoons granulated sugar
- 2 teaspoons kosher salt
- 2 tablespoons mayonnaise
- 2 tablespoons Sriracha sauce
- 1/4 teaspoon sesame oil
- 1tablespoon black sesame seeds
- 4 sushi nori sheets
- 1/2 carrot, ribboned, divided
- 1/2 cucumber, ribboned, divided
- 6 crab sticks, shredded, divided
- 6 large shrimp, cooked, deveined, tails removed and butterflied, divided
- Rinse rice bag under cold water to remove starch. Prepare rice according to package directions.
- In small saucepan over medium-low heat, heat rice vinegar, sugar and salt until sugar and salt have dissolved, about 1 minute. Set aside.
- In small bowl, mix mayonnaise, Sriracha sauce and sesame oil. Set aside.
- Transfer cooked rice onto large baking sheet. Drizzle half the vinegar mixture over rice, turning until all rice is fully coated. Taste and add more vinegar mixture, if desired. Spread rice into thin layer and cool to room temperature. Sprinkle sesame seeds on top.
- Lay down one sushi nori sheet. Spread layer of rice on it. Place half the carrots and cucumbers on rice. Place crab and shrimp on top.
- Place another sushi nori sheet just under first one and roll. Repeat with remaining sushi nori sheets, rice, carrots, cucumbers, crab and shrimp. Wrap both burritos in plastic wrap. Let rest 10 minutes.
- Slice burritos in half and serve with spicy mayo.

Thai Red Curry Chicken and Rice Soup
Prep time: 10 minutes
Cook time: 20 minutes
Servings: 6
- 6 cups chicken broth
- 2 bags Success Basmati Rice
- 1 can (14 ounces) coconut milk
- 2 tablespoons Thai red curry paste
- 1 tablespoon soy sauce
- 1 teaspoon brown sugar
- 1 pound chicken breast tenders
- 2 tablespoons lime juice
- 4 green onions, thinly sliced
- In pressure cooker on saute setting over high heat, bring broth and rice bags to boil. Boil, uncovered, 10 minutes. Remove bags with fork and set aside.
- Add coconut milk, curry paste, soy sauce and brown sugar to pressure cooker. Turn off saute setting. Add chicken. Cover and lock to seal. Set to pressure cook setting over high heat about 10 minutes, or until chicken is tender. Carefully, manually or naturally, release pressure according to manufacturer's instructions before removing lid.
- Set pressure cooker to saute setting over medium heat. Remove chicken and shred with two forks; add to soup along with lime juice and green onions. Remove rice from bags and stir into soup. Simmer until rice is heated through.
Source: Success Rice

Tasty Recipes to Combat the Hustle and Bustle: Family-friendly meals ready in 30 minutes or less
(Family Features) Jam-packed calendars and little spare time at home can make heads spin. When those hectic weeknights are giving your family fits, turn to delicious recipes you can have ready in 30 minutes or less.
Start with kitchen staples like chicken and rice – they’re easy to prepare and versatile enough to let you cook a variety of meals without feeling like you’re stuck in a dinner rut. For example, these Air-Fryer Bang Bang Chicken Tenders with Rice offer a kid-friendly take on bang bang chicken that’s both sweet and spicy.
This air-fryer favorite requires just half an hour in the kitchen and calls on the quality and convenience of Success Boil-in-Bag Jasmine Rice to make busy weeknights a breeze. In just 10 minutes, the aromatic rice cooks up soft and fluffy with a uniquely delicious flavor that’s naturally gluten free, Non-GMO Project Verified and free of MSG and preservatives.
For a real escape from the everyday hustle and bustle, invite island flavors to dinner with this simple yet satisfying Grilled Hawaiian Chicken and Coconut Rice. Remember, high quality doesn’t have to be high maintenance.
Ready in 10 minutes, Success Boil-in-Bag Basmati Rice is a quick, easy and mess-free option that is guaranteed to always cook right. It’s an appetizing addition to this tropic-inspired meal that can help you tackle hectic schedules without sacrificing flavor.
Find more ways to solve dinnertime dilemmas at SuccessRice.com.

Air-Fryer Bang Bang Chicken Tenders with Rice
Prep time: 10 minutes
Cook time: 20 minutes
Servings: 4
- 1 pound chicken tenders
- 1/2 cup sweet chili sauce, divided
- 1/4 cup sriracha hot sauce, divided
- 2 tablespoons sesame oil
- 1 bag Success Jasmine Rice
- 1/2 cup mayonnaise
- 1 bag (12 ounces) coleslaw mix
- 1/2 English cucumber, thinly sliced
- toasted sesame seeds, for garnish (optional)
- green onions, for garnish (optional)
- Toss chicken tenders with 2 tablespoons sweet chili sauce and 1 tablespoon sriracha. Drizzle with sesame oil.
- Preheat air-fryer to 400 F. In two batches, without overfilling basket, air fry chicken tenders, turning basket halfway during cook time, 10-12 minutes, or until chicken is golden brown and cooked through.
- Prepare rice according to package directions. Stir mayonnaise with remaining sweet chili sauce and sriracha until blended. In large bowl, toss coleslaw mix with 1/4 cup bang bang mayo sauce.
- Divide rice among four bowls. Top with chicken, coleslaw mix and cucumber. Drizzle with remaining bang bang mayo sauce.
- Garnish with toasted sesame seeds and green onions, if desired.

Grilled Hawaiian Chicken and Coconut Rice
Prep time: 5 minutes, plus 4 hours for marinating
Cook time: 15 minutes
Servings: 4
- 4 chicken breasts, skinless and boneless
- 1/2 cup soy sauce
- 1/2 cup water
- 1/2 teaspoon sesame oil
- 1/2 cup brown sugar
- 1 garlic clove, minced
- 1/4 cup white onion, chopped
- 1 bag Success Basmati Rice
- 2 cups coconut milk
- 4 pineapple rings
- 1/4 cup unsweetened coconut, shredded
- In 1-gallon bag, combine chicken with soy sauce, water, sesame oil, brown sugar, garlic and onion. Marinate in refrigerator about 4 hours.
- Heat grill to medium heat.
- Prepare rice according to package directions, replacing 2 cups water with coconut milk.
- Once finished marinating, remove chicken and pat dry. Grill about 7 minutes per side, or until internal temperature reaches 165 F.
- Pat pineapple rings dry and grill about 1 minute per side.
- Mix shredded coconut with rice. Place pineapples on top of chicken and serve with rice.
Source: Success Rice

Cool, Creamy Favorites that Elevate Entertaining
(Family Features) Those summer nights when a cool breeze replaces the warmth of the day have arrived. Gather your family, friends and loved ones, and elevate your entertaining with in-season California avocados for a backyard celebration featuring small bites and sweet treats.
Share a new favorite recipe with this simple dip that calls for just three pantry staples and fresh produce. California Cowboy Caviar includes beans, corn, olives, green onions, crisp cucumber and creamy California avocado for a tasty salsa everyone can enjoy with tortilla chips or served in lettuce cups.
For a cool nightcap, California Avocado Coconut Ice Cream provides an extra-creamy tropical delight with a base that takes mere minutes to make. Put your own spin on this summertime dessert by topping with coconut flakes, sprinkles, caramel or fudge.
Locally grown, sustainably farmed and ethically sourced, California avocados make entertaining easy with recipes like these as an in-season fruit perfect for those craving local produce. The California farmers who grow them prioritize premium quality with a focus on responsible, sustainable farming practices, worker well-being and community support. Grown in rich soil warmed by sunshine, cooled by gentle breezes and tended to by dedicated growers, this delicious fruit can make it from the grove to your table in just a few days.
Mostly sold on the West Coast, just look for California on the label so you can feel good about supporting local farmers and their sustainable growing practices, all while enjoying this delicious, premium-quality fruit. Make sure to pick up some California avocados while they are in season through late summer.
To find more mouthwatering recipes to make entertaining a breeze all summer long, visit CaliforniaAvocado.com or follow along at Facebook.com/CaliforniaAvocados and Instagram.com/ca_avocados.

California Cowboy Caviar
Recipe courtesy of California Avocado Grower Tara Axell Rosenthal
- 1 can (15 ounces) white beans, drained and rinsed
- 1 can (11 ounces) shoepeg or sweet corn, drained
- 1 can (4 1/4 ounces) chopped California black olives
- 3 green onions, diced
- 1 cucumber, diced
- 1 large, ripe, Fresh California Avocado, seeded, peeled and diced
- scoop-shaped tortilla chips or lettuce cups, for serving
- Mix beans, corn, olives, green onions and cucumber. Gently fold in avocado and serve with tortilla chips or spooned into lettuce cups.
Variations: Use fresh corn instead of canned. Add heat with minced chiles like serranos or jalapenos.

California Avocado Coconut Ice Cream
- 1/2 cup sugar
- 1 pinch salt
- 2 large, ripe, Fresh California Avocados, seeded, peeled and quartered
- 1 can (13 1/2 ounces) coconut milk
- 1/2 cup heavy cream
- 1/2 teaspoon lemon juice
- toasted coconut flakes, for garnish (optional)
- sprinkles, for garnish (optional)
- caramel topping, for garnish (optional)
- fudge topping, for garnish (optional)
- In blender or food processor, combine sugar, salt, avocados, coconut milk, cream and lemon juice. Use smoothie, puree or frappe setting, if available, and blend 2 minutes. If necessary, stop blender and carefully stir ingredients then blend again until smooth.
- Follow manufacturer directions on ice cream maker to churn ice cream, including time to chill blended ingredients, if necessary.
- For soft serve ice cream, serve immediately after blending. For firmer ice cream, spoon into freezer-safe container, cover with lid and freeze 2 hours.
- Garnish with toasted coconut flakes, sprinkles, caramel topping or fudge topping, if desired.
Source: California Avocado Commission

5 Cozy Ways to Add Warmth to Cold-Weather Meals
(Family Features) When the winds howl and the chill of changing seasons brings a crispness to the air, one way to warm up from the inside out is with favorite foods. Filling up on comforting recipes like hearty soups and stews can be the solution you need to fight off cold temperatures.
Consider quick and easy ingredients that add a little warmth to your plate as the cravings for comfort kick in.
Cheese
A family favorite in recipes year-round, ooey-gooey cheese is a hallmark of cool-weather recipes. Consider creamy mac and cheese mixed with your preferred protein, homemade Mexican cuisine topped with melted chile con queso or an appetizer plate with options like brie, Manchego, aged cheddar, Parmesan and more.
Rice
If you’re craving a meal that’s big on flavor but short on prep time, it’s hard to top the classic comfort food combo of chicken and rice. This Parmesan Chicken and Rice with Spinach and Artichoke starts with the homestyle taste of fully cooked Minute Chicken & Herb Seasoned Rice Cups with carrots, onion and garlic. The BPA-free cups offer a quick and flavorful option for an on-the-go power-up loaded with chicken, vegetables and herbs paired with hearty rice. Ready in only 1 minute, you can enjoy the flavored rice right out of the cup or prepare it as part of this 5-minute recipe on a busy weeknight.
Pasta
Whether you prefer spaghetti or penne, bowtie or stuffed shells, pasta provides a simple base for delicious meals loaded with comforting ingredients. For an easy weeknight meal, just choose a type of pasta, sauce and protein to put dinner on the table in 30 minutes or less.
Curry Paste
Available in many varieties, curry paste is a common ingredient in South Asian dishes. It typically consists of ingredients like garlic, chiles or peppers, ginger and lemongrass. When you’d like to add some spice to your menu without bothering with takeout, this Thai Chicken and Rice Soup calls for green curry paste, which is generally spicier than red or yellow versions, but any can be substituted based on your heat tolerance. You can take the dish up a level with lightly seasoned Minute Cilantro & Lime Jasmine Rice for zesty flavor in a BPA-free, microwaveable cup for a simple solution when life gets hectic and preparing a time-consuming meal becomes challenging.
Cayenne
Serving up a touch of spice in a wide variety of favorite recipes can be as easy as adding ground cayenne. Made of dried cayenne peppers finely ground to a powder, it’s commonly used in dishes ranging from deviled eggs and pastas to shrimp and barbecue as an easy way to add a warming kick to cold-weather meals.
Find more comfort food recipes at MinuteRice.com.

Parmesan Chicken and Rice with Spinach and Artichoke
Prep time: 5 minutes
Cook time: 5 minutes
Servings: 1
- 1 Minute Chicken & Herb Seasoned Rice Cup
- 1 tablespoon olive oil
- 1 cup spinach, stems removed
- 2 ounces chicken, cooked and shredded
- 1/4 cup canned artichokes, drained and quartered
- 1/4 cup shredded Parmesan cheese
- Heat rice according to package directions.
- In medium saute pan over medium heat, heat olive oil. Add spinach and saute 1 minute.
- Add chicken and artichokes; saute 2 minutes, or until heated through.
- Add cheese and rice; stir to combine until heated through.

Thai Chicken and Rice Soup
Prep time: 2 minutes
Cook time: 5 minutes
Servings: 1
- 1 Minute Ready to Serve Cilantro & Lime Jasmine Rice Cup
- 1/2 cup (3 ounces) cooked rotisserie chicken, chopped
- 1/2 cup chicken broth
- 1/2 cup coconut milk
- 1 tablespoon Thai green curry paste
- 3 small shiitake mushrooms, thinly sliced
- 1 green onion, thinly sliced
- Heat rice according to package directions.
- In medium, microwave-safe bowl, combine chicken, broth, coconut milk, curry paste and mushrooms.
- Microwave on high 3 minutes. Stir in rice and garnish with green onion.
Source: Minute Rice

Sweeten the Holiday Season with Deliciously Creamy Desserts
(Family Features) Once the table is cleared and gifts are put away, it’s often time for one of the favorite moments of holiday gatherings. The taste (and smell) of those divine desserts you may only make once a year is enough to keep guests hungry even after the main course.
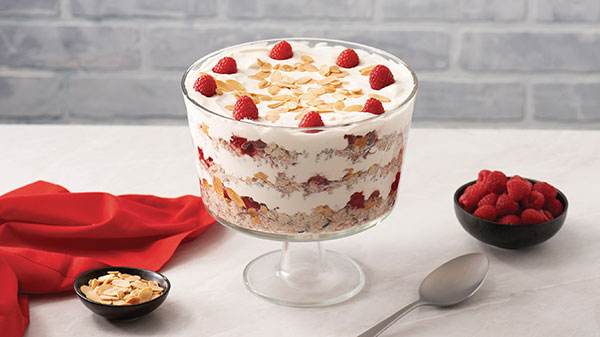
Put a new staple on holiday menus for years to come with this Cran-Raspberry Quinoa Pudding Trifle that combines fresh raspberries, vibrant cranberry sauce, orange juice and orange zest for a unique dessert. Ready in 30 minutes, it can be an easy way to impress everyone at the table with a creamy pudding base inspired by favorite winter flavors.
As a tasty treat that’s ideal for just about any occasion, this take on rice pudding is made using Success Boil-in-Bag Tri-Color Quinoa, which offers a heat-safe, BPA-free and FDA-approved bag and is easily prepared in just 10 minutes. Its light, nutty flavor and versatility creates a pudding that’s perfect for a wide range of pairings, from satisfying chocoholics or pumpkin-spice fanatics to whipping up a sweet, simple dessert.
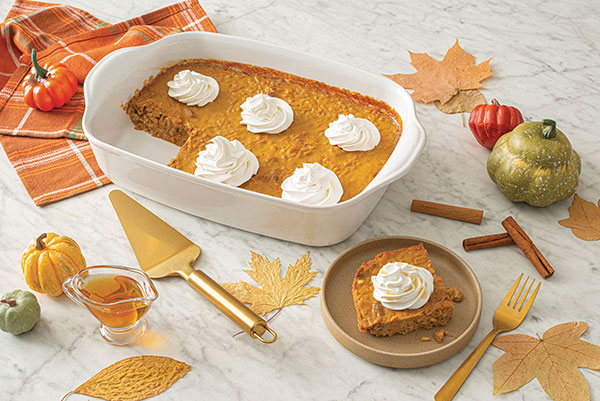
For a comforting dish full of familiar cold-weather flavors, serve Pumpkin Pecan Rice Pudding Bars. Pumpkin-spice fanatics can enjoy their favorite ingredient mixed into a rice pudding base sweetened with coconut milk, brown sugar, vanilla extract, whipping cream and maple syrup.
This holiday-inspired dessert relies on the fluffiness of Success Boil-in-Bag White Rice as a high-quality, precooked solution. The boil-in-bag rice is quick and easy with no measuring and no mess, and it’s ready in 10 minutes to make seasonal recipes a cinch.
Find more sweet holiday recipe inspiration at SuccessRice.com.
Cran-Raspberry Quinoa Pudding Truffle
Prep time: 25 minutes
Cook time: 5 minutes
Servings: 6
Quinoa Pudding:
- 2 bags Success Tri-Color Quinoa
- 4 cups almond milk
- 3 tablespoons honey
- 1 teaspoon vanilla extract
- 1/2 teaspoon ground cinnamon
Creamy Yogurt Layer:
- 2 cups plain Greek yogurt
- 3 tablespoons honey
- 1 teaspoon vanilla extract
- 1/2 cup heavy cream
Cran-Raspberry Layer:
- 1/2 cup cranberry sauce
- 1/4 cup orange juice
- 1 teaspoon orange zest
- 2 cups fresh raspberries
- 1/2 cup sliced almonds, toasted
- 2 cups gluten-free vanilla cookies, chopped
- 1/2 cup fresh raspberries
- To make quinoa pudding: Prepare quinoa according to package directions, substituting almond milk for water. Drain, reserving almond milk.
- Remove quinoa from bags and stir into almond milk in saucepan over medium heat. Stir in honey, vanilla and cinnamon. Bring to simmer. Cook, stirring constantly, 5-8 minutes, or until thickened slightly. Refrigerate 45-60 minutes, or until well chilled.
- To make creamy yogurt layer: In large bowl, stir yogurt, honey and vanilla. In separate bowl, beat cream until stiff peaks form. Stir whipped cream into yogurt mixture until blended. Refrigerate until ready to use.
- To make cran-raspberry layer: In medium bowl, stir cranberry sauce, orange juice and orange zest. Gently fold in raspberries.
- To assemble: In 10-cup trifle dish, layer 1/3 quinoa mixture, 2 tablespoons almonds, 1/3 cran-raspberry mixture, 1/3 vanilla cookies and 1/3 yogurt mixture. Repeat layers twice. Garnish with remaining raspberries and almonds.
Pumpkin Pecan Rice Pudding Bars
Prep time: 10 minutes
Cook time: 40 minutes
Servings: 4-6
- 1 bag Success White Rice
- 1 cup pecans
- 4 cups coconut milk
- 1 can (15 ounces) pumpkin puree
- 3/4 cup brown sugar
- 2 teaspoons pumpkin pie spice
- 1/2 teaspoon salt
- 3 eggs
- 1/2 teaspoon vanilla extract
- 1 cup heavy whipping cream
- 2 tablespoons maple syrup
- Prepare rice according to package directions. Preheat oven to 350 F. Spread pecans on baking sheet and toast 8-10 minutes. Cool then chop.
- In large saucepan over medium-high heat, combine milk, pumpkin, brown sugar, pumpkin pie spice and salt. Bring to boil, stirring constantly. Slowly add about 1/2 cup hot liquid to eggs and beat well. Stir egg mixture back into saucepan and cook over medium-high heat 2 minutes. Remove from heat and stir in cooked rice, vanilla and pecans.
- Pour mixture into greased 13-by-9-inch baking dish. Bake, uncovered, 30 minutes, or until knife inserted near center comes out clean.
- Whip heavy cream to soft peaks then add maple syrup and continue beating until peaks form. Serve with warm pudding.
Tip: For sweeter pudding, increase brown sugar to 1 1/2 cups.
Source:

Festive Recipes for Hosting an Inclusive Holiday Gathering
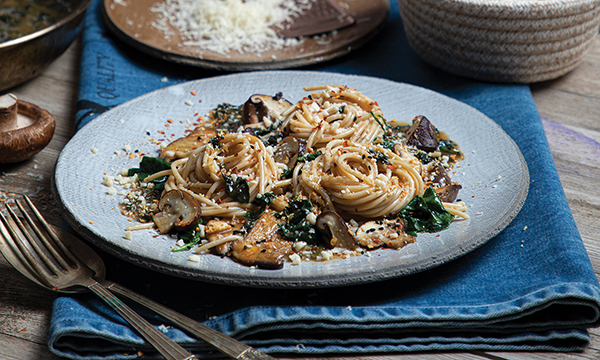
A family-favorite meal starts with a main course that looks and smells as good as it tastes. Creamy Mushroom Pasta Nests deliver that festive flavor with a robust blend of breadcrumbs, earthy mushrooms and a homemade sauce crafted with Violife Just Like Cream Cheese. Developed to capture the taste of dairy cream cheese, it’s designed to be enjoyed by everyone at the table this holiday season as a non-GMO solution free from dairy, soy, nuts, gluten, preservatives and lactose.
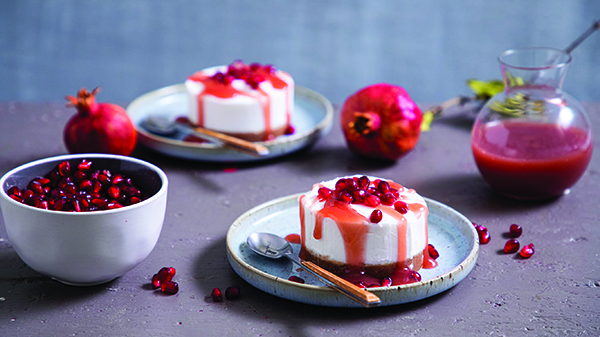
Dishing out a dessert that boasts the colors of the season is a perfect way to cap off a gathering of friends and family. With pops of red and deliciously sweet flavor, Pomegranate Cheesecake is ideal for serving in individual tins so guests can delight in the creamy deliciousness together without the hassle of cutting and serving.
Visit ViolifeFoods.com to find more holiday-worthy recipes.
Creamy Mushroom Pasta Nests
Prep time: 30 minutes
Cook time: 20 minutes
Servings: 4
Marinade:
- 2 tablespoons olive oil
- 3 1/2 ounces hoisin sauce
- 2 tablespoons sesame oil
- 1 tablespoon garlic chili paste
- 2 tablespoons black and white sesame seeds
- 1 teaspoon harissa paste
Breadcrumbs:
- 1 tablespoon Violife Plant Butter
- 1/2 cup panko breadcrumbs
- 1 tablespoon fresh rosemary
- 1 teaspoon dried garlic
Pasta:
- 17 1/2 ounces mushrooms, roughly sliced
- 2 tablespoons olive oil
- 10 1/2 ounces fresh spinach
- 1 package Violife Just Like Cream Cheese Original
- 17 1/2 ounces whole-wheat spaghetti
- 1 teaspoon red pepper flakes
- 3 1/2 ounces Violife Just Like Parmesan Wedge, grated
- To make marinade: Whisk olive oil, hoisin sauce, sesame oil, garlic chili paste, sesame seeds and harissa paste. Set aside.
- To make breadcrumbs: In frying pan, heat plant butter. Add breadcrumbs, rosemary and garlic; saute 3-5 minutes until golden. Remove from heat and set aside.
- To make pasta: Saute mushrooms in olive oil 5-7 minutes until golden. Add spinach, 2-3 minutes, and pour over marinade. Add cream cheese and whisk until creamy.
- Boil pasta according to package instructions. Sieve and reserve 1/2 cup pasta water, adding to pasta sauce. Whisk constantly until combined.
- Using tongs, make small nests in pasta, place on plates and pour creamy mushroom sauce on top.
- Sprinkle with breadcrumbs, red pepper flakes and grated Parmesan.
Pomegranate Cheesecake
Prep time: 5 hours, 30 minutes
Servings: 6 individual cheesecakes
Crust:
- 10 1/2 ounces vegan gingerbread biscuits
- 6 ounces plant-based butter
- 1/4 teaspoon salt
Cheesecake:
- 0.07 ounces agar-agar
- 3 1/2 ounces canned coconut milk
- 2 packages Violife Just Like Cream Cheese Original
- 2 tablespoons maple syrup
- 1 tablespoon lemon juice
- 1 teaspoon vanilla essence
Pomegranate Syrup:
- 10 fluid ounces pomegranate juice, divided
- 3 tablespoons cornstarch
- pomegranate seeds, for garnish
- To make crust: In blender, blitz gingerbread biscuits until they form powder. Add butter and salt; blitz again until combined.
- Place in six individual greased tart tins and smooth over base with back of spoon. Refrigerate to set.
- To make cheesecake: In small pot over low heat, dissolve agar-agar in coconut milk, whisking constantly. Once boiling, remove from heat and set aside.
- In large bowl, mix cream cheese, maple syrup, lemon juice and vanilla essence; slowly pour over warm coconut milk, whisking until combined and creamy. Divide evenly among tart tins and refrigerate 4 hours.
- To make pomegranate syrup: In small bowl, combine 3 fluid ounces pomegranate juice with cornstarch. In small pot, boil remaining pomegranate juice 5 minutes. Pour in cornstarch and pomegranate mixture; whisk 5 minutes until syrup forms. Cool.
- When cheesecakes have set, remove from tins and serve on plates. Pour pomegranate syrup on top and garnish with pomegranate seeds.
Source: Violife

Salmon and Shrimp Coconut Curry

(Family Features) Adding salmon to your weekly menu can take dinnertime from drab to delicious. Combining it with bright, fresh veggies heightens the savory experience even more for a burst of seafood flavor.
Loaded with salmon and shrimp, this Salmon and Shrimp Coconut Curry is a perfect option for putting together a quick yet delicious meal.
Fast becoming a leading source of seafood worldwide, aquaculture is similar to typical agriculture but with fish, shellfish and seaweeds. Farmed seafood can be raised and harvested in either fresh or seawater, where natural conditions are recreated.
However, not all seafood you find in the grocery aisles is the same. Despite industry advances, aquaculture still faces challenges with fraud, mislabeling and questionable conditions. That’s why it’s important to look for responsible seafood products that are labeled by a trusted certification process.
For example, the Aquaculture Stewardship Council is a non-profit certification program that has created and enforced the world’s strictest and highest standards for seafood farming since 2010. Today, it is transforming the seafood industry with a new level of certification for farmed seafood. This “new way to seafood” includes:
- Seafood that can be traced all the way from the farm to the store, ensuring the seafood you buy is what it claims to be
- The strictest combination of requirements to protect the environment, workers and communities on the farms where seafood is raised
- Improving farmed seafood quality and safety
Visit NewWaytoSeafood.com to find more information about the certification process.
Watch video to see how to make this recipe!
Salmon and Shrimp Coconut Curry
Recipe courtesy of MOWI on behalf of the Aquaculture Stewardship Council
Servings: 2
- 2 pieces of MOWI Pure portions salmon
- 1 cup wild rice
- 1 tablespoon coconut oil
- 1 clove garlic, sliced
- 1/4 cup red onion, diced
- 1 cup pumpkin or butternut squash, diced
- 1 tablespoon lemongrass, finely chopped
- 1 1/2 tablespoons red curry paste
- 1/2 cup coconut milk
- 1 tablespoon fish sauce
- 1/4 cup tomatoes
- 4 shrimp
- 1 lime, quartered
- 2-3 cilantro leaves, for garnish
- Cut salmon into 1/2-inch cubes. Cook rice according to package instructions.
- In large skillet, heat coconut oil over medium-high heat. Add garlic, onion and pumpkin or squash; saute 5 minutes, or until onions are translucent. Mix in lemongrass and curry paste. Cook 2-3 minutes, or until fragrant.
- Add coconut milk, fish sauce and tomatoes; mix thoroughly. Add shrimp and salmon; cook until done.
- Serve with rice and lime quarters. Sprinkle with cilantro.
Source: Aquaculture Stewardship Council

Fresh, Healthy Family Meals
Recipes to help boost iron levels, aid plasma donation recovery
(Family Features) Chef Nate Appleman knows how important it is to serve healthy meals to your family – ones they actually want to eat. Before having his first child, he transformed his eating and exercise habits and lost 85 pounds to get on a healthier path.
Now, he’s cooking meals for his family, including 14-year-old Oliver who was diagnosed with Kawasaki Disease as a toddler – an inflammation of the blood vessels that can cause damage to coronary arteries – as a healthy lifestyle is important to help manage the disease. Since Oliver’s diagnosis, Appleman made it his personal mission to create awareness of Kawasaki Disease and for the critical need for plasma donations that many people with the disease rely on for treatment, which is why he partnered with Abbott to bring attention to the need for plasma donations.
Plasma is a powerful part of your blood that supports essential bodily functions. It’s a lifeline for thousands of people who are immune-compromised and live with a variety of chronic and complex diseases. In fact, more than 125,000 Americans rely on medication made from plasma every day, according to the Plasma Protein Therapeutics Association (PPTA).
The COVID-19 pandemic led to a serious shortage of plasma donors – average donations per center in the United States were down approximately 11% during the first few months of 2021 compared to the previous year, further deepening the nearly 20% decline in donations in 2020 compared to 2019, according to the PPTA.
Donating plasma is a safe and relatively easy process. Since plasma is replaced in the body within about 24 hours, it can be donated up to twice per week. With a donation that typically takes between 1-3 hours, you can make a lasting impact by providing lifesaving medicine for patients like Oliver.
It’s a good idea to fuel up with iron-rich foods before and after donating, so Appleman created these fresh, nutritious recipes he loves to serve his family: Marinated Skirt Steak, Lemon Chicken with Roasted Red Onions and Potatoes, and Cheesy Frittata with Veggies.
Learn where you can donate at bethe1donor.abbott.
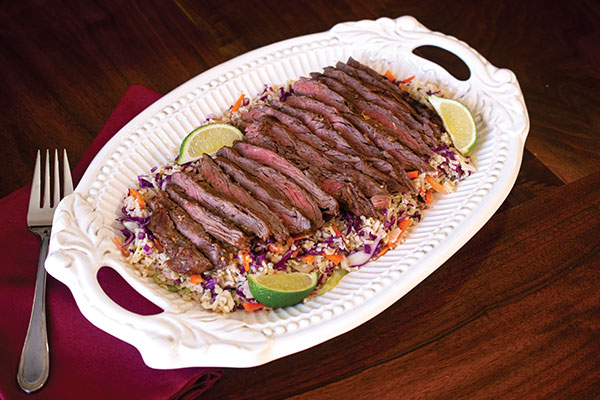
Marinated Skirt Steak
Recipe courtesy of chef Nate Appleman on behalf of Abbott
Vinaigrette:
- 1/4 cup oil
- 1/4 cup fish sauce
- 1/4 cup rice wine vinegar
- 1/4 cup water
- 2 tablespoons raw sugar
- 1 cup chopped fresh cilantro
- 1 lime, juice only
- 1 clove garlic, minced
- 1 small Thai bird chile or serrano chile, chopped
- 1/4 head finely shaved green cabbage
- 1/4 head finely shaved purple cabbage
- 2 carrots, thinly julienned
Skirt steak:
- 1 1/2 pounds trimmed skirt steak
- 1/2 cup coconut milk
- 3 cloves garlic, minced
- 2 tablespoons lime juice
- 1/4 cup chopped fresh cilantro
- 2 tablespoons sriracha
- salt, to taste
- 3 cups cooked brown rice
- 1/2 cup crushed peanuts
- 1 lime, quartered, for garnish
- To make vinaigrette: In large bowl, mix oil, fish sauce, rice wine vinegar, water, sugar, cilantro, lime juice, garlic and chile. Toss cabbage and carrots in vinaigrette; refrigerate until ready to serve.
- To make skirt steak: Marinate steak in coconut milk, garlic, lime juice, cilantro, sriracha and salt, to taste, at least 1 hour, or up to 24 hours.
- Heat grill to high.
- Grill 3-4 minutes each side until medium rare.
- Let rest 3 minutes.
- Thinly slice steaks against grain and serve with vinaigrette, rice and crushed peanuts; garnish with lime wedges.
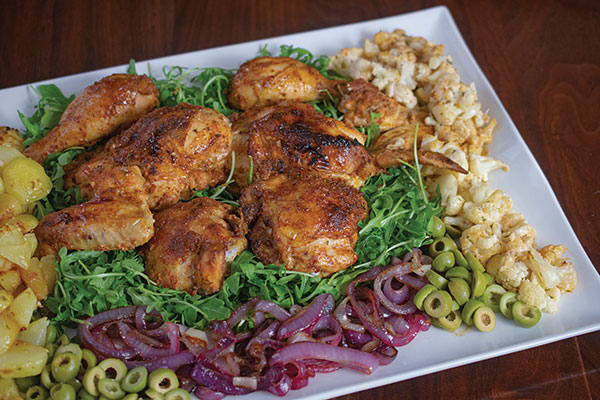
Lemon Chicken with Roasted Red Onions and Potatoes
Recipe courtesy of chef Nate Appleman on behalf of Abbott
Lemon chicken:
- 1 whole chicken, cut into eight pieces
- 1 ounce minced garlic
- 1/4 teaspoon granulated garlic
- 1/4 teaspoon paprika
- 1/4 teaspoon smoked paprika
- 1/4 teaspoon ground fennel seed
- 1/4 teaspoon dried oregano
- 1/4 teaspoon ground coriander
- 1 tablespoon kosher salt
Potatoes:
- 2 1/2 pounds Yukon gold potatoes
- salted water
- oil
Cauliflower:
- 1 head cauliflower
- salted water
- ice
- 2 tablespoons mayonnaise
- 1 teaspoon tamari or soy sauce
- 1 tablespoon chopped parsley
Roasted onions:
- 1 red onion
- salt
- oil
For serving:
- 3 ounces pitted Castelvetrano or green olives, cut into quarters
- 5 ounces wild arugula
- 1 lemon, quartered
- To make lemon chicken: Marinate chicken in mixture of minced garlic, granulated garlic, paprika, smoked paprika, fennel pollen, dried oregano, coriander and salt; let sit overnight.
- To make potatoes: Boil potatoes in heavily salted water until tender. Cool, peel and cut into 1 1/2-inch chunks. Toss with oil to coat; reserve.
- To make cauliflower: Cut cauliflower into florets and blanch in salted water 1 minute; shock in ice bath. Remove from ice and dry. Toss with mayonnaise, tamari and parsley; reserve.
- To make roasted onions: Preheat oven to 450 F. Peel onion and slice into 1-inch rings. Toss with salt and oil; roast until slightly caramelized with texture. Chill and reserve.
- Preheat oven to 450 F.
- Bake chicken on sheet pan approximately 15 minutes. Add potatoes and cauliflower. Bake approximately 15 minutes then switch oven to broil approximately 10 minutes.
- Squeeze lemon over reserved onion.
- When chicken is crispy and reaches internal temperature of 165 F, remove from oven and add onions and olives. Plate chicken, potatoes, onions, olives and cauliflower on top of arugula and garnish with lemon.
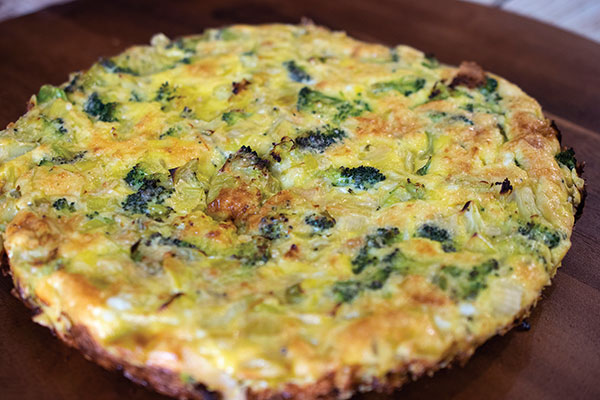
Cheesy Frittata with Veggies
Recipe courtesy of chef Nate Appleman on behalf of Abbott
Roasted Garlic:
- 2 heads garlic
- olive oil
- salt
Frittata:
- oil
- 2 medium leeks, sliced
- 8 ounces blanched, chopped broccoli
- salt, to taste
- 9 eggs
- 2 tablespoons chopped fresh parsley
- 2 ounces grated Parmigiano Reggiano
- 2 tablespoons heavy cream
- To make roasted garlic: Preheat oven to 400 F.
- Slice 1/4 inch off entire heads of garlic and place cut sides down in 1-liter casserole dish. Drizzle with olive oil and sprinkle with salt; cover with lid.
- Bake 35-45 minutes until heads of garlic are soft and light brown. Let cool then use back of knife to squeeze garlic from pods.
- To make frittata: Lower oven to 375 F.
- In saute pan, heat oil over medium-high heat. Cook leeks until soft; add broccoli then season with salt, to taste, and remove from heat.
- In mixing bowl, mix roasted garlic, sauteed leeks and broccoli, eggs, parsley, Parmigiano Reggiano and cream; place in 9-inch pie dish and bake approximately 20 minutes until top of frittata is brown. Remove from oven and let cool slightly before cutting and serving.
Source: Abbott

Holiday Spirits to Sip On
(Family Features) Despite a holiday season that’s practically guaranteed to feel different than any other, one constant will remain for many: enjoying the tastes of favorite foods and beverages while cozied up at home. Enhance the holiday spirit and complement the meal at your table with adult beverages that call for seasonal flavors to add to the festive vibe.
Whether you prefer your drinks with a fruity twist and plenty of mix-ins or would rather opt for a simpler combination, the options are vast. Many traditional holiday drinks require a small handful of ingredients that blend, mix or shake together to create a wintry flavor that’s worth the wait.
Regardless of personal preferences, one ingredient you can rely on when creating an at-home concoction is a mixer like those from Zevia, which are naturally sweetened with stevia and include no artificial ingredients, colors or preservatives. These non-alcoholic, zero-sugar, zero-calorie mixers for cocktails (or mocktails) are available in three different flavors: Lemon Lime with Bitters, Tonic and Ginger Beer to provide a simple yet delicious complement to the ingredients of your choosing.
For a fruit-flavored solution, this Cranberry Smash Moscow Mule offers a sweet spin on the classic cocktail. Break out your favorite copper mug and let the cranberries and cinnamon sticks add festive flair to your fusion of vodka and ginger beer.
Alternately, if the sour notes of a margarita better fit your style, go for a holiday twist with this Winter White Margarita by blending in coconut milk and garnishing with cranberries and rosemary sprigs. By rimming your glasses with granulated stevia, you can add a sweet touch to each gulp.
To find more holiday cocktail ideas, visit Zevia.com/recipes/cocktails.

Cranberry Smash Moscow Mule
Servings: 1
- 1 cup cranberries, plus additional for garnish (optional), divided
- 3/4-1 cup water, divided
- 2 ounces vodka
- 1-2 ounces fresh squeezed lime juice
- 4 ounces Zevia Ginger Beer Mixer
- ice
- rosemary, for garnish (optional)
- lime slices, for garnish (optional)
- cinnamon sticks, for garnish (optional)
- In saucepan, boil cranberries in 1/2 cup water until they burst.
- Use fork to smash cranberries. Boil 3-4 minutes. Keep mixture moist by adding water 1/4 cup at a time.
- Let mixture cool to room temperature.
- In copper mug, combine vodka, lime juice, ginger beer and smashed cranberries over ice.
- Garnish with additional cranberries, rosemary, lime slices and cinnamon sticks, if desired.

Winter White Margarita
Servings: 6
- 12 ounces coconut milk
- 12 ounces silver tequila
- 1 tablespoon orange extract
- 2 1/2 cups ice
- 1 1/2 cans Zevia Lemon Lime with Bitters
- granulated stevia, for garnish (optional)
- cranberries, for garnish (optional)
- rosemary sprigs, for garnish (optional)
- In blender, blend coconut milk, tequila, orange extract, ice and bitters until smooth.
- Rim six glasses with granulated stevia.
- Divide mixture among glasses and garnish each with cranberries and rosemary, if desired.
Photos courtesy of Getty Images
Source: Zevia

Festive and Flavorful Holiday Snacks
(Family Features) The holidays are filled with delicious food - from indulgent breakfasts to decadent desserts - but snacks can get overlooked. Spice up this holiday season with festive snacks that are perfect for a quick on-the-go bite or a taste of your favorite holiday dessert.
Although beloved in pie, pecans are a versatile nut that can be used beyond the pie shell - add them to a snack mix, incorporate them into granola or munch on them straight from the bag. Delicious and nutritious, 1 ounce of pecans offers 3 grams of plant-based protein and 3 grams of fiber, plus 12 grams of "good" monounsaturated fats and only 2 grams of saturated fat - perfect to power you through long days of holiday shopping.
This holiday season, nosh on a handful of these spiced Gingerbread Pecans for a sweet and savory snack while decorating the house or wrapping presents late at night, or set out a bowl for the family to enjoy.
You can also make snack-sized versions of your favorite holiday desserts to have on-hand when you're craving a quick and tasty treat. Chopped pecans add a flavorful and nutrient-dense crunch to these paleo-friendly No-Bake Pumpkin Pecan Pie Bites, while pecan halves provide a festive touch to these Reindeer Pecan Brownies.
Discover more nutritious, delicious and festive recipes at AmericanPecan.com.

Reindeer Pecan Brownies
Prep time: 20 minutes
Cook time: 15 minutes
Yield: 20 brownies
- Nonstick cooking spray
- 1 stick (1/2 cup) unsalted butter, melted
- 1 tablespoon pecan or canola oil
- 1 cup, plus 2 tablespoons, granulated sugar
- 2 large eggs
- 1 teaspoon vanilla extract
- 1/2 cup all-purpose flour
- 1/2 cup cocoa powder
- 1 teaspoon espresso powder (optional)
- 1/4 teaspoon kosher salt
- 20 raw pecan halves, cut in half
- 40 candy eyeballs
- 20 red chocolate candies
- 1/4 cup chocolate chip
- Preheat oven to 350 F. Spray mini muffin tin with nonstick cooking spray.
- In large bowl, whisk melted butter, oil and sugar until well combined. Add eggs and vanilla extract; beat until mixture is thick and pale in color, about 1 minute.
- Sift in flour and cocoa powder. Add espresso powder, if desired, and salt. Using rubber spatula, fold dry ingredients into butter mixture until just combined. Batter should be thick.
- Using 1-tablespoon cookie scoop, transfer batter to prepared mini muffin tin. Bake 13-15 minutes until toothpick inserted in center comes out mostly clean, with some lingering crumbs.
- Add chocolate chips to heat-proof bowl; microwave until smooth and melted. Pour melted chocolate into sandwich bag and cut off small portion of one corner to use as tip. Use melted chocolate to "glue" on pecan antlers, candy eyeballs and red candy noses to brownies.
- Allow chocolate to set before transferring brownies to airtight container.
Note: Brownies will stay fresh for up to three days.
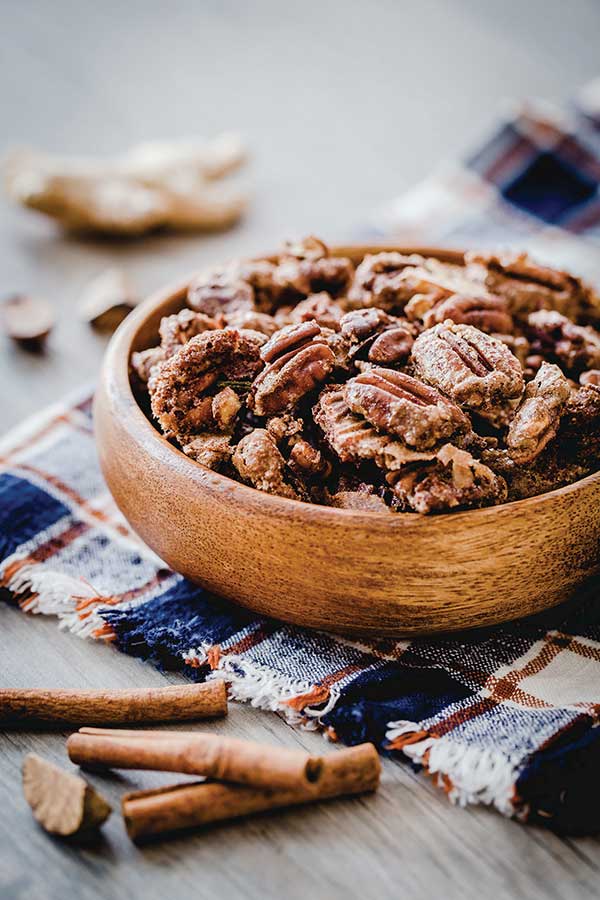
Gingerbread Pecans
Prep time: 5 minutes
Cook time: 40 minutes
Yield: 2 cups (6 servings)
- 1 large egg white, beaten
- 2 cups raw pecan halves
- 2 tablespoons granulated sugar
- 2 tablespoons light brown sugar
- 2 teaspoons gingerbread spice blend
- 1 pinch salt
- Preheat oven to 300 F. Line baking sheet with parchment paper; set aside.
- In large bowl, use fork to whisk beaten egg until frothy. Add pecans and stir until coated. Sprinkle pecans with granulated sugar, brown sugar, gingerbread spice and salt. Stir to coat evenly. Spread pecans in even layer on prepared baking sheet.
- Bake pecans 40 minutes, stirring halfway through. Allow pecans to cool completely.
Note: Pecans can be stored in airtight container for up to four days.
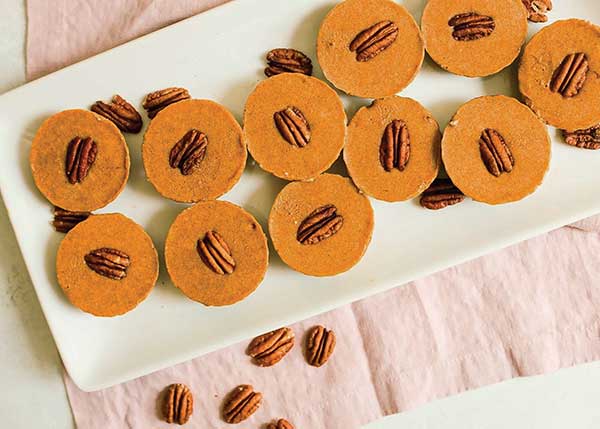
No-Bake Pumpkin Pecan Pie Bites
Prep time: 15 minutes
Chill time: 1 hour
Yield: 12 bites (6 servings)
Crust:
- 1 1/2 cups raw pecan pieces
- 3/4 cup pitted medjool dates (about 7 dates), soaked in hot water 10 minutes
- 1 pinch pink salt
Filling:
- 1/3 cup pumpkin puree
- 1/3 cup full fat coconut milk
- 1 teaspoon pumpkin spice
- 1/4 cup maple syrup
- 1 pinch pink salt
- 1 scoop collagen peptides (optional)
- 12 raw pecan halves, for topping
- To make crust: In food processor, process pecan pieces, drained dates and salt until combined and "dough" starts to form into ball.
- To make filling: In bowl, combine pumpkin puree, coconut milk, pumpkin spice, maple syrup, pink salt and collagen peptides, if desired. Whisk until smooth.
- Line cupcake tin and evenly distribute crust mixture, about 1 1/2 tablespoons in each cupcake opening. Use fingers to press crust into even layer.
- Evenly disperse pumpkin pie filling among openings until tins are about half full.
- Top each with one pecan half and place in freezer at least one hour.
Source: American Pecan Council