
Kickoff Cravings: Win your tailgate with MVP-level appetizers
(Family Features) Before the end zone dances and sideline celebrations, settling in for a winning game day experience starts with delicious foods. Whether your football parties take place at home, in the backyard or right outside the stadium, kicking it off with savory appetizers can get the crowd on its feet.
Keep your game plan simple this season and light up the scoreboard with fan favorites like dips and wings. These versions are both easy to prepare and can be enjoyed fresh or made in advance and kept warm or reheated to energize your fellow diehards.
Visit Culinary.net to find more touchdown-worthy tailgate recipes.

Add Savory Spice to Game Day Celebrations
Powering up for a successful game day starts with a pregame spread, and no tailgate or homegate is complete without a spicy dip that brings the heat.
This Game Day Buffalo Chicken Dip is a perfect solution for firing up your crowd as it requires little preparation so you save precious time before kickoff. Whether you bake shortly before the game begins or make it ahead of time for a parking lot party, simply keep it warm and serve with chips or veggie sticks for a quick, shareable appetizer.
Game Day Buffalo Chicken Dip
Servings: 3-4
- 2 cups shredded chicken
- 8 ounces cream cheese
- 1/2 cup sour cream
- 1 1/2 cups sharp cheddar cheese, plus additional for topping, divided
- 1/2 teaspoon onion powder
- 1/2 teaspoon garlic powder
- 1 heavy pinch dried dill
- 1/2 cup hot sauce
- 2 green onions, chopped
- blue cheese crumbles
- chips
- vegetable sticks
- Heat oven to 400 F.
- In bowl, mix shredded chicken, cream cheese, sour cream, 1 1/2 cups shredded cheese, onion powder, garlic powder and dried dill until combined. Add hot sauce; mix until combined.
- Transfer mixture from bowl to oven-safe dish. Top with additional shredded cheese, to taste.
- Bake until cheese is melted, approximately 15 minutes.
- Top with blue cheese crumbles and chopped green onion.
- Serve warm with chips and vegetable sticks.
Score a Touchdown with a Game Day Dip
One of the best ways to take tailgating to the next level this season is by making healthier versions of classic game day fare. For example, you can be the MVP of your game day gathering with a delicious, hall-of-fame-worthy appetizer. Call an audible by using fresh, easy and healthy ingredients to make it better for you and score extra points with family and friends.
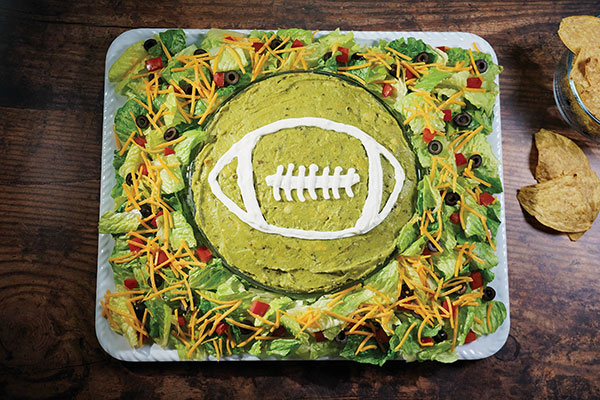
This Game Day Taco Dip takes fan-favorite flavors – beef, refried beans, salsa, guacamole, sour cream, cheese, tomatoes and black olives – and adds a twist with the Fresh Express Butter Supreme Salad kit. This tasty, colorful blend of green butter lettuce, red butter lettuce, radicchio and baby chard is available in the refrigerated produce department and is perfect for creating healthier versions of beloved tailgating dips, snacks, finger foods and more.
Visit FreshExpress.com to discover more winning game day recipe ideas and find a retailer near you.
Game Day Taco Dip
Prep time: 25 minutes
Cook time: 5 minutes
Servings: 12
- 1 pound ground beef
- 1 package (1 ounce) taco seasoning
- 1/4 cup water
- 2 tablespoons minced cilantro
- 1 can (16 ounces) refried beans, zesty salsa flavor
- 1 jar (16 ounces) thick and chunky salsa, medium or hot
- 2 cups guacamole
- 1/2 cup sour cream
- 3 packages (5 ounces each) Fresh Express Butter Supreme
- 1 1/2 cups shredded sharp cheddar cheese
- 1 cup tomatoes, chopped
- 1 can (2 1/4 ounces) sliced black olives, drained
- 1 package (14 ounces) tortilla chips
- In skillet over medium-high heat, cook beef 5 minutes, or until no longer pink. Sprinkle with taco seasoning; mix well. Add water; cook 2 minutes, or until water is absorbed. Transfer to bowl; cool to room temperature. Add cilantro; mix well.
- In 9-inch pie plate, evenly spread refried beans; top with seasoned ground beef and salsa. Add spoonfuls of guacamole across top of salsa then carefully spread to smooth.
- Place sour cream in small resealable bag; cut off corner. Pipe sour cream to create football shape on guacamole.
- Put pie plate in center of 15-by-18-inch tray. Arrange salad blend around pie plate. Top with cheddar cheese, tomatoes and olives. Serve with tortilla chips.

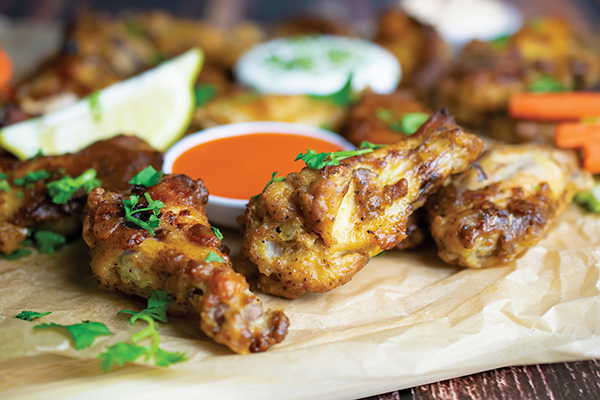
Just Wing It
Skip the silverware at your next homegate and dive right in with a fan favorite that requires just your hands and a heap of napkins: wings.
Whether you pick through your pieces or clean each wing to the bone, these Game Day Chicken Wings are perfect for eaters of all types. A simple flour-based coating keeps the recipe easy to make and baking in the oven means you can skip the messy fryer or firing up the grill.
Cook until crispy then corral your party’s favorite dipping sauces from ranch and blue cheese to barbecue and more. Once your spread is served, it’s time to sit back and enjoy the game.
Game Day Chicken Wings
Total time: 50 minutes
Servings: 4
- 1/2 cup butter, cubed
- 1/3 cup flour
- 2 teaspoons paprika
- 1 teaspoon garlic powder
- 1 teaspoon salt
- 1 teaspoon black pepper
- 10 chicken wingettes, thawed
- dipping sauces (optional)
- fresh parsley (optional)
- Preheat oven to 425 F.
- Line baking sheet with foil. Arrange butter cubes on foil.
- In medium bowl, combine flour, paprika, garlic powder, salt and pepper.
- Coat both sides of wings in flour mixture then evenly space among butter cubes on baking sheet.
- Bake wings 30 minutes.
- Turn wings over and bake 15 minutes, or until crispy and fully cooked.
- Serve with dipping sauces and sprinkle with fresh parsley, if desired.
Source: Fresh Express

A Full, Fresh Menu Fit for a Brunch Feast
(Family Features) Birthdays, holidays or just casual Saturdays are all perfect excuses to enjoy brunch with your favorite people. Bringing everyone together with quiches, pastries, appetizers, desserts and more offers an easy way to kick back and relax on a warm weekend morning.
These recipes for Easy Brunch Quiche, Savory Cheese Balls and Lemon Blueberry Trifle provide a full menu to feed your loved ones from start to finish, regardless of the occasion.
Find more brunch inspiration by visiting Culinary.net.
A Savory Way to Start the Celebration
Serving up exquisite flavor doesn’t have to mean spending hours in the kitchen. You can bring the cheer and favorite tastes with simple appetizers that are equal measures delicious and visually appealing.
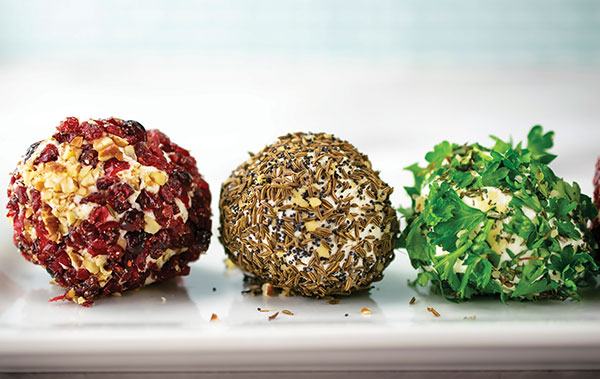
These Savory Cheese Balls are easy to make and perfect for get-togethers and brunch celebrations. Texture and color are the name of the game with this recipe, and the result is a beautiful array of red, gold and green, all on one plate.
To find more recipes fit for brunch, visit Culinary.net.
Savory Cheese Balls
Servings: 6-12
- 2 packages (8 ounces each) cream cheese
- 2 tablespoons caraway seeds
- 1 teaspoon poppy seeds
- 2 cloves garlic, minced, divided
- 1/4 cup parsley, chopped
- 2 teaspoons thyme leaves, chopped
- 1 teaspoon rosemary, chopped
- 1/4 cup dried cranberries, chopped
- 2 tablespoons pecans, chopped
- crackers (optional)
- fruit (optional)
- vegetables (optional)
- Cut each cream cheese block into three squares. Roll each square into ball.
- In small bowl, combine caraway seeds, poppy seeds and half the garlic.
- In second small bowl, combine parsley, thyme, rosemary and remaining garlic.
- In third small bowl, combine cranberries and pecans.
- Roll two cheese balls in seed mixture, two in herb mixture and two in cranberry mixture.
- Cut each ball in half and serve with crackers, fruit or vegetables, if desired.
Finish Brunch with a Light, Layered Treat
After enjoying eggs, bacon, French toast and pancakes or any other brunch combination you crave, it’s tough to top a fresh, fruity treat to round out the meal. Dish out a delicious dessert to cap off the morning and send guests out on a sweet note that’s perfectly light and airy.
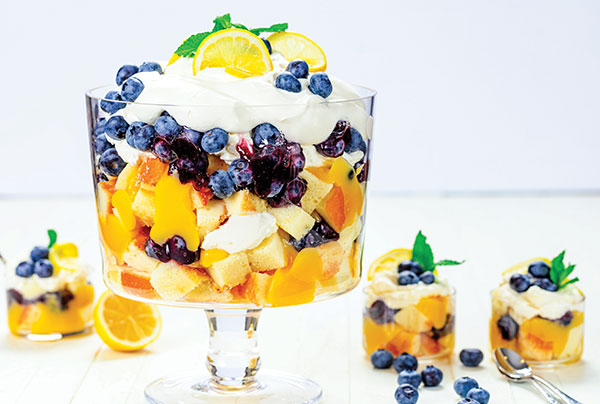
The zesty zip of lemon curd in this Lemon Blueberry Trifle brings out the sweetness of whipped cream made with Domino Golden Sugar, fresh blueberries and cubed pound cake for a vibrant, layered bite. Plus, it’s a bright, beautiful centerpiece you can feel proud of as soon as guests try their first bite.
Find more dessert recipes fit for brunch and other favorite occasions at DominoSugar.com.
Lemon Blueberry Trifle
Prep time: 45 minutes
Servings: 8-10
Lemon Curd:
- 1 cup Domino Golden Sugar
- 2 tablespoons cornstarch
- 1/4 cup freshly squeezed lemon juice
- 1 tablespoon lemon zest
- 6 tablespoons water
- 1/4 teaspoon salt
- 6 egg yolks
- 1/2 cup (1 stick) unsalted butter, at room temperature, cut into 1/2-inch cubes
Whipped Cream:
- 2 cups heavy whipping cream, cold
- 2 tablespoons Domino Golden Sugar
- 2 teaspoons pure vanilla extract
Trifle:
- 1 cup blueberry jam
- 12 ounces fresh blueberries, plus additional for garnish, divided
- 1 pound cake, cubed
- lemon slices, for garnish
- mint, for garnish
- To make lemon curd: In medium saucepan, stir sugar and cornstarch. Stir in lemon juice, lemon zest, water and salt. Cook over medium heat, stirring constantly, until thickened. Remove from heat and gradually stir in three egg yolks; mix well until combined. Stir in remaining egg yolks. Return to heat and cook 2 minutes, stirring constantly. Remove from heat.
- Stir in butter; mix until incorporated. Cover with plastic wrap, touching surface of lemon curd to prevent curd forming skin. Refrigerate until completely cool.
- To make whipped cream: In large bowl, beat cream, sugar and vanilla until soft peaks form. Do not overbeat.
- To make trifle: Mix blueberry jam with 12 ounces fresh blueberries. Place one layer cubed pound cake in bottom of trifle dish. Top with layer of blueberries. Add dollops of lemon curd and whipped cream. Repeat layering ending with whipped cream.
- Decorate trifle with lemon slices, fresh blueberries and mint.
Say Goodbye to Basic Brunch
The same old brunch menu can become tiresome and dull. Adding something new to the table with fresh ingredients and simple instructions can enhance your weekend spread and elevate brunch celebrations.
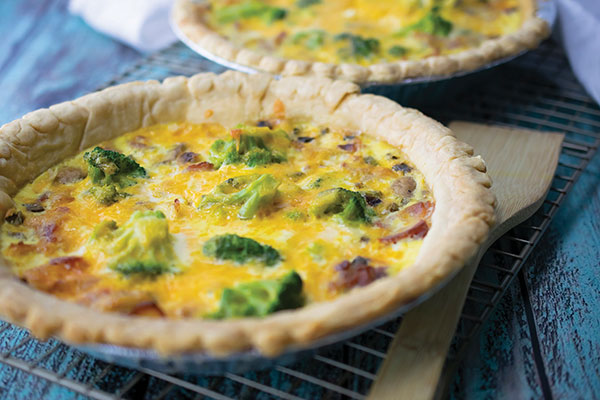
Try this Easy Brunch Quiche that is sure to have your senses swirling with every bite. This quiche is layered with many tastes and a variety of ingredients to give it crave-worthy flavor, from broccoli and bacon to mushrooms, eggs and melty cheese.
Visit Culinary.net to find more brunch recipes.
Easy Brunch Quiche
Serves: 12
- 1 package (10 ounces) frozen broccoli with cheese
- 12 slices bacon, chopped
- 1/2 cup green onions, sliced
- 1 cup mushrooms, sliced
- 4 eggs
- 1 cup milk
- 1 1/2 cups shredded cheese, divided
- 2 frozen deep dish pie shells (9 inches each)
- Heat oven to 350 F.
- In medium bowl, add broccoli and cheese contents from package. Microwave 5 minutes, or until cheese is saucy. Set aside.
- In skillet, cook chopped bacon 4 minutes. Add green onions; cook 2 minutes. Add mushrooms; cook 4 minutes, or until bacon is completely cooked and mushrooms are tender. Drain onto paper towel over plate. Set aside.
- In medium bowl, whisk eggs and milk until combined. Add broccoli and cheese mixture. Add 1 cup cheese. Stir to combine. Set aside.
- In pie shells, divide drained bacon mixture evenly. Divide broccoli mixture evenly and pour over bacon mixture. Sprinkle remaining cheese over both pies.
- Bake 40 minutes.
- Cool at least 12 minutes before serving.
Note: To keep edges of crust from burning, place aluminum foil over pies for first 20 minutes of cook time. Remove after 20 minutes and allow to cook uncovered until completed.
Source:

Spring Table Spread
(Culinary.net) With spring in the air, it’s the perfect time to invite guests over for a hopping party. It’s also a great opportunity to tackle that dreadful spring cleaning and spruce up your living spaces with vibrant decor for visitors to enjoy alongside a delicious recipe.
With this sweet, colorful table arrangement, your whole family can get into the spring spirit. From festive utensils, a bright centerpiece and cute snacks, your spring setup can be fresh and fabulous.
It’s simple to put together and easy on the budget. Pair it with appetizers or even a main dish for a full spring party spread that’s sure to impress.
Find more springtime recipes at Culinary.net.
Watch video to see how to create this Spring Table Spread!
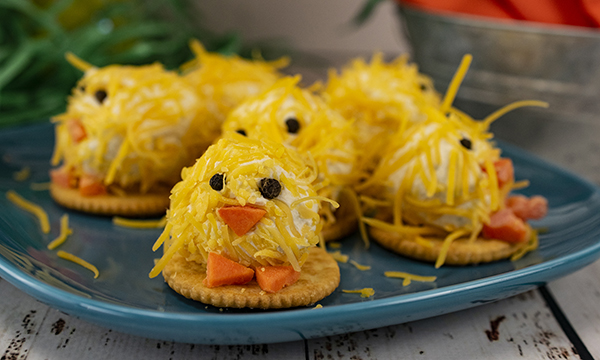
Chick Cheese Balls
Recipe adapted from Hallmark.com
Yield: 10 chicks
- 1 package cream cheese
- 1/4 tablespoon garlic powder
- 1 tablespoon Worcestershire sauce
- 1/2 lemon, juice only
- salt, to taste
- pepper, to taste
- 1 cup finely shredded cheddar cheese
- crackers
- carrots
- whole black peppercorns
- Using mixer, combine cream cheese, garlic powder, Worcestershire sauce and lemon juice. Add salt and pepper, to taste. Refrigerate mixture 1 hour.
- Using fingers, form about 1 tablespoon of cream cheese mixture at a time into balls. Refrigerate 30 minutes on small baking sheet.
- Before serving, roll each ball into shredded cheddar cheese to cover. Place each ball on round cracker.
- Cut small triangles from carrots for beaks and feet. Press carrots onto cheese balls. Add peppercorns for eyes.
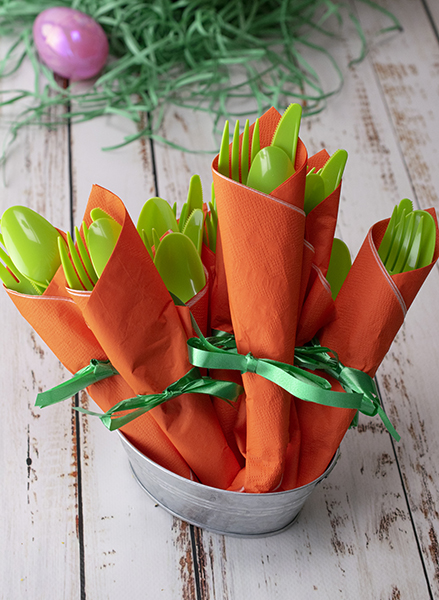
Carrot Utensils
- Orange napkins
- green plastic silverware
- green ribbon
- Lay napkins flat on table. Place one of each utensil in napkin facing top corner. Wrap napkin around utensils. Tie ribbon around middle of napkin. Place in bowl or basket on table.

Spring Table Centerpiece
Recipe adapted from Craftmorning.com
- Jelly beans
- chocolate coated candy eggs
- marshmallow chicks
- fresh or fake flowers
- plastic or dyed eggs (optional)
- Place medium bowl inside large dish. Pour jelly beans and chocolate coated candy eggs around bowl.
- Add marshmallow chicks around dish on top of candies. Arrange fresh or fake flowers in center. Set on table as centerpiece. Place eggs around dish, if desired.

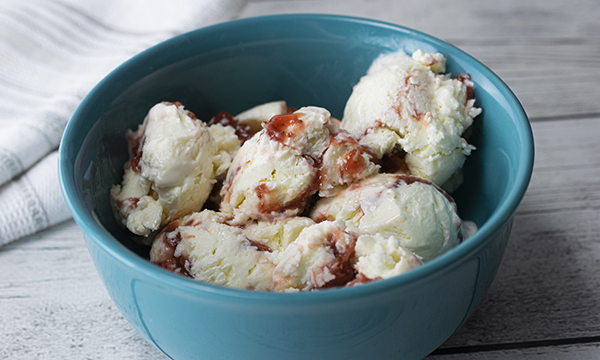
Cheesecake Ice Cream with Fruit Swirls
(Family Features) Spending precious moments enjoying outdoor meals with family and friends is part of what makes warm weather get-togethers so special. Take those al fresco occasions to the next level with a favorite dessert: ice cream.
Homemade ice cream is a hallmark of many family events from birthday celebrations and pool parties to warm weather holidays spent basking in the sunshine. Completely customizable with an array of fruits or other tasty mix-ins plus toppings of your choice, it’s a perfect way to put a grin on loved ones’ faces.
At your next outdoor event, try an option like Cheesecake Ice Cream with Fruit Swirls from Milk Means More. It’s a simple solution you can make a couple days in advance with your favorite fruit flavor such as blueberry, raspberry, cherry, strawberry, peach or apricot. Plus, this recipe serves a crowd, making it perfect for serving up smiles.
Visit MilkMeansMore.org for more delicious dessert ideas.
Watch video to see how to make this recipe!
Cheesecake Ice Cream with Fruit Swirls
Recipe courtesy of Marcia Stanley, MS, RDN, on behalf of Milk Means More
Prep time: 15 minutes
Servings: 12
- 12 ounces cream cheese, cut into cubes
- 3/4 cup sugar
- 1 cup sour cream
- 3/4 cup half-and-half
- 2 teaspoons vanilla
- 1 1/4 teaspoons lemon juice, divided
- 1 dash salt
- 1/3 cup blueberry, raspberry, cherry, strawberry, peach or apricot fruit spread
- In large mixer bowl of electric mixer, beat cream cheese and sugar on medium speed until fluffy. Add sour cream, half-and-half, vanilla, 1 teaspoon lemon juice and salt. Beat on low speed until combined then beat on medium speed until smooth. Cover and refrigerate 2-24 hours, or until cold.
- Pour cream cheese mixture into 1 1/2-quart ice cream freezer. Freeze according to manufacturer’s directions.
- In small bowl, stir fruit spread and remaining lemon juice.
- Spoon about one-third of ice cream into 2-quart food storage container. Spoon about half of fruit spread mixture in dollops over ice cream. Repeat layers. Top with remaining ice cream. Cover and freeze 4-24 hours.
- To serve, scoop ice cream into dessert dishes.

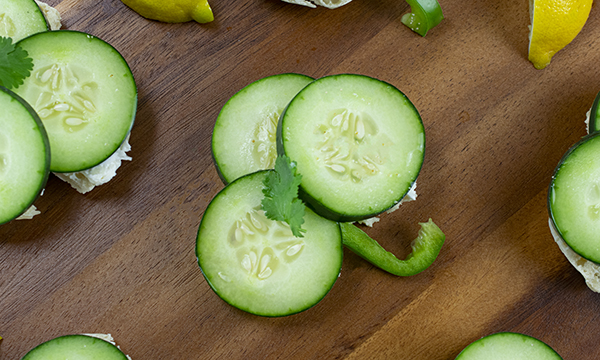
St. Patrick's Day Sandwiches
(Culinary.net) Freshen up your St. Patrick’s Day menu with easy, light sandwiches inspired by the traditional color of the festivities. These open-faced noshes can be perfect for lunch, snack time or even as an appetizer for get-togethers with friends and family.
Layered with a smooth cream cheese and mozzarella mixture then topped with crisp cucumber and a stem of green bell pepper, these St. Patrick’s Day Sandwiches are easy and cute, which makes them a fan favorite at nearly any green gathering. They’re also sprinkled with lemon juice to add a little acidity and create a nice, light bite.
Plus, this recipe is quick to make. When you’re in a rush to get everything on the table for the party, it’s easy to throw together and get on the platter in next to no time.
The sandwiches pop off the plate with their bright, seasonal garnishes. While sure to attract attention and have your loved ones asking “Where did you get this idea?” they’re also an easy way to sneak a few vegetables into your kids’ diets.
For more festive recipes and ideas at Culinary.net.
Watch video to see how to make this recipe!
St. Patrick’s Day Sandwiches
Yield: 8 sandwiches
- 8 ounces plain cream cheese spread, softened
- 1 cup finely shredded mozzarella cheese
- salt
- 4 English muffins
- 24 slices cucumber
- 8 thin slices green pepper
- fresh cilantro leaves
- lemon juice
- lemon slices, for garnish (optional)
- In bowl, mix cream cheese spread, mozzarella cheese and salt well.
- Split English muffins in half. Cut each muffin half into shamrock shape.
- Spread cheese mixture over each muffin half.
- Place three cucumbers on each “shamrock,” one on each “leaf.” Use green pepper slice as stem. Place cilantro leaf on top of each sandwich.
- Sprinkle sandwiches with lemon juice and add lemon slices, for garnish, if desired.
Source: Culinary.net

'Tis the Holiday Baking Season
(Family Features) One of the best parts of the holidays is the aromas and flavors of the season, from walnuts and cinnamon to peppermint and nutmeg. Sweet treats and mouthwatering desserts can bring family and friends around the table to celebrate the season together, one bite at a time.
During your festive gatherings this year, choose walnuts as the star baking ingredient. As many home cooks turn to wholesome ingredients that offer health benefits this holiday baking season, California walnuts make for a perfect addition to almost any dish and are an excellent source of omega-3 ALA (2.5g/oz). With a buttery flavor that elevates traditional and modern recipes, home bakers can do more with walnuts in the kitchen.
Part pumpkin, part cheesecake, this Walnut Pumpkin Cream Cheese Tart spices up the classic pumpkin pie recipe. Top it, or other favorite desserts, with light and airy Vanilla Walnut Whipped Cream flavored with honey and vanilla to complement festive dishes.
This holiday season, pick up a bag of walnuts for all your baking needs. To discover more festive dessert ideas, visit walnuts.org.
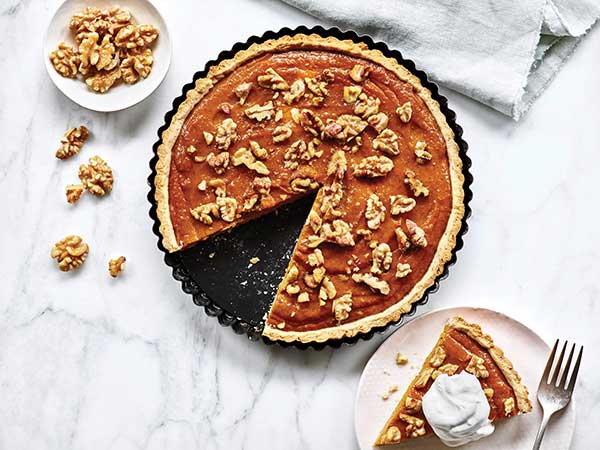
Walnut Pumpkin Cream Cheese Tart
Total time: 2 hours, 30 minutes
Servings: 12
Sweet Tart Crust:
- 1 1/4 cups flour
- 1/3 cup California walnuts, finely chopped
- 1/3 cup powdered sugar
- 1/3 cup salted butter, softened
- 1 large egg
- nonstick cooking spray
Filling:
- 1 can (15 ounces) pumpkin
- 4 ounces low-fat cream cheese, softened
- 1/2 cup brown sugar, packed
- 2 teaspoons pumpkin pie spice
- 1 teaspoon vanilla extract
- 1 egg, plus 1 egg yolk
- 1/2 cup California walnuts, coarsely chopped
- whipped cream, for serving (optional)
- To make sweet tart crust: In medium bowl, stir flour, walnuts and powdered sugar. Stir in butter and egg. Using fork, stir well until soft dough forms. Gather into ball and wrap tightly.
- Refrigerate at least 1 hour, or until dough is easy to handle.
- Preheat oven to 350 F and coat 9-inch tart pan with removable bottom with nonstick cooking spray.
- Lay pastry dough on lightly floured board and roll into 11-inch circle. Press dough into bottom and sides of prepared pan and poke with fork on bottom and sides. Bake 20 minutes.
- To make filling: In medium bowl, whisk pumpkin and cream cheese until smooth. Add brown sugar, pumpkin pie spice, vanilla extract, egg and egg yolk, beating until incorporated.
- Pour into prepared crust and top with walnuts. Bake 40 minutes, or until filling is set when pan is gently tapped.
- Remove from oven and let cool. Cover and refrigerate until ready to serve.
- Serve each slice with dollop of whipped cream, if desired.
Vanilla Walnut Whipped Cream
Total time: 8 minutes
Servings: 14
- 2 1/2 cups California walnuts, divided
- 1 cup water
- 2 tablespoons powdered sugar
- 1-2 teaspoons honey, divided
- 1 teaspoon vanilla extract
- 1 pinch salt
- In blender, puree 2 cups walnuts and water 2 minutes, or until light and fluffy.
- Add powdered sugar, 1 teaspoon honey, vanilla extract and salt; blend 30 seconds. Add remaining honey if sweeter taste is desired.
- To achieve thicker whipped cream, add remaining walnuts and puree until light and fluffy.
- Store tightly covered in refrigerator until ready to use.
Source: California Walnuts

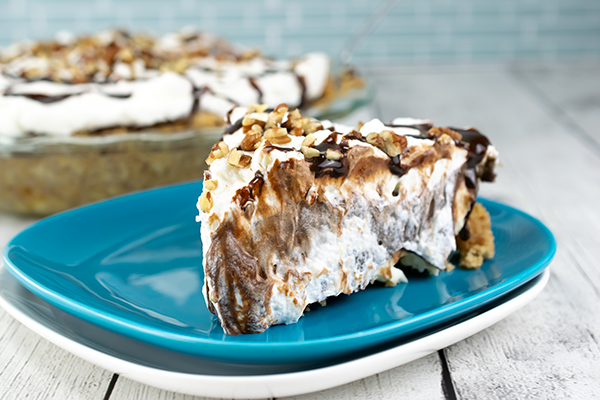
Arkansas Possum Pie
The star of your next spread can be hidden away in the refrigerator for a surprise delight for your guests. It’s topped with chocolate syrup and chopped pecans, and your loved ones just may vote it to be their favorite dish.
It’s an Arkansas Possum Pie, made with three delicious layers and crunchy toppings for a show-stopping dessert.
In a saucepan, melt butter. Add flour and stir to combine. Add crushed pecans and brown sugar. Stir to combine and form to the bottom of a pie pan. Bake for 15-20 minutes at 350 F.
In a separate bowl, add cream cheese and beat until smooth. Add powdered sugar and heavy cream. Stir to combine. Add to pie pan over cooled pecan crust. Refrigerate.
To make the pudding layer, whisk egg yolks in a bowl then whisk in whole milk.
In a separate bowl, add sugar, cocoa powder, cornstarch, flour and salt. Whisk to combine.
In a saucepan over medium heat, add egg mixture followed by the dry mixture and stir. Add butter and vanilla extract, stirring until butter is melted.
Pour pudding mixture into a separate pie pan and cover with plastic wrap. Refrigerate for 30 minutes. Once cooled, add on top of the other layers and spread evenly.
Refrigerate pie overnight.
To make whipped topping, in a mixer, add heavy whipping cream, powdered sugar and vanilla extract. Beat to combine. Add whipped topping to the top of the chilled pie.
Drizzle with chocolate syrup and sprinkle with chopped pecans.
Whether it’s a holiday, birthday or reunion, this pie is a perfect conversation starter. It’s sweet, crunchy and filled with creamy, delightful layers of goodness.
Find more unique dessert recipes at Culinary.net.
If you made this recipe at home, use #MyCulinaryConnection on your favorite social network to share your work.
Watch video to see how to make this recipe!
Arkansas Possum Pie
Servings: 8
Crust:
- 3/4 cup butter
- 1 1/2 cups flour
- 1/2 cup brown sugar
- 1 1/2 cups pecans, crushed
Cream Cheese Layer:
- 12 ounces cream cheese, softened
- 1 cup powdered sugar
- 4 tablespoons heavy cream
Pudding Layer:
- 3 egg yolks
- 2 cups whole milk
- 1 cup sugar
- 1/3 cup cocoa powder
- 3 tablespoons cornstarch
- 2 tablespoons flour
- 1/4 teaspoon salt
- 2 tablespoons butter
- 1 teaspoon vanilla extract
Whipped Cream Topping:
- 1 cup heavy whipping cream
- 4 tablespoons powdered sugar
- 1 teaspoon vanilla extract
- chocolate syrup
- 1/2 cup chopped pecans
- Heat oven to 350 F.
- To make crust: In saucepan, melt butter; add flour, brown sugar and crushed pecans. Stir until combined. Press into 9 1/2-inch deep pie plate.
- Bake 15-20 minutes until crust begins to brown. Cool completely.
- To make cream cheese layer: In medium bowl, mix cream cheese until creamy. Add powdered sugar and heavy cream; mix until smooth. Spread over cooled pecan crust. Refrigerate.
- To make pudding layer: In medium bowl, whisk egg yolks. Add milk; whisk until combined. Set aside.
- In separate medium bowl, whisk sugar, cocoa powder, cornstarch, flour and salt until combined.
- In saucepan over medium heat, add egg yolk mixture and flour mixture. Whisk constantly until pudding begins to thicken and bubble. Add butter and vanilla extract, stirring until butter is melted. Pour chocolate pudding in shallow bowl. Cover with plastic wrap touching pudding to keep it from forming skin. Refrigerate 30 minutes.
- Pour pudding over cream cheese layer. Cover pie with plastic wrap. Refrigerate overnight.
- To make whipped cream topping: In stand mixer bowl, add heavy cream, powdered sugar and vanilla extract. Whip until stiff peaks form. Spread whipped cream over pudding layer.
- Drizzle pie with chocolate syrup and sprinkle with chopped pecans.

Veal Tex Mex Stuffed Shells
(Family Features) Ease and convenience can go a long way toward creating weeknight meals that bring the entire family together, which is why it’s helpful to focus your favorite dishes around main ingredients that simplify dinner routines.
Versatile proteins like veal open many possibilities from decadent, romantic meals to easy and beginner-friendly options. Its flavor is light, making it a blank canvas for discovery by pairing it with different combinations of sauces, spices, cheeses and more.
You can be confident in the taste of veal as your main ingredient in these Veal Tex Mex Stuffed Shells, a quick and easy dinner perfect for hectic weeknights. Requiring just over half an hour in the kitchen, jumbo pasta shells are loaded with taco-flavored ground veal and melted cream cheese then topped with your favorite taco sauce.
It offers a new, exciting recipe to add to the family menu while also providing nutrition; a 3-ounce serving of veal includes 27 grams of protein, which is more than half of the daily value for a 2,000-calorie diet.
Discover more quick and easy recipe ideas at Veal.org, funded by Beef Farmers and Ranchers.
Watch video to see how to make this recipe!

Veal Tex Mex Stuffed Shells
Prep time: 20 minutes
Cook time: 15 minutes
Servings: 6
- 1 pound ground veal
- 1/2 cup diced onion
- 1/2 cup diced poblano pepper
- 1 package (1 1/4 ounces) taco seasoning
- 1/2 cup water
- 4 ounces cream cheese
- 2 cups shredded colby jack cheese, divided
- 20 jumbo pasta shells
- 1 1/2 cups salsa
- 1 cup taco sauce
- Preheat oven to 350 F.
- In large skillet over medium-high heat, cook ground veal, diced onion and diced pepper until meat is no longer pink, 5-7 minutes.
- Stir in taco seasoning and water.
- Break cream cheese into chunks and add to skillet; simmer 3-4 minutes, or until cream cheese melts into veal mixture.
- Remove from heat and add 1/2 cup colby jack cheese; stir to combine.
- Bring large pot of salted water to boil and add pasta shells. Cook according to package directions and drain.
- Immediately separate shells on plate to avoid sticking together.
- Pour salsa into 13-by-9-inch baking dish and spread to cover bottom.
- Fill each pasta shell with 1-2 tablespoons veal mixture and place in baking dish.
- Top stuffed shells with taco sauce and sprinkle remaining colby jack cheese on top.
- Bake 15 minutes, or until cheese is melted and shells are heated through.
Source: New York Beef Council

Plan a Perfect Reunion for Family and Friends
(Family Features) After an extended period of social distancing, this year will be a time for reuniting with family and friends. Picnic get-togethers filled with delicious food are one of the best ways to reunite with loved ones when you’re ready for those long-overdue laughs.
While planning the perfect outdoor gathering can feel overwhelming, it doesn’t have to be. With these simple tips, it can be easy to organize a memorable picnic reunion.
Make it fun. Whether it’s a water balloon toss or a three-legged race, organizing a few games for your guests can be a simple way to reconnect and have fun together. Outdoor games like ring toss and potato sack races or arts and crafts are activities all ages can enjoy.
Reach for pantry staples. No picnic is complete without good food. When planning your menu and packing your cooler, don’t stress. Before you make an extra trip to your local farmers market or grocery store, be sure to check your pantry. You probably already have the makings for simple yet delicious meals and snacks. For example, canned fruits, vegetables and proteins – like wild-caught tuna, salmon and sardines – can help you create and elevate your picnic recipes.
Host an eco-friendly picnic. Good food and good weather help make a successful picnic, but ensuring you leave your space as you found it is equally important. To minimize waste, invest in reusable picnicware, like utensils and plates. Also consider swapping your paper napkins for cloth versions. Not only are they more environmentally friendly, but they’ll also elevate the overall look of your picnic.
No grill, no problem. As more people seek out substitutes for red meat, change up your menu and serve seafood as a delicious alternative. For example, an Albacore Bliss Bowl made with Chicken of the Sea Solid White Albacore Tuna in Water is a versatile choice that can be topped with veggies like cabbage, cucumber and carrot then drizzled with a homemade dressing. Since there’s no cooking required, you can easily prep ahead of time or even on-site. For those taking part in the day’s games and activities, try these Salmon Rollups which make perfect handheld snacks.
For more recipe inspiration while planning your next picnic reunion, visit chickenofthesea.com .
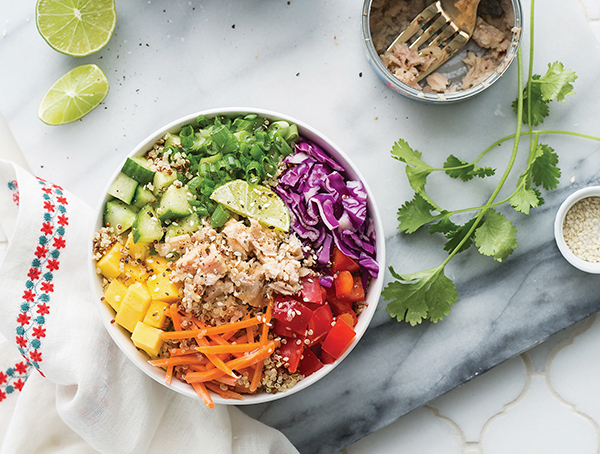
Albacore Bliss Bowl
Total time: 10 minutes
Servings: 4
- 2 cans (5 ounces each) Chicken of the Sea Solid White Albacore Tuna in Water, drained and flaked
- 2 cups cooked quinoa
- 1/2 cup chopped purple cabbage
- 1/3 cup diced cucumber
- 1/3 cup shredded carrot
- 1/3 cup diced red pepper
- 1/3 cup diced mango
- 1/3 cup chopped green onions
- 4 tablespoons apple cider vinegar
- 2 tablespoons olive oil
- 2 tablespoons honey
- 1 tablespoon sesame oil
- 1/2 teaspoon salt
- 1/2 teaspoon freshly ground pepper
- 1 teaspoon sesame seeds or black sesame seeds
- Divide cooked quinoa between four bowls. Top each with evenly divided tuna, cabbage, cucumber, carrots, red peppers, mango and green onions.
- In small bowl, whisk apple cider vinegar, olive oil, honey, sesame oil, salt and pepper. Drizzle over each bowl. Garnish with sesame seeds.
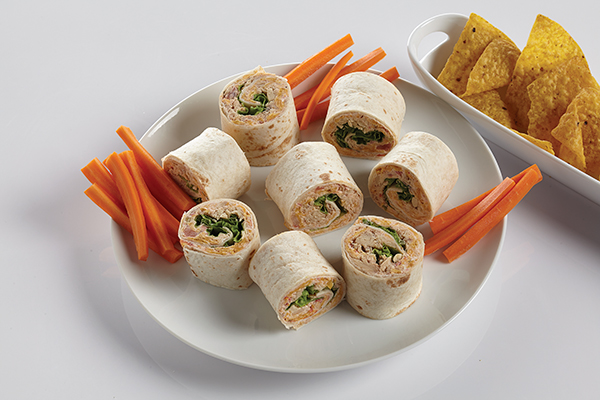
Salmon Rollups
Total time: 15 minutes
Servings: 4
- 1 can (5 ounce) Chicken of the Sea Pink Salmon
- 1 package (8 ounces) cream cheese, softened
- 1/2 cup thick and chunky salsa, plus additional for dipping (optional)
- 1 cup shredded cheddar cheese
- 1 cup corn chips, crushed
- 4 flour tortillas (8 inches)
- 4 large leafy green lettuce leaves, washed and patted dry
- In bowl, combine cream cheese and 1/2 cup salsa until light and fluffy. Stir in salmon, cheese and corn chips.
- Spread 1/4 filling to within 1/2 inch of each tortilla edge. Arrange one lettuce leaf over filling. Roll up tortillas and wrap in plastic wrap. Refrigerate 1-3 hours.
- To serve, remove plastic wrap, trim ends from rolls and cut each into 3-4 slices. Serve with additional salsa, if desired.
Source: Chicken of the Sea

Rally the Crowd with a Masterful Game Day Menu
(Family Features) Scoring big on game day requires championship-level meals and snacks that keep the crowd full and ready for action. You can take your tailgate to the house with these baked dishes that help simplify homegating so you can focus on the big screen.
From a salsa-based dip and chicken wings to kick off the party to sweet brownies for celebrating victory, each of these recipes call for less than an hour in the kitchen. Clock management is key to tackling a tailgate spread, making these delicious dishes the perfect play calls on game day.
To find more tailgate and homegate recipe inspiration, visit Culinary.net.
Just Wing It
Skip the silverware at your next homegate and dive right in with a fan favorite that requires just your hands and a heap of napkins: wings.
Whether you pick through your pieces or clean each wing to the bone, these Game Day Chicken Wings are perfect for eaters of all types. A simple flour-based coating keeps the recipe easy to make and baking in the oven means you can skip the messy fryer or firing up the grill.
Cook until crispy then corral your party’s favorite dipping sauces from ranch and blue cheese to barbecue and more. Once your spread is served, it’s time to sit back and enjoy the game.
Visit Culinary.net to find more touchdown-worthy tailgate recipes.
Game Day Chicken Wings
Total time: 50 minutes
Servings: 4
- 1/2 cup butter, cubed
- 1/3 cup flour
- 2 teaspoons paprika
- 1 teaspoon garlic powder
- 1 teaspoon salt
- 1 teaspoon black pepper
- 10 chicken wingettes, thawed
- dipping sauces (optional)
- fresh parsley (optional)
- Preheat oven to 425 F.
- Line baking sheet with foil. Arrange butter cubes on foil.
- In medium bowl, combine flour, paprika, garlic powder, salt and pepper.
- Coat both sides of wings in flour mixture then evenly space among butter cubes on baking sheet.
- Bake wings 30 minutes.
- Turn wings over and bake 15 minutes, or until crispy and fully cooked.
- Serve with dipping sauces and sprinkle with fresh parsley, if desired.
Score Big with a Salsa-Based Dip
Whether your game day celebrations call for a full-blown parking lot party or homegating with your closest friends, the nibbles and noshes you serve set the stage. Building your menu with crowd-pleasing classics – including one tried-and-true favorite that offers a fresh, veggie-forward taste: chilled salsa – makes your guests cheer for more than just the home team.
Healthy game day snacks are important to almost half (48%) of tailgaters and 18% said they’d consider leaving a party if salsa wasn’t served, according to the “Game Day Eats Report” survey from refrigerated salsa brand Fresh Cravings. With its low calorie count packed with high flavor, salsa supports health-conscious goals. Made with ingredients like fresh tomatoes, crisp vegetables, zesty peppers and more, the authentic taste of chilled salsa is a universal favorite among fans.
With a belief that plant-based foods should contain wholesome ingredients and bold flavors worth celebrating, Fresh Cravings refrigerated salsas are available in the produce section, next to dressings and dips, in restaurant-style or chunky mild, medium and hot varieties. Chilled salsa is an affordable and vibrant-tasting alternative to jarred salsa, making it a key ingredient in this Mexican Pizza Dip from celebrity chef George Duran. It’s a simple crowd-pleaser you can make in less than an hour, leaving more time for pregame festivities.
For more information and game day recipe ideas, visit freshcravings.com.
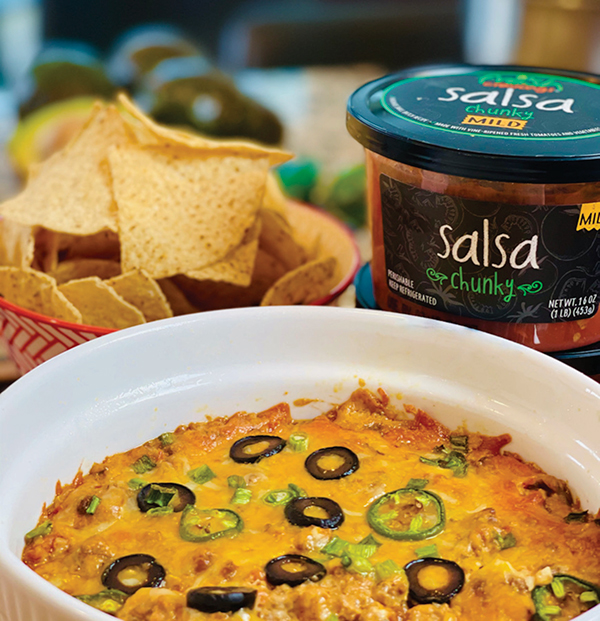
Mexican Pizza Dip
Recipe courtesy of chef George Duran
Servings: 6-8
- Nonstick cooking spray
- 1 tablespoon vegetable oil
- 1 pound ground beef
- 1 package taco seasoning mix
- 8 ounces cream cheese, at room temperature
- 1/2 cup sour cream
- 1 cup Fresh Cravings Chunky Salsa, plus additional for topping
- 1 cup grated mozzarella
- 1/2 cup blended Mexican cheese
- sliced jalapeno (optional)
- sliced black olives (optional)
- green onions (optional)
- tortilla chips
- Preheat oven to 350 F.
- Spray 8-by-8-inch glass pan or large souffle dish with nonstick cooking spray; set aside.
- In large saute pan, heat oil over medium-high heat and add ground beef, breaking up with flat wooden spatula, until fully cooked. Sprinkle taco seasoning throughout beef and combine.
- Place warm beef mixture in large bowl and add cream cheese, sour cream, 1 cup salsa and mozzarella. Mix well until combined and pour into prepared pan. Top with blended cheese and sliced jalapeno, black olives and green onions, if desired.
- Bake until fully warmed and cheese is melted, 30-35 minutes.
- Top with small spoonfuls of salsa. Serve with tortilla chips.
Cap Off Game Day with an All-Star Combo
Pregame festivities call for salty snacks and meaty morsels, but halftime eating and postgame celebrations are perfect for sweet treats.
You can sweeten up your tailgate or homegate with a shareable option like Marbled Peanut Butter Chocolate Brownies made with Domino Golden Sugar, which is made from pure cane sugar and dissolves and measures cup for cup just like white granulated sugar without compromising performance or taste. Featuring an undefeated combination of peanut butter and chocolate, this dessert is ideal for baking a day ahead so you can manage the clock on game day.
Find more tailgating sweets at dominosugar.com.

Marbled Peanut Butter Chocolate Brownies
Prep time: 25 minutes
Cook time: 20 minutes
Yield: 24 brownies
Chocolate Brownies:
- 1/2 cup (1/4 pound) butter
- 2 ounces unsweetened chocolate, chopped
- 1 cup Domino Golden Sugar
- 1/2 teaspoon vanilla extract
- 2 eggs
- 1/2 cup all-purpose flour
Peanut Butter Marble:
- 1/4 cup natural (no added sugar) peanut butter
- 4 tablespoons butter, softened
- 1/2 cup Domino Golden Sugar
- 1 egg
- 1/4 teaspoon vanilla extract
- 1/4 cup all-purpose flour
- 1/4 teaspoon baking powder
- powdered sugar, for topping (optional)
- Heat oven to 350 F.
- To make chocolate brownies: In medium saucepot over low heat, melt butter and chocolate. Remove pot from heat; stir in sugar and vanilla until blended.
- In small mixing bowl, whisk eggs until frothy then stir into chocolate mixture.
- Sift flour into batter and stir just until smooth. Pour batter into prepared pan, smoothing to edges.
- To make peanut butter marble: In mixing bowl, cream peanut butter, butter and sugar. Add egg and vanilla; beat just until blended. In separate bowl, sift or whisk flour and baking powder then stir into batter just until combined.
- Carefully spread peanut butter marble over chocolate batter. Use knife to swirl batters together, first horizontally then diagonally.
- Bake 20 minutes, or until toothpick inserted in center comes out almost clean. Cool completely on wire rack before cutting. Top with powdered sugar, if desired, before serving.
Source:Fresh Cravings
Domino Sugar