
Get Creative with Easter Sweets
(Family Features) Holiday hams and deviled eggs may take center stage at Easter gatherings, but edible crafts offer a reminder of the magic of the season that’s found in moments spent together. Simple recipes that call for a dose of creativity are perfect ways to bring the kids to the kitchen, made even easier when all that work leads to sweet treats.
While plastic eggs may have led to a decline in good, old-fashioned egg-dyeing, there are still fun ways to bring crafts back to Easter celebrations. Consider these Kids Krafty Easter Cake Pops, which call for little ones to help dip seasonal shapes in chocolate, use cake molds and more.
Children of virtually any age can relish in the joys of using cookie cutters and decorating Easter Sugar Cookies, all with a little supervision and short list of instructions. This version shows how to make the cookies and homemade icing so you can create any color you desire for maximum creativity.
Remember, these delicious crafts don’t have to be perfect – having fun and making memories that last a lifetime are what make Easter truly special.
Visit Culinary.net to find more Easter inspiration and recipes from “Cookin’ Savvy.”
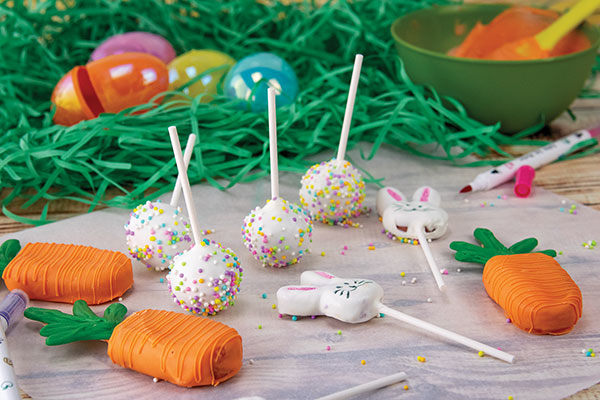
Kids Krafty Easter Cake Pops
Recipe courtesy of "Cookin' Savvy"
- 1 box cake mix
- 1 can frosting
- 1 bunny chocolate mold
- 1 cakesicle mold
- ice pop sticks
- 1 bag white chocolate chips or melting chips
- cake pop sticks
- 1 bag orange melting chips
- 2 tablespoons canola or coconut oil, divided
- 1 bag green melting chips
- pastel sprinkles
- 1 piece hard foam (optional)
- edible markers
- Bake cake according to package instructions and let cool completely.
- Crumble cake and mix with 1/2 can frosting until dough forms. Add more frosting, if needed. Using small cookie scoop, form dough into balls and set aside. Place dough in bunny molds then pop out and set aside with balls. Place dough in cakesicle mold, insert ice pop stick in each slot and freeze 5-10 minutes.
- Melt handful of white melting chips. Stick tip of each cake pop stick in chocolate then insert into every cake ball and bunny until each has one stick. Set aside to dry.
- Remove cakesicles from freezer and pop out of molds. In bowl, melt orange melts then mix in 1 tablespoon oil and transfer to cup. Dip cakesicles and scrape off excess using rim of cup. Place on parchment paper to dry.
- In bowl, melt green melts then place in zip-top or piping bag. Cut tip off bag, pipe carrot leaves onto piece of parchment paper and let dry.
- Melt remaining white melts and mix in remaining oil. Transfer to cup and dip ball-shaped cake pops and bunnies then tap stick on edge of cup to remove excess.
- Over separate bowl, sprinkle ball-shaped pops with pastel sprinkles. To keep ball shape, let dry by sticking in piece of hard foam. Bunnies can dry face side up on parchment paper. After bunnies are dry, use edible markers to make face and color in ears.
- When carrots and leaves are dry, remelt orange melts and place in piping or zip-top bag. Cut off tip and drizzle orange over carrots. Add small line of orange on each ice pop stick and place leaves on each stick. Let dry.
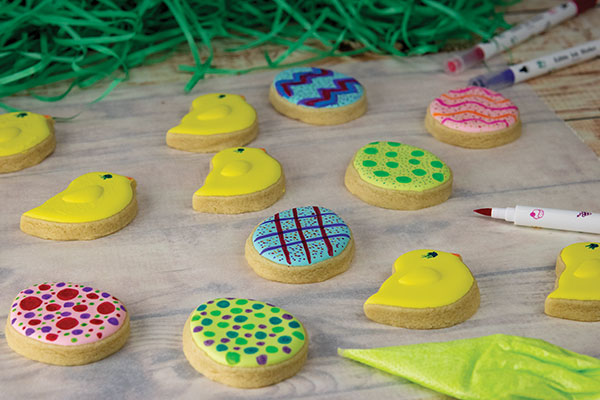
Easter Sugar Cookies
Recipe courtesy of "Cookin' Savvy"
Icing:
- 1/3 cup meringue powder
- 1/2 cup warm water, plus additional for thinning (optional), divided
- 3 tablespoons vanilla
- 1 bag (2 pounds) powdered sugar
- 2 tablespoons corn syrup
- assorted food coloring
Cookies:
- 2 sticks unsalted butter, at room temperature
- 1 cup sugar
- 1 egg
- 1 tablespoon vanilla
- 2 teaspoons baking powder
- 1 dash salt
- 3 cups all-purpose flour
- To make icing: Mix meringue powder, 1/2 cup warm water, vanilla, powdered sugar and corn syrup. Separate into bowls and add food coloring; mix with water, as needed, to thin for piping.
- To make cookies: Heat oven to 350 F.
- Cream butter and sugar. Mix in egg, vanilla, baking powder and salt. Mix in flour 1 cup at a time to form dough. Roll dough out to 1/4-1/2-inch thickness.
- Cut into shapes, place on baking sheet and freeze 10 minutes. Bake 8-12 minutes. Cool completely before icing.
- Place icing in zip-top or piping bags and cut off tips. Put cookies on parchment paper. Trace outline first then fill in middle. Use toothpicks to smooth out.
- Let dry 6 hours and finish decorating with different icing colors or edible markers.
Source: Culinary.net

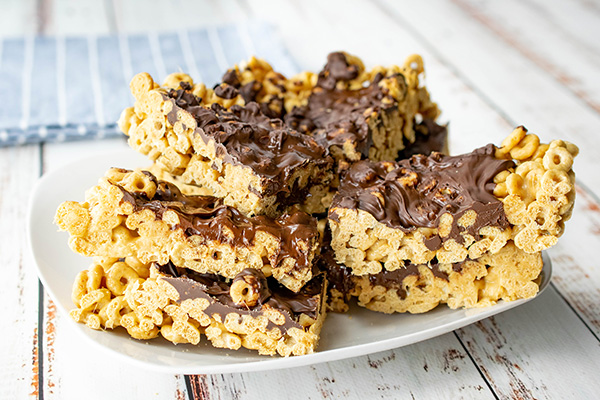
5-Minute Dark Chocolate Cereal Bars
(Culinary.net) Running short on time from a busy schedule shouldn’t mean skipping out on your favorite desserts. In fact, it should be all the more reason to enjoy a sweet treat as a reward for all that hard work.
When you’re due for a bite into dark chocolate goodness, all it takes is a few minutes out of your day to make 5-Minute Dark Chocolate Cereal Bars. This quick and simple dessert makes it easy to celebrate the day’s accomplishments without added stress.
As a fun way for little ones to help in the kitchen, you can cook together the butter, marshmallows, peanut butter and cereal then let the kiddos drizzle the key ingredient: melted chocolate. All that’s left to do is cut and serve or pack a few off to school and work for an afternoon treat.
Find more seasonal dessert recipes at Culinary.net.
If you made this recipe at home, use #MyCulinaryConnection on your favorite social network to share your work.
Watch video to see how to make this recipe!
5-Minute Dark Chocolate Cereal Bars
Recipe adapted from ScrummyLane.com
- 4 tablespoons butter
- 10 ounces marshmallows
- 1/2 cup peanut butter
- 6 cups cereal
- 4 ounces milk chocolate, melted
- 4 ounces dark chocolate, melted
- Heat saucepan over low heat. Add butter, marshmallows and peanut butter; stir to combine. Add cereal; mix until coated.
- Line 9-by-13-inch pan with parchment paper. Add cereal mixture to pan.
- In bowl, mix milk chocolate and dark chocolate. Drizzle chocolate over cereal mixture; spread evenly then allow to cool.
- Cut into bars and serve.
Source:

5 Tips for Tackling Leftover Halloween Treats
Going door to door for candy and treats is part of many families’ Halloween traditions, and the routine almost always ends with a kitchen loaded with treats. When the spooky season comes to a close, consider these ways to use up those delectable goodies.
Take Some to Work
A tried and true classic. It’s likely you won’t be the only person in your office bringing in leftovers a few days after Halloween, but there’s a good chance you have coworkers without kids who may not be as tired of treats as parents.
Freeze It
Certain candies like chocolates freeze better than others, so be conscious of what you’re putting in the freezer. This method keeps your sweets better longer and allows you to use them as ingredients in baking desserts throughout the year, or you can simply thaw a few at a time for snacking.
Make Trail Mix
The traditional recipe calls for peanuts, raisins and small chocolate pieces, but you can take matters into your own hands with a creative hodgepodge of just about anything you’re left with after Halloween passes. Candy corn, pretzels, chocolates and other sweets are perfect for mixing up as a snack to put in baggies for work or school – just choose your family’s favorites and toss together.
Set It Out for Guests
Leftover goodies don’t have to be hidden in the pantry. Grab a small glass dish, fill it with wrapped fun-size candies and place it on an end table, kitchen island or anywhere guests often gather and would feel invited to take one.
Create a Sweet Pairing
Although it’s (probably) your kids’ hard work that led to an abundance of candies, you can enjoy the fruits of their labor. For adults who enjoy a sweet chocolate treat (even if it isn’t fancy) with a glass of red wine or spiked hot chocolate, there are few better ways to wind down after Halloween than with a boozy pairing.
Visit Culinary.net for more Halloween treats and recipe ideas.
Photo courtesy of Getty Images

A DIY Halloween Creation
(Family Features) When it comes to family fun, it’s hard to beat Halloween, and with all the candy flying around, it’s an opportunity to add something nutritiousand delicious to festive celebrations.
Chocolate milk can provide the best of both worlds. It satisfies kids’ sweet tooth while providing all the nutrients of classic white milk, like calcium, vitamin D and high-quality protein to help keep little skeletons strong, making it a Halloween hit for kids and parents alike.
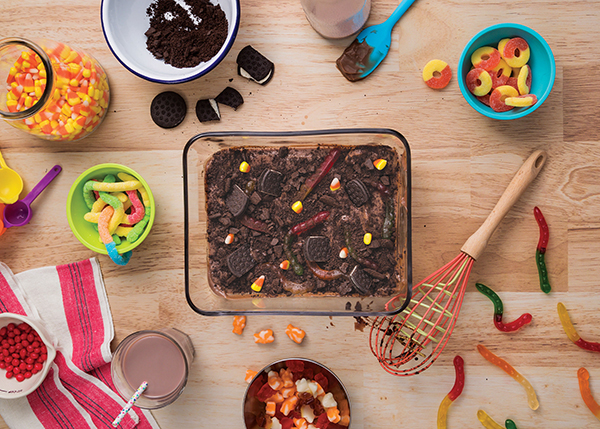
Carve out some quality time to make memories during the eeriest time of the year with this Scary Sweet Cemetery – including chocolate pudding, gummy worms and sandwich cookies – to get kids cooking and crafting, all while nourishing their bodies and bones with nutritious chocolate milk.
Visit MilkLife.com for more kid-friendly, DIY Halloween treats.
Scary Sweet Cemetery
Recipe courtesy of MilkPEP
Servings: 6
Pudding:
- 2 tablespoons unsweetened cocoa powder
- 2 tablespoons cornstarch
- 2 cups cold chocolate milk
- 1 pinch salt
- 1 large egg
- 4 ounces chopped semisweet chocolate (about 3/4 cup)
- 10 ounces chocolate vanilla sandwich cookies (about 20 cookies)
- 12 gummy worms
- In large saucepan over high heat, stir cocoa powder, cornstarch, chocolate milk and salt to incorporate dry ingredients into milk. Cook until mixture starts to boil then reduce heat to simmer until mixture starts to thicken, about 3-5 minutes.
- In large bowl, using whisk, beat egg, slowly drizzling hot chocolate mixture into bowl, whisking continuously. Fold in chopped chocolate and stir until chocolate has completely melted.
- Pour pudding mixture into glass baking dish. Place piece of parchment paper on top of surface of pudding. Chill in refrigerator 3 hours, or overnight.
- To prepare “dirt,” place chocolate vanilla sandwich cookies in large re-sealable bag. Using rolling pin, crush cookies into crumbs.
- When ready to serve, sprinkle cookie crumbs over pudding and place gummy worms on cookie crumb layer, making sure to “bury” parts of gummy worm ends as if worms are coming out of dirt.
Nutritional information per serving: 460 calories; 18 g fat; 8 g saturated fat; 35 mg cholesterol; 6 g protein; 75 g carbohydrates; 4 g fiber; 250 mg sodium; 104 mg calcium. Nutrition figures based on using low-fat chocolate milk.
Source: MilkPEP

Homemade Halloween Treats
(Culinary.net) Halloween calls for candies and treats of all kinds as trick-or-treaters roam neighborhoods, but don’t forget to stock your own snack supply with homemade goodies.
Skip the store-bought sweets this year and instead opt for ideas like these that can be whipped up in the comfort of your own kitchen.
Party Mix
As one of the easiest recipes you could imagine, a Halloween-themed party mix simply calls for your favorite snack-type foods tossed together in a group-sized bowl or individual containers. You can try just about anything from candy corns and miniature chocolates to pretzels, popcorn and more.
Spooky Cupcakes
Kid-friendly treats are the name of the game when it comes to Halloween, and there’s almost no better way to get children involved in the kitchen than with some personalized decorations. Bake your preferred cupcakes – chocolate or vanilla – then call on the kiddos to use icing and toppings for creepy custom creations.
Pumpkin Pie
There’s nothing wrong with going with a classic. While it may not scream All Hallows’ Eve, pumpkin is the flavor of the season, which makes pumpkin pie a traditional taste this time of year. Because most versions call for a fairly small number of ingredients, it’s a simple way to bake a desirable dessert. Plus, you can easily give pumpkin pie some Halloween flair using whipped cream to “draw” a spooky Jack-o-lantern-like face.
Creepy Cookies
Whether your family craves chocolate chip or prefers the sweetness of sugar cookies, you can lay out your favorite dough and use seasonal cookie cutters – think Frankenstein, witches, ghosts, spiders and more – for a frightful bite.
Caramel-Dipped Apples
Skip out on bobbing for apples and instead dip yours in caramel for a traditional Halloween treat. Just insert wooden skewers in the tops of your apples, dip the opposite end into melted caramel and enjoy. To add a bit of fun and flavor, sprinkle chopped nuts or crushed candies on the caramel end of each apple.
Find more snacks, desserts and treats at Culinary.net.
Photo courtesy of Getty Images

Easy, No-Bake Goodies
(Family Features) Summer is a great time to get kids into the kitchen to make some snacks and desserts. Whether you need something to take to a picnic or just something to do on a rainy day, making easy, no-bake goodies like Rice Krispies Treats(r) can show kids just how fun cooking can be.
Even young children can be kitchen helpers, so the whole family can get involved. What can your child do to help prepare a recipe?
2 to 3-year-olds can
-Wash and scrub fruits and vegetables
-Name and count foods
3 to 4-year-olds can
-Shape foods
-Mix dry ingredients together
-Pour pre-measured liquids into batter
4 to 5-year-olds can
-Help measure ingredients
-Open packages
-Pour cereal
-Mash soft fruits and vegetables
-Press cookie cutters into dough or soft food
6 years old and up can
-Beat recipe ingredients with a whisk
-Help locate ingredients in a spice rack or pantry
Make some summer magic with these tasty no-bake recipes for Choco P'Nutty Bars, Itsy Bitsy Fruit Pies, and Ice Cream Sandwich Treats. For even more kid-friendly recipes you can make together, visit www.Ricekrispies.com.
Note: The following recipes should be made with adult supervision.
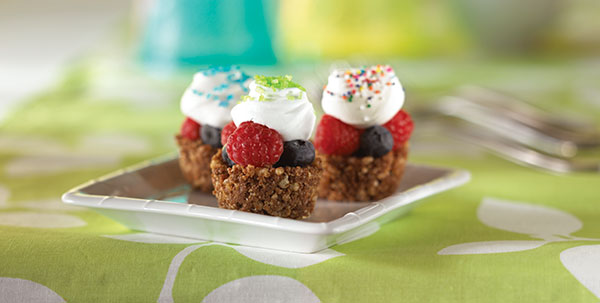
Itsy Bitsy Fruit Pies
Prep Time: 25 minutes
Total Time: 30 minutes
Servings: 24
- 1/2 cup butter or margarine
- 1 cup milk chocolate morsels
- 1/4 teaspoon cinnamon
- 4 cups Kellogg's® Rice Krispies® cereal
- 2 cups assorted fresh chopped fruits
- Frozen non-dairy whipped topping, thawed
- Assorted sprinkles
- In medium saucepan, melt butter over low heat. Stir in chocolate morsels until melted. Remove from heat. Stir in cinnamon.
- Place cereal in large bowl. Carefully pour melted chocolate mixture over cereal. Gently stir until cereal is completely coated with chocolate.
- Spoon cereal mixture into twenty-four 1 1/2-inch muffin-pan cups coated with cooking spray. Using your finger or thumb, press cereal mixture onto bottoms and up the sides of each cup, forming crusts.
- Place crusts in freezer for 30 minutes. Remove from freezer. Refrigerate, covered, until ready to serve.
- Before serving, fill each crust with fresh fruit. Dollop with whipped topping. Decorate with sprinkles. Serve immediately.
Note: Extra unfilled crusts may be frozen in air-tight container for up to a month. Let stand at room temperature for 15 minutes before serving.
Kid-friendly Kitchen Tips:
-Children of all ages should have an adult assistant with them at all times when cooking.
-Chefs 7 and older can measure the ingredients and help stir the melted chocolate into the cereal.
-Little ones, ages 3 to 6, will enjoy pressing the mixture into the muffin cups and decorating with the fruits and whipped cream.
-Make sure to have plenty of extra fruits for snacking while making these little pies.
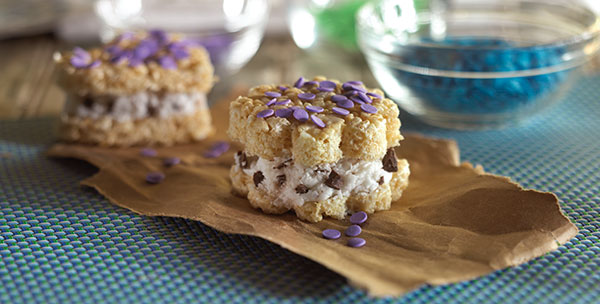
Ice Cream Sandwich Treats
Prep Time: 15 minutes
Total Time: 3 hours
Servings: 10 to 12
- 3 tablespoons butter or margarine
- 1 10 ounce-package (about 40) marshmallows, or 4 cups miniature marshmallows
- 2 teaspoons vanilla
- 6 cups Kellogg's Rice Krispies cereal
- 1/2 cup assorted sprinkles
- 2 pints desired flavor ice cream, frozen yogurt, sorbet or gelato
- In large saucepan melt butter over low heat. Add marshmallows and stir until completely melted. Remove from heat. Stir in vanilla.
- Add cereal. Stir until well coated.
- Using buttered spatula or wax paper, evenly press mixture to 1/4-inch thickness on baking sheet coated with cooking spray. Decorate with sprinkles. Refrigerate for 15 minutes.
- Remove from refrigerator. Using 2-inch cookie cutters coated with cooking spray, cut into desired shapes. Place small scoop of ice cream on undecorated side of one cut-out. Top with another cut-out, decorated side up. Gently press together. Return to baking sheet. Repeat with remaining cut-outs and remaining ice cream.
- Freeze for 30 minutes. Transfer to airtight container. Freeze for 2 hours to 1 week. Let stand at room temperature for 10 minutes before serving.
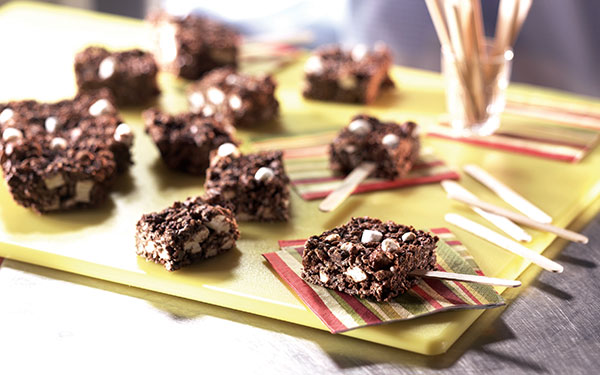
Choco P'Nutty Bars
Prep Time: 15 minutes
Total Time: 1 hour
Servings: 18
- 1 12-ounce package (2 cups) semi-sweet chocolate morsels
- 2/3 cup peanut butter
- 6 cups Kellogg's Rice Krispies cereal
- 3 cups miniature marshmallows
- 18 wooden or plastic sticks
- In large saucepan, melt chocolate morsels and peanut butter over low heat; stirring constantly. Remove from heat. Stir in cereal and marshmallows.
- Using buttered spatula or waxed paper, press mixture evenly into 13 x 9 x 2-inch baking pan coated with cooking spray. Chill in refrigerator about 45 minutes.
- Cut into 18 bars. Serve by inserting plastic or wooden stick into each bar.
Microwave Directions: In large microwave safe bowl, melt chocolate morsels and peanut butter at medium power for 2 to 2 1/2 minutes. Stir until smooth. Add remaining ingredients, stirring until well coated. Continue with recipe directions.
Source: Rice Krispies

Perfect Pops for Every Occasion
(Family Features) No matter what kind of events you have on your social calendar, you can pop up delicious treats that are sure to be a hit.
Whether hosting a get-together for the guys and tuning into the game or having a night in with the girls, freshly popped popcorn, which is naturally low in fat and calories, non-GMO and gluten free, can help you please every palate.
Sweet, spicy, salty or served in more non-traditional ways, the possibilities are endless, and perfect for everything from date night to a family movie night or even a sleepover or kids’ party. And since it’s healthy and whole grain, popcorn is a satisfying snack suitable for every occasion that you can feel good about serving.
Find more versatile, nutritious recipes for your next event at popcorn.org.
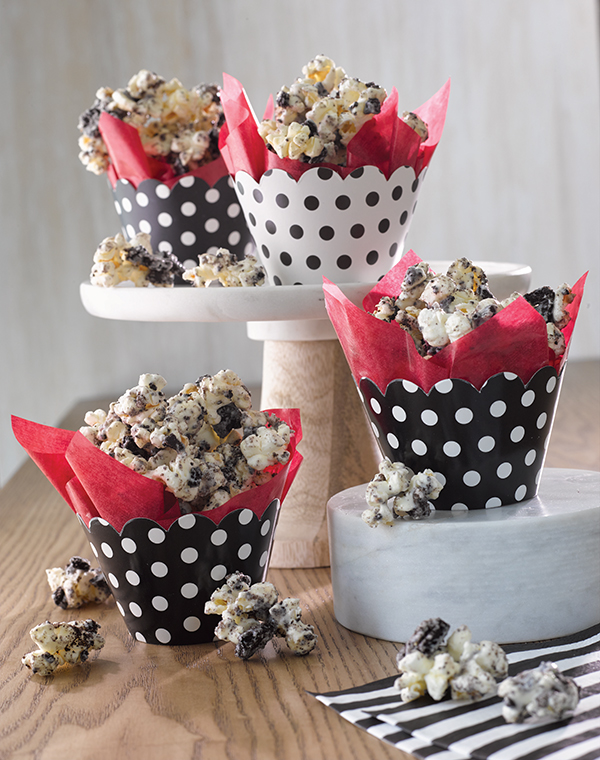
Cookies ’N Cream Popcorn
- 12 cups popped popcorn
- 1 package (11 ounces) white chocolate chips
- 2 teaspoons coconut oil
- 15 Oreo cookies, coarsely chopped
- Place popcorn in large bowl; set aside.
- In medium saucepan on low heat, melt chocolate chips and coconut oil; stir until blended.
- Pour melted chocolate over popcorn, stirring until well-coated. Stir in chopped Oreos.
- Spread mixture on baking sheet and chill until chocolate has set. Break into pieces to serve.
Serves
12 cups
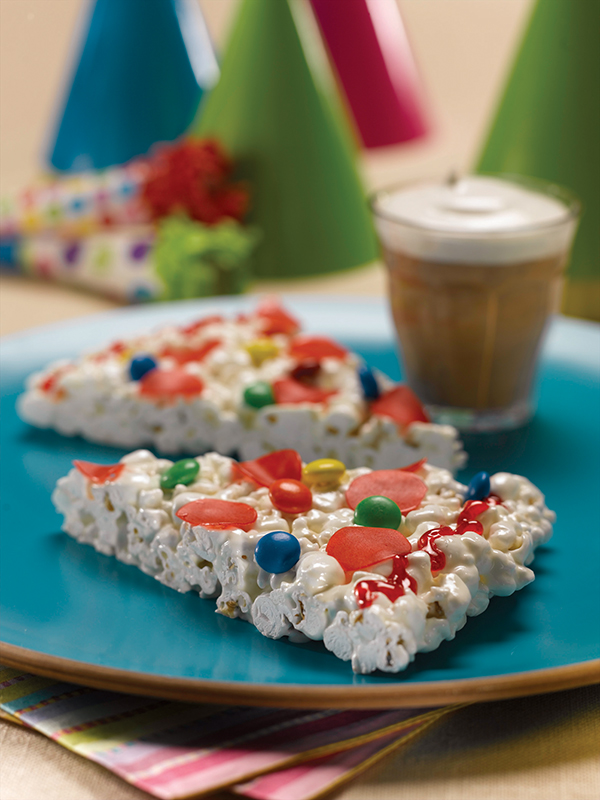
Popcorn Party Pizza
- 3 tablespoons butter
- 1 bag (10.5 ounces) mini marshmallows
- 2 quarts popped popcorn
- 1 tube (.68 ounces) red piping gel
- 1 package red raspberry fruit roll-ups
- green jelly beans
- coconut
- candy-coated chocolate pieces
- Spray 12-inch pizza pan with cooking spray; set aside.
- In large saucepan over medium heat, heat butter.
- Stir in marshmallows until melted.
- Stir in popcorn until well coated.
- Spread mixture evenly onto prepared pizza pan.
- Drizzle red piping gel over “pizza” to make “sauce.”
- Cut small circles (about 1 1/4 inches in diameter) from fruit roll-up and place on pizza for “pepperoni” slices.
- Decorate as desired with jelly beans, coconut and candies. Allow to cool completely before cutting into wedges to serve.
Serves
8 slices
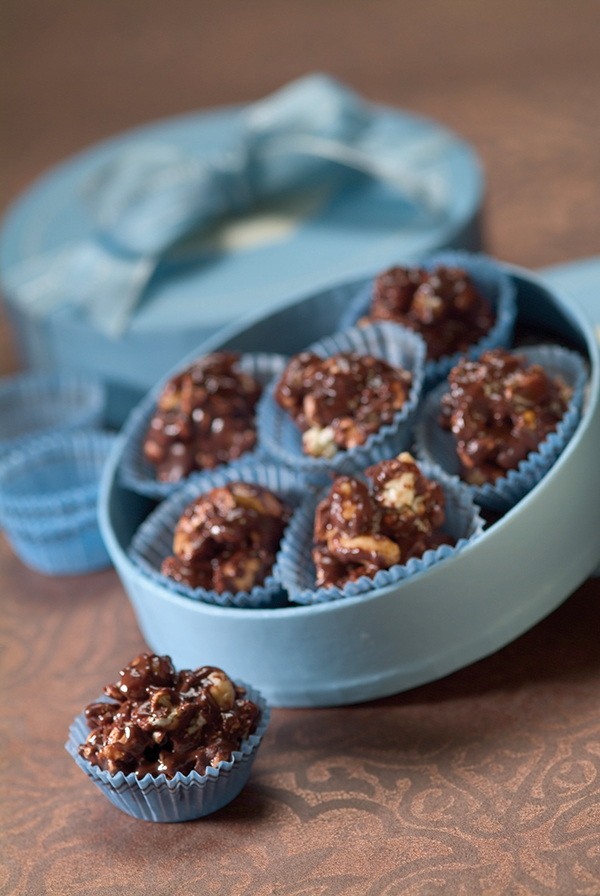
Popcorn and Peanut Truffles
- 6 cups popped popcorn
- 1 cup roasted and salted peanuts
- 1 package (12 ounces) semisweet chocolate chips
- 1/2 cup honey
- In large bowl, stir popcorn and peanuts together; set aside.
- In microwave-safe bowl, heat chocolate chips 10 seconds. Stir chips and repeat, stirring after each 10 seconds, until chips are melted. Warm honey in microwave 10 seconds and stir into chocolate until well blended.
- Pour chocolate mixture over popcorn mixture and stir until popcorn is evenly coated. With small ice cream scoop, push popcorn mixture into scoop and release onto wax paper to form truffles. Refrigerate until firm.
Serves
30 pieces
Notes, Tips & Suggestions
Truffles can be stored in an airtight container up to 5 days.
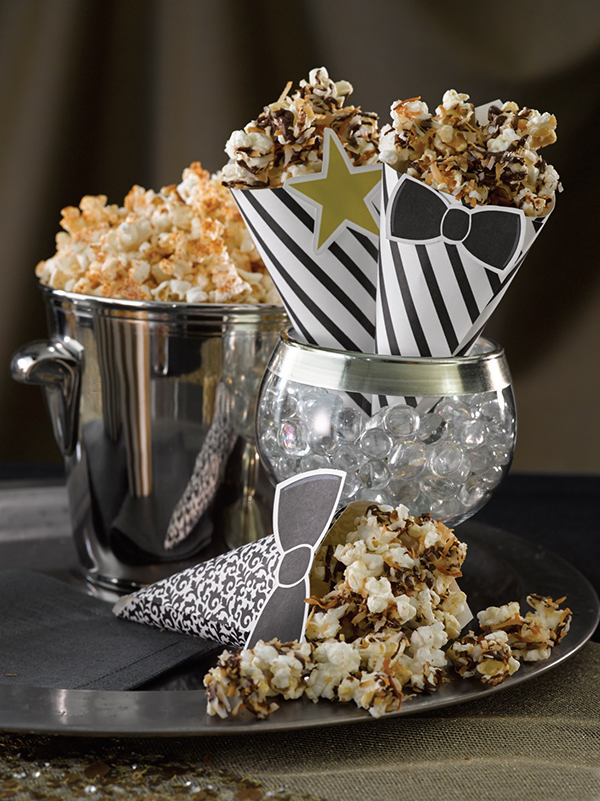
Toasted Coconut and Chocolate Popcorn
- 10 cups popped popcorn
- 2 tablespoons butter or margarine
- 2 tablespoons light brown sugar
- 1/2 teaspoon coconut extract (optional)
- 1 cup chocolate chips
- 1 teaspoon vegetable oil
- 1 bag (7 ounces) shredded coconut, toasted
- Place popcorn in large bowl; set aside.
- In small saucepan, combine butter, brown sugar and coconut extract; stir until melted and combined.
- Pour over popcorn, coating well. Spread popcorn onto large cookie sheet.
- In glass measuring cup, melt chocolate chips and vegetable oil in microwave on low heat until smooth. Drizzle over popcorn. Immediately sprinkle coconut over popcorn mixture; cool.
- Break into pieces and serve.
Serves
10 cups
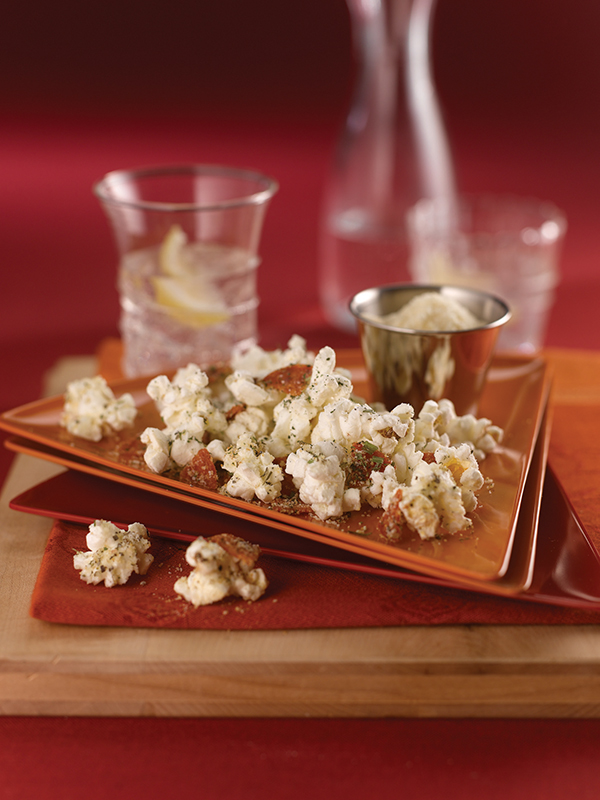
Cheesy Pepperoni Popcorn
- 1/4 cup nonfat Parmesan cheese
- 2 teaspoons garlic powder
- 1/4 teaspoon dried oregano
- 1/4 teaspoon dried marjoram leaves
- 1/4 teaspoon dried basil leaves
- 1/8 teaspoon dried sage
- black pepper, to taste
- 12 cups popped popcorn
- 3/4 cup turkey pepperoni, cut into bite-size bits
- olive oil cooking spray
- In small bowl, combine Parmesan cheese, garlic powder, oregano, marjoram, basil, sage and pepper; mix well.
- Place cooked popcorn and turkey pepperoni in large bowl; spray lightly with cooking spray.
- Sprinkle popcorn and pepperoni with cheese mixture and toss to coat evenly.
Serves
6-8 cups
Source: Popcorn Board

Pop Up Sweet Treats
(Family Features) When the weather is warm and it’s time for a sweet treat, look for seasonal goodies that complement summertime fun. For example, reach for an option like whole-grain, fluffy and crisp popcorn which can be an easy, DIY snack.
Combine sweet and salty flavors to create something delicious to devour like Coconut Popcorn Crunch Pie or delightful Down Home Apple Pie Popcorn.
To better serve a crowd, try these Perfect Picnic Popcorn Squares, Popcorn S’mores or Key Lime Popcorn Clusters at your next family pool party or summertime barbecue with friends.
For more creative, DIY popcorn recipe ideas, visit popcorn.org.
Down Home Apple Pie Popcorn
Yield: 10 cups
- 3 tablespoons melted butter
- 1 teaspoon vanilla extract
- 2 tablespoons brown sugar
- 1 teaspoon ground cinnamon
- 1/8 teaspoon ground allspice
- 1/8 teaspoon ground nutmeg
- 8 cups popped popcorn
- 1 cup dried apple chips, broken into large pieces
- 1/4 cup toffee bits
- Heat oven to 300° F. Whisk melted butter with vanilla. Toss brown sugar with cinnamon, allspice and nutmeg.
- Toss popcorn with butter mixture. Sprinkle evenly with brown sugar mixture. Stir. Transfer to baking sheet lined with parchment paper.
- Sprinkle apple chips and toffee bits over top. Bake 15 minutes, or until toffee bits start to melt. Cool before serving.
Tip: Add chopped pecans for extra crunch.

Key Lime Popcorn Clusters
Yield: about 32 clusters
- 8 cups popped popcorn
- 4 whole graham crackers, finely chopped, divided
- 1 jar (7 1/2 ounces) marshmallow creme
- 1/4 cup butter or margarine
- 2 tablespoons grated lime peel
- 1 tablespoon key lime juice
- Line 9-inch square pan with foil.
- In large bowl, combine popcorn and all but 2 tablespoons graham cracker pieces.
- In large glass bowl, microwave marshmallow creme and butter on high 1 minute. Stir until butter is melted. Stir in lime peel and lime juice.
- Pour marshmallow mixture over popcorn, mixing thoroughly.
- Using damp hand, firmly press mixture into prepared pan. Sprinkle with reserved graham cracker pieces. Refrigerate 2 hours until firm.
- Lift foil from pan. Break popcorn mixture into clusters.

Coconut-Popcorn Crunch Pie
Yield: 12 servings
- 2 quarts popped popcorn, unsalted
- 1 can (4 ounces) flaked coconut, toasted
- 1 cup sugar
- 1 cup light corn syrup
- 1/2 cup butter or margarine
- 1/4 cup water
- 2 teaspoons salt
- 1 teaspoon vanilla
- 1 quart vanilla, spumoni or butter pecan ice cream
- fresh fruit, for topping (optional)
- chocolate sauce, for topping (optional)
- In large, buttered bowl, mix popcorn and coconut. In saucepan, combine sugar, syrup, butter, water and salt. Bring to boil over low heat, stirring until sugar dissolves. Continue cooking until syrup reaches hard crack stage (290-295 F).
- Stir in vanilla. Pour syrup in fine stream over popcorn mixture; stir until particles are evenly coated with syrup.
- On buttered, 12-inch pizza pan, spread half of popcorn mixture in thin layer, covering bottom of pan. Mark off into wedge-shaped servings; set aside. Repeat using remaining popcorn mixture; cool.
- Cover one layer with ice cream; top with second popcorn layer. Store in freezer. To serve, cut in wedges. Serve with fruit or chocolate sauce, if desired.

Perfect Picnic Popcorn Squares
Yield: 12 squares
- 1 cup light corn syrup
- 1/2 cup sugar
- 1/2 cup brown sugar
- 1 cup reduced-fat peanut butter
- 3/4 cup raisins
- 8 cups air-popped popcorn
- nonstick cooking spray
- In large saucepan, combine corn syrup, sugar, brown sugar and peanut butter.
- Bring to boil over low heat, stirring constantly; boil 2-3 minutes. Remove saucepan from heat.
- In large bowl, combine raisins and popcorn; pour hot mixture over popcorn and toss carefully with wooden spoons until well-coated.
- Spray 9-by-13-inch baking dish with cooking spray; press popcorn mixture into pan and cool completely.
- Cut into squares and serve.

Popcorn S’mores
Yield: 20 pieces
- 1 cup firmly packed light brown sugar
- 1/2 cup (1 stick) butter or margarine
- 1/2 cup corn syrup
- 1/2 teaspoon baking soda
- 10 cups freshly popped popcorn
- 1 package (10 1/2 ounces) miniature marshmallows
- 2 cups mini graham cookies
- 1 cup chocolate chips
- In medium saucepan, combine brown sugar, butter and corn syrup.
- Cook over high heat 5 minutes; remove from heat and stir in baking soda.
- In large bowl, combine popcorn and marshmallows.
- Pour sugar mixture over popcorn to coat.
- Gently stir in graham cookies and chocolate chips.
- Spread mixture evenly into greased 15-by-10-inch pan.
- Let cool completely. Break into pieces.

Ballpark Popcorn Crunch (VIDEO)
- 1/2 cup butter
- 1/2 cup brown sugar
- 3 quarts unsalted popped popcorn
- 1 cup chopped walnuts
- Cream together butter and brown sugar till light and fluffy.
- In a separate bowl, toss popcorn and walnuts.
- Add creamed mixture to popcorn and nuts. Combine until coated.
- Spread on a large baking sheet in a single layer.
- Bake at 350-degree oven for 10 minutes or until crisp.
Source: Popcorn Board

Popping Up a Winter Wonderland
Edible, handmade holiday decor perfect for gifting
(Family Features) ’Tis the season to pop up some holiday fun by creating a scenic winter wonderland that tastes as great as it looks.
Gather the kids and make a hands-on family holiday tradition out of crafting festive, edible decorations. Popcorn is the perfect choice to pop up and eat while trimming your popcorn tree and decking out your creations. At 30 calories a cup, whole-grain, freshly popped popcorn offers a nutritious alternative to traditional holiday party nibbles. Popcorn is naturally low in fat and calories, non-GMO, gluten-free, has no artificial additives or preservatives and is sugar-free.
These clever recipes can help you make edible decor or gifts to give to friends, family and co-workers. Find more creative holiday recipes at popcorn.org.

Festive Popcorn Trees
Yield: 10 trees
- 10 cups air-popped popcorn
- 1 bag (10 ounces) miniature marshmallows
- 2 tablespoons butter
- 1 teaspoon vanilla extract
- nonstick cooking spray
- green decorating sugar
- blue decorating sugar
- 1 tube white frosting with decorating tip
- small, colorful candies (such as sprinkles and miniature silver dragees)
- Place popcorn in large bowl.
- Place marshmallows and butter in medium saucepan over medium-low heat. Stir until marshmallows are melted and mixture is smooth. Remove from heat.
- Stir in vanilla extract.
- Pour mixture over popcorn in bowl. Toss well to coat popcorn evenly.
- Line baking sheet with foil.
- Spray hands with nonstick cooking spray then scoop up about 1 cup popcorn mixture.
- Shape mixture into cone, keeping base flat to form tree.
- Sprinkle tree with decorating sugars; place tree on baking sheet.
- Make nine additional trees.
- Pipe frosting on trees to make garland then decorate with sprinkles and silver dragees, as desired.
Serving suggestion: Place each tree on sugar cookie and decorate serving tray with shredded coconut to resemble snow.
Notes: For best flavor and color, start recipe with unflavored white popcorn. You can make your own colored sugar by adding food coloring to sugar then stirring in bowl or shaking vigorously in sealed container. Add additional food coloring for more intense tones.

Holiday Popcorn Snowman
Yield: 5 snowmen
- 1 package (1 pound) large marshmallows
- 1/4 cup (1/2 stick) butter or margarine, plus additional
- 1 teaspoon vanilla
- 10 cups popped popcorn
- sprinkles (optional)
- licorice (optional)
- gum drops (optional)
- cinnamon candies (optional)
- In large saucepan, melt marshmallows and 1/4 cup butter.
- Remove from heat and stir in vanilla.
- Let stand 5 minutes.
- Pour over popcorn and stir mixture.
- Butter hands well and form into balls.
- Decorate with sprinkles, licorice, gum drops and cinnamon candies, as desired.

Holiday Wreath Popcorn Treats
Yield: 8 wreaths
- Nonstick cooking spray
- 3 quarts popped popcorn
- 4 tablespoons (1/2 stick) butter or margarine
- 3 cups miniature marshmallows
- 3 tablespoons lime gelatin dessert mix
- small red candies
- jellybeans
- red fruit leather
- Lightly spray large mixing bowl with nonstick cooking spray and place popcorn inside.
- In medium saucepan over low heat, melt butter. Stir in marshmallows and gelatin dessert mix until marshmallows are melted and mixture is smooth. Pour over popcorn and mix until coated.
- Spray hands with cooking spray and press firmly to form into 9-inch logs then bend to form wreaths.
- Place wreaths on wax paper. Press candies and jellybeans into wreaths as decorations; cut fruit leather to make ribbon and add.
- Serve immediately or wrap individually in plastic wrap for storage. Add ribbon tie to plastic wrap as decorative closure.
Tip: Soak saucepan before cleaning.

Chocolate Popcorn Reindeer
Yield: 8 reindeer
- 8 cups unsalted, unbuttered popped popcorn
- 2 1/2 cups mini marshmallows
- 1/2 cup chopped dark chocolate or dark chocolate chips
- 2 tablespoons butter or light olive oil
- 1/4 teaspoon salt
- 16 pretzel sticks
- 16 eyeball candies
- 8 red candy-coated chocolate candies
- Place popcorn in large mixing bowl.
- In saucepan set over medium heat, heat marshmallows, chocolate, butter and salt, stirring often until smooth. Toss marshmallow mixture with popcorn until well combined.
- Scoop 3/4 cup popcorn mixture into ball. Repeat with remaining mixture to make eight balls total. Place each ball in paper muffin cup liner.
- Insert pretzel stick on each side of ball to resemble antlers, attach two eyeball candies for eyes and red candy for nose. Let cool completely.
Tip: Eyeball candies can typically be found in baking aisles of supermarkets or bulk food stores.

Sweet Seasonal Treats for Fall
(Family Features) Crisp fall days call for flavorful desserts that warm you from the inside out. There’s no better way to capture the flavor of fall than with dishes that celebrate traditional seasonal favorites like cinnamon, spice and tart, juicy apples.
These desserts are perfect for fall, and a secret ingredient makes them quick and easy so you have plenty of free time to work up an appetite and earn an extra bite (or two). Apple butter is more than just a spread for toast; it’s a versatile ingredient that can enhance your favorite recipes. With Musselman’s Apple Butter, made the old-fashioned way for perfect texture and a deep, rich flavor, you can make it simple to satisfy your craving for a taste of autumn at its best.
Find more fall tips and recipes perfect for sharing with your family at musselmans.com.

Caramel Crumble Bars
- 1 box (15 1/4 ounces) yellow cake mix, dry
- 1/2 cup butter, softened, plus 2 tablespoons, divided
- 3/4 cup Musselman’s Apple Butter, plus 3 tablespoons
- 1 egg
- 1 package (11 ounces) caramels, unwrapped
- 2/3 cup walnuts, chopped
- 2/3 cup flaked coconut, sweetened
- 2 tablespoons butter, melted
- Heat oven to 350° F. Grease 13-by-9-inch baking pan.
- With electric mixer on low speed, beat dry cake mix and 1/2 cup softened butter until mixture is crumbly. Spoon 1 cup cake mix mixture into medium bowl; set aside.
- Add 3/4 cup apple butter and egg to remaining mixture. Beat on medium speed until smooth and creamy.
- Spread evenly into pan. Bake 20 minutes, or until starting to brown and top is set.
- Place caramels, 2 tablespoons butter and remaining apple butter in microwavable bowl. Microwave on high 3-4 minutes, stirring every 30 seconds until smooth and melted.
- Pour caramel mixture evenly over partially baked crust. If caramel has cooled and set, microwave 1 minute until soft and pourable.
- Combine walnuts, coconut and 2 tablespoons melted butter with reserved cake mix mixture. Mix until crumbly.
- Break up topping and sprinkle evenly over caramel.
- Bake 16-18 minutes, or until topping is starting to brown. Cool completely before cutting into bars.

Easy Apple Pie Bars
Prep time: 20 minutes
Cook time: 1 hour
Servings: 20
- Nonstick cooking spray
- 7 cups Granny Smith apples, peeled, cored and diced
- 1 cup Musselman’s Apple Butter
- 1 1/2 teaspoons vanilla extract, divided
- 1/2 cup brown sugar
- 2 frozen pie crusts, defrosted
- 1 egg white
- 2 tablespoons sugar
- 1/2 teaspoon ground cinnamon
- 1 cup powdered sugar
- 2 tablespoons milk
- Heat oven to 350° F. Grease 9-by-13-inch pan with nonstick cooking spray.
- Place diced apples in large mixing bowl. Add apple butter, 1 teaspoon vanilla and brown sugar. Mix until apples are evenly coated.
- Place one pie crust in bottom of greased pan. Slowly stretch out crust to cover pan’s bottom. Cut some edges off, if necessary. Spread apple filling evenly over crust.
- With rolling pin, roll second crust to make it same size as pan. Place second crust on top of apple pie filling and tuck down edges to cover.
- To make topping: In small bowl, whisk egg white until foamy and brush over crust. In another bowl, combine sugar and cinnamon, and sprinkle evenly over crust.
- Bake 50-60 minutes until crust is golden brown. Remove from oven and cool slightly before cutting.
- To make glaze: In small bowl, combine powdered sugar, milk and remaining vanilla, and whisk until smooth. Drizzle over cooled bars and serve.
Source: Musselman’s Apple Butter