
Unite Loved Ones with a Luscious Dessert
(Family Features) Celebration-worthy treats are perfect ways to cap off days spent with those you love, whether there’s a special occasion or you’re simply looking for creative ways to share more moments together. As a beloved staple in American households for generations, pie provides a sweet, delicious way to bring family and friends to the table.
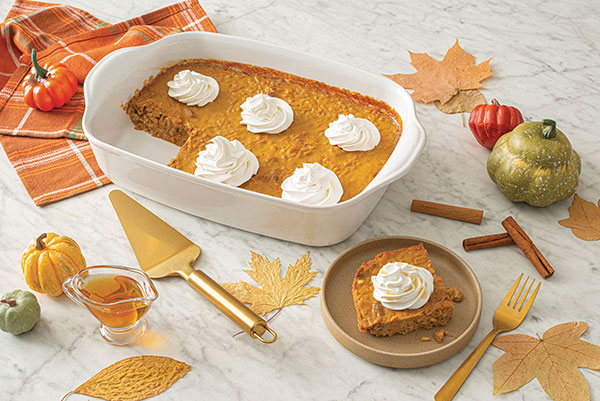
By bringing some of the most popular pie flavors together, the Tart Cherry Unity Pie offers the familiar, distinct sweet-tart flavor of Montmorency tart cherries that pair well with pecans, apple and pumpkin pie spice for a sense of nostalgia representative of family, tradition and celebration.
In this unique recipe, the bold and vibrant flavors of tart cherries take center stage, complemented by the subtle sweetness of apples and crunch of pecans. With their burst of brightness and acidity, tart cherries perfectly balance the other flavors to create a pie fit for any occasion.
U.S.-grown tart cherries are a particularly versatile ingredient that makes them an ideal partner for other beloved ingredients and flavors. In fact, as the demand for sour, less sweet food and beverages continues to gain momentum, they provide a multi-faceted, sweet-tart profile for favorite foods and drinks. While tart cherries are increasingly featured in a wide array of recipes, they remain a favorite ingredient in confectionary items and baked goods like pies.
Slow down your fast-paced world and savor a slice of this timeless dessert alongside loved ones for a moment of respite. With its sweet and tangy filling, flaky crust and tart cherry topping, you can indulge in life’s simple pleasures for a sense of coziness and comfort.
Visit ChooseCherries.com to find more celebration-worthy tart cherry desserts.
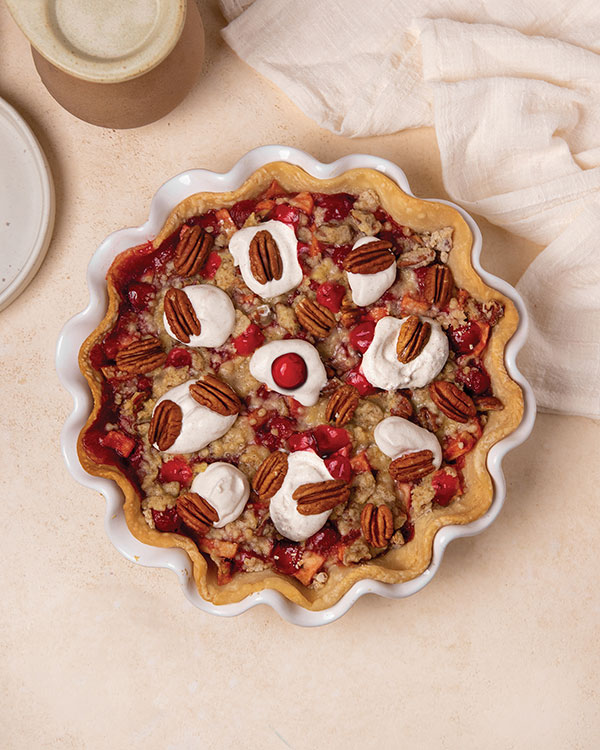
Tart Cherry Unity Pie
Recipe courtesy of the U.S. Tart Cherry Industry
Prep time: 20 minutes
Cook time: 55 minutes
Servings: 8
Pie:
- 1 pie crust (9 inches)
- 2 cups canned tart cherry pie filling
- 2 cups canned apple pie filling
- 1 egg, beaten (for egg wash)
Streusel:
- 1/2 cup all-purpose flour
- 1/4 cup brown sugar
- 2 tablespoons granulated sugar
- 1/3 cup pecans, roughly chopped
- 1 pinch salt
- 4 tablespoons butter, melted
Pumpkin Spice Whipped Cream:
- 1 cup heavy cream
- 2 tablespoons powdered sugar
- 1/2 teaspoon pumpkin spice
- Preheat oven to 400 F.
- Fit pie crust to 9-inch pie dish. Crimp edges and use fork to poke holes in bottom. Place pie crust in freezer to chill.
- In large bowl, combine tart cherry pie filling and apple pie filling. Set aside.
- To make streusel: In bowl, use fork to mix flour, brown sugar, granulated sugar, pecans and salt. Pour butter over dry ingredients and mix until ingredients come together in clumps.
- To assemble pie: Pour cherry-apple filling into prepared pie crust and sprinkle streusel on top. Brush beaten egg onto exposed pie crust edges.
- Bake 25 minutes. At 10-minute mark, cover pie dish with foil to prevent crust from over-browning. After 25 minutes, lower oven temperature to 375 F and bake 30 minutes.
- To make pumpkin spice whipped cream: In large bowl or bowl of stand mixer, add heavy cream, powdered sugar and pumpkin spice. Use hand mixer or beater attachment on stand mixer to beat on medium-high speed 3-5 minutes until stiff peaks form. Refrigerate whipped cream until ready to serve.
- Let pie cool 2-3 hours then dollop pumpkin spice whipped cream on top, slice and serve.
- Substitution: Storebought whipped cream topped with pumpkin spice can be used in place of homemade pumpkin spice whipped cream.

Family-Friendly Fun to Beat Winter Blahs
(Family Features) Cool winter days may have you tempted to burrow under a blanket and wait out the weather, but there are plenty of entertaining and affordable ways to enjoy quality family time together despite chilly temperatures.
Kids who are cooped up indoors during the winter often get restless, but you can make the most of that boredom by gathering everyone and discovering new ways to create memories together.
Get Your Game On
Forget about screen play and instead show the younger generation how much fun it can be to take on family rivals with classic board games or work in teams to complete age-appropriate puzzles. These activities allow everyone to participate and practice skills like problem solving while having fun.
Make a Meal Together
You likely know it’s a good idea to gather the family around the table for a meal, but there’s no need to wait until the food is done. Not only does cooking together give you something fun to do as a family, but it also helps kids develop important life skills and healthy habits, exposes them to new food options and allows them to practice reading and math when they follow recipes.
Get everyone in on the prep work with kid-friendly foods such as these flavorful frozen waffles that can be used as the base for simple and delicious recipes. A fun, easy way to enjoy a favorite cereal in waffle form, PEBBLES Waffles are available in beloved Fruity and Cocoa flavors. Start the day by making breakfast a family affair or mix things up and prepare a breakfast menu for dinner. Try one of these easy recipes for a sure way to put a smile on your loved ones’ faces.
Explore What Surrounds You
Resist the temptation to huddle indoors and instead explore how your community transforms with the seasons. Look for the best sledding hills or check out seasonal attractions like ice rinks and festivals. Even taking a family drive to see the holiday lights or marvel at the way snow transforms your surroundings gives you a way to break out of the house and enjoy some entertaining fun.
Encourage Artistic Expression
Once kids are bundled up properly, there’s little that tops good old-fashioned snow days. Snow angels, snow forts and snowmen are just the beginning. Inviting kids to create and design lets their imaginations run wild and, with a little luck, they’ll run off some of that pent-up energy, too. If you’re stuck inside, encourage creativity through arts and crafts, or make mealtimes a chance for children to explore their artistic sides by allowing them to customize toppings on favorites such as waffles.
Give Back to Others
It’s never too early to learn the intrinsic good of giving back, and cold winter months are an ideal time to instill a giving mindset. As a family, you could volunteer time at a local food bank or work together to assemble care kits with warm blankets and socks for the homeless. You could write letters to soldiers or make seasonal greeting cards for seniors at a local nursing home. Big or small, they’re gestures that make a lasting impression on young minds.
Find more family-friendly ideas for a winter to remember at postpebblescereal.com.
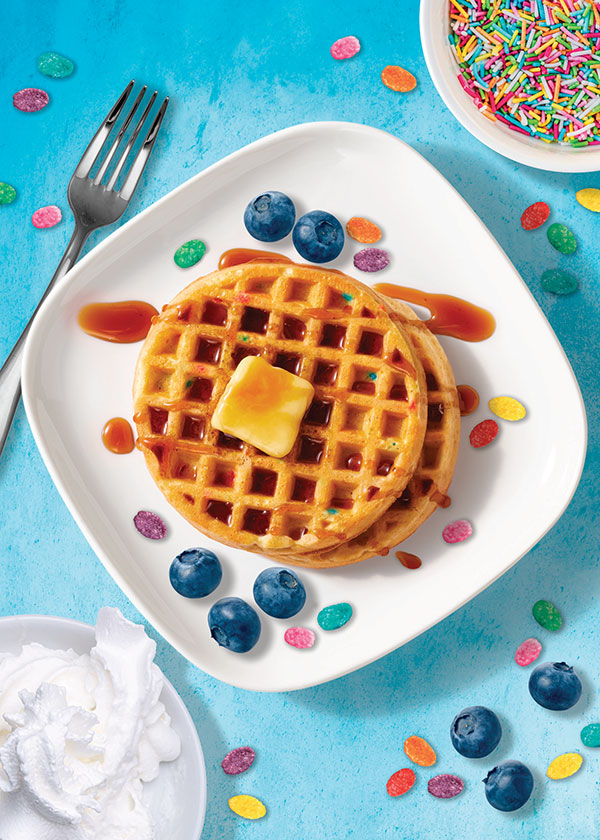
Fruity Smiley Face Waffle
- 2 Fruity PEBBLES Waffles
- 1 container whipped cream
- 1 cup Fruity PEBBLES cereal
- blueberries (optional)
- rainbow sprinkles (optional)
- maple syrup (optional)
- Heat waffles until golden brown and place on plate. Use whipped cream to make smiley face eyes, nose and mouth.
- Place cereal on top of whipped cream to make eyes, nose and mouth colorful. Add blueberries, rainbow sprinkles and syrup, if desired.
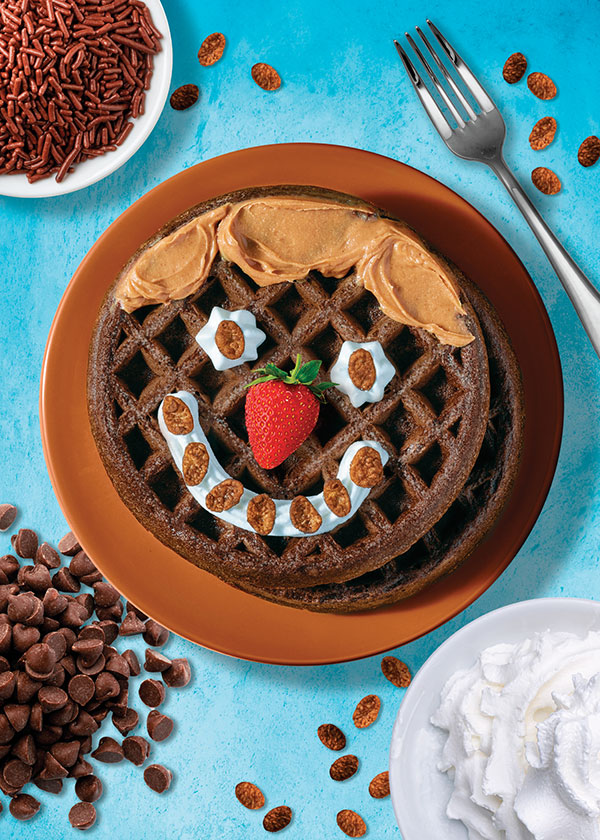
Cocoa Smiley Face Waffle
- 2 Cocoa PEBBLES waffles
- 1 cup Cocoa PEBBLES cereal
- 1 container whipped cream
- chocolate chips (optional)
- chocolate sprinkles (optional)
- strawberries (optional)
- chocolate syrup (optional)
- Heat waffles until golden brown and place on plate. Use whipped cream to make smiley face eyes, nose and mouth.
- Place cereal on top of whipped cream to make eyes, nose and mouth colorful. Add chocolate chips, chocolate sprinkles, strawberries and chocolate syrup, if desired.
Source: Post Cereals

Sweeten the Holiday Season with Deliciously Creamy Desserts
(Family Features) Once the table is cleared and gifts are put away, it’s often time for one of the favorite moments of holiday gatherings. The taste (and smell) of those divine desserts you may only make once a year is enough to keep guests hungry even after the main course.
Put a new staple on holiday menus for years to come with this Cran-Raspberry Quinoa Pudding Trifle that combines fresh raspberries, vibrant cranberry sauce, orange juice and orange zest for a unique dessert. Ready in 30 minutes, it can be an easy way to impress everyone at the table with a creamy pudding base inspired by favorite winter flavors.
As a tasty treat that’s ideal for just about any occasion, this take on rice pudding is made using Success Boil-in-Bag Tri-Color Quinoa, which offers a heat-safe, BPA-free and FDA-approved bag and is easily prepared in just 10 minutes. Its light, nutty flavor and versatility creates a pudding that’s perfect for a wide range of pairings, from satisfying chocoholics or pumpkin-spice fanatics to whipping up a sweet, simple dessert.
For a comforting dish full of familiar cold-weather flavors, serve Pumpkin Pecan Rice Pudding Bars. Pumpkin-spice fanatics can enjoy their favorite ingredient mixed into a rice pudding base sweetened with coconut milk, brown sugar, vanilla extract, whipping cream and maple syrup.
This holiday-inspired dessert relies on the fluffiness of Success Boil-in-Bag White Rice as a high-quality, precooked solution. The boil-in-bag rice is quick and easy with no measuring and no mess, and it’s ready in 10 minutes to make seasonal recipes a cinch.
Find more sweet holiday recipe inspiration at SuccessRice.com.
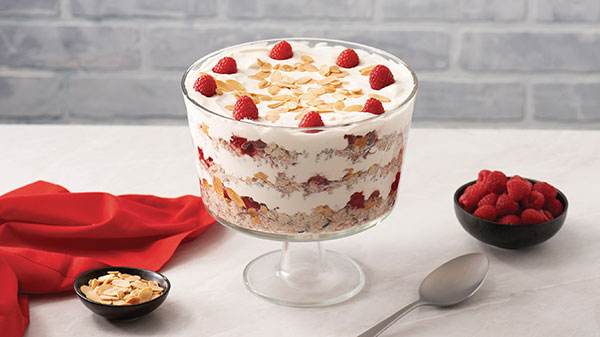
Cran-Raspberry Quinoa Pudding Truffle
Prep time: 25 minutes
Cook time: 5 minutes
Servings: 6
Quinoa Pudding:
- 2 bags Success Tri-Color Quinoa
- 4 cups almond milk
- 3 tablespoons honey
- 1 teaspoon vanilla extract
- 1/2 teaspoon ground cinnamon
Creamy Yogurt Layer:
- 2 cups plain Greek yogurt
- 3 tablespoons honey
- 1 teaspoon vanilla extract
- 1/2 cup heavy cream
Cran-Raspberry Layer:
- 1/2 cup cranberry sauce
- 1/4 cup orange juice
- 1 teaspoon orange zest
- 2 cups fresh raspberries
- 1/2 cup sliced almonds, toasted
- 2 cups gluten-free vanilla cookies, chopped
- 1/2 cup fresh raspberries
- To make quinoa pudding: Prepare quinoa according to package directions, substituting almond milk for water. Drain, reserving almond milk.
- Remove quinoa from bags and stir into almond milk in saucepan over medium heat. Stir in honey, vanilla and cinnamon. Bring to simmer. Cook, stirring constantly, 5-8 minutes, or until thickened slightly. Refrigerate 45-60 minutes, or until well chilled.
- To make creamy yogurt layer: In large bowl, stir yogurt, honey and vanilla. In separate bowl, beat cream until stiff peaks form. Stir whipped cream into yogurt mixture until blended. Refrigerate until ready to use.
- To make cran-raspberry layer: In medium bowl, stir cranberry sauce, orange juice and orange zest. Gently fold in raspberries.
- To assemble: In 10-cup trifle dish, layer 1/3 quinoa mixture, 2 tablespoons almonds, 1/3 cran-raspberry mixture, 1/3 vanilla cookies and 1/3 yogurt mixture. Repeat layers twice. Garnish with remaining raspberries and almonds.
Pumpkin Pecan Rice Pudding Bars
Prep time: 10 minutes
Cook time: 40 minutes
Servings: 4-6
- 1 bag Success White Rice
- 1 cup pecans
- 4 cups coconut milk
- 1 can (15 ounces) pumpkin puree
- 3/4 cup brown sugar
- 2 teaspoons pumpkin pie spice
- 1/2 teaspoon salt
- 3 eggs
- 1/2 teaspoon vanilla extract
- 1 cup heavy whipping cream
- 2 tablespoons maple syrup
- Prepare rice according to package directions. Preheat oven to 350 F. Spread pecans on baking sheet and toast 8-10 minutes. Cool then chop.
- In large saucepan over medium-high heat, combine milk, pumpkin, brown sugar, pumpkin pie spice and salt. Bring to boil, stirring constantly. Slowly add about 1/2 cup hot liquid to eggs and beat well. Stir egg mixture back into saucepan and cook over medium-high heat 2 minutes. Remove from heat and stir in cooked rice, vanilla and pecans.
- Pour mixture into greased 13-by-9-inch baking dish. Bake, uncovered, 30 minutes, or until knife inserted near center comes out clean.
- Whip heavy cream to soft peaks then add maple syrup and continue beating until peaks form. Serve with warm pudding.
Tip: For sweeter pudding, increase brown sugar to 1 1/2 cups.
Source:

Meringue Nests with Vanilla Bean Whipped Cream and Strawberries
(Family Features) It’s tough to top the joy of a spring morning spent celebrating with family, enjoying a delicious brunch or snacking on sweet treats. With warmer weather and bright sunshine comes plenty of opportunities to enjoy favorite recipes.
Celebrating the season with eggs can bring loved ones together in the kitchen and beyond, from crafting classic desserts to serving up new delights. Plus, the versatility of eggs allows for nearly countless creations.
Boiled, scrambled, poached, baked and any other way you like them, eggs can be your kitchen superhero. As a natural source of vitamins and minerals, they’re a delicious protein powerhouse with just 70 calories per large egg.
Make the celebration truly memorable with the power of eggs in a sweet dessert like these Meringue Nests with Vanilla Bean Whipped Cream and Strawberries, a perfect option for topping off a brunch feast or an afternoon meal.
Find more spring recipe ideas and ways to celebrate the season at incrediableegg.org.
Watch Video to see how to make this recipe!
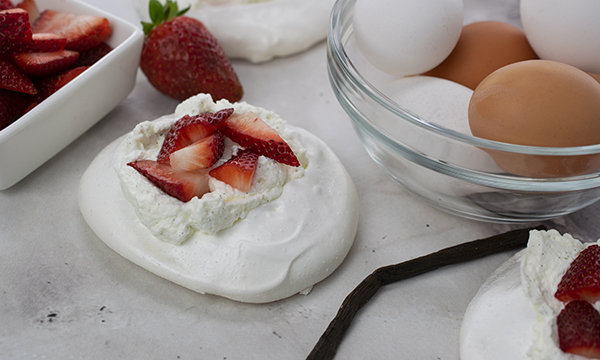
Meringue Nests with Vanilla Bean Whipped Cream and Strawberries
Recipe courtesy of the American Egg Board and Sam Adler (@frostingandfettucine)
Prep time: 15 minutes
Total time: 6 hours
Servings: 6
Meringue Nests:
- 1 1/4 cups granulated sugar
- 6 large eggs
- 1 teaspoon cream of tartar
- 1 teaspoon vanilla extract
- 2 teaspoons cornstarch
Garnish:
- 1 cup heavy whipping cream
- 1 teaspoon granulated sugar
- 1/2 teaspoon vanilla extract (or 1 vanilla bean, scraped)
- 1/2 pint fresh strawberries, sliced
- To make meringue nests: Preheat oven to 200 F. On parchment paper-lined baking sheet, spread sugar evenly and bake 5-7 minutes to slightly heat. Remove sugar from oven then increase oven temperature to 225 F.
- Carefully separate egg whites from yolks completely. In bowl of hand or stand mixer fitted with whip attachment, whisk egg whites on medium-low speed until foamy about 1 minute.
- Slowly add sugar 2-3 tablespoons at a time and mix on medium speed 2 minutes between each addition. Sugar needs completely mixed into egg whites to ensure success. Continue mixing on medium until mixed through and meringue does not feel gritty.
- Add cream of tartar, vanilla extract and cornstarch. Increase to high speed and beat until stiff peaks form.
- On two parchment paper-lined baking sheets, pipe or spread meringue with spoon into six 4-inch circular “nests.”
- Bake 1 hour, 15 minutes then turn off oven and let meringues cool without opening oven for at least 4 hours or overnight. The USDA recommends egg dishes be cooked to 160 F.
- To make garnish: When ready to serve, in clean mixing bowl fitted with whip attachment, whip heavy whipping cream on medium speed. Slowly add sugar and vanilla. Continue mixing on high speed 2-3 minutes until stiff peaks form.
- Dollop whipped cream on meringue nests and top with sliced strawberries.
Source: American Egg Board

Fruity Sprinkles Smoothie
To kids, birthday parties are a big deal and only happen once a year. From the decorations to their friends and all the sweet, delicious treats to devour, it can be an overwhelming amount of excitement and awe.
They receive gifts, get to have fun with their friends and family, and get to snack on treats they typically don’t have on a regular basis. This is part of what makes birthdays so fun.
It can be a lot of pressure for parents, though. You want everything to be perfect and fall in line with expectations, especially when it comes to the food and treats served to everyone that day.
At the next party you’re hosting, try this delightful Fruity Sprinkles Smoothie that fits the theme for nearly any colorful birthday bash.
It’s made with frozen blueberries, frozen strawberries and frozen mango for a healthier alternative to sugar-filled birthday cake. Topped with fluffy, fun whipped cream and mini sprinkles, it still provides a sweet, festive treat. Plus, this smoothie can be made in a matter of minutes using only one kitchen appliance for easy clean up.
To make it, blend frozen blueberries, frozen strawberries, frozen mango, milk and yogurt until well combined.
Pour the mixture into four smoothie glasses and garnish each with whipped cream and sprinkles to add some extra color. It’s that easy to make and even better to enjoy while watching your kid make wonderful memories with friends and family.
Find more fun celebration recipes at Culinary.net.
If you made this recipe at home, use #MyCulinaryConnection on your favorite social network to share your work.
SUBSCRIBE to our free monthly email newsletter: https://bit.ly/3epFZi0
Watch video to see how to make this recipe!

Fruity Sprinkles Smoothie
Servings: 4
- 1 cup frozen blueberries
- 2 cups frozen strawberries
- 1 cup frozen mango
- 1 1/2 cups milk
- 1 carton (6 ounces) vanilla yogurt
- whipped cream
- sprinkles
- In blender, blend blueberries, strawberries, mango, milk and yogurt until combined.
- Pour smoothie into four glasses. Garnish with whipped cream and sprinkles.

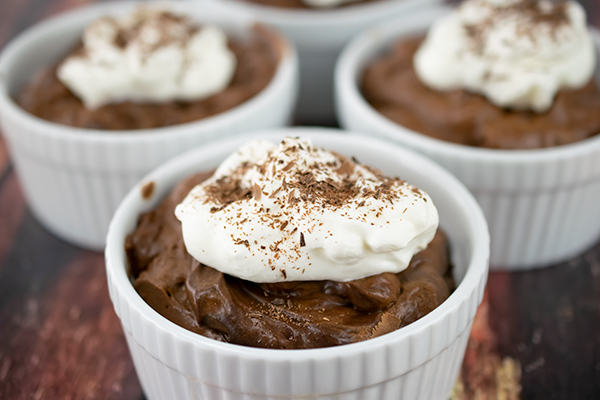
Dreamy Chocolate Mousse
Some of the best memories throughout life stick with you forever as you play them over and over in your head and smile, thinking fondly of those times.
A lot of these good memories are centered around laughs, great conversation and irresistible, mouthwatering food. Family events such as wedding showers or Mother’s Day, or the first day of spring after a bitter winter, can be reasons to celebrate and indulge in something out of the ordinary.
This Dreamy Chocolate Mousse can make those special memories just a little bit sweeter. It’s rich, decedent and full of scrumptious chocolate flavor. Topped with whipped cream and shaved chocolate, it’s the perfect addition to almost any special occasion.
It works as a dessert after a meal or just a special treat. It can be served at a big event or simply a Sunday afternoon at home.
To start, add chocolate, marshmallows and heavy cream to a mixing bowl. Microwave until melted, about 2 minutes. Let cool for 1 hour.
Pour additional heavy cream into a mixer and whip until soft peaks form. Take 1/2 cup of whipped cream and refrigerate for later.
Fold half of the soft whipped cream mixture into the cooled chocolate. Once combined, add the rest of the whipped cream.
Spoon the mousse into serving bowls or ramekins and refrigerate at least 2 hours. Once chilled, add toppings or reserved whipped cream and shaved chocolate, if desired.
It’s easy and requires minimal ingredients, and the results are something smooth, rich and luscious.
Your sense of taste will take you right back to that happy place once you take a small bite. Memories are some of the greatest gifts you get to keep forever.
Find more sweet treat recipes at Culinary.net.
Watch video to see how to make this recipe!
Dreamy Chocolate Mousse
Serves: 4-8
- 8 ounces bittersweet chocolate, chopped, plus chocolate shavings (optional)
- 40 large marshmallows
- 2 1/4 cups heavy cream, divided
- In large bowl, combine chopped chocolate, marshmallows and 1/2 cup heavy cream. Microwave 2 minutes on high, or until marshmallows are melted. Let mixture cool 1 hour.
- Using mixer, whip 1 3/4 cups heavy cream until soft peaks form. Reserve and refrigerate 1/2 cup whipped cream for topping.
- In cooled chocolate mixture, fold in 2 cups whipped cream until combined. Add remaining whipped cream and mix until combined.
- Spoon mousse into ramekins. Refrigerate at least 2 hours.
- To serve, top with 1/2 cup reserved whipped cream and sprinkle with shaved chocolate, if desired.

Combat Cool Days with Comforting Dishes
(Family Features) From filling dinners to favorite desserts, comfort foods can bring smiles to friendly faces. As temperatures drop, lean on recipes that add flavor and bring warming scents to your kitchen.
Loaded with comforting ingredients like READ German Potato Salad, this Cheesy German Potato Soup can appease appetites with tantalizing taste. Ideal at dinner parties or festivities throughout winter, Mini Chocolate-Beet Cheesecakes with Maple-Orange Glaze combine Aunt Nellie's Sliced Beets with familiar cheesecake flavor for a tempting treat.
Visit readsalads.com and auntnellies.com for more comforting inspiration.
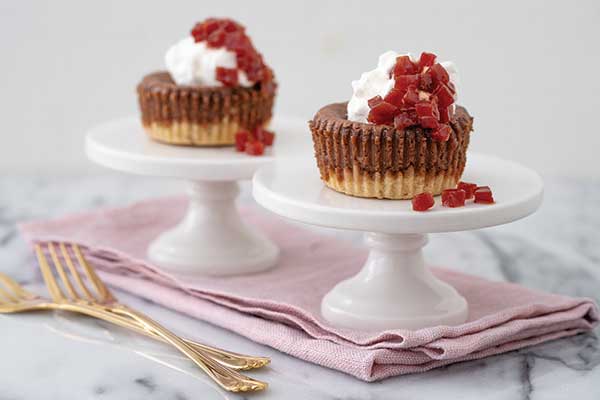
Mini Chocolate-Beet Cheesecakes with Maple-Orange Glaze
Servings: 12
Crust:
- 1/2 cup all-purpose flour
- 1/4 cup chopped walnuts
- 3 tablespoons salted butter, softened
Cheesecake:
- 1 jar (15 ounces) Aunt Nellie's Sliced Beets
- 1 package (8 ounces) cream cheese, softened
- 1/4 cup pure maple syrup
- 1 large egg
- 1/2 cup semi-sweet chocolate chips, melted
Topping:
- 2 tablespoons frozen orange juice concentrate
- 3 tablespoons pure maple syrup
- 1/8 teaspoon ground cinnamon
- whipped cream (optional)
- Preheat oven to 350 F. Line 12 medium muffin cups with foil liners.
- To make crust: In medium bowl, combine flour and walnuts.
- Using fork or pastry blender, cut in butter until mixture resembles fine crumbs. Place about 1 tablespoon mixture into each lined muffin cup. Lightly press crumbs into bottom. Bake 5-6 minutes, or until crust begins to brown.
- To make cheesecake: Drain beets, reserving 2 tablespoons liquid. In blender, puree 1/2 cup beets and reserved liquid until smooth; set aside. Dice remaining beets; set aside.
- In large bowl, combine cream cheese and syrup. Beat until smooth. Add egg; mix until blended. Stir in reserved pureed beets. Add melted chocolate; mix well. Spoon about 3 tablespoons cream cheese mixture into muffin cups over warm crusts. Bake 15 minutes, or until filling is set. Let cool to room temperature. Place cheesecakes in refrigerator at least 30 minutes.
- To make topping: In small saucepan, combine reserved diced beets, orange juice concentrate, syrup and cinnamon. Cook and stir over medium heat until mixture comes to boil, stirring frequently. Continue cooking and stirring until mixture thickens and appears glossy, 5-8 minutes. Remove from heat; let cool to room temperature.
- Remove cheesecakes from muffin liners. Top evenly with glazed beets. Serve with whipped cream, if desired.

Cheesy German Potato Soup
Recipe courtesy of "Today's Creative Life"
Servings: 8
- 1 1/2 cups shredded cheddar cheese
- 1 cup shredded Gruyere cheese
- 3 tablespoons all-purpose flour
- 8 slices bacon, chopped
- 3 large carrots, chopped
- 1 medium onion, diced
- 2 cloves garlic, minced
- 6 cups low-sodium chicken broth
- 1/2 teaspoon ground black pepper
- 1/2 teaspoon crushed red pepper flakes
- 1/2 teaspoon dried thyme
- 1 tablespoon dried parsley
- 2 cans (15 ounces each) READ German Potato Salad
- 1 cup heavy cream
- 1 cup whole milkchopped parsley or chives (optional)
- Place cheeses and flour in gallon-size zip-top bag. Close bag. Shake until cheese is covered with flour; set aside.
- In large Dutch oven over medium heat, cook bacon until crisp, stirring occasionally. Transfer to paper towel-lined plate; set aside.
- Pour off all but 2-3 tablespoons bacon drippings. Return Dutch oven to medium heat. Add carrots, onion and garlic. Cook until onions are translucent and carrots are softened, 3-4 minutes. Add chicken broth, black pepper, red pepper flakes, thyme and parsley. Stir in potato salad. Continue cooking over medium heat 5 minutes, or until potatoes are heated through, stirring occasionally.
- Reduce heat to low. Slowly stir in cream and milk. Cook 5-8 minutes until blended and heated through, stirring frequently. Slowly add cheeses, stirring until melted.
- Top with bacon. Garnish with parsley or chives, if desired.

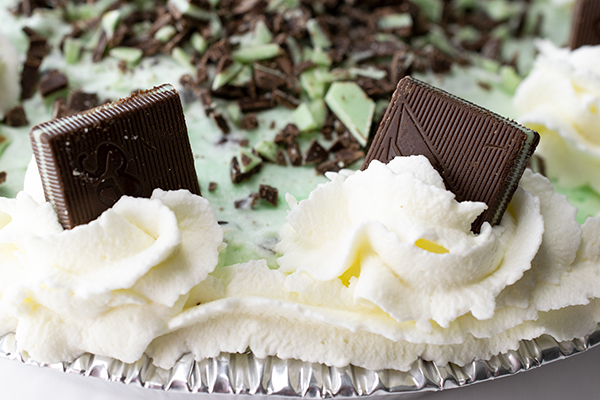
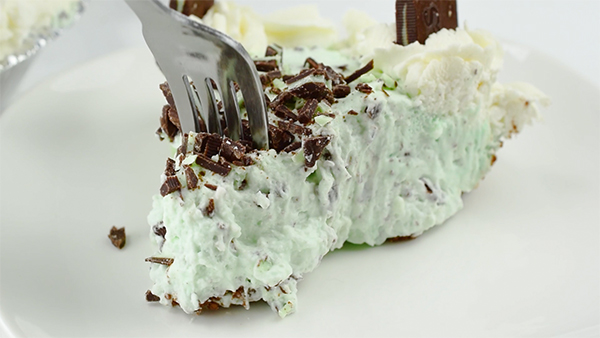
Luck o’ the Irish Mint Pie
(Culinary.net) Even if you’re not Irish, a green treat like this Luck o’ the Irish Mint Pie can get you and your guests into the festive spirit. With enough seasonal flavor to go around, this recipe makes two pies, so be sure to cut every leprechaun a generous portion.
Find more festive recipes at Culinary.net.
Watch video to see how to make this recipe!
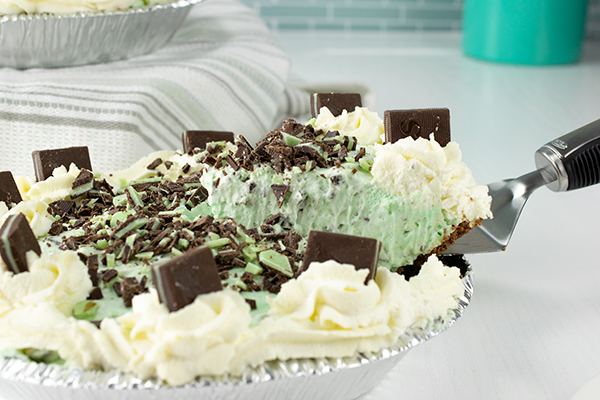
Luck o’ the Irish Mint Pie
Makes: 2 pies (9 inches each)
- 3 3/4 cups heavy whipped cream, divided
- 8 ounces cream cheese, softened
- 1 1/4 cups, plus 2 tablespoons, powdered sugar, divided
- 5 drops green food coloring
- 1 1/4 teaspoons vanilla extract, divided
- 1/4 teaspoon mint extract
- 1 bag mint chocolate candies, chopped, divided
- 2 chocolate cookie crusts (9 inches each)
- 1 bag mint chocolate candies
- To make filling: In bowl of stand mixer, whisk 2 1/2 cups heavy cream until stiff peaks form. Transfer to bowl.
- In separate stand mixer bowl, beat cream cheese on high 2 minutes. Gradually add 1 1/4 cups powdered sugar and green food coloring; mix until smooth. Add 1/4 teaspoon vanilla and mint extract; mix well.
- Fold prepared whipped cream into cream cheese mixture. Fold 1 cup chopped mint chocolate candies into filling.
- To make frosting: In bowl of stand mixer, whisk remaining heavy cream and remaining powdered sugar. Add remaining vanilla extract and mix until stiff peaks form.
- Pour filling into crusts and smooth tops.
- Fill decorating bag with frosting and pipe thick band around edges of pies. Then pipe circle dollops evenly around edges of pies.
- Scatter 1 cup chopped mint chocolate candies in middle of pies. Place whole mint chocolate candies into each dollop of frosting around edges of pies.
- Refrigerate until firm, 5-6 hours.

Easy Strawberry Shortcake
(Family Features) Enjoy your summer with fresh fruit like strawberries in this Easy Strawberry Shortcake recipe.
Find more dessert recipes at Culinary.net.
Watch video to see how to make recipe!

Easy Strawberry Shortcake
Recipe courtesy of Pillsbury
- 1 can (5-8) Pillsbury flaky buttermilk biscuits
- 2 tablespoons butter, melted
- 1/4 cup sugar
Strawberry mixture:
- 3 cups fresh strawberries, sliced
- 1/3 cup sugar
Whipped cream:
- 1/2 cup whipping cream
- 2 tablespoons sugar
- 1/4 teaspoon vanilla
- Heat oven to 375° F.
- Separate biscuits. Dip tops and sides of biscuits in melted butter. Dip biscuits, covering tops and sides, in sugar. Place sugar-side up on ungreased baking sheet. Bake 13-17 minutes, or until golden brown.
- To make strawberry mixture: In medium bowl, mix strawberries and sugar. Set aside.
- To make whipped cream: In small bowl, beat whipping cream and sugar until soft peaks form. Add vanilla and beat into mixture.
- On plate, split biscuits and put dollop of whipped cream mixture on bottom half of biscuit. Add strawberry mixture. Replace biscuit top and dollop with whipping cream.
Source: Culinary.net

Swoon-Worthy Sweets Made Easy
(Family Features) Do you think that beautiful and delicious desserts must all be made from scratch? Think again. With a cake mix and a new cookbook, you can be on your way to making spectacular sweets in no time.
The "Betty Crocker Fix-With-a-Mix Desserts" cookbook, (Wiley Publishing, 2010), features 100 mix masterpieces from bite-size delights to full-size show-stoppers. The book includes:
* Delectable desserts from cakes and cupcakes to cookies and bars, fruit cobblers, tarts, cheesecake and more.
* Luscious full-color photos of every recipe.
* Flavors that take mixes beyond the basics, like Chocolate-Marshmallow Pillows, Citrus Mini Cheesecakes and Banana Turtle Torte.
* A handy index by mix so you can pick recipes based on the mixes you already have in your pantry.
All recipes start with Betty Crocker's trusted mixes, including SuperMoist® Cake Mix, angel food cake mix, brownie mix, cookie mix, Bisquick®, and all-new gluten-free mixes for cookies, brownies, and cakes.
See how easy it is to turn a mix into a mouthwatering dessert with this Ooey-Gooey Caramel Cake recipe featured in the cookbook.
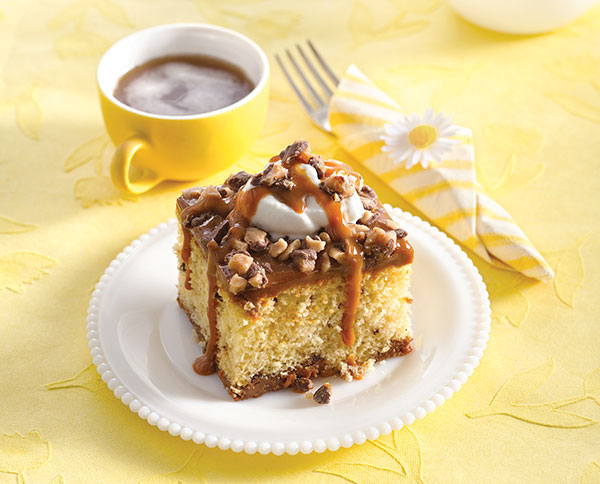
Ooey-Gooey Caramel Cake
Prep time: 20 minutes
Start to finish: 2 hours 5 minutes
15 servings
- 1 box (1 lb 2.25 ounces) Betty Crocker SuperMoist® yellow cake mix
- 1/4 cup all-purpose flour
- 1 cup water
- 1/3 cup vegetable oil
- 3 eggs
- 1 bag (8 ounces) milk chocolate-coated toffee bits
- 1 can (13.4 ounces) dulce de leche (caramelized sweetened condensed milk)
- Sweetened whipped cream, if desired
- Caramel topping, if desired
- Heat oven to 350°F (325°F for dark or nonstick pan). Spray bottom and sides of 13 x 9-inch pan with baking spray with flour.
- In large bowl, beat cake mix, flour, water, oil and eggs with electric mixer on low speed 30 seconds. Beat on medium speed 2 minutes, scraping bowl occasionally. Stir in 1/2 cup of the toffee bits. Pour into pan.
- Reserve 1/2 cup dulce de leche. Spoon remaining dulce de leche by teaspoonfuls onto batter.
- Bake 30 to 40 minutes or until toothpick inserted in center comes out clean. Cool 5 minutes. Drop reserved dulce de leche by spoonfuls over top of cake and spread evenly. Sprinkle with remaining toffee bits. Cool about 1 hour before serving. Top each serving with whipped cream and caramel topping.
Sweet Note: Crushed, chocolate-covered English toffee candy bars can be used instead of the toffee bits.
Source: Wiley Publishing