
Rally the Crowd with a Masterful Game Day Menu
(Family Features) Scoring big on game day requires championship-level meals and snacks that keep the crowd full and ready for action. You can take your tailgate to the house with these baked dishes that help simplify homegating so you can focus on the big screen.
From a salsa-based dip and chicken wings to kick off the party to sweet brownies for celebrating victory, each of these recipes call for less than an hour in the kitchen. Clock management is key to tackling a tailgate spread, making these delicious dishes the perfect play calls on game day.
To find more tailgate and homegate recipe inspiration, visit Culinary.net.
Just Wing It
Skip the silverware at your next homegate and dive right in with a fan favorite that requires just your hands and a heap of napkins: wings.
Whether you pick through your pieces or clean each wing to the bone, these Game Day Chicken Wings are perfect for eaters of all types. A simple flour-based coating keeps the recipe easy to make and baking in the oven means you can skip the messy fryer or firing up the grill.
Cook until crispy then corral your party’s favorite dipping sauces from ranch and blue cheese to barbecue and more. Once your spread is served, it’s time to sit back and enjoy the game.
Visit Culinary.net to find more touchdown-worthy tailgate recipes.
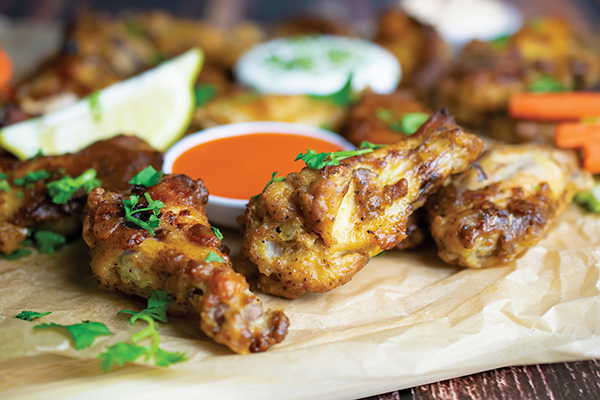
Game Day Chicken Wings
Total time: 50 minutes
Servings: 4
- 1/2 cup butter, cubed
- 1/3 cup flour
- 2 teaspoons paprika
- 1 teaspoon garlic powder
- 1 teaspoon salt
- 1 teaspoon black pepper
- 10 chicken wingettes, thawed
- dipping sauces (optional)
- fresh parsley (optional)
- Preheat oven to 425 F.
- Line baking sheet with foil. Arrange butter cubes on foil.
- In medium bowl, combine flour, paprika, garlic powder, salt and pepper.
- Coat both sides of wings in flour mixture then evenly space among butter cubes on baking sheet.
- Bake wings 30 minutes.
- Turn wings over and bake 15 minutes, or until crispy and fully cooked.
- Serve with dipping sauces and sprinkle with fresh parsley, if desired.
Score Big with a Salsa-Based Dip
Whether your game day celebrations call for a full-blown parking lot party or homegating with your closest friends, the nibbles and noshes you serve set the stage. Building your menu with crowd-pleasing classics – including one tried-and-true favorite that offers a fresh, veggie-forward taste: chilled salsa – makes your guests cheer for more than just the home team.
Healthy game day snacks are important to almost half (48%) of tailgaters and 18% said they’d consider leaving a party if salsa wasn’t served, according to the “Game Day Eats Report” survey from refrigerated salsa brand Fresh Cravings. With its low calorie count packed with high flavor, salsa supports health-conscious goals. Made with ingredients like fresh tomatoes, crisp vegetables, zesty peppers and more, the authentic taste of chilled salsa is a universal favorite among fans.
With a belief that plant-based foods should contain wholesome ingredients and bold flavors worth celebrating, Fresh Cravings refrigerated salsas are available in the produce section, next to dressings and dips, in restaurant-style or chunky mild, medium and hot varieties. Chilled salsa is an affordable and vibrant-tasting alternative to jarred salsa, making it a key ingredient in this Mexican Pizza Dip from celebrity chef George Duran. It’s a simple crowd-pleaser you can make in less than an hour, leaving more time for pregame festivities.
For more information and game day recipe ideas, visit freshcravings.com.
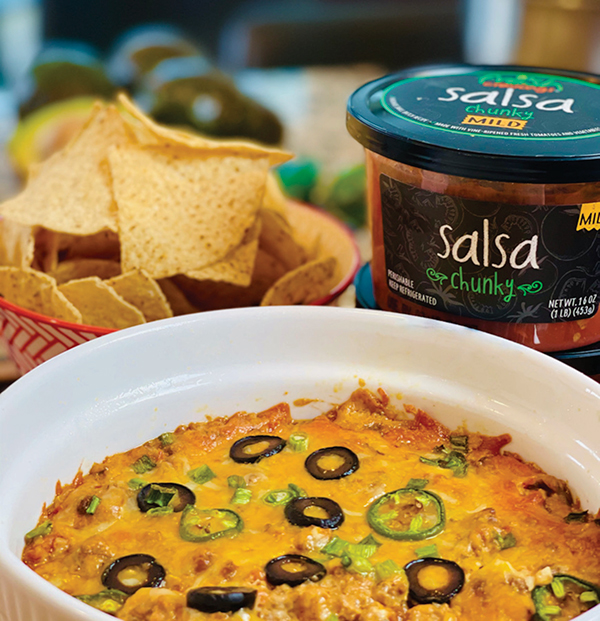
Mexican Pizza Dip
Recipe courtesy of chef George Duran
Servings: 6-8
- Nonstick cooking spray
- 1 tablespoon vegetable oil
- 1 pound ground beef
- 1 package taco seasoning mix
- 8 ounces cream cheese, at room temperature
- 1/2 cup sour cream
- 1 cup Fresh Cravings Chunky Salsa, plus additional for topping
- 1 cup grated mozzarella
- 1/2 cup blended Mexican cheese
- sliced jalapeno (optional)
- sliced black olives (optional)
- green onions (optional)
- tortilla chips
- Preheat oven to 350 F.
- Spray 8-by-8-inch glass pan or large souffle dish with nonstick cooking spray; set aside.
- In large saute pan, heat oil over medium-high heat and add ground beef, breaking up with flat wooden spatula, until fully cooked. Sprinkle taco seasoning throughout beef and combine.
- Place warm beef mixture in large bowl and add cream cheese, sour cream, 1 cup salsa and mozzarella. Mix well until combined and pour into prepared pan. Top with blended cheese and sliced jalapeno, black olives and green onions, if desired.
- Bake until fully warmed and cheese is melted, 30-35 minutes.
- Top with small spoonfuls of salsa. Serve with tortilla chips.
Cap Off Game Day with an All-Star Combo
Pregame festivities call for salty snacks and meaty morsels, but halftime eating and postgame celebrations are perfect for sweet treats.
You can sweeten up your tailgate or homegate with a shareable option like Marbled Peanut Butter Chocolate Brownies made with Domino Golden Sugar, which is made from pure cane sugar and dissolves and measures cup for cup just like white granulated sugar without compromising performance or taste. Featuring an undefeated combination of peanut butter and chocolate, this dessert is ideal for baking a day ahead so you can manage the clock on game day.
Find more tailgating sweets at dominosugar.com.

Marbled Peanut Butter Chocolate Brownies
Prep time: 25 minutes
Cook time: 20 minutes
Yield: 24 brownies
Chocolate Brownies:
- 1/2 cup (1/4 pound) butter
- 2 ounces unsweetened chocolate, chopped
- 1 cup Domino Golden Sugar
- 1/2 teaspoon vanilla extract
- 2 eggs
- 1/2 cup all-purpose flour
Peanut Butter Marble:
- 1/4 cup natural (no added sugar) peanut butter
- 4 tablespoons butter, softened
- 1/2 cup Domino Golden Sugar
- 1 egg
- 1/4 teaspoon vanilla extract
- 1/4 cup all-purpose flour
- 1/4 teaspoon baking powder
- powdered sugar, for topping (optional)
- Heat oven to 350 F.
- To make chocolate brownies: In medium saucepot over low heat, melt butter and chocolate. Remove pot from heat; stir in sugar and vanilla until blended.
- In small mixing bowl, whisk eggs until frothy then stir into chocolate mixture.
- Sift flour into batter and stir just until smooth. Pour batter into prepared pan, smoothing to edges.
- To make peanut butter marble: In mixing bowl, cream peanut butter, butter and sugar. Add egg and vanilla; beat just until blended. In separate bowl, sift or whisk flour and baking powder then stir into batter just until combined.
- Carefully spread peanut butter marble over chocolate batter. Use knife to swirl batters together, first horizontally then diagonally.
- Bake 20 minutes, or until toothpick inserted in center comes out almost clean. Cool completely on wire rack before cutting. Top with powdered sugar, if desired, before serving.
Source:Fresh Cravings
Domino Sugar

Sweet and Savory School Day Snacks
(Family Features) As children head back to school and parents work to balance hectic schedules, it can be difficult to maintain a meal plan that doesn’t consume too much time. Make your morning meals, lunchbox packing and meal prepping easier by including time-saving hacks like easy-to-use ingredients and recipes.
Getting back into a routine can be stressful, but Cheesy Quinoa Bites offer a kid-friendly, parent-approved breakfast option that can be enjoyed at the kitchen counter, on the way to school or as a snack during the day. Try making them Sunday evening then simply reheating throughout the week for an appetizing way to encourage kiddos to eat their veggies and start the day strong.
For a snack to be enjoyed as a mid-morning treat or afternoon pick-me-up, pack these Pine Nut Strawberry Rice Bars in lunchboxes to help boost energy with a sweet-and-savory combination. Or, you can store them in the fridge and keep them at home as a reward after a long day of learning.
Ready in just 10 minutes, Success Boil-in-Bag quinoa and rice are the keys to these quick and easy recipes with a no measure, no mess process that makes cooking simple. Enjoyed by kids and adults alike, they’re made using high-quality ingredients to help you and your loved ones enjoy hassle-free school days from start to finish.
Find more back-to-school snacking solutions at SuccessRice.com .
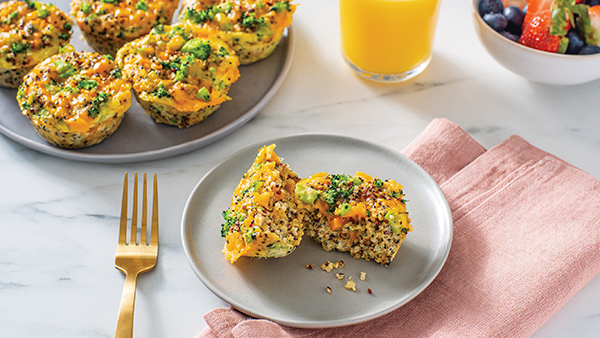
Cheesy Quinoa Bites
Prep time: 15 minutes
Cook time: 30 minutes
Servings: 12
- 1 bag Success Tri-Color Quinoa
- 2 cups aged cheddar cheese, shredded and divided
- 2 eggs
- 3/4 cup broccoli florets, cooked and finely chopped
- 1/3 cup orange bell pepper, finely diced
- 3/4 teaspoon salt
- Preheat oven to 375 F. Grease 12 muffin cups. Cook quinoa according to package directions; let cool slightly.
- Stir together quinoa, 1 1/2 cups cheddar cheese, eggs, broccoli, bell pepper and salt. Spoon mixture into prepared muffin cups. Sprinkle remaining cheese over top.
- Bake 18-20 minutes, or until golden brown and set. Let cool slightly in pan on rack; invert onto rack and let cool completely or serve warm.
Substitution: Use finely chopped sun-dried tomatoes, black olives or pickled jalapeno peppers for orange bell pepper, if desired.
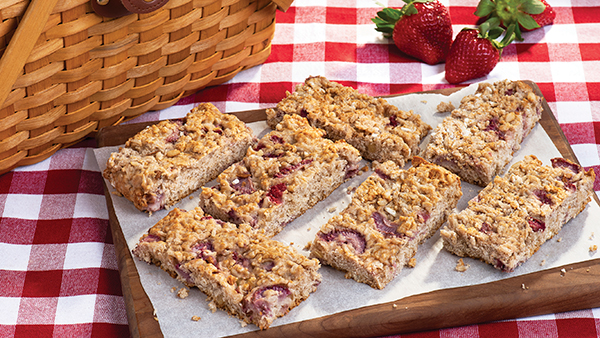
Pine Nut Strawberry Rice Bars
Prep time: 10 minutes
Cook time: 25 minutes
Yield: 36 bars
- 1 bag Success White Rice or Brown Rice
- nonstick cooking spray
- 3 tablespoons butter, softened
- 1/3 cup sugar
- 1/4 cup strawberry jam
- 2 eggs, beaten
- 1 teaspoon lemon extract
- 2 1/2 cups all-purpose flour, sifted
- 2 teaspoons baking powder
- 2 teaspoons ground turmeric
- 1 teaspoon baking soda
- 1 1/2 cups fresh strawberries, hulled and sliced
- 1/2 cup unsalted pine nuts, chopped
- Prepare rice according to package directions. Coat 9-by-13-inch baking pan with nonstick cooking spray and set aside. Preheat oven to 350 F.
- In bowl or electric mixer on medium speed, beat butter, sugar and strawberry jam until thoroughly combined. Add eggs and lemon extract; continue beating until well mixed.
- In separate bowl, sift flour, baking powder, turmeric and baking soda.
- Add rice to flour mixture and mix thoroughly. Combine rice mixture with egg mixture. Gently fold in strawberries and nuts.
- Spread batter in prepared pan. Bake 25 minutes.
- Remove bars from oven and cool in pan. Once cool, transfer to cutting board and cut into 36 bars. Store in refrigerator.
Source: Success Rice

Deliver Flavor and Nutrition Despite Busy Schedules
(Family Features) As kids and parents return to busy schedules full of sports, homework and weeknight activities, building a plan for nutritious and easy meals can be challenging. Piecing together a menu that fuels active minds without spending hours in the kitchen is a common goal for many families.
These recipes require minimal prep and call for on-hand ingredients like dairy food favorites that provide nutrients people of all ages need to grow and maintain strong bodies and minds.
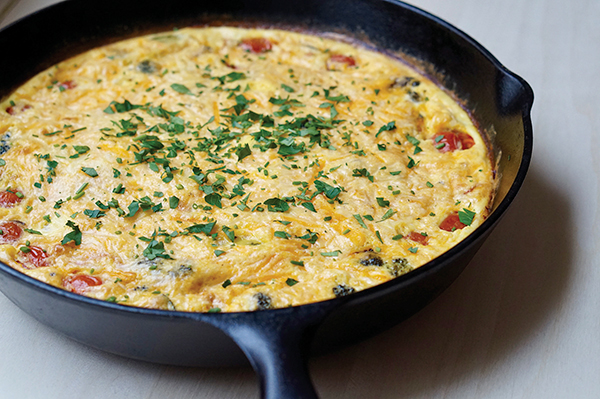
Whether you enjoy it together in the morning before getting the day started or mix it up with breakfast for dinner, this Sustainable Frittata is called “sustainable” because you can use leftover cheeses, veggies, ham, sausage and more to recycle ingredients you already have on hand.
For a customizable kid-pleaser, turn to Chopped Chicken Taco Salad and garnish with your family’s favorite toppings. When it’s time to put a twist on a classic while changing up your dinner routine, Roasted Red Pepper and Pesto Grilled Cheese Sandwiches are perfect for putting something new on the table. Make supper a cinch with Slow Cooker Macaroni and Cheese, which lets you put the work in the hands of your slow cooker for a versatile dish that can be served when homework is finished.
Visit milkmeansmore.org to find more recipes perfect for bringing loved ones together.
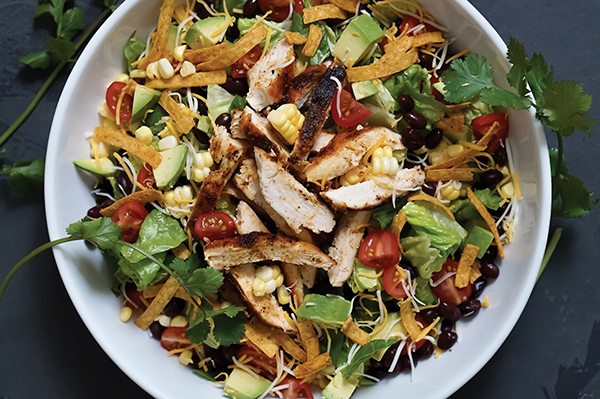
Chopped Chicken Taco Salad
Recipe courtesy of Megan Gundy of “What Megan’s Making” on behalf of Milk Means More
Prep time: 15 minutes
Cook time: 15 minutes
Servings: 4
Dressing:
- 1 cup plain Greek yogurt
- 1/3 cup buttermilk, plus additional (optional)
- 1 tablespoon fresh-squeezed lime juice, plus additional (optional)
- 3 tablespoons chopped cilantro
- 2 tablespoons taco seasoning
Salad:
- 2 pounds boneless, skinless chicken breasts
- 2 tablespoons taco seasoning
- 2 tablespoons olive oil
- 1 head leaf lettuce, chopped
- 1 avocado, chopped into bite- sized pieces
- 1 cup black beans, drained and rinsed
- 1 cup corn
- 1 pint grape or cherry tomatoes, chopped
- 1 cup shredded cheese (Monterey Jack or Mexican)
- tortilla strips or crushed tortilla chips, for topping
- To make dressing: In small bowl, stir yogurt, buttermilk, lime juice, cilantro and taco seasoning until combined. Taste and adjust lime juice and cilantro as needed. If dressing is too thick, add buttermilk 1 teaspoon at a time until desired consistency is reached. Refrigerate until ready to serve.
- To make salad: Season chicken on both sides with taco seasoning. Heat large skillet over medium-high heat and add olive oil. Add chicken to pan and cook on both sides until outside is golden brown and chicken is cooked through. Remove to cutting board and slice into strips.
- On large platter, heap chopped lettuce. Sprinkle chicken over top. Add avocado, beans, corn, tomatoes and shredded cheese. Drizzle dressing on top and sprinkle with tortilla strips or crushed tortilla chips.
Sustainable Frittata
Recipe courtesy of Jenn Fillenworth of “Jenny With the Good Eats” on behalf of Milk Means More
Prep time: 5 minutes
Cook time: 20 minutes
Servings: 8
- 12 eggs, beaten
- 1/4 cup whole milk, half and half or heavy cream
- 1/2 teaspoon salt
- 2 cups shredded cheese, any variety
- 3 cups assorted cooked vegetables and pre-cooked meats
- fresh herbs, for garnish (optional)
- Preheat oven to 450 F.
- Preheat cast-iron pan or oven-safe skillet over medium heat.
- In large bowl, mix eggs, milk and salt then add shredded cheese.
- Add cooked vegetables and meats to pan to reheat. Once vegetables have softened, add egg mixture to pan and scramble. Let sit over medium heat 1 minute.
- Carefully transfer to oven and bake 10-15 minutes. Frittata is done when eggs have set. Remove from oven and top with fresh herbs.
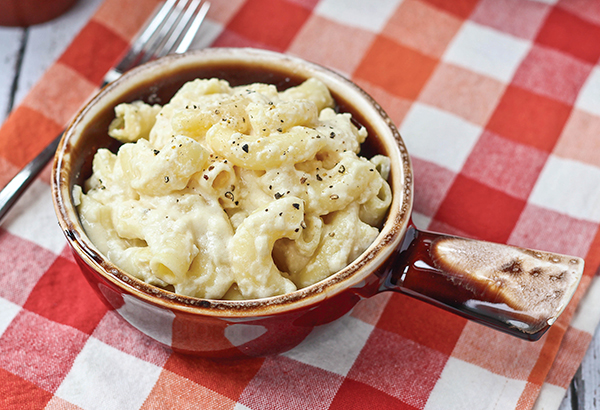
Slow Cooker Macaroni and Cheese
Recipe courtesy of Rachel Gurk of “Rachel Cooks” on behalf of Milk Means More
Prep time: 20 minutes
Cook time: 2 hours
Servings: 8
- 16 ounces elbow pasta
- 4 tablespoons butter
- 3 ounces reduced-fat cream cheese
- 2 cups whole milk
- 12 ounces evaporated milk
- 1/2 cup light sour cream
- 2 large eggs, beaten
- 3/4 teaspoon ground mustard
- pepper, to taste
- 8 ounces shredded sharp cheddar cheese
- 8 ounces grated provolone cheese
- Cook pasta al dente according to package directions. Drain and pour into large slow cooker.
- In small saucepan over medium heat, whisk butter and cream cheese until melted. Stir in milk, evaporated milk and sour cream; whisk until combined. Remove from heat; whisk in eggs, ground mustard and pepper, to taste. Stir in cheeses. Pour mixture over cooked macaroni and stir to combine cheese and pasta.
- Cover and cook 2 hours on low. Switch to warm until ready to serve.
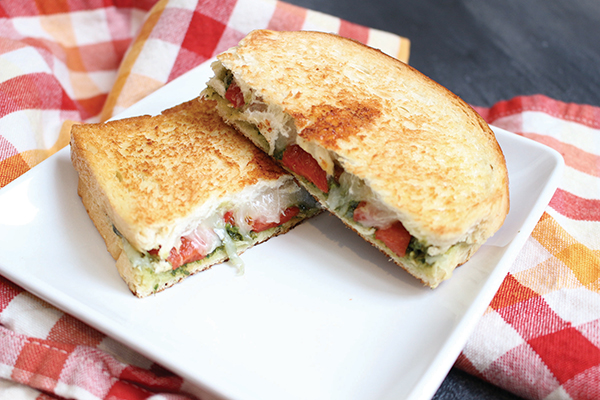
Roasted Red Pepper and Pesto Grilled Cheese Sandwiches
Recipe courtesy of Katie Serbinski of “Mom to Mom Nutrition” on behalf of Milk Means More
Prep time: 5 minutes
Cook time: 10 minutes
Servings: 2
- 4 slices French or Italian bread
- 3 tablespoons prepared pesto
- 2 large roasted red peppers
- 4 slices mozzarella cheese
- 2 tablespoons butter, softened
- Preheat skillet or grill pan over medium-low heat.
- Spread insides of bread slices evenly with pesto. Stack red peppers and mozzarella cheese.
- Spread outer sides of bread with softened butter and grill until toasted and cheese is melted, about 5 minutes per side.
- Rest 1 minute before cutting.

Get Grilling This Summer with Plant-Based Sides
(Family Features) Grilling gives summertime a special meaning for many people – especially when it comes to food. Those savory whiffs of barbecuing might call to mind burgers and drumsticks, but don’t forget the sweet smell of seared, steamed or skewered garden-fresh vegetables to make those colorful, flavorful side dishes too.
This summer consider adding a vegan twist to those classic veggie sides like grilled corn on the cob or crunchy coleslaw with the help of Violife 100% Vegan Cheese. By adding a vegan cheese to these recipes, you can spice them up or make them sweet and colorful – and plant-based. They’re sure to go hand-in-hand with your summer menus and satisfy even the pickiest of eaters.
The corn on the cob in this creamy Grilled Corn with Garlic and Herbs recipe can be grilled alongside your main protein and is an easy way to add healthy veggies without the dairy. Or try this Sweet and Spicy Vegan Coleslaw recipe that puts a plant-based spin on a classic and asks for just 10 minutes of prep time in the kitchen.
By using Violife 100% Vegan Cheeses in your favorite summer recipes, you won’t be sacrificing taste or texture with your meal. Each option is non-GMO and free from dairy, soy, nuts, gluten, preservatives and lactose. Made from the goodness of plants and available in shreds, slices, wedges, blocks or as a cream cheese alternative, these vegan cheeses melt, stretch and are perfect for including as part of any plant-forward summer menu.
To find more summer recipe ideas, visit violifefoods.com .
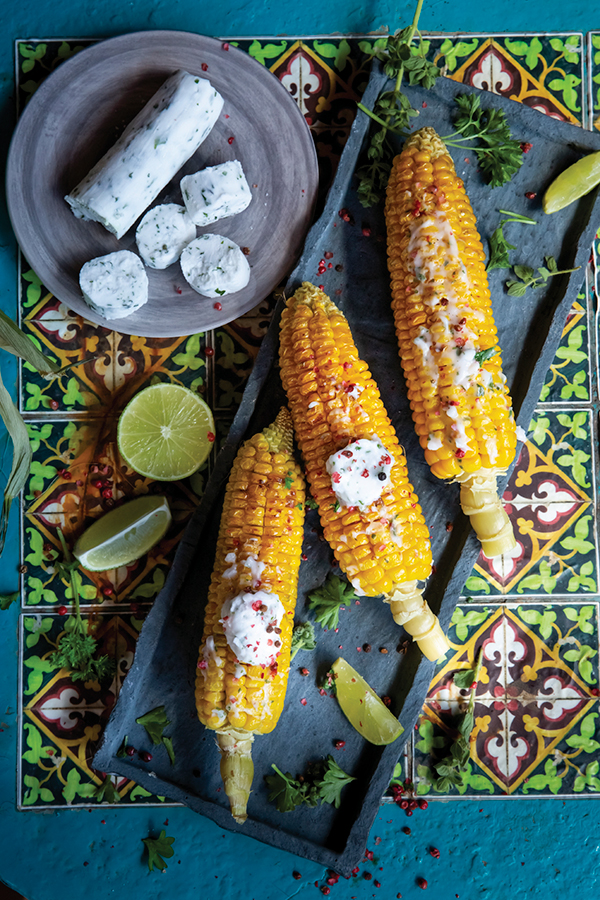
Grilled Corn with Garlic and Herbs
Prep time: 10 minutes
Cook time: 30 minutes
Servings: 6
- 1 pack Violife Just Like Cream Cheese Original
- 1 garlic clove, crushed
- 1 tablespoon parsley, chopped
- 1 tablespoon oregano, chopped
- salt, to taste
- freshly ground pepper, to taste
- 6 corn cobs
- pink pepper, to taste
- lime
- Preheat oven to 350 F or heat grill to medium.
- Mix cream cheese substitute, chopped garlic, parsley and oregano. Season with salt and pepper, to taste, and place on baking sheet. Twist sides and refrigerate 1 hour.
- Grill corn or bake 30-35 minutes, or until tender.
- Remove cream cheese mixture from baking sheet and cut into slices. Place on top of each corn cob. Sprinkle with pink pepper, to taste, and serve with lime.
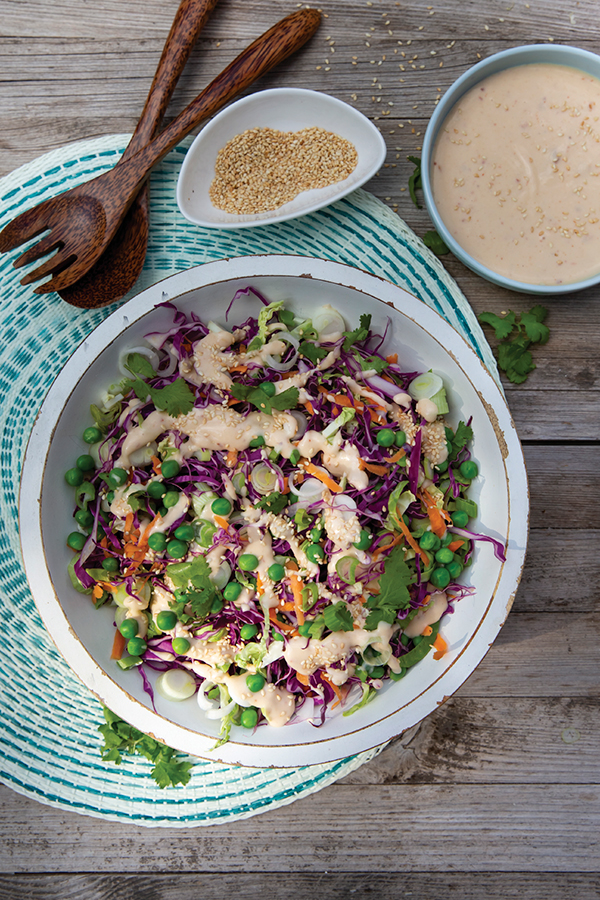
Sweet and Spicy Vegan Coleslaw
Prep time: 10 minutes
Servings: 4
- 1 carrot, grated
- 10 Brussels sprouts, finely sliced
- 1 small red cabbage, grated
- 1 cup peas
- 3 spring onions, sliced diagonally
- 1 cup coriander, chopped
Dressing:
- 1 pack Violife Just Like Cream Cheese Original
- 1 garlic clove, finely minced
- 3 tablespoons olive oil
- 1/4 cup wine vinegar
- 3 tablespoons agave
- 1 tablespoon ginger, finely chopped
- 1/2 teaspoon chili flakes or chili paste (optional)
- toasted sesame seeds (optional)
- In large bowl, toss carrot, Brussels sprouts, cabbage, peas, onions and coriander; mix thoroughly.
- In small bowl, whisk cream cheese substitute, garlic, olive oil, wine vinegar, agave, ginger and chili flakes, if desired.
- Pour dressing into salad and toss well. Garnish with toasted sesame seeds, if desired.
Source: Violife

A Full School Day of Family Favorites
(Family Features) Each school day calls for a multitude of meals and snacks to make sure little learners are energized for time spent in the classroom, playing with friends and completing their homework. From breakfast to dinner and sweet rewards after a long day of educational activities, it’s important to keep the family on schedule with favorite recipes.
These options for a simple quiche that’ll almost certainly leave leftovers for the week, tasty tacos with a cheeseburger twist and cream-filled cookies offer delicious ways to keep your loved ones full and happy.
Visit Culinary.net to find more family-friendly dishes.
Say Goodbye to Basic Breakfast
The same old breakfast routine week after week can become tiresome and dull, especially for little ones.
It’s time to add something new to the table with fresh ingredients and simple instructions to enhance the start to busy weekdays. Try this recipe for an Easy Breakfast Quiche that is sure to have your senses swirling with every bite while fueling kiddos for the day ahead.
Find more breakfast recipes at Culinary.net.
Easy Breakfast Quiche
Servings: 12
- 1 package (10 ounces) frozen broccoli with cheese
- 12 slices bacon, chopped
- 1/2 cup green onions, sliced
- 1 cup mushrooms, sliced
- 4 eggs
- 1 cup milk
- 1 1/2 cups shredded cheese, divided
- 2 frozen deep-dish pie shells (9 inches each)
- Heat oven to 350 F.
- In medium bowl, add broccoli and cheese contents from package. Microwave 5 minutes, or until cheese is saucy. Set aside.
- In skillet, cook chopped bacon 4 minutes. Add green onions; cook 2 minutes. Add mushrooms; cook 4 minutes, or until bacon is completely cooked and mushrooms are tender. Drain onto paper towel over plate. Set aside.
- In medium bowl, whisk eggs and milk until combined. Add broccoli and cheese mixture. Add 1 cup cheese. Stir to combine. Set aside.
- In pie shells, divide drained bacon mixture evenly. Divide broccoli mixture evenly and pour over bacon mixture. Sprinkle remaining cheese over both pies.
- Bake 40 minutes.
- Allow to cool at least 12 minutes before serving.
Note: To keep edges of crust from burning, place aluminum foil over pies for first 20 minutes of cook time. Remove after 20 minutes and allow to cook uncovered until completed.
A Tasty Take on School Night Tradition
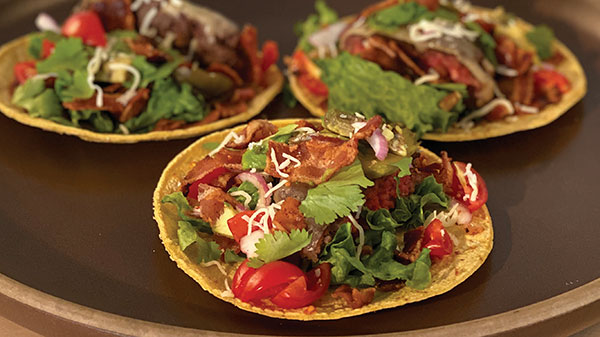
Put a twist on taco Tuesday and get outside the burger bun with this easy weekday dinner idea.
Pick up a few simple ingredients you can feel good about feeding your family including Coleman Natural uncured bacon, which has no artificial ingredients or preservatives and is sourced from American family farms that humanely raise their animals with no antibiotics or added hormones.
For more creative, kid-friendly recipes, visit ColemanNatural.com/recipes.
Bacon Cheeseburger Tacos
Servings: 4
- 8-10 slices Coleman Natural bacon
- 1 pound ground beef
- salt
- pepper
- 4 slices cheese
- 1 cup canola oil
- 8 soft corn tortillas
- 1 medium red onion, sliced
- 1 avocado, skin removed and sliced
- 1 medium tomato, chopped
- 8-10 romaine lettuce leaves, torn
- In large frying pan or cast-iron skillet, cook bacon until crispy. Remove slices from skillet to drain on paper towel. Pour bacon fat from pan.
- Shape ground beef into four burger patties, seasoning both sides of patties with salt and pepper.
- In skillet over medium-high heat, cook burgers about 4 minutes per side for medium doneness.
- Top each burger with one slice cheese then cover skillet with lid and cook until cheese melts. Remove from heat.
Cap Off School Nights with a Creamy Cookie
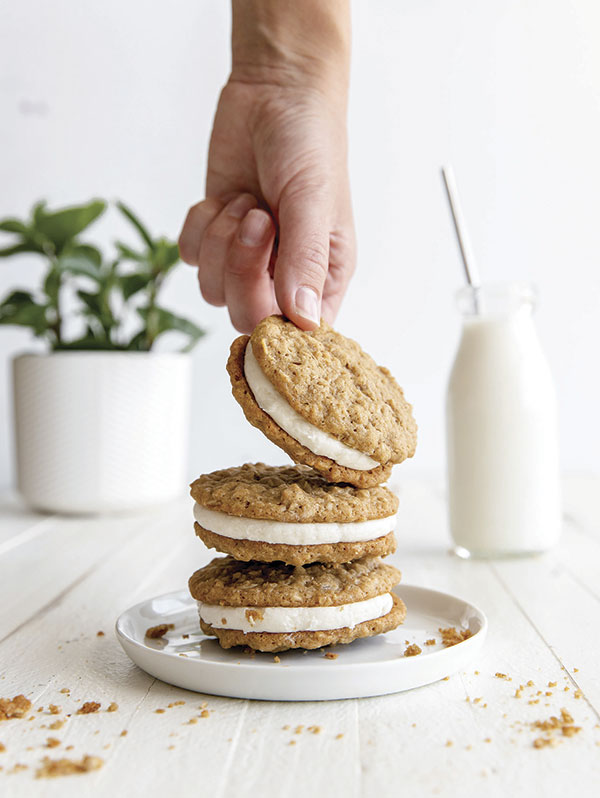
Once the school day is done, homework is complete and dinner is finished, there’s just one thing left for many families: dessert. After all the day’s accomplishments, sometimes a sweet treat is the perfect way to reward kiddos for their hard work in the classroom.
These Oatmeal Creme Cookies are a tasty example of a tempting dish that comes together in less than half an hour, so you don’t add more stress to a busy day. Plus, with high-quality ingredients like C&H Sugars, they can keep the whole family happy while allowing little ones to help in the kitchen.
Visit chsugar.com for more back-to-school recipe inspiration.
Oatmeal Creme Cookies
Recipe courtesy of chef Haley Williams @IfYouGiveABlondeAKitchen
Prep time: 10 minutes
Cook time: 12 minutes
Oatmeal Cookies:
- 1 1/2 cups all-purpose flour
- 1 teaspoon baking soda
- 1/2 teaspoon salt
- 1 teaspoon ground cinnamon
- 1/4 teaspoon ground cloves (optional)
- 1 cup (2 sticks) unsalted butter, at room temperature
- 3/4 cup Dark Brown Sugar
- 1/2 cup Organic Raw Cane Sugar
- 2 large eggs, at room temperature
- 1 1/2 teaspoons pure vanilla extract
- 3 cups quick oats
Creme Filling:
- 3/4 cup unsalted butter, at room temperature
- 2 cups Confectioners’ Sugar
- 1-2 tablespoons heavy cream
- 1 teaspoon pure vanilla extract
- 1 pinch salt
- To make oatmeal cookies: Preheat oven to 350 F. Line two cookie sheets with parchment paper and set aside.
- In large bowl, whisk flour, baking soda, salt, cinnamon and cloves, if desired. Set aside.
- In bowl of stand mixer, beat butter, dark brown sugar and raw cane sugar on medium-high speed until light and creamy, about 1 minute. Add eggs and vanilla; beat until combined. Scrape down sides and bottom of bowl.
- With mixer on low, slowly add dry ingredients to wet ingredients. Mix until combined while avoiding overmixing. Add oats and mix until incorporated.
- Scoop about 2 tablespoons dough onto prepared cookie sheet. Space dough balls at least 3 inches apart. Bake 10-12 minutes, or until edges are light brown. Let cookies cool 5 minutes before transferring to wire rack to cool completely.
- To make creme filling: In bowl of stand mixer, beat butter on medium-high speed until light in color, about 3 minutes. With mixer on low, gradually add confectioners’ sugar and mix until well combined, about 1 minute. Add 1 tablespoon heavy cream, vanilla and salt. Beat on medium-high speed until fluffy. If filling is too thick, add second tablespoon heavy cream.
- Once cookies cool, pipe or spread creme filling on flat sides of half the cookies. Top with remaining cookies to form sandwiches.
Source: Coleman Natural Foods
C&H Sugar

Easy, Satisfying Spring Recipes
(Family Features) Whether you enjoy your spring meals al fresco or simply turn to warm-weather dishes at the comfort of your own dining table, the season brings with it a perfect excuse to shake up your menu.
Lighter fare is often the way to go as temperatures climb, but that doesn’t mean you have to settle for a regular sandwich or a boring salad. Instead, enhance these springtime classics by rethinking tradition in tasty (yet easy) ways.
This Sabich recipe calls for a multitude of fresh flavors including Aunt Nellie’s Pickled Beets and Onions and hard-boiled eggs plus a variety of veggies, hummus and ethnic seasonings. Or, if a quick and easy salad calls your name for an outdoor meal, this Tossed Bean Salad with Lemon Vinaigrette requires only READ Bean Salad, mixed greens and a handful of other ingredients.
Find more easy springtime dishes at readsalads.com and auntnellies.com.
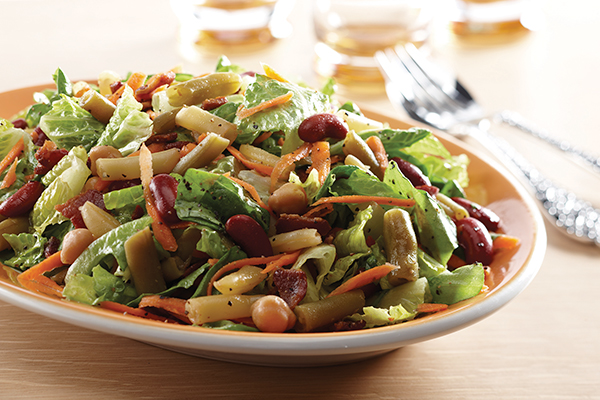
Tossed Bean Salad with Lemon Vinaigrette
Prep time: 15 minutes
Servings: 4
- 1 can (15 ounces) READ 3 or 4 Bean Salad
- 2 tablespoons lemon juice or white wine vinegar
- 2 tablespoons olive oil
- coarsely ground black pepper, to taste
- 1 package (about 10 ounces) mixed salad greens with carrots
- 4 slices bacon (about 1/4 cup), cooked crisp and crumbled (optional)
- shaved Parmesan or Asiago cheese (optional)
- Drain bean salad well; in small bowl, reserve 1/2 cup liquid.
- To make dressing: Whisk reserved bean liquid and lemon juice then whisk in oil. Add pepper, to taste.
- Place salad greens in bowl. Add bean salad and bacon. Add dressing, as desired. Toss gently to coat. Arrange on platter; top with shaved cheese, if desired.
Variation: Top salad with sliced grilled chicken then top with cheese.
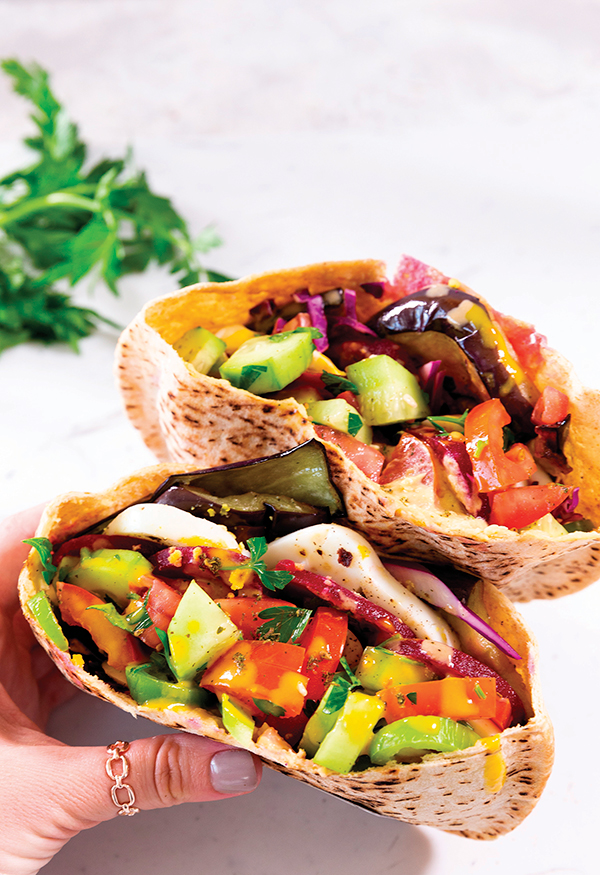
Sabich
Recipe courtesy of eazypeazymealz.com
Prep time: 20 minutes
Servings: 4
- 1 jar (16 ounces) Aunt Nellie’s Pickled Beets and Onions
- 1 medium eggplant
- 2 teaspoons salt, plus additional, to taste, divided
- 1 cup vegetable oil
- 4 hard-boiled eggs, sliced
- pepper, to taste
- 1 1/2 teaspoons za’atar, plus additional for serving, divided (optional)
- 1/2 teaspoon sumac, plus additional for serving, divided (optional)
- 1 cucumber, diced
- 3 Roma tomatoes, diced
- 1/3 cup fresh parsley, finely chopped
- 1/2 lemon, juice only
- 4 whole-grain pita breads with pockets
- 1/2 cup hummus
- 2 cups shredded red cabbage
- 1 medium green bell pepper, thinly sliced
- 1/4 cup Amba pickled mango sauce (optional)
- 1/4 cup tahini
- Drain beets and onions; set aside.
- Wash eggplant. Slice into 3/8-inch-thick pieces. Place slices on cooling rack. Add 2 teaspoons salt to slices to draw out extra moisture. Let sit 10 minutes. Pat extra moisture off.
- In large 14-inch skillet, heat vegetable oil over medium heat. Once oil is hot, place eggplant slices in oil; fry until browned, about 3 minutes per side, in batches of four pieces. Place on paper towel-lined plate to absorb additional oil.
- Season hard-boiled egg slices with salt and pepper, to taste. Season with 1/2 teaspoon za’atar and sumac, if desired. Set aside.
- To make salad: In medium bowl, combine cucumber, tomatoes, parsley, lemon juice and remaining za’atar. Set aside.
- Gently slice one end of each pita and open pocket. In microwave on high, heat pitas 10 seconds. Place equal amounts fried eggplant in each pita. Spread 2 tablespoons hummus in each pita. Gently layer one-fourth of egg slices, beets and onions, cabbage, Israeli salad and green peppers in each pita.
- Drizzle each sabich with about 1 tablespoon amba sauce, if desired, and 1 tablespoon tahini. Season with additional salt and pepper or sumac and Za’atar, if desired.
Source: Seneca Foods
Aunt Nellies

Maximize Family Meal Flavors with Cheese
(Family Features) While there are many ways to enhance the taste and texture of your family’s favorite dishes, perhaps one of the simplest and most impactful is the addition of cheese. From fish and seafood to veggie-inspired recipes, the dairy delight provides a versatile, flavorful ingredient.
One wholesome option is cheese made with 100% sustainably sourced Real California Milk from dairy farm families, which helps bring out the full flavor of dishes like California Queso Fresco Fish Tacos. Quality, authentic dairy can be part of flavor-driven experiences with your loved ones whether you enjoy the tacos during a “fish Friday” event or simply as an opportunity to share a meal as a family. You can also use queso fresco to elevate the flavor of dishes like chilaquiles, or turn to other varieties like Oaxaca for a capirotada or asadero for quiche.
If a vegetarian-friendly meal suits your style, cheese can also enhance plant-forward dishes like Vegetarian Stuffed Peppers. These red bell peppers are cooked and seeded before being stuffed with onions, mushrooms, cheese and seasonings. Once they’re baked to an ooey-gooey doneness, they’re served with white rice for a filling yet healthful meal.
Visit realcaliforniamilk.com/hispanic-dairy to find more cheesy, delicious recipes.
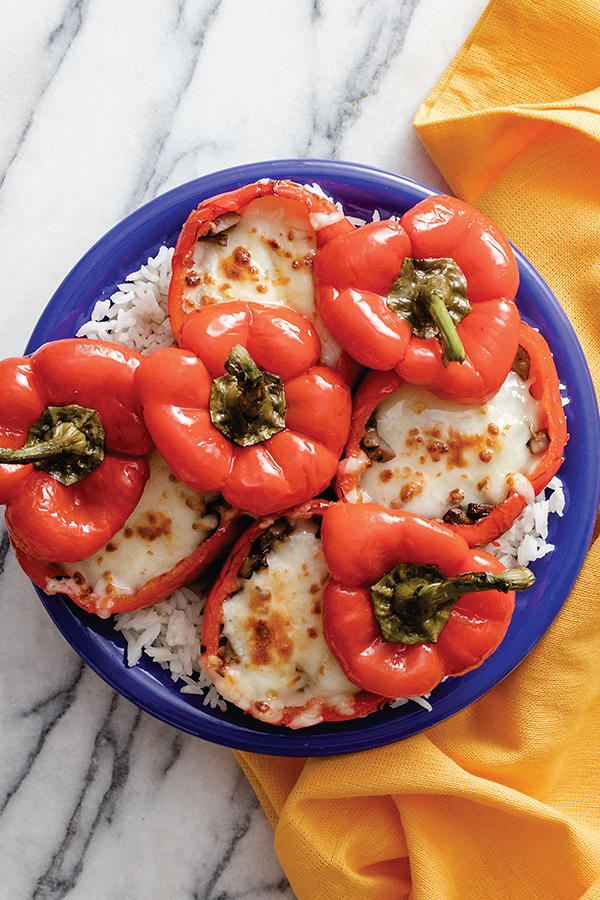
Vegetarian Stuffed Peppers
Prep time: 25 minutes
Cook time: about 1 hour
Servings: 4
- 4 red bell peppers
- 1/2 cup, plus 1 tablespoon, vegetable oil, divided
- 1 cup white onion (about 1 medium), 1/4-inch diced
- 4 cups cremini or brown mushrooms (about 1 pound), 1/4-inch diced
- 1 teaspoon garlic salt
- 1 teaspoon black pepper
- 1 cup Real California Oaxaca cheese, shredded
- cooked white rice, for serving
- Preheat oven to 400 F.
- Rub bell peppers with 1 tablespoon oil then use grill, broiler or gas stovetop burner to cook peppers, turning occasionally, until well charred, 12-15 minutes. Transfer to bowl, cover and set aside until cool enough to handle, about 10 minutes.
- In large skillet over medium heat, warm remaining oil. Add onion and cook, stirring occasionally, until starting to brown, 3-5 minutes. Add mushrooms, garlic salt and black pepper; cook, stirring occasionally, until mushrooms are browned and liquid is almost entirely evaporated, 7-10 minutes.
- Rub charred skin from bell peppers. Slice off tops and remove seeds. Fill bell peppers with mushroom mixture, top with cheese and arrange in baking dish. Replace bell pepper tops and bake until cheese melts, 8-10 minutes. Serve with cooked rice.

California Queso Fresco Fish Tacos
Servings: 6 (12 tacos)
Avocado Radish Salsa:
- 2 medium avocados, chopped
- 1/3 cup finely chopped onion
- 3/4 cup diced radish
- 5 serrano chile peppers, seeded and finely chopped
- 3 tablespoons cilantro, finely chopped
- 1 clove garlic, finely chopped
- 1 lime, juice only
- salt, to taste
- pepper, to taste
Tacos:
- 1 1/2 pounds swordfish, or other whitefish, steaks or fillets
- vegetable oil
- salt, to taste
- pepper, to taste
- 1 tablespoon lime juice
- 1/2 teaspoon ground cumin
- 12 corn tortillas
- 6 ounces Real California Queso Fresco cheese, crumbled
- 2 medium ripe tomatoes, diced
- 1 cup shredded cabbage
- To make avocado radish salsa: In small bowl, combine avocados, onion, radish, chile peppers, cilantro, garlic and lime juice. Add salt and pepper, to taste. Set aside.
- Heat grill to medium heat.
- Rinse fish and pat dry with paper towels. Rub oil on both sides to coat; season with salt and pepper, to taste. Grill fish 6-9 minutes until cooked through; cool slightly. Remove skin and bones; cut fish into 1 1/2-inch strips.
- In medium bowl, toss fish with lime juice and cumin. Warm tortillas in microwave or at 275 F in oven.
- Place equal amounts of fish, cheese, tomatoes, cabbage and salsa in center of each tortilla. Roll up tacos to serve.
Substitution: Use Real California Asadero or Monterey Jack cheese for Queso Fresco.
Source: Real California Milk

Easy Brunch Quiche
(Culinary.net) The same old brunch menu week after week can become tiresome and dull. It’s bland, boring and your tastebuds get used to the same flavors repeatedly.
It’s time to add something new to the table with fresh ingredients and simple instructions to enhance your weekend spread.
Try this recipe for an Easy Brunch Quiche that is sure to have your senses swirling with every bite. This quiche is layered with many tastes and a variety of ingredients to give it crave-worthy flavor.
To create this dish, start with one package of broccoli and cheese then microwave it for 5 minutes until heated through.
Add 12 slices of chopped bacon to a skillet. While cooking, add 1/2 cup of green onions. Cook for 2 minutes then add 1 cup of mushrooms to the skillet. Cook for 4 minutes and drain the grease.
In a small mixing bowl, combine four eggs and 1 cup of milk. Whisk together. Add egg mixture to the broccoli and cheese. Also add 1 cup of shredded cheese and stir the ingredients together.
In two separate pie shells, spoon in the bacon mixture then pour the egg and broccoli mixtures over the top. Sprinkle with a little more cheese then bake for 35-45 minutes at 350 F.
With a range of ingredients from broccoli to bacon, this quiche is a brunch hero. While baking, the cheese gets all melty, and with every bite the mushrooms add texture and earthy flavor. The ingredients combine together to make something warm, hearty and fresh.
Find more brunch recipes and cooking ideas at Culinary.net.
Watch video to see how to make this recipe!

Easy Brunch Quiche
Serves: 12
- 1 package (10 ounces) frozen broccoli with cheese
- 12 slices bacon, chopped
- 1/2 cup green onions, sliced
- 1 cup mushrooms, sliced
- 4 eggs
- 1 cup milk
- 1 1/2 cups shredded cheese, divided
- 2 frozen deep dish pie shells (9 inches each)
- Heat oven to 350 F.
- In medium bowl, add broccoli and cheese contents from package. Microwave 5 minutes, or until cheese is saucy. Set aside.
- In skillet, cook chopped bacon 4 minutes. Add green onions; cook 2 minutes. Add mushrooms; cook 4 minutes, or until bacon is completely cooked and mushrooms are tender. Drain onto paper towel over plate. Set aside.
- In medium bowl, whisk eggs and milk until combined. Add broccoli and cheese mixture. Add 1 cup cheese. Stir to combine. Set aside.
- In pie shells, divide drained bacon mixture evenly. Divide broccoli mixture evenly and pour over bacon mixture. Sprinkle remaining cheese over both pies.
- Bake 40 minutes.
- Allow to cool at least 12 minutes before serving.
Note: To keep edges of crust from burning, place aluminum foil over pies for first 20 minutes of cook time. Remove after 20 minutes and allow to cook uncovered until completed.

Fast, Flavorful Meals When You're Short on Time
(Family Features) Quality meals don't have to drain hours from your day; satisfying taste is possible in just minutes when you have a few strategies that can help make meal prep easier and the results more enjoyable.
Eat better with veggies. If eating better is your goal, explore veggie-based recipes that are hearty and filled with nutrients and vitamins. This Brown and Wild Rice Bowl with Veggie Burger is perfect for a meatless Monday or any other day when you need a fast, filling and flavorful meal in short order. If you don't have veggie burgers at home, or simply prefer a meat-based option, a cooked frozen beef patty is a good time-saving alternative.
Make simple swaps for variety. When you find a dish that's easy and tasty, you may find yourself falling back on the same thing again and again. Prevent taste bud boredom by mixing up your ingredients. You can transform a rice-based recipe by changing up the veggies, cheese, dressing and other toppings. Try pickled jalapenos for spice. Add corn if you like things sweet. Swap a creamy dressing with a zesty vinaigrette for fewer calories and a whole new taste.
Shop for convenience. Takeout may let you skip prep time completely, but you can easily make versions of many favorite to-go meals at home in just a few minutes. This Beef and Broccoli Garlic Rice uses perfectly portioned Minute Ready to Serve microwavable rice cups that help you put together a delicious lunch or dinner without measuring or overeating. Choosing products like portion-controlled rice and other ready-to-serve ingredients can help shave time off your prep work.
Tempt your taste buds with more convenient meal ideas at minuterice.com.
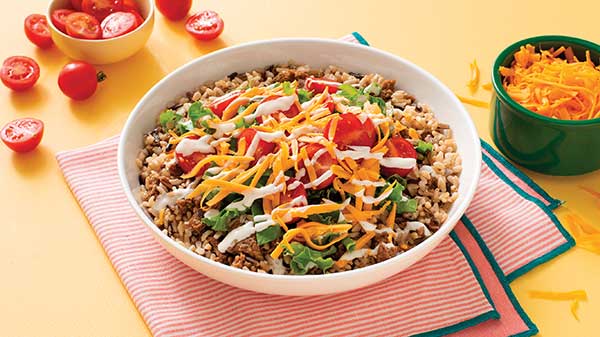
Brown and Wild Rice Bowl with Veggie Burger
Prep time: 5 minutes
Servings: 1
- 1 cup Minute Ready to Serve Brown and Wild Rice
- 1 precooked veggie burger patty
- 1/2 cup shredded lettuce
- 1/2 cup halved grape tomatoes
- 2 tablespoons shredded cheddar cheese
- 2 tablespoons ranch dressing
- Prepare rice according to package directions.
- Break veggie burger into large chunks and place in small, microwave-safe bowl. Microwave on high 60-90 seconds, or until veggie burger is heated through.
- Toss together rice and veggie burger. Top with lettuce, tomatoes and cheese. Drizzle with ranch dressing.
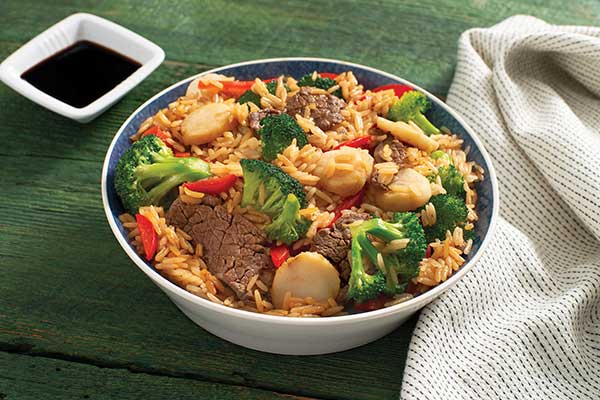
Beef and Broccoli Garlic Rice
Prep time: 5 minutes
Servings: 1
- 1 cup Minute Ready to Serve Garlic and Olive Oil Jasmine Rice
- 1/2 cup fresh broccoli florets
- 1/2 cup sliced red bell pepper
- 2 tablespoons diced water chestnuts
- 3 ounces cooked beef, sliced into strips
- 3 tablespoons teriyaki glaze
- soy sauce (optional)
- Heat rice according to package directions.
- In large, microwave-safe bowl, combine broccoli, bell pepper and water chestnuts. Microwave on high 1 minute. Add beef and microwave on high 1 minute.
- Stir in glaze and rice. Top with soy sauce, if desired.
Source: Minute Rice

Put a Zesty Spin on Weeknight Meals
(Family Features) Dinner in many households means foolproof recipes that families can count on, but those can become bland and boring. Finding new ways to put a twist on meals throughout the week adds fun to time spent in the kitchen while bringing new flavor to the table.
To help reinvigorate traditional weeknight dinners, chef Bobby Flay and Hidden Valley Ranch created the three-part Hidden Valley Ranch Night! series to debut dishes that bring bold flavor to traditional meals, such as these recipes for Ranch Crusted Burgers with Avocado Ranch Sauce and Ranch Seasoned Chicken and Mushroom Quesadillas with Tomato Salsa and Sour Cream. The series will provide a spin on weeknight staples to showcase the simplicity, versatility and zesty flavor of ranch seasoning when used to create family-friendly dinners any night of the week.
Find more information, including series episodes and additional recipes, at hiddenvalley.com/ranch-night.
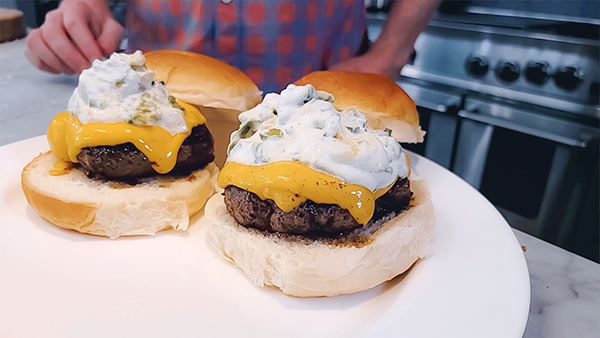
Ranch Crusted Burgers with Avocado Ranch Sauce
Servings: 4
Avocado Ranch Sauce:
- 1/4 cup mayonnaise
- 1/4 cup sour cream
- 1 tablespoon well-shaken buttermilk
- 1/2 teaspoon Hidden Valley Ranch Seasoning
- kosher salt
- freshly ground black pepper
- 3 green onions, thinly sliced
- 2 avocados, peeled, pitted and diced
Ranch Spice Crusted Burger:
- 1 1/2 teaspoons Hidden Valley Ranch Seasoning
- 1 teaspoon paprika
- kosher salt
- freshly ground pepper
- 1 1/2 pounds ground chuck (80% lean)
- 2 tablespoons canola oil
- 8 slices American cheese
- 1/4 cup water
- 4 brioche buns, split in half
- Avocado Ranch Sauce
- To make avocado ranch sauce: In bowl, whisk mayonnaise, sour cream, buttermilk, ranch seasoning, salt and pepper until smooth. Fold in green onions and diced avocados; set aside.
- To make burgers: In small bowl, whisk ranch seasoning, paprika, salt and pepper.
- Heat large cast-iron pan or griddle over high heat. Divide meat into four 6-ounce patties and make deep depression in centers with thumb. Season each with spice rub on one side.
- Add canola oil to pan and heat until shimmering. Place on burgers in pan, spice side down, and cook until golden brown and lightly charred, 4 minutes. Turn burgers over and cook 4 minutes, or until they reach desired doneness.
- Top each burger with two slices cheese. Add water to pan and cover tightly with lid 10 seconds, or until the cheese is melted.
- Place burgers on bottom buns and top each with avocado ranch sauce and top buns.

Ranch Seasoned Chicken and Mushroom Quesadillas with Tomato Salsa and Sour Cream
Servings: 4
Tomato Salsa:
- 4 plum tomatoes, seeded and finely diced
- 1/2 small red onion, finely diced
- 1/2 jalapeno, finely diced
- 1 lime, juice only
- 2 tablespoons olive oil
- 3 tablespoons fresh basil, finely chopped into ribbons
- kosher salt
- freshly ground black pepper
Quesadillas:
- 2 tablespoons canola oil
- 1 1/2 pounds cremini or button mushrooms, thinly sliced
- 2 teaspoons Hidden Valley Ranch Seasoning, divided
- 12 flour tortillas (6 inches)
- 2 cups shredded Monterey Jack cheese
- 16 ounces roasted or rotisserie chicken, shredded
- kosher salt
- freshly ground black pepper
- canola oil
- 1/2 cup sour cream
- tomato salsa
- 2 tablespoons fresh basil, chopped
- To make tomato salsa: In medium bowl, combine tomatoes, red onion, jalapeno, lime juice, olive oil and basil; season with salt and pepper. Refrigerate until ready to use.
- To make quesadillas: Preheat oven to 450 F.
- In large saute pan over medium-high heat, heat oil. Add mushrooms and season with 1 1/2 teaspoons ranch seasoning. Cook until mushrooms are golden brown and liquid has evaporated. Set aside to cool.
- Place tortillas next to each other on baking sheet. Sprinkle thin layer of cheese on eight tortillas. Add cooled mushrooms to four tortillas and shredded chicken to other four tortillas. Season each layer with salt and pepper. Stack tortillas to create four, two-layer quesadillas. Cover each with remaining tortillas; brush top tortillas lightly with canola oil and sprinkle with remaining ranch seasoning.
- Bake 6-8 minutes until cheese is melted and tortillas turn lightly golden brown with crispy edges.
- Cut each quesadilla into four pieces. Garnish each slice with dollop of sour cream. Add dollop of tomato salsa on top of sour cream and garnish with basil.
Source: Hidden Valley Ranch