
Get Creative with Easter Sweets
(Family Features) Holiday hams and deviled eggs may take center stage at Easter gatherings, but edible crafts offer a reminder of the magic of the season that’s found in moments spent together. Simple recipes that call for a dose of creativity are perfect ways to bring the kids to the kitchen, made even easier when all that work leads to sweet treats.
While plastic eggs may have led to a decline in good, old-fashioned egg-dyeing, there are still fun ways to bring crafts back to Easter celebrations. Consider these Kids Krafty Easter Cake Pops, which call for little ones to help dip seasonal shapes in chocolate, use cake molds and more.
Children of virtually any age can relish in the joys of using cookie cutters and decorating Easter Sugar Cookies, all with a little supervision and short list of instructions. This version shows how to make the cookies and homemade icing so you can create any color you desire for maximum creativity.
Remember, these delicious crafts don’t have to be perfect – having fun and making memories that last a lifetime are what make Easter truly special.
Visit Culinary.net to find more Easter inspiration and recipes from “Cookin’ Savvy.”
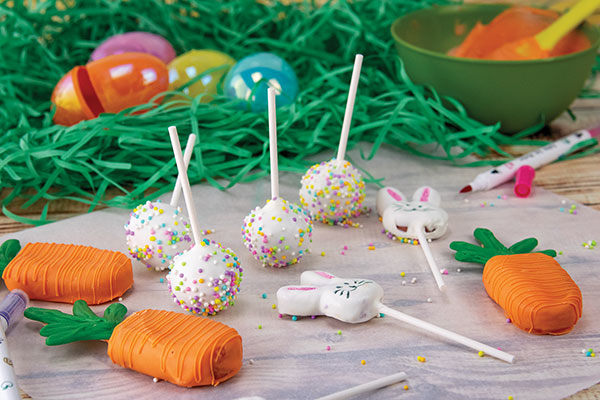
Kids Krafty Easter Cake Pops
Recipe courtesy of "Cookin' Savvy"
- 1 box cake mix
- 1 can frosting
- 1 bunny chocolate mold
- 1 cakesicle mold
- ice pop sticks
- 1 bag white chocolate chips or melting chips
- cake pop sticks
- 1 bag orange melting chips
- 2 tablespoons canola or coconut oil, divided
- 1 bag green melting chips
- pastel sprinkles
- 1 piece hard foam (optional)
- edible markers
- Bake cake according to package instructions and let cool completely.
- Crumble cake and mix with 1/2 can frosting until dough forms. Add more frosting, if needed. Using small cookie scoop, form dough into balls and set aside. Place dough in bunny molds then pop out and set aside with balls. Place dough in cakesicle mold, insert ice pop stick in each slot and freeze 5-10 minutes.
- Melt handful of white melting chips. Stick tip of each cake pop stick in chocolate then insert into every cake ball and bunny until each has one stick. Set aside to dry.
- Remove cakesicles from freezer and pop out of molds. In bowl, melt orange melts then mix in 1 tablespoon oil and transfer to cup. Dip cakesicles and scrape off excess using rim of cup. Place on parchment paper to dry.
- In bowl, melt green melts then place in zip-top or piping bag. Cut tip off bag, pipe carrot leaves onto piece of parchment paper and let dry.
- Melt remaining white melts and mix in remaining oil. Transfer to cup and dip ball-shaped cake pops and bunnies then tap stick on edge of cup to remove excess.
- Over separate bowl, sprinkle ball-shaped pops with pastel sprinkles. To keep ball shape, let dry by sticking in piece of hard foam. Bunnies can dry face side up on parchment paper. After bunnies are dry, use edible markers to make face and color in ears.
- When carrots and leaves are dry, remelt orange melts and place in piping or zip-top bag. Cut off tip and drizzle orange over carrots. Add small line of orange on each ice pop stick and place leaves on each stick. Let dry.
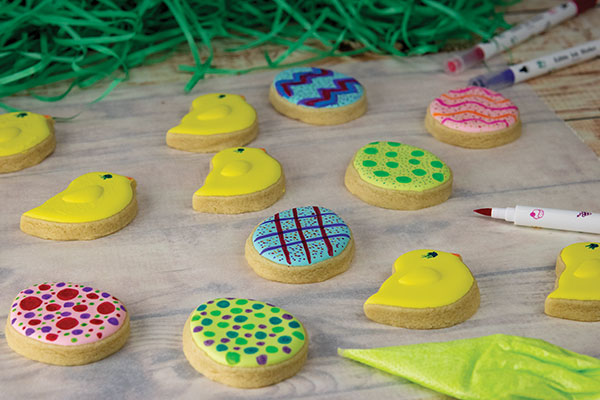
Easter Sugar Cookies
Recipe courtesy of "Cookin' Savvy"
Icing:
- 1/3 cup meringue powder
- 1/2 cup warm water, plus additional for thinning (optional), divided
- 3 tablespoons vanilla
- 1 bag (2 pounds) powdered sugar
- 2 tablespoons corn syrup
- assorted food coloring
Cookies:
- 2 sticks unsalted butter, at room temperature
- 1 cup sugar
- 1 egg
- 1 tablespoon vanilla
- 2 teaspoons baking powder
- 1 dash salt
- 3 cups all-purpose flour
- To make icing: Mix meringue powder, 1/2 cup warm water, vanilla, powdered sugar and corn syrup. Separate into bowls and add food coloring; mix with water, as needed, to thin for piping.
- To make cookies: Heat oven to 350 F.
- Cream butter and sugar. Mix in egg, vanilla, baking powder and salt. Mix in flour 1 cup at a time to form dough. Roll dough out to 1/4-1/2-inch thickness.
- Cut into shapes, place on baking sheet and freeze 10 minutes. Bake 8-12 minutes. Cool completely before icing.
- Place icing in zip-top or piping bags and cut off tips. Put cookies on parchment paper. Trace outline first then fill in middle. Use toothpicks to smooth out.
- Let dry 6 hours and finish decorating with different icing colors or edible markers.
Source: Culinary.net

Peanut Butter Crunch
(Family Features) Adding better-for-you recipes to your family’s menu can be as simple as incorporating protein with ingredients that enhance flavor and nutrition.
For example, this Peanut Butter Crunch is powered by peanuts, a nutrient-rich superfood that delivers 19 vitamins and minerals plus 7 grams of protein per serving. It’s a simple, sweet way to enjoy an at-home dessert without ditching health goals.
Visit gapeanuts.com to find more recipes that pack a protein punch.
Watch video to see how to make this recipe!
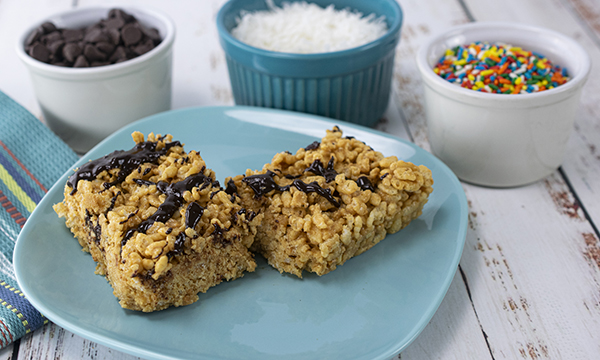
Peanut Butter Crunch
Yield: 2 dozen squares
- 1 cup light corn syrup
- 1 cup granulated sugar
- 1 jar (12 ounces) crunchy peanut butter
- 6 cups crisp rice cereal
- coconut flakes, for topping (optional)
- chocolate chips, for topping (optional)
- melted chocolate, for topping (optional)
- sprinkles, for topping (optional)
- In 2-quart microwave-safe container, stir syrup and sugar.
- Microwave 1 1/2-2 minutes on high, or until sugar is dissolved.
- Stir in peanut butter until well blended.
- Mix in cereal.
- Pour into 8-by-12-inch buttered pan.
- When cooled, cut into squares and top with coconut flakes, chocolate chips, melted chocolate or sprinkles, if desired.
Source: Georgia Peanut Commission

Celebrate Family and Food
(Family Features) Family traditions and in-person connections are important parts of gatherings of loved ones, and many of those get-togethers are centered on food. The entire family coming together around a table covered with warm, delicious food to share stories and create new memories is what makes mealtime special.
Forty chefs from around the nation came together to create “Come to the Table,” which offers a delicious mix of cuisines from a variety of cultures, including this sampling of classic family favorites, sweet indulgences and family-style creations all inspired by what family means to each chef.
“Sales from this book will directly benefit the families we serve, so we are so grateful for each and every chef that has offered their time and talent to this cookbook,” said Jill Cumnock, CEO of Ronald McDonald House of Dallas. “The way ‘Come to the Table’ has been created reminds me of a recipe that culminates in a feast for the senses. We can’t think of a better way to celebrate our 40th anniversary, particularly at a time when families are starting to reunite after the pandemic forced so many apart.”
Visit rmhdallas.org for more information and to order the cookbook.
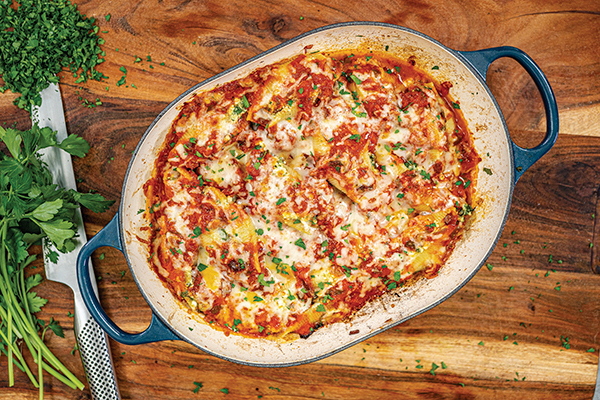
Baked Stuffed Pasta Shells
Recipe courtesy of chef Kevin Curry
Servings: 6-8
- 6 ounces jumbo pasta shells
- 2 tablespoons olive oil
- 1 tablespoon fresh garlic
- 1 medium onion, diced
- 5 portobello mushroom caps, gills removed then diced
- 1 pinch sea salt, plus additional, to taste
- 1 pinch pepper, plus additional, to taste
- 2 cups shredded kale
- 3 tablespoons water
- 15 ounces skim milk ricotta cheese
- 4 tablespoons pesto
- 1 tablespoon The Fit Cook Land spice blend
- 1 1/2 cups reduced-fat marinara, divided
- 1 1/2 cups reduced-fat mozzarella
- fresh herbs, for garnish
Preheat oven to 420 F.
Bring pot of salted water to boil. Cook pasta shells according to package instructions. Drain then set aside.
Heat pot or cast-iron casserole dish over medium heat. Once hot, add oil, garlic, onion and mushrooms. Add pinch of sea salt and pepper as it cooks. Cook until onions turn brown and mushrooms shrink in size, about 3-5 minutes. Empty contents and set aside.
Place pot back over heat. Add shredded kale and water to create steam. Toss kale in pot until it turns vibrant green; set aside to cool.
In large bowl, mix ricotta cheese with mushroom mixture, kale, pesto and spice blend.
In casserole dish, spread about 1/2 cup marinara on bottom. Then one-by-one, stuff each pasta shell with approximately 2 tablespoons ricotta mixture and add to casserole dish. Repeat with remaining shells.
Cover shells with remaining marinara and mozzarella cheese. Cover casserole dish with foil and bake 20 minutes. During final 5 minutes, remove foil so mozzarella can brown.
Garnish with fresh herbs and salt and pepper, to taste.
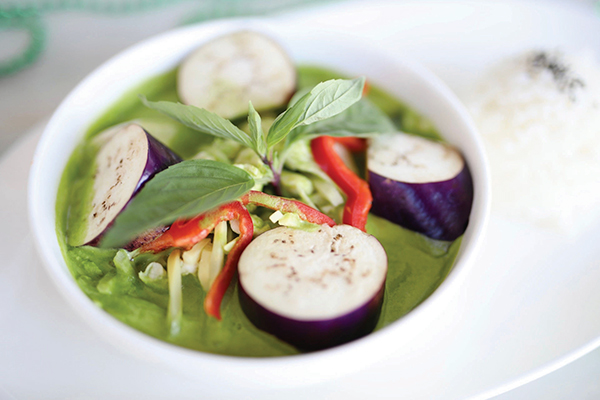
Green Curry
Recipe courtesy of chef Nikky Phinyawatana
Servings: 2
- 2 cups fresh spinach
- 1 cup water
- 1 tablespoon vegetable oil
- 2 tablespoons green curry paste
- 8 ounces skinless, boneless chicken, beef or pork, sliced thin
- 1 small Japanese purple eggplant
- 2 cups coconut milk
- 4 teaspoons granulated sugar
- 1/2 teaspoon salt
- 1/2 cup bamboo shoots, sliced
- 1/4 medium red bell pepper, sliced thin
- 8-10 Thai basil leaves, plus additional, for garnish, divided
- 2 cups cooked jasmine rice
In blender, blend spinach and water until mixture turns green and no leaves are visible.
In medium saucepan over medium-high heat, heat oil. Add green curry paste and stir to release fragrance, about 10 seconds.
Add protein and cook 3-5 minutes.
Add blended spinach water, purple eggplant, coconut milk, sugar and salt. Bring to boil. Add bamboo shoots and red bell pepper. Simmer 10 minutes.
Stir in basil leaves and turn off heat.
Serve with jasmine rice and garnish with additional basil leaves.

Daddy’s Birthday Flan
Recipe courtesy of chef Ninamarie Bojekian Mendoza
Servings: 10-12
Caramel Sauce:
- 1 cup granulated sugar
- 1/4 cup water
Cake:
- 1 1/2 cups all-purpose flour
- 1 teaspoon baking powder
- 1/4 teaspoon baking soda
- 1/4 teaspoon salt
- 3/4 cup unsalted butter, at room temperature
- 3/4 cup granulated sugar
- 2 large eggs
- 1/2 teaspoon vanilla extract
- 3/4 cup buttermilk
- 3 tablespoons rainbow sprinkles (optional)
Flan:
- 4 large eggs
- 1 can (14 ounces) sweetened condensed milk
- 1 can (12 ounces) evaporated milk
- 1 tablespoon vanilla extract
- ground cinnamon, to taste
- In saucepan, heat granulated sugar and water over medium-low heat until melted.
- Preheat oven to 350 F.
- Grease and flour 9-inch Bundt pan. Set aside.
- When sugar liquifies and turns golden brown, remove from heat and use silicone spatula or whisk to stir. While stirring, quickly pour into prepared Bundt pan.
- To make cake: In large bowl, sift flour, baking powder, baking soda and salt. Set aside.
- In another bowl, use hand mixer on medium speed to beat butter and sugar, about 3 minutes, until fluffy. Add eggs and vanilla. Beat well.
- On low speed, gradually beat in flour mixture and buttermilk until combined.
- Fold in rainbow sprinkles, if desired.
- Pour batter into pans over caramel sauce.
- To make flan: In blender on high speed, blend eggs, sweetened condensed milk, evaporated milk and vanilla until well combined.
- Gently pour through strainer and onto prepared cake batter.
- Sprinkle cinnamon on top.
- Place pan in water bath by putting it in larger baking dish, roasting pan, hotel pan or similar. Pour hot water halfway up sides to create water bath.
- Bake approximately 1 hour. Cake should be golden brown and jiggle when shaken when done.
- Remove cake from water bath and cool on rack 10 minutes.
- Run knife or spatula carefully around edges to separate. Place plate on top of cake and, while holding it, flip over carefully and quickly.
- Refrigerate at least 1 hour or overnight before serving.
Photo courtesy of Ink Phinyawatana (Green Curry)
Source: Ronald McDonald House of Dallas

Popping Up Festive Holiday Fun
(Family Features) During a holiday season that may not quite feel the same for many families, you can add a magic touch to at-home festivities with activities and treats that get everyone involved. Creating decorative holiday sweets allows little ones and grown-ups alike to take part in the fun, and the end result is delicious desserts for all to enjoy.
Start with a main ingredient like whole-grain, freshly popped popcorn. At 30 calories a cup, it’s naturally low in fat, non-GMO and gluten-free for a nutritious alternative to traditional holiday indulgences. It’s a clever way to create artsy representations of the season at hand that celebrate festive flavors like peppermint, coconut, chocolate and other sweet eats.
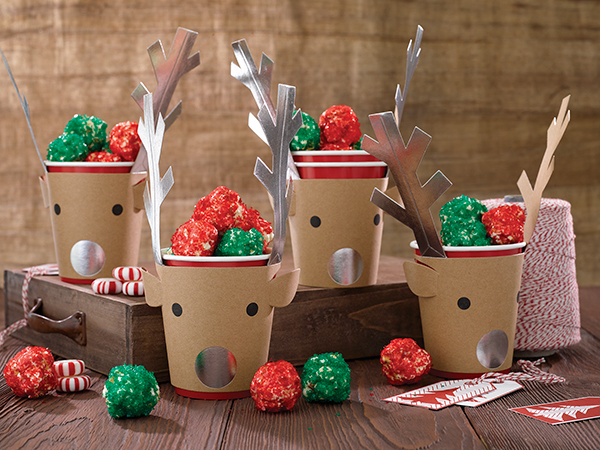
For example, Coconut Popcorn Snowballs add fun and flavor to wintertime with a coat of sweetened coconut “snow” and candy cane handle while easy-to-construct Holiday Popcorn Snowmen are sure to be a hit with your children. Add to the holiday spirit throughout your home with wintery Jingle Balls that call for colored sugars to create a magical sparkling effect then take the creativity to the next level by encouraging kids to make their own red-nosed, sleigh-pulling team of Chocolate Popcorn Reindeer.
Discover more decorative dessert recipes at popcorn.org.
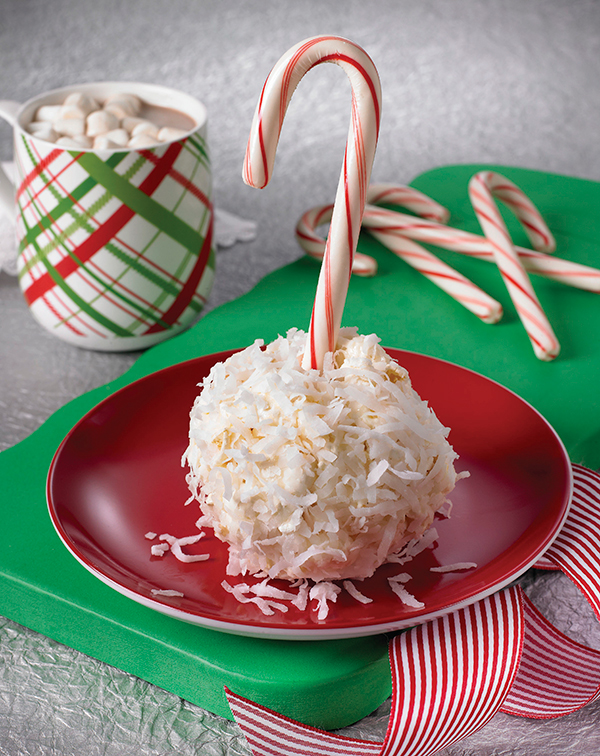
Coconut Popcorn Snowballs
Yield: 8 balls (4 inches)
- 2 cups shredded or flaked sweetened coconut
- nonstick cooking spray
- 3 quarts popped popcorn
- 4 tablespoons (1/2 stick) butter or margarine
- 3 cups miniature marshmallows
- 1 teaspoon coconut or vanilla extract
- 8 candy canes or candy cane sticks (about 3-4 inches)
- Place large sheet wax or parchment paper over work surface. Spread coconut on paper.
- Spray large mixing bowl lightly with nonstick cooking spray and place popcorn inside.
- In medium saucepan, melt butter over low heat. Stir in marshmallows until melted and mixture is smooth. Pour over popcorn and mix well until coated.
- Spray hands with cooking spray and press mixture firmly to form into balls. Place balls on coconut; roll and press coconut to coat. While holding popcorn balls, gently press candy cane into each ball.
- Serve immediately or wrap individually in plastic wrap for storage.
Jingle Balls
Yield: 12 cups
- Nonstick cooking spray
- 12 cups popped popcorn
- 6 tablespoons butter or margarine
- 3 cups mini marshmallows
- 1/2 teaspoon peppermint extract
- assorted colored sugars
- Spray large mixing bowl lightly with nonstick cooking spray. Add popcorn.
- Spread plastic wrap on cookie sheet; set aside.
- In medium saucepan, melt butter and marshmallows; stir until mixture is smooth. Stir in peppermint extract. Pour over popcorn, mixing until well coated. Let cool 2 minutes.
- Spray hands with nonstick cooking spray and form popcorn mixture into 3-inch balls. Gently press colored sugar onto balls. Let sit on prepared cookie sheet until cool and set.

Chocolate Popcorn Reindeer
Servings: 8
- 8 cups unsalted, unbuttered, popped popcorn
- 2 1/2 cups mini marshmallows
- 1/2 cup chopped dark chocolate or dark chocolate chips
- 2 tablespoons butter or light olive oil
- 1/4 teaspoon salt
- 16 pretzel sticks
- 16 eyeball candies
- 8 red candy-coated
- chocolate candies
- Place popcorn in large mixing bowl.
- In saucepan over medium heat, heat marshmallows, chocolate, butter and salt, stirring often, until smooth. Toss marshmallow mixture with popcorn until well combined.
- Scoop 3/4 cup popcorn mixture into ball. Repeat with remaining mixture to make eight balls. Place each ball in paper muffin cup liner.
- Insert one pretzel stick on each side of ball to resemble antlers, attach two eyeball candies for “eyes” and one red chocolate candy for “nose.” Repeat with remaining balls. Let cool completely.
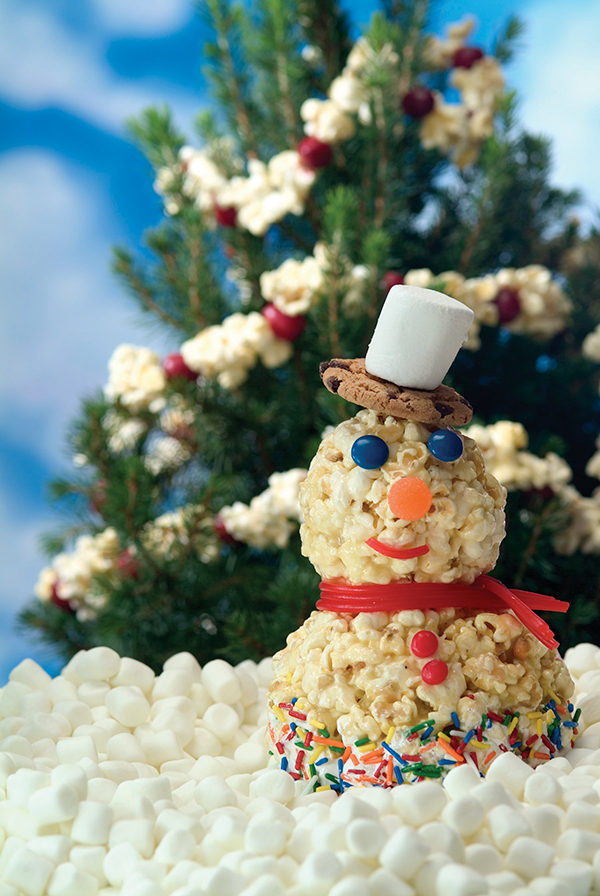
Holiday Popcorn Snowmen
Yield: 5 snowmen
- 1 package (1 pound) large marshmallows
- 1/4 cup (1/2 stick) butter or margarine, plus additional for greasing hands
- 1 teaspoon vanilla
- 10 cups popped popcorn
- sprinkles (optional)
- licorice (optional)
- gum drops (optional)
- cinnamon candies (optional)
- In large saucepan, melt marshmallows and 1/4 cup butter. Remove from heat and stir in vanilla. Let stand 5 minutes.
- Pour marshmallow mixture over popcorn and stir. Butter hands well and form into balls.
- Decorate with sprinkles, licorice, gum drops and cinnamon candies, if desired.
Popcorn Board

Add Fruity Flavor and Fun to Holiday Desserts
(Family Features) Making the holiday season special is an important tradition for many families, and it’s likely to take on heightened importance this year with gatherings, celebrations and festivities taking on a different look than years past. One family-favorite way to create holiday magic is through delicious desserts that can be made and enjoyed together.
Don’t be afraid to try something new this year by turning to foods typically associated with warmer weather. For example, watermelon is available year-round and makes a surprisingly nutritious, flavorful addition to your seasonal spread, whether it’s the main ingredient or included in recipes from entrees to sides and drinks to desserts.
For a kid-friendly, tasty treat, ask your little ones to help make these Holiday Watermelon Cutouts. Because they only require a few ingredients and plenty of creativity, they’re perfect for getting the whole family involved. Or try this Watermelon and Blueberry Cheesecake as the highlight at your dessert table with its creamy, fruity flavor and eye-popping looks.
To find more holiday dessert solutions and other sweet recipe ideas, visit watermelon.org.
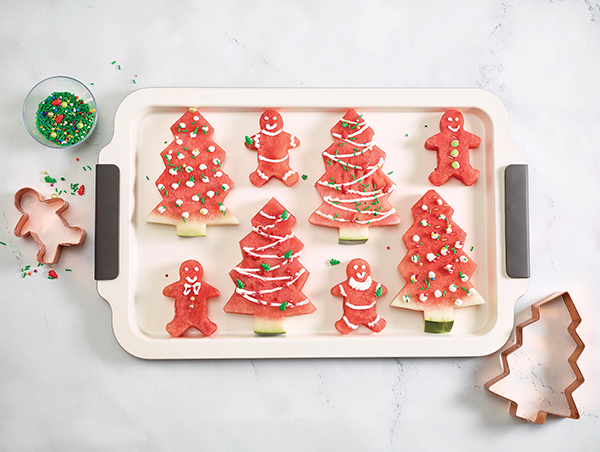
Holiday Watermelon Cutouts
Recipe courtesy of the National Watermelon Promotion Board
- 1/2 watermelon, cut into 1/2-inch thick disks
- vanilla frosting or yogurt
- sprinkles, for decorating
- Using holiday cookie cutters, cut shapes out of watermelon disks.
- Decorate watermelon shapes with yogurt.
- Top with sprinkles.

Watermelon and Blueberry Cheesecake
Recipe courtesy of the National Watermelon Promotion Board
Servings: 12
Cheesecake:
- Nonstick cooking spray
- 1/3 cup graham cracker crumbs (2 graham crackers)
- 24 ounces fat-free cream cheese, at room temperature
- 8 ounces low-fat cream cheese, at room temperature
- 1 cup white sugar
- 3/4 cup no-calorie sugar substitute
- 3/4 cup fat-free half-and-half
- 1/4 cup fresh lemon juice
- 2 tablespoons lemon peel, finely grated
- 2 teaspoons vanilla extract
- 1 1/2 cups liquid egg substitute (equivalent of 6 eggs)
Watermelon-Blueberry Sauce:
- 3 cups watermelon juice, with pulp
- 6 teaspoons cornstarch
- 6 tablespoons lemon juice
- 3 tablespoons sugar
- 3 tablespoons no-calorie sugar substitute
- 1-1 1/2 teaspoons lemon extract
- 2 cups diced watermelon
- 3 cups blueberries
- To make cheesecake: Preheat oven to 350 F.
- Spray bottom and sides of 9-inch springform pan. Sprinkle graham cracker crumbs in pan and tilt to spread evenly over bottom and sides, leaving extra crumbs on bottom.
- Using electric mixer, beat fat-free cream cheese, low-fat cream cheese, sugar and sugar substitute until creamy and well-blended. Slowly add half-and-half, lemon juice, lemon peel and vanilla; continue beating. Add egg substitute until mixture is thoroughly blended and creamy. Pour into crumb-lined pan.
- Place springform pan in large roasting pan. Pour enough water into roasting pan to come halfway up sides of springform pan. Bake cheesecake until firm, slightly golden and top is cracked, about 1 hour, 25 minutes. Remove springform pan from water and refrigerate, uncovered, until cold, about 3 hours or overnight.
- To make watermelon-blueberry sauce: In blender, whip watermelon juice, cornstarch, lemon juice, sugar and sugar substitute until smooth. Pour into small saucepan over medium-high heat and bring to gentle boil until topping begins to thicken. Remove from heat and place in refrigerator to cool. Just before serving, add lemon extract, diced watermelon and blueberries; stir to thoroughly blend.
- To serve, run knife around sides of cheesecake and remove springform pan sides. Top each slice with generous helping of watermelon-blueberry sauce.

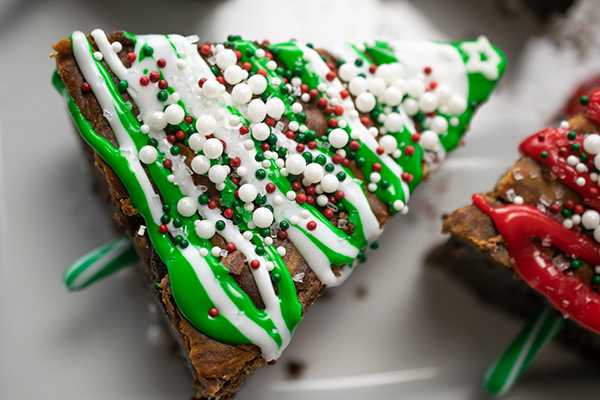
Christmas Tree Cheesecake Brownies
(Family Features) Festive fun and baking holiday treats go hand-in-hand, and these Christmas Tree Cheesecake Brownies provide a perfect way to enjoy a holiday tradition in the kitchen with loved ones.
Decorate your own version using green and white frosting, sprinkles of your choice and candy canes for “stumps” in the tree-shaped sweets.
Visit milkmeansmore.org to find more holiday inspiration.
Watch video to see how to make this recipe!
Christmas Tree Cheesecake Brownies
Recipe courtesy of Jenn Fillenworth of “Jenny with the Good Eats” on behalf of Milk Means More
Prep time: 10 minutes
Cook time: 30 minutes
Servings: 16
- Nonstick cooking spray
Cheesecake Batter:
- 8 ounces low-fat cream cheese, at room temperature
- 1/3 cup granulated sugar
- 2 eggs
- 1 tablespoon all-purpose flour
Brownie Batter:
- 1 cup all-purpose flour
- 1/2 cup cocoa powder
- 1/2 teaspoon salt
- 1 cup granulated sugar
- 1/4 cup vegetable oil
- 1/4 cup milk
- 2 eggs
- 1 teaspoon pure vanilla extract
Decorations:
- green frosting
- white frosting
- assorted sprinkles
- star-shaped sprinkles
- candy canes
- Preheat oven to 350 F.
- Coat 8-inch square baking pan with nonstick cooking spray; set aside.
- To make cheesecake batter: Place cream cheese in bowl of stand mixer. Beat at medium speed until smooth and creamy. Add sugar and beat well. Add eggs, one at a time, beating well after each addition. Add flour and beat mixture until blended.
- To make brownie batter: In medium bowl, whisk flour, cocoa powder and salt until combined. In separate bowl, whisk sugar, oil, milk, eggs and vanilla until well combined. Add wet ingredients to dry ingredients and mix until blended.
- Pour brownie batter evenly into prepared pan.
- Carefully pour cheesecake batter over top, spreading evenly. Carefully swirl layers together using knife tip.
- Bake 30 minutes until brownies are set.
- Cool brownies completely in pan on wire rack before cutting into triangle pieces.
- Decorate trees by piping green and white frosting. Top with assorted sprinkles and star-shaped sprinkles. Place 3-inch candy cane pieces in bottoms of brownies for stumps.
Source:

Crazy Candy Ice Cream Sandwiches
(Family Features) Letting kids get hands-on in the kitchen is an easy way to keep them busy while teaching important life skills. Planning for delicious snacks children can make all on their own (or with minimal assistance) makes for a winning solution, and these Crazy Candy Ice Cream Sandwiches are a prime example. Find more kid-friendly snack ideas at milkmeansmore.org.
Watch video to see how to make this recipe!
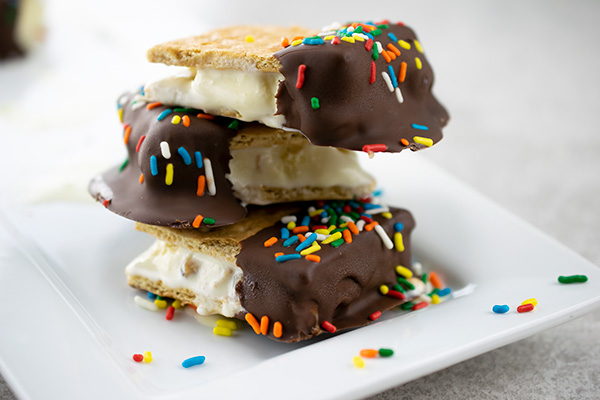
Crazy Candy Ice Cream Sandwiches
Prep time: 10 minutes
Servings: 6
- 1 cup vanilla ice cream
- 1/4 cup chopped candy bar
- 6 graham cracker sheets, broken into 12 squares
- 1/2 cup semisweet chocolate morsels
- 1 1/2 tablespoons refined coconut oil or vegetable oil
- multi-colored sprinkles (optional)
- In medium bowl, stir ice cream until just softened. Stir in chopped candy.
- Working quickly, scoop ice cream mixture onto six graham cracker squares. Top with remaining graham cracker squares, gently pressing down until ice cream reaches edges of crackers. Place in shallow, wax paper-lined pan. Freeze 1 hour.
- In small, microwave-safe bowl, combine chocolate morsels and coconut oil. Microwave on high 40-60 seconds, or until melted, stirring vigorously every 20 seconds. Let stand at room temperature 10 minutes.
- Remove sandwiches from freezer. Dip half of each sandwich into chocolate mixture. Immediately scatter sprinkles over chocolate, if desired. Return to wax paper-lined pan. Freeze about 5 minutes, or until chocolate sets. Serve immediately or individually wrap in plastic wrap and store in freezer.

A Tasty Holiday Treat
(Family Features) When family and friends come together in celebration of the holiday season, tasty treats are a must-have for the festivities. You can also celebrate the season of giving with a special giveaway at the end of your gathering to show your gratitude to loved ones.
A simple yet delicious treat, Chocolate Bacon Bark is a sweet-and-salty snack with Gwaltney Bacon as the centerpiece of a crowd-pleaser for nearly any celebration. Try pairing with these creative giveaway bags as a personalized memento to offer a unique memory even after the season comes to a close. The bite-sized morsels are also perfect for individual grab bags by the door as guests make their way home following holiday celebrations.
Visit gwaltneyfoods.com for more holiday recipe ideas.
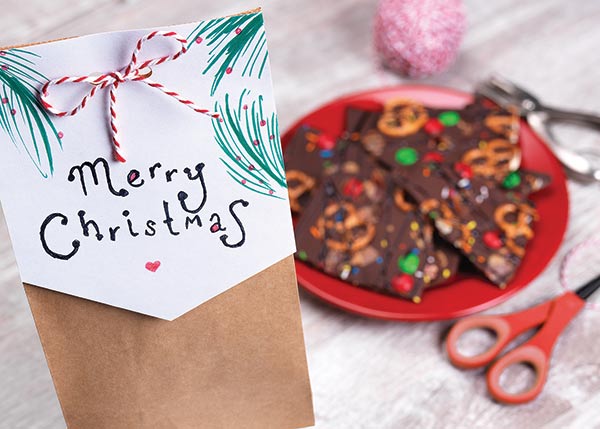
Chocolate Bacon Bark and Giveaway Bags
Prep time: 10 minutes
Servings: 24
Chocolate Bacon Bark:
- 1 bag (12 ounces) chocolate candy melts
- 1 package (12 ounces) Gwaltney Bacon
- toppings such as pretzels, candies and sprinkles (optional)
Giveaway Bags:
- Scissors
- Card stock or construction paper
- 24 brown paper lunch bags
- Coloring or drawing materials
- Hole puncher
- Ribbon
- To make Chocolate Bacon Bark: Line baking sheet with parchment paper. In bowl, melt chocolate candy in microwave in 30-second increments; stir every 30 seconds.
- Pour chocolate into pan and spread evenly.
- Top with bacon and pretzels, candies and sprinkles, if desired; freeze until hardened (about 12 hours).
- Break into bite-sized pieces.
- To make Giveaway Bags: Using scissors, cut one piece of card stock or construction paper to match width of paper bag.
- Cut length of card stock or construction paper into “V” shape so point comes about 3/4 down bag.
- Decorate card stock or construction paper with sayings or drawings.
- Stuff paper bag with Chocolate Bacon Bark.
- Hold decorated card stock or construction paper to top of paper bag, “V” shape pointed down, and punch two centered holes about 1/2 inch from top and 1/2 inch away from each other.
- Using scissors, cut one piece of ribbon about 6 inches long.
- With holes aligned and decorated card stock or construction paper facing out, insert end of ribbon from back side of bag; tie loose enough knot or bow so paper bag doesn’t rip.
- Repeat process with remaining bags.
Source: Gwaltney

Forecast: Showers
(Family Features) These, though, are happy showers filled with good wishes, gifts and a celebration of events to come, like weddings or babies.
Such special occasions deserve special food, says Nancy Siler, vice president of consumer affairs and public relations at Wilton. She suggests cupcakes for dessert, but not just any cupcake. These are unique - shower-ready, decorated theme-appropriately with umbrellas.
They can be prepared from a mix or from scratch and baked and served in color-coordinated silicone baking cups. Siler suggests incorporating a grouping of cupcakes as part of the shower décor. Use them as the table centerpiece, arranged on a tray, or a tiered cupcake stand. Or if it's a sit-down meal, place a cupcake at each setting.
Construct the umbrella decorations from ready-to-use fondant that is tinted in the colors selected for the occasion. Step-by-step instructions ensure foolproof results, plus they can be made several days in advance, so on party day there's no last-minute mad rush. Cupcakes can be baked, iced and sprinkled a day in advance. Place the umbrellas on the mini cakes the day of the party.
Umbrellas in place, let the showers begin!
For additional shower and party ideas, baking and decorating tips or to order supplies, visit www.wilton.com.

Ready for Showers
Each serves 1
- 1 package (24 ounces) White Ready-To-Use Rolled Fondant
Rose, Royal Blue, Lemon Yellow Icing Color
Round Fondant Cut-Outs
Lollipop Sticks
Fondant Adhesive* - 1 package (about 18 ounces) cake mix, any flavor
Water, vegetable oil and eggs to prepare cake mix - 1 can (16 ounces) White Decorator Icing
Heart Drops Sprinkles
- Several days in advance, tint fondant rose, blue and yellow; roll out 1/8-inch thick. Cut circles using largest Round Cut-Out; cut across circle, slightly more than halfway. Using smallest Round Cut-Out, cut scalloped edge; with spatula, score umbrella rib lines. Let dry on waxed paper covered cake boards. Reserve remaining tinted fondant. Attach dried fondant pieces to lollipop sticks with Fondant Adhesive. Roll a 1/4-inch ball of matching fondant; attach to umbrella top with adhesive. Let dry.
- Preheat oven to 350°F. Prepare cake mix following package instructions; place batter in Pastel Silicone Baking Cups supported by cookie sheet. Bake 18-20 minutes or until toothpick inserted in center comes out clean; cool completely. Ice cupcakes smooth with icing; sprinkle with Heart Drops. Insert fondant umbrella. If desired, tie ribbon around stick.
* To make Fondant Adhesive for attaching dried fondant decorations to lollipop sticks, knead 1/4 teaspoon water into 1 ounce (1-1/2-inch ball) rolled fondant until it becomes soft and sticky. Apply to fondant decoration with brush or place in decorating bag and pipe it onto decoration.
Source: Wilton Products