
Mother's Day Delights
(Family Features) The Mother's Day brunch is arranged, the cards and flowers are picked out - now it's time to make a show-stopping dessert that will truly make her day. And it's easier than you might think.
When looking for the perfect way to treat mom on Mother's Day, try a simple search on Bing.com. Bing makes it easy to find recipes by meals, convenience, or even ingredients to find just the right recipe - like cheesecake, pie or blackberry cobbler - to truly delight the special mom in your life.
Show your mom just how much she means to you by making her something special and giving her a Mother's Day she won't forget. Here are three delicious ideas.
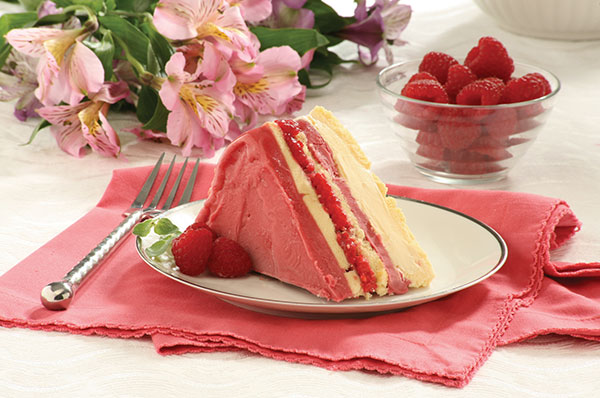
Frozen Raspberry Layer Cake
From Country Living
Prep Time: 20 minutes (not counting freezing times)
Total Freezing Time: 4 hours+
Servings: 8 to 10
- 2 10 3/4-ounce frozen pound cakes, crusts removed, sliced into 1/4-inch-thick slices
- 3 cups vanilla ice cream, slightly softened
- 4 cups raspberry sorbet, slightly softened
- 1 pint fresh raspberries, rinsed and picked over
- 3 tablespoons Chambord, or other raspberry-flavored liqueur
- Prepare the pan: Trace and cut out a 9-inch circle from parchment paper and fit it into the bottom of a 9-inch springform pan.
Cut out a 3- by 27-inch strip of parchment and fit around inside of pan. Tape to secure parchment paper and set aside. - Assemble the cake: Cover bottom of pan with a single layer of pound cake slices and spread ice cream evenly over cake. Freeze until ice cream hardens - about 25 minutes.
- Spread 2 cups sorbet over ice cream, followed by another layer of pound cake slices. Return cake to freezer for 10 minutes.
- Combine raspberries and Chambord together in small bowl. Remove cake pan from freezer and place berries evenly over cake.
- Top with a final layer of pound cake and remaining sorbet. Wrap tightly with plastic wrap and freeze until firm - at least 4 hours.
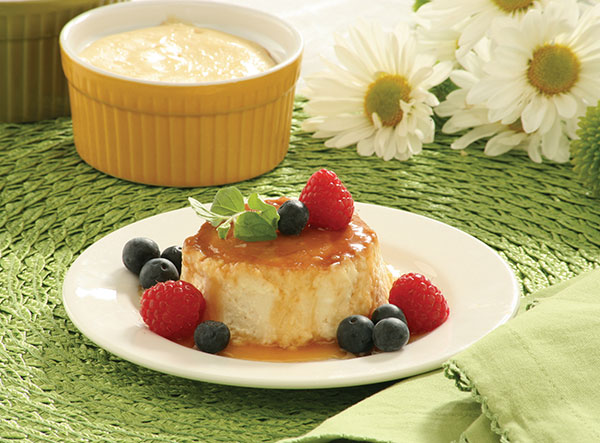
Upside-Down Honey Cheesecakes
From Bon Appétit
Prep Time: 25 minutes
Cook Time: 35 minutes
Chilling Time: 1 hour+
Servings: 12
- 1 cup sugar
- 1/3 cup honey
- 1/4 cup (1/2 stick) unsalted butter
- 1/3 cup water
- 3 8-ounce packages cream cheese, room temperature
- 2/3 cup (packed) golden brown sugar
- 1 cup sour cream
- 2 teaspoons fresh lemon juice
- 2 teaspoons vanilla extract
- 4 large eggs, room temperature
- Assorted fresh berries (for garnish)
- Preheat oven to 300°F. Butter twelve 3/4-cup ramekins or custard cups.
- Place 1 cup sugar, honey, and butter in heavy medium saucepan. Stir over medium heat until butter melts and mixture is blended.
Increase heat to medium-high and bring to boil. Whisk until mixture darkens slightly and candy thermometer registers 300°F, about 5 minutes. - Remove from heat; add 1/3 cup water (mixture will bubble vigorously); whisk to blend. Divide topping among ramekins (about 2 tablespoonfuls for each). Divide ramekins between 2 roasting pans and chill while preparing filling.
- Using on/off turns, blend cream cheese and brown sugar in processor, scraping bowl occasionally. Add sour cream, lemon juice, and vanilla; process until smooth. Add eggs 1 at a time, processing just to blend between additions. Divide filling among ramekins.
Add enough hot water to pans to come halfway up sides of ramekins. - Bake cheesecakes until set, about 35 minutes. Remove from roasting pans and chill until firm, about 1 hour. DO AHEAD: Can be made 2 days ahead. Cover and keep chilled.
- Run thin knife around sides of ramekins. Invert onto plates, scooping any remaining topping from ramekins over cheesecakes. Garnish with berries.

Strawberry Shortcake Cupcakes
From Redbook
Prep Time: 25 minutes
Cook Time: 24 minutes
Servings: 12
- 1 1/3 cups all-purpose flour
- 1/2 teaspoon baking powder
- 1/2 teaspoon baking soda
- 1/4 teaspoon salt
- 1/2 cup unsalted butter, softened
- 2/3 cup granulated sugar
- 2 large eggs
- 1 1/2 teaspoons vanilla extract
- 2/3 cup sour cream
Topping
- 1 quart strawberries, hulled, thickly sliced
- 1/3 cup granulated sugar
- 1 tablespoon lemon juice
- 1 1/2 cups cold heavy cream
- 3 tablespoons confectioners' sugar
- 1 tablespoon vanilla extract
- Heat oven to 350° F. Line 12 standard muffin cups with paper liners.
- In medium bowl, whisk flour, baking powder, baking soda, and salt. In large bowl with mixer on medium, beat butter and sugar until light and creamy. Beat in eggs, 1 at a time, then vanilla. With mixer on low, alternately beat in flour mixture and sour cream until combined. Continue to beat on medium until batter is thick and smooth.
- Spoon batter into a zip-top bag. Snip a 1/2-inch corner from bag and fill liners slightly less than two-thirds full. Bake 24 to 26 minutes, or until lightly golden and a pick inserted in the center of a cupcake comes out clean. Cool in pan on a wire rack 5 minutes; remove cupcakes from pan and cool completely.
- Toss strawberries several times in a bowl with sugar and lemon juice until very syrupy. In large bowl, beat cream, confectioners' sugar, and vanilla until soft peaks form.
- Use a skewer to poke several holes into top of each cupcake. Spoon some syrup from bowl over top, allowing it to absorb into cupcakes. Top with sliced berries and a dollop of cream. Arrange a few sliced berries in cream and drizzle with remaining strawberry syrup.
Source: Bing.com

A Savory Springtime Brunch
(Family Features) Warm breezes, blooming flowers, pretty pastels - when spring is in the air, there's plenty of reason to celebrate. It's the perfect time to bring family and friends together for a welcoming brunch.
When planning your menu, be sure to have plenty of savory dishes on hand to satisfy your guests. And rest easy, you don't have to spend hours in the kitchen to prepare your feast. Using ingredients already full of flavor, such as Johnsonville Breakfast Sausage, lets you create memorable brunch dishes without a lot of work.
These recipes are simple yet satisfying - and leave you plenty of time to enjoy the company gathered around your table.
For more savory brunch recipes, visit www.johnsonville.com.

Amazing Muffin Cups
Prep Time: 20 minutes
Cook Time: 25 minutes
Yield: 12 servings
- 3 cups refrigerated shredded hash browns
- 3 tablespoons melted butter
- 1/8 teaspoon salt
- 1/8 teaspoon pepper
- 12 links Johnsonville Original
- Breakfast Sausage
- 6 eggs
- 2 cups (8 ounces) shredded 4-cheese
- Mexican blend cheese
- 1/4 cup chopped red bell pepper
- Chopped fresh chives or green onions, for garnish
- Place 12 paper liners in a muffin pan; spray liners with cooking spray.
- In bowl, combine hash browns, butter, salt and pepper. Press hash brown mixture into the bottom and up the sides of the muffin cups.
Bake at 400°F for 12 minutes or until lightly browned. - Meanwhile, cook sausage according to package directions; cut into 1/2-inch pieces. Divide sausage between muffin cups.
- Combine eggs, cheese and bell pepper. Pour over sausage. Sprinkle with chives. Bake for 13 to 15 minutes or until set.
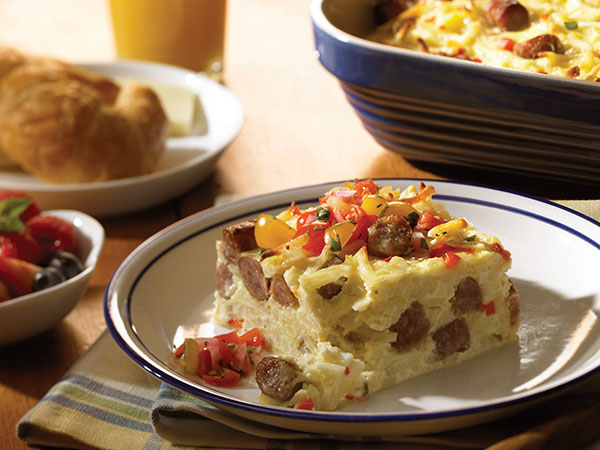
Sunrise Breakfast Casserole
Prep Time: 30 minutes
Bake Time: 70 minutes
Yield: 12 to 15 servings
- 2 packages (12 ounces each) Johnsonville Breakfast Sausage Links
- 9 eggs
- 3 cups milk
- 1 1/2 teaspoons ground mustard
- 1 teaspoon salt
- 1/2 teaspoon pepper
- 2 packages (20 ounces each) refrigerated shredded hash browns
- 2 cups (8 ounces) shredded cheddar cheese
- 1/2 cup diced sweet red pepper
- 1/3 cup thinly sliced green onions
- 2 cups salsa or picante sauce, optional
- Place sausage on a 15 x 10 x 1-inch baking pan. Bake at 375°F for 15 to 20 minutes or until sausage is no longer pink, turning once; drain and slice into 1/4-inch coins.
- In large bowl, combine eggs, milk, mustard, salt and pepper. Add hash browns, sausage, cheese, sweet red pepper and green onions; mix well. Pour into a greased 13 x 9 x 2-inch baking dish. Cover and refrigerate overnight.
- Remove from the refrigerator 30 minutes before baking. Bake, uncovered, at 350°F for 65 to 70 minutes or until set and golden brown.
Let stand 10 minutes before serving. - Serve with salsa or picante sauce if desired.
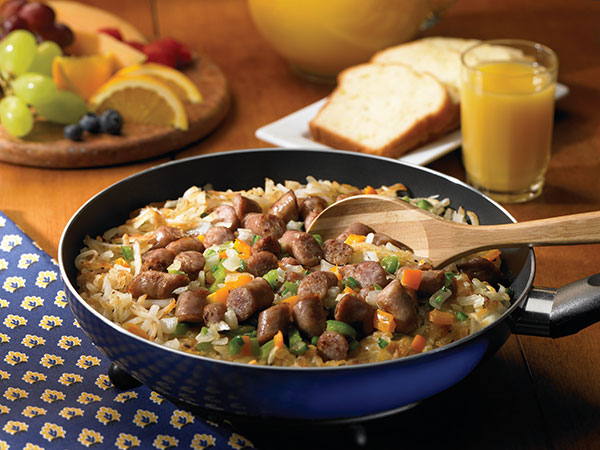
Blue Ribbon Skillet
Prep Time: 15 minutes
Cook Time: 15 minutes
Yield: 3 servings
- 7 links Johnsonville Original Breakfast Sausage
- 3 tablespoons canola oil
- 4 cups refrigerated shredded hash browns
- 1/4 cup chopped onion
- 1/4 cup chopped green pepper
- 1/4 cup chopped orange bell pepper
- 1 jalapeño pepper, seeded and chopped
- 1/8 teaspoon salt
- 1/8 teaspoon pepper
- 1 cup (4 ounces) shredded 4-cheese Mexican blend cheese
- In large skillet, cook sausage per package directions. Cut links into 1-inch pieces and set aside.
- In the same skillet, heat oil over medium-high heat. Add hash browns, onion, green and orange peppers, jalapeños, salt and pepper. Cook for about 10 minutes until hash browns are lightly browned and tender, turning occasionally.
- Return sausage to skillet and sprinkle with cheese. Cover skillet for 2 minutes until cheese is melted.
Option: This recipe can be doubled to make a "2-Skillet Breakfast." Cook sausage in one skillet and hash browns, onion and peppers in another skillet.
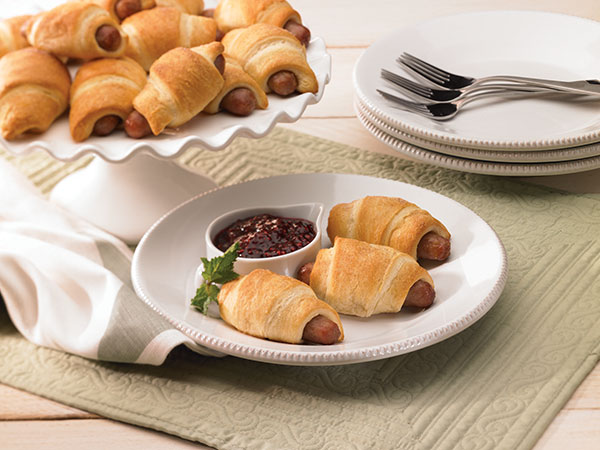
Easy Sausage Roll-Ups
Prep Time: 15 minutes
Cook Time: 15 minutes
Yield: 16 roll-ups
- 1 package (12 ounces) Johnsonville Breakfast Sausage Links
- 2 containers refrigerated crescent rolls (16 rolls total)
- 1/2 teaspoon cinnamon
- 2 tablespoons sugar
- Prepare sausage according to package directions. Drain and set aside.
- Unroll crescent roll dough according to directions on package. Place one cooked sausage onto one end of a dough triangle. Roll dough around sausage according to directions on dough package and place on jelly-roll pan with the seam side down. Repeat with remaining sausage and dough. (You will have 2 extra rolls. Bake and enjoy with jam.)
- Mix cinnamon and sugar together and sprinkle evenly over roll-ups. Bake according to directions on dough package. Serve hot.
Suggestion: Serve with warm maple syrup, honey or your favorite preserves for dipping.
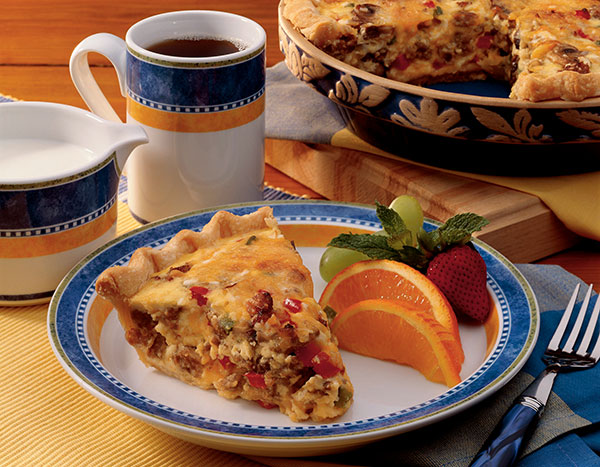
Sausage Mushroom Quiche
Yield: 8 servings
- 1 package (12 ounces) Johnsonville Original Breakfast Sausage Patties
- 1 1/2 cups sliced fresh mushrooms
- 1/4 cup chopped onion
- 1/4 cup chopped sweet red pepper
- 1/4 cup chopped green pepper
- 1 package (3 ounces) cream cheese, softened
- 4 eggs
- 1/3 cup half-and-half cream
- 1 cup (4 ounces) shredded Monterey Jack cheese
- 1 cup (4 ounces) shredded cheddar cheese
- 1/4 teaspoon salt
- 1/4 teaspoon pepper
- Dash ground nutmeg
- 1 pastry shell (9 inches), baked
- In skillet, cook sausage over medium-high heat for 3 minutes, chopping into small pieces. Add mushrooms, onion and peppers. Cook and stir 5 minutes longer or until sausage is no longer pink and the vegetables are tender; drain well and set aside.
- In mixing bowl, beat cream cheese until smooth. Gradually beat in eggs and cream.
- Stir in cheeses, salt, pepper, nutmeg and sausage mixture. Pour into baked pastry shell. Bake, uncovered, at 350°F for 40 to 45 minutes or until a knife inserted near center comes out clean. If necessary, cover edges of crust with foil to prevent over-browning. Let stand 10 minutes before serving.
Source: Johnsonville

Hop into Spring with Easter Desserts
(Family Features) From full-course brunches to simple sit-down dinners, Easter celebrations are a time to enjoy family, friends and the delicious tastes of spring.
However elaborate the festivities, a rich and creamy dessert is the perfect finale to any Easter gathering. Made from fresh milk and real cream, PHILADELPHIA Cream Cheese is the high-quality ingredient that makes sweets stand out.
These fresh dessert ideas all feature everyone's favorite indulgence - cheesecake - along with other lively flavors, such as coconut, lemon and blueberry. Desserts this delicious will have your guests hopping up for seconds. For these and other recipe ideas, visit www.creamcheese.com.

Easter Mini Cheesecakes
Prep time: 20 minutes
Total time: 3 hours, 20 minutes
Servings: 18
- 1 cup graham cracker crumbs
- 3/4 cup plus 2 tablespoons sugar, divided
- 3 tablespoons butter or margarine, melted
- 3 packages (8 ounces each) PHILADELPHIA Cream Cheese, softened
- 1 teaspoon vanilla
- 3 eggs
- 1 cup plus 2 tablespoons BAKER'S ANGEL FLAKE Coconut, toasted
- 54 speckled malted milk eggs (about 9 ounces)
- Heat oven to 325°F.
- Mix graham crumbs, 2 tablespoons sugar and butter; press onto bottoms of 18 paper-lined muffin cups.
- Beat cream cheese, vanilla and remaining sugar with mixer until blended. Add eggs, 1 at a time, mixing on low speed after each just until blended. Spoon over crusts.
- Bake 25-30 minutes or until centers are almost set. Cool completely. Refrigerate 2 hours.
- Top each cheesecake with 1 tablespoon coconut; shape to resemble bird's nest. Fill with malted milk eggs.
Note: To soften cream cheese, place completely unwrapped package of cream cheese in microwaveable bowl. Microwave on high 10 seconds or just until softened. Add 15 seconds for each additional package of cream cheese.
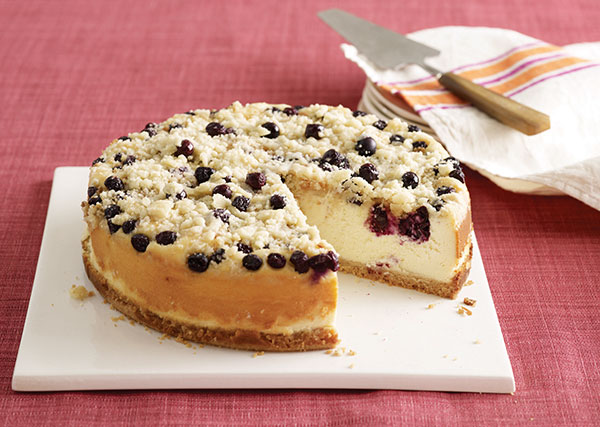
Blueberry Streusel Cheesecake
Prep time: 15 minutes
Total time: 6 hours, 45 minutes
Servings: 16
- 1 1/2 cups plus 3 tablespoons flour, divided
- 1 1/3 cups sugar, divided
- 1/2 teaspoon ground cinnamon
- 3/4 cup cold butter, cut up
- 4 packages (8 ounces each) PHILADELPHIA Cream Cheese, softened
- 1 tablespoon vanilla extract
- 1 cup BREAKSTONE'S or KNUDSEN Sour Cream
- 4 eggs
- 2 cups fresh blueberries
- Heat oven to 325°F.
- Mix 1 1/2 cups flour, 1/3 cup sugar and cinnamon in medium bowl. Cut in butter with pastry blender or 2 knives until mixture resembles coarse crumbs. Reserve 1/2 cup; press remaining onto bottom of 9-inch springform pan. Bake 25 minutes or until lightly browned.
- Beat cream cheese, remaining flour, remaining sugar and vanilla with mixer until well blended. Add sour cream; mix well. Add eggs, 1 at a time, beating on low speed after each just until blended. Pour over crust. Top with berries and reserved crumb mixture.
- Bake 1 hour 25 minutes to 1 hour 30 minutes or until center is almost set. Run knife around rim of pan to loosen cake; cool before removing rim. Refrigerate 4 hours.
Note: You can substitute cream cheese with Neufchatel cheese, or fresh blueberries with 1 (16-ounce) package frozen blueberries. Garnish with additional berries or cinnamon just before serving.
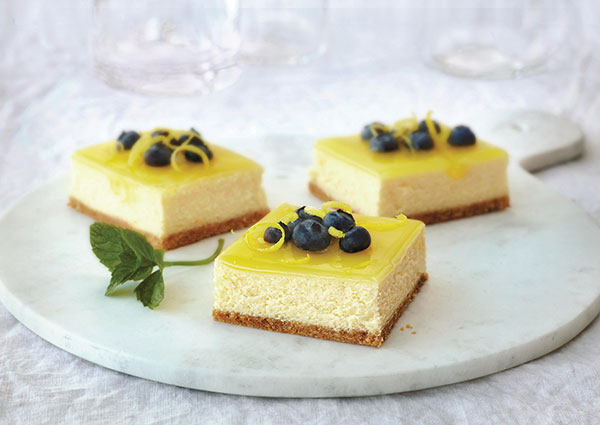
Double Lemon Cheesecake Bars
Prep time: 35 minutes
Total time: 7 hours, 15 minutes
Servings: 16
- 52 vanilla wafers, finely crushed (about 2 cups)
- 3 tablespoons butter or margarine, melted
- 4 eggs, divided
- 4 packages (8 ounces each) PHILADELPHIA Cream Cheese, softened
- 1 3/4 cups sugar, divided
- 3 tablespoons flour
- 1 tablespoon lemon zest
- 1/3 cup lemon juice (about 2 lemons), divided
- 1/2teaspoon vanilla
- 2 tablespoons cornstarch
- 1/2 cup water
- Heat oven to 325°F.
- Line 13-by-9-inch pan with parchment paper, with ends of paper extending over sides.
- Mix wafer crumbs and butter until blended; press onto bottom of prepared pan. Bake 10 minutes.
- Separate 1 egg; refrigerate yolk until ready to use. Beat cream cheese, 1 cup sugar, flour, lemon zest, 2 tablespoons lemon juice and vanilla in large bowl with mixer until blended. Add egg white and remaining 3 whole eggs, 1 at a time, mixing on low speed after each until just blended. Pour over crust.
- Bake 40 minutes or until center is almost set. Cool 1 hour. Refrigerate 4 hours.
- Mix cornstarch and remaining sugar in medium saucepan; gradually stir in water and remaining lemon juice until blended. Bring just to boil on medium heat, stirring constantly; cook and stir until clear and thickened. Lightly beat reserved egg yolk in small bowl with fork until blended; stir in 2 tablespoons of hot cornstarch mixture.
- Return to remaining cornstarch mixture in saucepan; stir until blended. Cook 1 minute or until thickened, stirring constantly. Cool slightly.
- Spoon lemon glaze over cheesecake. Refrigerate 1 hour or until firm. Use parchment handles to remove cheesecake from pan before cutting to serve.
Note: This lemon glaze can be prepared ahead of time. Cool, then refrigerate up to 8 hours before spooning over individual slices of cheesecake. Garnish with 1/2 cup blueberries, lemon peel and fresh mint leaves.
Recipes/photos courtesy of PHILADELPHIA Cream Cheese
Source: PHILADELPHIA Cream Cheese

Sweetness Made Simple
(Family Features) It's time to enjoy summer entertaining with easy, no-bake desserts that let you relax and enjoy time with friends and family while your creations are chilling in the fridge. To help you keep your cool, Eagle Brand(r) Sweetened Condensed Milk is sharing expert tips and recipes to satisfy your family, friends and guests alike without ever turning on the oven.
Foolproof Ice Cream: Homemade ice cream is easy to make with Eagle Brand Sweetened Condensed Milk. It lends a rich, thick consistency, so no eggs are required - and you don't need an ice-cream maker, either. Try this luscious Butter Pecan Ice Cream recipe, or use your favorite fruit, candy pieces, nuts or coffee to create your own delicious and refreshing ice cream flavors.
Make It Mini: Mini desserts are perfect for summer parties - small, bite-sized treats are easy to handle and let guests enjoy something sweet without feeling like they're overindulging. Try different variations of Creamy Mini Tarts using chocolate, peanut butter or your favorite fruit to satisfy everyone's taste. Also try making mini-size Raspberry Mocha Mousse Parfaits by layering the ingredients in small juice glasses.
Fresh and Fun: Make the most of the season's freshest flavors with this Fresh Fruit Cream Cheese Pie. Mix and match your favorites for a show-stopping dessert.
Sweet Inspiration: If life hands you lemons, make easy, no-bake party desserts. When combined with acidic fruit juice from a lemon or lime, Eagle Brand Sweetened Condensed Milk thickens - without heating - to form velvety pie fillings, puddings and other desserts. Get inspired and whip up these Creamy Mini Tarts.
To get more easy dessert recipes, see how-to videos, and to download a free recipe book, visit www.eaglebrand.com.
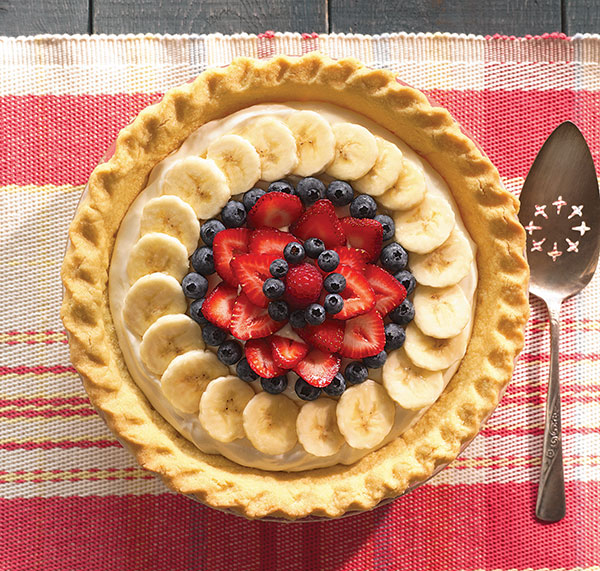
Fresh Fruit Cream Cheese Pie
Prep Time: 10 Minutes
Chilling Time: 3+ hours
Yield: 8 servings
- 1 8-ounce package cream cheese, softened
- 1 14-ounce can Eagle Brand Sweetened Condensed Milk OR 1 14-ounce can Eagle Brand Low Fat Sweetened Condensed Milk
- 1/3 cup lemon juice
- 1 teaspoon vanilla extract
- 1 9-inch frozen deep-dish pie crust, baked
- Fresh fruit (blueberries, strawberries, bananas*)
- Seedless red raspberry jam
- BEAT cream cheese in large bowl with an electric mixer until fluffy. Gradually beat in sweetened condensed milk until smooth. Stir in lemon juice and vanilla. Pour into baked pie crust.
- REFRIGERATE 3 hours or until set. Arrange fruit on top of pie. If coating berries, stir jam until smooth. Brush berries with jam and serve.
*If using bananas, dip in lemon juice before placing on pie to keep them from turning brown. Do not coat with jam.
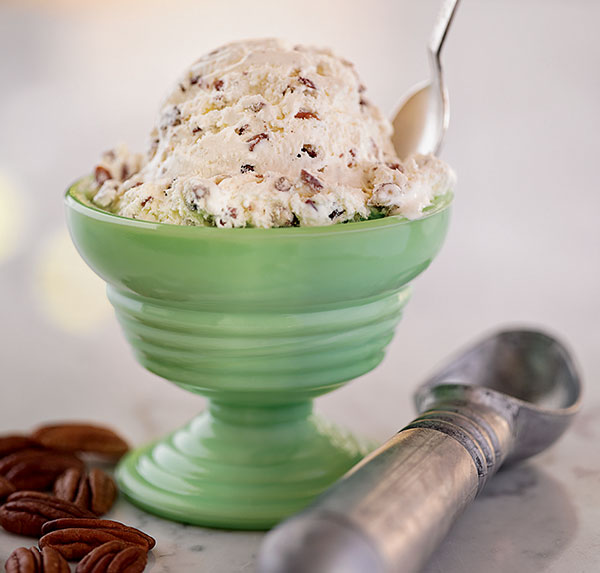
Butter Pecan Ice Cream
Prep Time: 15 minutes
Freezer Time: 6+ hours
Yield: 1 3/4 quarts
- 2 cups heavy cream
- 1 14-ounce can Eagle Brand Sweetened Condensed Milk
- 1 to 1 1/2 cups chopped pecans, toasted*
- 3 tablespoons butter, melted
- 1 teaspoon maple extract
- WHIP heavy cream to stiff peaks in large bowl. Combine sweetened condensed milk, pecans, butter and maple flavoring in large bowl. Mix well. Fold in whipped cream.
- POUR into 9 x 5-inch loaf pan or 2-quart container; cover. Freeze 6 hours or until firm. Store in freezer.
*To toast nuts: Place nuts in dry nonstick skillet. Cook over medium heat, shaking pan until nuts are lightly browned. To avoid over-browning, remove from pan immediately.
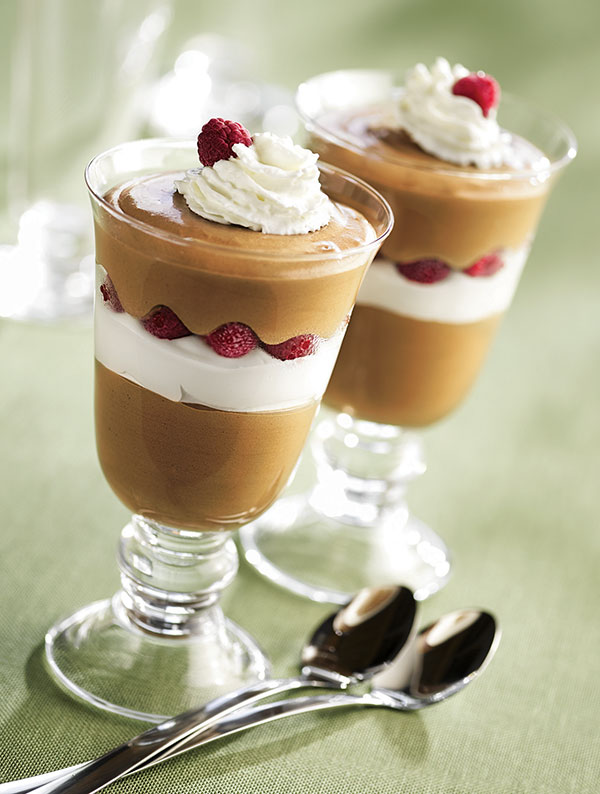
Raspberry Mocha Mousse Parfaits
Prep Time: 40 Minutes
Chilling Time: 20 Minutes
Yield: 8 servings
- 4 1-ounce squares unsweetened chocolate
- 1 14-ounce can Eagle Brand Sweetened Condensed Milk
- 1 1/2 teaspoons vanilla extract
- 1 tablespoon Folgers® Instant Coffee Crystals
- 1 teaspoon hot water
- 1 cup (1/2 pint) heavy cream
- 1 can refrigerated whipped cream
- 2 cups Nature's Peak® Frozen Raspberries OR 2 cups fresh raspberries
- MELT chocolate in a microwave-safe dish on HIGH (100% power) in 20 second intervals until melted. Stir until smooth.
- POUR sweetened condensed milk into large bowl. Beat in melted chocolate and vanilla. Dissolve coffee in hot water. Add to chocolate mixture, beating until smooth. Chill 15 minutes. Chill beaters and mixing bowl from electric mixer 10 minutes in preparation for next step.
- BEAT cream in chilled bowl with chilled beaters until stiff. Fold into chilled chocolate mixture. Reserve 8 raspberries for garnish. Layer parfait glasses as follows: 1/4 cup chocolate mousse, refrigerated whipped cream, 1/4 cup raspberries, 1/4 cup chocolate mousse. Refrigerate parfaits 20 minutes before serving. Just before serving, garnish each with refrigerated whipped cream and a single raspberry.
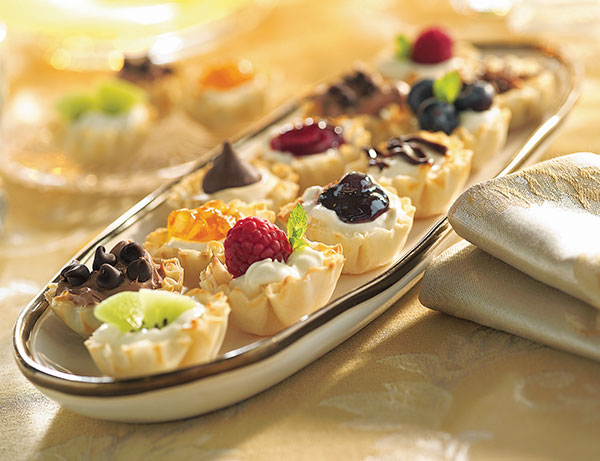
Creamy Mini Tarts
Prep Time: 1 hour
Chilling Time: 2 hours
Yield: 60 mini tarts
- 1 8-ounce package cream cheese, softened
- 1 14-ounce can Eagle Brand Sweetened Condensed Milk
- 1/3 cup lemon juice
- 1 teaspoon vanilla extract
- 4 1.9-ounce boxes mini phyllo shells
- 2/3 cup Smucker's® Blueberry Preserves
- BEAT cream cheese in large bowl until fluffy. Gradually beat in sweetened condensed milk until smooth. Stir in lemon juice and vanilla until blended. Spoon about 2 teaspoons into each mini shell. Refrigerate 2 hours or until firm.
- MAKE a slight indentation in the filling using the back of small round measuring spoon. Fill with 1/2 teaspoon preserves. Refrigerate until ready to serve.
Variations
Fresh Fruit: Top mini tarts with fresh fruit such as strawberries, blueberries, bananas, raspberries, cherries, kiwi, grapes or pineapple. Garnish with mint leaves.
Hot Fudge: Place 2 tablespoons hot fudge topping into corner of resealable plastic bag. Cut small corner off bag. Squeeze to drizzle over top of mini tarts.
Preserves: Use different flavors of preserves or orange marmalade to create a colorful assortment. Garnish with mint leaves.

How to Make Spanakopita Puffs
(Family Features) If you want to impress your guests, try serving this puff pastry recipe as an appetizer at your next gathering.This flaky pastry filled with a delicious combination of spinach, onions and feta cheese can keep them coming back for more.
For more appetizer ideas, visit culinary.net.
Watch video to see how to make this delicious recipe!
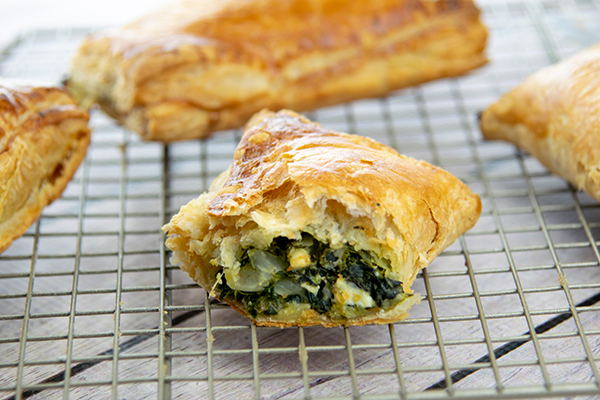
Spanakopita Puffs
- 1 package puff pastry sheets
- 1 tablespoon unsalted butter
- 1 small onion, diced
- 10 ounces frozen chopped spinach, thawed and drained
- 4 ounces light cream cheese, softened
- 2 eggs, divided
- 1/2 teaspoon salt
- 1/4 teaspoon black pepper
- 1/2 cup crumbled garlic and herb feta cheese
- 1 tablespoon cold water
- Heat oven to 375° F.
- Thaw folded pastries 15 minutes. Once thawed, unfold sheets to thaw out flat.
- In a large skillet over medium heat, melt butter. Add onions and saute 3 - 5 minutes, or until tender and translucent.
- Stir spinach into softened onions. Continue cooking, stirring frequently, until water from spinach evaporates and spinach is mostly dry. Transfer spinach mixture to large bowl.
- In small bowl, blend cream cheese with one egg, salt and pepper until smooth. Fold cream cheese mixture into spinach mixture to combine. Stir in feta cheese and set aside.
- Line baking pans with parchment paper or silicone baking mats.
- On floured surface, roll one sheet of puff pastry out to 10 by 12 inch rectangle. Cut sheet in half lengthwise, then again widthwise to form four 5 by 6 inch rectangles. Place rectangles on prepared baking sheets.
- Place spoonful of filling onto center of each cut pastry. Whisk remaining egg with cold water to create egg wash. Lightly brush egg wash around perimeter edges of each pastry square.
- Pick up short side of pastry and fold over filling toward other short side. Press edges to seal before crimping with fork. Repeat with remaining pastries.
- Brush small amount egg wash over top of each pastry. Cut small slits on top of each pastry to allow filling to vent steam while cooking.
- Bake 25 - 30 minutes, or until pastries are evenly browned on top.
- Transfer pastries to wire rack. Cool 8 - 10 minutes before serving.
Recipe adapted from MilkMeansMore.org.
Source: Culinary.net

Holiday Guesting 101
(Family Features) If you manage to avoid hosting duties this holiday season, you may be dodging some of the hardest work, but remember that being a good guest goes beyond arriving on time and taking your shoes off at the door. This holiday season, ensure your host gets to enjoy the festivities by putting these ideas to practice – it may earn you an invitation for years to come.
Make a holiday playlist. Offer to put together a holiday playlist for the host who will undoubtedly have his or her hands full prepping for the holiday celebration. Try to choose songs specific to the guests, host and overall theme. A good playlist can be a conversation starter for everyone at the party.
Don't arrive empty-handed. Even if your host shrugs off an offer for help, a gesture of appreciation is always appropriate. It may be a bottle of wine, a seasonal flower arrangement or, better yet, an appetizer or dessert to share, such as this mouthwatering Slow Cooker Banana Cake. This crowd-pleasing cake is made using a Crock-Pot® Cook & Carry Slow Cooker, which has a locking lid and travel clips to help you get to your holiday celebration without making a mess. The 6-quart, removable pot can be used as a serving dish, and is dishwasher safe to make clean-up a breeze.
Stay off your phone. It may seem obvious, but these days, looking at your phone is almost as habitual as breathing, and chances are you don’t mean to appear standoffish or rude by sneaking a quick peek. However, playing with your phone can detract from time you get to spend with family and friends, many of whom you probably don’t get to see often. Tuck away your phone for the party and live in the moment.
Pitch in to help clean. No host likes to be stuck in the kitchen while the rest of the party carries on. After the meal, offer your help to clear the table, put away perishable items and get the kitchen back in order so your host can join the merry-making. If you’ll be opening gifts, grab a garbage bag and collect debris to help keep the mess under control.
Find more holiday recipes and tips at Crock-Pot.com.

Slow Cooker Banana Cake
Prep time: 15 minutes
Cook time: 4 hours
Servings: 12
- Crock-Pot® Cook & Carry Slow Cooker
- nonstick cooking spray
- 3 cups flour
- 1 1/2 teaspoons baking soda
- pinch of salt
- 3-4 ripe bananas
- 2 lemon wedges, juice only
- 3/4 cup butter, softened
- 1 1/2 cups honey or 2 cups white sugar
- 3 eggs
- 1 teaspoon vanilla
- 1 1/2 cups almond milk
- cream cheese frosting
- Grease slow cooker with nonstick spray.
- In medium bowl, combine flour, baking soda and salt; set aside.
- In small bowl, mash bananas and lemon juice together; set aside.
- In large bowl, use mixer to cream butter and honey. Add eggs and mix well. Stir in vanilla then milk. Gradually add flour mixture. Once combined, stir in mashed bananas.
- Pour into slow cooker. Cover; cook on low 6 hours or high 4 hours, or until center of cake no longer looks gooey.
- Uncover and let cake cool. Once completely cooled, frost cake and, if desired, top with sliced bananas and walnuts.
Notes: If adding bananas, do so just before serving or they will brown. If using a non-oval slow cooker, cook 1 hour less on high heat or 2 hours less on low heat.
Photo courtesy of Getty Images
Source: Crock-Pot

Tomato-Tortellini Soup
When the weather is frightfully cold and you need something quick to warm you up, try this recipe for Tomato-Tortellini soup. With only 4 ingredients, you'll be warm and cozy in no time.
For more comfort food ideas, go to www.culinary.net.
Watch video to see how to make this delicious recipe!
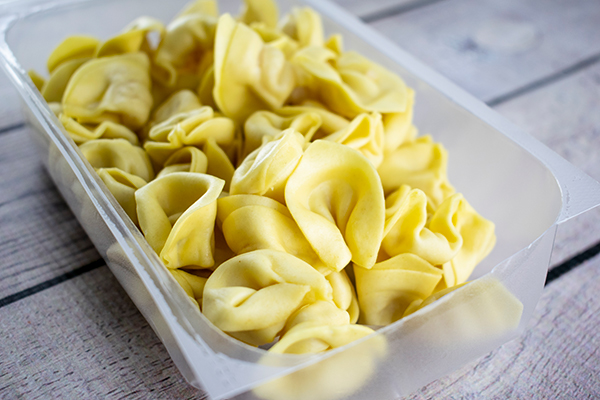


Tomato-Tortellini Soup
- 2 14 ounce cans reduced-sodium chicken broth
- 1 9 ounce package of refrigerated tortellini
- 1 8 ounce tub cream cheese spread with chive and onion
- 1 can tomato soup
- Fresh chives (optional)
- In a medium sauce pan bring broth to a boil. Add tortellini then reduce heat to simmer uncovered for 5 minutes.
- In a bowl whisk 1/3 cup of hot broth into the cream cheese spread. Whisk until smooth. Pour contents into sauce pan.
- Stir in tomato soup and heat through.
- Serve with fresh chives, if desired.
Recipe adapted from Better Homes and Gardens.
Source: Culinary.net

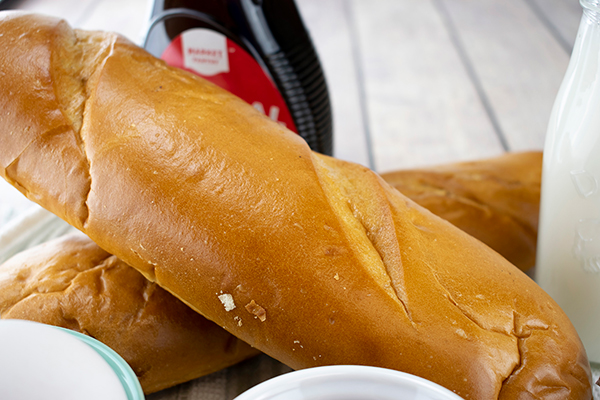
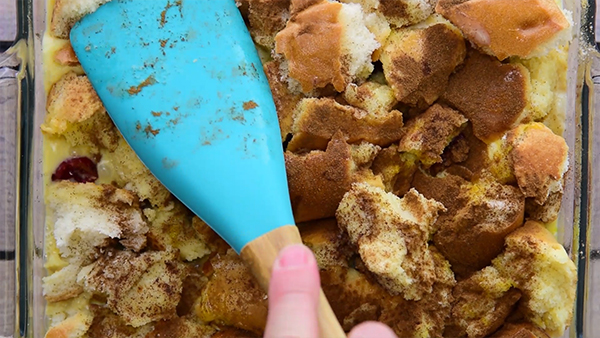
Cranberry Strata
(Culinary.net) Nearly nothing is better than a perfectly planned brunch. This delicious, sweet recipe could be the cherry on top of your brunch bash.
As you see your friends and family members take their first bites, you will see their faces light up with delight as they devour this Cranberry Strata. It’s made with fluffy, baked French bread, smooth cream cheese, sweet and tangy maple syrup and, of course, dried cranberries.
This recipe is easy to make and even easier to eat. With only a handful of ingredients and just a few simple steps, this dish is one you can quickly whip up when you’re in a pinch.
Plus, the end result will have you and brunch goers asking, “Why is this so good?” It’s wholesome, rich and delicious. With two layers of bread sandwiched around layers of cranberries and cream cheese, this dish is almost certain to be a new brunch favorite.
Start by mixing eggs, maple syrup and milk together in a bowl. Then in a baking dish, add a layer of French bread and top it with chunks of cream cheese. Spread the cranberries on top.
Then layer on your second sheet of French bread. Next pour your egg mixture over top of everything, making sure the bread is absorbing the flavors. Top with a dash of cinnamon and bake.
Pull it out of the oven and serve warm. You will have a gooey, creamy, melt-in-your-mouth strata on your hands.
This dish is wonderful for brunch, however, it is versatile enough to be served as a family dessert, scrumptious breakfast or treat on a cold, winter day.
Between the dairy, grains and sprinkle of fruit, this dish is a star for any occasion throughout the year.
Find more recipes at www.culinary.net.
Watch video to learn how to make this delicious recipe!

What you'll need:
- French Bread
- 8 ounce cream cheese
- Dried cranberries
- Eggs
- Maple Syrup
- Ground cinnamon

In a greased 2-quart baking dish, tear off pieces from 1/2 of the French bread and put into dish.

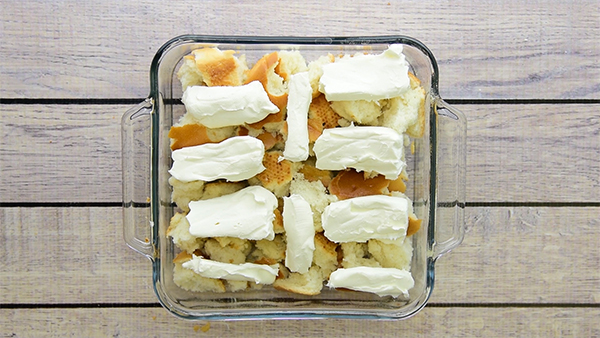
Cut the creamcheese into slices and place over the bread pieces.
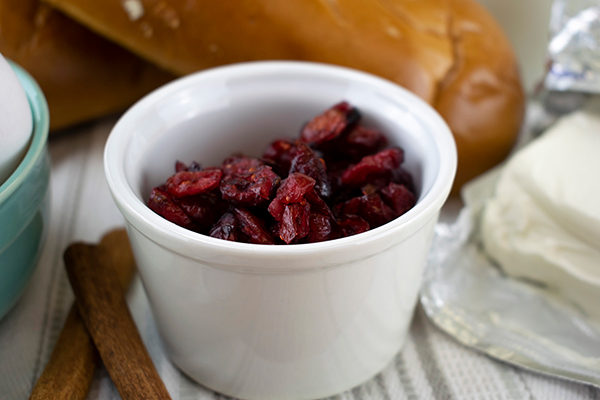
Sprinkle the dried cranberries over the creamcheese and bread pieces.

Top cranberries with remaining broken french bread pieces.
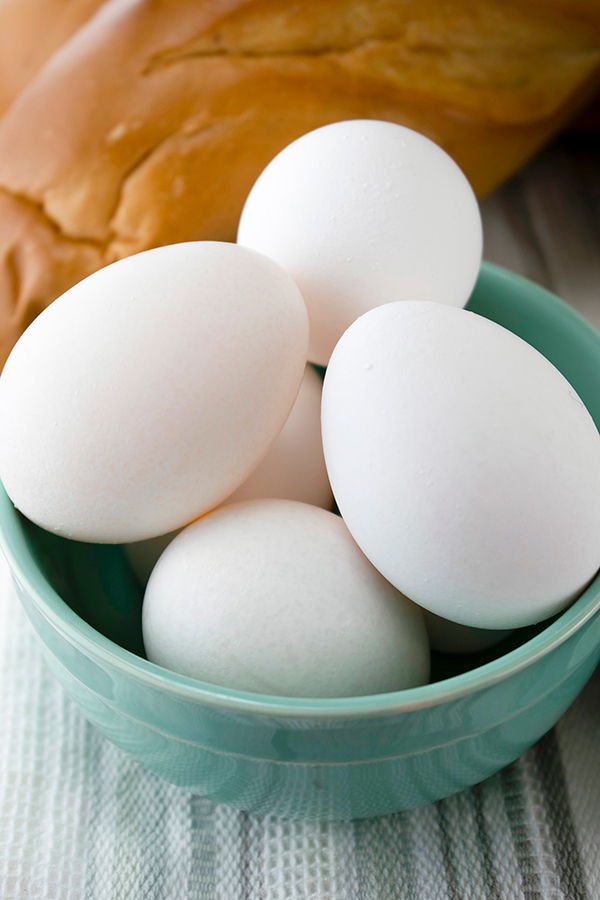
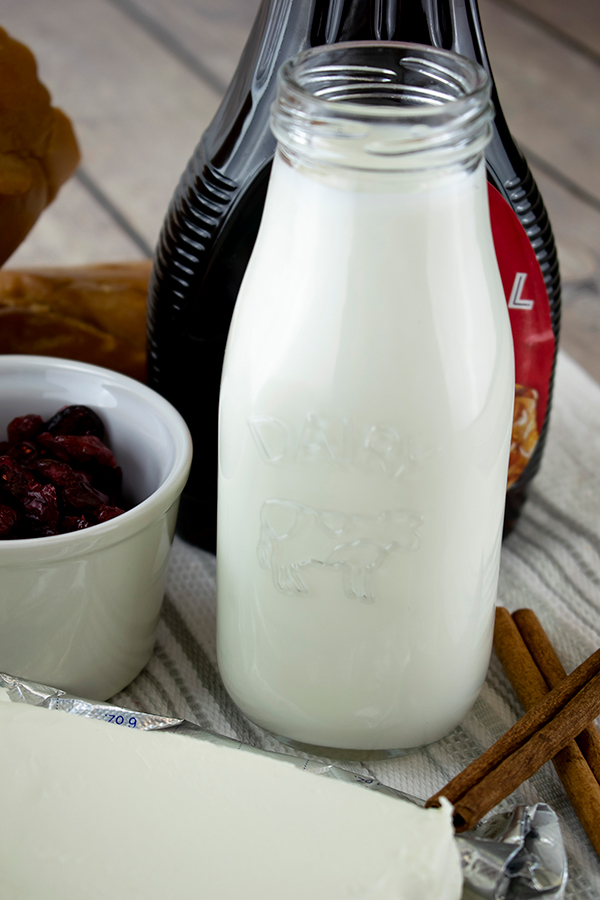
In a medium bowl, mix together eggs, milk and maple syrup.
Pour egg and milk mixture over bread and lightly press down the bread to saturate in the liquid mixture. Sprinkle with ground cinnamon.

Cover with aluminum foil and bake for 45 minutes. Remove the foil and bake for another 20 minutes. Full recipe instructions below.


Cranberry Strata
- 8 cups French Bread (Crusty)
- 1 8 oz package of cream cheese
- 1/2 cup dried cranberries
- 6 eggs
- 2 ¼ cups milk
- 1/3 cup maple syrup
- ½ tsp ground cinnamon or nutmeg
- In a greased 2-quart rectangular baking dish, arrange half of the bread pieces, about 4 cups.
- Cut cream cheese into 8-10 slices and arrange over the bread chunks.
- Sprinkle cranberries over bread chunks.
- Top with remaining bread pieces (4 cups).
- In a medium bowl beat together eggs, milk and maple syrup.
- Pour over bread in dish.
- Sprinkle with ground cinnamon.
- Lightly press down with back of spoon or spatula to saturate bread with egg mixture.
- Cover and chill for up to 24 hours.
- Preheat oven to 350°F.
- Bake covered for 45 minutes.
- Uncover then bake for 20 minutes more.
- Let stand for 10 minutes before serving.
- Serve warm and topped with maple syrup, if desired.
Source: Culinary.net

Game Day Eats and Treats
Score major points with delicious dishes
(Family Features) If the crew is coming over to root for your favorite team, it may be time to spice up the menu. Whether you’re hosting the weekend get-together or watching the game after work, switch up your typical spread and serve something new to leave your guests cheering for more.
When it comes to choosing an ingredient that can lend a winning assist to nearly any dish and score you some major points, look no further than California Ripe Olives.
Variety is key when mapping out food for a crowd, regardless of the event. Plan on serving one main course and two sides, and consider no-fuss options like chips and dips. If there are kids in attendance, make sure there is something neutral for even the pickiest eaters to snack on. However, try your best to avoid anything that needs a knife and fork to eat – finger foods typically work best when the game is on and conversation is flowing.
The mild and unique taste of California Ripe Olives lends itself well to many different flavor pairings, such as these recipes for Pulled Pork Sandwiches with Peach-Olive Jam, Easy Olive Bread and Sun-Dried Tomato and Olive Tapenade. Whether your guests are fans of spicy, mild, sweet or savory, the only limit is your imagination when you pull a can of olives from the pantry.
Family farms across California grow 95 percent of the ripe olives consumed in the United States. Each can is a labor of love. Multi-generational family farms work with family-owned canneries in California to produce each can and ensure only the highest quality olives make it from the farm to your game-day table. For more creative ways to use olives, including family recipes from growers across California, visit CalOlive.org .
Simple Entertaining Tips to Take Your Table to the Next Level
- A colorful platter is an easy way to spice up a spread.
- Pair something salty with something sweet for a juxtaposition of flavors.
- If you’re serving food on neutral plates, add some colorful linens.
- Plan the menu around a central theme or ingredient.
- Guests love choices – making more options available can make for better spreads.
- Use versatile ingredients, like California Ripe Olives, to keep picky eaters happy.

Pulled Pork Sandwiches with Peach-Olive Jam
- 1 teaspoon olive oil
- 3 pounds pork shoulder roast
- kosher salt, to taste
- ground black pepper, to taste
- 4 cloves garlic, quartered
- 4 cups low-sodium chicken broth
- 8 ounces dried peaches
- 1 tablespoon chili powder
- 1 cup California Black Ripe Olives, wedged
- 2 teaspoons country mustard
- 1 ounce arugula
- 8 onion rolls, split and toasted
- Heat oven to 375° F.
- In large, high-sided saute pan, heat oil over medium-high heat.
- Season pork with salt and pepper, to taste, and cook in pan 3-4 minutes on each side until browned.
- Stir in garlic and continue cooking 3-5 minutes.
- Pour in chicken broth, peaches and chili powder; bring to boil.
- Cover loosely with foil and bake in oven 2 hours.
- With slotted spoon, carefully remove peaches and transfer to small mixing bowl. Mix olives and mustard with peaches; set aside.
- Continue to cook pork in oven 30-60 minutes until fork tender.
- Allow to cool slightly then shred by pulling apart with fork.
- Assemble sandwiches by spooning pork onto toasted rolls.
- Top with arugula and peach-olive mixture.

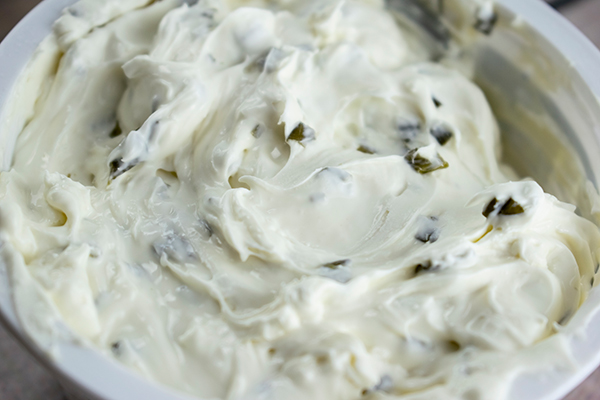
Easy Olive Bread
Recipe courtesy of The Wicked Noodle
- 8 ounces cream cheese, softened
- 1/4 cup unsalted butter, softened
- 1/2 cup mayonnaise
- 1 clove garlic, minced
- 2 cups shredded cheddar cheese
- 10 ounces California Green Ripe Olives, chopped
- 2 green onions, chopped
- 1 loaf French bread, sliced in half lengthwise
- Heat oven to 350° F.
- In bowl, mix cream cheese, butter and mayonnaise until thoroughly combined. Add garlic; stir well to distribute. Add cheddar cheese, green olives and green onions; stir to combine.
- Spread mixture on cut sides of bread. Bake 20-30 minutes, until cheese is hot, bubbly and starting to brown.

Sun-Dried Tomato and Olive Tapenade
- 1/2 cup shallots, chopped
- 1/4 cup chopped smoked sun-dried tomatoes
- 2 tablespoons extra-virgin olive oil
- 2 tablespoons white balsamic vinegar
- 2 cloves garlic, minced
- 1 can (6 ounces) California Green Ripe Olives, drained
- 1 can (6 ounces) California Black Ripe Olives, drained
- 1/4 cup lightly packed fresh basil
- sea salt, to taste
- freshly ground pepper, to taste
- crackers or toasted baguette slices
- In food processor, pulse shallots, sun-dried tomatoes, olive oil, vinegar and garlic until finely chopped. Add olives, basil, salt and pepper; pulse again until chopped.
- Cover and chill 1 hour.
- Serve with crackers or toasted baguette slices.
Note: Recipe can be prepared one day in advance.
Photo courtesy of The Wicked Noodle (Easy Olive Bread)
Source: California Olive Committee

Big Game Snacks for the Win
(Family Features) The big game is almost here: two teams, a room full of fans and a spread of fan-favorite foods to keep everybody going. Whether everyone's at your place or you're heading somewhere else to watch the game, you want to make sure the place is stocked with flavorful snacks that will wow the crowd.
This year, step up your game with clutch recipes loaded with bold flavor and plenty of heat.
One of the most popular party favorites is buffalo chicken dip. It is a must-have because it's creamy, cheesy and loaded with great-tasting buffalo flavor. Serve it up with fresh-cut celery or bell peppers, baby carrots, crackers and pita bread, and you'll add some kick to your sporty celebration. Plus, this recipe provides a way to include those traditional football flavors without the mess of hot wings.
A kick can make or break a game, and the right sauce can make or break your recipe. Not only is Frank's RedHot a game-day staple, it was the key ingredient in the first-ever buffalo wings back in 1964. It's an essential ingredient for any big game food lineup, so make sure you've got plenty on-hand.
Once you've got the dip prepared for kickoff, it's time to turn to something a little more unexpected. Round out your game-day lineup with an amazing flavor combination they won't see coming - something sweet, tangy and savory that brings just the right amount of heat: Sweet Chili Meatballs.
Bite-sized meatballs made with ginger, fresh cilantro, green onions and sweet chili sauce are baked before getting doused in even more sweet chili sauce, making them an irresistibly tasty addition to any game day spread. If the game heads into overtime, no need to worry because these meatballs will stay warm in the slow cooker all game long.
If you're looking for more big game tips and recipes to dazzle the crowd, check out franksredhot.com/recipes.

Buffalo Chicken Dip
- 2 cups shredded cooked chicken
- 1 package cream cheese (8 ounces), softened
- 1/2 cup Frank's RedHot Original Cayenne Pepper Sauce or Buffalo Wings Sauce
- 1/2 cup ranch dressing
- 1/2 cup crumbled bleu cheese or other shredded cheese
- green onions, chopped (optional)
- Heat oven to 350 F.
- In shallow, 1-quart baking dish, combine all ingredients.
- Bake 20 minutes, or until mixture is heated through. Stir.
- Garnish with chopped green onions, if desired. Serve with tortilla chips, crackers and/or vegetables.

Sweet Chili Meatballs
- 1 pound lean ground turkey or ground beef
- 1/3 cup Japanese panko crumbs or bread crumbs
- 1/4 cup cilantro, finely chopped
- 3 green onions, chopped
- 1 tablespoon fresh ginger, finely minced
- 1 large egg, beaten
- 1/2 teaspoon salt
- 12 ounces Frank's RedHot Sweet Chili Sauce, divided
- Heat oven to 350 F.
- Mix ground meat, panko crumbs, cilantro, green onion, ginger, egg, salt and 1/4 cup sweet chili sauce. Form into one-inch meatballs.
- Place meatballs on lightly greased baking sheets.
- Bake 20 minutes, turning once halfway through. Put meatballs in slow cooker on warm.
- With slow cooker on low to keep meatballs warm, pour remaining sweet chili sauce over meatballs. Gently stir to coat.
Source: Frank’s RedHot