
Holiday Entertaining is Back with Sweet, Savory and Oh So Cheesy Ideas
Real California Milk helps impress guests with the California Cheese Centerpiece and Cookie Exchange Board
(Family Features) This holiday season, entertaining is back on the table and that means endless opportunities to showcase Instagram-worthy ideas. For those looking to impress friends and family, Real California Milk has two unique culinary ideas to take holiday traditions to the next level: The Cheese Centerpiece and Cookie Exchange Board. From fresh food as bountiful décor to camera-ready cookie presentations, incorporating California dairy into your entertaining is a winning holiday strategy.
California Cheese Centerpiece
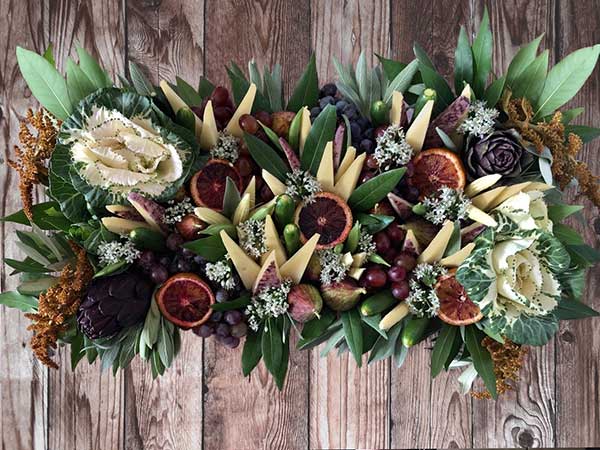
The mission? Create a holiday centerpiece but make it delicious. Real California Milk partner Jessica Lawrenz, Founder of Monger, Mold and Milk, took the challenge with the California Cheese Centerpiece, the ultimate in edible entertaining with a beautiful display of Real California Cheeses, salami, fruits and vegetables arranged with fragrant herbal garnishes in a display sure to impress family and friends. As a bonus, it creates less waste than a stand-alone floral bouquet (and you’ll have less to clean up!).
Find additional cheese displays and holiday recipes at realcaliforniamilk.com.
INGREDIENTS:
Variety of firm to medium (semi-firm) Real California Cheeses (find them here: https://www.realcaliforniamilk.com/cheese-makers)
Shown in arrangement:
- Real California Dry Jack cheese wedges
- Real California Wine-soaked Cheddar wedges
- Real California Triple Cream cheese wedges
- Salumi or salami, made into roses
Fresh fruits and vegetables:
- Mini clementines or kumquats
- Grapes or currants (both shown)
- Fresh figs
- Gooseberries
- Cucamelons or mini cucumbers
- Cherry tomatoes (tiger stripe tomatoes shown but any small tomato works)
Garnishes:
- Bay leaf stems
- Olive leaf stems
- Rosemary branches
- Lavender stems
- Sage bunches
- Chive or garlic flowers or any edible flower with a stem
Tools and Materials:
- Circular tray or plate
- Craft or flora foam (half sphere shape that is at least 1-inch smaller in diameter than your tray)
- Double-sided tape
- Plastic wrap
- Toothpicks, U-shape bamboo toothpicks (optional)
- Cookie cutter shapes (optional)
DIRECTIONS:
- Cover foam in plastic wrap to protect food from making contact with the foam.
- Use double-sided tape to secure the foam to the tray.
- Now you can start assembling the centerpiece. Start from the bottom and work your way up to the top of the sphere.
- Use the bulk of your leafy garnishment (bay leaf stems, olive leaf stems, sage bunches) on the bottom layer to create a base and coverage by poking the stems into the foam. If needed you can trim the bottom of the stem in a diagonal direction to create a more pokey end OR use a toothpick to pierce a hole in the place where you want to insert stems.
- For best visual appeal, fruits like grapes and currants should be arranged to kind of flow over the edge of the tray near the bottom as well. PRO TIP: Use “U” shaped bamboo toothpicks to secure the stems of the hanging fruits into the foam.
- From here use toothpicks to secure cheese wedges, salumi roses, fruits and vegetables into the foam. Cut shorter, triangular pieces of cheese (as opposed to longer triangular pieces used for a long/rectangular centerpiece). Use any tall wedges near the bottom where they will be easy to grab but not sticking out too far if placed near the top. You can use cookie cutter shapes as well for the cheeses, if desired.
- Finally, take any of the smaller garnish pieces you have (lavender, chive flowers, rosemary ends, loose leaves) to fill in the spaces between all the items.

Holiday Cookie Exchange Board
If a cookie exchange is on the docket for this year’s holiday or you’re simply looking to upgrade your dessert table, take some tips from this stunning cookie exchange presentation. Mix and match Real California Milk cookie recipes to create a mouthwatering arrangement and decorate with mini candy canes, holiday lollipops, various holiday décor and lights. Add napkins, cookie bags for take-away, and recipe cards for sharing, and let your guests go to town.
- Hot cocoa or coffee
- Milk shooters
- Coconut Walnut Cake Bars
- Chocolate Mint Cookies
- Stroopwafel Cookies
- Mini Gingerbread Cupcakes
- Madeleines
Dipped in melted dark chocolate and rolled in crushed peppermint candies or Holiday sprinkles
Leave out ice cream, exchange holiday sprinkles for rainbow sprinkles, and dip in melted white chocolate with color for extra festivity
California is the nation’s leading milk producer and is responsible for producing more butter, ice cream and nonfat dry milk than any other state. The state is the second-largest producer of cheese and yogurt. California milk and dairy foods can be identified by the Real California Milk seal, which certifies they are made exclusively with milk from the state’s dairy farm families.
About Real California Milk/California Milk Advisory Board
The California Milk Advisory Board (CMAB), an instrumentality of the California Department of Food and Agriculture, is funded by the state’s dairy farm families who lead the nation in sustainable dairy farming practices. With a vision to nourish the world with the wholesome goodness of Real California Milk, the CMAB’s programs focus on increasing demand for California’s sustainable dairy products in the state, across the U.S. and around the world through advertising, public relations, research, and retail and foodservice promotional programs. For more information and to connect with the CMAB, visit RealCaliforniaMilk.com, Facebook, YouTube, Twitter, Instagram and Pinterest.
Source: Real California Milk

A Spring-Inspired Easter Brunch
Sweet ideas for a bright, seasonal spread
(Family Features) Spring is blooming on your Easter table. From yellow chick cupcakes to blueberry French-toast casseroles, there are plenty of ways to wow your brunch guests with simple seasonal recipes.
“Between hiding eggs and preparing baskets, you may be tempted to fall back on brunch basics like pancakes and scrambled eggs, but that’s no fun,” McCormick Executive Chef Kevan Vetter said. “With simple pantry staples – like food color – and a little planning the night before, you can enjoy a fun and tasty holiday brunch.”
These simple tips from Vetter can help you transform a boring brunch into a colorful Easter feast.
- Waffle art is a fun way to get kids (and adults) involved during breakfast time. Try tinting the waffle batter orange by using McCormick Color from Nature Food Colors. Cut them into wedges hot out of the iron and pipe green frosting for the stems to create these Carrot-Shaped Waffles.
- Making French toast for a crowd can be a hassle. Instead, make a sweet breakfast casserole the night before to pop in the oven Easter morning. Add fresh, sweet-tart blueberries to celebrate spring.
- Rather than splurging on designer cupcakes, just pipe yellow marshmallow creme on mini cupcakes for a baby chick then decorate with sprinkles for the nose and cut up wafers to look like a hatching egg.
For more recipes and tips, check out McCormick.com and visit McCormick Spice on Facebook and Pinterest.

Baby Chick Cupcakes
Prep time: 30 minutes
Servings: 24
- 1 package (12 ounces) white confectionary coating wafers
- 1 cup (2 sticks) butter, softened
- 2 teaspoons McCormick Pure Vanilla Extract
- 1 box (16 ounces) confectioners’ sugar
- 1 jar (7 ounces) marshmallow creme
- 1 teaspoon Sunflower color from McCormick Color from Nature Food Colors
- 2 tablespoons milk, plus additional (optional)
- 48 unfrosted mini yellow cupcakes, baked in white paper liners
- sprinkles (optional)
- additional McCormick Color from Nature Food Colors (optional)
- To make broken egg shell pieces: melt coating wafers as directed on package. Spread on large foil-lined baking sheet to 1/4-inch thickness. Refrigerate about 10 minutes, or until firm. Break into small, irregular pieces. Set aside.
- In large bowl, beat butter with electric mixer on medium speed until light and fluffy. Add vanilla; mix well. Gradually beat in confectioners’ sugar, beating until well blended after each addition, frequently scraping sides and bottom of bowl. Beat in marshmallow creme until well blended. In small bowl, stir food color into milk until dissolved. Add colored milk to frosting; beat until light and fluffy. Stir in additional milk, as needed, to reach desired consistency.
- To decorate cupcakes: spoon frosting into large pastry bag fitted with large round tip. Pipe two dollops of frosting on top of each other to form baby chick. If desired, insert sprinkles into face for eyes and beak. Or tint any remaining frosting with food colors to pipe out eyes and beak.
- Place coating wafer pieces around bottom of baby chick to resemble broken egg shell.

Carrot-Shaped Waffles
Prep time: 10 minutes
Cook time: 20 minutes
Servings: 6
- Nonstick cooking spray
- 2 cups all-purpose waffle and baking mix
- 1 1/3 cups milk
- 1 egg
- 2 tablespoons vegetable oil
- 3 teaspoons McCormick Pure Vanilla Extract, divided
- 1 1/4 teaspoons Sunflower color from McCormick Color from Nature Food Colors, divided
- 1 teaspoon Berry color from McCormick Color from Nature Food Colors
- 1/2 teaspoon Sky Blue color from McCormick Color from Nature Food Colors
- 1 cup heavy cream
- 1/4 cup confectioners’ sugar
- Heat round waffle iron. Spray with nonstick cooking spray. In medium bowl, mix together waffle mix, milk, egg, oil, 2 teaspoons vanilla and 1 teaspoon each sunflower and berry colors until blended. Let batter stand 5 minutes to allow color to fully develop.
- Pour about 1/3 cup batter onto center of waffle iron. Close lid. Cook about 3 minutes, or until no longer steaming. Carefully remove waffle. Repeat with remaining batter. Cut each waffle into 8 triangles. Set aside.
- In another medium bowl, stir sky blue color and remaining sunflower color into cream. Add confectioners’ sugar and remaining vanilla; beat with electric mixer on high speed until stiff peaks form. Spoon into re-sealable plastic bag. Cut piece off one bottom corner.
- To decorate and serve waffles, place waffle triangles onto serving plates and pipe green colored cream on wide side of each triangle to resemble carrot tops.

Overnight Lemon Blueberry Muffin Casserole
Prep time: 15 minutes
Cook time: 30 minutes
Servings: 12
Streusel Topping:
- 1/2 cup firmly packed light brown sugar
- 1/2 cup flour
- 2 teaspoons McCormick Cinnamon, Ground
- 1/4 cup (1/2 stick) cold butter, cut into chunks
Casserole:
- 6 eggs
- 1 cup, plus 2 tablespoons, milk, divided
- 1/4 cup, plus 2 tablespoons, granulated sugar, divided
- 1 teaspoon McCormick Cinnamon, Ground
- 1 loaf French bread, cut into 1-inch cubes
- nonstick cooking spray
- 1 package (8 ounces) cream cheese, softened
- 1 tablespoon McCormick Pure Lemon Extract
- 2 cups blueberries, divided
- To make Streusel Topping: In medium bowl, mix together brown sugar, flour and cinnamon. Cover. Set aside until ready to assemble in the morning.
- To make Casserole: In large bowl, mix together eggs, 1 cup milk, 1/4 cup granulated sugar and cinnamon with wire whisk until well blended. Add bread cubes; toss gently to coat. Pour evenly into 13-by-9-inch baking dish sprayed with nonstick cooking spray.
- In medium bowl, mix together cream cheese, remaining milk and sugar, and lemon extract until well blended. Gently stir in 1 cup blueberries. Spread evenly on top of bread cubes. Top with remaining blueberries. Cover. Refrigerate overnight.
- Heat oven to 350° F.
- Remove casserole from refrigerator. Let stand 10-15 minutes.
- Cut butter into Streusel Topping mixture with pastry blender or two knives until mixture resembles coarse crumbs. Sprinkle over casserole. Bake 30 minutes, or until golden brown. Let stand 5 minutes before serving.
Source: McCormick

Impress Spring Party Guests with Surprise Sweets
(Family Features) Transform an ordinary cupcake into something extraordinary with a peek-a-boo filling. These simple cupcakes are an easy addition to any spring celebration. You’ll want to serve every variety of these turned up treats for Easter and beyond.
The best part about this party trick? It’s easy. You’ll be digging this one out of your recipe repertoire for every spring soiree.
Hop to Easter
Who said Easter baskets are just for the kids? Treat your holiday guests to take-home cupcakes served in individual cupcake boxes. They’ll be delighted to find a surprise inside these icing-filled cupcakes.
The Garden Party
Spring into the season and host an outdoor party on the patio or in the garden. Your guests will enjoy the fresh air and the sweetly decorated desserts.
Add Fresh Flavor
Shake things up with a refreshing new twist. Try filling your cupcakes with refreshing lemon meringue, raspberry mousse or peanut butter and jelly cupcake fillings.
No matter how you slice it, fill it or serve it, these cupcakes are a party pleaser that’s guaranteed to impress. Find tasty filling recipes, fresh ideas and easy decorating projects at www.wilton.com.

Carrot Garden Easter Cupcakes
Servings: 1 dozen cupcakes
- Favorite chocolate cake mix or recipe
- Creamy Decorator Icing
- Chocolate Decorator Icing
- Leaf Green Icing Color
- Orange Icing Color
- Crushed chocolate sandwich cookies
- Preheat oven to 350°F. Place Color Wheel baking cups in standard muffin pan.
- Prepare cake mix following package instructions. Bake in prepared muffin pan 18-20 minutes or until toothpick inserted in center comes out clean. Cool completely in pan on cooling grid.
- To decorate, tint small amount of creamy decorator icing green; tint remaining orange. Use spatula and chocolate icing to ice tops of cupcakes smooth. Sprinkle with cookie crumbs. Chill until set, about 15 minutes.
- Use knife to cut out center of cupcakes almost to bottom of cupcake. Use tip 2A and orange icing to fill in center of cupcake and pipe about 1/4 inch above cupcake; pat smooth. Use tip 352 and green icing to pipe pull-out leaf carrot tops.
Source: Wilton

Edible Easter Fun
(Family Features) Little ones (and big ones too) will have fun making these adorable Easter Lamb Carrot Cupcakes. Easter is a special time for bringing families together. Make memories happen in the kitchen when you get hands on with these sweet cupcakes made with Dixie Crystals Sugar. Marshmallow lambs sitting atop moist carrot cupcakes on a bed of green coconut grass are a sure way to sweeten any family gathering.
For more recipes to add fun and flavor to your Easter festivities, visit www.dixiecrystals.com.

Easter Lamb Carrot Cupcakes
Servings: 12-16
- 1 2/3 cups all-purpose flour
- 1 teaspoon baking soda
- 2 teaspoons cinnamon
- 1/4 teaspoon ginger
- 2 large eggs
- 1/2 cup vegetable oil
- 1 1/2 cups Dixie Crystals Extra Fine Granulated Sugar
- 1/2 teaspoon salt
- 2 teaspoons vanilla extract
- 2 cups finely shredded carrots
- 1 can (8 ounces) crushed pineapple, drained
- 1/2 cup chopped walnuts or pecans
Frosting:
- 1 package (8 ounces) cream cheese
- 1 stick or 1/2 cup unsalted butter, very soft
- 4 cups Dixie Crystals Confectioners Powdered Sugar
- 1/2 teaspoon vanilla extract
Royal icing:
- 1 cup Dixie Crystals Confectioners Powdered Sugar
- 2 1/4 teaspoons dried egg whites
- 2 tablespoons warm water
- 1/2 teaspoon lemon juice
Decoration:
- 1 cup sweetened coconut
- Green food coloring
- Black food coloring
- 1 bag regular size marshmallows
- 1 bag miniature marshmallows
- 24-36 pink jelly beans
- 24 black jelly beans
- 12-16 hard candy caramels
- Heat oven to 350°F.
- Place 16 cupcake liners in cupcake or muffin tin and set aside.
- Sift together flour, baking soda, cinnamon and ginger and set aside.
- In large bowl, whisk together eggs and vegetable oil until well blended. Add sugar, salt and vanilla; mix well.
- Add carrots, pineapple and nuts and combine well. Stir in flour mixture.
- Scoop into paper cups about 2/3 full. (May make more depending on size.)
- Bake until center of cupcakes bounce back when lightly pressed or inserted toothpick comes out clean, about 23 minutes. Allow to cool before frosting.
- For frosting, mix cream cheese and soft butter on low speed until blended. Add one cup powdered sugar and mix on low speed. Gradually add remaining powdered sugar and mix on low to medium speed until light and fluffy. Add vanilla and mix well. Set aside covered in refrigerator.
- Place coconut in bowl and add drop of green food color, mix by gloved hand until color is well distributed. (Add touch of yellow if color is too harsh.)
- Fill piping bag or food storage bag fitted with medium round decorating tip with cream cheese frosting.
- Prepare 2 small paper piping bags; set aside to prepare icing.
- To make royal icing, sift together powdered sugar with dried egg whites and place in bowl. Add water and lemon juice and whip several minutes to stiff mixture. Thin mixture with water if necessary.
- Place 3 – 4 tablespoons of royal icing in a small bowl and tint with black food coloring.
- Fill 2 small piping bags; one with white and the other with black royal icing. Set aside.
- Using cream cheese frosting pipe generous circle of frosting onto cupcake.
- Cut large marshmallow crosswise in half. Lay one and a half large marshmallows horizontally onto cupcake. Pipe thin layer of cream cheese frosting onto marshmallows.
- Starting at bottom surround large marshmallows with miniature marshmallows. Pipe a little cream cheese frosting onto first layer of mini marshmallow and stack another layer of mini marshmallows. Continue until completely covered.
- Press green coconut onto edges of cupcake.
- Position cupcake so circle side of large marshmallow faces you.
- For head, place hard caramel onto top edge of large marshmallow and ensure it is resting onto miniature marshmallows. (Remove some marshmallows to fit if necessary.)
- For ears, cut pink jelly bean lengthwise in half. Pinch beans to make pointy. Place next to head and use a little cream cheese frosting to make them stick.
- Cut black jelly beans in fours to create feet. Cut black jelly bean lengthwise to create tail. Attach with cream cheese frosting.
- Using white royal icing pipe eyes, followed by black. Pipe with black royal icing for nostrils.
Notes: When measuring flour, avoid firmly packing measuring cup. Mixing frosting on high will make it runny and too soft.
Source: Dixie Crystals Sugar

Mentor Knows Best
The Mother’s Day Edition
(Family Features) Whether she’s your mom or a “like-a-mother” mentor, chances are you’ve got a lot to thank her for this Mother’s Day. It’s a time for celebrating your biggest supporters, number one fans and best friends.
In life, we’re lucky to form relationships with women we can learn from and grow with. Beth Somers, Elizabeth Nelson and Emily Tatak from the Wilton Test Kitchen consider themselves lucky.
Beth Somers, Director of Creative Content Development, owes her start to her former boss Milette Raz. Raz is trained in the Wilton Method of Cake DecoratingTM and taught Somers how to decorate. But Somers thinks of Raz as so much more — calling her a mentor, her second mother and her friend. Years after working together, the duo teamed up for Cupcake Wars on the Food Network, returning home as champions of season six with winning recipes like Tropical Getaway Cupcakes.
Elizabeth Nelson, Assistant Culinary Specialist, attributes her love of baking to her grandma Ann, learning the basics with her and picking up passed down recipes that she brought with her to college. She looks up to her mother, her grandmother and her great-grandmother, whom she’s told she also gets her competitive nature from. Nelson and her grandmother went through a lot of trial and error together to come up with what they believe is the perfect cinnamon roll recipe, very similar to this recipe for Cinnamon Rolls with Caramel Glaze.
For Emily Tatak, preserving family recipes and continuing the traditions around the holidays and in the kitchen led to her career at Wilton as an Assistant Culinary Specialist. She owes her inspiration to her mom, who taught her how to bake. Together they iced cakes, decorated sugar cookies and even made a gingerbread house from scratch. Keeping with tradition, celebrating the holidays without grandma Irene’s Kolachy recipe just wouldn’t be the same.
For more recipe ideas to honor your mother or special mentor, visit s.wilton.com/MentorKnowsBest.

Cinnamon Rolls with Caramel Glaze
Servings: 1 dozen rolls
Rolls:
- 1 1/3 cups warm milk (105°F)
- 2 packages (1/4-ounce each) active dry yeast
- 1/4 cup granulated sugar, divided
- 1/2 cup (1 stick) butter, softened
- 2 egg yolks
- 1 teaspoon Wilton Pure Vanilla Extract
- 3/4 teaspoon salt
- 4 cups bread flour, plus more for dusting
Filling:
- 1/2 cup (1 stick) butter, softened
- 1/3 cup granulated sugar
- 2 tablespoons bread flour
- 2 tablespoons ground cinnamon
Glaze:
- 1/4 cup (1/2 stick) butter
- 1/2 cup lightly-packed light brown sugar
- 1/2 cup heavy whipping cream
- 1 teaspoon Wilton Pure Vanilla Extract
- 1/4 teaspoon salt
- 1 cup confectioners’ sugar (about 1/4 pound)
- For rolls, stir together warm milk, yeast and 1 tablespoon sugar in large bowl. Let stand 5–10 minutes or until foamy. Add butter, remaining 3 tablespoons sugar, egg yolks, vanilla and salt. Mix with electric mixer using dough hook on medium speed until combined. Gradually add flour, 1 cup at a time, and mix on medium speed until smooth, elastic dough forms, about 5 minutes.
- Spray large bowl with vegetable pan spray. Form dough into ball, place into bowl and cover with plastic wrap. Let stand in warm place for 45 minutes or until doubled in size.
- For filling, stir together butter, sugar, flour and cinnamon in medium bowl until well-combined.
- Prepare 13-by-9-inch pan with vegetable pan spray.
- Punch dough down and roll out to 18-by-14-inch rectangle on floured surface. Spread filling onto dough and roll up from long end, like a jelly roll. Pinch seam to seal, trim ends and cut into 12 equally-sized pieces.
- Place rolls into prepared pan; cover with plastic wrap and let rise 25–30 minutes or until doubled in size.
- Meanwhile, heat oven to 350°F. Remove plastic wrap from rolls and bake 25–29 minutes or until golden brown. Cool in pan on wire rack while preparing glaze.
- For glaze, melt butter in saucepan over medium heat. Add brown sugar and cream. Cook over medium-high heat until mixture reaches a simmer; cook for 1 minute, stirring constantly. Remove from heat and stir in vanilla and salt. Whisk in confectioners’ sugar until smooth. Pour glaze over warm rolls. Serve warm.

Grandma’s Kolachy Cookies
Servings: 6 1/2 dozen cookies
- 1 package (8 ounces) cream cheese, softened
- 1 cup (2 sticks) butter, softened
- 2 cups all-purpose flour
- 1 teaspoon Wilton Pure Vanilla Extract
- 1/2 teaspoon salt
- Poppy seed, apricot and strawberry pastry filling
- Confectioners’ sugar, for dusting
- In large bowl, beat cream cheese and butter with electric mixer on medium speed until well combined. Add flour, vanilla and salt; beat until just combined. Divide dough into 2 disks. Wrap with plastic wrap and chill at least 12 hours.
- Heat oven to 375°F.
- Working with 1 disk at a time, roll each to 1/8-inch thickness on generously floured surface. Cut cookies using 2-inch round cutter. Place on cookie sheet and make indentation in dough with thumb. Spoon 1/2 teaspoon pastry filling into each indentation.
- Bake 16–18 minutes or until edges are lightly browned. Cool cookies on pan on cooling grid 5 minutes. Remove from pan; cool completely on grid. Dust with confectioners’ sugar before serving.

Tropical Getaway Cupcakes
Servings: 2 dozen
Cupcakes:
- 2 eggs plus 4 egg whites, lightly beaten (reserve 2 yolks for filling)
- 1 cup cream of coconut
- 1/2 cup water
- 1 teaspoon coconut extract
- 1/2 teaspoon Wilton Pure Vanilla Extract
- 2 cups all-purpose flour
- 1-1/2 cups sweetened shredded coconut, coarsely chopped
- 1 cup granulated sugar
- 1 tablespoon baking powder
- 1/4 teaspoon salt
- 3/4 cup (1 1/2 sticks) butter, softened and cut into tablespoons
Filling:
- 2 egg yolks
- 3 tablespoons cornstarch
- 1 1/4 cups thick mango juice, divided
- 1 tablespoon granulated sugar
- Pinch salt
Icing:
- 2 packages (8 ounces each) cream cheese, softened
- 1/2 cup (1 stick) butter, softened
- 2 1/2 cups confectioners’ sugar
- 1 tablespoon finely grated orange zest (about 1 orange)
- 1 teaspoon Wilton Pure Vanilla Extract
- Heat oven to 350°F. Line muffin pans with baking cups.
- In large bowl, whisk together eggs, egg whites, cream of coconut, water, coconut and vanilla extracts until well combined.
- In large bowl, mix flour, shredded coconut, sugar, baking powder and salt with electric mixer on low speed until combined, about 15 seconds. Add butter, 1 tablespoon at a time, continuing to beat on low speed until mixture looks dry and crumbly and largest chunks of butter are about 1/4 inch in diameter, about 30 seconds. Stop mixer and add half of liquid ingredients. Beat on low speed until flour mixture is moistened, about 15 seconds. Increase mixer speed to medium and beat until light and fluffy, about 45 seconds. With mixer still running, slowly stream in remaining liquid. Stop mixer and scrape sides and bottom of bowl. Beat on medium speed for an additional 30 seconds. Divide batter evenly into baking cups, filling about 2/3 full.
- Bake 18–22 minutes, or until toothpick inserted in centers of cupcakes comes out clean. Cool cupcakes in pan on cooling grid 5 minutes. Remove from pan; cool completely on grid.
- For filling, whisk together egg yolks, cornstarch and 1/4 cup mango juice in small bowl until smooth.
- In saucepan, combine remaining 1 cup mango juice, sugar and salt. Bring to boil over medium-high heat. Slowly stream half of hot liquid into egg yolk mixture, whisking constantly. Add egg yolk mixture back into saucepan and reduce heat to medium. Cook, stirring constantly, until mixture thickens and boils. Strain through fine mesh sieve. Cool completely.
- For icing, beat cream cheese and butter in large bowl with electric mixer on medium speed until creamy; gradually add confectioners’ sugar, 1/2 cup at a time, scraping down bottom and sides of bowl as necessary. Add orange zest and vanilla extract and beat until fully incorporated.
To assemble, remove center of cupcake with coring tool or paring knife. Fill with mango filling. Pipe icing onto cupcakes.
Note: Stir cream of coconut before measuring it, as it tends to settle as it sits. Coconut can be coarsely chopped in food processor or with knife.

Fuel the Day
Boost every moment with versatile peanut butter
(Family Features) Whether you’re a fitness junkie, busy parent, sleep-deprived student or diehard sweet tooth, peanut butter is an ingredient that sticks for all of life’s moments. With a healthy boost of protein and energy, peanut butter is perfect as an on-the-go snack, fuel for a workout, a reliable family meal or a decadent dessert.
There’s no shortage of delicious ways to pack peanut butter into diverse dishes throughout the day:
- Add peanut butter to your favorite fruit smoothie for a nutty new flavor.
- Encourage children to experiment with the essential spread and go beyond PB and J by replacing fruit for the jelly or stirring peanut butter or peanut butter powder into their yogurt.
- A simple peanut butter and honey sandwich makes a great on-the-go snack you can throw in your gym bag or tuck away in a drawer at work.
- Add peanut butter to a sauce or salad dressing for an extra zip of flavor and protein.
Find more creative ways to enjoy peanut butter with these winning recipes from Southern Peanut Growers’ annual PB My Way recipe contest, and explore additional dishes that celebrate this versatile ingredient at peanutbutterlovers.com.

Veggie Sammies with Peanut Butter Satay Sauce
Recipe courtesy of Ben M., San Francisco, California
Serves: 2
- 4 tablespoons creamy peanut butter
- 3 tablespoons lime juice
- 2 tablespoons water
- 4 teaspoons hoisin sauce
- 2 teaspoons soy sauce
- 2 teaspoons sriracha
- 2 French baguette rolls (6 inches each)
- 1/2 cup sliced cucumber
- 1/2 cup white onion
- 1/2 cup red bell pepper
- 1/2 cup purple cabbage
- 1/2 cup fresh cilantro
- In small bowl, combine peanut butter, lime juice, water, hoisin sauce, soy sauce and sriracha. Mix well.
- Spread sauce on both sides of bread then layer with cucumber, onion and bell pepper. Top with cabbage and cilantro leaves.

Graceland Mini Cupcakes
Recipe courtesy of Linda D., Coconut Creek, Florida
Serves: 36
Cupcakes:
- 2 cups all-purpose flour
- 2 teaspoons baking powder
- 1/2 teaspoon salt
- 4 ripe bananas
- 1/2 cup light sour cream
- 4 tablespoons unsalted butter, at room temperature
- 2 tablespoons canola oil
- 3/4 cups sugar
- 2 large eggs, at room temperature
- 1 large egg white, at room temperature
- 1 teaspoon vanilla extract
Peanut Butter Filling:
- 1/4 cup creamy peanut butter
Bacon Topping:
- 4 slices bacon
- 1/2 cup brown sugar
Frosting:
- 8 ounces low-fat cream cheese
- 1/2 cup butter
- 1/2 cup creamy peanut butter
- 2 teaspoons vanilla extract
- 3/4 cups confectioners’ sugar
- Heat oven to 350°F. Line cupcake tins with paper liners and lightly spray with cooking spray.
- To make batter: In medium bowl, combine flour, baking powder and salt. Stir to combine and set aside.
- In small bowl, mash bananas and add sour cream. Mix well and set aside.
- Using electric hand mixer, beat butter, oil and sugar until incorporated, about 3-5 minutes. Add eggs, egg white and vanilla. Mix until combined. Slowly add half the dry ingredients and mix until almost incorporated. Add sour cream and banana mixture and gently fold into batter. Add rest of dry ingredients until combined.
- Spoon batter into lined cupcake pans. Bake 18-20 minutes and let cool.
- After cooling about 30-45 minutes, use paring knife to cut small circle in middle of top of cupcakes and remove plug, creating a well about halfway down cupcake. Add peanut butter to piping bag and fill each hole. Set aside.
- In medium bowl, dredge both sides of bacon slices in brown sugar. Place on foil-lined baking sheet; bake 10 minutes. Flip and bake another 6-8 minutes. Remove bacon from oven and place on plate to cool. Once cool, chop bacon and set aside.
- To make frosting: In large bowl, combine cream cheese, butter, peanut butter and vanilla extract. Mix until combined. Add confectioners’ sugar and mix until well-combined.
- Add frosting to piping bag. Pipe a dollop of frosting onto each cupcake and sprinkle with candied bacon pieces.

Peanut Apple Chicken Curry
Recipe courtesy of Jess A., Berkeley, California
Serves: 4
Sauce:
- 1 tablespoon olive oil
- 2 cloves garlic, minced
- 2 teaspoons curry powder
- 1/4 cup scallions, chopped
- 1 cup creamy peanut butter
- 2 teaspoons rice wine vinegar
- 1 3/4 cups apple juice
- 1 3/4 cups coconut milk
- 1/4 cup brown sugar
- 1/4 teaspoon cayenne pepper (optional)
Chicken:
- 2 tablespoons olive oil
- 1/2 small yellow onion, chopped
- 1 1/2 pounds boneless, skinless chicken breast, cut into 1-inch strips
- 1 medium apple, peeled, cored and chopped
- salt, to taste
- pepper, to taste
- cooked rice (optional)
- To make sauce: In medium to large saucepan, heat oil over medium heat. Add garlic, curry powder and scallions. Saute 1 minute.
- Add peanut butter, vinegar, apple juice, coconut milk, brown sugar and cayenne. Bring to simmer, reduce heat and cook over low heat, stirring frequently, about 10-15 minutes.
- Meanwhile, in large skillet, heat oil. Add onion and stir fry about 2-3 minutes until onions start to become opaque.
- Add chicken and apples, and stir until chicken is cooked completely. Add peanut sauce and cook until heated evenly, about 2-5 minutes. Season with salt and pepper, to taste. Serve warm over rice, if desired.
Source: Peanut Growers