
Elevate Pizza Night with Premium Toppings
(Family Features) A family debate over what’s for dinner often ends with one word: pizza. Next time you land on pizza night, take it to the next level with premium ingredients everyone can agree on.
Elevating the pizza experience starts with tasty toppings that allow you to customize for everyone’s preferences, such as Carando’s Dry Sausage line. Featuring three varieties – Italian Dry Salame, Pepperoni and Genoa Salame, as well as a duo pack with Genoa Salame and Pepperoni – the line is made of all-natural ingredients that pairs effortlessly with an array of dishes.
Uncured and well-seasoned for classic Italian flavor, it allows families to elevate pizza night with options like Genoa Salame and Pepperoni Three-Cheese White Pizza. This cheesy, flavor-packed recipe is ready in just 20 minutes without sacrificing taste, making it perfect for busy weeknights.
When the weekend rolls around and it’s time for a savory snack or in-home entertaining, put premium dry sausage at centerstage with this Tour of Italy Charcuterie Board. Ideal for serving a crowd or sharing during family movie night, this platter calls for cheeses, olives, a homemade mostarda and Carando’s high-protein sausage that’s dried and sliced to perfection. Made with select cuts of meat and a longstanding recipe, it’s a classic star ingredient for meat and cheese boards. Each 5-ounce package contains 6-10 grams of protein per serving without added MSG or artificial flavorings, ingredients or colorings.
Visit Carando.com to find more recipes that take pizza night or your next summertime event to the next level.

Genoa Salame and Pepperoni Three-Cheese White Pizza
Prep time: 10 minutes
Cook time: 10 minutes
Serves: 6
- 2 pizza dough balls
- 1/4 cup extra-virgin olive oil
- 2 tablespoons fresh garlic, minced
- 2 tablespoons anchovy filets, chopped
- 1 cup Parmesan cheese, grated
- 1 pound fontina cheese, shredded
- 1 pound fresh mozzarella pearls
- 1 package Carando Charcuterie Duo
- 2 tablespoons flat-leaf parsley, chopped
- Preheat oven to 425 F.
- Stretch each dough ball over separate lightly greased, 14-inch pizza pans.
- Drizzle 1/8 cup olive oil on top of each crust then top each with 1 tablespoon garlic and 1 tablespoon anchovies followed by 1/2 cup Parmesan cheese, 1/2 pound fontina cheese, 1/2 pound fresh mozzarella pearls and 1/2 package charcuterie duo.
- Bake pizzas about 15 minutes, or until cheese is bubbly and crust is golden brown.
- Remove pizzas from oven and garnish each with 1 tablespoon chopped parsley.

Tour of Italy Charcuterie Board
Prep time: 20 minutes
Servings: 3-4
Mostarda:
- 1/2 cup apricot preserves
- 1/4 cup whole-grain mustard
Charcuterie Board:
- 1 package (5 ounces) Carando Uncured Genoa Salame
- 1 package (5 ounces) Carando Uncured Dry Salame
- 1 package (5 ounces) Carando Uncured Pepperoni
- 5 ounces fontina cheese
- 5 ounces provolone piccante cheese
- 5 ounces fresh mozzarella pearls
- 6 ounces olives
- 6 ounces giardiniera (pickled vegetables in oil)
- crackers, crostini or bread, for serving
- fresh basil, for garnish
- cherry tomatoes, for garnish
- To make mostarda: Mix apricot preserves and whole-grain mustard.
- To prepare charcuterie board: On large board or platter, arrange mostarda, genoa salame, dry salame, pepperoni, fontina cheese, provolone piccante cheese, mozzarella pearls, olives and giardiniera. Serve with crackers, crostini or bread and garnish with fresh basil and cherry tomatoes.
Source: Carando

Grape Summer Gatherings: Easy recipes to enjoy at warm-weather celebrations
(Family Features) Celebrations abound throughout summer, and if you plan on hosting your nearest and dearest for events large and small, you’ll need a tasty, convenient ingredient to elevate your entertaining all summer long. When that one ingredient also serves as a healthy, refreshing snack on its own, it’s a win-win.
Delicious, healthy and versatile, Grapes from California can be that special ingredient and pleasing snack. In recipes, grapes deliver sweet-tart flavor and crisp, juicy texture to appetizers, main courses, drinks, desserts and beyond. These recipes show the myriad ways this bite-sized fruit can bring out the best in warm-weather fare: a tasty frozen treat, a chic cocktail and a flavorful Southwestern-inspired salad that each add a special touch to any gathering.
In fact, while grapes complement a wide array of flavors – including sweet, sour, salty, spicy and smoky – that make them easy to use in recipes and serve alongside other foods, they’re also an ideal snack to serve by themselves. Grapes are inherently cool and refreshing, easily shareable and satisfying to eat.
Take your summer entertaining to new heights with additional recipe inspiration at GrapesFromCalifornia.com.
6 Ways to Chill Out with Grapes
Taking get-togethers, parties and celebrations outdoors during the summer months means frozen treats are essential. Consider these creative ways to use frozen grapes in your summer entertaining:
- Freeze grapes as they are – on or off the stem – for 2 hours for a healthy frozen treat.
- Ice cubes – frozen grapes offer a visually appealing (and delicious) replacement for plain ice cubes to help keep guests’ drinks cool.
- Swalty Frozen Grapes – these cold, sweet and spicy grapes rolled in honey, lime juice and spicy chili-lime seasoning are fun to eat.
- Wine-marinated frozen grapes – soak grapes in wine overnight then freeze for a festive, boozy bite.
- Frozen Yogurt Dipped Grapes – dip skewered grapes in yogurt then freeze for a mini, sweet-tart treat.
- Grape Sorbet – fresh grapes blend and freeze beautifully for a lovely frozen dessert.

Chocolate-Dipped Frozen Grape and Yogurt Clusters
Yield: 7 mounds
- 1 cup black Grapes from California, halved
- 3/4 cup plain nonfat vanilla Greek yogurt
- 2 teaspoons pure vanilla extract
- 2 1/2 ounces bittersweet chocolate, chopped
- 1 teaspoon extra-virgin olive oil
- In medium bowl, combine grapes, yogurt and vanilla. Line 9-inch square metal baking pan with parchment paper then, using 1-ounce scoop, place mounds of grape-yogurt mixture on sheet. Freeze until set, about 3 hours, or overnight.
- Place chopped chocolate in small, wide microwaveable bowl. Microwave 1 minute on medium power. Stir and repeat. Stir then microwave 30 seconds, repeating as needed until melted and smooth.
- Stir in oil. Dip bottoms of frozen clusters in chocolate to coat and return to pan.
- Store frozen clusters in airtight container in freezer up to 1 week.
Nutritional information per serving: 100 calories; 3 g protein; 12 g carbohydrates; 4.5 g fat (41% calories from fat); 2.5 g saturated fat (23% calories from saturated fat); 0 mg cholesterol; 10 mg sodium; 2 g fiber.

Southwest Charred Corn Salad with Grapes
Yield: 4 servings (6 cups)
- 2 large ears yellow corn on the cob, shucked
- 1/2 English cucumber, peeled, halved lengthwise and thinly sliced crosswise
- 1 cup large green and red Grapes from California, halved
- 1 cup canned black beans, drained and rinsed
- 1/2 small red onion, thinly sliced
- 1 tablespoon fresh jalapeno, minced
- 2 tablespoons extra-virgin olive oil
- 4 teaspoons cider vinegar
- 3/4 teaspoon cumin powder
- 1/4 teaspoon fine sea salt
- 1 avocado, diced 1/2 inch
- 1 ounce cotija cheese, crumbled
- freshly ground black pepper, to taste
- 3 tablespoons fresh cilantro leaves
- Over open flame on stove, directly under broiler or on grill, char corn, turning with tongs as needed, until roasted all around, about 3 minutes. Set aside to cool.
- In medium mixing bowl, combine cucumber, grapes, black beans, onion, jalapeno, olive oil, vinegar, cumin and salt; toss well.
- Working with sharp knife in wide, shallow bowl or pie pan, cut corn from cobs. Stand ear of corn upright in bowl and cut from middle downward, rotating to cut down 4-5 times. Invert cob and repeat. Repeat with remaining cobs.
- Add corn, avocado and cheese to bowl with grape-black bean mixture. Sprinkle with pepper, to taste, and top with cilantro; toss well.
Nutritional information per serving: 200 calories; 5 g protein; 24 g carbohydrates; 11 g fat (50% calories from fat); 2 g saturated fat (9% calories from saturated fat); 0 mg cholesterol; 160 mg sodium; 4 g fiber.

Lemongrass Grape Cocktail
Yield: 1 drink
Lemongrass Simple Syrup:
- 1 cup sugar
- 1 cup water
- 3-4 stalks lemongrass, trimmed, halved, inner cores cut into 1-inch pieces, chopped
Cocktail:
- 1/2 cup cold Grapes from California
- 2 slices fresh ginger
- 1 cup ice
- 2 ounces vodka
- 1 1/2 ounces lemongrass simple syrup
- 1/2 ounce lime juice
- frozen Grapes from California, for garnish
- lemongrass stalk, trimmed, for garnish
- To make lemongrass simple syrup: In heavy, small saucepan, combine sugar and water. Bring to simmer over medium heat. Stir until sugar is dissolved; add lemongrass pieces and simmer 3-5 minutes. Remove from heat. When cool, cover and refrigerate up to 2 weeks.
- To make cocktail: In shaker, muddle cold grapes and ginger. Add ice, vodka, lemongrass simple syrup and lime juice; shake well. Pour into glass over ice and garnish with frozen grapes and lemongrass stalk.
Note: For mocktail, replace vodka with seltzer water.
Nutritional information per serving: 270 calories; 1 g protein; 37 g carbohydrates; 0 g fat; 0 mg cholesterol; 0 mg sodium; 1 g fiber.

Fire Up the Grill for Favorite Summer Fare
(Family Features) Among the many staples of a summer gathering, lighting the grill and enjoying fresh-cooked fare is what makes those moments so special. Bring together your nearest and dearest with favorites straight off the grates to make this summer one to remember.
Pickled Beet Chimichurri Tri-Tip is sure to leave a lasting impression with the succulence of perfectly cooked steak elevated by beet chimichurri. Made with Aunt Nellie’s Diced Pickled Beets that are picked and packed at peak ripeness, they provide a balance of sweetness and vinegar for that familiar homemade flavor.
For a quick-and-easy option that makes dinnertime a cinch, turn to a beloved summer solution: bratwurst. Whether the outer layer is slightly charred or crispy, bratwurst makes it easy on the grill master while giving guests the opportunity to customize with their favorite toppings.
This German Potato Salad Flatbread with Bratwurst and Caramelized Onions recipe combines sliced bratwurst with caramelized onions and cheese for a unique spin on a summer classic. Serving as the base is browned READ German Potato Salad, made with thinly sliced potatoes and bacon in a traditional sweet-piquant dressing.
Find more ways to make summer grilling “grate” at AuntNellies.com and READSalads.com.

Pickled Beet Chimichurri Tri-Tip
Recipe courtesy of “Dad with a Pan”
Prep time: 15 minutes
Cook time: 60-90 minutes, plus 10-15 minutes rest time
Servings: 6-8
Tri-Tip:
- 1 tri-tip roast (2-3 pounds)
- salt, to taste
- pepper, to taste
Chimichurri Beet Sauce:
- 1 jar Aunt Nellie’s Diced Pickled Beets, drained
- 1 cup fresh parsley, roughly chopped
- 1/4 cup fresh cilantro, roughly chopped
- 4 cloves garlic, minced
- 1/4 cup red wine vinegar
- 1/2 cup olive oil
- 1 teaspoon fresh oregano, roughly chopped
- 1/2 teaspoon red pepper flakes, or to taste
- salt, to taste
- pepper, to taste
- To prepare tri-tip: Season tri-tip generously with salt and pepper, to taste, on all sides. Rest at room temperature about 30 minutes.
- To prepare chimichurri beet sauce: In food processor, combine pickled beets, parsley, cilantro, minced garlic, red wine vinegar, olive oil, fresh oregano, red pepper flakes, salt and pepper. Pulse until mixture is well combined and forms chunky sauce. Adjust seasoning, to taste.
- Heat grill to 350 F and prepare for two-zone grilling.
- Place tri-tip over indirect heat. Close lid and grill 30-40 minutes, flipping every 5-7 minutes, until internal temperature reaches 125 F for medium-rare.
- Move tri-tip to direct heat and grill 2-3 minutes per side, or until internal temperature reaches desired doneness (135 F for medium-rare).
- Transfer tri-tip to cutting board and rest 10-15 minutes.
- Slice tri-tip against grain into thin slices. Arrange slices on serving platter and drizzle with chimichurri beet sauce. Serve extra sauce on side for dipping.

German Potato Salad Flatbread with Bratwurst and Caramelized Onions
Recipe courtesy of “Dad with a Pan”
Prep time: 10 minutes
Cook time: 30 minutes
Servings: 4-6
- 2 large onions, thinly sliced
- 2 tablespoons butter
- 4 bratwurst links, sliced crosswise 1/8-inch thick
- 1 can (15 ounces) READ German Potato Salad, drained
- 1 flatbread, approximately 12 inches
- olive oil
- 1 cup shredded gruyere cheese
- fresh chives, chopped, for garnish
- fresh lemon wedges
- Preheat grill to medium-high heat (about 425 F).
- In 12-inch skillet or pan over direct heat, caramelize onions in butter 15-20 minutes. Set aside.
- In same pan, cook sliced bratwursts until browned and cooked through, 7-10 minutes. Set aside.
- In same pan, spread drained German potato salad. Cook until browned, 5-7 minutes. Set aside.
- Brush bottom of flatbread with olive oil.
- Place flatbread directly on grill grates. Layer with browned potato salad, cooked Bratwurst slices, caramelized onions and cheese.
- Close grill lid and cook 8-10 minutes, or until cheese is melted and flatbread is heated through.
- Garnish with chopped chives and serve with fresh lemon wedges.
Source:

Supercharge Summer Fun with a Sweet, Simple Salsa
(Family Features) After a full day at the park or swimming pool, summer fun calls for some refueling. All that sun is sure to exhaust busy families, leaving little time for complicated snacks.
Skip the long ingredients lists and leave confusing cooking instructions behind. Instead, treat your loved ones to this Roasted Sweetpotato Mango Salsa, an easy-to-prepare solution for those busy afternoons.
The natural sweetness of cubed sweetpotatoes (no added sugar required) and mango collide with the delightful crunch of diced bell peppers, onion and jalapeno. Combined with fresh-squeezed orange, lemon and lime juices, it’s equal parts flavor and refreshment served with your favorite chips or crackers.
With complex carbohydrates that provide sustained energy, sweetpotatoes help with both endurance and recovery in athletes, making them a perfect ingredient for reenergizing your family. This nutrition powerhouse is versatile and available year-round so you can enjoy them throughout the summer as part of favorite snacks, weeknight meals or even Saturday morning pancakes.
Pairing them with the more than 20 vitamins and minerals from mangos, which are fat free, sodium free and cholesterol free, makes this salsa a better-for-you snacking solution.
The versatility of sweetpotatoes makes it a cinch to add them to a variety of recipes to enhance flavor and nutrition content, from simple salsas and small bites to elevated recipes and beyond. Plus, they can be baked, microwaved, grilled, slow-cooked or prepared on the stove as a perfect summer sidekick.
Visit ncsweetpotatoes.com to find more recipes that are sure to become summer family favorites.
Watch video to see how to make this recipe!

Roasted Sweetpotato Mango Salsa
Recipe courtesy of the North Carolina Sweetpotato Commission
Servings: 12
- 1 1/2 cups (2 medium) sweetpotatoes
- 1/2 teaspoon salt
- 1/4 teaspoon pepper
- 1/2 tablespoon chili powder
- 2 tablespoons olive oil
- 1 cup mango
- 1/2 green bell pepper
- 1/2 red bell pepper
- 1/2 cup purple onion
- 1 jalapeno
- 1/4 cup cilantro
- 1 tablespoon fresh-squeezed orange juice
- 1 tablespoon fresh-squeezed lemon juice
- 1 tablespoon fresh-squeezed lime juice
- chips or crackers
- Heat oven to 400 F.
- Peel, rinse and cube sweetpotatoes 1/4 inch or smaller. Toss sweetpotatoes with salt, pepper, chili powder and olive oil.
- Spread on baking sheet and roast 20 minutes.
- Peel and cube mango. Seed and cube bell peppers. Dice onion. Seed and dice jalapeno. Finely chop cilantro.
- Once sweetpotatoes cool, mix with mango, peppers, onion and jalapeno. Cover with fresh-squeezed orange, lemon and lime juices.
- Chill and serve with chips or crackers.

Bring Joy to Mealtimes by Dining Together: Benefits of a Mediterranean lifestyle
(Family Features) The renowned Mediterranean Diet, celebrated for its myriad benefits, has been rated as a top diet in the world for years.
Recognizing the benefits of the foods included in the Mediterranean Diet, it’s important to broaden the understanding beyond its ingredients to embrace the elements of the Mediterranean lifestyle, which also contribute to these benefits. Essentially, it’s not just about what you eat; it’s also about how you enjoy it and with whom you share the experience.
Nutrition, physical activity, sleep and togetherness comprise this balanced way of living, with preparing, eating and enjoying food together being key elements of the Mediterranean lifestyle. You can immerse yourself in the vibrant spirit of the Mediterranean lifestyle simply by inviting friends or family to gather around the table for a meal – like a family favorite pasta dish.
The benefits of gathering around the table are abundant, ranging from fostering stronger connections and communication among family members to enhancing overall well-being. In fact, first-of-its-kind research conducted by researchers at the University of Minnesota and supported by Barilla, the world’s leading pasta maker, demonstrates that people experience greater happiness when they share meals with others, highlighting the importance of togetherness.
Published in “Families, Systems, & Health,” the research shows a strong positive correlation between how often people gather around the table during mealtimes and enhanced connectedness, reduced depressive symptoms and an improvement in overall mood.
Semolina pasta is a staple for many people in the Mediterranean region, playing a significant role in culinary history and making it a favorite ingredient in dishes aligned with the Mediterranean lifestyle and gathering around the table. For example, these recipes for Cellentani Caprese Pasta Salad and Linguine with Zucchini Carbonara are perfect for sharing, whether you’re hosting friends and neighbors or enjoying a meal with someone special.
A high-quality, minimally processed carbohydrate, semolina pasta is naturally low in sodium, a good source of fiber and contains a variety of micronutrients.
“Eating together is a joyful and important practice of the Mediterranean lifestyle that truly contributes to overall well-being,” said Michele Lefebvre, registered dietitian nutritionist and manager of nutrition and well-being at Barilla America. “As a traditional yet versatile food, pasta brings a sense of nostalgia to meals as people gather together around the table and connect in an impactful way.”
Visit barilla.com/recipes to discover more dishes that can help you follow the Mediterranean lifestyle.

Cellentani Caprese Pasta Salad
Prep time: 10 minutes
Cook time: 15 minutes
Servings: 7
- 1 box Barilla Protein+ Cellentanii pasta
- 4 tablespoons extra-virgin olive oil, divided
- 2 pints grape tomatoes, mixed color, halved
- 4 tablespoons lemon juice
- 8 basil leaves, julienned
- 2 cups small mozzarella cheese balls, halved
- salt, to taste
- black pepper, to taste
- Bring large pot of water to boil. Cook pasta according to package directions and drain. Drizzle pasta with 1 tablespoon olive oil and place on sheet tray to cool. Set aside.
- In large bowl, combine tomatoes, lemon juice, basil, remaining olive oil and cheese. Season with salt and pepper, to taste. Add pasta and stir.

Linguine with Zucchini Carbonara
Prep time: 5 minutes
Cook time: 10 minutes
Servings: 8
- 5 egg yolks
- 1 cup Pecorino Romano cheese, grated, divided
- 1/2 cup milk
- salt, to taste
- 1 tablespoon extra-virgin olive oil
- 1 medium zucchini, julienned
- 1 box Barilla Linguine
- 1 tablespoon fresh mint, chopped
- black pepper, to taste
- Bring large pot of water to boil.
- In bowl, mix egg yolks, 1/3 cup Pecorino Romano cheese and milk. Season with salt, to taste. Set aside.
- In large skillet, heat olive oil and cook zucchini.
- Cook pasta according to package directions. Reserve 1/2 cup cooking water.
- Mix pasta in pan with zucchini. Add egg yolk mixture and 2 tablespoons cooking water. Combine well.
- Add remaining cheese and mint; mix. Season with salt and pepper, to taste.
Source: Barilla

Take Family Favorites Al Fresco: Advice for enjoying easy meals outdoors
(Family Features) Bright sunshine, warm patios and fresh foods go hand in hand. As warm weather and sunny days call you outdoors, bring the whole family along with favorite meals that blend perfectly with a soft breeze and the subtle sounds of nature.
Al fresco dining doesn’t have to be difficult. Just gather a few supplies, whip up a favorite recipe or two and ask for a hand in heading outside. Take these tips into account to help ensure your backyard dining goes off without a hitch.
Create a Cozy Spot
Dinner in the backyard means convenience and the comfort of your own patio furniture, but you can always enhance the experience with an umbrella to add a touch of shade or a small fan on those still, steamy evenings. If a busy day means a later dinner, hanging strings of soft lighting can help illuminate the table.
Make It Fresh
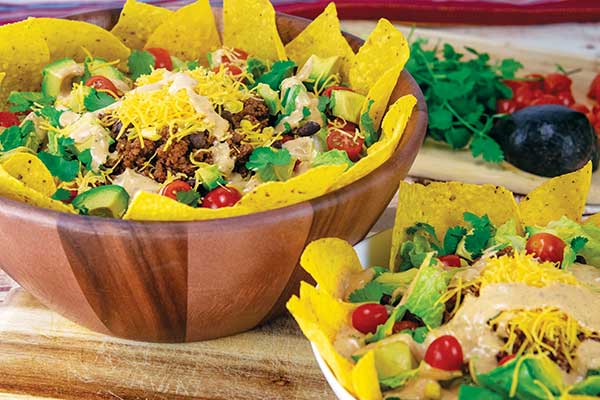
Salad season means fresh ingredients from lettuce and veggies to favorite toppings and beyond. Add a crisp bite to your next al fresco occasion with this Southwest Ranch Taco Salad featuring Newman’s Own’s Southwest Ranch Dressing. The dressing is creamy and smoky with a kick of spice and features no artificial flavors, no colors from artificial sources and no MSG, making it a perfect companion for salads and dips. In fact, you can enjoy this seasonal salad even more knowing that 100% of profits from the sale of the dressing goes toward helping nourish and transform the lives of children facing adversity.
Don’t Forget the Essentials
No outdoor meal is complete without a few must-have utensils. Avoid trips back and forth from the house by writing a list of everything you need so you don’t head to the deck without forks to share a salad or napkins to help clean up the mess. Bring the basics like plates, cups, utensils, napkins and a cloth to rest food on. Don’t leave behind serving spoons, trash bags and other convenience items that make al fresco dining a breeze.
Serve a Perfect Salad Partner
While a hearty salad alone is enough for a filling al fresco meal, you can take your backyard dining to the next level with the perfect partner for satisfying salads: crudites. Arranged neatly on a platter or board, a seasonal variety of sliced or whole raw vegetables such as snap peas, celery, carrots, cucumbers, cherry tomatoes, mini bell peppers, broccoli and more can make for a perfect accompaniment to nearly any outdoor meal. Serve with a dip or two, such as Newman’s Own’s Southwest Ranch Dressing, to complete your al fresco appetizer.
To find more al fresco food options that give back, visit NewmansOwn.com.
Southwest Ranch Taco Salad
Total time: 25 minutes
- 1/2 head romaine lettuce
- 1 pint cherry tomatoes
- 2 small avocados
- 1 tablespoon extra-virgin olive oil
- 1 pound ground beef (80/20 ground chuck)
- 2 teaspoons Newman's Own Mild Taco Seasoning
- 1/4 cup water
- 1 can (15 1/2 ounces) black beans
- 1 1/2 cups canned corn
- 1 cup shredded sharp cheddar cheese
- 2 tablespoons chopped fresh cilantro, plus additional for serving (optional), divided
- 1 cup Newman's Own Southwest Ranch Dressing
- 6 ounces tortilla chips
- Coarsely chop lettuce, halve cherry tomatoes and pit, peel and slice avocados. Set aside.
- In large frying pan over medium-high heat, heat olive oil. Brown ground beef, stirring occasionally, 4-5 minutes. Add taco seasoning and water; cook according to package directions, 5-8 minutes, or until meat is thoroughly cooked.
- Drain and rinse black beans. Set aside.
- Divide lettuce among serving bowls or plates. Top with ground beef, tomatoes, avocados, black beans, corn, cheese and 2 tablespoons cilantro. Tuck in tortilla chips.
- Drizzle with southwest ranch dressing and sprinkle with additional cilantro, if desired.
Source: Newman’s Own

A Creamy Pasta Delight Perfect for Dining Outdoors
(Family Features) Warming weather brings with it plenty of opportunities to celebrate from holidays and birthdays to sunny afternoons offering an excuse to spend time outdoors with loved ones. Dining al fresco brings added freshness to favorite foods, and taking your next meal to the patio can be a fun, delicious way to soak in some vitamin D.
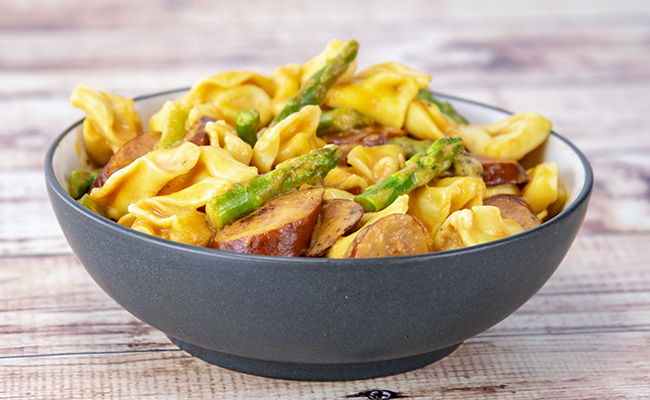
Pasta provides an easy option for sharing with a crowd, like this Creamy Tomato Smoked Sausage and Asparagus Tortellini. A cheesy, filling delight, it’s ready to enjoy in less than half an hour.
Plus, locally grown Michigan Asparagus adds an extra level of freshness requiring just about three days to travel from family farms in Michigan to your kitchen. It doesn’t need a passport to make it from farm to table, and you won’t need one either to enjoy this Italian-inspired dish in the comfort of home.
The thicker spears offer texture and additional flavor that’s also more tender because the fiber is less concentrated. Just 5-8 minutes in boiling water results in firm and delicious spears. This pasta dish calls for a late addition to the already-simmering sauce and tortellini so you can count on perfectly cooked asparagus as the finishing touch.
It’s also a sustainably produced ingredient as Michigan’s asparagus season primarily relies on the weather and uses rainwater rather than irrigation. As a nutrient-dense, low-calorie vegetable with no fat, no cholesterol and little sodium, it’s a family favorite you can feel good about serving your loved ones.
Find more patio-friendly recipe ideas at michiganasparagus.org.
Watch video to see how to make this recipe!
Creamy Tomato Smoked Sausage and Asparagus Tortellini
Recipe courtesy of the Michigan Asparagus Advisory Board
Servings: 6
- 1 tablespoon olive oil
- 1 pound smoked turkey sausage, sliced into bite-sized rounds
- 1 clove garlic, minced
- 1 2/3 cups chicken broth
- 1 can (15 ounces) tomato sauce
- 3/4 cup heavy cream
- 18 ounces cheese tortellini
- 1/2 pound fresh asparagus, trimmed and cut into bite-sized pieces
- In large rimmed skillet, heat olive oil over medium heat.
- Add sausage and brown on both sides. Add garlic and stir until golden, 20-30 seconds.
- Add broth, tomato sauce, cream and tortellini; stir to combine. Bring to light simmer.
- Cover and simmer over low heat 10 minutes. Add asparagus during last 5 minutes of cooking until tortellini is tender and sauce has reduced.

Bring Joy Back to Family Meals
(Family Features) While meals savored with loved ones are intended to produce smiles and shared moments, the process of grocery shopping, planning and cooking has become a chore for many families. Take the first step toward bringing back the joy and magic of making your favorite foods with tools that do the work for you.
For example, the all-in-one Albertsons Meal Plans and Recipes tool allows you to focus on what you want to eat rather than what you need to buy as it empowers everyday home cooks to plan, shop and prepare personalized recipes based on dietary preferences, allergies or family likes and dislikes. The app features a library of 9,000 exclusive recipes created by professional chefs (with new recipes added each month) and includes tasty dishes such as Sheet Pan Cajun Shrimp Fajitas with Bell Pepper, Onion and Spicy Ranch; Cheese Tortellini and Cauliflower with Creamy Spinach Marinara; and Garlic-Parmesan Chicken Tenders with Green Beans and Honey Mustard Dip.
The free digital tool also includes an artificial intelligence-powered “Scan Your Own Recipe” feature that allows you to snap a photo with your phone of grandma’s handwritten, not-so-secret recipe and transforms it into a digital version saved in the app. Recipes are instantly turned into shoppable ingredients and added to your cart for quick, convenient checkout. Now, you can turn all of your recipes into a digital library for quick and easy access in one place. No more flipping through cookbooks or recipe cards searching for your favorites.
Designed to provide culinary inspiration throughout the week while saving time and money, the app also features a budget tracker and hands-free cooking mode with a step-by-step timer.
“The Albertsons Meal Plans tool is the ultimate life hack,” said Jill Pavlovich, senior vice president of digital customer experience for Albertsons Cos. “This all-in-one app makes it simple for anyone to plan, shop and prepare inspiring recipes from anywhere – whether it is an old family favorite, a best-seller from a favorite food blogger or one of our 9,000 delicious recipes. Best of all, it’s completely free to use on our grocery app and website.”
The tool is available on the store apps and websites across the Albertsons Cos. banner of stores including Albertsons, Safeway, Vons, Jewel-Osco, Shaw’s, Acme, Tom Thumb, Randalls, United Supermarkets, Pavilions, Star Market, Haggen, Carrs, Kings Food Markets and Balducci’s Food Lovers Market.
Find more information and a seemingly endless collection of recipes at Albertsons.com.
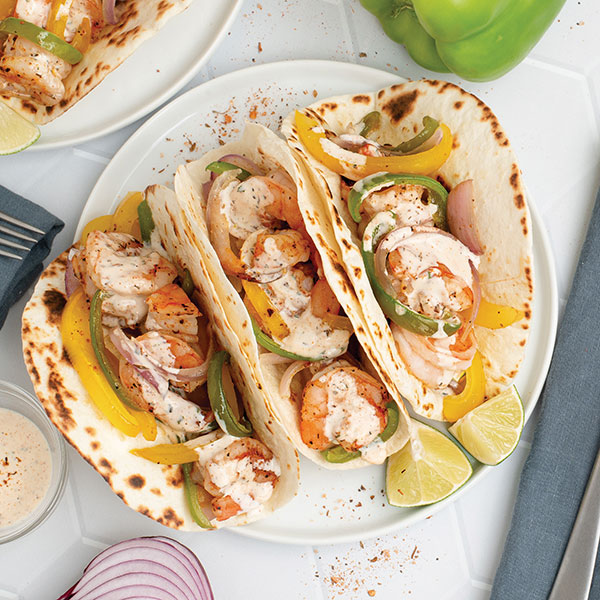
Sheet Pan Cajun Shrimp Fajitas with Bell Pepper, Onion and Spicy Ranch
Recipe courtesy of Albertsons
Total time: 30 minutes
Servings: 4
- 2 green bell peppers
- 2 yellow bell peppers
- 1 lime
- 1 medium red onion
- 2 tablespoons extra-virgin olive oil
- 1 1/2 pounds raw, peeled shrimp, fresh or frozen
- 5 teaspoons Cajun seasoning, divided
- 1 teaspoon salt
- 1/2cup ranch dressing
- 12 small flour tortillas
- Preheat oven to 450 F.
- Wash and dry green bell peppers, yellow bell peppers and lime.
- Trim, seed and slice bell peppers lengthwise into thin strips; transfer to large baking sheet.
- Peel, halve and slice onion lengthwise into thin pieces; add to baking sheet with bell peppers.
- Drizzle veggies with oil, toss to combine and spread in even layer. Bake until veggies have softened slightly, about 5 minutes.
- If using frozen shrimp, place them in colander and run under cold water to thaw slightly. Place shrimp on clean towel or paper towels and pat dry.
- Remove baking sheet from oven. Arrange shrimp over veggies then sprinkle with 4 teaspoons Cajun seasoning and salt; toss to combine and spread in even layer.
- Bake until veggies are tender and shrimp are cooked through, 5-7 minutes. Remove from oven.
- Cut lime into wedges.
- In small bowl, stir ranch dressing and remaining Cajun seasoning.
- Warm tortillas in skillet, oven or microwave, if desired.
- Divide tortillas between plates and fill with shrimp and veggies; drizzle with spicy ranch and serve with squeeze of lime.
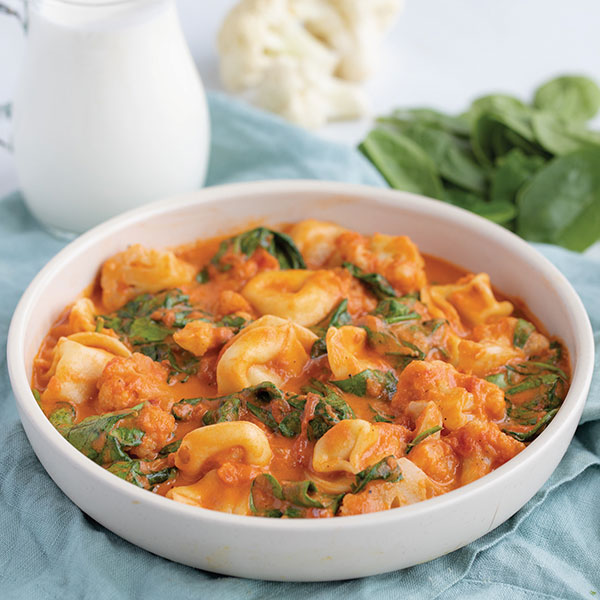
Cheese Tortellini and Cauliflower with Creamy Spinach Marinara
Recipe courtesy of Albertsons
Total time: 20 minutes
Servings: 4
- 2 bags (10 ounces each) cauliflower florets
- 18 ounces cheese tortellini, fresh or frozen
- 1/2 tablespoon salt
- 1 jar (24 ounces) marinara sauce
- 8 fluid ounces heavy whipping cream
- 1/2 teaspoon basil, dried
- 1/4 teaspoon black pepper
- 2 packages (5 ounces each) baby spinach
- Fill large pot halfway with hot water, cover and bring to boil. Uncover then add cauliflower, tortellini and salt; stir for a few seconds. Cook, stirring occasionally, until just tender, about 5 minutes, or cook according to package instructions.
- In separate large pot over medium heat, stir marinara sauce, cream, basil and black pepper to combine and bring sauce to simmer. Once simmering, reduce heat to medium-low and cook until slightly thickened, 3-4 minutes.
- Wash and dry spinach.
- When sauce has thickened, add spinach to pot in handfuls, waiting for spinach to wilt slightly before adding next handful. Remove from heat and cover to keep warm.
- When cauliflower and tortellini are done, drain and add to pot with creamy marinara sauce; stir to combine.
- To serve, divide pasta between plates or bowls.
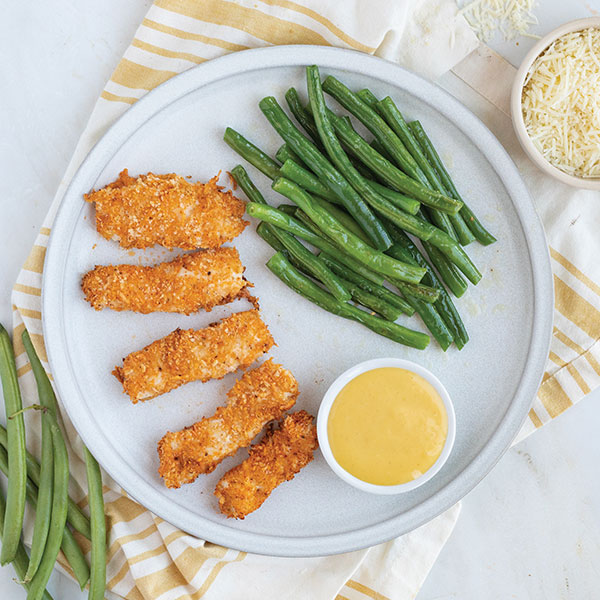
Garlic-Parmesan Chicken Tenders with Green Beans and Honey Mustard Dip
Recipe courtesy of Albertsons
Total time: 30 minutes
Servings: 4
- 2 tablespoons extra-virgin olive oil, divided
- 1/4 cup mayonnaise
- 1 teaspoon garlic powder
- 1 teaspoon salt, divided
- 2/3 cup Parmesan cheese, shredded
- 1/2 cup panko breadcrumbs
- 1/2 teaspoon paprika
- 1 1/2 pounds boneless, skinless chicken breasts
- 1 1/2 pounds green beans
- 1/2 cup honey mustard dressing
- Preheat oven to 450 F. Coat baking sheet with 2 teaspoons oil.
- In medium bowl, stir mayo, garlic powder and 1/2 teaspoon salt to combine.
- In separate medium bowl, stir Parmesan, breadcrumbs and paprika to combine.
- Pat chicken dry with paper towels and slice into 3/4-inch tenders. Add to bowl with mayo mixture and toss to coat.
- Working in batches, dredge tenders in breadcrumb coating, pressing to adhere. Transfer to baking sheet.
- Bake until tenders start to turn golden, about 10 minutes.
- On clean cutting board, wash, dry and trim green beans. Set aside.
- When chicken is golden, flip and bake until cooked through, 6-8 minutes. Remove from oven.
- Preheat large skillet over medium-high heat.
- Add remaining oil and swirl to coat bottom. Add green beans and remaining salt; cook, stirring occasionally, until tender-crisp, 4-5 minutes. Remove from heat.
- Divide chicken tenders and green beans between plates. Serve with dressing for dipping.
Source: Albertsons

Simple, Convenient Salads to Celebrate Spring
(Family Features) Letting in a little fresh air with an open window or a screen door is a sure sign of spring, allowing the natural sights and smells of the outdoors to accompany you at the dinner table. Take that open-air freshness to new heights this spring by pairing it with your own signature spins on salad season.
For example, this Tuna and Rice Nicoise Salad offers a new take on tuna salad with olive tapenade, capers, tomatoes, green beans and cherry tomatoes. Its calling card: swapping out potatoes in favor of Minute Yellow Rice Cups, which cook up fast as a convenient and flavorful alternative that saves the chore of washing, peeling and boiling potatoes. Fully cooked and packaged in BPA-free cups, it features white rice lightly seasoned with onion powder, garlic powder and turmeric for a delightful taste ready in just 1 minute.
As a perfect recipe for those who love veggies, this dish combines classic salad freshness with olive tapenade for a briny bite in every mouthful. Canned tuna mixes with bursts of capers, hard-boiled egg, crisp green beans and sweet cherry tomatoes capped off with tart balsamic dressing to round out the dish.
If you love the taste of crisp, peppery arugula, this Pomegranate and Arugula Rice Salad is practically perfect. Your favorite green shines alongside a delicious mix of sweet pomegranate seeds, crisp almonds and tart balsamic dressing that’s ideal for a starter or side, or you can add a preferred protein to turn it into a satisfying main course.
Incredibly colorful with a lively taste, bright flavors mingle with fluffy grains of Minute Instant Jasmine Rice, ready in just 5 minutes to keep your dinner schedule on track. Aromatic white rice provides a distinct scent, perfect texture and delicious taste that’s fast, fragrant, flavorful and fluffy. It’s simply precooked then dried with nothing added but convenience to help you get tasty meals on the table quickly.
Requiring just 15 minutes to prepare, this salad is ready in an instant and serves up to eight people, making it a solution for anything from family gatherings to meal prepping for a busy week ahead.
Find more spring salads and other flavorful, convenient recipes by visiting MinuteRice.com.
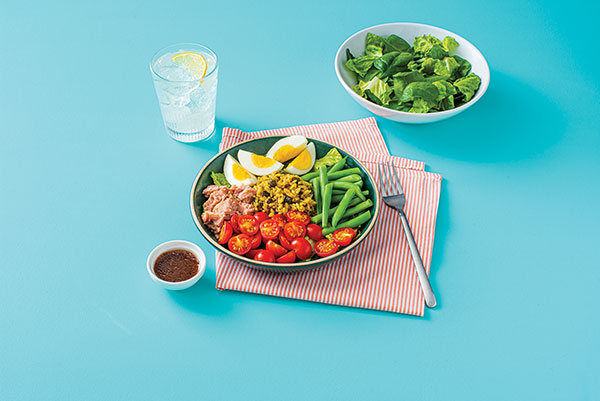
Tuna and Rice Nicoise Salad
Prep time: 4 minutes
Cook time: 1 minute
Servings: 1
- 1 cup Minute Yellow Rice Cups
- 2 tablespoons balsamic dressing
- 2 tablespoons olive tapenade
- 1 teaspoon capers, drained well
- 1/2 cup halved cherry tomatoes
- 1/2 cup frozen green beans, thawed
- 1 can (3 ounces) tuna, drained and flaked
- 1 hard-boiled egg, cut into wedges
- Heat rice according to package directions.
- In medium bowl, combine rice, balsamic dressing, tapenade and capers. Mix well.
- Top with cherry tomatoes, green beans, tuna and hard-boiled egg.
- Tip: Serve salad over bed of mixed greens, if desired.
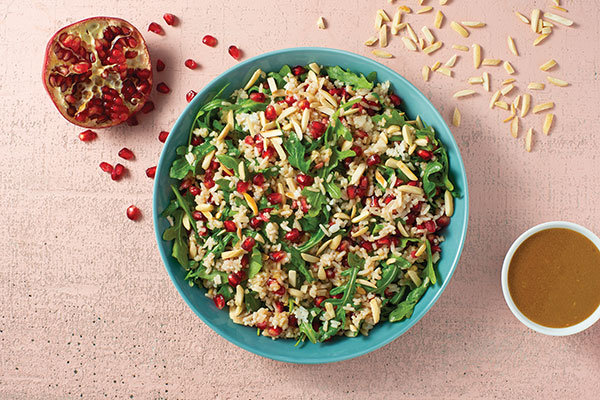
Pomegranate and Arugula Rice Salad
Prep time: 10 minutes
Cook time: 5 minutes
Servings: 8
- 2 cups Minute Instant Jasmine Rice
- 1/3 cup olive oil
- 3 tablespoons balsamic vinegar
- 2 tablespoons minced red onion
- 1 tablespoon Dijon mustard
- 1 teaspoon honey
- 1/2 teaspoon salt
- 1/4 teaspoon black pepper
- 1 bag (5 ounces) arugula
- 1 cup pomegranate seeds
- 1/3 cup slivered almonds, toasted
- Prepare rice according to package directions. Cool completely, about 10 minutes.
- In large bowl, whisk oil, vinegar, red onion, mustard, honey, salt and pepper.
- Add rice, arugula and pomegranate seeds to bowl; toss to coat thoroughly. Sprinkle with almonds.
Tips: For added flavor, top salad with crumbled goat or blue cheese.
To cool rice quickly, spread evenly on parchment paper-lined baking sheet.
Source: Minute Rice

Indulge Taste Buds with Better-for-You Snacks
(Family Features) The foundation of healthy eating may include nutritious breakfasts, lunches and dinners, but just as important are the snacks in-between meals. Regardless of when or where you snack, encourage better-for-you eating habits with nutritious nibbles to power through your day.
According to an online survey conducted among 1,000 Americans ages 18 and older across the U.S. by Wakefield Research on behalf of the American Pecan Promotion Board, Americans love snacks, and reach for them an average of three times a day.
However, where and when those snacks are eaten can vary from on the move to on the couch, from sunrise to after bedtime. Nearly a third (30%) of respondents are munching on snacks while in bed, calling it their favorite snacking spot. However, only 35% of their snack choices are considered healthy.
Fueling busy days can be easy with an option like pecans. According to the survey, 66% of snackers enjoy pecans on their own with 58% eating them as part of a trail mix. If you’re among the 50% who reach for a snack in the late afternoon, you can turn to nutritious, satisfying solutions to indulge afternoon cravings without the guilt. With pleasing crunch, comforting creaminess and a satisfying chew, pecans are the “no sacrifice” nut that can punch up your routine with both delicious taste and plant-based nutrition.
Just a handful of pecans – about 19 halves – provides a good source of fiber, thiamin and zinc and an excellent source of copper and manganese, a mineral that’s essential for metabolism and bone health. They also provide a mix of protein and good fats – 18 grams of unsaturated fat, including oleic acid, and only 2 grams of unsaturated fat – to help keep you full and energized throughout the day.
As an added bonus, their versatility and easy-to-pair profile makes them a perfect ingredient in recipes you can prepare in a cinch. For bite-sized treats that are packed with flavor and perfect for snack time, these Pecan Chickpea Cookie Dough Bites swap out flour and sugar in favor of blended pecans, chickpeas, vanilla extract, cinnamon and sea salt with dark chocolate chips folded in for a sweet finishing touch.
Or you can simply toss warm pecans with olive oil and sea salt in this Roasted Pecans recipe for a grab-and-go snack that can be prepared in advance without worrying about spoiling. Another benefit of pecans: They can be stored in the refrigerator for up to 9 months or frozen up to 2 years, giving them a longer shelf life than many pantry favorites. Plus, they can be thawed and refrozen without losing flavor or texture.
To find more surprisingly delicious nutritional facts or recipe inspiration, visit EatPecans.com.
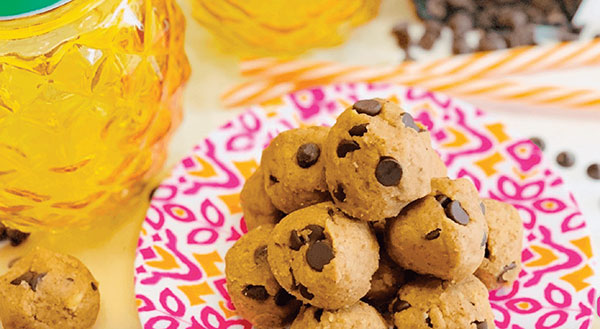
Pecan Chickpea Cookie Dough Bites
Recipe courtesy of Dawn Jackson Blatner, RDN, on behalf of the American Pecan Promotion Board
Prep time: 10 minutes
Servings: 24
- 1 cup raw pecan pieces
- 1 can (15 ounces) chickpeas, rinsed and drained
- 1 tablespoon vanilla extract
- 1/2 teaspoon cinnamon
- 1/2 teaspoon sea salt
- 1/2 cup dark chocolate chips
- In blender or food processor, blend pecan pieces, chickpeas, vanilla extract, cinnamon and sea salt 3-5 minutes, scraping down sides occasionally, until smooth and creamy.
- Fold in dark chocolate chips.
- Form into 24 cookie dough balls. Eat as-is; no baking required.
Note: Store leftovers in airtight container in refrigerator 5 days or freeze up to 3 months.
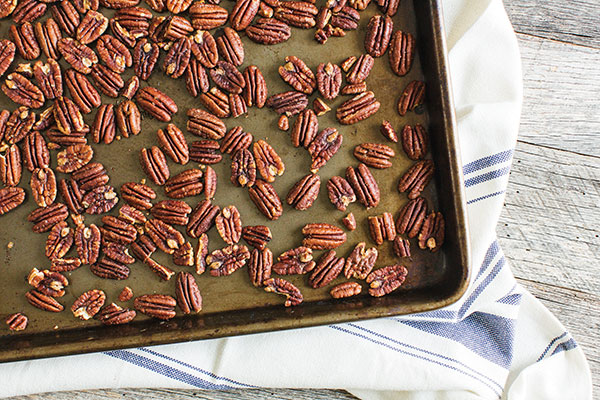
Roasted Pecans
Recipe courtesy of the American Pecan Promotion Board
Prep time: 40 minutes
Cook time: 35 minutes
Servings: 8
- 2 1/4 cups raw pecan halves
- 2 teaspoons olive oil or pecan oil
- 1 teaspoon flaky sea salt
- Preheat oven to 300 F.
- Place pecans on baking sheet and bake 15 minutes.
- In heat-proof bowl, toss warm pecans with olive oil and sea salt, crushing larger salt grains with fingers while sprinkling.
- Return pecans to baking sheet in single layer and bake 20 minutes, or until slightly browned and dry. Remove from oven and cool on baking sheet.
Note: Store pecans in airtight container in refrigerator up to 9 months or freeze up to 2 years. Pecans can be thawed and frozen repeatedly without loss of flavor or texture.
Source: American Pecan Promotion Board