
Give Your Grilling Game a Flavor Boost: 3 tips to make summer meals deliciously memorable
(Family Features) Make sure your grill game is on fire this summer. The right prepping, seasoning and grilling techniques can help you serve your favorite foods in the tastiest ways all summer.
Consider these helpful tips from the flavor experts at Watkins.
Seasoning with Staying Power
The first step for impressive flavor is proper preparation. For dry seasoning, blot meat or sliced vegetables (such as zucchini) with paper towels to dry. Then rub 1-2 teaspoons of vegetable oil over each piece to help your seasoning or dry rub stick.
For marinades, after mixing – but before adding the meat – reserve 2 tablespoons of marinade liquid to baste meat while on the grill. If you’re dicing meat (except for shrimp), do so before adding it to the marinade so each piece can soak in as much flavor as possible.
Finally, no grilling menu would be complete without burgers. Adding a seasoning tailor-made for this all-American classic, like Watkins Organic Hamburger Seasoning, brings an unforgettable boost of flavor. You’ll want about 1 tablespoon of seasoning for each pound of ground meat – just be sure to mix in thoroughly before you make your patties to distribute the flavor evenly.
Flavor for All Your Favorites
While most people think of meats for grilling season, there are so many ways to spice up all your favorite foods and beverages. For fajitas, you can use chili lime seasoning for the meat and put it on the rim of your lemonade or margaritas, too.
You can also switch it up and roast potatoes instead of fries to go with a well-seasoned burger. Try peppercorn Parmesan seasoning for a complementary flavor. If you’re looking for a finishing touch for steak, mushrooms make a perfect enhancement and you can use the same steak seasoning to prepare them.
A Showstopping Side
Grilled corn makes a fresh, juicy side for summer meals. For tender kernels and a milder char flavor, leave the husks on, soak the corn in water for 20-30 minutes and grill over medium-high heat for 15-20 minutes. For more char and caramelized flavor, remove the husks and grill over medium-high heat for 8-10 minutes, turning frequently.
After grilling, remove the husks (if needed) and lightly coat the corn in butter before seasoning. Corn can work with a range of flavor profiles – get creative with Watkins Organic Mesquite, Chili Lime or Peppercorn Parmesan seasoning blends to make your most memorable corn yet.
Whatever you add to your menu, enjoy finding new summer staples. For more flavors and grilling inspiration, visit watkins1868.com.

Southwest Pork Chops
- 2 tablespoons Watkins 1868 Organic Grilling Chili Lime Seasoning
- 2 teaspoons Watkins Organic Black Pepper
- 2 teaspoons cooking oil of choice
- 1/2 teaspoon Watkins Fine Himalayan Pink Salt
- 8 pork loin chops (about 2 1/2 pounds)
- hot sauce (optional)
- Combine chili lime seasoning, black pepper, cooking oil and pink salt. Spread mixture evenly over pork chops. Cover and refrigerate at least 30 minutes.
- Heat grill to medium heat. Grill pork chops 4-5 inches from heat source, turning frequently, until no longer pink when cut near bone. Serve with hot sauce, if desired.

Peppery Beef Kebabs
- 1 pound sirloin, cut into 1-inch cubes
- 2 tablespoons Watkins 1868 Organic Grilling Steak Seasoning or Watkins 1868 Organic Grilling Salt Free Steak Seasoning
- 1 teaspoon Watkins Organic Ground Black Pepper
- bell peppers, cut into chunks (optional)
- onions, cut into chunks (optional)
- mushrooms, cut into chunks (optional)
- cooked couscous or rice
- Sprinkle sirloin with steak seasoning and black pepper. Thread beef onto skewers along with bell peppers, onions and mushrooms, as desired.
- Heat grill to medium-high heat. Grill, turning occasionally, until meat is cooked to desired doneness, 5-7 minutes. Serve atop cooked couscous or rice.
Photos courtesy of Shutterstock
Source: Watkins Spices

Fire Up the Grill for Favorite Summer Fare
(Family Features) Among the many staples of a summer gathering, lighting the grill and enjoying fresh-cooked fare is what makes those moments so special. Bring together your nearest and dearest with favorites straight off the grates to make this summer one to remember.
Pickled Beet Chimichurri Tri-Tip is sure to leave a lasting impression with the succulence of perfectly cooked steak elevated by beet chimichurri. Made with Aunt Nellie’s Diced Pickled Beets that are picked and packed at peak ripeness, they provide a balance of sweetness and vinegar for that familiar homemade flavor.
For a quick-and-easy option that makes dinnertime a cinch, turn to a beloved summer solution: bratwurst. Whether the outer layer is slightly charred or crispy, bratwurst makes it easy on the grill master while giving guests the opportunity to customize with their favorite toppings.
This German Potato Salad Flatbread with Bratwurst and Caramelized Onions recipe combines sliced bratwurst with caramelized onions and cheese for a unique spin on a summer classic. Serving as the base is browned READ German Potato Salad, made with thinly sliced potatoes and bacon in a traditional sweet-piquant dressing.
Find more ways to make summer grilling “grate” at AuntNellies.com and READSalads.com.

Pickled Beet Chimichurri Tri-Tip
Recipe courtesy of “Dad with a Pan”
Prep time: 15 minutes
Cook time: 60-90 minutes, plus 10-15 minutes rest time
Servings: 6-8
Tri-Tip:
- 1 tri-tip roast (2-3 pounds)
- salt, to taste
- pepper, to taste
Chimichurri Beet Sauce:
- 1 jar Aunt Nellie’s Diced Pickled Beets, drained
- 1 cup fresh parsley, roughly chopped
- 1/4 cup fresh cilantro, roughly chopped
- 4 cloves garlic, minced
- 1/4 cup red wine vinegar
- 1/2 cup olive oil
- 1 teaspoon fresh oregano, roughly chopped
- 1/2 teaspoon red pepper flakes, or to taste
- salt, to taste
- pepper, to taste
- To prepare tri-tip: Season tri-tip generously with salt and pepper, to taste, on all sides. Rest at room temperature about 30 minutes.
- To prepare chimichurri beet sauce: In food processor, combine pickled beets, parsley, cilantro, minced garlic, red wine vinegar, olive oil, fresh oregano, red pepper flakes, salt and pepper. Pulse until mixture is well combined and forms chunky sauce. Adjust seasoning, to taste.
- Heat grill to 350 F and prepare for two-zone grilling.
- Place tri-tip over indirect heat. Close lid and grill 30-40 minutes, flipping every 5-7 minutes, until internal temperature reaches 125 F for medium-rare.
- Move tri-tip to direct heat and grill 2-3 minutes per side, or until internal temperature reaches desired doneness (135 F for medium-rare).
- Transfer tri-tip to cutting board and rest 10-15 minutes.
- Slice tri-tip against grain into thin slices. Arrange slices on serving platter and drizzle with chimichurri beet sauce. Serve extra sauce on side for dipping.

German Potato Salad Flatbread with Bratwurst and Caramelized Onions
Recipe courtesy of “Dad with a Pan”
Prep time: 10 minutes
Cook time: 30 minutes
Servings: 4-6
- 2 large onions, thinly sliced
- 2 tablespoons butter
- 4 bratwurst links, sliced crosswise 1/8-inch thick
- 1 can (15 ounces) READ German Potato Salad, drained
- 1 flatbread, approximately 12 inches
- olive oil
- 1 cup shredded gruyere cheese
- fresh chives, chopped, for garnish
- fresh lemon wedges
- Preheat grill to medium-high heat (about 425 F).
- In 12-inch skillet or pan over direct heat, caramelize onions in butter 15-20 minutes. Set aside.
- In same pan, cook sliced bratwursts until browned and cooked through, 7-10 minutes. Set aside.
- In same pan, spread drained German potato salad. Cook until browned, 5-7 minutes. Set aside.
- Brush bottom of flatbread with olive oil.
- Place flatbread directly on grill grates. Layer with browned potato salad, cooked Bratwurst slices, caramelized onions and cheese.
- Close grill lid and cook 8-10 minutes, or until cheese is melted and flatbread is heated through.
- Garnish with chopped chives and serve with fresh lemon wedges.
Source:

Power Up Family Mealtimes
(Family Features) Between juggling work, family, friends and social activities, powering through busy day-to-day schedules requires a lot of energy. Building meals around recipes packed with a plant-based protein such as peanuts or peanut butter can help your family come together to refuel.
In fact, at 7 grams per serving, a nutrient-rich powerhouse like peanuts delivers the most protein of any nut and contains six essential vitamins – vitamin E, folate, riboflavin, thiamin, niacin and vitamin B6 – and seven essential minerals – phosphorus, iron, magnesium, potassium, zinc, copper and calcium.
As a versatile ingredient that can be enjoyed as a standalone snack or part of a variety of recipes from morning to night, peanuts can take center stage at the family table when it’s time to recharge at the end of long days. Start with an appetizer like Broccoli and Edamame Salad with Peanut Dressing, which can be on the table in 10 minutes, to hold over hunger ahead of a protein-packed main course like Chicken with Peanut Sauce in Lettuce Wraps. Finish off the evening meal with Peanut Butter Cottage Cheese Cheesecake as a better-for-you dessert.
Find more delicious ideas for keeping your family energized at gapeanuts.com.

Chicken with Peanut Sauce in Lettuce Wraps
Recipe courtesy of Parker’s Plate on behalf of the Georgia Peanut Commission
Prep time: 10 minutes
Cook time: 15 minutes
Servings: 4
- 2 pounds ground chicken
- 2 tablespoons sesame oil
- 3/4 cup diced shiitake mushrooms
- 1 small onion, diced
- 2 garlic cloves, grated
- 1 1/2 tablespoons fresh grated ginger
- 1/2 cup hoisin sauce
- 1/2 cup water chestnuts, diced
- 3 green onions (both white and green parts), chopped
- 2 garlic cloves, grated
- 1/4 cup cilantro, chopped, for garnish
- 1/4 cup crushed peanuts, for garnish
- iceberg or butter lettuce, for wraps
Peanut Sauce:
- 3 tablespoons creamy peanut butter
- 2 teaspoons brown sugar
- 1 tablespoon fresh lime juice
- 2 tablespoons chili garlic sauce
- 1 teaspoon fresh grated ginger
- 1 tablespoon soy sauce
- In pan, saute ground chicken in sesame oil until cooked through. Drain if mixture is watery.
- Add shiitake mushrooms and onion; saute until mushrooms have softened and appear caramel colored.
- Add garlic, ginger, hoisin, water chestnuts and green onions. Let chicken mixture simmer on low.
- To make peanut sauce: In saucepan over medium-low heat, mix peanut butter, brown sugar, lime juice, chili garlic sauce, ginger and soy sauce until smooth, warm and thinned slightly.
- Fold into chicken mixture. Stir until combined and simmer on low until peanut sauce is evenly distributed.
- Garnish with fresh cilantro and crushed peanuts. Serve in lettuce wraps.

Broccoli and Edamame Salad with Peanut Dressing
Recipe courtesy of Parker’s Plate on behalf of the Georgia Peanut Commission
Prep time: 10 minutes
Cook time 5 minutes
Servings: 4
Dressing:
- 1/2 fresh lime, juice only
- 1/4 cup toasted sesame seed oil
- 3 tablespoons honey
- 2 tablespoons tahini
- 3 tablespoons creamy peanut butter
- 1 teaspoon chili oil
- 1 garlic clove, grated
- 1 teaspoon fresh ginger, grated
- kosher salt, to taste
- 1 tablespoon hot water, plus additional for thinner consistency (optional)
Salad:
- 2 cups broccoli slaw
- 1 cup shelled edamame, cooked
- 1 1/2 cups chopped raw broccoli
- 1/2 cup English cucumber, quartered and chopped
- 1/4 cup fresh mint, chopped
- 1/4 cup fresh cilantro, chopped
- 1/4 cup salted peanuts, roughly chopped
- toasted sesame seeds, for garnish (optional)
- To make dressing: In bowl, whisk lime juice, toasted sesame seed oil, honey, tahini, peanut butter, chili oil, garlic, ginger and salt, to taste. Add hot water, adding additional, if necessary, until dressing reaches desired consistency. Set aside.
- To make salad: In large bowl, combine broccoli slaw, edamame, broccoli, cucumber, mint, cilantro and peanuts. Toss with dressing to combine and garnish with toasted sesame seeds, if desired.

Peanut Butter Cottage Cheese Cheesecake
Recipe courtesy of Parker’s Plate on behalf of the Georgia Peanut Commission
Prep time: 25 minutes
Cook time: 2 hours
Servings: 8 (1 slice each)
Crust:
- 2 cups pretzels
- 1 1/2 cups vanilla-flavored wafer-style cookies
- 1/2 cup peanuts
- 12 tablespoons unsalted butter
- nonstick cooking spray
Filling:
- 1/2 cup cottage cheese
- 1 cup heavy whipping cream
- 3 tablespoons sugar
- 3 tablespoons creamy peanut butter
- 1/2 cup roughly chopped dark chocolate
- 1/2 cup roughly chopped peanuts
- 1 pinch sea salt
- To make crust: In food processor, pulse pretzels, wafer-style cookies and peanuts until chopped but not powdery.
- In skillet, melt butter. Add pretzel mixture until combined with butter.
- Spray pie pan with nonstick cooking spray and spread mixture on bottom of pan and slightly up sides; press down until even.
- To make filling: In bowl using hand mixer, whip cottage cheese until lumps are smoother, 3-4 minutes.
- In separate bowl, use hand mixer to whip heavy cream and sugar until stiff peaks form.
- Add cottage cheese and peanut butter to heavy cream mixture; whip until combined, about 1 minute.
- Top pie with chopped chocolate and peanuts and freeze 2 hours. Remove from freezer 15 minutes before ready to serve.
- Before serving, sprinkle with sea salt.
Source:

Create a Family-Friendly Grazing Board
(Family Features) A beautifully designed charcuterie board may feel more like a grown-up treat, but with the right ingredients, delicious grazing boards can provide fun and nutrition for the whole family.
No matter what you call it, charcuterie boards, grazing boards and snack platters are all basically the same thing. The boards make a trendy addition to an entertaining menu, but a platter or kid-friendly board can be equally pleasing.
What you serve on a grazing board is entirely up to you. Most include a selection of meats and cheeses, and many incorporate nuts, crackers, dips and jams. Some also incorporate fresh fruits and vegetables. Creating your own board means there really are no rules; you can add just about anything you want.
To build a successful board, keep these tips in mind:
Choose ingredients and elements that don’t require temperature control. The idea of a grazing board is that it sits out for a while. Avoid anything that needs refrigeration, heat or will lose its shape or flavor if it rests for an extended amount of time.
Select a surface large enough to hold a variety of food. It can be a simple cutting board or a cute platter. There’s no specific size requirement but err on the side of bigger; spacing out your goodies can be more attractive and less messy.
Use high-quality ingredients to ensure every bite is delicious and nutritious. While shopping, remember to look for the Produce for Kids and Healthy Family Project logos next to favorite items in the produce department, as adding these flavorful fruits and veggies to your cart can help make a difference in your community.
Build your board around a theme to add an extra element of fun. Use mini cookie cutters to make fun, kid-friendly shapes out of cheese and meats. Be mindful of colors; a rainbow platter is vibrant and appealing, and colorful fruits and veggies offer a strong mix of nutrients.
Remember it doesn’t have to be elaborate. Classic favorites are all you need. Even kid favorites like sections of mandarin oranges, carrot sticks and chocolate chips are fair game for a family-friendly board.
Find more ideas for creating family-friendly treats at healthyfamilyproject.com.

Taco Tuesday Board
Recipe courtesy of Healthy Family Project’s “Come Graze With Us” e-cookbook
- Guacamole
- Salsa
- Queso
- Hard and soft taco shells
- Ground turkey, seasoned and browned
- Lettuce
- Diced tomatoes
- Shredded cheese
- Chopped onions
- Chopped peppers
- Sour cream
- Cilantro
- Lime wedges
- On grazing board or platter, arrange guacamole, salsa, queso, taco shells, ground turkey, lettuce, tomatoes, shredded cheese, onions, peppers, sour cream, cilantro and lime wedges.

Weekend Breakfast Grazing Board
Recipe courtesy of Healthy Family Project’s “Come Graze With Us” e-cookbook
- Hard-boiled eggs
- Cooked sausage links
- Mini frozen waffles, toasted
- Mini frozen pancakes, toasted
- Mini muffins
- Yogurt
- Fresh fruit
- Syrup
- Jelly
- On grazing board or platter, arrange eggs, sausage links, toasted waffles, toasted pancakes, muffins, yogurt, fruit, syrup and jelly.
Source: Healthy Family Project

Savor Spring Flavor with Fresh Seafood Recipes
(Family Features) Fresh, flavorful ingredients take springtime meals to another level, and it’s hard to top seafood as a seasonal favorite. Skip the wait at restaurants and instead create your own savory seafood dishes by taking advantage of easy-to-make recipes.
While takeout may be an easy option, the satisfaction of enjoying a delicious, home-cooked meal like Shrimp Pad Thai with Jasmine Rice can make you feel like you’re enjoying a restaurant-quality dinner. Next time you’re craving Asian cuisine, swap out traditional rice noodles for this version with Jasmine rice as an aromatic, quick-cooking solution for your own spin on a classic.
Take the guesswork out of cooking rice with an option like Success Boil-In-Bag Rice, which offers a heat safe, BPA-free and FDA-approved solution for fluffy, flavorful rice that cooks up perfectly. The high-quality grains are quick, easy, mess-free and ready in 10 minutes, so you can enjoy hassle-free dishes such as Successful Crab and Rice Cakes.
These crispy crab cakes come together easily and are served with a zesty, homemade aioli that tastes just like you’re on the coast. If you’re new to making crab cakes, it’s simpler than it may seem – just cook rice beforehand so it can cool then mix in beaten eggs, seafood and seasonings. Refrigerating and resting the mixture helps it hold together before frying to a mouthwatering golden brown for a delicious appetizer, snack or side dish.
Visit SuccessRice.com to find more springtime meal ideas.
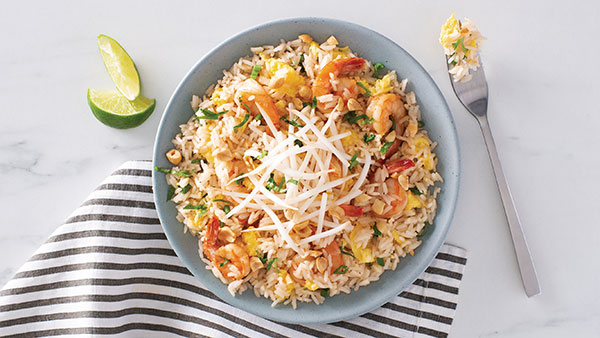
Shrimp Pad Thai with Jasmine Rice
Prep time: 15 minutes
Cook time: 10 minutes
Servings: 4
- 1 bag Success Jasmine Rice
- 3 tablespoons light brown sugar
- 2 tablespoons fish sauce
- 2 tablespoons lime juice
- 2 tablespoons soy sauce
- 1 tablespoon chili garlic sauce
- 2 tablespoons canola oil, divided
- 1 egg, lightly beaten
- 1 pound medium shrimp, peeled and deveined
- 1 tablespoon minced garlic
- 3 green onions, thinly sliced
- 1 cup bean sprouts
- 1/4 cup fresh cilantro leaves, chopped
- 2 tablespoons dry roasted peanuts, chopped
- 4 lime wedges
- Prepare rice according to package directions. Set aside.
- In small bowl, combine brown sugar, fish sauce, lime juice, soy sauce and chili garlic sauce. Set aside.
- In large wok or skillet over high heat, heat 1/2 tablespoon oil. Quickly scramble egg. Remove from pan and reserve.
- Add remaining oil to wok over high heat. Add shrimp and garlic; stir-fry 5 minutes, or until shrimp are cooked. Add reserved sauce and rice; stir-fry 2 minutes. Add green onions and reserved egg; toss to combine.
- Divide pad Thai between four bowls. Top each with bean sprouts, cilantro and peanuts. Serve with lime wedges.

Successful Crab and Rice Cakes
Prep time: 20 minutes
Cook time: 20 minutes
Servings: 4
Crab Cakes:
- 1 bag Success Brown Rice
- 2 eggs
- 1 pound lump crabmeat
- 2 tablespoons seafood seasoning
- 2 tablespoons olive oil
Aioli:
- 1/3 cup mayonnaise
- 1 teaspoon minced garlic
- 1 lemon, zest and juice only
- lemon wedges (optional)
- To make crab cakes: Prepare rice according to package directions. Allow to cool.
- In medium bowl, beat eggs lightly. Stir in rice, crabmeat and seafood seasoning; mix well. Refrigerate 5 minutes. Shape mixture into eight patties.
- In large, nonstick skillet over medium heat, heat oil. Working in batches, carefully place patties in skillet. Cook 5 minutes on each side, or until golden brown. Transfer to paper towel-lined plate.
- To make aioli: Stir together mayonnaise, garlic, lemon zest and lemon juice.
- Serve aioli with crab cakes and garnish with lemon wedges, if desired.
Source:

Jalapeno Sweetpotato Chowder
(Family Features) Colder, shorter days call for a little comfort. Cozying up with a hearty meal on brisk winter evenings can help fight off the chill while savoring favorite flavors alongside the ones you love.
Avoid venturing into the cold for a trip to the store by turning to a pantry staple like sweetpotatoes. As one of the most versatile veggies, they’re easy to add to a variety of recipes while enhancing both flavor and nutrition. Perfectly suitable for both simple and elevated dishes, they can be baked, microwaved, grilled, slow cooked or prepared on the stove so their sweet taste never goes out of style.
Their long shelf life – up to four weeks if stored properly in a cool, dry, well-ventilated area away from heat sources – means you can rely on sweetpotatoes throughout the winter as an on-hand ingredient. Additionally, as a “diabetes superfood” according to the American Diabetes Association, they’re rich in vitamins, minerals, antioxidants and fiber, all of which are good for overall health and may help prevent disease, making them a key source of nutrients during wintertime.
When your family needs a warm-up on those frosty days, put sweetpotatoes at the center of mealtime (with an added kick) in this Jalapeno Sweetpotato Chowder. Loaded with the flavors of winter comfort, it’s a filling meal that makes enough for a crowd so no one goes hungry.
Visit ncsweetpotatoes.com to find more comforting meal ideas.
Watch video to see how to make this recipe!

Jalapeno Sweetpotato Chowder
Recipe courtesy of the North Carolina SweetPotato Commission
Servings: 6
- 2 large North Carolina sweetpotatoes, baked
- 1 small onion, 1/4-inch diced
- 2 tablespoons olive oil
- 1 quart chicken or vegetable stock
- 2 cups cooked chicken, cubed
- 1 1/2 cups whole corn kernels
- 2 teaspoons minced jalapenos
- 1/2 cup heavy cream
- 1 teaspoon salt
- chopped scallions, for garnish
Source:
- Peel baked sweetpotatoes; discard skin and puree.
- In soup pot, saute onion in butter until softened. Add pureed sweetpotato and stock, as desired. Bring to boil, reducing liquid slightly.
- Add chicken, corn, jalapenos, heavy cream and salt. Simmer 10 minutes.
- To serve, ladle into bowls and garnish with chopped scallions.
Source: North Carolina SweetPotato Commission

Easy, Satisfying Spring Recipes
(Family Features) Whether you enjoy your spring meals al fresco or simply turn to warm-weather dishes at the comfort of your own dining table, the season brings with it a perfect excuse to shake up your menu.
Lighter fare is often the way to go as temperatures climb, but that doesn’t mean you have to settle for a regular sandwich or a boring salad. Instead, enhance these springtime classics by rethinking tradition in tasty (yet easy) ways.
This Sabich recipe calls for a multitude of fresh flavors including Aunt Nellie’s Pickled Beets and Onions and hard-boiled eggs plus a variety of veggies, hummus and ethnic seasonings. Or, if a quick and easy salad calls your name for an outdoor meal, this Tossed Bean Salad with Lemon Vinaigrette requires only READ Bean Salad, mixed greens and a handful of other ingredients.
Find more easy springtime dishes at readsalads.com and auntnellies.com.
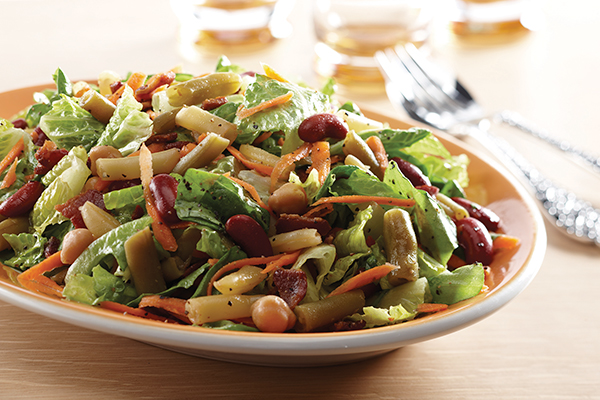
Tossed Bean Salad with Lemon Vinaigrette
Prep time: 15 minutes
Servings: 4
- 1 can (15 ounces) READ 3 or 4 Bean Salad
- 2 tablespoons lemon juice or white wine vinegar
- 2 tablespoons olive oil
- coarsely ground black pepper, to taste
- 1 package (about 10 ounces) mixed salad greens with carrots
- 4 slices bacon (about 1/4 cup), cooked crisp and crumbled (optional)
- shaved Parmesan or Asiago cheese (optional)
- Drain bean salad well; in small bowl, reserve 1/2 cup liquid.
- To make dressing: Whisk reserved bean liquid and lemon juice then whisk in oil. Add pepper, to taste.
- Place salad greens in bowl. Add bean salad and bacon. Add dressing, as desired. Toss gently to coat. Arrange on platter; top with shaved cheese, if desired.
Variation: Top salad with sliced grilled chicken then top with cheese.
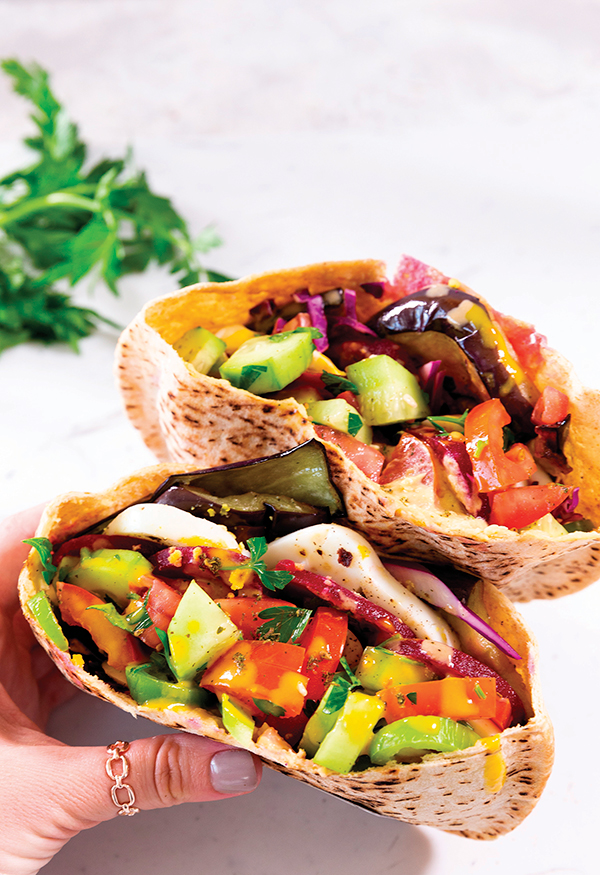
Sabich
Recipe courtesy of eazypeazymealz.com
Prep time: 20 minutes
Servings: 4
- 1 jar (16 ounces) Aunt Nellie’s Pickled Beets and Onions
- 1 medium eggplant
- 2 teaspoons salt, plus additional, to taste, divided
- 1 cup vegetable oil
- 4 hard-boiled eggs, sliced
- pepper, to taste
- 1 1/2 teaspoons za’atar, plus additional for serving, divided (optional)
- 1/2 teaspoon sumac, plus additional for serving, divided (optional)
- 1 cucumber, diced
- 3 Roma tomatoes, diced
- 1/3 cup fresh parsley, finely chopped
- 1/2 lemon, juice only
- 4 whole-grain pita breads with pockets
- 1/2 cup hummus
- 2 cups shredded red cabbage
- 1 medium green bell pepper, thinly sliced
- 1/4 cup Amba pickled mango sauce (optional)
- 1/4 cup tahini
- Drain beets and onions; set aside.
- Wash eggplant. Slice into 3/8-inch-thick pieces. Place slices on cooling rack. Add 2 teaspoons salt to slices to draw out extra moisture. Let sit 10 minutes. Pat extra moisture off.
- In large 14-inch skillet, heat vegetable oil over medium heat. Once oil is hot, place eggplant slices in oil; fry until browned, about 3 minutes per side, in batches of four pieces. Place on paper towel-lined plate to absorb additional oil.
- Season hard-boiled egg slices with salt and pepper, to taste. Season with 1/2 teaspoon za’atar and sumac, if desired. Set aside.
- To make salad: In medium bowl, combine cucumber, tomatoes, parsley, lemon juice and remaining za’atar. Set aside.
- Gently slice one end of each pita and open pocket. In microwave on high, heat pitas 10 seconds. Place equal amounts fried eggplant in each pita. Spread 2 tablespoons hummus in each pita. Gently layer one-fourth of egg slices, beets and onions, cabbage, Israeli salad and green peppers in each pita.
- Drizzle each sabich with about 1 tablespoon amba sauce, if desired, and 1 tablespoon tahini. Season with additional salt and pepper or sumac and Za’atar, if desired.
Source: Seneca Foods
Aunt Nellies

Salisbury Steak
(Family Features) Enjoying a meal together at the table is surely one of the all-time holiday traditions for many families. Make this holiday season one to remember by turning to a centerpiece that’s tough to top: steak.
By combining Premium Ground Beef from Omaha Steaks with flavorful additions like mushrooms and onion, you can turn a seasonal meal into a truly sensational dish to savor. While family and friends focus on sides or dessert, you can be the host with the most by serving up a flavorful main course to please nearly everyone’s palate.
Visit OmahaSteaks.com to find more steak-inspired holiday solutions.
Watch video to see how to make this recipe!
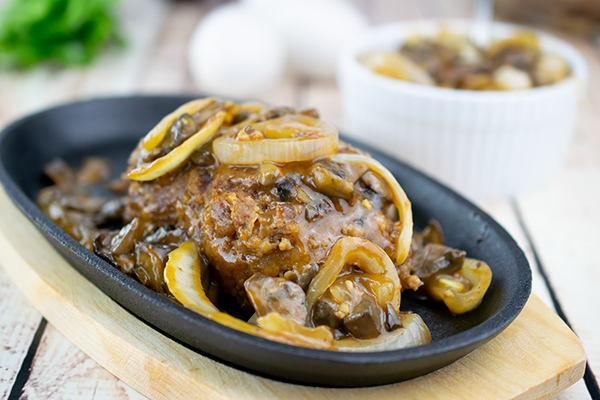
Salisbury Steak
Prep time: 5 minutes
Cook time: 30 minutes
Servings: 4
- 1 large egg
- 1 cup fresh breadcrumbs or 1/2 cup dried plain breadcrumbs
- 2 tablespoons Worcestershire sauce, divided
- 1/2 teaspoon kosher salt
- 1 pound Omaha Steaks Premium Ground Beef, thawed
- 1 tablespoon canola oil
- 1 tablespoon butter
- 8 ounces mushrooms, thinly sliced
- 1 yellow onion, halved and thinly sliced
- 1 clove garlic, minced
- 1 tablespoon tomato paste
- 1 1/2 cups beef broth
- 1 tablespoon cornstarch
- In medium bowl, whisk egg. Add breadcrumbs, 1 tablespoon Worcestershire sauce and salt; stir to combine. Add beef and mix until combined. Divide mixture into four portions and shape each into oval patty about 1/2-inch thick.
- In large skillet over medium heat, heat canola oil until shimmering. Add patties and sear until dark brown crust forms, about 5 minutes. Flip patties and cook until second side is browned, 4-5 minutes. Transfer patties to platter.
- In same pan, add butter, scraping up browned bits from bottom of pan. Add mushrooms and onions. Cook, stirring frequently, until mushrooms are tender and onions are beginning to brown, about 8 minutes. Add garlic and tomato paste; cook until fragrant, about 1 minute. Mix beef broth, remaining Worcestershire sauce and cornstarch; add to pan, stirring until combined.
- Return patties and any accumulated juices to pan; cover and simmer until patties are cooked through and sauce thickens slightly, 10-12 minutes.
Source: Omaha Steaks

Meatless Cheesy Burrito Bake
(Culinary.net) Enjoying a meal with loved ones at the end of the day is a timeless tradition, but many families feel as though they’re constantly searching for ways to mix up the menu.
One trend gaining traction among home chefs is “meatless Mondays” in which classic dishes are made using substitutions for meat like veggies or grains. It’s a simple way to maintain nutritional value at the dinner table while putting a tasty twist on worn-out meals.
This Meatless Cheesy Burrito Bake can provide your family a flavorful way to skip the meat and make way for protein in the form of brown rice paired with bell peppers, onion and refried beans wrapped in wheat tortillas and topped with cheese, salsa and guacamole.
Find more creative family dinner inspiration at Culinary.net.
Watch video to see how to make this recipe!

Meatless Cheesy Burrito Bake
- 2 tablespoons canola oil
- 2 bell peppers, sliced
- 1 medium onion, sliced
- 1 teaspoon cumin
- 2 cups water
- 1 cup brown rice, uncooked
- 1 can (12 ounces) evaporated milk, divided
- 1 cup shredded cheddar cheese
- 1 can (4 ounces) diced green chiles, undrained
- 1 can (16 ounces) refried beans
- 6 wheat tortillas (8 inches)
- salsa (optional)
- guacamole (optional)
- Heat oven to 350 F.
- In large skillet, heat canola oil. Cook peppers, onion and cumin until tender.
- In saucepan, add water and brown rice. Cook 45 minutes.
- In saucepan, add 1 1/4 cups evaporated milk, shredded cheese and green chilies. Cook over medium heat until cheese is melted and smooth. Stir 3/4 cheese mixture in with rice; set remaining cheese sauce aside.
- In medium bowl, add refried beans and remaining evaporated milk. Microwave 3-4 minutes.
- Lay out tortillas and layer: refried bean mixture, rice mixture and pepper-onion mixture. Roll into burritos and place in baking pan. Top burritos with remaining cheese sauce. Bake 20-25 minutes.
- Garnish with salsa and guacamole, if desired.

Asian Carne Asada Tacos
(Family Features) Combine the best of both worlds this summer with an ethnic favorite straight off the grill. These Asian Carne Asada Tacos require less than half an hour of prep and cook time for a quick, easy family meal.
Skirt steak is marinated in a NAKANO Seasoned Rice Vinegar-based marinade for a unique, delicious flavor combination before hitting a hot grill then layering in tortillas with your desired garnishes.
Find more flavorful ways to put an Asian twist on your summer dishes at nakanoflavors.com.
Watch video to see how to make this recipe!
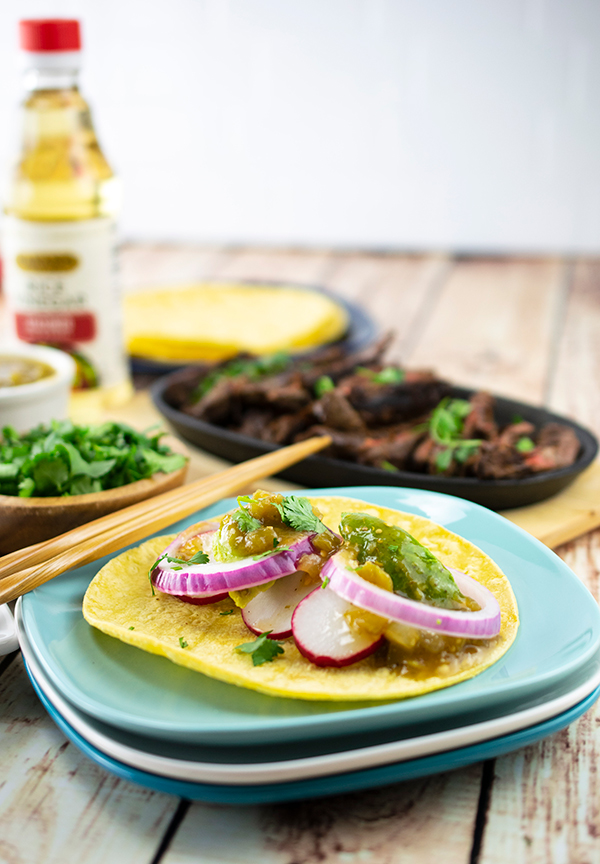
Asian Carne Asada Tacos
Prep time: 15 minutes
Cook time: 5 minutes
Servings: 6
- 1 1/2 pounds beef skirt steak
- 1/2 cup NAKANO Seasoned Rice Vinegar
- 2 tablespoons sugar
- 2 teaspoons sambal oelek (Asian chili garlic sauce)
- 1/2 teaspoon kosher salt
- 1/4 cup soy sauce
- 2 tablespoons olive oil
- 2 teaspoons ancho chili powder
- 1/2 teaspoon ground cumin
Pickled Onions:
- 1/4 cup water
- 1 medium red onion, halved, thinly sliced
- corn tortillas, warmed
- roasted tomato or tomatillo salsa
- cilantro sprigs
- sliced avocados
- thinly sliced radishes
- Using fork, pierce steak at 1/2-inch intervals. In large bowl, whisk vinegar, sugar, sambal oelek and salt. Reserve 1/4 cup mixture for later use. Add soy sauce, oil, chili powder and cumin to remaining vinegar mixture. Add steak; turn to coat. Let stand 10 minutes to marinate.
- To make pickled onions: In medium microwaveable bowl, combine water and reserved vinegar mixture. Microwave 2-3 minutes, or until hot. Add onions, submerging in vinegar mixture. Let stand at room temperature until cool.
- Preheat grill to high heat. Grill steaks 1-2 minutes on each side, or until medium rare. Let stand 5 minutes before slicing against grain into thin strips.
- Serve with tortillas, salsa, pickled onions, cilantro, avocado and radishes.
Source: Nakano