
Set the Menu for a Successful Year
(Family Features) If your goals for 2024 include a healthier lifestyle and added nutrition, your mission is likely to start with a refreshed menu. Add a few newfound favorites to this year’s rotation like wraps, salads and smoothies to power each day and propel yourself toward wellness success.
These easy-to-make, better-for-you recipes offer simple solutions to keep your goals on track without taking flavor off the table. Begin busy days with an energy boost from a Strawberry Oatmeal Smoothie then tackle lunchtime cravings or make family dinner a cinch with BLT Wraps with Avocado Spread. For a hearty salad to pair with favorite meals or enjoy all on its own, this Roasted Cauliflower and Potato Spinach Salad is an ideal way to make 2024 your best year yet.
Visit Culinary.net to discover more nutritious solutions in the new year.
Wrap Your Way to a Nutritious Year
Planning and executing a more nutritious menu can often be thwarted by lunchtime cravings or busy weeknights that leave little time to cook at home. Rather than giving in to those takeout temptations, turn to easy recipes you can create yourself with just a few simple, on-hand ingredients.
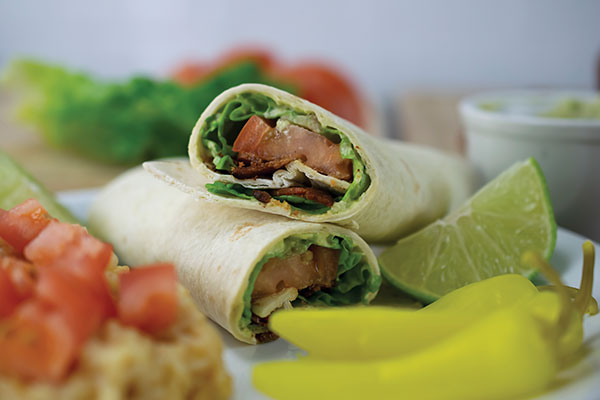
Grab tortillas out of the pantry and a few favorites from the refrigerator to make these BLT Wraps with Avocado Spread, which are perfect for meal-prepping weekday lunches or whipping up at a moment’s notice for a family dinner. Bacon, a nearly unanimous favorite, teams up with a homemade avocado spread, lettuce and tomatoes for fresh taste without the hassle.
For a satisfying meal without leaving behind health goals, serve with a hearty salad or Spanish rice and banana peppers on the side.
BLT Wraps with Avocado Spread
Servings: 4
- 8 slices bacon
- 1 avocado, peeled and pitted
- 1/4 cup sour cream
- 1 lime, juice only
- 1/2 teaspoon hot sauce
- 1/2 teaspoon Worcestershire sauce
- 1/4 teaspoon salt
- 4 flour tortillas
- 4 large red leaf lettuce leaves
- 2 large tomatoes, cut into 1/4-inch slices
- Spanish rice (optional)
- banana peppers (optional)
- In large skillet, cook bacon until crispy. Drain on plate lined with paper towels. Set aside.
- In medium bowl, mash avocado, sour cream, lime juice, hot sauce, Worcestershire sauce and salt with fork until combined and smooth.
- Spread thin layer of avocado mixture over tortillas. Layer with lettuce leaves, tomatoes and bacon. Fold sides up and roll.
- Serve with Spanish rice and banana peppers, if desired.
Fresh Flavors for the New Year
If you’re among those looking to set goals and wellness intentions for the new year, it’s important to equip yourself with the right tools, whether information or inspiration, to help support you on your journey toward a healthier lifestyle. That can start with something as easy as elevating your menu and the ingredients you keep on-hand.
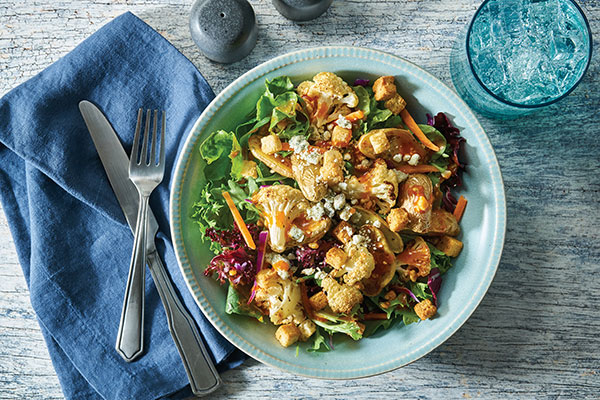
For example, Fresh Express offers more than 100 varieties of fresh, healthy and convenient ready-to-eat salads, including the French Blue Cheese Salad Kit, which combines a nutrient-dense salad mix of fresh baby spinach, spring mix, red cabbage and carrots, and is enhanced with aromatic blue cheese, crunchy garlic brioche croutons and a savory French blue cheese dressing. Available in the refrigerated produce department, the kit can be paired with better-for-you ingredients like roasted cauliflower and seasoned potatoes to make this Roasted Cauliflower and Potato Spinach Salad in less than an hour.
Visit freshexpress.com to discover more recipes and find a store near you.
Roasted Cauliflower and Potato Spinach Salad
Prep time: 15 minutes
Cook time: 40 minutes
Servings: 4
- 1 small head cauliflower, cut into florets
- 3 tablespoons olive oil, divided
- 2 teaspoons Italian seasoning, divided
- 1/2 teaspoon salt, divided
- 1 pound fingerling potatoes, quartered
- 1 package (8 ounces) Fresh Express French Blue Cheese Salad Kit
- Heat oven to 425 F.
- In large bowl, toss cauliflower florets with 2 tablespoons olive oil. Sprinkle with 1 teaspoon Italian seasoning and 1/4 teaspoon salt; mix well. Arrange in single layer on sheet pan.
- Bake cauliflower 30-40 minutes, tossing once halfway through, until tender and lightly charred. Cool.
- In bowl, toss potatoes with remaining olive oil. Sprinkle with remaining Italian seasoning and salt; mix well. Arrange in single layer on sheet pan.
- Bake potatoes 20 minutes until tender and lightly browned. Cool.
- Place greens from salad kit in large bowl; add roasted vegetables. Drizzle with dressing from salad kit; mix well. Top with croutons and blue cheese from salad kit.
Start Each Day Strong
Giving your mornings a delicious boost doesn't have to be a chore. In fact, it can be just as easy as it is delicious with a fresh, fruity smoothie ready in a matter of minutes.
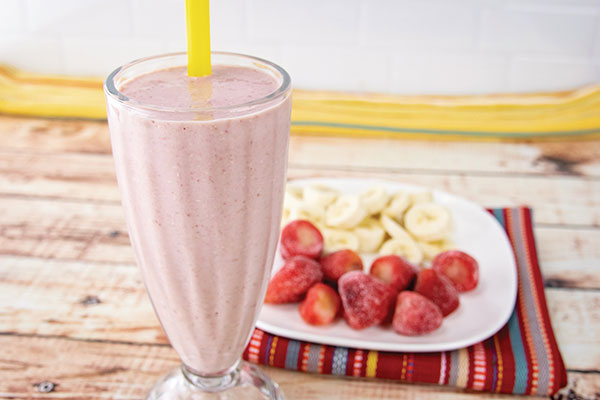
Just six blended ingredients are all you need to make this Strawberry Oatmeal Smoothie, a creamy solution that makes for a nutritious, refreshing and filling breakfast before heading out the door.
Strawberry Oatmeal Smoothie
- 1/2 cup rolled oats
- 1 banana
- 14 frozen strawberries
- 1 cup soy milk
- 1 1/2 teaspoons sugar
- 1/2 teaspoon vanilla extract
- In blender, grind oats. Add banana, strawberries, soy milk, sugar and vanilla extract then blend until smooth. Pour into glass or to-go container and serve.
Source: Fresh Express

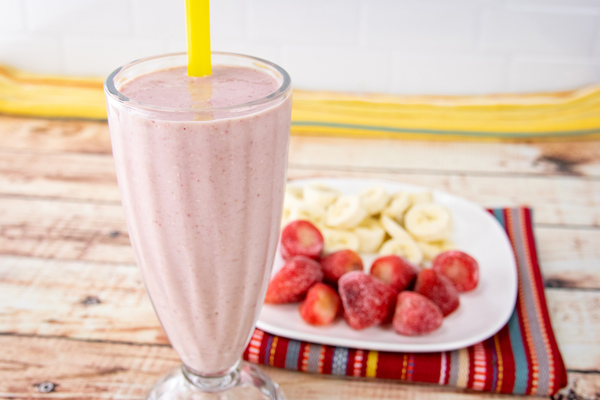
Strawberry Oatmeal Smoothie
Making a delicious oatmeal smoothie has never been easier. Just six ingredients and a blender is all you need to make the perfect fruit-smoothie at home. Deliciously sweet and creamy this strawberry oatmeal smoothie makes for a healthy and filling breakfast or snack.
Watch video to see how to make this recipe!
Strawberry Oatmeal Smoothie
- ½ cup rolled oats
- 1 banana
- 14 frozen strawberries
- 1 cup soy milk
- 1 ½ teaspoon sugar
- ½ teaspoon vanilla extract
- Use blender to grind up oats.
- Add soy milk, strawberries, banana, vanilla extract and sugar then blend until smooth.
- Pour and serve.
Source: Culinary.net

Bring Back Family Bonding This Fall: 3 ways to free up busy schedules to spend time with loved ones
(Family Features) Busy fall schedules often leave little time for the things that matter most – sharing special moments with those you love. This year, as time seems to speed up during another school year, making family bonding a priority in your household can start with a few simple tricks.
Connect with your loved ones this fall while juggling hectic routines with this advice:
Schedule Family Nights
Desiring evenings spent with your nearest and dearest and actually making them happen are two separate things entirely. It’s easy to get caught up in the hustle and bustle of the season with days that feel too long and evenings that are often too short. Putting dedicated family nights on the calendar is a good way to avoid last-minute commitments that take away from important bonding time. Incorporate some favorite activities, whether your loved ones are board game enthusiasts or movie buffs, to give everyone something exciting to look forward to.
Make Cooking Together a Family Activity
Making dinner for the family shouldn’t take up valuable time that could be used for quality moments together. Seeking out quick and easy recipes leaves more hours in the day to spend with family members – or you can even make preparing dinner a family activity.
Teaching kids how to make your favorite recipes creates great memories and can maximize time spent together. From making kid-approved lunchbox sliders together to preparing time-saving, weeknight-friendly sliders as a family after school, King’s Hawaiian Rolls and Slider Buns have the power to help unite busy parents and picky kids. Plus, they’re soft and fluffy with the right touch of sweetness, and sliders are customizable, easy, fun and always a crowd pleaser. These Ham and Swiss Sliders or Peanut Butter, Jelly and Banana Sliders offer ways kids can help, from layering meats and cheeses to spreading peanut butter. Everyone can lend a hand in the kitchen while enjoying quality time together.
Encourage Extracurricular Participation
Beyond those special moments at home, there are plenty of ways to connect with your kiddos. Encouraging them to participate in extracurriculars, like sports, band, theater, dance, choir or other activities, provides a great way to enjoy something together as you watch your children branch out and try new things. If they happen to try an activity you used to (or still do) participate in, it’s an easy way to make a unique connection by sharing your own memories, offering helpful tips or even passing down old equipment like sports gear or an instrument.
Find more inspiration for family bonding with delicious meals and snacks by visiting KingsHawaiian.com.

Ham and Swiss Sliders
Total time: 25 minutes
Servings: 4-6
- 1 stick butter
- 1 package (12 rolls) King's Hawaiian Original Hawaiian Sweet Rolls
- 1 pound shaved deli ham
- 1 pound thinly sliced Swiss cheese
- Heat oven to 350 F. Melt butter and set aside.
- Cut entire pack of rolls in half horizontally, keeping all top and bottom halves intact.
- In 9-by-13-inch pan, place bottom halves of rolls and cover with ham and cheese.
- Cover ham and cheese stacks with top halves of rolls. Drizzle butter mixture over tops of rolls.
- Bake, uncovered, 15-20 minutes. Separate rolls for serving.

Peanut Butter, Jelly and Banana Sliders
Prep time: 5 minutes
Servings: 4-6
- 1 package (12 rolls) King's Hawaiian Original Sweet Rolls
- 4 tablespoons salted peanut butter
- 4 tablespoons strawberry jam
- 2 bananas, sliced
- Cut entire pack of rolls in half horizontally, keeping all top and bottom halves intact.
- Spread peanut butter on bottom halves followed by strawberry jam. Top with banana slices then top halves of rolls.
Source: King’s Hawaiian

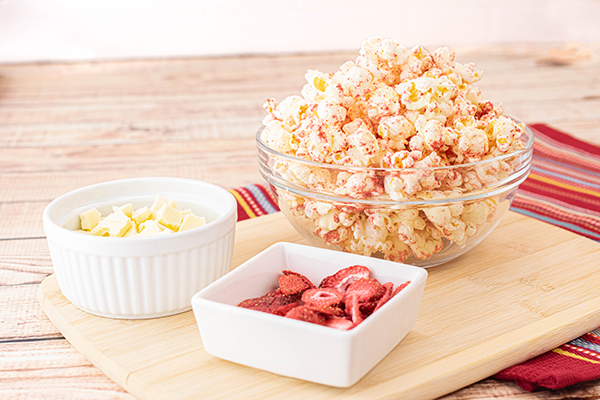
Strawberries and Cream Popcorn
(Family Features) Perfect for a picnic, celebrating a birthday or just enjoying time with family and friends, the classic combination of strawberries and cream serves as both a sweet treat and a crowd favorite.
This version adds another tasty treat – popcorn – so you can triple down on deliciousness. With just three ingredients, it’s easy to make and ideal for sharing. Simply drizzle popcorn with melted white chocolate chips and top with pulsed freeze-dried strawberries for a kid- and adult-friendly flavor trio.
An added benefit: Popcorn is a whole grain that’s 100% unprocessed with no additives, hidden ingredients or GMOs while providing nutrients like zinc, magnesium, B vitamins and fiber. At just 30 calories per cup of air-popped popcorn, it’s an energy-providing snack full of complex carbohydrates.
Visit Popcorn.org to find more sweet snacking solutions.
Watch video to see how to make this recipe!
Strawberries and Cream Popcorn
Servings: 4-6
- 1/4 cup freeze-dried strawberries
- 6 cups popped popcorn
- 1 cup white chocolate chips, melted
- In small food processor or spice grinder, pulse freeze-dried strawberries until finely ground.
- Place popcorn in large bowl. Drizzle melted chocolate over top; toss until well coated. Sprinkle evenly with ground freeze-dried strawberries; toss until well coated.
- Scrape onto large parchment paper-lined baking sheet, spreading into even layer.
- Let stand at room temperature 30-60 minutes, or until chocolate is set and hardened. To serve, break into pieces.
Tips: To melt chocolate: In heatproof bowl over saucepan of barely simmering water, stir chocolate chips 3-5 minutes, or until smooth.
To melt chocolate in microwave: In microwave-safe bowl or measuring cup, microwave chocolate on medium heat 1-2 minutes, stirring every 30 seconds, or until smooth and melted.
Source: Popcorn Board

Family Fun with a Pop: Kid-friendly snacks and treats perfect for sharing
(Family Features) When hunger strikes and family fun calls for a snack to keep the excitement going, take your kiddos to the kitchen to whip up a tasty treat for all to enjoy. Whether you’re celebrating a special occasion or watching favorite movies, turn to an ingredient like popcorn that encourages creativity. Plus, it’s a delicious way for adults to turn back the clock and recreate childhood memories while making new ones with the family.
Consider these popcorn-inspired snacks to serve during your next adventure:
- Take yourself back in time to your own childhood with a classic pairing that never goes out of style: Peanut Butter and Jelly Popcorn. This version offers a fun way to jazz up popcorn for kids and adults alike with a sprinkling of strawberries and dried cranberries on top for added nutrition.
- When it’s time for a little fun in the sun or a trip to the park, sweeten up the celebration with this Graham Cracker Picnic Mix that’s a flavorful, kid-favorite combination of popcorn, bear-shaped graham crackers, marshmallows, fudge-covered pretzels and miniature cookies.
- Pizza is hard to beat as a snacking solution the whole family can enjoy, and this Grab and Go Pizza Popcorn is no exception. Ready in just minutes by mixing popcorn, Parmesan cheese and seasonings, little ones can help prepare a batch quickly before heading out the door.
- Colorful and fun, these Minty Green Popcorn Clusters are simple to make and a perfect treat to share. Just melt together marshmallows, butter, salt, green food coloring and peppermint extract before tossing with popcorn and green candy-coated chocolates.
To find more family-friendly snack time favorites, visit Popcorn.org.

Peanut Butter and Jelly Popcorn
Servings: 4-6
- 8 cups popcorn
- 2 tablespoons raspberry jam
- 1/2 cup white chocolate chips
- 3 tablespoons smooth natural peanut butter
- 1/4 cup freeze-dried strawberries
- 1/4 cup dried cranberries
- In large bowl, stir popcorn and jam until evenly coated. Transfer to parchment paper-lined baking sheet.
- In small heatproof bowl over small saucepan of barely simmering water, add white chocolate chips and peanut butter. Cook, stirring occasionally, 3-5 minutes, or until smooth and melted.
- Drizzle peanut butter mixture over popcorn mixture. Sprinkle with strawberries and cranberries.
- Refrigerate 10 minutes, or until peanut butter mixture is set; break into pieces to serve. Store in airtight container in refrigerator up to 1 week.
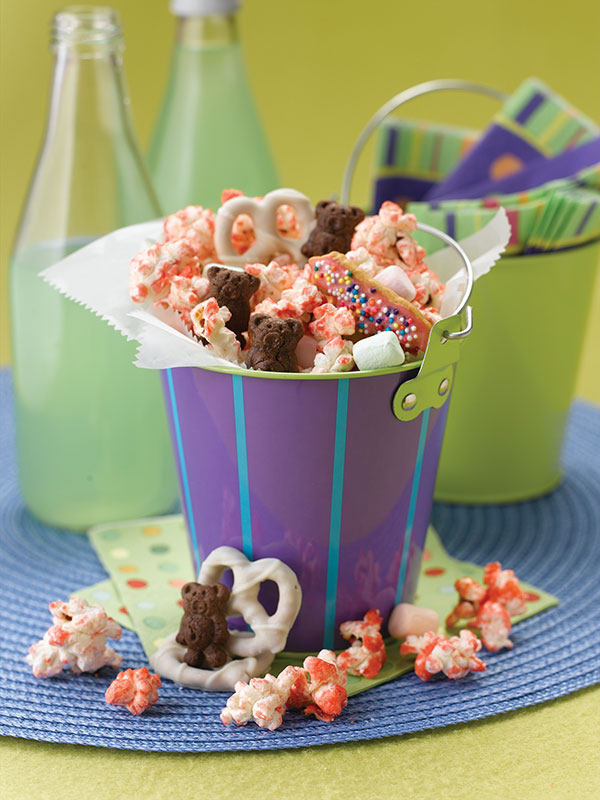
Graham Cracker Picnic Mix
Yield: About 12 cups
- 1/4 cup vegetable oil
- 1/4 cup sugar
- 5-6 drops pink neon liquid food color or desired color
- 1/2 cup unpopped popcorn kernels
- 1 package mini pastel marshmallows
- 1 cup bear-shaped graham crackers
- 1 package white fudge-covered pretzels
- 1 cup mini cookies
- In large pot over medium heat, stir oil, sugar and food coloring.
- Stir in popcorn kernels; cover. Cook until popcorn begins to pop. Shake pot over heat until popping slows.
- Remove pan from heat and pour popcorn into large bowl.
- Add marshmallows, graham crackers, pretzels and cookies then toss lightly.

Grab and Go Pizza Popcorn
Yield: 6 quarts
- 6 quarts popped popcorn
- olive oil cooking spray
- 1 cup grated Parmesan cheese
- 2 teaspoons garlic salt
- 2 teaspoons paprika
- 1 tablespoon Italian seasoning
- Place popcorn in large, sealable plastic container or 2 1/2-gallon plastic sealable bag.
- Spray popcorn lightly with cooking spray.
- Sprinkle cheese, garlic salt, paprika and Italian seasoning over popcorn and shake to distribute evenly.
- To serve, scoop popcorn into reusable plastic cups.
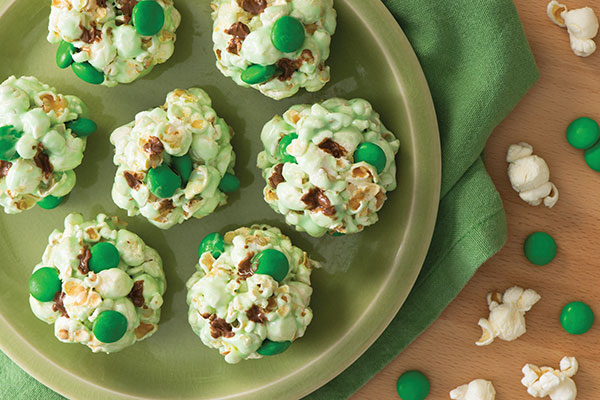
Minty Green Popcorn Clusters
Yield: 32 clusters
- 12 cups unsalted, unbuttered, popped popcorn
- 4 cups mini marshmallows
- 2 tablespoons butter or light olive oil
- 1/2 teaspoon salt
- 1 tablespoon green food coloring
- 1/4 teaspoon peppermint extract
- 1 cup green candy-coated chocolate candies
- Place popcorn in large mixing bowl.
- In saucepan over medium heat, melt marshmallows, butter and salt, stirring occasionally, until smooth. Remove from heat; stir in food coloring and peppermint extract.
- Toss marshmallow mixture with popcorn; cool 2-3 minutes, or until cool enough to handle. Toss with chocolate candies.
- Shape 3 tablespoons of popcorn mixture into small cluster; repeat with remaining popcorn mixture. Place on wax paper-lined baking sheet; cool completely.
Source:

Take Homemade Family Favorites to New Heights
(Family Features) Gathering together to enjoy a meal at the family table or a sweet treat at the end of a long day is what time with loved ones is all about. Turning to beloved classics can bring everyone running to the kitchen to share the flavors of those familiar favorites.
Savor the timeless taste of pasta with this Penne Alla Vodka, a classic dish high on flavor and low on hassle so you can have a meal ready in just 30 minutes. Plus, it offers an alternative to traditional recipes by using Country Crock Plant Cream, a new dairy-free substitute for heavy whipping cream perfect for using in a variety of your favorite dishes.
Made with delicious plant-powered ingredients, it provides the taste of heavy whipping cream without the heaviness. As a 100% vegan, dairy-free and soy-free solution, it’s a 1-for-1 swap for heavy whipping cream in cooking and baking recipes, making it ideal to have on hand year-round.
When it’s time to settle down for the night, end the day on a high note with the sweetness of Strawberry Shortcake. Toss strawberries with sugar, create your own whipped plant cream and make shortcakes from scratch for a true taste of home.
Visit CountryCrock.com for more ways to elevate weeknight meals and desserts.
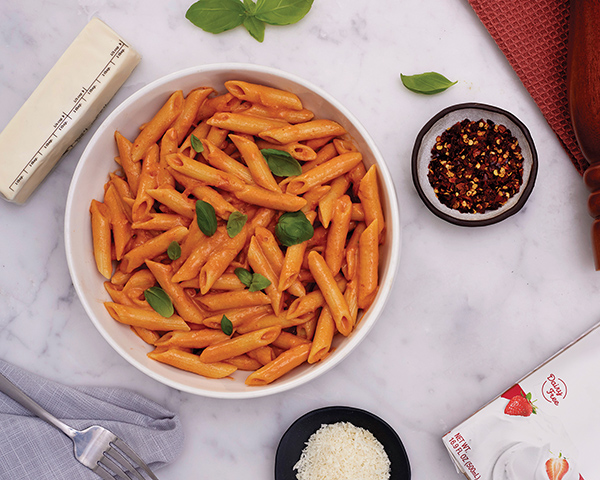
Penne Alla Vodka
Prep time: 10 minutes
Total time: 30 minutes
Servings: 5
- 1 tablespoon Country Crock Plant Butter with Olive Oil
- 1/2 cup chopped white or yellow onion
- 1/2 teaspoon finely chopped garlic
- 1/2 cup tomato paste
- 1 pinch red pepper flakes
- 1/4 cup (2 fluid ounces) vodka
- 16 fluid ounces Country Crock Plant Cream
- 1/4 cup (2 fluid ounces) water
- 3 cups dry penne pasta, cooked and drained
- 1/4 cup grated vegan Parmesan cheese
- 1/2 teaspoon kosher salt
- 1/4 cup loosely packed fresh basil leaves
- In pan over moderate heat, melt plant butter. Add onions and garlic. Cover and cook until onions are translucent, about 5 minutes.
- Add tomato paste and red pepper flakes. Cook until tomato paste starts to lightly brown.
- Add vodka and stir well, scraping bits of browned tomato paste from bottom of pan. Cook over high heat until liquid is reduced by about half to concentrate flavors.
- Add plant cream and water; stir to incorporate tomato paste evenly. Bring to simmer.
- Toss in cooked pasta. Add vegan Parmesan, salt and fresh basil.

Strawberry Shortcake
Prep time: 20 minutes
Cook time: 12 minutes
Servings: 8
Strawberries:
- 2 pounds strawberries, hulled and sliced
- 6 tablespoons sugar
Whipped Plant Cream:
- 2 cups Country Crock Plant Cream, directly from refrigerator
- 2 tablespoons powdered sugar
- 2 teaspoons vanilla extract
Shortcakes:
- 3/4 cup chilled Country Crock Plant Cream, plus additional for brushing, divided
- 1 tablespoon lemon juice
- 2 cups flour
- 2 tablespoons sugar
- 2 teaspoons baking powder
- 1/2 teaspoon baking soda
- 1/2 teaspoon salt
- 1/2 cup (1 stick) Country Crock Plant Butter Sticks with Avocado Oil, melted
- 1 tablespoon turbinado sugar
- To make strawberries: In bowl, toss sliced strawberries and sugar. Let berries sit 30 minutes-2 hours before serving.
- To make whipped plant cream: In chilled bowl, using electric hand mixer or stand mixer on high, whisk chilled plant cream, powdered sugar and vanilla extract until plant cream thickens and stiff peaks form.
- To make shortcakes: Preheat oven to 475 F.
- In small bowl, mix 3/4 cup plant cream and lemon juice; set aside 2-3 minutes, or until it begins to curdle.
- In large bowl, whisk flour, sugar, baking powder, baking soda and salt. Stir in plant butter and plant cream mixture.
- Knead dough a few times then shape into 1-inch-tall circle. Cut circle into eight wedges. Transfer wedges onto baking sheet lined with parchment paper. Brush tops of biscuits generously with additional plant cream and sprinkle turbinado sugar on top.
- Bake 10-12 minutes, rotating sheet halfway through baking. Biscuits should be golden brown. Cool before assembling.
- Split each biscuit in half. Spoon strawberries over half of biscuits. Add dollop of whipped plant cream on top. Layer other biscuit halves on top followed by more strawberries and plant cream.
Source: Country Crock Plant Cream

Make the Most of Your Money with Family-Friendly Meals
(Family Features) It can be hard to ignore the rising costs of food, gas and other basic household items. Many families are especially feeling the burden of inflation at the grocery store.
However, you can make your hard-earned dollars stretch a little further at the supermarket and put delicious, nutritious meals on the table with these cost-saving tips from Healthy Family Project and by looking for the Produce for Kids logo in your local produce department. These produce companies give back to local communities and support nutrition education and information sharing.
Plan your meals. Making a plan for what meals will be on the menu each week can help you identify ingredients you can use in multiple recipes and save money by not adding items you may not use to your grocery list. Once your meals are planned and you head to the store, stick to your list to avoid unnecessary spending.
Opt for in-season produce. Typically, fresh fruits and vegetables cost more when out of season since they’re not as readily available. Buying in-season produce also helps ensure you get better tasting fruits and veggies.
Keep ingredient lists short. Quick and easy meals the entire family can enjoy are often accompanied by shorter ingredient lists. For example, these recipes for Grilled Peach Flatbread with Goat Cheese and Mixed Berry Pizza with Oatmeal Coconut Crust both require 15 ingredients or less and can be on the table in half an hour, giving you more time to spend with those who matter most.
Discover more family-focused recipes and tips for saving on grocery bills at healthyfamilyproject.com.

Mixed Berry Pizza with Oatmeal Coconut Crust
Recipe courtesy of Healthy Family Project
Prep time: 10 minutes
Cook time: 20 minutes
- 1 egg
- 1 1/2 cups rolled oats
- 1/3 cup unsweetened shredded coconut
- 1/3 cup all-purpose flour
- 2 tablespoons brown sugar
- 3 tablespoons unsalted butter, melted
- 1/4 cup honey, plus additional for drizzling, divided
- 1/2 teaspoon cinnamon
- 1 teaspoon pure vanilla extract
- 1pinch salt
- 1/2 cup vanilla Greek yogurt
- 1/2 lemon, juice only
- 3 strawberries, sliced
- 1/4 cup blueberries
- 1/4 cup blackberries
- Preheat oven to 350 F.
- In mixing bowl, mix egg, rolled oats, coconut, flour, brown sugar, butter, 1/4 cup honey, cinnamon, vanilla and salt until incorporated.
- Evenly spread mixture in greased springform pan and bake 20 minutes, or until golden brown.
- Remove pan from oven and cool.
- In bowl, mix Greek yogurt with lemon juice.
- Once oatmeal crust is fully cooked, use spatula to spread lemon-yogurt mixture on top.
- Top with sliced strawberries, blackberries and blueberries. Drizzle with additional honey.

Grilled Peach Flatbread with Goat Cheese
Recipe courtesy of Healthy Family Project
Prep time: 5 minutes
Cook time: 10 minutes
- 2 large naan or flatbreads
- 2 fresh peaches, sliced
- 1/4 cup goat cheese crumbles
- 1-2 tablespoons balsamic vinegar
- 1 tablespoon olive oil
- fresh arugula (optional)
- Preheat grill or grill pan.
- Grill naan until softened and lightly grilled.
- Place peach slices on grill and sear about 1 minute per side.
- Using pastry brush, spread olive oil onto naan.
- Top naan with goat cheese and peaches.
- Place back on grill over low heat, cover and cook 3-5 minutes.
- Add fresh arugula, if desired
- Drizzle with balsamic vinegar before slicing and serving.
Source: Healthy Family Project

Shake Up Summer Snacks
(Family Features) Power up for summer adventures by shaking up your snacking routine with homemade recipes inspired by childhood favorites.
Tasty and versatile, California walnuts are easy to swap into your favorite snack recipes and work hard to keep you energized and full. Kick off summer with some irresistible plant-forward Walnut Chorizo Pizza Bites and Strawberry Walnut Hand Pies for delicious summer snacks loaded with the nutrition benefits of walnuts.
Visit walnuts.org/snacking for more snack recipes.
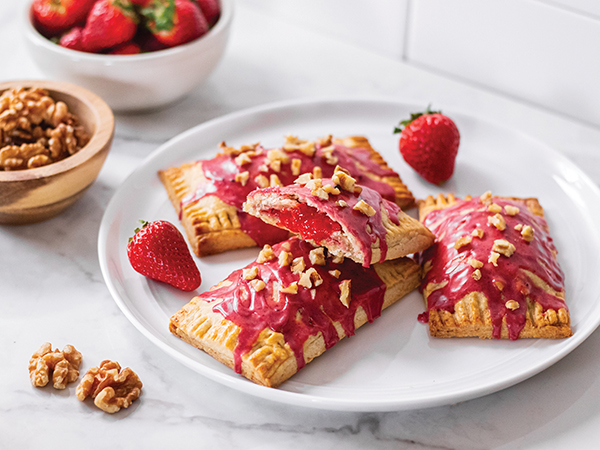
Strawberry Walnut Hand Pies
Dough:
- 1/4 cup California walnuts
- 1 1/4 cups all-purpose flour
- 1 teaspoon cane sugar
- 1/4 teaspoon salt
- 7 tablespoons cold unsalted butter, cubed
- 4-5 tablespoons ice cold water
- 1 egg, beaten
Strawberry Walnut Filling:
- 1 cup strawberries, tops removed, halved
- 1 tablespoon fresh lemon juice
- 1 teaspoon cornstarch
- 2 tablespoons cane sugar
- 1/3 cup finely chopped California walnuts
Frosting:
- 1/2 cup powdered sugar
- 2 tablespoons 2% milk
- 1/2 teaspoon beetroot powder
- 2 tablespoons finely chopped California walnuts
- To make dough: In food processor, pulse walnuts until fine and evenly ground. Add flour, sugar and salt to ground walnuts; pulse to combine. Add cubed butter; pulse until butter is in small pieces. Add cold water 1 tablespoon at a time, pulsing while adding, until dough starts sticking together.
- Transfer dough to clean surface; shape into two 4-inch discs. Wrap with plastic wrap and refrigerate 1 hour.
- To make filling: In food processor, pulse strawberries and lemon juice until slightly chunky.
- Transfer to saucepan and gradually whisk in cornstarch until dissolved. Stir in sugar.
- Heat over low heat until sugar dissolves, about 3 minutes. Turn heat off and stir in chopped walnuts. Transfer mixture to small bowl; refrigerate.
- To assemble hand pies: Remove one dough disc from refrigerator. Lightly flour work surface and rolling pin. Roll out dough into large rectangle. Slice dough into six 4-by-2-inch rectangles. Place on parchment paper-lined baking sheet.
- In bowl, mix water and egg. Brush perimeter of dough rectangles with egg wash. Place 1 tablespoon filling on center of dough.
- Roll out second dough disc, creating six rectangles of dough. Place on top of jam and crimp edges with fork to seal. Freeze hand pies 20 minutes.
- Preheat oven to 375 F.
- Trim uneven edges of dough with sharp knife and brush tops and sides with egg wash.
- Bake 20-24 minutes until golden brown around edges. Cool at room temperature 5 minutes on baking sheet then transfer to wire cooling rack until completely cooled.
- To make frosting: In bowl, whisk sugar, milk and beetroot powder until thick but smooth. Drizzle frosting over hand pies and top with chopped walnuts. Cool 15 minutes, or until frosting is set.
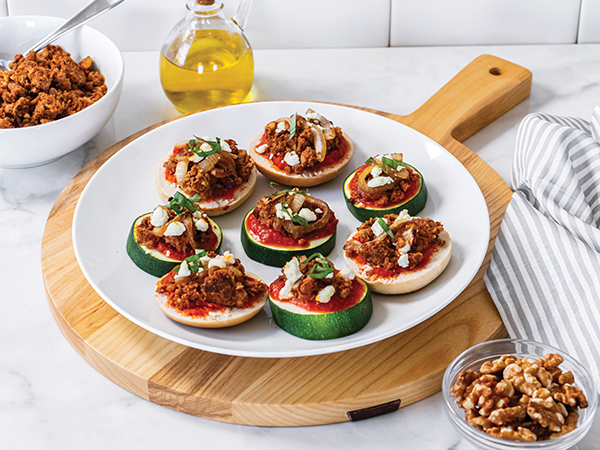
Walnut Chorizo Pizza Bites
Walnut Chorizo:
- 1 1/2 cups California walnuts
- 1 cup pinto beans, drained and rinsed
- 2 tablespoons lime juice
- 1 teaspoon smoked paprika
- 1/2 teaspoon dried oregano
- 1/2 teaspoon cumin
- 1/2 teaspoon chipotle powder
- 1/2 teaspoon salt
- 1/4 teaspoon garlic powder
- 1 tablespoon olive oil
Pizza Bites:
- 3 tablespoons olive oil
- 1 cup sliced sweet onion
- 5 mini bagels
- 1 large zucchini, sliced 1/2 inch (10 slices)
- 1 cup marinara sauce
- 1 cup walnut chorizo
- 1/2 cup crumbled goat cheese
- 1/2 cup chopped basil
- To make walnut chorizo: In food processor, pulse walnuts until finely crumbled. Transfer to mixing bowl.
- In food processor, pulse pinto beans, lime juice, paprika, oregano, cumin, chipotle powder, salt and garlic powder until mixture resembles ground meat. Stir bean mixture with walnut pieces.
- In medium skillet over medium heat, heat olive oil. Add walnut chorizo and cook 5-7 minutes until lightly browned, using spatula to break into crumbles.
- To make pizza bites: In pan over medium heat, heat olive oil and add onion. Cook, stirring occasionally, 15-20 minutes until onion is soft and golden brown.
- Preheat oven to 375 F. Line two baking sheets with parchment paper. Halve bagels and place on baking sheet. Place zucchini slices on second baking sheet.
- Top each bagel and zucchini slice with 1 tablespoon marinara; spread with back of spoon. Add 1 tablespoon walnut chorizo crumbles to each bagel and zucchini slice. Sprinkle with caramelized onion and goat cheese.
- Bake 10 minutes.
- Cool 5 minutes on baking sheets. Top with basil.
Source: California Walnut Board

Meringue Nests with Vanilla Bean Whipped Cream and Strawberries
(Family Features) It’s tough to top the joy of a spring morning spent celebrating with family, enjoying a delicious brunch or snacking on sweet treats. With warmer weather and bright sunshine comes plenty of opportunities to enjoy favorite recipes.
Celebrating the season with eggs can bring loved ones together in the kitchen and beyond, from crafting classic desserts to serving up new delights. Plus, the versatility of eggs allows for nearly countless creations.
Boiled, scrambled, poached, baked and any other way you like them, eggs can be your kitchen superhero. As a natural source of vitamins and minerals, they’re a delicious protein powerhouse with just 70 calories per large egg.
Make the celebration truly memorable with the power of eggs in a sweet dessert like these Meringue Nests with Vanilla Bean Whipped Cream and Strawberries, a perfect option for topping off a brunch feast or an afternoon meal.
Find more spring recipe ideas and ways to celebrate the season at incrediableegg.org.
Watch Video to see how to make this recipe!
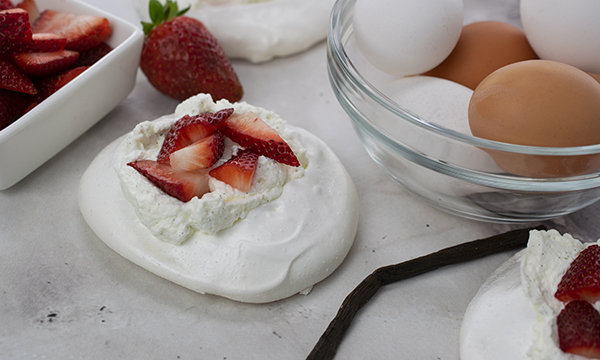
Meringue Nests with Vanilla Bean Whipped Cream and Strawberries
Recipe courtesy of the American Egg Board and Sam Adler (@frostingandfettucine)
Prep time: 15 minutes
Total time: 6 hours
Servings: 6
Meringue Nests:
- 1 1/4 cups granulated sugar
- 6 large eggs
- 1 teaspoon cream of tartar
- 1 teaspoon vanilla extract
- 2 teaspoons cornstarch
Garnish:
- 1 cup heavy whipping cream
- 1 teaspoon granulated sugar
- 1/2 teaspoon vanilla extract (or 1 vanilla bean, scraped)
- 1/2 pint fresh strawberries, sliced
- To make meringue nests: Preheat oven to 200 F. On parchment paper-lined baking sheet, spread sugar evenly and bake 5-7 minutes to slightly heat. Remove sugar from oven then increase oven temperature to 225 F.
- Carefully separate egg whites from yolks completely. In bowl of hand or stand mixer fitted with whip attachment, whisk egg whites on medium-low speed until foamy about 1 minute.
- Slowly add sugar 2-3 tablespoons at a time and mix on medium speed 2 minutes between each addition. Sugar needs completely mixed into egg whites to ensure success. Continue mixing on medium until mixed through and meringue does not feel gritty.
- Add cream of tartar, vanilla extract and cornstarch. Increase to high speed and beat until stiff peaks form.
- On two parchment paper-lined baking sheets, pipe or spread meringue with spoon into six 4-inch circular “nests.”
- Bake 1 hour, 15 minutes then turn off oven and let meringues cool without opening oven for at least 4 hours or overnight. The USDA recommends egg dishes be cooked to 160 F.
- To make garnish: When ready to serve, in clean mixing bowl fitted with whip attachment, whip heavy whipping cream on medium speed. Slowly add sugar and vanilla. Continue mixing on high speed 2-3 minutes until stiff peaks form.
- Dollop whipped cream on meringue nests and top with sliced strawberries.
Source: American Egg Board

Cheesecake Ice Cream with Fruit Swirls
(Family Features) Spending precious moments enjoying outdoor meals with family and friends is part of what makes warm weather get-togethers so special. Take those al fresco occasions to the next level with a favorite dessert: ice cream.
Homemade ice cream is a hallmark of many family events from birthday celebrations and pool parties to warm weather holidays spent basking in the sunshine. Completely customizable with an array of fruits or other tasty mix-ins plus toppings of your choice, it’s a perfect way to put a grin on loved ones’ faces.
At your next outdoor event, try an option like Cheesecake Ice Cream with Fruit Swirls from Milk Means More. It’s a simple solution you can make a couple days in advance with your favorite fruit flavor such as blueberry, raspberry, cherry, strawberry, peach or apricot. Plus, this recipe serves a crowd, making it perfect for serving up smiles.
Visit MilkMeansMore.org for more delicious dessert ideas.
Watch video to see how to make this recipe!
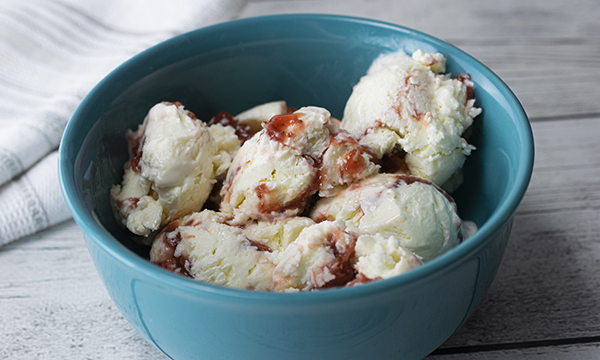
Cheesecake Ice Cream with Fruit Swirls
Recipe courtesy of Marcia Stanley, MS, RDN, on behalf of Milk Means More
Prep time: 15 minutes
Servings: 12
- 12 ounces cream cheese, cut into cubes
- 3/4 cup sugar
- 1 cup sour cream
- 3/4 cup half-and-half
- 2 teaspoons vanilla
- 1 1/4 teaspoons lemon juice, divided
- 1 dash salt
- 1/3 cup blueberry, raspberry, cherry, strawberry, peach or apricot fruit spread
- In large mixer bowl of electric mixer, beat cream cheese and sugar on medium speed until fluffy. Add sour cream, half-and-half, vanilla, 1 teaspoon lemon juice and salt. Beat on low speed until combined then beat on medium speed until smooth. Cover and refrigerate 2-24 hours, or until cold.
- Pour cream cheese mixture into 1 1/2-quart ice cream freezer. Freeze according to manufacturer’s directions.
- In small bowl, stir fruit spread and remaining lemon juice.
- Spoon about one-third of ice cream into 2-quart food storage container. Spoon about half of fruit spread mixture in dollops over ice cream. Repeat layers. Top with remaining ice cream. Cover and freeze 4-24 hours.
- To serve, scoop ice cream into dessert dishes.