
Get Creative with Easter Sweets
(Family Features) Holiday hams and deviled eggs may take center stage at Easter gatherings, but edible crafts offer a reminder of the magic of the season that’s found in moments spent together. Simple recipes that call for a dose of creativity are perfect ways to bring the kids to the kitchen, made even easier when all that work leads to sweet treats.
While plastic eggs may have led to a decline in good, old-fashioned egg-dyeing, there are still fun ways to bring crafts back to Easter celebrations. Consider these Kids Krafty Easter Cake Pops, which call for little ones to help dip seasonal shapes in chocolate, use cake molds and more.
Children of virtually any age can relish in the joys of using cookie cutters and decorating Easter Sugar Cookies, all with a little supervision and short list of instructions. This version shows how to make the cookies and homemade icing so you can create any color you desire for maximum creativity.
Remember, these delicious crafts don’t have to be perfect – having fun and making memories that last a lifetime are what make Easter truly special.
Visit Culinary.net to find more Easter inspiration and recipes from “Cookin’ Savvy.”
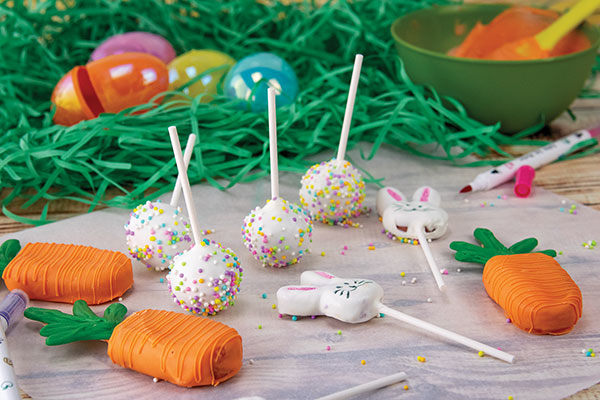
Kids Krafty Easter Cake Pops
Recipe courtesy of "Cookin' Savvy"
- 1 box cake mix
- 1 can frosting
- 1 bunny chocolate mold
- 1 cakesicle mold
- ice pop sticks
- 1 bag white chocolate chips or melting chips
- cake pop sticks
- 1 bag orange melting chips
- 2 tablespoons canola or coconut oil, divided
- 1 bag green melting chips
- pastel sprinkles
- 1 piece hard foam (optional)
- edible markers
- Bake cake according to package instructions and let cool completely.
- Crumble cake and mix with 1/2 can frosting until dough forms. Add more frosting, if needed. Using small cookie scoop, form dough into balls and set aside. Place dough in bunny molds then pop out and set aside with balls. Place dough in cakesicle mold, insert ice pop stick in each slot and freeze 5-10 minutes.
- Melt handful of white melting chips. Stick tip of each cake pop stick in chocolate then insert into every cake ball and bunny until each has one stick. Set aside to dry.
- Remove cakesicles from freezer and pop out of molds. In bowl, melt orange melts then mix in 1 tablespoon oil and transfer to cup. Dip cakesicles and scrape off excess using rim of cup. Place on parchment paper to dry.
- In bowl, melt green melts then place in zip-top or piping bag. Cut tip off bag, pipe carrot leaves onto piece of parchment paper and let dry.
- Melt remaining white melts and mix in remaining oil. Transfer to cup and dip ball-shaped cake pops and bunnies then tap stick on edge of cup to remove excess.
- Over separate bowl, sprinkle ball-shaped pops with pastel sprinkles. To keep ball shape, let dry by sticking in piece of hard foam. Bunnies can dry face side up on parchment paper. After bunnies are dry, use edible markers to make face and color in ears.
- When carrots and leaves are dry, remelt orange melts and place in piping or zip-top bag. Cut off tip and drizzle orange over carrots. Add small line of orange on each ice pop stick and place leaves on each stick. Let dry.
Easter Sugar Cookies
Recipe courtesy of "Cookin' Savvy"
Icing:
- 1/3 cup meringue powder
- 1/2 cup warm water, plus additional for thinning (optional), divided
- 3 tablespoons vanilla
- 1 bag (2 pounds) powdered sugar
- 2 tablespoons corn syrup
- assorted food coloring
Cookies:
- 2 sticks unsalted butter, at room temperature
- 1 cup sugar
- 1 egg
- 1 tablespoon vanilla
- 2 teaspoons baking powder
- 1 dash salt
- 3 cups all-purpose flour
- To make icing: Mix meringue powder, 1/2 cup warm water, vanilla, powdered sugar and corn syrup. Separate into bowls and add food coloring; mix with water, as needed, to thin for piping.
- To make cookies: Heat oven to 350 F.
- Cream butter and sugar. Mix in egg, vanilla, baking powder and salt. Mix in flour 1 cup at a time to form dough. Roll dough out to 1/4-1/2-inch thickness.
- Cut into shapes, place on baking sheet and freeze 10 minutes. Bake 8-12 minutes. Cool completely before icing.
- Place icing in zip-top or piping bags and cut off tips. Put cookies on parchment paper. Trace outline first then fill in middle. Use toothpicks to smooth out.
- Let dry 6 hours and finish decorating with different icing colors or edible markers.
Source: Culinary.net

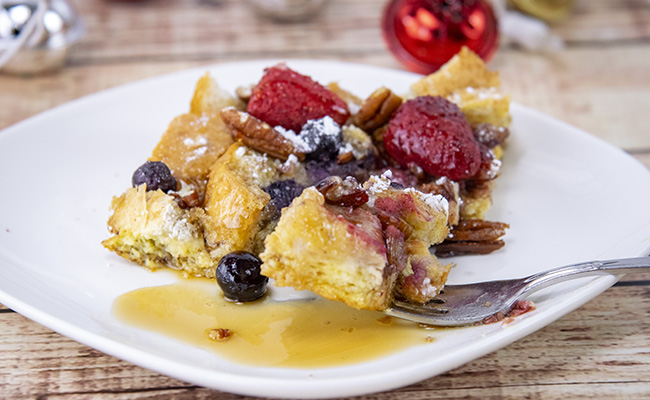
French Toast Casserole
(Culinary.net) On a cool, crisp morning, it’s hard to beat an exciting twist on a breakfast classic.
This French Toast Casserole is crisp on top while soft and moist in the middle, coming fresh out of the oven with the aroma of maple syrup and pecans that will have the whole house eager for a bite. It’s easy enough to make fresh in the morning- but can also be prepared the night before so all you have to do is add the topping and pop it in the oven.
Find more fresh breakfast recipes to start your day at Culinary.net.
Watch video to see how to make this recipe!
French Toast Casserole
- 1 loaf French bread (about 1 1/2 pounds), cut into 1-inch cubes
- 5 large eggs
- 1 1/2 cups unsweetened milk
- 2 tablespoons brown sugar
- 2 teaspoons vanilla extract
- 1 teaspoon cinnamon
- 1/4 teaspoon nutmeg
- 1/4 teaspoon sea salt
- maple syrup, for serving
Topping:
- 2 tablespoons unsalted butter or coconut oil, melted
- 2 tablespoons brown sugar
- 1/2 cup chopped pecans
- 1 cup frozen strawberries
- 1 cup frozen blueberries
- confectioners’ sugar, for dusting
- Grease 9-by-13-inch baking dish. Place bread cubes in baking dish. In large bowl, whisk eggs, milk, brown sugar, vanilla, cinnamon, nutmeg and salt. Pour mixture evenly over bread cubes.
- If making casserole ahead, cover baking dish and refrigerate overnight. If baking immediately, let stand 30 minutes at room temperature to allow bread to soak up egg mixture.
- Preheat oven to 350 F.
- To make topping: Drizzle casserole with melted butter and sprinkle with brown sugar and pecans. Top with strawberries and blueberries.
- Cover and bake 35 minutes then uncover and bake 10-20 minutes, or until topping is browned and egg mixture has mostly set.
- Remove from oven, cover loosely with foil and let stand 10 minutes. Dust with confectioners’ sugar. Serve with maple syrup.
Source: Culinary.Net

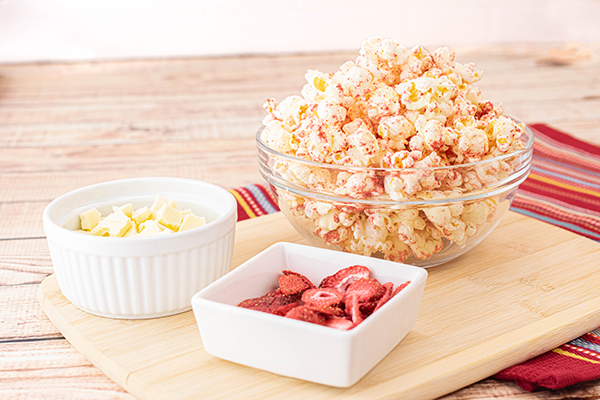
Strawberries and Cream Popcorn
(Family Features) Perfect for a picnic, celebrating a birthday or just enjoying time with family and friends, the classic combination of strawberries and cream serves as both a sweet treat and a crowd favorite.
This version adds another tasty treat – popcorn – so you can triple down on deliciousness. With just three ingredients, it’s easy to make and ideal for sharing. Simply drizzle popcorn with melted white chocolate chips and top with pulsed freeze-dried strawberries for a kid- and adult-friendly flavor trio.
An added benefit: Popcorn is a whole grain that’s 100% unprocessed with no additives, hidden ingredients or GMOs while providing nutrients like zinc, magnesium, B vitamins and fiber. At just 30 calories per cup of air-popped popcorn, it’s an energy-providing snack full of complex carbohydrates.
Visit Popcorn.org to find more sweet snacking solutions.
Watch video to see how to make this recipe!
Strawberries and Cream Popcorn
Servings: 4-6
- 1/4 cup freeze-dried strawberries
- 6 cups popped popcorn
- 1 cup white chocolate chips, melted
- In small food processor or spice grinder, pulse freeze-dried strawberries until finely ground.
- Place popcorn in large bowl. Drizzle melted chocolate over top; toss until well coated. Sprinkle evenly with ground freeze-dried strawberries; toss until well coated.
- Scrape onto large parchment paper-lined baking sheet, spreading into even layer.
- Let stand at room temperature 30-60 minutes, or until chocolate is set and hardened. To serve, break into pieces.
Tips: To melt chocolate: In heatproof bowl over saucepan of barely simmering water, stir chocolate chips 3-5 minutes, or until smooth.
To melt chocolate in microwave: In microwave-safe bowl or measuring cup, microwave chocolate on medium heat 1-2 minutes, stirring every 30 seconds, or until smooth and melted.
Source: Popcorn Board

Fuel for Full Days of Learning
(Family Features) Between morning routines, days spent in the classroom, extracurriculars and homework, it may seem like there’s never enough time in the day during the school year. However, making time for tasty meals and snacks doesn’t have to be another burden on jam-packed schedules.
These quick recipes for a flavorful twist on a breakfast favorite, easy-to-make sliders featuring kid-friendly flavors and delightful treats to enjoy at the end of the day can help keep little learners (and older family members, too) fueled up and ready to tackle all the school year throws their way.
Find more recipes to get you through busy back-to-school season at Culinary.net.
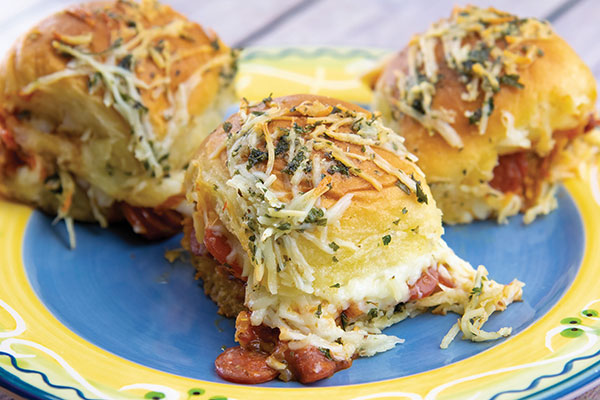
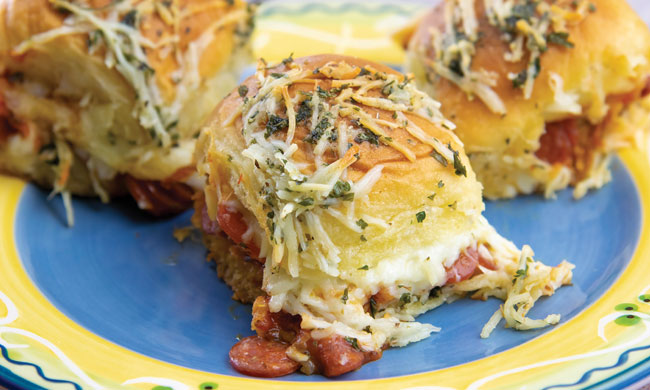
Simple, Kid-Friendly Sliders
For those busy school nights when time is at a premium and you need to get a meal on the table quickly, these simple yet savory Pepperoni Pizza Sliders can be a perfect solution. A modified take on a kid favorite – pizza – they’re easy to make after work and extracurricular activities to steal a few moments of family time enjoying the cheesy pepperoni goodness before completing homework and beginning preparations for a new day.
Pepperoni Pizza Sliders
Recipe adapted from MilkMeansMore.org
- 1 package slider rolls
- 1/2 cup pizza sauce
- 1/2 cup mini pepperoni
- 1 1/2 cups shredded, low-moisture, part-skim mozzarella cheese
- 1/4 cup butter, melted
- 1 teaspoon parsley flakes
- 1/2 teaspoon dried oregano
- 1/2 teaspoon garlic powder
- 1/2 cup shredded Parmesan cheese
- nonstick cooking spray
- Heat oven to 350 F.
- Keeping rolls connected, cut sheet of rolls horizontally, separating tops from bottoms. Place bottom halves of rolls in baking dish.
- Spread pizza sauce evenly over bottom halves. Sprinkle pepperoni over sauce. Sprinkle mozzarella over pepperoni and cover with top halves of rolls.
- Mix melted butter with parsley flakes, dried oregano, garlic powder and shredded Parmesan cheese. Spoon evenly over sliders.
- Cover baking dish with aluminum foil sprayed with nonstick cooking spray to keep cheese from sticking.
- Bake 20 minutes.
- Remove foil and bake additional 5-10 minutes, or until Parmesan is melted and golden brown.
Cut sliders and serve immediately.
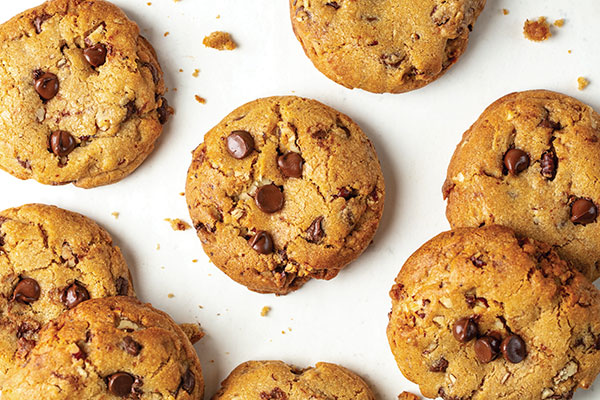
A Fresh-Baked After-School Sweet
After a long day of learning or a tough homework assignment, many kids love a warm, chocolatey homemade cookie. Once your kiddos pack away the calculators and put their pencils down, serve up an ooey-gooey delight as a reward for all that hard work.
These Brown Butter Chocolate Chip Cookies are ready in just 30 minutes and made with high-quality ingredients you can count on like C&H Dark Brown Sugar for that familiar homemade flavor.
Find more sweet after-school desserts at chsugar.com.
Brown Butter Chocolate Chip Cookies
Prep time: 15 minutes
Cook time: 15 minutes
Yield: 18 cookies
- 1 cup (2 sticks) unsalted butter, softened
- 2 cups all-purpose flour
- 1 teaspoon baking powder
- 1/2 teaspoon baking soda
- 1/2 teaspoon salt
- 1 1/4 cups C&H Dark Brown Sugar
- 2 large eggs, at room temperature
- 2 teaspoons pure vanilla extract
- 1 cup chopped pecans, toasted
- 1 1/2 cups semisweet chocolate chips
- In medium saucepan over medium heat, melt butter and cook until foaming and golden brown. Remove from heat and transfer to heatproof bowl. Place in refrigerator until solidified, about 45 minutes.
- In medium bowl, whisk flour, baking powder, baking soda and salt. Set aside.
- Once butter has solidified, remove from refrigerator. In bowl of electric stand mixer, using paddle attachment, beat butter and sugar at medium speed 2-3 minutes until light and fluffy. Add eggs, one at a time, and vanilla. Mix until combined. Scrape sides of bowl as needed. Reduce speed, add flour mixture and beat to combine. Add pecans and chocolate chips; mix at low speed until combined. Place dough in refrigerator and rest 30 minutes.
- Preheat oven to 350 F and line baking sheets with parchment paper.
- Using 2-ounce ice cream scoop, portion out dough on prepared baking sheets, spacing about 3 inches apart. Gently flatten dough balls using palm.
- Bake 13-15 minutes, or until golden brown. Allow cookies to cool on baking sheets 10 minutes then transfer to wire rack. Serve warm.
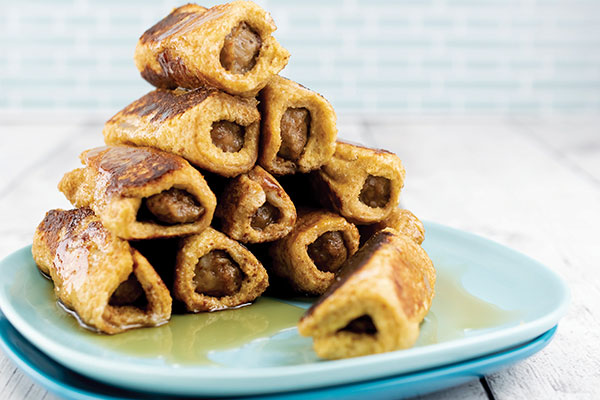
A Traditional Breakfast with a Twist
The same bowl of cereal can get boring after eating it for breakfast day in and day out. You may find yourself looking for something new and exciting to start school day mornings on the right foot.
Kids can be picky when it comes to breakfast foods, but this recipe for Sausage French Toast Roll-Ups is a quick and easy way to fill their bellies with a taste of several flavors they may already love. A sizzling sausage link wrapped with French toast, it combines a favorite breakfast protein and traditional deliciousness in one roll.
Sausage French Toast Roll-Ups
Servings: 12
- 12 sausage links
- 2 eggs
- 2/3 cup milk
- 3 teaspoons almond extract
- 1/2 teaspoon ground cinnamon
- 6 bread slices, crust removed, cut in half
- 3 tablespoons butter
- syrup
- In skillet, cook sausage links according to package directions. Set aside.
- In medium bowl, whisk eggs, milk, almond extract and cinnamon.
- Dip bread slice in egg mixture. Wrap bread slice around cooked sausage link, pressing seam to keep from unrolling. Repeat with remaining bread slices and sausage links.
- In large skillet over medium-high heat, melt butter. Place roll-ups in skillet, seam-sides down, and cook until all sides are browned, approximately 10 minutes.
- Drizzle with syrup.
Source: C&H Sugar

Raspberry Swirl Cheesecake Pie

Raspberry Swirl Cheesecake Pie
Prep Time: 15 minutes
Baking Time: 55 minutes
Makes one 9-inch pie
- 1 (8-ounce) package cream cheese, softened
- 1 (14-ounce) can Eagle Brand Sweetened Condensed Milk (NOT evaporated milk)
- 1 egg
- 3 tablespoons plus 1 teaspoon lemon juice from concentrate, divided
- 1 (9-inch) graham cracker crumb crust
- 1/2 cup raspberry preserves
- Preheat oven to 300°F. In large mixing bowl, beat cream cheese until fluffy. Gradually beat in sweetened condensed milk until smooth, add egg and 3 tablespoons lemon juice; mix well.
- Pour 1/2 the batter into crust. Combine remaining 1 teaspoon lemon juice with preserves in small bowl. Spoon half the preserves over batter.
- Pour remaining batter on top. Using a knife, swirl remaining preserves into decorative pattern on top.
- Bake 55 minutes. Cool. Refrigerate leftovers.

Hop Into Spring
A Bunny for Your Honey
(Family Features) Every year, friends and family emerge from hibernation to say farewell to winter and welcome spring with open arms. Whether you’re celebrating Easter, Earth Day or any other cheery spring occasion, this darling Bunny Cake is a great way to enjoy the happiness and rebirth that comes along with the season.
Children will love helping with this simple Bunny Cake recipe because they can customize it to make it their own. For example, surround your bunny cake with some grass made out of shredded coconut that has been colored with green food color, or really make the cake stand out by making it a polka-dotted or striped bunny. The Easy Bunny Cake recipe, which makes a pair of bunny cakes, is also a great centerpiece until it is time to indulge and enjoy.
Bunny Games
If you have more than a few guests, bake multiple bunny cakes, split up into teams, offer several different types of candies and decorations and challenge each team to come up a creative bunny cake.
After the cakes are judged and the dessert is enjoyed, send the kids outside for bunny hop races. In this relay race, the participants, who are split into two teams, will take turns hopping through the pre-determined course and pass to the next person by transferring bunny ears or a carrot stick.
For the Easy Bunny Cake and many other fun and delicious recipes, perfect for spring, visit www.BettyCrocker.com.

Easy Bunny Cake
Prep Time: 30 min
Total Time: 2 hours 10 min
Makes: 2 bunny cakes, 16 servings
- 1 box Betty Crocker SuperMoist yellow cake mix
- Water, vegetable oil and eggs called for on cake mix box
- 2 containers (1 pound each) Betty Crocker Rich & Creamy vanilla frosting
- Neon purple and/or pink food color
- Construction paper (inedible)
- 2 small marshmallows, cut in half, flattened
- 2 small jelly beans, cut in half
- 2 5-inch strips rainbow-colored sour candy, separated into strips
- 2 large jelly beans or candy-coated chocolate-covered peanut candies
- 2 rectangular-shaped white chewing gum pieces, cut in half
- 2 large marshmallows
1. Heat oven to 350°F (325°F for dark or nonstick pans). Make, bake and cool cake as directed on box for 2 (8- or 9-inch) round cake pans, using water, oil and eggs.
2. In medium bowl, tint 1 container frosting with neon purple food color. Using 1 cake round, cut in half to form 2 semicircles. Arrange halves on serving plate with cut side down and flat sides together with 1/4 cup frosting to form body.
3. Frost cake with frosting. Cut teardrop-shaped ears from construction paper; insert into cake. Using toothpicks to attach, use 2 small marshmallow halves and 2 small jelly bean halves for eyes. Use large jelly bean for nose and sour candy strips for whiskers. Place gum halves just below nose for teeth. Use large marshmallow for tail.
4. Repeat with remaining cake to make second bunny, using pink neon food color. Frost and decorate as above.
Betty Crocker® and SuperMoist® are Reg. T.M.s of General Mills Inc.
Source: Betty Crocker