
A Savory Summer Dessert Perfect for Sharing
(Family Features) Put delicious desserts back on the menu all summer long with savory favorites that don’t call for wasting sunny days in the kitchen. Single-serve solutions are perfect for sharing with guests, whether you’re hosting a pool party or calling over loved ones for a backyard barbecue.
This Peanut Butter Cookie Banana Pudding can be prepped first thing in the morning and refrigerated until it’s time for a treat. Portioned in 1/4-pint canning jars (or small, kid-proof cups to avoid a mess) for individual servings, you can simply break them out when the dessert bell dings and top them with whipped topping and extra cookies.
At 7 grams per serving, a nutrient-rich powerhouse like peanuts can put a better-for-you spin on summer sweets. They deliver the most protein of any nut and contain six essential – vitamin E, folate, riboflavin, thiamin, niacin and vitamin B6 – and seven essential minerals – phosphorus, iron, magnesium, potassium, zinc, copper and calcium.
Visit gapeanuts.com to find more protein-packed recipe ideas.
Watch video to see how to make this recipe!

Peanut Butter Cookie Banana Pudding
Recipe courtesy of Peanut Butter Lovers on behalf of the Georgia Peanut Commission
- 1 box (5.1 ounces) instant vanilla pudding mix
- 3 cups cold milk
- 1 package (16 ounces) peanut butter sandwich cookies, divided
- 12 canning jars (1/4 pint each)
- 2-3 bananas
- frozen whipped topping, thawed
- In large measuring cup, whisk pudding mix and milk until thoroughly combined. Set aside to soft set, about 5 minutes.
- Cut or break six cookies in half and set aside. Pour remainder of package in 1-gallon bag, seal it and use rolling pin to crush cookies.
- Spoon layer of cookie crumbs in bottom of each jar, reserving some for topping. Top with layer of vanilla pudding. Cut one banana in half lengthwise and slice. Put layer of bananas on top of pudding. Top bananas with another layer of pudding. Repeat with remaining ingredients.
- Refrigerate until ready to serve. To serve, top with whipped topping and sprinkle with crushed cookies. Serve each with broken cookie half.
Note: Twelve 1/4-pint canning jars fit into disposable foil lasagna pan with clear lid for easy refrigeration and transportation.
Source: Georgia Peanut Commission

Put a Traditional Spin on Cinco de Mayo: Celebrate Mexican culture with pork stew and cinnamon sweets
(Family Features) Whether Cinco de Mayo means an opportunity to celebrate your family’s heritage or it’s simply an excuse to gather with the ones you love, every holiday truly is about the same thing: special moments together. While those treasured times at the table revolve around camaraderie and conversation, it can start with a filling meal and end with a sweet treat.
Take this year’s festivities the traditional route with recipes that combine familiar favorites with ingredients you normally may not use otherwise, such as cactus. This Mexican Cactus Pork Stew makes Cinco de Mayo a cinch with the use of a Dutch oven. Just brown fresh pork shoulder (or reheat leftover pork) in the Dutch oven and combine with onion and jalapeno for the right mixture of flavor and spice. Once pork is cooked or warmed through, add broth, beans, spices, seasonings and a cup of chopped cactus for a southwestern spin.
After some lively chatter or friendly competition, you’re bound to work up the appetite for dessert. Call the kids to the kitchen to lend a hand with these Kid-Friendly Mexican Cinnamon Cookies – they’ll love working with the dough and rolling warm cookies in the cinnamon-sugar mixture after baking. Remember, they don’t have to be perfect; you can ensure a bit of fun and flavor by letting their creativity shine.
Visit Culinary.net to find more family-friendly recipes perfect for celebrating holidays throughout the year.

Mexican Cactus Pork Stew
Recipe courtesy of "Cookin' Savvy"
- 1 pound pork shoulder (leftover or fresh)
- 1 medium onion, chopped
- 1 jalapeno pepper, chopped
- 3 cups beef broth
- 1 can (28 ounces) diced tomatoes
- 2 cans (15 ounces each) mild chili beans
- 1 cup chopped cactus (nopales)
- 1 tablespoon garlic powder
- 2 tablespoons smoked paprika
- 1 teaspoon cayenne pepper
- salt, to taste
- pepper, to taste
- 4 green onions, chopped, for garnish
- 1/4 cup chopped cilantro, for garnish
- If using fresh pork, in Dutch oven, cube and brown it with onion and jalapeno pepper. If using leftover pork, reheat in Dutch oven with onion and jalapeno pepper.
- Add beef broth, diced tomatoes, chili beans, cactus, garlic powder, smoked paprika, cayenne pepper and salt and pepper, to taste.
- Simmer 25 minutes then garnish with green onions and cilantro.

Kid-Friendly Mexican Cinnamon Cookies
Recipe courtesy of "Cookin' Savvy"
- 4 sticks butter, at room temperature
- 4 cups self-rising flour, plus additional for coating workspace
- 2 teaspoons cinnamon
- 1 egg
- 3/4 cup sugar
Topping:
- 2/3 cup sugar
- 4 teaspoons cinnamon
- Preheat oven to 375 F.
- In bowl, combine butter, 4 cups flour and cinnamon. Add egg and sugar then knead into ball.
- Spread additional flour on counter and cut ball into six sections. Roll each section into 24-inch ropes then cut into 1-inch pieces and place on cookie sheet.
- Bake 10 minutes.
- To make topping: In bowl, combine sugar and cinnamon.
- Roll warm cookies in mixture and let cool on rack.

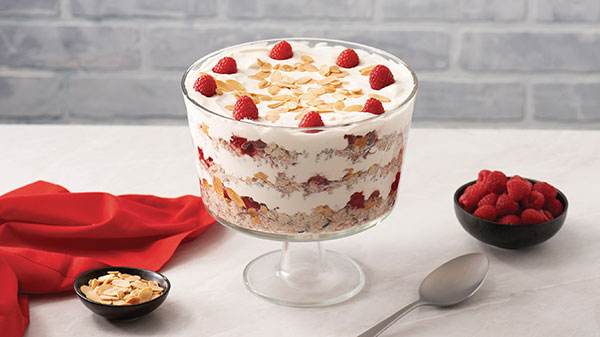
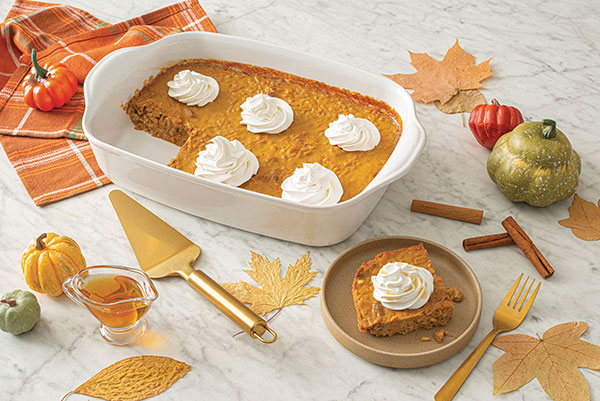
Sweeten the Holiday Season with Deliciously Creamy Desserts
(Family Features) Once the table is cleared and gifts are put away, it’s often time for one of the favorite moments of holiday gatherings. The taste (and smell) of those divine desserts you may only make once a year is enough to keep guests hungry even after the main course.
Put a new staple on holiday menus for years to come with this Cran-Raspberry Quinoa Pudding Trifle that combines fresh raspberries, vibrant cranberry sauce, orange juice and orange zest for a unique dessert. Ready in 30 minutes, it can be an easy way to impress everyone at the table with a creamy pudding base inspired by favorite winter flavors.
As a tasty treat that’s ideal for just about any occasion, this take on rice pudding is made using Success Boil-in-Bag Tri-Color Quinoa, which offers a heat-safe, BPA-free and FDA-approved bag and is easily prepared in just 10 minutes. Its light, nutty flavor and versatility creates a pudding that’s perfect for a wide range of pairings, from satisfying chocoholics or pumpkin-spice fanatics to whipping up a sweet, simple dessert.
For a comforting dish full of familiar cold-weather flavors, serve Pumpkin Pecan Rice Pudding Bars. Pumpkin-spice fanatics can enjoy their favorite ingredient mixed into a rice pudding base sweetened with coconut milk, brown sugar, vanilla extract, whipping cream and maple syrup.
This holiday-inspired dessert relies on the fluffiness of Success Boil-in-Bag White Rice as a high-quality, precooked solution. The boil-in-bag rice is quick and easy with no measuring and no mess, and it’s ready in 10 minutes to make seasonal recipes a cinch.
Find more sweet holiday recipe inspiration at SuccessRice.com.
Cran-Raspberry Quinoa Pudding Truffle
Prep time: 25 minutes
Cook time: 5 minutes
Servings: 6
Quinoa Pudding:
- 2 bags Success Tri-Color Quinoa
- 4 cups almond milk
- 3 tablespoons honey
- 1 teaspoon vanilla extract
- 1/2 teaspoon ground cinnamon
Creamy Yogurt Layer:
- 2 cups plain Greek yogurt
- 3 tablespoons honey
- 1 teaspoon vanilla extract
- 1/2 cup heavy cream
Cran-Raspberry Layer:
- 1/2 cup cranberry sauce
- 1/4 cup orange juice
- 1 teaspoon orange zest
- 2 cups fresh raspberries
- 1/2 cup sliced almonds, toasted
- 2 cups gluten-free vanilla cookies, chopped
- 1/2 cup fresh raspberries
- To make quinoa pudding: Prepare quinoa according to package directions, substituting almond milk for water. Drain, reserving almond milk.
- Remove quinoa from bags and stir into almond milk in saucepan over medium heat. Stir in honey, vanilla and cinnamon. Bring to simmer. Cook, stirring constantly, 5-8 minutes, or until thickened slightly. Refrigerate 45-60 minutes, or until well chilled.
- To make creamy yogurt layer: In large bowl, stir yogurt, honey and vanilla. In separate bowl, beat cream until stiff peaks form. Stir whipped cream into yogurt mixture until blended. Refrigerate until ready to use.
- To make cran-raspberry layer: In medium bowl, stir cranberry sauce, orange juice and orange zest. Gently fold in raspberries.
- To assemble: In 10-cup trifle dish, layer 1/3 quinoa mixture, 2 tablespoons almonds, 1/3 cran-raspberry mixture, 1/3 vanilla cookies and 1/3 yogurt mixture. Repeat layers twice. Garnish with remaining raspberries and almonds.
Pumpkin Pecan Rice Pudding Bars
Prep time: 10 minutes
Cook time: 40 minutes
Servings: 4-6
- 1 bag Success White Rice
- 1 cup pecans
- 4 cups coconut milk
- 1 can (15 ounces) pumpkin puree
- 3/4 cup brown sugar
- 2 teaspoons pumpkin pie spice
- 1/2 teaspoon salt
- 3 eggs
- 1/2 teaspoon vanilla extract
- 1 cup heavy whipping cream
- 2 tablespoons maple syrup
- Prepare rice according to package directions. Preheat oven to 350 F. Spread pecans on baking sheet and toast 8-10 minutes. Cool then chop.
- In large saucepan over medium-high heat, combine milk, pumpkin, brown sugar, pumpkin pie spice and salt. Bring to boil, stirring constantly. Slowly add about 1/2 cup hot liquid to eggs and beat well. Stir egg mixture back into saucepan and cook over medium-high heat 2 minutes. Remove from heat and stir in cooked rice, vanilla and pecans.
- Pour mixture into greased 13-by-9-inch baking dish. Bake, uncovered, 30 minutes, or until knife inserted near center comes out clean.
- Whip heavy cream to soft peaks then add maple syrup and continue beating until peaks form. Serve with warm pudding.
Tip: For sweeter pudding, increase brown sugar to 1 1/2 cups.
Source:

Getting to the Gut of It: Dietitian-approved tips for overall wellness
(Family Features) Social media frequently touts weight loss trends and solutions. However, there’s another aspect to healthy eating that’s underappreciated but critical for overall wellness – gut health.
The body contains approximately 40 trillion bacteria, most of which are found in your gut, according to “Molecular Science.” The right balance of these bacteria is the key to good gut health.
Keeping your digestive system on track plays an important role in overall well-being, including immune health and mental health, according to “Clinical Practice.” When there is a gut bacteria imbalance, many people experience discomfort or digestive issues.
To help improve and maintain gut health – and your overall wellness – consider these tips from Mia Syn, MS, RDN, and Chobani:
- Get a dose of probiotics. Probiotics are live microorganisms that provide health benefits when consumed. They aid digestion and help maintain a healthy balance between good and bad bacteria.
- Focus on fiber. Fiber helps keep digestion running smoothly. One type of fiber, prebiotics, may be especially beneficial because they help nourish and support the growth of good gut bacteria to create a balanced and healthy microbiome.
- Power up with protein. While protein is not directly involved in nourishing gut bacteria, it provides essential amino acids and other nutrients that contribute to a healthy gut and overall digestive function. Protein is essential for the repair and maintenance of the gut lining, digestive enzyme production, efficient gut motility and more.
Options like Chobani Zero Sugar Drinks (not a low-calorie food) provide 10 grams of protein per 7-ounce serving, plus billions of probiotics. Available in four flavors – Mixed Berry, Peaches & Cream, Strawberry Cheesecake and Milk & Cookies – the drinks are perfect while on-the-go or can be used as an ingredient in recipes like this Protein-Powered Chia Pudding 4 Ways. Sweetened with only natural sugar alternatives, free of lactose and preservatives, these drinks contain 0 grams total sugar, are 50 calories and are made using only natural, non-GMO ingredients.
Find more recipes and solutions to support gut health at Chobani.com.
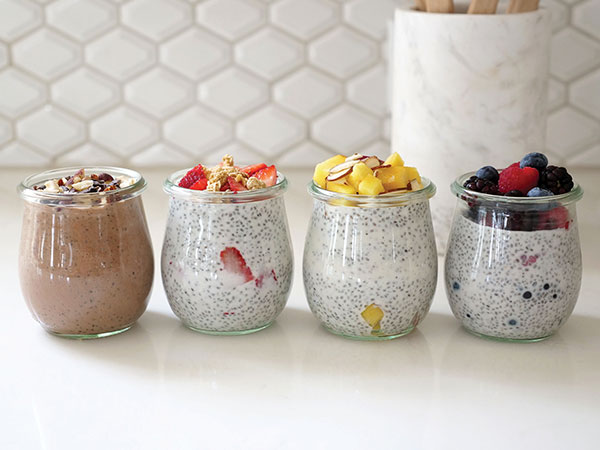
Protein-Powered Chia Pudding 4 Ways
Prep time: 15 minutes
Servings: 1 per flavor
Mixed Berry Blast:
- 1 Chobani Zero Sugar Mixed Berry Drink
- 3 tablespoons chia seeds
- 2 teaspoons pure maple syrup
- 1/4 teaspoon pure vanilla extract
- 1 cup mixed berries (blueberries, raspberries, blackberries or chopped strawberries)
Peaches and Cream Dream:
- 1 Chobani Zero Sugar Peaches & Cream Drink
- 3 tablespoons chia seeds
- 2 teaspoons manuka honey
- 1/4 teaspoon pure vanilla extract
- 1 peach, chopped
- 1 tablespoon sliced almonds
Strawberry Cheesecake Delight:
- 1 Chobani Zero Sugar Strawberry Cheesecake Drink
- 3 tablespoons chia seeds
- 2 teaspoons pure maple syrup
- 1/4 teaspoon pure vanilla extract
- 1 cup chopped strawberries
- 2 tablespoons low-sugar granola
Milk and Cookies Madness:
- 1 Chobani Zero Sugar Milk & Cookies Drink
- 3 tablespoons chia seeds
- 2 teaspoons pure maple syrup
- 1 tablespoon unsweetened cocoa powder
- 1/4 teaspoon pure vanilla extract
- 2 teaspoons cacao nibs
- 2 teaspoons chopped hazelnuts
- To make Mixed Berry Blast: In small bowl, use fork to whisk mixed berry drink, chia seeds, maple syrup and vanilla extract. Let mixture sit 10 minutes to thicken then stir to distribute seeds. Stir in 1/2 cup berries and transfer to serving glass. Top with remaining berries.
- To make Peaches and Cream Dream: In small bowl, use fork to whisk peaches and cream drink, chia seeds, honey and vanilla extract. Let mixture sit 10 minutes to thicken then stir to distribute seeds. Stir in half the peaches and transfer to serving glass. Top with remaining peaches and sliced almonds.
- To make Strawberry Cheesecake Delight: In small bowl, use fork to whisk strawberry cheesecake drink, chia seeds, maple syrup and vanilla extract. Let mixture sit on 10 minutes to thicken then stir to distribute seeds. Stir in 1/2 cup strawberries and transfer to serving glass. Top with remaining strawberries and granola.
- To make Milk and Cookies Madness: In small bowl, use fork to whisk milk and cookies drink, chia seeds, maple syrup, cocoa powder and vanilla extract. Let mixture sit 10 minutes to thicken then stir to distribute seeds. Transfer to serving glass and top with cacao nibs and chopped hazelnuts.
Source: Chobani

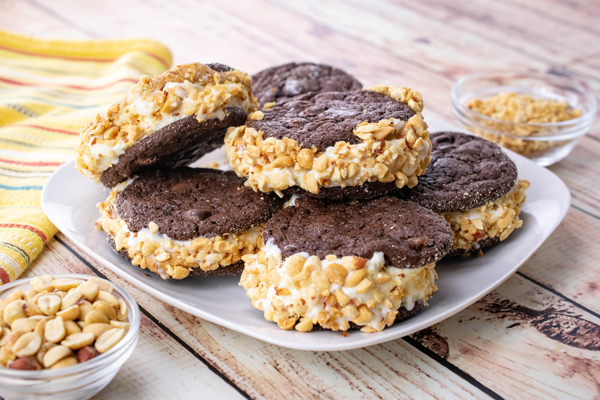
Peanut Butter Ice Cream Sandwiches
(Family Features) When the sun is shining and you need to beat the heat, cool down with a little shade and a nutty, frozen treat. This kid-favorite is a childhood classic you can customize with favorite toppings, too.
Made with the protein power of peanuts, these Peanut Butter Ice Cream Sandwiches are easy to prepare on hot days that call for a cold dessert. Just bake chocolate chip cookies, spread them with peanut butter, add a scoop of ice cream and roll in chopped peanuts, chocolate chips or toasted coconut for a sweet bite of perfection.
With approximately 4,000 active peanut farmers, it’s likely your peanuts – often referred to as “nutrition in a nutshell” – came from Georgia, which produces 52% of the country’s supply.
Visit GAPeanuts.com for more delicious dessert ideas.
Watch video to see how to make this recipe!
Peanut Butter Ice Cream Sandwiches
Recipe courtesy of Peanut Butter Lovers and the Georgia Peanut Commission
Yield: 12
- 24 fresh baked chocolate chip cookies (about 3 inches in diameter), cooled
- 1 1/2 cups creamy or crunchy peanut butter
- 1 1/2 quarts vanilla ice cream, slightly softened
- chopped peanuts, for topping (optional)
- mini chocolate chips, for topping (optional)
- toasted coconut, for topping (optional)
- On 12 cookies, top sides down, spread layer of peanut butter. Add one scoop of ice cream to each. Create sandwiches by topping with remaining cookies.
- Roll edges of ice cream in chopped peanuts, mini chocolate chips or toasted coconut, if desired. Place on baking sheet in freezer and freeze until firm.
- Serve slightly frozen.
Source: Georgia Peanut Commission

Family Fun with a Pop: Kid-friendly snacks and treats perfect for sharing
(Family Features) When hunger strikes and family fun calls for a snack to keep the excitement going, take your kiddos to the kitchen to whip up a tasty treat for all to enjoy. Whether you’re celebrating a special occasion or watching favorite movies, turn to an ingredient like popcorn that encourages creativity. Plus, it’s a delicious way for adults to turn back the clock and recreate childhood memories while making new ones with the family.
Consider these popcorn-inspired snacks to serve during your next adventure:
- Take yourself back in time to your own childhood with a classic pairing that never goes out of style: Peanut Butter and Jelly Popcorn. This version offers a fun way to jazz up popcorn for kids and adults alike with a sprinkling of strawberries and dried cranberries on top for added nutrition.
- When it’s time for a little fun in the sun or a trip to the park, sweeten up the celebration with this Graham Cracker Picnic Mix that’s a flavorful, kid-favorite combination of popcorn, bear-shaped graham crackers, marshmallows, fudge-covered pretzels and miniature cookies.
- Pizza is hard to beat as a snacking solution the whole family can enjoy, and this Grab and Go Pizza Popcorn is no exception. Ready in just minutes by mixing popcorn, Parmesan cheese and seasonings, little ones can help prepare a batch quickly before heading out the door.
- Colorful and fun, these Minty Green Popcorn Clusters are simple to make and a perfect treat to share. Just melt together marshmallows, butter, salt, green food coloring and peppermint extract before tossing with popcorn and green candy-coated chocolates.
To find more family-friendly snack time favorites, visit Popcorn.org.

Peanut Butter and Jelly Popcorn
Servings: 4-6
- 8 cups popcorn
- 2 tablespoons raspberry jam
- 1/2 cup white chocolate chips
- 3 tablespoons smooth natural peanut butter
- 1/4 cup freeze-dried strawberries
- 1/4 cup dried cranberries
- In large bowl, stir popcorn and jam until evenly coated. Transfer to parchment paper-lined baking sheet.
- In small heatproof bowl over small saucepan of barely simmering water, add white chocolate chips and peanut butter. Cook, stirring occasionally, 3-5 minutes, or until smooth and melted.
- Drizzle peanut butter mixture over popcorn mixture. Sprinkle with strawberries and cranberries.
- Refrigerate 10 minutes, or until peanut butter mixture is set; break into pieces to serve. Store in airtight container in refrigerator up to 1 week.
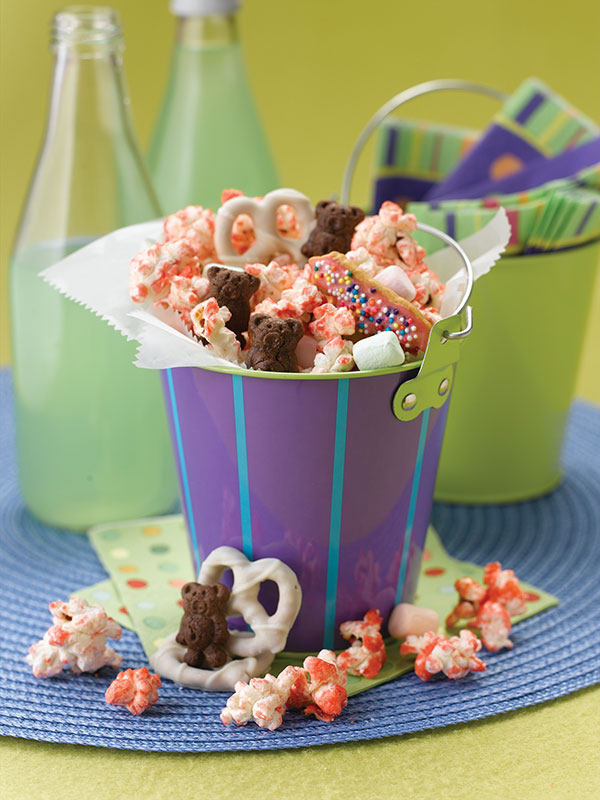
Graham Cracker Picnic Mix
Yield: About 12 cups
- 1/4 cup vegetable oil
- 1/4 cup sugar
- 5-6 drops pink neon liquid food color or desired color
- 1/2 cup unpopped popcorn kernels
- 1 package mini pastel marshmallows
- 1 cup bear-shaped graham crackers
- 1 package white fudge-covered pretzels
- 1 cup mini cookies
- In large pot over medium heat, stir oil, sugar and food coloring.
- Stir in popcorn kernels; cover. Cook until popcorn begins to pop. Shake pot over heat until popping slows.
- Remove pan from heat and pour popcorn into large bowl.
- Add marshmallows, graham crackers, pretzels and cookies then toss lightly.

Grab and Go Pizza Popcorn
Yield: 6 quarts
- 6 quarts popped popcorn
- olive oil cooking spray
- 1 cup grated Parmesan cheese
- 2 teaspoons garlic salt
- 2 teaspoons paprika
- 1 tablespoon Italian seasoning
- Place popcorn in large, sealable plastic container or 2 1/2-gallon plastic sealable bag.
- Spray popcorn lightly with cooking spray.
- Sprinkle cheese, garlic salt, paprika and Italian seasoning over popcorn and shake to distribute evenly.
- To serve, scoop popcorn into reusable plastic cups.
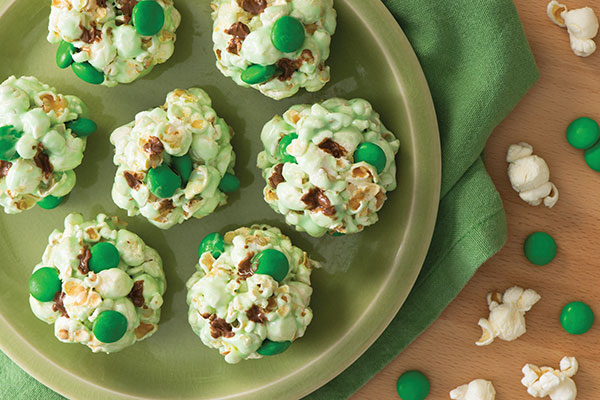
Minty Green Popcorn Clusters
Yield: 32 clusters
- 12 cups unsalted, unbuttered, popped popcorn
- 4 cups mini marshmallows
- 2 tablespoons butter or light olive oil
- 1/2 teaspoon salt
- 1 tablespoon green food coloring
- 1/4 teaspoon peppermint extract
- 1 cup green candy-coated chocolate candies
- Place popcorn in large mixing bowl.
- In saucepan over medium heat, melt marshmallows, butter and salt, stirring occasionally, until smooth. Remove from heat; stir in food coloring and peppermint extract.
- Toss marshmallow mixture with popcorn; cool 2-3 minutes, or until cool enough to handle. Toss with chocolate candies.
- Shape 3 tablespoons of popcorn mixture into small cluster; repeat with remaining popcorn mixture. Place on wax paper-lined baking sheet; cool completely.
Source:

Holiday Entertaining is Back with Sweet, Savory and Oh So Cheesy Ideas
Real California Milk helps impress guests with the California Cheese Centerpiece and Cookie Exchange Board
(Family Features) This holiday season, entertaining is back on the table and that means endless opportunities to showcase Instagram-worthy ideas. For those looking to impress friends and family, Real California Milk has two unique culinary ideas to take holiday traditions to the next level: The Cheese Centerpiece and Cookie Exchange Board. From fresh food as bountiful décor to camera-ready cookie presentations, incorporating California dairy into your entertaining is a winning holiday strategy.
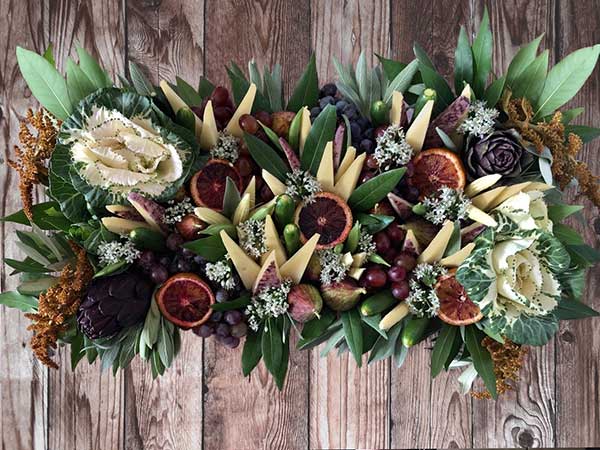
California Cheese Centerpiece
The mission? Create a holiday centerpiece but make it delicious. Real California Milk partner Jessica Lawrenz, Founder of Monger, Mold and Milk, took the challenge with the California Cheese Centerpiece, the ultimate in edible entertaining with a beautiful display of Real California Cheeses, salami, fruits and vegetables arranged with fragrant herbal garnishes in a display sure to impress family and friends. As a bonus, it creates less waste than a stand-alone floral bouquet (and you’ll have less to clean up!).
Find additional cheese displays and holiday recipes at realcaliforniamilk.com.
INGREDIENTS:
Variety of firm to medium (semi-firm) Real California Cheeses (find them here: https://www.realcaliforniamilk.com/cheese-makers)
Shown in arrangement:
- Real California Dry Jack cheese wedges
- Real California Wine-soaked Cheddar wedges
- Real California Triple Cream cheese wedges
- Salumi or salami, made into roses
Fresh fruits and vegetables:
- Mini clementines or kumquats
- Grapes or currants (both shown)
- Fresh figs
- Gooseberries
- Cucamelons or mini cucumbers
- Cherry tomatoes (tiger stripe tomatoes shown but any small tomato works)
Garnishes:
- Bay leaf stems
- Olive leaf stems
- Rosemary branches
- Lavender stems
- Sage bunches
- Chive or garlic flowers or any edible flower with a stem
Tools and Materials:
- Circular tray or plate
- Craft or flora foam (half sphere shape that is at least 1-inch smaller in diameter than your tray)
- Double-sided tape
- Plastic wrap
- Toothpicks, U-shape bamboo toothpicks (optional)
- Cookie cutter shapes (optional)
DIRECTIONS:
- Cover foam in plastic wrap to protect food from making contact with the foam.
- Use double-sided tape to secure the foam to the tray.
- Now you can start assembling the centerpiece. Start from the bottom and work your way up to the top of the sphere.
- Use the bulk of your leafy garnishment (bay leaf stems, olive leaf stems, sage bunches) on the bottom layer to create a base and coverage by poking the stems into the foam. If needed you can trim the bottom of the stem in a diagonal direction to create a more pokey end OR use a toothpick to pierce a hole in the place where you want to insert stems.
- For best visual appeal, fruits like grapes and currants should be arranged to kind of flow over the edge of the tray near the bottom as well. PRO TIP: Use “U” shaped bamboo toothpicks to secure the stems of the hanging fruits into the foam.
- From here use toothpicks to secure cheese wedges, salumi roses, fruits and vegetables into the foam. Cut shorter, triangular pieces of cheese (as opposed to longer triangular pieces used for a long/rectangular centerpiece). Use any tall wedges near the bottom where they will be easy to grab but not sticking out too far if placed near the top. You can use cookie cutter shapes as well for the cheeses, if desired.
- Finally, take any of the smaller garnish pieces you have (lavender, chive flowers, rosemary ends, loose leaves) to fill in the spaces between all the items.

Holiday Cookie Exchange Board
If a cookie exchange is on the docket for this year’s holiday or you’re simply looking to upgrade your dessert table, take some tips from this stunning cookie exchange presentation. Mix and match Real California Milk cookie recipes to create a mouthwatering arrangement and decorate with mini candy canes, holiday lollipops, various holiday décor and lights. Add napkins, cookie bags for take-away, and recipe cards for sharing, and let your guests go to town.
- Hot cocoa or coffee
- Milk shooters
- Coconut Walnut Cake Bars
- Chocolate Mint Cookies
- Stroopwafel Cookies
- Mini Gingerbread Cupcakes
- Madeleines
Dipped in melted dark chocolate and rolled in crushed peppermint candies or Holiday sprinkles
Leave out ice cream, exchange holiday sprinkles for rainbow sprinkles, and dip in melted white chocolate with color for extra festivity
California is the nation’s leading milk producer and is responsible for producing more butter, ice cream and nonfat dry milk than any other state. The state is the second-largest producer of cheese and yogurt. California milk and dairy foods can be identified by the Real California Milk seal, which certifies they are made exclusively with milk from the state’s dairy farm families.
About Real California Milk/California Milk Advisory Board
The California Milk Advisory Board (CMAB), an instrumentality of the California Department of Food and Agriculture, is funded by the state’s dairy farm families who lead the nation in sustainable dairy farming practices. With a vision to nourish the world with the wholesome goodness of Real California Milk, the CMAB’s programs focus on increasing demand for California’s sustainable dairy products in the state, across the U.S. and around the world through advertising, public relations, research, and retail and foodservice promotional programs. For more information and to connect with the CMAB, visit RealCaliforniaMilk.com, Facebook, YouTube, Twitter, Instagram and Pinterest.
Source: Real California Milk

Power Packed Popcorn Cookies
(Family Features) Bring your family together for a tasty dessert that’s packed with whole grains, a nutrient many Americans are missing from their diets.
According to a National Health and Nutrition Examination Survey, most Americans fail to get enough whole grains each day, opting instead for mostly refined grains. Because whole grains keep their dietary fiber, they play a key role in keeping bodies healthy.
These Power Packed Popcorn Cookies can help you make every bite count by including an easy health hack: popcorn. As a simple option for meeting dietary recommendations, 3 cups of popcorn is equal to one serving of whole grains, meaning you can snack on it throughout the day to meet your goals or enjoy it in a sharable dish.
Find more whole-grain solutions at popcorn.org.
Watch video to see how to make this recipe!
Power Packed Popcorn Cookies
Yield: 4 dozen cookies
- Nonstick cooking spray
- 1/4 cup whole-wheat or all-purpose flour
- 2 teaspoons baking powder
- 1/2 teaspoon baking soda
- 1/2 teaspoon salt
- 1 stick (1/2 cup) butter, softened
- 1 cup brown sugar, firmly packed
- 1 egg
- 1 teaspoon vanilla extract
- 1 cup toasted wheat germ
- 1/2 cup oatmeal
- 1/2 cup flaked coconut
- 3 cups popped popcorn
- 1 cup raisins, dried cranberries or other dried fruit, chopped
- 1/2 cup sunflower seeds or chopped nuts (optional)
- Preheat oven to 350 F. Lightly spray baking sheets with nonstick cooking spray and set aside.
- In small bowl, stir flour, baking powder, baking soda and salt; set aside.
- Cream butter and brown sugar together then add egg and vanilla; mix well. Stir in flour mixture, wheat germ and oatmeal until well blended. Add coconut, popcorn, raisins and sunflower seeds, if desired; mix until well blended.
- Drop rounded teaspoons onto baking sheets with 2 inches between cookies.
- Bake 7-8 minutes, or until edges are lightly browned.
- Allow cookies to cool on pan 5 minutes before removing to racks to cool completely.
Source: Popcorn Board

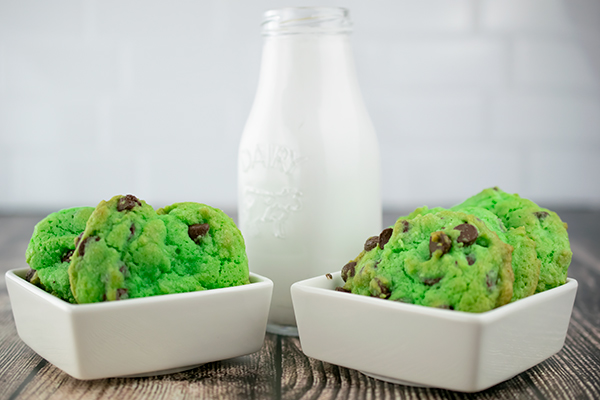
Mint Chocolate Chip Cookies
It’s your lucky day because you don’t have to search for the pot of gold under the rainbow for this winning recipe. Throw out the old Irish classics and sweeten things up this year with some mint chocolate chip fun.
If you’re in a crunch for St. Patrick’s Day and need something glowing with green, here is a dessert that is sure to have everyone coming back for seconds (and more).
These Mint Chocolate Chip Cookies are as green as four-leaf clovers and have delicious chocolate chips mixed throughout for some extra sweet flavor. Served beside a big glass of milk, they are perfect treats for any St. Patrick’s Day party or virtual gathering.
To start the recipe, whisk together flour, baking soda and salt in a large mixing bowl. In a separate bowl, add butter, sugar, eggs, green food coloring and peppermint extract for that crisp mint flavor. Beat with a hand mixture and combine the ingredients in both bowls together.
Add chocolate chips to the mixed cookie batter. Scoop onto a baking sheet and bake at 375 F for 11-24 minutes until the edges of the cookies are light brown. Cool on a wire rack before devouring.
With so much mixing and scooping to be done, this is a great recipe for kids to get involved in the kitchen, too. One of the best parts is the eye-catching color. Watch children’s smiling little faces as the batter turns from light brown to dark green for a priceless reaction.
After being perfectly baked, these cookies are bright, fun and will be the hit of any celebration. Soft in the middle, a little crisp on the edges and as green as can be. You can’t ask for much more on St. Patrick’s Day.
Find more recipes, celebration ideas and dessert favorites for every occasion at Culinary.net.
Watch video to see how to make this recipe!
Mint Chocolate Chip Cookies
Servings: 24-32
- 2 1/2 cups flour
- 1 teaspoon baking soda
- 1/2 teaspoon salt
- 1 cup butter, softened
- 1 1/4 cups sugar
- 2 eggs
- 30 drops green food coloring
- 1 teaspoon peppermint extract
- 1 package (12 ounces) chocolate chips
- Heat oven to 375 F.
- In large bowl, mix flour, baking soda and salt until blended. Set aside.
- In medium bowl, beat butter and sugar until combined. Add eggs, food coloring and peppermint extract; beat until combined.
- Add wet ingredients to dry ingredients; beat until combined. Stir in chocolate chips. Drop spoonfuls of cookie dough onto baking sheet.
- Bake 11-14 minutes, or until edges are lightly browned.
- Cool on wire racks.

Flourless Peanut Butter Cookies
(Family Features) Whether it’s a home-cooked meal, a tasty snack or a delicious dessert, sometimes the best recipes are the easiest. Take your sweets to the next level by adding an option to your cookbook that’s as simple as it is tempting and satisfying.
These Flourless Peanut Butter Cookies require only three everyday ingredients that can be prepped and baked in less than half an hour. Just preheat the oven; mix the peanut butter, sugar and one egg; roll into individual balls then flatten on a cookie sheet and bake 10 minutes.
The key ingredient is the flavorful peanut butter that packs a protein punch while delivering the taste that’ll bring loved ones back for seconds.
Find more ways to incorporate peanuts and peanut butter into your desserts at gapeanuts.com.
Watch video to see how to make this recipe!
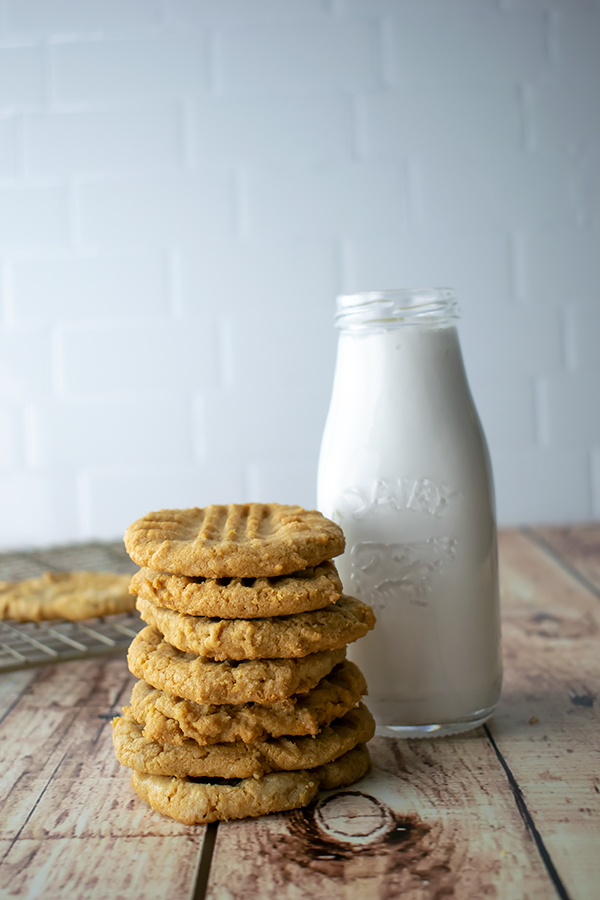
Flourless Peanut Butter Cookies
Prep time: 20 minutes
Cook time: 8-10 minutes
- 1 cup peanut butter
- 1 cup granulated sugar
- 1 large egg
- Preheat oven to 350 F.
- In bowl, combine peanut butter, sugar and egg.
- Using small cookie scoop, place dough balls on parchment paper-lined cookie sheet. Flatten with fork to make traditional peanut butter cookie crisscross pattern.
- Bake 8-10 minutes until done. Cool thoroughly before removing from cookie sheet. Store in air-tight container.
Source: Georgia Peanut Commission