Honey Mustard Crunch Salmon
(Family Features) Quick and easy family dinners often feel few and far between, but you can make them a more frequent occurrence by depending on seafood as a flavorful, easy-to-prepare protein.
Today, more than half of all seafood consumed in the U.S. is raised by aquaculture, also known as seafood farming. While this industry has made strides throughout the last few decades, from increasingly sustainable farming practices to technological advancements, not all seafood farms are equal and neither are the certifications you see on the packaging.
Aquaculture helps meet the ever-growing popularity of seafood and provides people in developing countries with healthy protein. It also aids in rebuilding populations of threatened and endangered species along with boosting wild stocks of freshwater and seawater species. By ensuring supply chain integrity from farm to the store, the Aquaculture Stewardship Council’s (ASC) Sea Green certification label lets shoppers know they’re protecting oceans, coasts and wildlife while also investing in restoring them.
With a mission to help the industry feed a growing global population while respecting the planet and its people, the council aims to minimize the industry’s impact on climate change and protect fish welfare. To achieve these goals, the certification label helps shoppers identify products that meet strict standards for responsibly farmed seafood, raising the bar for farm performance, verification and traceability.
With increased demand from the culinary community for alternative seafood sources that preserve wild populations without compromising farm-to-fork flavor or freshness, ASC’s certification helps ensure the seafood you’re buying is what it claims to be. That way, you can enjoy make-at-home recipes like Honey Mustard Crunch Salmon.
Visit SeaGreenBeGreen.org to find family-friendly recipes and certification information.
Watch video to see how to make this recipe!
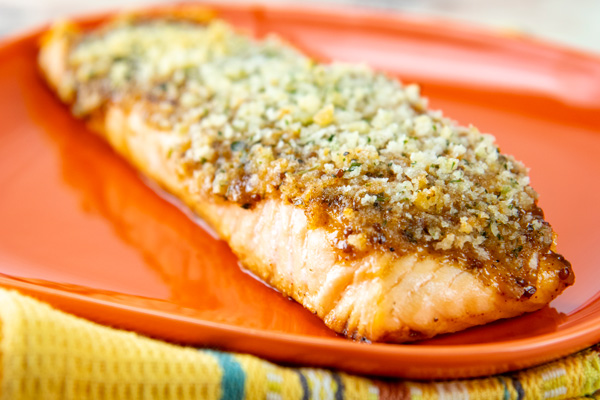
Honey Mustard Crunch Salmon
- 1 bag (1 pound, three 6-ounce portions) ASC-certified North Coast Seafoods Naked Norwegian Salmon
- salt, to taste
- pepper, to taste
Honey Mustard Glaze:
- 1/3 cup honey
- 1/4 cup whole-grain mustard
- 2 tablespoons smooth Dijon mustard
- 2 tablespoons mayonnaise
- 2 teaspoons horseradish
- 1 teaspoon smoked paprika
Crunch:
- 3/4 cup panko breadcrumbs
- 2 tablespoons dried parsley
- 2 tablespoons olive oil
- Thaw salmon and pat dry. Arrange on oiled baking tray. Season with salt and pepper, to taste.
- To make glaze: In small bowl, combine honey, mustard, Dijon mustard, mayonnaise, horseradish and paprika; mix until well combined. Chill glaze until ready to use.
- To make crunch: In bowl, combine breadcrumbs, parsley and oil; mix well. Reserve.
- Preheat oven to 400 F.
- Top each salmon portion with 1 tablespoon glaze and spread evenly over fish. Press crunch evenly onto glaze.
- Bake 15-17 minutes until fish is cooked through.
- Serve with drizzle of remaining glaze.
Source: Aquaculture Stewardship Council
Mouthwatering Recipes to Beef Up the Holiday Menu
(Family Features) At this year’s holiday gatherings, you can put together a showstopping menu from the beginning of the party to the final bite with mouthwatering recipes that bring guests back for more. It all starts with beef, a versatile, beloved ingredient that can be used in appetizers, sides and main courses alike.
Consider these holiday favorites from Beef Loving Texans, including a must-have main course like Classic Beef Wellington. Perfect for a family get-together, this traditional dish combines tender chateaubriand roast with a homemade glaze of earthy mushrooms, red wine and Dijon mustard wrapped in a golden-brown puff pastry.
If you’re serving a group, Top Sirloin Roast with Herb Garlic Peppercorn Crust is ideal for sharing and provides an eye-catching centerpiece at the dining room table.
Before bringing out the main course, however, there’s an important aspect of seasonal parties that calls everyone to the kitchen: savory appetizers. You can invite your guests to share an option like Holiday Mini Beef Meatball Skewers with Cranberry Barbecue Sauce, a festive, easy-to-make favorite that can tide the cravings of a hungry crowd.
Find more beef-inspired holiday dishes at BeefLovingTexans.com.
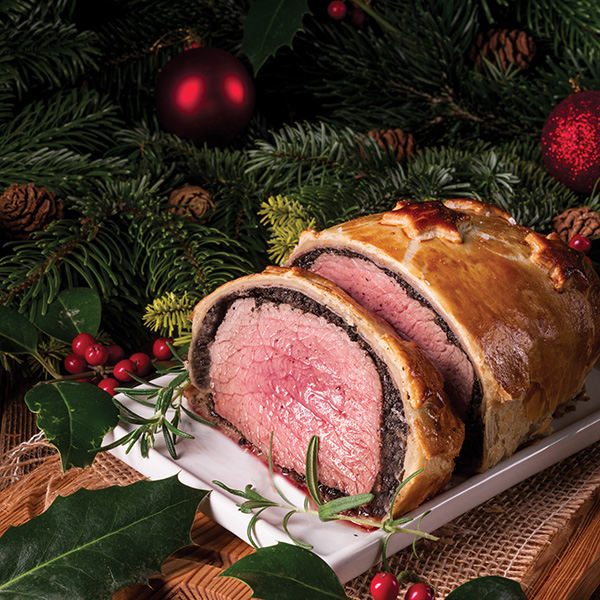
Classic Beef Wellington
Recipe courtesy of Beef Loving Texans
Total time: 1 hour, 30 minutes
Servings: 4
- 1 teaspoon olive oil, divided
- 1/2 teaspoon salt
- 1/2 teaspoon pepper, divided
- 1 chateaubriand tenderloin roast
- 8 ounces mushrooms
- 1 large shallot
- 2 tablespoons dry red wine
- 2 tablespoons Dijon mustard
- 1/2 teaspoon dried thyme leaves
- flour
- 1 sheet puff pastry
- In large nonstick skillet over medium-high heat, heat 1/2 teaspoon oil until hot. Combine salt and 1/4 teaspoon pepper. Press evenly onto all surfaces of roast. Place roast in skillet; brown evenly. Remove roast from skillet.
- Heat oven to 425 F.
- In food processor, pulse mushrooms and shallot about 10 times until finely chopped. Do not overprocess.
- Place same skillet used for roast over medium-high heat and heat remaining oil until hot. Add mushrooms and shallot; cook 4-6 minutes until tender and all liquid is evaporated, stirring often. Add wine; cook 2-3 minutes until all liquid is evaporated. Stir in mustard, thyme and remaining pepper. Cook 2-3 minutes. Remove from skillet to medium bowl; cool.
- Line rimmed baking sheet with aluminum foil and place in oven. On lightly floured cutting board, unfold pastry dough. Roll pastry out to 12-by-9-inch rectangle; lay dough with shortest edge toward you. Spread mushroom mixture onto pastry dough, leaving 1/2-inch border around edges. Place roast in center of mushrooms. Fold pastry dough neatly around roast, stretching dough if necessary. Cut off excess pastry dough; press to seal overlapping edges.
- Remove baking sheet from oven and dust lightly with flour. Place pastry-wrapped roast, seam-side down, on baking sheet. Cut four (2-inch) vents in top of pastry.
- Bake 35-50 minutes, or until golden brown and instant-read thermometer inserted into center of roast registers 135 F for medium-rare or 150 F for medium. Transfer roast to carving board. Let stand 10 minutes. Temperature will rise about 10 F to reach 145 F for medium-rare or 160F for medium.
- Carve into slices and serve.
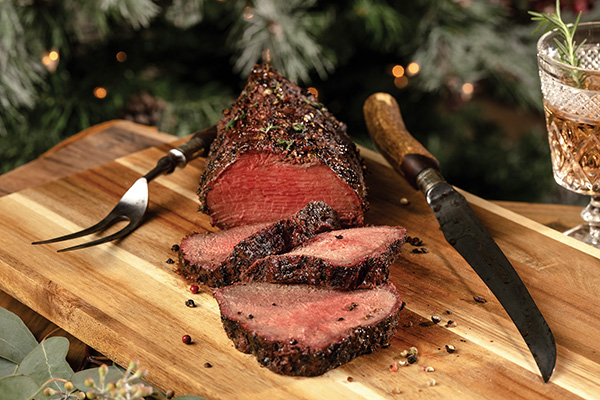
Top Sirloin Roast with Herb Garlic Peppercorn Crust
Recipe courtesy of Beef Loving Texans
Total time: 45 minutes
Servings: 8
- 1 center-cut sirloin beef roast (about 3 pounds)
- 1 tablespoon olive oil
Seasoning:
- 2 teaspoons kosher salt
- 2 tablespoons fresh parsley, chopped
- 2 tablespoons fresh thyme, chopped
- 5 cloves garlic, minced
- 2 teaspoons coarsely ground mixed peppercorns (black, white, green and pink)
- Preheat oven to 350 F.
- Rub roast with olive oil.
- To make seasoning: In small bowl, combine salt, parsley, thyme, garlic and mixed peppercorns; press evenly into beef roast.
- Place roast in roasting pan or baking dish with wire rack in bottom. Bake 40-60 minutes. Remove roast when meat thermometer registers 135 F for medium-rare or 150 F for medium.
- Transfer roast to carving board; tent loosely with aluminum foil. Let stand 10-15 minutes. Temperature will rise about 10 F to reach 145 F for medium-rare or 160 F for medium.
- Carve roast into slices by cutting against grain.
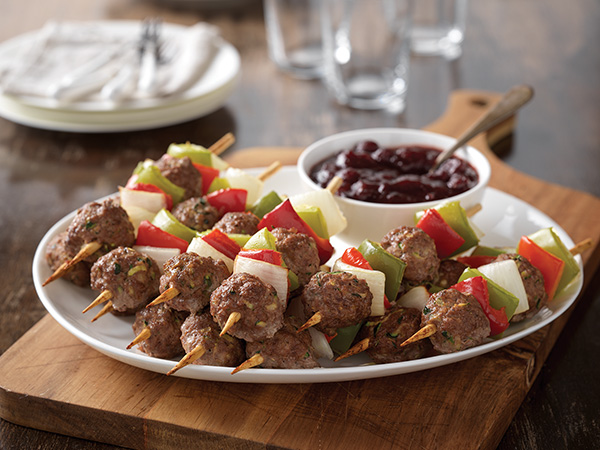
Holiday Mini Beef Meatball Skewers with Cranberry Barbecue Sauce
Recipe courtesy of Beef Loving Texans
Total time: 50 minutes
Servings: 12
- 1 pound ground beef
- 1 cup fresh zucchini, grated
- 1 egg
- 1/2 teaspoon salt
- 1/4 teaspoon pepper
- 1 small yellow onion, diced 1/2 inch
- 2 red bell peppers, diced 1/2 inch
- 2 green bell peppers, diced 1/2 inch
- 12 skewers (6 inches)
Cranberry Barbecue Sauce:
- 1 can (16 ounces) whole berry cranberry sauce
- 3 tablespoons barbecue sauce
- Preheat oven to 400 F.
- In medium bowl, lightly mix ground beef, zucchini, egg, salt and pepper until thoroughly combined. Shape into 24 1-inch meatballs. Alternately thread meatballs, onions, red peppers and green peppers onto skewers. Place skewers on shallow-rimmed baking sheet.
- Bake 22-25 minutes, or until instant-read thermometer inserted into center of meatball registers 160 F.
- To make cranberry barbecue sauce: In medium saucepan, combine cranberry sauce and barbecue sauce; simmer 5 minutes, or until flavors blend.
- Drizzle sauce over skewers or serve as dipping sauce.
Source: Beef Loving Texans
Serve Up Smiles with Favorite Holiday Sides
(Family Features) Turkey and ham may sit centerstage, but classic holiday sides can make the season truly special. You can bring smiles to your loved ones’ faces by dishing out those favorite recipes everyone asks for year after year.
Made with a delicious combination of rice, cheddar cheese, cream of mushroom soup and broccoli florets, this quick and easy version of Broccoli and Cheese Rice Casserole is an ideal one-pot dish to keep the holidays simple. With three easy steps and everyday ingredients, it comes together with minimal effort for traditional casserole taste.
When it comes to feeding a crowd, it’s often best to let your oven do the work. This Brussels Sprouts and Ham Rice Gratin recipe allows you to serve up a filling favorite with little effort using pantry staples. Plus, it’s a kid-friendly way to encourage veggies at this year’s holiday meal with gooey cheese providing tempting taste bud motivation.
These seasonal classics and more are made quick and easy with an option like Success Boil-in-Bag Rice, a pre-measured, mess-free way to make fluffy, high-quality rice. It’s cooked by simply dropping a bag of rice in a pot of water or broth then boiling it for 10 minutes. BPA-free and FDA-approved, the bags are safe to use and made to withstand high temperatures.
An added bonus: If you’re aiming to achieve a particular flavor, just season the rice by cooking in water infused with herbs, spices, broth, coconut milk or other liquids like juice for sweeter recipes.
Visit SuccessRice.com to find more holiday recipe inspiration.
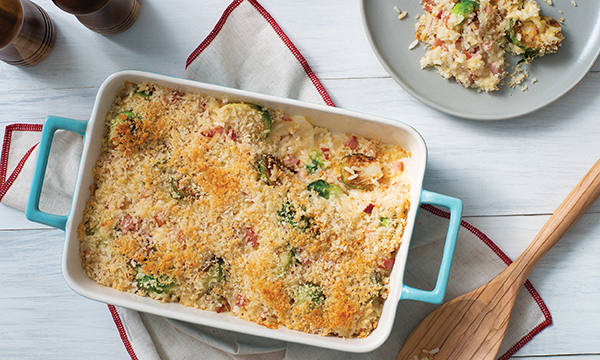
Brussels Sprouts and Ham Rice Gratin
Prep time: 20 minutes
Cook time: 25 minutes
Servings: 4
- 1 bag Success White Rice
- 1/2 pound Brussels sprouts, trimmed and halved
- 1/3 cup diced ham
- 1 clove garlic, minced
- 1 tablespoon olive oil
- 3/4 teaspoon salt, divided
- 3/4 teaspoon black pepper, divided
- 1 cup heavy cream
- 2 tablespoons finely chopped fresh chives
- 2 tablespoons Dijon mustard
- 1 cup shredded sharp cheddar cheese
- 1/2 cup grated Parmesan cheese, divided
- 1/3 cup breadcrumbs
- 2 tablespoons butter, melted
- Preheat oven to 450 F. Prepare rice according to package directions.
- In large bowl, toss Brussels sprouts, ham, garlic, olive oil, 1/4 teaspoon salt and 1/4 teaspoon pepper. Place on parchment paper-lined baking tray and roast 12-15 minutes, or until caramelized. Decrease oven temperature to 425 F.
- In large bowl, toss rice, Brussels sprouts mixture, cream, chives, Dijon mustard, remaining salt and remaining pepper. Stir in cheddar and 1/3 cup Parmesan cheese. Transfer mixture to greased, 2-quart baking dish.
- In small bowl, stir breadcrumbs, remaining Parmesan and melted butter. Sprinkle over rice mixture.
- Bake 12-15 minutes, or until golden brown and bubbling.
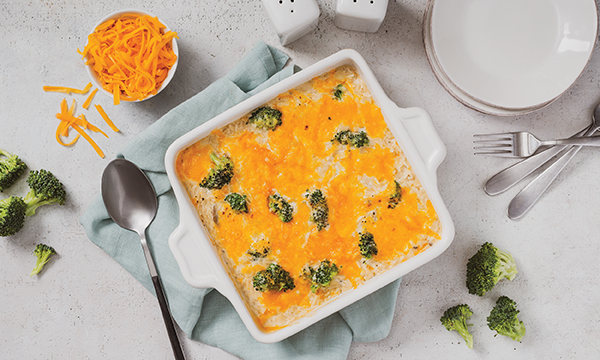
Broccoli and Cheese Rice Casserole
Prep time: 5 minutes
Cook time: 30 minutes
Servings: 4-6
- 1 bag Success White Rice or Brown Rice
- nonstick cooking spray
- 1 can (10 3/4 ounces) condensed cream of mushroom soup
- 2 cups frozen broccoli florets, thawed and drained
- 1 1/2 cups shredded cheddar cheese, divided
- 1/2 cup evaporated milk
- 3 tablespoons butter, melted
- 1 tablespoon grated onion
- 1/2 teaspoon salt
- 1/2 teaspoon black pepper
- Prepare rice according to package directions. Preheat oven to 350 F.
- Coat 2-quart casserole dish with nonstick cooking spray. In medium bowl, combine soup, broccoli, 1 cup cheddar cheese, evaporated milk, butter, onion, salt and pepper. Fold in rice.
- Pour mixture into prepared dish and top with remaining cheddar cheese. Bake 20 minutes.
Put a Plant-Based Twist on Holiday Baking
(Family Features) Flavorful desserts are a staple of the holidays and the exciting, appetizing allure of new recipes can help elevate seasonal gatherings and create sweet memories. With near-endless options for celebrating the season, putting a plant-based twist on traditional recipes offers everyone the opportunity to indulge with decadent treats.
In seasonal sweets like Brulee Pumpkin Pie and No-Bake Chocolate Peanut Butter Cheesecake, an option like Country Crock Plant Cream can be used as a dairy-free substitute for heavy whipping cream. With 29% less saturated fat than dairy heavy whipping cream, it’s an easy 1:1 swap and is also soy-free, certified plant-based and 100% vegan, making it ideal to have on hand during holiday baking season. It’s all of the deliciousness of heavy cream, with none of the heaviness of dairy.
Visit CountryCrock.com for more delectable holiday dessert ideas.
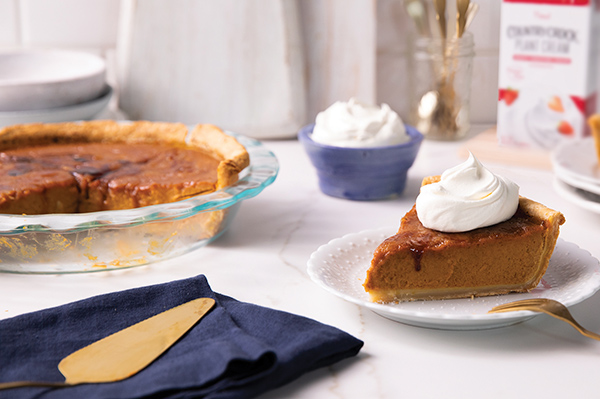
Brulee Pumpkin Pie
Prep time: 45 minutes
Cook time: 1 hour
Servings: 8
Pie Crust:
- 1 1/2 cups all-purpose flour
- 1 teaspoon sugar
- 1/4 teaspoon salt
- 8 tablespoons Country Crock Plant Butter, cold and cut into cubes
- 2 tablespoons chilled vegetable shortening, cut into pieces
- 4 tablespoons ice water
Pumpkin Filling:
- 1/2 cup maple syrup
- 1 tablespoon vanilla
- 1 can (15 ounces) pumpkin puree
- 1/4 cup coconut cream
- 1 cup Country Crock Plant Cream
- 1 cup brown sugar
- 1 teaspoon cinnamon
- 1 teaspoon ginger
- 1 teaspoon nutmeg
- 1/8 teaspoon ground clove
- 1/2 teaspoon salt
- 3 tablespoons cornstarch
- 3 tablespoons white granulated sugar
Whipped Topping:
- 2 cups Country Crock Plant Cream, chilled
- 1/4 cup powdered sugar
- 2 teaspoons vanilla extract
- To make pie crust: Preheat oven to 350 F.
- In bowl of food processor, add flour, sugar and salt; pulse to combine. Add cold plant butter and shortening. Process about 10 seconds until it looks like coarse meal.
- With food processor running, add ice water. Process until mixture clumps together.
- On lightly floured surface, roll dough into 14-inch circle. Transfer to 9-inch pie dish. Lift edges and allow dough to drape into dish. Trim, leaving 1-inch overhang. Fold excess dough under and crimp edges.
- To make pumpkin filling: In medium saucepan over medium heat, add syrup and vanilla; warm about 2 minutes then remove from heat and set aside.
- In large bowl, combine syrup mixture, pumpkin, coconut cream, plant cream, brown sugar, cinnamon, ginger, nutmeg, clove, salt and cornstarch; blend with hand mixer until smooth. Pour mixture into pie crust.
- Bake 1 hour. If crust starts to burn, cover edges with aluminum foil. The middle will still be jiggly.
- Cool at room temperature 30 minutes then cover and transfer to refrigerator to chill at least 5 hours or overnight.
- Before serving, sprinkle pie with white sugar and, using kitchen torch, brelee until sugar is melted and dark brown.
- To make whipped topping: Using electric hand mixer or stand mixer, whisk plant cream, powdered sugar and vanilla on high until mixture thickens and stiff peaks form.
- Slice and serve with whipped topping.
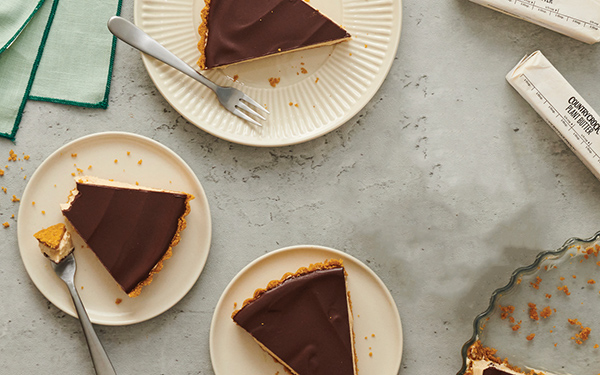
No-Bake Chocolate Peanut Butter Cheesecake
Prep time: 5-10 minutes
Cook time: 5 minutes
Total time: 6-7 hours
Servings: 8
- Country Crock Plant Butter, for greasing
Crust:
- 1 1/2 cups graham cracker crumbs
- 1/2 cup Country Crock Plant Butter, melted
Filling:
- 2 packages (8 ounces each) dairy-free cream cheese, at room temperature
- 1 cup peanut butter
- 1 tablespoon vanilla extract
- 1/2 cup Country Crock Plant Cream
- 1 cup powdered sugar
Chocolate Ganache:
- 1 stick Country Crock Plant Butter, cubed
- 1 cup semi-sweet chocolate chips
- Grease 9-inch pie dish with plant butter; set aside.
- To make crust: In medium bowl, combine graham cracker crumbs and melted plant butter; mix thoroughly.
- Add crust to greased pie dish and press firmly to bottom and sides; refrigerate.
- To make filling: In bowl of electric mixer, beat cream cheese until smooth and creamy.
- Add powdered sugar; beat until fully incorporated.
- Add peanut butter, vanilla extract and plant cream; beat until smooth and creamy.
- Pour filling into prepared crust and refrigerate 5-6 hours or overnight.
- To make chocolate ganache: In pan over medium heat, add plant butter cubes and chocolate; stir continuously.
- Spread chocolate ganache evenly on top of chilled cheesecake. Refrigerate at least 1 hour before slicing and serving.
Source: Country Crock Plant Cream
Meringue Nests with Vanilla Bean Whipped Cream and Strawberries
(Family Features) It’s tough to top the joy of a spring morning spent celebrating with family, enjoying a delicious brunch or snacking on sweet treats. With warmer weather and bright sunshine comes plenty of opportunities to enjoy favorite recipes.
Celebrating the season with eggs can bring loved ones together in the kitchen and beyond, from crafting classic desserts to serving up new delights. Plus, the versatility of eggs allows for nearly countless creations.
Boiled, scrambled, poached, baked and any other way you like them, eggs can be your kitchen superhero. As a natural source of vitamins and minerals, they’re a delicious protein powerhouse with just 70 calories per large egg.
Make the celebration truly memorable with the power of eggs in a sweet dessert like these Meringue Nests with Vanilla Bean Whipped Cream and Strawberries, a perfect option for topping off a brunch feast or an afternoon meal.
Find more spring recipe ideas and ways to celebrate the season at incrediableegg.org.
Watch Video to see how to make this recipe!
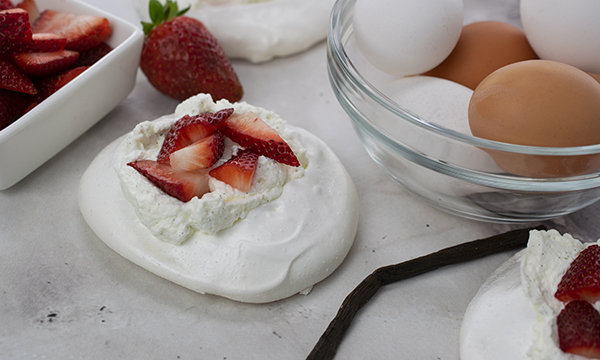
Meringue Nests with Vanilla Bean Whipped Cream and Strawberries
Recipe courtesy of the American Egg Board and Sam Adler (@frostingandfettucine)
Prep time: 15 minutes
Total time: 6 hours
Servings: 6
Meringue Nests:
- 1 1/4 cups granulated sugar
- 6 large eggs
- 1 teaspoon cream of tartar
- 1 teaspoon vanilla extract
- 2 teaspoons cornstarch
Garnish:
- 1 cup heavy whipping cream
- 1 teaspoon granulated sugar
- 1/2 teaspoon vanilla extract (or 1 vanilla bean, scraped)
- 1/2 pint fresh strawberries, sliced
- To make meringue nests: Preheat oven to 200 F. On parchment paper-lined baking sheet, spread sugar evenly and bake 5-7 minutes to slightly heat. Remove sugar from oven then increase oven temperature to 225 F.
- Carefully separate egg whites from yolks completely. In bowl of hand or stand mixer fitted with whip attachment, whisk egg whites on medium-low speed until foamy about 1 minute.
- Slowly add sugar 2-3 tablespoons at a time and mix on medium speed 2 minutes between each addition. Sugar needs completely mixed into egg whites to ensure success. Continue mixing on medium until mixed through and meringue does not feel gritty.
- Add cream of tartar, vanilla extract and cornstarch. Increase to high speed and beat until stiff peaks form.
- On two parchment paper-lined baking sheets, pipe or spread meringue with spoon into six 4-inch circular “nests.”
- Bake 1 hour, 15 minutes then turn off oven and let meringues cool without opening oven for at least 4 hours or overnight. The USDA recommends egg dishes be cooked to 160 F.
- To make garnish: When ready to serve, in clean mixing bowl fitted with whip attachment, whip heavy whipping cream on medium speed. Slowly add sugar and vanilla. Continue mixing on high speed 2-3 minutes until stiff peaks form.
- Dollop whipped cream on meringue nests and top with sliced strawberries.
Source: American Egg Board
Add Grapes to Your Holiday Gatherings
(Family Features) Add a special touch this holiday season with simple yet stunning small plates that add beauty and flavor to gatherings with friends and family.
Available into January, California grapes offer a way to make the season special as an ingredient in your favorite recipes or as decoration for a festive centerpiece. Pops of red, green and black provide a seasonal touch and they’re perfect as an easy, fresh, healthy snack.
Plus, you can dip grapes in nut butter and finish with coatings of coconut, dark chocolate and almonds to make these Peanut Butter Grape Bites for a holiday treat that’s simply divine – without spending hours in the kitchen.
Visit grapesfromcalifornia.com to find more holiday recipe inspiration.
Watch video to see how to make this recipe!
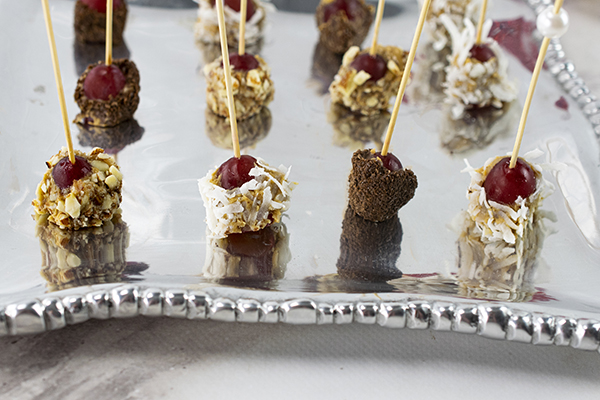
Peanut Butter Grape Bites
Prep time: 10 minutes
Cook time: 5 minutes
Yield: 12 pieces
12 California grapes, chilled
1/3 cup natural peanut or almond butter
1/4 cup shredded coconut
1/4 cup chopped dark chocolate
1/4 cup chopped almonds
Place sheet of wax paper on baking sheet. Dip each grape in nut butter to coat half then dip in either coconut, dark chocolate or chopped almonds. Transfer to sheet then chill until ready to serve.
Nutritional analysis per serving: 70 calories; 2 g protein; 4 g carbohydrates; 5 g fat (64% calories from fat); 1.5 g saturated fat (19% calories from saturated fat); 0 mg cholesterol; 25 mg sodium; 1 g fiber.
Christmas Tree Cheesecake Brownies
(Family Features) Festive fun and baking holiday treats go hand-in-hand, and these Christmas Tree Cheesecake Brownies provide a perfect way to enjoy a holiday tradition in the kitchen with loved ones.
Decorate your own version using green and white frosting, sprinkles of your choice and candy canes for “stumps” in the tree-shaped sweets.
Visit milkmeansmore.org to find more holiday inspiration.
Watch video to see how to make this recipe!
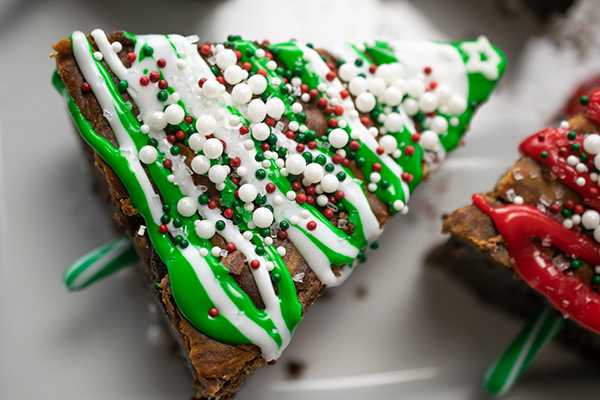
Christmas Tree Cheesecake Brownies
Recipe courtesy of Jenn Fillenworth of “Jenny with the Good Eats” on behalf of Milk Means More
Prep time: 10 minutes
Cook time: 30 minutes
Servings: 16
- Nonstick cooking spray
Cheesecake Batter:
- 8 ounces low-fat cream cheese, at room temperature
- 1/3 cup granulated sugar
- 2 eggs
- 1 tablespoon all-purpose flour
Brownie Batter:
- 1 cup all-purpose flour
- 1/2 cup cocoa powder
- 1/2 teaspoon salt
- 1 cup granulated sugar
- 1/4 cup vegetable oil
- 1/4 cup milk
- 2 eggs
- 1 teaspoon pure vanilla extract
Decorations:
- green frosting
- white frosting
- assorted sprinkles
- star-shaped sprinkles
- candy canes
- Preheat oven to 350 F.
- Coat 8-inch square baking pan with nonstick cooking spray; set aside.
- To make cheesecake batter: Place cream cheese in bowl of stand mixer. Beat at medium speed until smooth and creamy. Add sugar and beat well. Add eggs, one at a time, beating well after each addition. Add flour and beat mixture until blended.
- To make brownie batter: In medium bowl, whisk flour, cocoa powder and salt until combined. In separate bowl, whisk sugar, oil, milk, eggs and vanilla until well combined. Add wet ingredients to dry ingredients and mix until blended.
- Pour brownie batter evenly into prepared pan.
- Carefully pour cheesecake batter over top, spreading evenly. Carefully swirl layers together using knife tip.
- Bake 30 minutes until brownies are set.
- Cool brownies completely in pan on wire rack before cutting into triangle pieces.
- Decorate trees by piping green and white frosting. Top with assorted sprinkles and star-shaped sprinkles. Place 3-inch candy cane pieces in bottoms of brownies for stumps.
Source:
Pop Up Holiday Traditions New and Old
(Family Features) From decorating the tree to carving the turkey, there are many time-honored holiday traditions observed by families around the country. However, the holiday season is about more than just celebrating old traditions.
A perfect opportunity for creating new memories and, in turn, traditions, popcorn can serve as an ideal ingredient to bring family time to life. Whether wrapping the tree with garland made from the light and airy treat, filling clear ornaments with freshly popped kernels or simply popping up a bowl as a nutritious alternative to other holiday noshes, popcorn makes it easy to get hands-on while you deck the halls.
These seasonal recipes for traditional treats like peppermint bark and popcorn balls plus edible trees and a more elegant take on a simple snack highlight low-fat, non-GMO, gluten-free whole-grain popcorn as the main ingredient. Find more modern takes on traditional holiday recipes at popcorn.org.

White Chocolate Peppermint Popcorn Bark
Yield: 1 pound
- 5 cups popped popcorn
- 12 ounces white chocolate baking chips
- 1 cup crushed hard candy peppermints Cover baking pan with foil or wax paper; set aside.
- Place popcorn in large bowl; set aside.
- In double boiler over barely simmering water, melt chocolate, stirring until smooth.
- Stir in crushed peppermints.
- Pour chocolate mixture over popcorn and stir to coat.
- Spread onto prepared pan; cool completely. When chocolate is cooled and set, break into chunks.
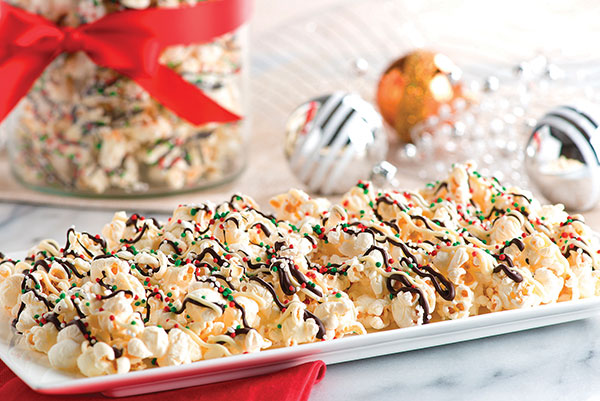
Easy, Elegant Holiday Popcorn
Yield: 8 cups
- 8 cups popped popcorn
- 1/2 cup milk chocolate chips
- 1/2 cup white chocolate chips
- candy sprinkles
- Line baking sheet with wax paper. Spread popcorn in thin layer on prepared pan.
- Place chocolate chips in microwave-safe bowl. Microwave on medium 30 seconds; stir. If necessary, microwave in additional 10-second increments, stirring after each heating, until chips are melted and smooth. Drizzle over popcorn.
- Place white chocolate chips in separate microwave-safe bowl. Microwave on medium 30 seconds; stir. If necessary, microwave in additional 10-second increments, stirring after each heating, until chips are melted and smooth. Drizzle over popcorn.
- Sprinkle desired amount of candy sprinkles over warm chocolate-coated popcorn.
- Allow chocolate drizzles to set until firm. Break popcorn into pieces.
Note: Chocolate chips can be replaced with cut up chocolate bars.

Cranberry Popcorn Balls
Yield: 18 balls
- 2 cups sugar
- 1 cup whole berry cranberry sauce, slightly mashed
- 1 tablespoon grated orange peel
- 1/2 cup cranberry juice
- 1/2 cup light corn syrup
- 1 teaspoon vinegar
- 1/2 teaspoon salt
- 5 quarts unsalted, popped popcorn
- butter
- In heavy saucepan, combine sugar, cranberry sauce, grated orange peel, cranberry juice, corn syrup, vinegar and salt.
- Bring to boil; lower heat and cook until temperature reaches 250 F on candy thermometer.
- Slowly pour cranberry mixture onto hot popcorn; mix until well-coated.
- Let stand 5 minutes, or until mixture can easily be formed into balls.
- Butter hands and form into 3-inch balls.

Festive Popcorn Trees
Yield: 10 trees
- 10 cups air-popped popcorn
- 1 bag (10 ounces) miniature marshmallows
- 2 tablespoons butter
- 1 teaspoon vanilla extract
- nonstick cooking spray
- green decorating sugar
- blue decorating sugar
- 1 tube white frosting
- small, colorful candies such as sprinkles and miniature silver dragees
- Place popcorn in large bowl.
- In medium saucepan over medium-low heat, stir marshmallows and butter until marshmallows are melted and mixture is smooth. Remove from heat.
- Stir in vanilla extract.
- Pour mixture over popcorn in bowl. Toss well to coat popcorn evenly.
- Line baking sheet with foil.
- Spray hands with nonstick cooking spray then scoop about 1 cup popcorn mixture.
- Shape mixture into cone, keeping base flat to form tree.
- Sprinkle tree with decorating sugars; place tree on baking sheet.
- Make nine additional trees.
- Using decorating tip, pipe frosting on trees to make garland then decorate with sprinkles and silver dragees, as desired.
- Serving suggestion: Place each tree on sugar cookie and decorate serving tray with shredded coconut to resemble snow.
Notes: For best flavor and color, start recipe with unflavored white popcorn. You can make colored sugar by adding food coloring to sugar then stirring in bowl or shaking vigorously in sealed container. Add additional food coloring for more intense tones.
Source: Popcorn Board
Easy Holiday Hosting and Toasting
(Family Features) If the very notion of holiday hosting has you feeling a bit overwhelmed, get organized with these simple ideas that can help you serve up a successful holiday celebration.
Entertainment: Ensure guests enjoy a good time by offering entertainment that is suitable for their personality types. If your guests are more drawn to energetic activities, choose light-hearted, competitive games like charades. For guests who are more laid back, organize classic board games. There are many popular games available in special holiday editions for extra-festive fun. You can also simply play holiday movies and music in the background for crowds that would rather just mingle.
Beverages: Stock up on refreshments all ages can enjoy. Keep a kid-friendly favorite like lemonade on hand, and tea is a traditionally well-received option for the grownups. Put a special holiday touch on your drink menu with a recipe like this Holiday Hot Tea featuring Milo's Famous Sweet Tea, which has been fresh brewed from custom-blended tea leaves with no added acids or preservatives for generations.
Favors: Send guests home with a sweet memory of the event, such as an ornament that connects to the party’s theme or a bag of seasonal treats like homemade cookies or candy to nibble on during the trip back home.
Simple Snacks: Building your menu around simple snacks and finger foods guests can nibble on while they mingle is perfectly acceptable for almost any type of holiday gathering. Include options that can satisfy all the taste buds. You can even combine sweet and sour with a seasonal crowd-pleaser like this Lemonade Cranberry Orange Bread, which draws its flavor from a secret ingredient: Milo’s All Natural Lemonade.
Find more holiday hosting ideas and recipes at drinkmilos.com .

Lemonade Cranberry Orange Bread
Prep time: 15 minutes
Cook time: 1 hour
Servings: 8
- 1 can cranberry sauce
- 3/4 cup Milo’s All Natural Lemonade
- 1 orange, zest only
- 2 tablespoons vegetable oil
- 1 egg
- 2 cups flour
- 1 cup sugar
- 1 1/2 teaspoons baking powder
- 1 teaspoon salt
- 1/2 teaspoon baking soda
- Heat oven to 350° F.
- In large bowl, mash cranberry sauce into small pieces. Add lemonade, orange zest, vegetable oil and egg; mix until blended.
- In separate bowl, combine flour, sugar, baking powder, salt and baking soda. Combine wet and dry ingredients; mix until batter is formed.
- Pour batter into greased loaf pan. Bake 1 hour. Let cool 20 minutes before slicing and serving.
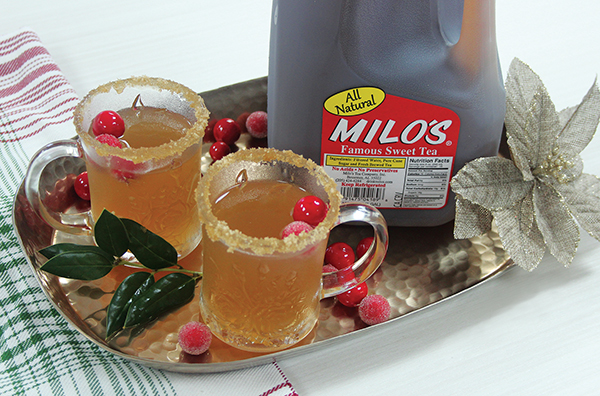
Holiday Hot Tea
Prep time: 5 minutes
Cook time: 2 hours, 30 minutes
Servings: 12
- 12 cups Milo's Famous Sweet Tea
- 2 cans (12 ounces each) frozen limeade juice concentrate
- 1 orange, thinly sliced, plus additional for garnish (optional)
- 12 whole cloves
- 4 cinnamon sticks
- 1 teaspoon vanilla
- 1 cup fresh cranberries
- 1 cup ginger ale
- raw sugar, for garnish (optional)
- In large slow-cooker, combine sweet tea, limeade concentrate, orange slices, cloves, cinnamon sticks, vanilla, cranberries and ginger ale; stir.
- Heat on high 30 minutes then reduce heat to low for 2 hours, or heat on low 2 hours then reduce setting to warm overnight.
- Invert moistened glass rims in sugar then fit orange slice over rim, if desired.
Note: For easier serving, place cloves in tea ball or double layer of coffee filters sealed with kitchen twine.
Photo courtesy of Getty Images (Lemonade Cranberry Orange Bread)
Source: Milo’s Tea Company
Holiday Fun for the Whole Family
(Family Features) Celebrating the holidays with family meals and activities is what the season is all about, and when those moments and at-home projects are kid-friendly, you can get the whole gang involved.
A simple weeknight at home during the holiday season can turn into family fun time starting with a recipe like these Reindeer Hot Dogs, a dish that requires little prep time and allows for help from little ones. Made with Gwaltney Hot Dogs, a tasty, kid-friendly dinner solution requires just a handful of easy-to-find ingredients.
Once everyone is finished eating and all have pitched in to help with cleanup, turn your attention to a family activity that transforms everyday supplies into this Wooden Snowman Ornament for seasonal decor to hang on a tree or elsewhere in the house.
Find more kid-friendly recipes to involve the whole family at gwaltneyfoods.com.
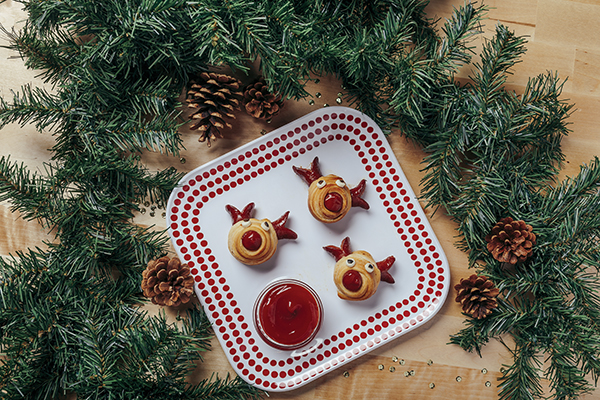
Reindeer Hot Dogs
Prep time: 20 minutes
Servings: 10
- 1 can refrigerated crescent rolls
- 1 package Gwaltney Hot Dogs
- 1 slice white cheese
- black olives
- ketchup
- Heat oven according to crescent roll package directions.
- Cut hot dogs into three equal sections.
- Lay out crescent rolls and wrap around middle sections of hot dog pieces.
- Cut triangles out of end sections to look like antlers.
- Cut two slits at top of dough; press end hot dog pieces into slits.
- Bake according to crescent roll package directions. Cut out small circles from sliced cheese for reindeer eyes. Cover cheese pieces with small slices of black olives for pupils. Add ketchup to hot dogs for red noses.
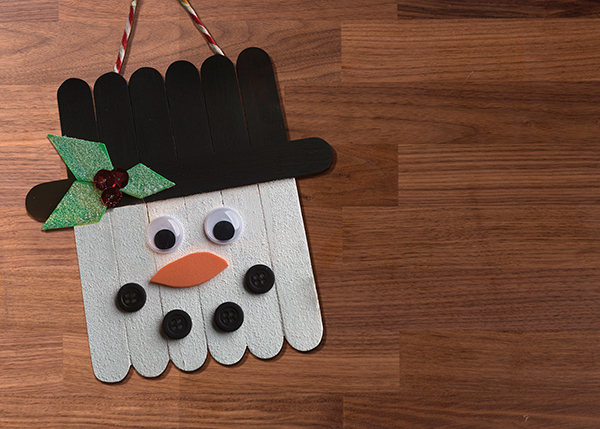
Wooden Snowman Ornament
Craft courtesy of Gwaltney
- 7ice pop sticks
- Hot glue gun
- Foam paintbrush
- Black paint
- Glitter
- White paint
- Googly eyes
- Colored craft foam
- Sequins
- Buttons
- String
- Line up six ice pop sticks next to each other vertically.
- Place line of hot glue horizontally across sticks, about one-third of the way down, and adhere seventh stick to create brim of snowman’s hat.
- Using black paint, brush top third (brim to top of hat) and let dry.
- Mix glitter into white paint and brush lower two-thirds of sticks, creating snowman’s face.
- Use googly eyes, colored craft foam, sequins and buttons to create details of face and hat, such as mouth, nose and hat decor.
- Glue piece of string to backside to hang ornament.
Source: Gwaltney


