Step Into Spring with a Sweet, Fresh Meal
Family Features) As the weather turns the corner and temperatures rise, opportunities for dining outdoors and soaking up the sunshine abound. Patio meals often mean fresh flavors, making spring a perfect time for heading outside with your favorite seasonal dishes.
The freshness of Texas 1015 Sweet Onions is an ideal starting point for recipes that heighten the enjoyment of al fresco dining. As the first spring sweet onion of the season, they’re harvested and packed fresh, meaning they’re never stored. Plus, with no burning sensation when you cut them, you can skip the tears for more enjoyable meal prep.
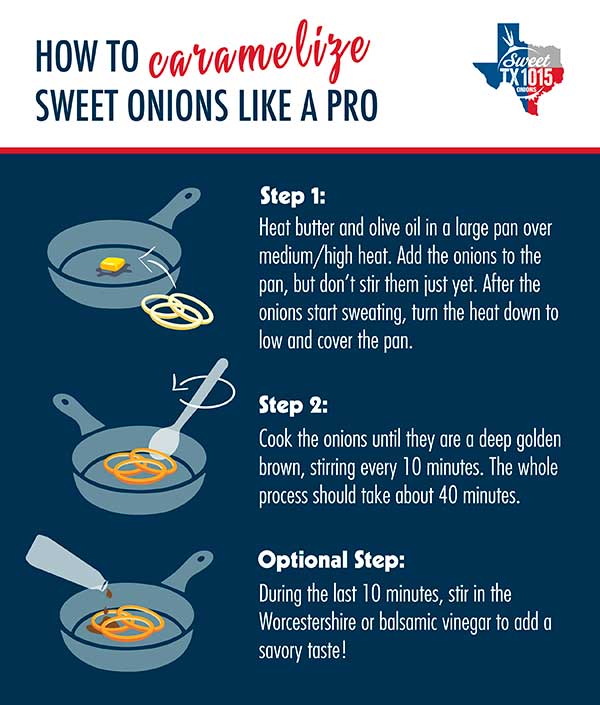
It’s a versatile veggie that can be grilled, roasted, eaten fresh or caramelized for delightful recipes like this Flatbread with Caramelized Onions, Bacon and Arugula. Start by heating butter and olive oil then allow the onions to rest in the mixture; once they’re sweating, turn the heat down and cover the pan. Stirring every 10 minutes, cook for about 40 minutes until the onions reach a deep golden brown. In the final 10 minutes, stir in balsamic vinegar for savory flavor.
Layer the sweet, caramelized concoction along with cheese and bacon on a flatbread. Bake (or grill, if the weather allows) for 15 minutes before topping with fresh arugula for a lighter dish that reminds you springtime has arrived.
Find more recipes to celebrate spring at tx1015.com.
Storage Tips for Sweet Onions
Short-term storage for sweet onions is simple: If using them within a week, just leave them out on the counter. However, if you’re stocked up and thinking beyond a handful of days, consider these tips for keeping them fresh long-term.
- Wrap and separate. If you plan to store in the refrigerator, wrap each bulb individually in a paper towel. Place the bulbs in the crisper with the vents closed.
- Break out the pantyhose. Because sweet onions can be preserved if stored in a cool, dry place with air circulation, you can put one onion in each leg of clean pantyhose then tie a knot above the onion. Keep adding onions until each leg is full. Each time you need one, simply cut the sections based on the number of onions you need.
- Keep away from spuds. Although they pair perfectly in dozens of recipes, for storage purposes, onions and potatoes don’t play nice. Storing together can cause onions to go bad quicker.
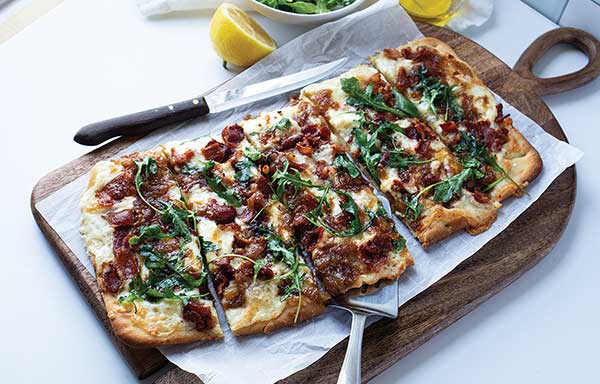
Flatbread with Caramelized Onions, Bacon and Arugula
Recipe courtesy of South Texas Onions
Servings: 2-3
- 1 tablespoon butter
- 1/2 tablespoon olive oil
- 1 large sweet onion, sliced
- 1/2 teaspoon balsamic vinegar
- 1 naan flatbread (rectangular shape)
- 1 cup cheddar cheese, shredded
- 1 cup fontina cheese, shredded
- 4 slices bacon
- arugula
- olive oil (optional)
- lemon juice (optional)
- To make caramelized onions: In pan over medium-high heat, heat butter and olive oil. Add onions and let sit about 5 minutes. Once onions start sweating, turn heat to low and cover pan. Cook onions to deep golden brown, stirring every 10-15 minutes. With 10 minutes left, stir in balsamic vinegar.
- To make flatbread: Preheat oven to 425 F.
- On flatbread, layer cheese, bacon and caramelized onions. Bake 13-15 minutes, or until cheese is bubbly and edges are golden brown.
- Toss arugula with olive oil and lemon juice, if desired, before placing on flatbread.
Source: South Texas Onions
5 Steps for Mastering Family Meal Planning
(Family Features) As you and your family embark on a mission to create delicious, nutritious meals all while saving money, it’s key to remember meal planning is essential for success. From tracking a list of ingredients you’ll need to noting your loved ones’ favorite foods, there are some easy steps you can take to make dinners at home enjoyable and budget friendly.
Getting on track with your own plan can start with these tips from Healthy Family Project’s Mission for Nutrition, which aims to help families find weekly meal success with an internationally inspired e-cookbook including grocery lists, recipe ideas and cooking hacks.
Work together. Before heading to the store or heating up the oven, sit down with your loved ones and make a list of easy-to-make recipes you all enjoy. Each time you discover a new favorite, add it to the list so you’ll have a reference guide when it’s time to plan a week’s worth of meals.
Stick to a schedule. Set a day and time each week your family can meet and plan out dinners. This also offers an opportunity to bring to light any newfound favorites or fresh ideas while bringing everyone to the same room for quality time together.
Plan time-saving processes. Think ahead while planning meals and consider the equipment you’ll need. Saving time while cooking can be as easy as sticking to recipes that call for hands-off appliances like a slow cooker or pressure cooker and using a food processor rather than a knife and cutting board.
Schedule a “leftovers night.” When you prep dinners that call for crossover ingredients, it’s easier to turn one meal into two. For example, buying sweet onions and chicken breast to make Chicken Apple Enchiladas means you’ll have those ingredients on hand for Greek Chicken Bowls later in the week.
Make a list. Once you’ve decided on recipes for the week, create a list of all the ingredients you’ll need. While you’re at the store, stick to your plan and avoid impulse buys to help stay on track while getting in and out quicker.
Find more recipes and meal planning tips by downloading the free e-cookbook at healthyfamilyproject.com/mission-for-nutrition and join the conversation by following #missionfornutrition on social media.
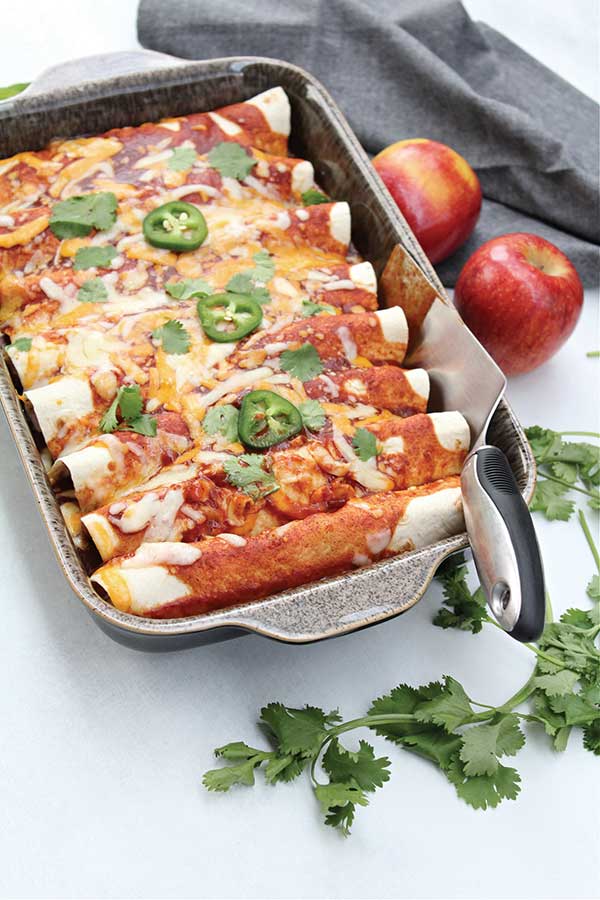
Chicken Apple Enchiladas
Recipe courtesy of Healthy Family Project's Mission for Nutrition
- 1/2 sweet onion, diced
- 1 jalapeno, diced
- 1 Envy or Jazz apple, diced
- 2 cups cooked shredded chicken
- 8 flour tortillas
- 6 ounces shredded Mexican blend cheese, divided
- 1 can red enchilada sauce
- cilantro (optional)
- Heat oven to 350 F.
- In skillet, cook onions until translucent. Add jalapeno and apple; saute 2-3 minutes.
- Add cooked chicken and mix well. Remove from heat.
- Lay out tortillas and sprinkle cheese on each. Add chicken mixture and roll. Place in baking dish and cover with enchilada sauce.
- Bake 20 minutes, or until heated throughout.
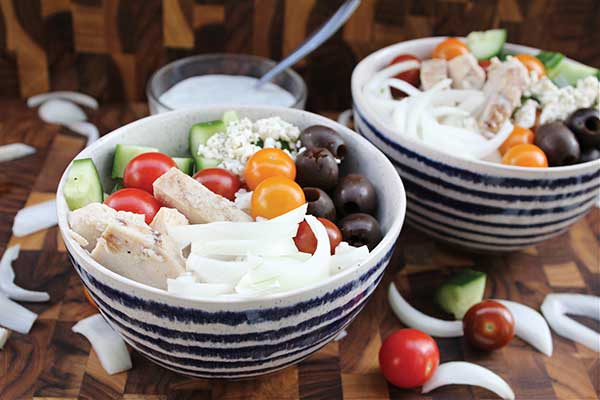
Greek Chicken Bowls
Recipe courtesy of Healthy Family Project's Mission for Nutrition
- 1 cup cooked white or brown rice
- 1 grilled chicken breast, sliced
- 1 RealSweet onion, sliced
- 1 cup cherry tomatoes
- 1 cucumber, cut into quarters
- 1/2 cup black olives
- 1 tablespoon feta cheese
- 2 tablespoons tzatziki sauce
- Place cooked rice and chicken in bowls.
- Top each bowl with sweet onions, tomatoes, cucumbers and black olives. Sprinkle each with feta cheese. Drizzle each with tzatziki sauce.
Source: Healthy Family Project
Deliciously Healthy Dishes from Sweet to Savory
(Family Features) Supplementing meals and snacks with powerful, versatile ingredients can take healthy eating from bland and boring to delicious and adventurous.
Take your breakfasts, appetizers, dinners and desserts to new heights while maintaining nutrition goals with naturally nutritious and surprisingly versatile California Prunes. Rich and smooth with an ability to enhance both sweet and savory flavors, they can expand your menu with nearly endless powerful pairing options.
One serving of 4-5 prunes packs a powerful punch of vitamins, minerals, antioxidants and fiber. Together, these nutrients form a web of vital functions that support overall health.
Whole, diced or pureed, the versatility of prunes allows you to enhance the flavor of recipes from morning to night in dishes like Citrus Breakfast Toast, which brings together vitamin B6 and copper from prunes and vitamin C from citrus to support a healthy immune system.
Try Caramelized Onion, Mozzarella, Prune and Thyme Flatbreads for a tasty family meal, and while you wait for dinner to cook, you can serve up Prune, Mozzarella and Basil Skewers. These easy appetizers provide several key nutrients. Mozzarella is a good source of calcium and prunes provide vitamin K and copper, all of which support overall bone health.
Make dessert a bit better for you but equally delectable with a vegan option like gluten-free, plant-based Prune and Almond Truffles. The soluble fiber in prunes helps lower serum cholesterol and blunt the effects of excessive sodium in the diet. Nuts like almonds provide good fats that help lower the risk for heart disease.
Find more recipe ideas at CaliforniaPrunes.org.
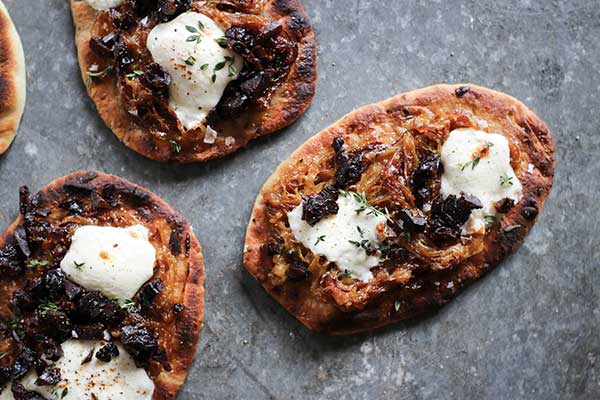
Caramelized Onion, Mozzarella, Prune and Thyme Flatbreads
Prep time: 15 minutes
Cook time: 1 hour, 30 minutes
Yield: 4 flatbreads
Caramelized Onions:
- 2 tablespoons olive oil
- 1/2 cup butter
- 6 large yellow sweet onions, sliced into thin half circles
- 3 sprigs fresh thyme
- coarse kosher salt, to taste
Flatbreads:
- 4 personal flatbreads
- 1 cup caramelized onions
- 4 ounces fresh mozzarella
- 10 California Prunes, diced small
- 1 tablespoon fresh thyme leaves
- sea salt, to taste
- coarsely ground black pepper, to taste
- To make caramelized onions: Preheat oven to 400 F.
- In large stockpot over medium-low heat, warm oil and melt butter. Add onions and cover; cook 20-25 minutes, stirring occasionally. Add thyme sprigs and season with salt, to taste; turn pan lid slightly ajar. Place pot in oven 1 hour, stirring occasionally.
- To make flatbreads: Preheat oven to broil. On sheet pan, toast flatbreads under broiler 4 minutes, or until toasted, flipping halfway through.
- Spread 1/4 cup of caramelized onions over each toasted flatbread. Refrigerate leftover onions.
- Tear mozzarella and place over onions. Divide prunes among flatbreads and place flatbreads under broiler 4-6 minutes until cheese has melted and is beginning to brown.
- Sprinkle flatbreads with fresh thyme and season with salt and pepper, to taste.
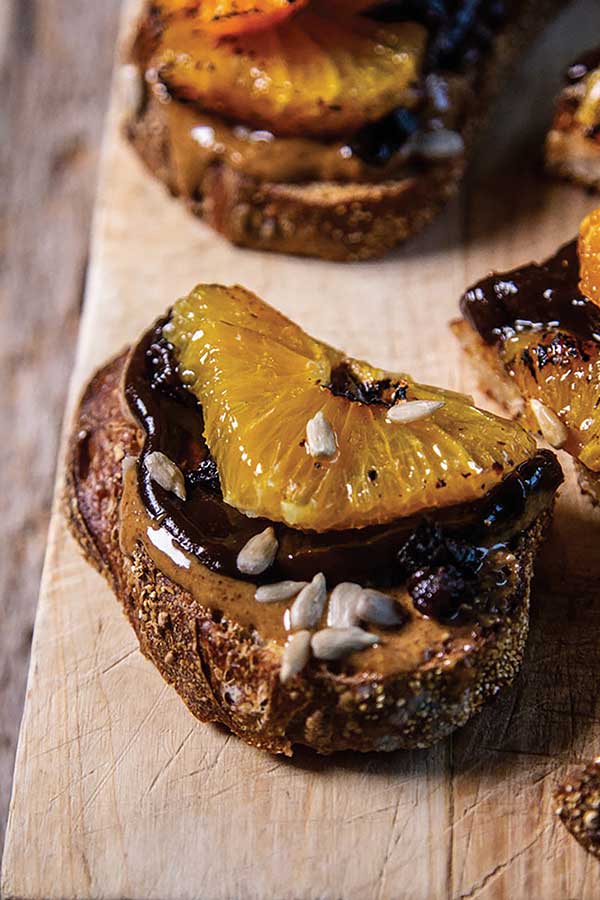
Citrus Breakfast Toast
Prep time: 13 minutes
Cook time: 2 minutes
Servings: 2
Prune Puree:
- 16 ounces pitted California Prunes
- 1/2 cup hot water
- 1 large citrus fruit, peels and piths removed with knife, sliced into rounds
- 1 1/2 tablespoons raw sugar
- 4 tablespoons sunflower butter
- 2 slices whole-grain sourdough bread, toasted to desired darkness
- 2 tablespoons prune puree
- 1 tablespoon sunflower seeds
- 2 California Prunes, finely diced
- To make prune puree: In blender, pulse prunes and water to combine then blend until smooth, pourable consistency forms, scraping sides, if necessary.
- Store in airtight container up to 4 weeks.
- To make bruleed citrus wheels: Place citrus wheels on baking sheet and divide sugar evenly among each piece.
- Using circular motion, pass flame of culinary torch repeatedly over sugar until it boils and turns lightly charred and amber.
- To build toast: Spread 2 tablespoons sunflower butter on each piece of toast. Top each with 1 tablespoon prune puree spread evenly across sunflower butter. Sprinkle each evenly with sunflower seeds and diced prunes. Top each with half broiled citrus and serve.
- Alteration: Use broiler set on high instead of culinary torch to caramelize sugar.
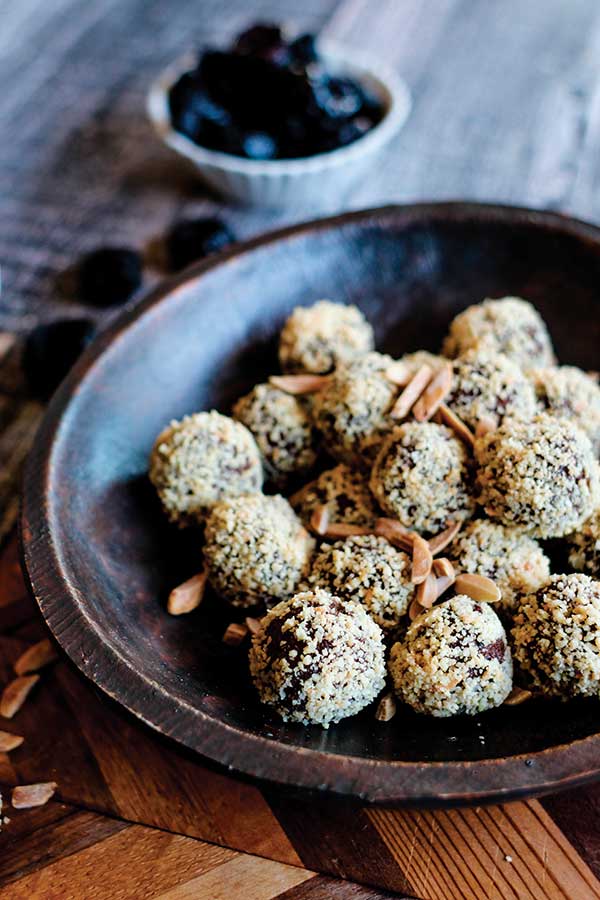
Prune and Almond Truffles
Recipe courtesy of Meg of "This Mess is Ours"
Prep time: 45 minutes
Servings: 24
- Water
- 1 cup California Prunes
- 1 1/2 cups toasted slivered almonds, divided
- 1/4 teaspoon coarse kosher salt, plus additional, to taste, divided
- 1 tablespoon cocoa powder
- 1 1/2 tablespoons vanilla paste or extract
- 1/4 teaspoon almond extract
- Boil water and pour over prunes. Soak 30 minutes; drain.
- In food processor fitted with "S" blade, pulse 1/2 cup toasted almonds with salt, to taste, until fine crumbs form. Transfer to shallow bowl and set aside.
- Add remaining almonds to food processor with 1/4 teaspoon salt and cocoa powder. Pulse 30 seconds to combine. Add prunes, vanilla paste and almond extract; process until combined. Mixture should be creamy with slight texture from almond crumbs. Transfer prune mixture to bowl and refrigerate 1 hour.
- Once chilled, use small cookie scoop to portion out individual truffles on parchment-lined baking sheet. Gently roll each truffle in reserved toasted almond crumbs. Store on parchment-lined plate in refrigerator up to 2 weeks. Serve chilled.

Prune, Mozzarella and Basil Skewers
Prep time: 5 minutes
Servings: 5
- 5 pieces prosciutto, halved lengthwise (optional)
- 10 California Prunes
- 10 basil leaves
- 10 cherry-size mozzarella balls
- If using prosciutto, fold each half in half lengthwise so width of prune is wider than width of prosciutto. Starting at one end of prosciutto, wrap one prune; repeat with remaining prosciutto. Set aside.
- Wrap one basil leaf around each mozzarella ball then thread onto skewer. Thread one prune or prosciutto-wrapped prune onto each skewer.
Source: California Prunes
Made with Love
Set the table for romance with a delicious date night at home
(Family Features) Planning a delicious, romantic date night doesn’t have to take you any further than your own kitchen. You don’t have to be an accomplished chef to set the table for romance, but you can take inspiration from simple, quality Italian dishes to celebrate the link between food and love.
As these recipes show, a romantic meal can be ready in minutes or, like a great love story, simmered to perfection. To plan the ultimate date night at home, start by choosing one of these dreamy main dishes made with mouthwatering sauces.
Flavorful sauces make a great Italian meal, but the sauce doesn’t need to be made from scratch (at least, not completely). For example, Bertolli d’Italia sauces are made in Italy for authentically delicious flavor. They are crafted with tomatoes vine-ripened under the Italian sun, finely aged Italian cheeses, fresh cream and Mediterranean olive oil. The result is a sauce that’s perfect for your date-night meal.
Once you select your main course, prepare a simple salad of greens with a drizzle of Italian vinaigrette or Caesar dressing. Pop a loaf of bakery-fresh Italian or focaccia bread into the oven to warm through and serve with butter or olive oil for dipping. If you’re so inclined, cap off the meal with a classic Italian dessert from your local bakery, like tiramisu, cannoli or a creamy panna cotta topped with fresh fruit.
Find more romantic dishes perfect for sharing at Bertolli.com.
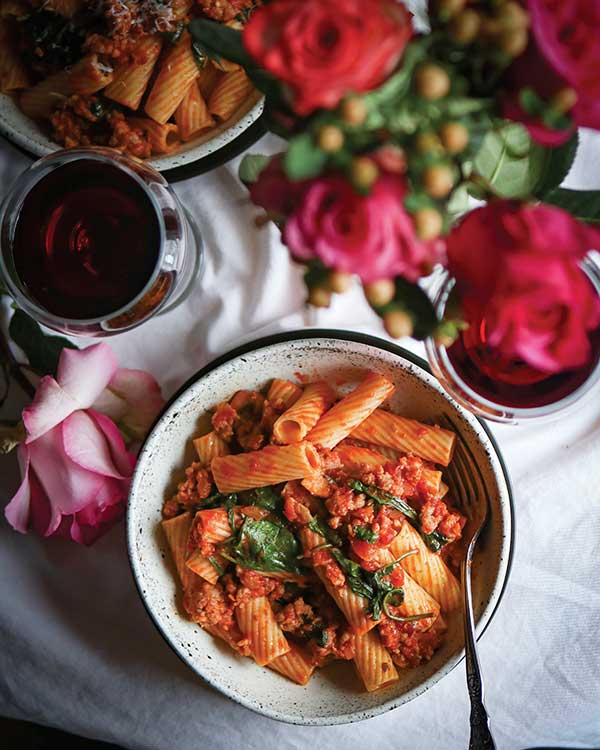
Italian Sausage Spinach and Tomato Rigatoni
Prep time: 10 minutes
Cook time: 20 minutes
- Water
- 1/2 box rigatoni pasta
- 1 tablespoon olive oil
- 1/2 cup onions, chopped
- 4 cloves garlic, minced
- 1/2 cup mushrooms, sliced
- 16 ounces sweet Italian sausage
- 1 jar Bertolli d'Italia Marinara Sauce
- 2 cups fresh baby spinach
- salt, to taste
- pepper, to taste
- Parmesan cheese, for garnish
- Bring large stockpot of water to boil. Boil rigatoni pasta until al dente. Drain and set aside.
- In saute pan over medium heat, add olive oil. Add onions, garlic and mushrooms. Saute until vegetables start to brown. Add Italian sausage and cook until done, breaking into small pieces. Add sauce and bring to low boil.
- Add baby spinach. Cook until spinach is mostly wilted. Season with salt and pepper, to taste.
- Add drained pasta to pan with sausage and sauce. Toss and divide between plates. Garnish with Parmesan cheese.
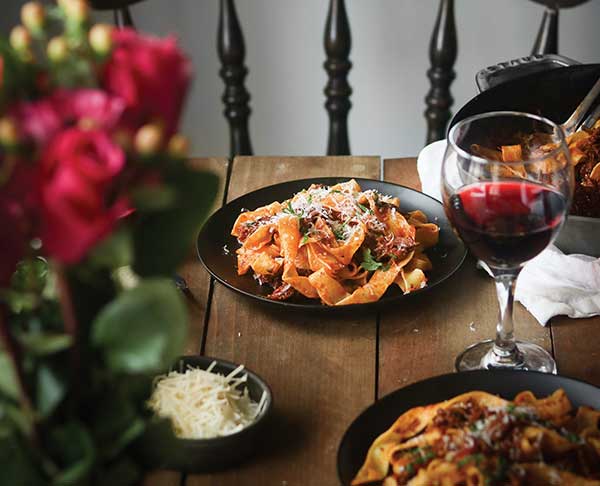
Red Wine Braised Beef Short Rib Ragu
Prep time: 25 minutes
Cook time: 3 hours
- 2 tablespoons olive oil
- 4 pounds bone-in beef short ribs
- salt, to taste
- ground black pepper, to taste
- 1 stalk celery, chopped
- 1 large carrot, peeled and finely diced
- 1 small onion, chopped
- 8 cloves garlic, finely chopped
- 4 tablespoons tomato paste
- 1 cup red wine
- 4 sprigs fresh rosemary
- 2 sprigs fresh sage leaves, chopped
- 8 sprigs fresh thyme
- 2 bay leaves
- 1 jar Bertolli d'Italia Marinara Sauce
- 2 cups beef bone broth
- water
- 24 ounces pappardelle pasta or preferred pasta
- freshly grated Parmesan cheese, for garnish
- Heat oven to 350 F.
- In 5-quart Dutch oven, heat olive oil over medium heat. Season short ribs with salt and ground black pepper, to taste. Place one layer of short ribs in pot. Set remaining ribs aside.
- Cook ribs 3-4 minutes per side until browned. Transfer to plate and set aside. Repeat with remaining short ribs.
- Add celery, carrots and onion to pot used to brown ribs. Stir and cook until vegetables are browned, about 15 minutes.
- Add garlic and stir 1-2 minutes. Add tomato paste. Cook 2-3 minutes.
- Carefully pour red wine into pot.
- Stir and scrape any browned bits from bottom of pot. Cook 3-4 minutes until wine is almost completely absorbed into vegetables.
- Add rosemary, sage, thyme and bay leaves to pot. Add sauce, bone broth and browned ribs. Cover pot and place in oven 2 1/2-3 hours, or until ribs are fall-apart tender.
- Remove pot from oven. Transfer ribs to plate or cutting board. Remove and discard herb stems and bay leaves. Remove bones from ribs then shred meat into bite-sized pieces using two forks or tongs. Return shredded ribs to pot with ragu. Stir to combine. Set aside.
- Bring large stockpot of water to boil. Boil pappardelle pasta until al dente. Add drained pasta to pot with beef ragu and toss until combined.
- Garnish with freshly grated Parmesan cheese.
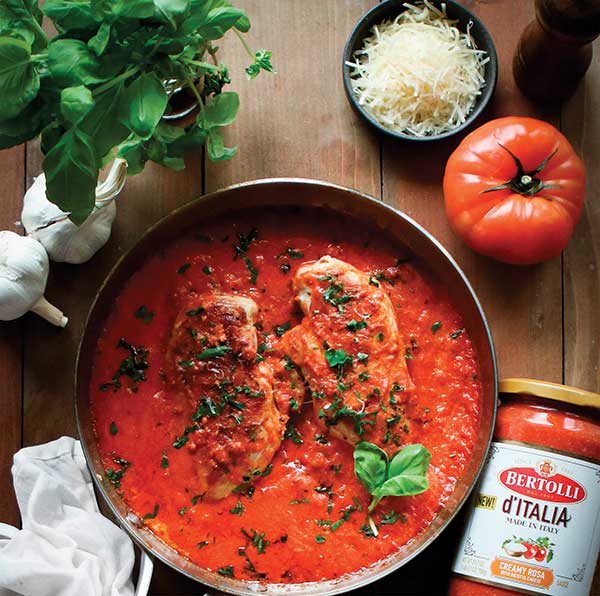
Creamy Italian Garlic Chicken Pasta
Prep time: 10 minutes
Cook time: 20 minutes
- 2 tablespoons olive oil
- 2 large chicken breasts
- 1 teaspoon Italian seasoning
- salt, to taste
- pepper, to taste
- 4 cloves garlic, minced
- 1/4 cup onions, chopped
- 1/4 cup sun-dried tomatoes, cut into strips
- 2 tablespoons capers, drained
- 6 fresh basil leaves, sliced
- 1 jar Bertolli d'Italia Creamy Rosa Sauce
- 1/2 cup heavy cream
- water
- 1/2 box Casarecce or preferred pasta
- parsley, for garnish
- Parmesan cheese, for garnish
- In saute pan over medium heat, add olive oil. Season chicken with Italian seasoning and salt and pepper to taste. Sear chicken breasts on both sides until browned. Remove from pan and set aside.
- Add garlic and onions to hot pan. Cook until starting to brown. Add sun-dried tomatoes, capers and basil; stir. Add sauce and heavy cream; cook until mixture starts boiling.
- Bring large stockpot of water to boil. Boil Casarecce pasta until al dente. Divide pasta between two plates. Place one chicken breast over pasta on each plate and top with additional sauce, parsley and Parmesan cheese.
Source: Bertolli
5 Cooking Swaps to Help Manage Cholesterol
(Family Features) When cooking, keep in mind small changes that can make a big impact on heart health.
High cholesterol is one of the major controllable risk factors for heart disease and stroke, with about 38% of American adults diagnosed with high cholesterol, according to the American Heart Association. It can be managed by getting levels regularly tested and making lifestyle changes like eating a heart-healthy diet.
- Reduce saturated fat – Select lean cuts of meat or opt for plant protein, limit processed meats, broil or bake rather than pan-fry meats and remove skin from poultry before cooking.
- Eat more fish – Fish can be fatty or lean, but it’s still low in saturated fat. Choose oily fish like salmon or trout, which are high in omega-3 fatty acids.
- Use liquid oils in place of solid fats – For roasting, sauteing and more, use non-tropical liquid vegetable oils like canola, safflower, soybean or olive instead of butter, lard or shortening.
- Lower dairy fats – Low-fat, fat-free or non-dairy milk can be used in many recipes instead of whole milk or half-and-half.
- Increase fiber and whole grains – Add high-fiber vegetables to meals, serve fruit instead of juice and try brown rice instead of white.
These simple tips and better-for-you recipes like Chicken Tortilla Soup and Air Fryer Crispy (Un) Fried Chicken can help you eat healthy without sacrificing taste.
Find tips for managing cholesterol and other risk factors at heart.org/cholesterol.
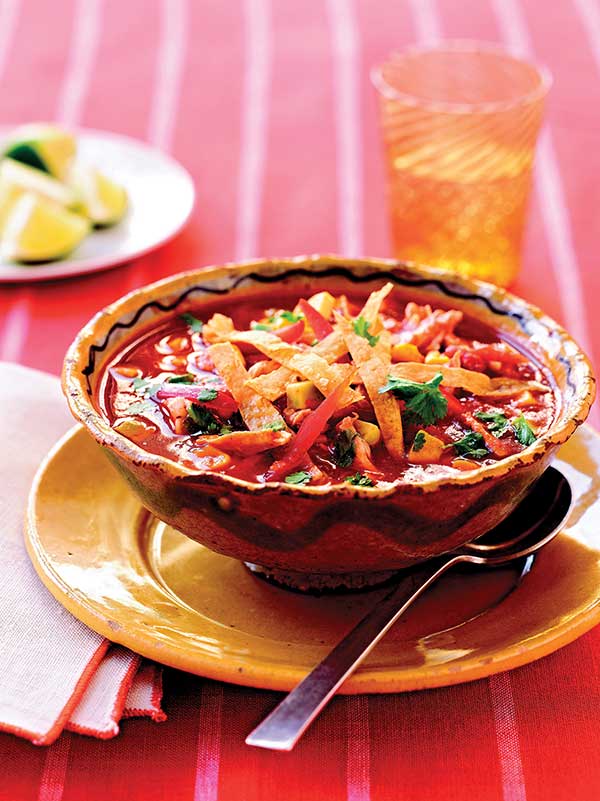
Chicken Tortilla Soup
This recipe is reprinted with permission from "Healthy Slow Cooker Cookbook, 2nd Edition." Copyright 2018 by the American Heart Association. Published by Harmony Books, an imprint of Penguin Random House, LLC.
Servings: 4
- 1 pound boneless, skinless chicken breasts, visible fat discarded, cut into 1/2-inch cubes
- 2 cups frozen whole-kernel corn, thawed
- 2 cups fat-free, no-salt-added chicken broth
- 1 can (14 1/2 ounces) no-salt-added, diced tomatoes, undrained
- 1/4 cup finely chopped onion
- 1 teaspoon sugar
- 1 teaspoon ancho powder
- 2 medium garlic cloves, minced
- 1/4 teaspoon salt
- 2 corn tortillas (6 inches each), cut into 1/4-inch-wide strips
- 1 corn tortilla (6 inches), torn into pieces
- 2-4 tablespoons snipped fresh cilantro
- 1/4 cup finely chopped avocado
- 1/4 medium red bell pepper, cut into matchstick-size strips
- In slow cooker, stir chicken, corn, broth, tomatoes, onion, sugar, ancho powder, garlic and salt. Cook, covered, on low, 6-8 hours, or on high, 3-4 hours.
- Preheat oven to 350 F.
- On baking sheet, arrange tortilla strips in single layer. Bake 8-10 minutes, or until crisp. Transfer baking sheet to cooling rack. Let strips stand 15 minutes, or until cool. Transfer to airtight container and set aside.
- When soup is ready, transfer 1 cup to food processor or blender. Stir in tortilla pieces. Let mixture stand 1 minute. Process until smooth. Stir mixture into soup. Stir in cilantro.
- Ladle soup into bowls. Sprinkle with avocado, bell pepper and reserved tortilla strips.
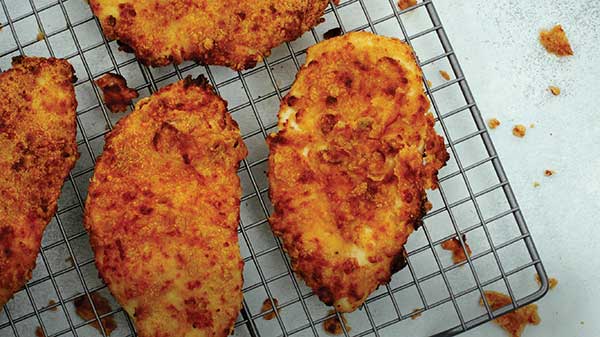
Air Fryer Crispy (Un) Fried Chicken
Recipe courtesy of the American Heart Association
Servings: 4
- 1/2 cup all-purpose flour
- 2 tablespoons minced fresh parsley
- 1/2 teaspoon ground oregano
- 1/4 teaspoon pepper
- 1/4 teaspoon cayenne pepper (optional)
- 1/2-1 cup low-fat buttermilk
- 1/2 tablespoon hot pepper sauce (optional)
- 1/3 cup whole-wheat panko breadcrumbs
- 1/3 cup shredded or grated Parmesan cheese
- 4 boneless, skinless chicken breasts (about 4 ounces each), visible fat discarded, flattened to 1/4-inch thickness, patted dry with paper towels
- nonstick cooking spray
- reheat air fryer to 390 F.
- In shallow dish or pie pan, whisk flour, parsley, oregano, pepper and cayenne.
- In separate shallow dish or pie pan, whisk buttermilk and hot sauce.
- In third shallow dish or pie pan, stir panko and Parmesan.
- Place dishes and large plate in row. Dip chicken in flour mixture then buttermilk mixture then panko mixture, turning to coat at each step and gently shaking off excess. Using fingertips, gently press panko mixture so it adheres. Place chicken on plate. Cover and refrigerate 30 minutes.
- Lightly spray chicken with nonstick cooking spray. Arrange chicken in single layer in air fryer basket, working in batches if needed. Cook 10-15 minutes, or until chicken is no longer pink in center and coating is golden brown, turning once halfway through and lightly spraying with nonstick cooking spray.
Source: American Heart Association
A New Way to Seafood
(Family Features) Whether you’re celebrating a weekend meal with loved ones or simply looking for a way to bring your family to the table at the same time, seafood night can make dinnertime a special treat. Next time you plan to make fish the focus of your menu, it’s possible you’ll be enjoying the benefits of aquaculture, also known as seafood farming.
Fast becoming a leading source of seafood worldwide, aquaculture is similar to typical agriculture but with fish, shellfish and seaweeds. Farmed seafood can be raised and harvested in either fresh or seawater, where natural conditions are recreated.
Today, half of all seafood Americans eat annually is farm raised and the appetite is only growing. There are many reasons for this, but one is due to overfishing and destructive practices. About 33% of wild fish stocks have reached their biological limit and aquaculture helps meet the increasing demand for seafood.
However, not all seafood you find in the grocery aisles is the same. Despite industry advances, aquaculture still faces challenges with fraud, mislabeling and questionable conditions. That’s why it’s important to look for responsible seafood products that are labeled by a trusted certification process.
For example, the Aquaculture Stewardship Council is a non-profit certification program that has created and enforced the world’s strictest and highest standards for seafood farming since 2010. Today, it is transforming the seafood industry with a new level of certification for farmed seafood. This “new way to seafood” includes:
- Seafood that can be traced all the way from the farm to the store, ensuring the seafood you buy is what it claims to be
- The strictest combination of requirements to protect the environment, workers and communities on the farms where seafood is raised
- Improving farmed seafood quality and safety, so you can enjoy the flavor of recipes like One-Pan Japanese Salmon with Sweet Potato, Salmon and Shrimp Coconut Curry and Royal Salmon with Romesco Sauce and Aioli
To find more information about the certification process, visit NewWaytoSeafood.com.
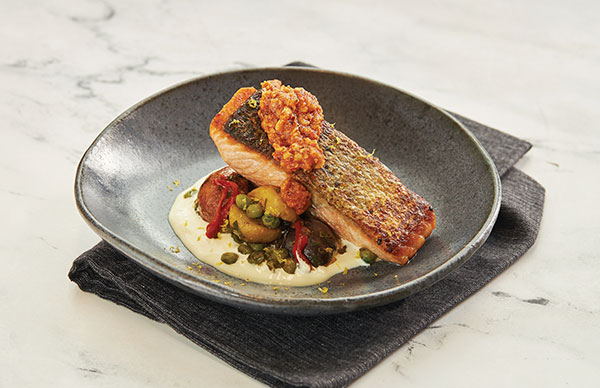
Royal Salmon with Romesco Sauce and Aioli
Recipe courtesy of MOWI on behalf of the Aquaculture Stewardship Council
Servings: 2
- 2 tablespoons olive oil, divided
- 2 Atlantic Salmon MOWI Royal portions
- salt, to taste
- pepper, to taste
- 1 red pepper, cut into long strips
- 2 cups small potatoes, cooked and cut in half
- 1 teaspoon paprika
- 1/2 teaspoon cayenne pepper
- 1/2 cup garden peas
- 1 tablespoon chopped tarragon
Romesco Sauce:
- 1/2 cup extra-virgin olive oil
- 2 cloves garlic, smashed
- 1/4 cup slivered almonds, toasted
- 1/4 cup hazelnuts
- 1 slice white bread, crust removed
- 1 large roasted red pepper
- 1/4 cup tomato puree
- 1 teaspoon sherry vinegar
- salt
- black pepper
Aioli Sauce:
- 1 cup mayonnaise
- 1-2 cloves garlic, crushed
- 1 tablespoon olive oil
- 1 lemon, zest and juice
- salt
- white pepper
- lemon wedges, for garnish
- Preheat oven to 400 F.
- Place large skillet over medium-high heat and add 1 tablespoon olive oil. Season salmon portions with salt and pepper, to taste, and place skin sides down in pan. Cook 2-3 minutes until skin is crispy. Place on sheet pan, skin sides up, and bake 6-7 minutes. Remove from oven and let rest.
- In same skillet, add remaining olive oil then add peppers and potatoes. Cook 6-7 minutes until peppers soften and potatoes start to caramelize.
- Add paprika, cayenne and peas; stir and cook 2 minutes. Add tarragon.
- To make romesco sauce: In clean pan, heat olive oil and gently fry garlic, nuts and bread until toasted.
- In blender, process red pepper, tomato puree and vinegar until smooth. Add toasted nuts and bread; process to desired consistency.
- To make aioli: In bowl, whisk mayonnaise, garlic, olive oil, lemon zest and juice, salt and pepper.
- Place several spoonfuls of aioli on plate. Top with potatoes, peppers and salmon, skin side up. Top with romesco sauce.
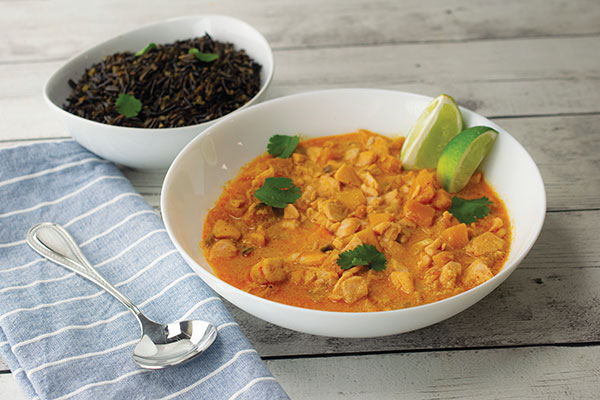
Salmon and Shrimp Coconut Curry
Recipe courtesy of MOWI on behalf of the Aquaculture Stewardship Council
Servings: 2
- 2 pieces of MOWI Pure portions salmon
- 1 cup wild rice
- 1 tablespoon coconut oil
- 1 clove garlic, sliced
- 1/4 cup red onion, diced
- 1cup pumpkin or butternut squash, diced
- 1 tablespoon lemongrass, finely chopped
- 1 1/2tablespoons red curry paste
- 1/2 cup coconut milk
- 1 tablespoon fish sauce
- 1/4 cup tomatoes
- 4 shrimp
- 1 lime, quartered
- 2-3 cilantro leaves, for garnish
- Cut salmon into 1/2-inch cubes. Cook rice according to package instructions.
- In large skillet, heat coconut oil over medium-high heat. Add garlic, onion and pumpkin or squash; saute 5 minutes, or until onions are translucent. Mix in lemongrass and curry paste. Cook 2-3 minutes, or until fragrant.
- Add coconut milk, fish sauce and tomatoes; mix thoroughly. Add shrimp and salmon; cook until done.
- Serve with rice and lime quarters. Sprinkle with cilantro.
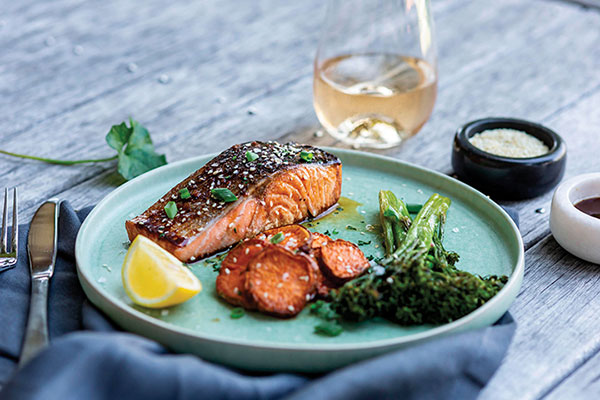
One-Pan Japanese Salmon with Sweet Potato
Servings: 2
Marinade:
- 1 tablespoon sesame oil
- 1/4 cup tamarind sauce
- 1/2 tablespoon Dijon mustard
- 2 tablespoons sesame seeds
- 1 tablespoon honey
- 1 sweet potato, cut into rounds
- 2 tablespoons coconut oil, divided
- 1 tablespoon sesame seeds
- sea salt
- 8 spears broccolini
- 2 salmon fillets (4 ounces each)
- brown rice, for serving
- Preheat oven to 400 F. Line tray with baking paper.
- To make marinade: In bowl, whisk sesame oil, tamarind sauce, Dijon mustard, sesame seeds and honey until combined.
- Place sweet potato on baking tray and drizzle with 1 tablespoon coconut oil. Toss to coat. Sprinkle with sesame seeds and sea salt. Roast 25 minutes.
- Remove tray from oven and add broccolini. Drizzle with remaining coconut oil and sea salt. Place salmon fillets in middle of tray and drizzle with marinade. Bake 12-15 minutes, or until cooked to desired doneness. Serve with brown rice.
Source: Aquaculture Stewardship Council
Salmon and Shrimp Coconut Curry

(Family Features) Adding salmon to your weekly menu can take dinnertime from drab to delicious. Combining it with bright, fresh veggies heightens the savory experience even more for a burst of seafood flavor.
Loaded with salmon and shrimp, this Salmon and Shrimp Coconut Curry is a perfect option for putting together a quick yet delicious meal.
Fast becoming a leading source of seafood worldwide, aquaculture is similar to typical agriculture but with fish, shellfish and seaweeds. Farmed seafood can be raised and harvested in either fresh or seawater, where natural conditions are recreated.
However, not all seafood you find in the grocery aisles is the same. Despite industry advances, aquaculture still faces challenges with fraud, mislabeling and questionable conditions. That’s why it’s important to look for responsible seafood products that are labeled by a trusted certification process.
For example, the Aquaculture Stewardship Council is a non-profit certification program that has created and enforced the world’s strictest and highest standards for seafood farming since 2010. Today, it is transforming the seafood industry with a new level of certification for farmed seafood. This “new way to seafood” includes:
- Seafood that can be traced all the way from the farm to the store, ensuring the seafood you buy is what it claims to be
- The strictest combination of requirements to protect the environment, workers and communities on the farms where seafood is raised
- Improving farmed seafood quality and safety
Visit NewWaytoSeafood.com to find more information about the certification process.
Watch video to see how to make this recipe!

Salmon and Shrimp Coconut Curry
Recipe courtesy of MOWI on behalf of the Aquaculture Stewardship Council
Servings: 2
- 2 pieces of MOWI Pure portions salmon
- 1 cup wild rice
- 1 tablespoon coconut oil
- 1 clove garlic, sliced
- 1/4 cup red onion, diced
- 1 cup pumpkin or butternut squash, diced
- 1 tablespoon lemongrass, finely chopped
- 1 1/2 tablespoons red curry paste
- 1/2 cup coconut milk
- 1 tablespoon fish sauce
- 1/4 cup tomatoes
- 4 shrimp
- 1 lime, quartered
- 2-3 cilantro leaves, for garnish
- Cut salmon into 1/2-inch cubes. Cook rice according to package instructions.
- In large skillet, heat coconut oil over medium-high heat. Add garlic, onion and pumpkin or squash; saute 5 minutes, or until onions are translucent. Mix in lemongrass and curry paste. Cook 2-3 minutes, or until fragrant.
- Add coconut milk, fish sauce and tomatoes; mix thoroughly. Add shrimp and salmon; cook until done.
- Serve with rice and lime quarters. Sprinkle with cilantro.
Source: Aquaculture Stewardship Council
Fresh, Healthy Family Meals
Recipes to help boost iron levels, aid plasma donation recovery
(Family Features) Chef Nate Appleman knows how important it is to serve healthy meals to your family – ones they actually want to eat. Before having his first child, he transformed his eating and exercise habits and lost 85 pounds to get on a healthier path.
Now, he’s cooking meals for his family, including 14-year-old Oliver who was diagnosed with Kawasaki Disease as a toddler – an inflammation of the blood vessels that can cause damage to coronary arteries – as a healthy lifestyle is important to help manage the disease. Since Oliver’s diagnosis, Appleman made it his personal mission to create awareness of Kawasaki Disease and for the critical need for plasma donations that many people with the disease rely on for treatment, which is why he partnered with Abbott to bring attention to the need for plasma donations.
Plasma is a powerful part of your blood that supports essential bodily functions. It’s a lifeline for thousands of people who are immune-compromised and live with a variety of chronic and complex diseases. In fact, more than 125,000 Americans rely on medication made from plasma every day, according to the Plasma Protein Therapeutics Association (PPTA).
The COVID-19 pandemic led to a serious shortage of plasma donors – average donations per center in the United States were down approximately 11% during the first few months of 2021 compared to the previous year, further deepening the nearly 20% decline in donations in 2020 compared to 2019, according to the PPTA.
Donating plasma is a safe and relatively easy process. Since plasma is replaced in the body within about 24 hours, it can be donated up to twice per week. With a donation that typically takes between 1-3 hours, you can make a lasting impact by providing lifesaving medicine for patients like Oliver.
It’s a good idea to fuel up with iron-rich foods before and after donating, so Appleman created these fresh, nutritious recipes he loves to serve his family: Marinated Skirt Steak, Lemon Chicken with Roasted Red Onions and Potatoes, and Cheesy Frittata with Veggies.
Learn where you can donate at bethe1donor.abbott.
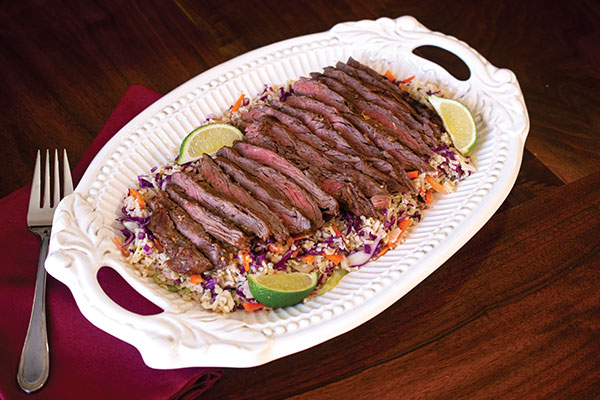
Marinated Skirt Steak
Recipe courtesy of chef Nate Appleman on behalf of Abbott
Vinaigrette:
- 1/4 cup oil
- 1/4 cup fish sauce
- 1/4 cup rice wine vinegar
- 1/4 cup water
- 2 tablespoons raw sugar
- 1 cup chopped fresh cilantro
- 1 lime, juice only
- 1 clove garlic, minced
- 1 small Thai bird chile or serrano chile, chopped
- 1/4 head finely shaved green cabbage
- 1/4 head finely shaved purple cabbage
- 2 carrots, thinly julienned
Skirt steak:
- 1 1/2 pounds trimmed skirt steak
- 1/2 cup coconut milk
- 3 cloves garlic, minced
- 2 tablespoons lime juice
- 1/4 cup chopped fresh cilantro
- 2 tablespoons sriracha
- salt, to taste
- 3 cups cooked brown rice
- 1/2 cup crushed peanuts
- 1 lime, quartered, for garnish
- To make vinaigrette: In large bowl, mix oil, fish sauce, rice wine vinegar, water, sugar, cilantro, lime juice, garlic and chile. Toss cabbage and carrots in vinaigrette; refrigerate until ready to serve.
- To make skirt steak: Marinate steak in coconut milk, garlic, lime juice, cilantro, sriracha and salt, to taste, at least 1 hour, or up to 24 hours.
- Heat grill to high.
- Grill 3-4 minutes each side until medium rare.
- Let rest 3 minutes.
- Thinly slice steaks against grain and serve with vinaigrette, rice and crushed peanuts; garnish with lime wedges.
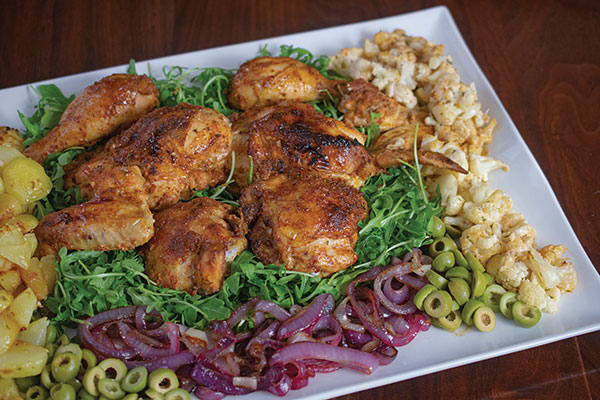
Lemon Chicken with Roasted Red Onions and Potatoes
Recipe courtesy of chef Nate Appleman on behalf of Abbott
Lemon chicken:
- 1 whole chicken, cut into eight pieces
- 1 ounce minced garlic
- 1/4 teaspoon granulated garlic
- 1/4 teaspoon paprika
- 1/4 teaspoon smoked paprika
- 1/4 teaspoon ground fennel seed
- 1/4 teaspoon dried oregano
- 1/4 teaspoon ground coriander
- 1 tablespoon kosher salt
Potatoes:
- 2 1/2 pounds Yukon gold potatoes
- salted water
- oil
Cauliflower:
- 1 head cauliflower
- salted water
- ice
- 2 tablespoons mayonnaise
- 1 teaspoon tamari or soy sauce
- 1 tablespoon chopped parsley
Roasted onions:
- 1 red onion
- salt
- oil
For serving:
- 3 ounces pitted Castelvetrano or green olives, cut into quarters
- 5 ounces wild arugula
- 1 lemon, quartered
- To make lemon chicken: Marinate chicken in mixture of minced garlic, granulated garlic, paprika, smoked paprika, fennel pollen, dried oregano, coriander and salt; let sit overnight.
- To make potatoes: Boil potatoes in heavily salted water until tender. Cool, peel and cut into 1 1/2-inch chunks. Toss with oil to coat; reserve.
- To make cauliflower: Cut cauliflower into florets and blanch in salted water 1 minute; shock in ice bath. Remove from ice and dry. Toss with mayonnaise, tamari and parsley; reserve.
- To make roasted onions: Preheat oven to 450 F. Peel onion and slice into 1-inch rings. Toss with salt and oil; roast until slightly caramelized with texture. Chill and reserve.
- Preheat oven to 450 F.
- Bake chicken on sheet pan approximately 15 minutes. Add potatoes and cauliflower. Bake approximately 15 minutes then switch oven to broil approximately 10 minutes.
- Squeeze lemon over reserved onion.
- When chicken is crispy and reaches internal temperature of 165 F, remove from oven and add onions and olives. Plate chicken, potatoes, onions, olives and cauliflower on top of arugula and garnish with lemon.
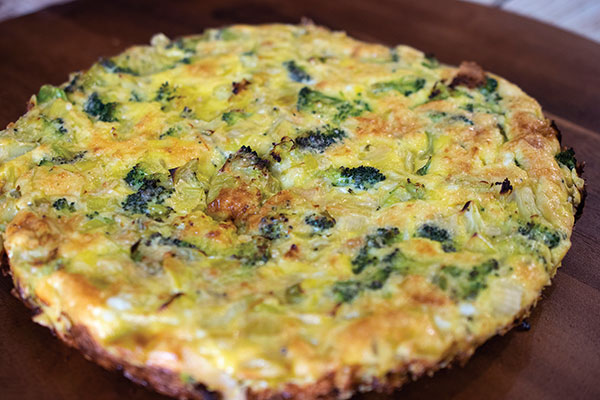
Cheesy Frittata with Veggies
Recipe courtesy of chef Nate Appleman on behalf of Abbott
Roasted Garlic:
- 2 heads garlic
- olive oil
- salt
Frittata:
- oil
- 2 medium leeks, sliced
- 8 ounces blanched, chopped broccoli
- salt, to taste
- 9 eggs
- 2 tablespoons chopped fresh parsley
- 2 ounces grated Parmigiano Reggiano
- 2 tablespoons heavy cream
- To make roasted garlic: Preheat oven to 400 F.
- Slice 1/4 inch off entire heads of garlic and place cut sides down in 1-liter casserole dish. Drizzle with olive oil and sprinkle with salt; cover with lid.
- Bake 35-45 minutes until heads of garlic are soft and light brown. Let cool then use back of knife to squeeze garlic from pods.
- To make frittata: Lower oven to 375 F.
- In saute pan, heat oil over medium-high heat. Cook leeks until soft; add broccoli then season with salt, to taste, and remove from heat.
- In mixing bowl, mix roasted garlic, sauteed leeks and broccoli, eggs, parsley, Parmigiano Reggiano and cream; place in 9-inch pie dish and bake approximately 20 minutes until top of frittata is brown. Remove from oven and let cool slightly before cutting and serving.
Source: Abbott
Create Healthy Habits in the New Year
(Family Features) The changing of the calendar to a new year is a perfect opportunity to look toward the future and create better health and wellness habits.
Setting yourself up with a strong foundation is key to long-term success. Consider these tips as you look to build healthy habits this year:
Set reasonable goals. It’s important to take an honest look at your lifestyle and assess any changes you can make to improve wellness. Whether your goal is to lose weight, eat healthier, exercise more frequently or something else entirely, start with an attainable target – like losing 1 pound a week – and know you can always challenge yourself further once you’ve sustained the change for an extended period of time.
 Eat well. A well-balanced diet includes fruits, vegetables, legumes, nuts and whole grains.You can create lower-calorie versions of some of your favorite dishes by substituting low-calorie fruits and vegetables in place of higher calorie ingredients. An option like watermelon is more than a raw fruit or snack; it can be an ingredient in a wide variety of recipes, including appetizers, mocktails (or cocktails), entrees, sauces or salsa. For example, these recipes for Watermelon Chia Seed Muffins and Watermelon and Pistachio Salad can help satisfy cravings any time of day. Consisting of 92% water, watermelon is cholesterol-free, fat-free and offers an excellent source of vitamin C (25% daily value) while also containing vitamin A (8%) and vitamin B6 (6%).
Get active. Proper nutrition is just one part of making healthy lifestyle choices. Adults should aim for at least 160 minutes of moderate physical activity each week, according to the Centers for Disease Control and Prevention. If you want to lose weight, increase aerobic activities like walking or running. If your goal is adding strength, start resistance training such as lifting weights.
Find more healthy recipes and tips to help keep you on track all year long at watermelon.org.
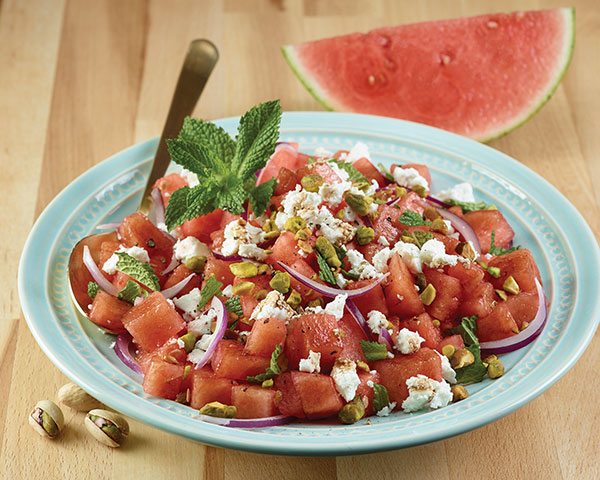
Watermelon and Pistachio Salad
Servings: 3
- 3 cups watermelon cubes
- 1/2 red onion, thinly sliced
- 1/3 cup balsamic vinegar
- 1/4 cup pistachios
- 4 ounces feta
- 1-2 tablespoons chopped fresh mint
- Place watermelon and onion in large bowl. Add balsamic vinegar and toss to combine.
- Add pistachios, feta and mint, reserving small amount of mint to sprinkle on top. Toss.
- Serve on large platter and sprinkle with remaining mint.
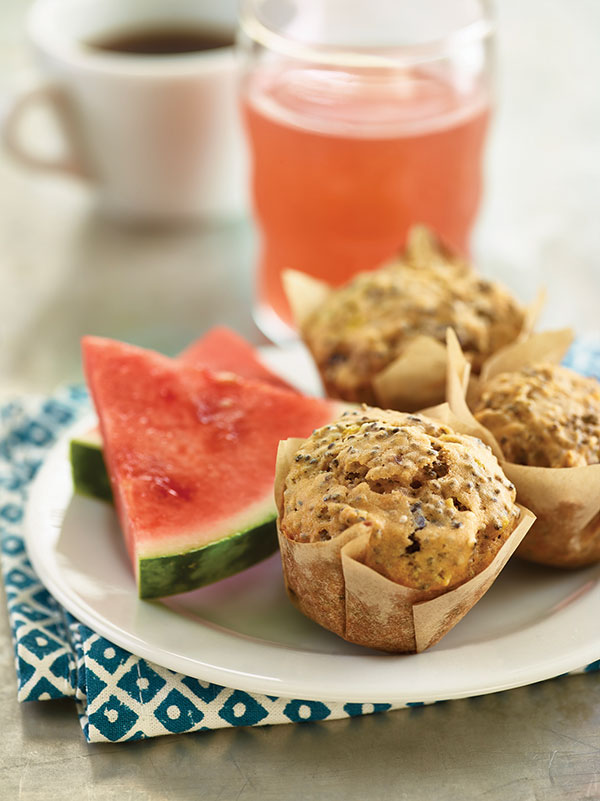
Watermelon Chia Seed Muffins
Yield: 12 muffins
- 1 can nonstick cooking spray
- 1/2 cup sugar
- 1/3 cup sucralose
- 1 1/2 tablespoons lemon zest
- 2 cups flour
- 3/4cup chia seeds
- 1 teaspoon baking soda
- 2 teaspoons baking powder
- 1/4 teaspoon salt
- 4 tablespoons canola oil
- 1/3 cup plain, nonfat Greek yogurt
- 3/4 cup liquefied watermelon juice
- 1/2 cup egg substitute
- 1 cup dried tart cherries
- 1 lemon, juice only
- 2 teaspoons vanilla extract
- 2 tablespoons sugar
- Heat oven to 375 F. Spray 12-piece muffin pan with nonstick cooking spray.
- In large bowl, combine sugar, sucralose and lemon zest. Use fingers to rub zest into sugar until fragrant. Add flour, chia seeds, baking soda, baking powder and salt; thoroughly mix. Set aside.
- In medium bowl, whisk oil, yogurt, watermelon juice and egg substitute until thoroughly blended. Add cherries, lemon juice and vanilla.
- Add liquid mixture to flour mixture. Gently toss until incorporated. Avoid overbeating or muffins will be flat and tough. Spoon evenly into muffin pan. Top each muffin with 1/2 teaspoon sugar.
- Bake 15-17 minutes, or until toothpick inserted in middle comes out clean. Remove from oven, allow to sit 5 minutes then transfer muffins to cooling rack.
Warm Up Winter with Comforting Classics
(Family Features) Whipping up family favorites all winter long is a perfect activity to keep loved ones warm in the kitchen while avoiding the bitter chill outdoors. Delicious, heartwarming snacks offer a simple and savory way to bring everyone in from the cold while enjoying comforting flavors together.
Lean on beloved ingredients like go-to RAGÚ sauces when it’s time to come together for quick bites. The possibilities are nearly endless with delicious recipes using classics like the RAGÚ Old World Style Traditional or RAGÚ Simply Traditional options.
Hearty flavors can take away the chill of winter in recipes like Snowman Pizza Bombs, Polenta Bites and Baked Tomato Goat Cheese Dip. Easy to make and fun to create together, these simple snacks are perfect for a cold afternoon spent together in the kitchen or watching a family-movie marathon.
Originally started by an Italian mother more than 80 years ago, RAGÚ sauce, known for its distinctive yellow cap, is the perfect have-on-hand pantry staple to help you create easy and delicious home cooking. As an invaluable resource and family favorite since 1937, RAGÚ sauces easily allow anyone, regardless of gender or culinary skillset, to “cook like a mother” and serve up delicious, homemade favorites. The brand’s rich heritage and array of sauce choices ensures that your next cold-weather day spent inside will be elevated with family-favorite snacks and easy and taste-tempting meals made with RAGÚ.
Find more recipes perfect for warming up this winter at Ragu.com.
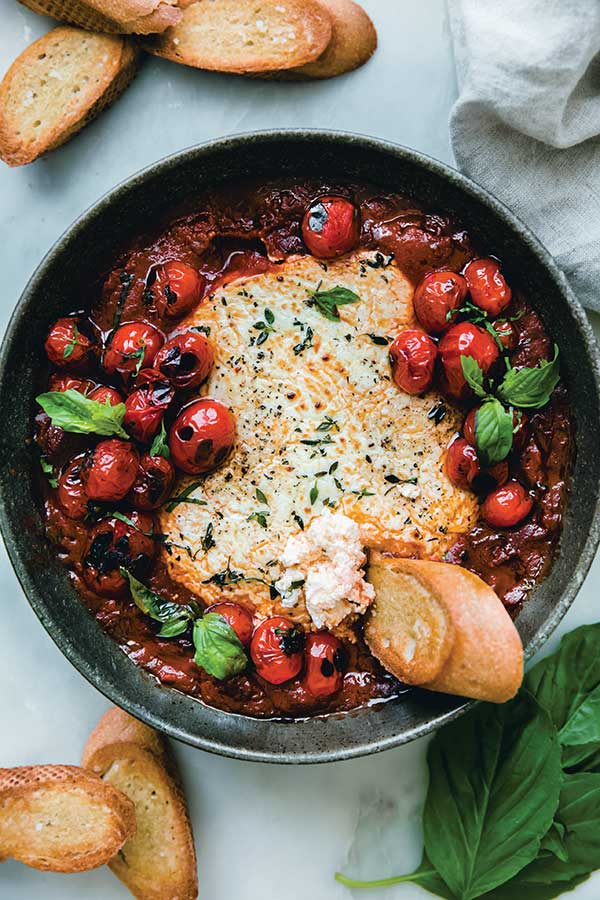
Baked Tomato Goat Cheese Dip
Recipe courtesy of Marzia Aziz of "Little Spice Jar"
Prep time: 10 minutes
Cook time: 20 minutes
Servings: 4-6
- Nonstick cooking spray
- 2 cups RAGÚ Simply Traditional Sauce
- 3 cloves garlic, divided
- 1/ 4 cup fresh basil, chopped, divided
- 1/8-1/4 teaspoon red pepper flakes
- 1 log (10-10 1/2 ounces) goat cheese, softened at room temperature
- 2 teaspoons olive oil, plus additional for brushing, divided
- 1/4 teaspoon fresh thyme
- kosher salt, divided
- pepper
- 1 large baguette, sliced on bias
- blistered tomatoes, for serving (optional)
- Position one rack in upper third of oven and one in lower third. Preheat oven to 375 F. Spray small, round baking dish with nonstick cooking spray; set aside.
- Add sauce to small bowl. Grate in two garlic cloves then add 1/8 cup basil and red pepper flakes. Stir to combine then pour sauce into baking dish.
- Smash goat cheese log into ball. Place ball between two sheets plastic wrap. Using hands, flatten cheese into thick, round disc about 1 inch smaller in diameter than baking dish. Remove goat cheese from plastic wrap and place in center of sauce. Drizzle cheese with 2 teaspoons olive oil. Sprinkle with fresh thyme, kosher salt and pepper. Bake on lower rack, uncovered, 20-25 minutes, or until sauce is bubbly and cheese is warmed through.
- Place baguette slices on baking sheet. Drizzle or brush with olive oil and sprinkle with kosher salt. Bake crostini on upper rack 10-12 minutes, flipping halfway through. When bread is done, remove from oven, cut last garlic clove in half and rub cut side on bread.
- Top dip with remaining basil and blistered tomatoes, if desired, and serve with crostini.
Note: To make blistered tomatoes: Heat skillet over medium-high heat until almost smoking. Add 1 pint cherry tomatoes to dry skillet and let sit 1 minute. Lower heat to low, toss tomatoes with 2 teaspoons olive oil and cook 2-3 minutes, or until tomatoes are about to burst. Remove from heat; sprinkle with pinch of salt and pepper.
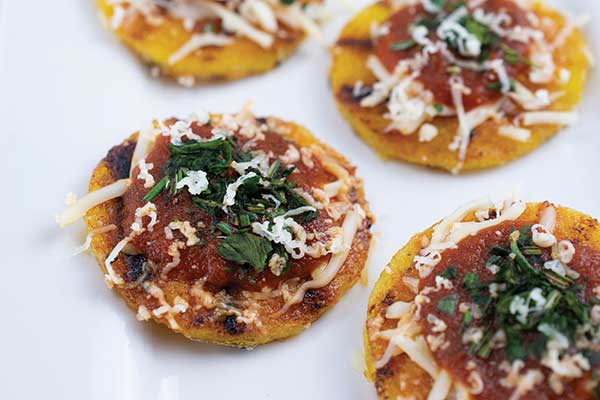
Polenta Bites
- 1 tube (18 ounces) polenta
- 1 1/2 teaspoons olive oil
- 1 jar (24 ounces) RAGÚ Chunky Tomato, Garlic and Onion Sauce
- 1 package (8 ounces) shredded mozzarella
- 2 sprigs, rosemary, destemmed and chopped
- 3 basil leaves, chopped
- 1 block (8 ounces) hard Parmesan cheese
- Cut polenta into slices. In skillet, heat olive oil over medium-high heat; fry polenta slices 10-12 minutes on each side until crispy and golden brown.
- In saucepan over medium heat, warm sauce.
- Place polenta slices on tray and sprinkle with mozzarella. Place 1/2 teaspoon warm sauce on each slice then sprinkle with chopped rosemary and basil. Grate hard Parmesan onto each slice for topping.
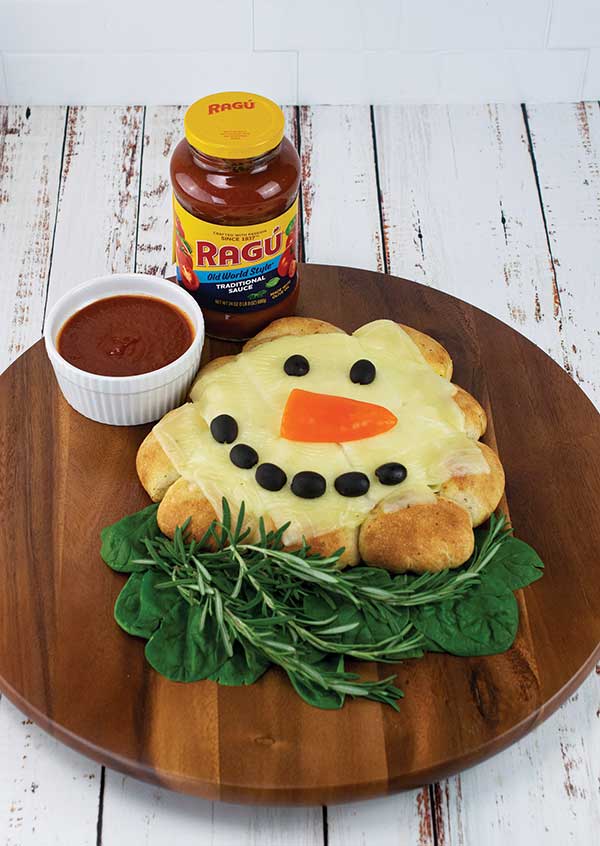
Snowman Pizza Bombs
- 1 tube (11.8 ounces) pizza dough
- 1 jar (24 ounces) RAGÚ Old World Style Traditional Sauce
- 1 package (6 ounces) pepperoni slices
- 1 package (6 ounces) Canadian bacon slices
- 1 package (8 ounces) shredded cheddar cheese
- 4 tablespoons melted butter
- 1 teaspoon garlic powder
- 1 1/2 teaspoons Italian seasoning
- 1 package (8 ounces) mozzarella cheese slices
Decorative vegetables (optional):
- multicolored sweet peppers
- olives
- spinach
- mushrooms
- cherry tomatoes
- Preheat oven to 400 F.
- Cut pizza dough into 12 squares. On each square, place 1/2 teaspoon sauce and evenly top with pepperoni, Canadian bacon and cheddar cheese.
- Pinch corners of dough together to round into balls then place in muffin tins.
- In small bowl, mix melted butter, garlic powder and Italian seasoning; brush generously over dough balls.
- Bake 15-20 minutes until golden brown.
- Remove from muffin tin and carefully shape dough balls into circles; place on baking sheet. Cover with mozzarella slices and bake until melted.
- Create snowman faces by decorating each with peppers, olives, spinach, mushrooms and cherry tomatoes, if desired. Use remaining sauce for dipping.
Source: RAGÚ


