
A Festive Menu Fit for Family and Friends
(Family Features) Hearty snacks, seasonal sides, flavorful main dishes and tantalizing desserts all complement one another perfectly for holiday celebrations among loved ones. This year, when planning your menu, be sure to consider recipes that keep family and friends content from the moment they hang up their coats to the goodbye hugs.
These delicious options for a satisfying bread bowl, pumpkin spice potatoes, artfully glazed lamb chops and fresh apple pie can bring your guests running to the kitchen (and keep them there) as you celebrate all the season has to offer.
Find more recipes fit for holiday festivities at Culinary.net
Beckon Holiday Guests with a Bread Bowl
While your loved ones wait patiently for the main course to be served, hearty appetizers like bread bowls can keep appetites at bay. This Spinach-Ham Dip is the perfect combination of comforting and satisfying when served with bread cubes, crackers or tortilla chips for a warming snack ahead of the big meal.
To find more seasonal appetizer inspiration, visit Culinary.net.
Spinach-Ham Dip
- 2 cups ricotta cheese
- 1 cup sour cream
- 1 package (10 ounces) frozen spinach, thawed and squeezed dry
- 1/4 pound ham, cubed
- 3/4 cup shredded Parmesan cheese
- 2 green onions, thinly sliced
- 1 round bread loaf (16 ounces), unsliced
- Heat oven to 350 F.
- In medium bowl, blend ricotta cheese and sour cream until smooth. Add spinach, ham, Parmesan cheese and green onions; mix until blended.
- Cut 1-2-inch diameter circle out of top of bread loaf. Reserve top. Remove bread inside loaf, leaving about 1 inch along sides. Pour cheese mixture into bread bowl. Replace top. Cover bread loaf in aluminum foil and bake 60 minutes, or until warmed through.
- Take bread removed from inside bread bowl and cut into dipping sized chunks.
- Remove bread from aluminum foil and place on platter. Scatter bread chunks around bread bowl to use for dunking in cheese sauce.
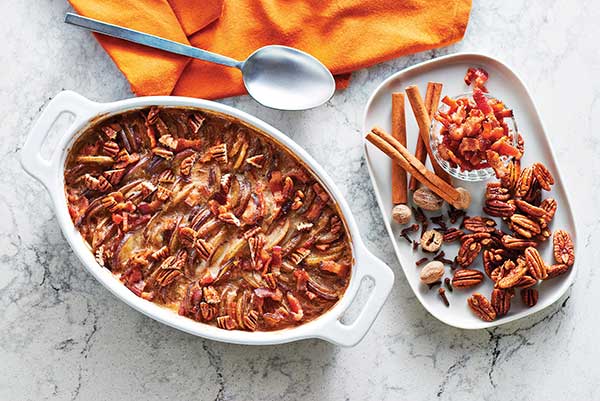
A Seasonal Side with a Tasty Twist
No matter what life may look like this holiday season, you can put a smile on loved ones’ faces with classic meals and sides that memories are made of.
You can use a traditional holiday ingredient, potatoes, to make easy yet delicious recipes like these Pumpkin Spice Scalloped Potatoes. Perfect for serving with your favorite main course, they’re a tasty twist on a classic sweet potato casserole.
Plus, they’re made with Little potatoes that come ready to use with no washing or peeling required, perfect for busy families during bustling holiday gatherings. Try them roasted, boiled, smashed or mashed in your favorite seasonal dishes. For a time-saving hack, use the slicer attachment in a food processor to evenly slice potatoes in minutes.
Visit littlepotatoes.com for more holiday recipe inspiration.
Pumpkin Spice Scalloped Little Potatoes
Prep time: 20 minutes
Cook time: 1 hour
Servings: 4
- 3 tablespoons butter
- 3 tablespoons flour
- 2 1/2 cups milk
- 1 1/2 pounds Terrific Trio Little Potatoes, 1/8-inch sliced, kept in water until ready to use
- 5 slices thick-cut bacon, sliced, cooked until crisp and drained
- 1 teaspoon cinnamon
- 1/2 teaspoon ground nutmeg
- 1/2 teaspoon ground ginger
- 1/4 teaspoon ground cloves
- salt, to taste
- pepper, to taste
- 1 1/2 tablespoons brown sugar
- 1 1/2 tablespoons water
- 1 cup pecans, rough chopped
- Preheat oven to 375 F.
- In pot over medium heat, melt butter. Add flour and cook 4 minutes, stirring occasionally. Reduce heat to low then slowly add milk gradually, ensuring it is incorporated before adding more. Turn heat to medium-high and cook until thickened, stirring continuously. Remove from heat and set aside.
- In bowl, add drained potatoes, sauce, bacon, cinnamon, nutmeg, ginger and cloves. Season with salt and pepper, to taste; mix well.
- In greased 8-by-11-inch baking dish, line potatoes on sides in desired pattern. Stuff extra bacon between potatoes from remains left in bowl. Pour extra sauce over potatoes.
- Bake 60 minutes.
- In small pot over medium-high heat, add brown sugar and water. Cook to melt sugar and allow to bubble, about 5 minutes. Add pecans; stir 2 minutes. Lay on parchment-lined baking sheet and allow to cool. Once cool, chop into pieces.
- Remove potatoes from oven and sprinkle pecans over top.
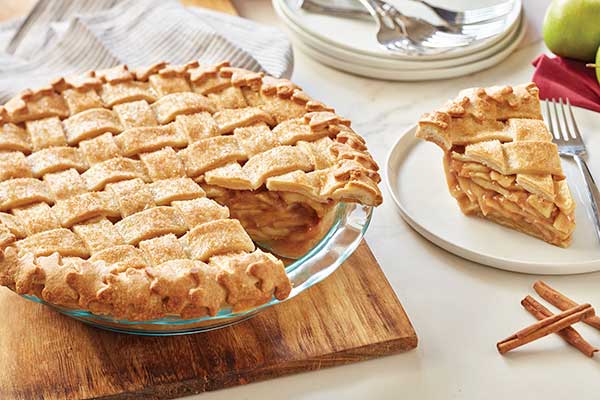
Serve Up a Seasonal Treat
No seasonal gathering is complete without dessert, and quality baking during the holidays results in fresh favorites like Apple Pie.
Allspice, nutmeg and cinnamon add spice to this festive favorite while brown sugar adds a hint of caramel sweetness with a nutty, moist, subtle molasses flavor that’s ideal for use in desserts of all kinds. The trusted performance of an option like Domino sugar helps make this a recipe you can turn to when it’s time to savor the season.
Find more holiday dessert ideas to bring your family and friends together at dominosugar.com .
Apple Pie
Prep time: 30 minutes
Cook time: 40 minutes
Servings: 8
- 1 prepared 9-inch double-crust pie pastry, divided
- 3/4 cup Domino Light Brown Sugar
- 1 tablespoon all-purpose flour
- 2 tablespoons butter
- 2 teaspoons cinnamon
- 1/4 teaspoon ground nutmeg
- 1/8 teaspoon salt
- 1 tablespoon lemon juice
- 1 teaspoon finely grated lemon zest
- 2 pounds apples, cored, quartered and sliced
- 1/4 teaspoon allspice
- Preheat oven to 375 F. Line 9-inch pie pan with half pastry then prick bottom and sides with fork.
- In large saucepot, combine brown sugar, flour, butter, cinnamon, nutmeg, salt, lemon juice and lemon zest. Add apples and toss to coat evenly. Slowly heat over medium-low heat, stirring occasionally, until sugar dissolves and apples begin to soften and cook down to about 6 cups.
- Turn apple mixture into lined pie plate. Top with remaining pastry. Trim and flute edges with fork. Slit top crust to allow steam to escape.
- Bake 35-40 minutes, or until crust is golden.
- Serve warm or at room temperature. Cover and refrigerate leftovers.
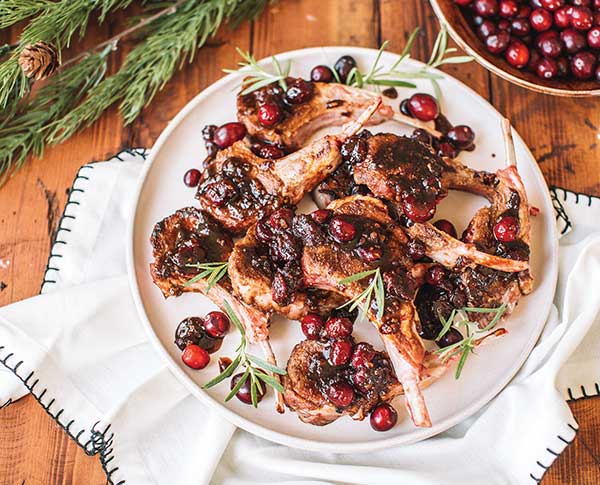
Add Color and Flavor to the Holiday Table
When a holiday celebration calls for a truly memorable meal, it’s a perfect opportunity to serve a dish that just might become a family favorite. Combining a seasonal staple like cranberries with naturally flavorful lamb could be your ticket to a newfound tradition.
These festive Cranberry Maple Glazed Grass-Fed Lamb Chops can brighten up your holiday table with an irresistible pop of red and deliciously pure New Zealand grass-fed lamb. New Zealand is home to some of the world’s most naturally raised beef and lamb, where the animals are allowed to roam and graze freely over lush green hills and pastures, resulting in a beautifully tender meat that tastes just as nature intended.
Visit beefandlambnz.com to learn more and find where to buy grass-fed meat for your holiday meals.
Cranberry Maple Glazed Grass-Fed Lamb Chops
Prep time: 5 minutes
Cook time: 15 minutes
Servings: 4
Glaze:
- 1 cup fresh or thawed cranberries
- 1/3 cup maple syrup
- 1/4 cup fresh orange juice
- 2 teaspoons orange zest
- 2 garlic cloves, minced
- 2 teaspoons Dijon mustard
- 1/2 teaspoon salt
- cracked black pepper
Lamb Chops:
- 8-10 New Zealand grass-fed lamb rib chops
- 1 teaspoon brown sugar
- 1 teaspoon chili powder
- 1 teaspoon smoked paprika
- 1 teaspoon salt
- 1 teaspoon garlic powder
- olive oil
- To make glaze: In small bowl, whisk cranberries, maple syrup, orange juice, orange zest, garlic, Dijon mustard, salt and pepper. Set aside.
- To make lamb chops: Pat lamb chops dry with paper towel.
- In small bowl, whisk brown sugar, chili powder, smoked paprika, salt and garlic powder.
- Sprinkle dry rub on lamb chops and press mixture into meat.
- In large skillet, heat thin layer olive oil over medium heat until drop of water sizzles in pan. Sear rib chops 2 minutes on each side, or until internal temperature reaches 140 F. Remove chops from pan and set aside.
- Add glaze to pan and cook 3-5 minutes, whisking constantly until reduced by half.
- Drizzle glaze over chops before serving.
Source: The Little Potato Company
Domino Golden Sugar
Beef + Lamb New Zealand

Pro Tips for Perfecting Pasta
(Family Features) Next time hunger calls in your home, turn to a filling family favorite: pasta. With a nearly endless variety of pasta types, sauce pairings and recipe ideas, the options are aplenty, and cooking is often a breeze.
Consider these pasta cooking tips from Rouxbe, an online culinary school training people of all abilities to become better, more confident cooks.
- Use a large, straight-sided pot with 6 quarts of water for every 1 pound of pasta. Bring to a boil, add 1 teaspoon of salt for each quart of water and stir to dissolve.
- Wait for rapidly boiling water before adding pre-made pasta then cook according to package instructions for al dente, which means the pasta offers a slight resistance. For stuffed or fresh pasta, aim for a gentle boil and cook 1-5 minutes. Reserve 1 cup of pasta water for use in sauces then drain (never rinse) your pasta.
- Add pasta to your sauce; never the other way around. Pair thin pastas like angel hair with lighter sauces, seafoods, basil and light oils. Fettucine, penne and rigatoni complement spicy sausage, heavy creams and chunky ragu. When in doubt, spaghetti offers a versatile option.
Pasta is a natural fit for fresh veggies, and you can put your skills to the test with Pappardelle with Garden Vegetables or create Homemade Potato Gnocchi to freeze and enjoy later.
For more information, visit rouxbe.com.
Pappardelle with Garden Vegetables
Total time: 1 hour
Servings: 3-4
- Salted water
- 3 tablespoons olive oil
- 3 tablespoons shallots or white onion, minced
- 2 cloves garlic, minced
- 1/4 teaspoon chili flakes
- 1 cup white wine
- 2 cups pappardelle noodles
- 3/4 cup vegetable stock
- 3 tablespoons capers (optional)
- 2 vine-ripened tomatoes, sliced in wedges
- 1 handful baby kale
- 1 fresh lemon, juice only
- 2 tablespoons butter (optional)
- sea salt, to taste
- freshly ground black pepper, to taste
- 1 handful fresh basil, torn
- Bring large pot of salted water to boil.
- In fry pan on medium-high heat, add olive oil and onions; saute 2 minutes. Lower heat slightly and add garlic and chile flakes. Saute on medium heat 2-3 minutes. Add white wine and deglaze pan. Cook 3 minutes. Remove from heat and keep warm until ready to add freshly cooked pasta.
- In pot of boiling water, add pappardelle. Cook according to package instructions then drain.
- Place fry pan back on medium heat. Add drained pasta; vegetable stock; capers, if desired; tomatoes; baby kale; and lemon juice. Add butter, if desired, and toss well. Cook 2-3 minutes, tossing occasionally, and season with salt and pepper, to taste, and fresh basil.
- Toss again, remove from heat and serve.
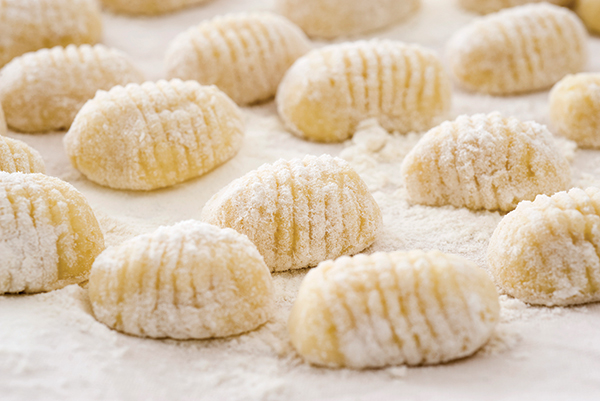
Homemade Potato Gnocchi
Total time: 2 hours
Servings: 2-4
- 2 medium Yukon Gold or russet potatoes
- 3/4 teaspoon sea salt, divided
- 2 teaspoons water
- 1 cup all-purpose flour, divided, plus additional, for surface
- 1/4 teaspoon freshly grated nutmeg
- 1/8 teaspoon white pepper
- 2 large egg yolks
- Preheat oven to 400 F. Place potatoes on sheet of foil, add 1/2 teaspoon salt and water; wrap. Bake 40 minutes, or until cooked through.
- Peel potatoes while hot. Cut and rice potatoes. Let potatoes cool completely.
- To make dough, sprinkle potatoes with flour. Aerate with bench scraper then add remaining salt, nutmeg and white pepper.
- Break up egg yolks and pour over potatoes. Cover surface with flour. Continue cutting and gently lifting dough.
- Test dough by squeezing gently; it shouldn’t stick. Add flour, if needed.
- Shape dough into rectangle and fold several times, using fingertips to bring together. Flatten dough out until it reaches finger thickness. Sprinkle with flour and let rest 5-10 minutes.
- Cut finger-width strips of dough and sprinkle strips with flour. Roll out each strip and cut ropes into 3/4-inch pieces. Separate slightly and flour well.
- Fresh gnocchi can sit at room temperature 30 minutes before cooking.
- To freeze: Place gnocchi on tray, making sure they aren’t touching. Once frozen, transfer to plastic freezer bag and freeze up to 2 months. Cook gnocchi from frozen and serve with desired sauce.
Photos courtesy of Getty Images
Source: Rouxbe

Protect Your Health with a Heart-Smart Eating Plan
(Family Features) As people have spent more time at home, many have rediscovered the simple joy of home-cooking and stumbled upon a secret weapon for health at the same time. By making smart, intentional decisions from breakfast to dinner and every meal (and drink) in-between, they are supporting strong bodies.
A heart-smart eating plan is especially important for more than 30 million people in the U.S. living with type 2 diabetes who are at double the risk for heart disease and stroke compared to those without diabetes, according to the American Heart Association and American Diabetes Association’s Know Diabetes by Heart initiative. When managing diabetes and heart health, building a consistent eating plan with the right balance can be a powerful tool.
Healthy eating provides benefits for the whole family whether members are managing existing health conditions or not. This recipe for Baked Parmesan Chicken is packed with 30 grams of protein in each serving yet delivers only 280 calories. For a tasty way to increase vegetable intake, try pairing the no-sugar chicken dish with Green Beans with Mushrooms and Onions.
A key to feeling your best begins with the first meal of the day. Start the morning on a nutritious note with this Ham and Broccoli Frittata – a low-sugar, low-fat, low-calorie alternative to traditional fat- and sugar-laden breakfast foods. With this recipe, you’re setting yourself up for a healthy day and getting the energy you need to live it to the fullest.
Find more recipes and learn more about managing the connection between diabetes and heart health at KnowDiabetesbyHeart.org/Recipes.
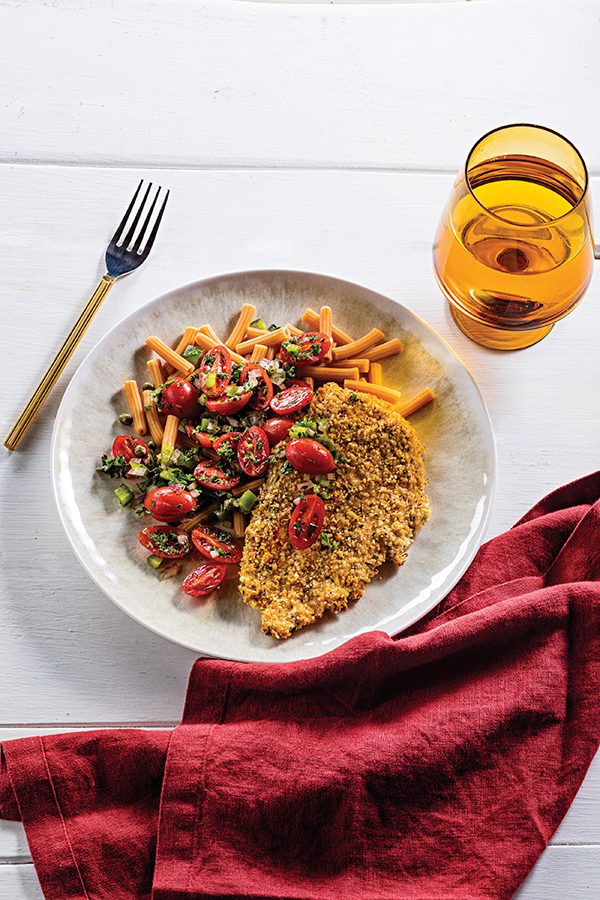
Baked Parmesan Chicken
Recipe courtesy of Know Diabetes by Heart
Prep time: 15 minutes
Cook time: 18 minutes
Servings: 4 (3 ounces chicken per serving)
- Cooking spray
- 1 large egg
- 1 tablespoon water
- 2 teaspoons olive oil
- 1/3 cup finely crushed, low-sodium, whole-grain crispbread
- 1/3 cup shredded or grated Parmesan cheese
- 2 tablespoons minced fresh parsley
- 1/2 teaspoon ground oregano
- 1/4 teaspoon pepper
- 4 boneless, skinless chicken breasts (about 4 ounces each), all visible fat discarded, flattened to 1/4-inch thickness
- Preheat the oven to 400 F. Lightly spray a 13-by-9-by-2-inch baking dish with cooking spray.
- In a shallow dish, whisk the egg, water and oil. In a separate shallow dish or pie pan, stir together the crispbread, Parmesan cheese, parsley, oregano and pepper. Dip the chicken in the egg mixture then in crumb mixture, turning to coat at each step and gently shaking off any excess. Using fingertips, gently press the coating mixture so it adheres to the chicken. Arrange the chicken in a single layer in the baking dish. Lightly spray the chicken with cooking spray.
- Bake for 15-18 minutes, or until chicken is no longer pink in the center and the top coating is golden brown.
Nutritional information per serving: 280 calories; 80 calories from fat; 9 g total fat; 2.5 g saturated fat; 0 g trans fat; 1 g polyunsaturated fat; 4 g monounsaturated fat; 125 mg cholesterol; 340 mg sodium; 530 mg potassium; 18 g total carbohydrate; 4 g dietary fiber; 0 g sugar; 0 g added sugar; 30 g protein; 370 mg phosphorus. Choices/Exchanges: 1 starch, 4 lean protein.
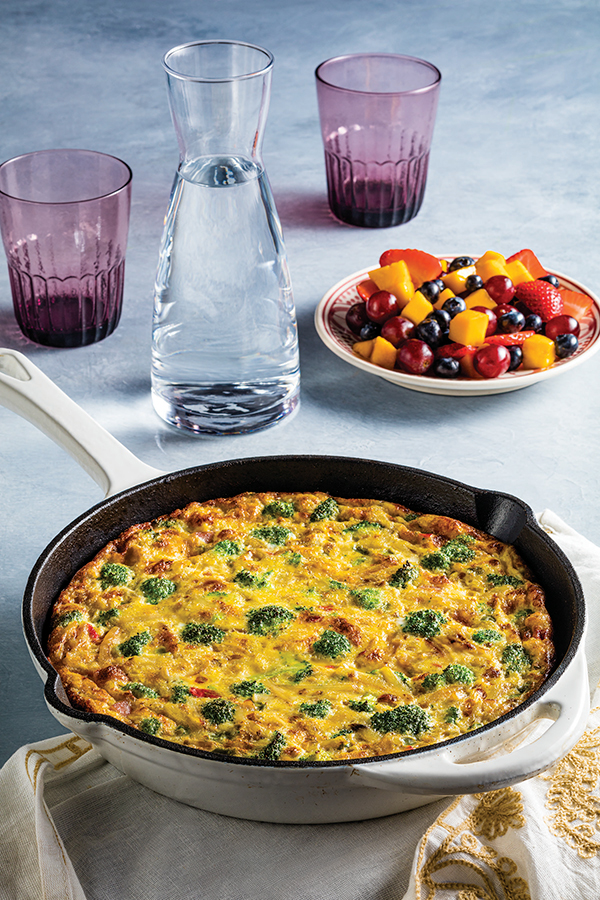
Ham and Broccoli Frittata
Recipe courtesy of Know Diabetes by Heart
Prep time: 10 minutes
Cook time: 25 minutes
Servings: 4 (1/4 frittata per serving)
- Cooking spray
- 2 cups frozen fat-free potatoes O’Brien, thawed
- 6 ounces small broccoli florets, rinsed in cold water, drained but not dried
- 8 large egg whites
- 1 large egg
- 4 ounces lower-sodium, low-fat ham (uncured, nitrate/nitrite-free), cut into 1/4-inch cubes
- 1/4 cup fat-free milk
- 1/4 teaspoon pepper
- Preheat the oven to 400 F.
- Lightly spray a medium ovenproof skillet with cooking spray. Heat over medium heat. Remove from the heat. Put the potatoes in the skillet. Lightly spray with cooking spray. Cook for 4-5 minutes, or until potatoes are golden brown, stirring occasionally.
- In a microwaveable bowl, microwave the broccoli, covered, on high for 3-4 minutes, or until tender-crisp. Drain in a colander. Stir the broccoli into the potatoes.
- In a medium bowl, whisk the egg whites and egg. Whisk in the ham, milk and pepper. Pour the mixture over the potatoes and broccoli; stir well.
- Bake for 15-18 minutes, or until the eggs are set.
Nutritional information per serving: 180 calories; 30 calories from fat; 3 g total fat; 1 g saturated fat; 0 g trans fat; 0.5 g polyunsaturated fat; 1.5 g monounsaturated fat; 60 mg cholesterol; 460 mg sodium; 570 mg potassium; 17 g total carbohydrate; 2 g dietary fiber; 4 g sugar; 1 g added sugar; 18 g protein; 210 mg phosphorus. Choices/Exchanges: 1 carbohydrate, 2 lean protein.
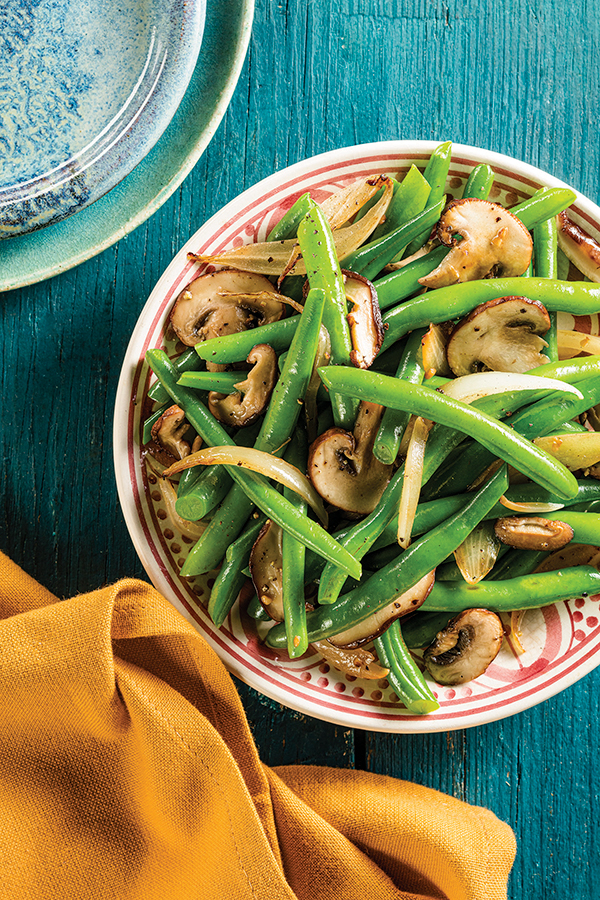
Green Beans with Mushrooms and Onions
Recipe courtesy of Know Diabetes by Heart
Prep time: 10 minutes
Cook time: 10 minutes
Servings: 4 (1/2 cup per serving)
- Water
- 8 ounces green beans, trimmed
- 2 teaspoons olive oil
- 4 ounces sliced mushrooms, stems discarded
- 1/2 cup thinly sliced onion
- 1 medium garlic clove, minced
- 1/8 teaspoon salt
- 2 teaspoons fresh lemon juice
- 1 pinch pepper
- Fill a medium saucepan 3/4 full of water. Bring to a boil, covered, over high heat. Cook the green beans, uncovered, 5 minutes, or until tender-crisp. Drain well in a colander.
- In a medium nonstick skillet, heat the oil over medium-high heat, swirling to coat the bottom. Cook the mushrooms, onion, garlic and salt 5 minutes, or until the mushrooms are soft and lightly browned, stirring frequently. Stir in the lemon juice, pepper and cooked green beans.
Nutritional information per serving: 60 calories; 25 calories from fat; 2.5 g total fat; 0.5 g saturated fat; 0 g trans fat; 0.5 g polyunsaturated fat; 1.5 g monounsaturated fat; 0 mg cholesterol; 60 mg sodium; 300 mg potassium; 9 g total carbohydrate; 2 g dietary fiber; 4 g sugar; 0 g added sugar; 2 g protein; 70 mg phosphorus. Choices/Exchanges: 2 vegetable, 1/2 fat.
Source: American Heart Association and American Diabetes Association

Roasted Onion and Garlic Mashed Potatoes
(Family Features) No holiday celebration can be considered complete without taste bud-tingling sides to pair with your favorite seasonal dishes. Whether you’re able to celebrate with loved ones or joining virtually from afar, dining together with traditional holiday foods is oftentimes a major part of the festivities.
For a salivation-worthy side dish, turn to a seasonal classic like mashed potatoes but with a slight twist. Onions, at just 45 calories per serving, add a flavorful boost to Roasted Onion and Garlic Mashed Potatoes, and they serve as a source of dietary fiber, vitamin C, vitamin B6, potassium and other key nutrients such as folate, calcium and iron.
Also known as nature’s ninja due to their many “skills,” onions can add abundant flavor to many dishes. This simple recipe calls for less than 10 ingredients and is an easy way to serve up an iconic holiday side. Because it makes 12 servings, you can feed a small gathering and still enjoy leftovers for a next-day snack.
To find more holiday recipe ideas, visit onions-usa.org.
Watch video to see how to make this recipe!
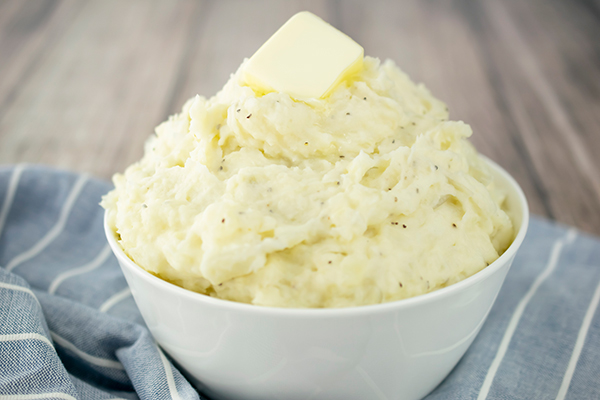
Roasted Onion and Garlic Mashed Potatoes
Servings: 12
Onion:
- 2 cups white onion, diced
- 1/4 cup coarsely chopped garlic
- 1 tablespoon olive oil
Potatoes:
- 8 cups potatoes, peeled and cut in half
- 8 cups water
- 6 tablespoons butter
- 1/2 cup sour cream
- 2 teaspoons salt
- 1/2 teaspoon ground black pepper
- Heat oven to 350 F.
- Combine onions, garlic and olive oil. Place in ovenproof baking dish; cover tightly with foil and bake 45 minutes until tender. Remove from oven and set aside.
- In large saucepan, cover potatoes with water and bring to boil over high heat. Reduce to medium heat and cook 20-30 minutes until tender. Drain well. Do not let cool.
- In bowl, mash or whip potatoes, roasted onions, butter, sour cream, salt and pepper until fluffy and combined.
Source: National Onion Association

A Memorable Holiday Menu
(Family Features) Holiday gatherings, even in a time when smaller groups are encouraged, take on special meaning for many families. Part of the joy comes from the food that’s shared among loved ones from appetizers and sides to the main course.
This year, you can enjoy those meaningful moments with your closest family members and friends by putting together a menu that keeps smiles on faces from the first bite to the last. Start with your favorite among the nearly endless appetizer options that symbolize the season then enjoy a tender tri-tip alongside bacon-wrapped asparagus and a twist on classic, roasted potatoes.
Visit Culinary.net to find more holiday menu ideas.
Start Your Seasonal Celebration with Small Bites
While main courses, sides and desserts may be what holiday memories are made of, you can calm family members’ and guests’ appetites with an array of appetizers like these:
Meatballs
Stuffed mushrooms
Stuffed peppers
Sliced cheese
Sliced meats
Crackers
Spinach dip
Cheesy bread
Sliders
Little smokies
Fresh fruit and vegetables
A Simply Tasty Side
Many recipes commonly associated with the holidays are accompanied by lengthy ingredient lists or hours spent in the kitchen. However, all that time and effort doesn’t have to be used on this year’s side dish when you opt for a simple yet mouthwatering option.
You can feel good about what you’re feeding your family this holiday season while saving prep time by serving this Bacon-Wrapped Asparagus made with Coleman Natural bacon, which contains no artificial ingredients or preservatives and is sourced from American family farms that humanely raise their animals with no antibiotics or added hormones. Whether it’s served as a side dish or an appetizer, it calls for just a handful of everyday ingredients for a dish you can be proud of.
Visit ColemanNatural.com/Recipes for more seasonal recipe inspiration.
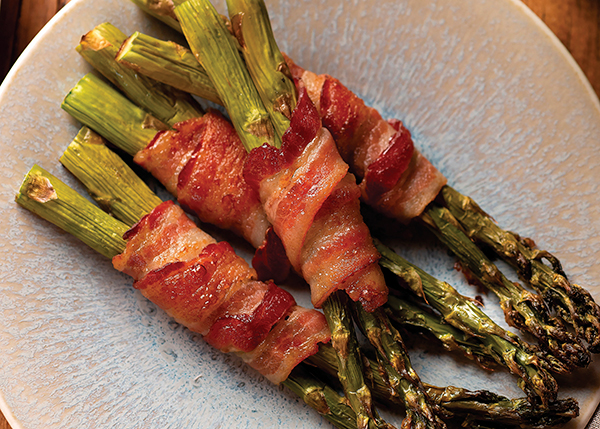
Bacon-Wrapped Asparagus
Servings: 10
- 20 asparagus stalks
- 10 slices Coleman Natural Hickory Smoked Bacon
- 2 tablespoons olive oil
- 1 teaspoon salt
- 1/2 teaspoon pepper
- Preheat oven to 400 F. Line rimmed baking sheet with parchment paper.
- Wrap 2 asparagus stalks with 1 slice bacon. Repeat with remaining asparagus and bacon. Place bundles on baking sheet. Drizzle asparagus ends with olive oil and sprinkle with salt and pepper.
- Bake until asparagus is cooked through and bacon is crisp, about 20 minutes.
A Tender Holiday Tri-Tip
Centering your holiday meal around a flavorful cut of meat can make the celebration truly memorable, especially when it’s cooked to perfection over the hot flame of a grill.
This year, take your family’s main course to the next level with a Garlic Herb Tri-Tip lightly seasoned with garlic, thyme, rosemary, salt and pepper to let the naturally flavorful New Zealand grass-fed beef speak for itself. Because the animals roam and graze freely over lush green hills and pastures year-round, New Zealand grass-fed beef is leaner, more finely textured and tastes just as nature intended.
Find more recipes and holiday meal ideas at beefandlambnz.com.

Garlic Herb Tri-Tip
Prep time: 10 minutes
Cook time: 30 minutes
Servings: 6
- 1 New Zealand grass-fed beef tri-tip (2 1/2-3 pounds)
- 1/4 cup olive oil
- 2 tablespoons minced garlic
- 3 tablespoons fresh chopped thyme
- 3 tablespoons fresh chopped rosemary
- 1 teaspoon salt
- 1 1/2 teaspoons black pepper
- Preheat grill to high heat.
- Rub tri-tip with olive oil. Add minced garlic and use hands to evenly distribute.
- Combine chopped thyme, rosemary, salt and pepper; cover oiled tri-tip on both sides with spice blend.
- Place tri-tip on hottest part of grill and sear 2-3 minutes.
- Flip tri-tip and transfer to indirect heat. Continue grilling until internal temperature reaches 135 F for medium-rare.
- Transfer meat to platter, cover with foil and let rest 10 minutes.
- Slice across the grain and serve.
An Easy but Impressive Side
Every holiday meal comes with plenty of traditional and family-favorite dishes, and one of the most common on tables is potatoes. Whether they’re roasted, mashed or anything in-between, they’re among the most versatile options for the holidays.
This year, you can save time on seasonal favorites with Creamer potatoes from The Little Potato Company. They are ready to use, with no washing or peeling required, and they’re small and consistent in size so they cook quickly.
Try them roasted, boiled, smashed or mashed whether you’re making a quick weeknight dinner or getting a festive meal on the table. This holiday season, try these Little Hasselback Potatoes for a twist on the classic roasted variety. For an easy cooking hack, slice the potatoes on a wooden spoon to prevent cutting all the way through.
Visit littlepotatoes.com for more holiday recipe inspiration.

Little Hasselback Potatoes
Prep time: 10 minutes
Cook time: 20 minutes
Servings: 8-12
- 1 bag (3 pounds) The Little Potato Company Holiday Blend
- 10 sprigs thyme, removed from stem
- 6 sprigs parsley, chopped
- 4 cloves garlic, minced
- 6 tablespoons extra-virgin olive oil
- 1 teaspoon kosher salt
- 1/2 teaspoon pepper
- sour cream (optional)
- cooked bacon pieces (optional)
- green onion slices (optional)
- Preheat oven to 400 F.
- Lay wooden spoon flat on solid surface and place one potato in spoon. Using paring knife, slice 1/8-inch thick slices along length of each potato one at a time.
- In bowl, toss potatoes, thyme, parsley, garlic, olive oil, salt and pepper. Place potatoes on parchment-lined baking sheet, cut sides down. Bake 10 minutes, flip and bake 10 minutes, or until soft.
- Serve with sour cream, bacon and green onion, if desired.
Photo courtesy of Getty Images (Holiday small bites)
Source: Coleman Natural Foods
Beef + Lamb New Zealand
The Little Potato Company

Great Game Day Grub
(Family Features) While you may not be able to enjoy game day with thousands of your closest friends at the stadium this year, that doesn’t mean you can’t still enjoy tailgate-worthy grub at home with a smaller group of friends and loved ones.
Step up your home-gate with an appetizing pre-game lineup featuring customized hot dogs and bratwursts as the main course with other plate-filling appetizers on the side to keep the noshing going right up to game time like bacon-wrapped potatoes, sweet cinnamon churros and a savory take on guacamole.
Find more game day recipes worth cheering about at Culinary.net.
Build-Your-Own Brat Bar

A simple and tasty main course, hot dogs and bratwursts are mainstays on game day and can be easily topped and customized to match each guests’ taste buds, regardless of age. Consider setting out a variety of garnishes and topping options such as these:
- Ketchup
- Mustard
- Relish
- Onions
- Chili
- Nacho cheese
- Shredded cheese
- Jalapeno peppers
- Diced tomatoes
- Sauerkraut
- Cole slaw
- Pickle spears
- Barbecue sauce
- Sriracha
A Bacon-Wrapped Winner
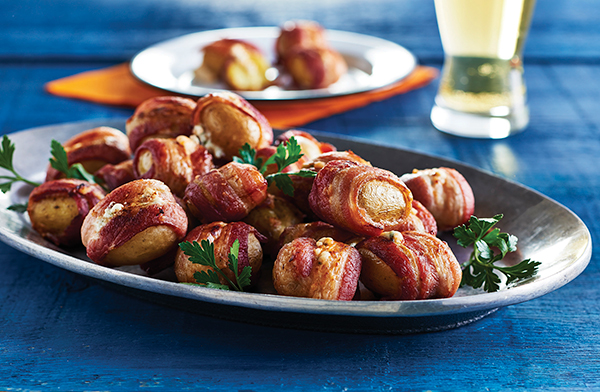
Creating a mouthwatering game day spread is all about teamwork, and it’s hard to find a better set of teammates than crispy bacon and potatoes.
Take one to the house with these Pigskin Potatoes that cut down on prep time and cleanup as an easy-to-eat finger food that can be made in advance. Just prep the potatoes and wrap with bacon a day or two ahead of time then throw in the oven an hour or so before kickoff.
Your base ingredient in these tasty, touchdown-worthy snacks, Wisconsin Potatoes, are low in calories, high in fiber and a source of vitamin B6, potassium, vitamin C and antioxidants.
Find more game day inspiration at eatwisconsinpotatoes.com .
Pigskin Potatoes
Recipe courtesy of The Little Potato Company on behalf of Wisconsin Potatoes
Prep time: 20 minutes
Cook time: 44 minutes
Serves: 8
- 1 1/2 pounds Boomer Gold Little Potatoes
- 6 ounces plain cream cheese, at room temperature
- 1/3 cup orange cheddar cheese, finely shredded
- 3 tablespoons fresh chives, finely chopped
- 1/8 teaspoon salt
- 1/8 teaspoon pepper
- jalapenos, to taste (optional)
- 1 pound bacon, thinly sliced, rashers cut in half
- Preheat oven to 400 F.
- Boil potatoes until fork tender, approximately 15-20 minutes. Cut in half and allow to cool.
- In bowl, use spatula to combine cream cheese, cheddar, chives, salt, pepper and jalapenos, if desired.
- Once potatoes cool, spread cream cheese on one half of each cut potato and sandwich using other half. Wrap each potato using half rasher of bacon around cut middle to secure cheese filling.
- Bake on middle rack 10 minutes to allow bacon to set. Flip and bake 10 minutes.
- Turn oven to broil. Broil 2 minutes, turn and broil 2 minutes until bacon reaches desired crispiness.
Tip: Bacon-wrapped potatoes can be made ahead of time and kept in refrigerator until ready to bake.
A Sweet Cinnamon Snack
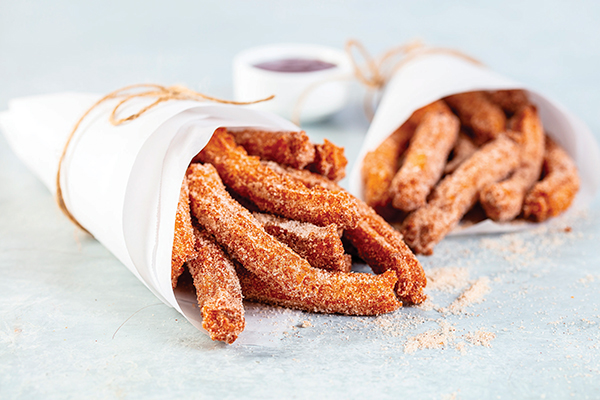
Sweet, handheld snacks make for perfect teammates while watching a game at home, and these Churros are an ideal example of a quick, fun bite that’s made with ease.
Requiring less than an hour in the kitchen, they can be made in short order without missing your favorite team’s first play. Lightly coated with fresh cinnamon and flavored with C&H Golden Brown Sugar, these deep-fried delights are as simple to make as they are delicious.
Find more home-gating recipe ideas at chsugar.com .
Churros
Prep time: 20 minutes
Cook time: 20 minutes
Yield: 45 churros
- 1 1/4 cups water
- 1/2 cup (1 stick) unsalted butter
- 2 teaspoons C&H Golden Brown Sugar
- 1/4 teaspoon salt
- 1 cup all-purpose flour
- 3 large eggs, lightly beaten
- 3 cups canola oil, for frying
- 1 cup C&H Granulated Sugar
- 2 tablespoons ground cinnamon
- In medium saucepan over high heat, combine water, butter, sugar and salt; bring to boil.
- Reduce heat and add flour. Using wooden spoon, mix vigorously until mixture forms into dough. Remove from heat.
- While stirring, gradually add eggs into dough. Mix well. Place dough in pastry bag fitted with large star tip.
- In heavy pot over medium-high heat, heat oil until it reaches 365 F.
- On plate, mix granulated sugar and cinnamon; set aside.
- Squeeze churro dough in 4-inch strips into hot oil. Fry 5-6 churros in batches until golden brown, about 2 minutes per side. When ready, transfer to plate lined with paper towels.
- Roll churros in sugar-cinnamon mix.
A Tasty Take on a Tailgate Favorite
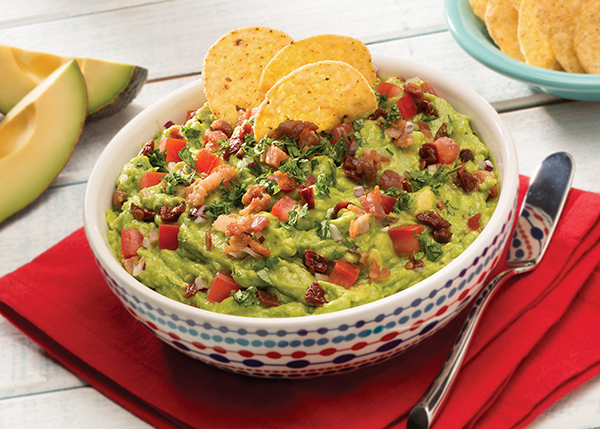
Even at home, game day means good times with friends and family while enjoying moments together watching your favorite teams. A menu full of flavorful favorites takes the experience to another level, and tackling your spread by starting with a tasty dip is a sure way to fire up the crowd.
No tailgate or home-gate is complete without fresh guacamole made with the Avocados From Mexico brand. Because they’re always in season, you can enjoy guac during your favorite sporting events and beyond.
Take it to the house with a twist on a game day classic by testing out this Bacon Chipotle Guacamole, a tailgate-worthy snack loaded with crowd-pleasing flavor. Because it’s such a fan-favorite, you might find yourself making another round at halftime.
To find this recipe and more ways to take your tailgate to new heights, including more than 200 guacamole recipes to choose from, visit avocadosfrommexico.com .
Bacon Chipotle Guacamole
- 3 Avocados From Mexico, halved, pitted and peeled
- 3 tablespoons shallot, minced
- 2 garlic cloves, minced
- 1/2 cup cilantro, finely chopped
- 1 lime, juice only
- 8 ounces applewood smoked bacon, cooked and crumbled
- 1/2 cup tomatoes, small diced
- 2 canned chipotle chiles, finely chopped
- ground cumin. to taste
- salt, to taste
- pepper, to taste
- In large bowl, mash avocados with shallots, garlic, cilantro and lime juice to desired consistency. Fold in bacon, tomatoes and chipotle chiles until well combined. Season with cumin, salt and pepper, to taste.
Photo courtesy of Getty Images (hot dogs)
Photo courtesy of The Little Potato Company (Pigskin Potatoes)
Photo courtesy of C&H Sugar (Churros)
Photo courtesy of Avocados From Mexico (Bacon Chipotle Guacamole)

Cookout Cravings: Appease summer appetites with grilled fare
(Family Features) The first thought that comes to mind when picturing grilling in the summer sun might be a perfectly cooked steak or a juicy burger, but no backyard barbecue is complete without the all-important sides and beverages that complete the meal.
Whether you're pairing a main protein with separate side dishes or going all-in-one by combining tender chicken with veggies on skewers, the opportunities are endless for a crave-worthy cookout.
Find more summer grilling recipes at Culinary.net.
5 Steps for Sizzling Steak
A sizzling steak is a surefire sound of summer, and the flavors achieved from one that's perfectly grilled are hard to match.
Before you fire up your grill, consider these five basics for cooking a chef-worthy steak:
Prepare Your Cut
Taste preferences (and prices) may differ among sirloins, ribeyes, T-bones and more, but the way you prepare steaks likely won't change much from cut to cut. You'll want to trim the thickness down to 1/2-1 inch for proper cooking, and setting the meat out ahead of time allows it to warm to room temperature before hitting the grill.
Add Some Salt
Feel free to add any spices you prefer, but remember a good steak typically doesn't require fancy seasoning - a pinch of salt works just fine. Add your salt anywhere between 30 minutes to a few hours before grilling time to help retain moisture and improve flavor.
Aim for High Heat
A two-zone fire is usually the way to go - one side of the grill should be hot (using direct heat) with the other side not quite as warm (indirect heat). This allows you to create a sear over direct heat before finishing cooking through - without burning - over indirect heat.
Sear and Slide
Cooking your steak over direct heat 1-2 minutes on each side is normally about right for creating a proper sear. At this point, depending on the thickness of your steak, you'll want to check for doneness. If it's not quite to the temperature you're looking to achieve, simply slide it over to the indirect heat for a finishing touch. Keep in mind these general guidelines for doneness: 120-125 F is rare, 130-135 F is medium-rare, 140-145 F is medium, 150-155 F is medium-well and 160-175 F is well done.
Let Rest
Finally, as hungry as you may be at this point, resting steaks is an important last step before diving in. Giving your steaks 5-10 minutes (foil or no foil) allows flavors to redistribute and moisture to be retained in the meat.
Less Prep, More Summer with a Skewered Solution
Make summer grilling easy and delicious by cooking your side dish and main dish together so you can spend more time outdoors and less time meal planning. These Grilled Greek Kebabs pair cubed chicken thighs with little potatoes on skewers, making for a classic cookout combo.
With no washing or peeling required, Creamer potatoes from The Little Potato Company require little prep, which helps make this recipe a breeze, and they cook quickly on the grill. Just marinate your chicken and potatoes with this zesty dressing and prepare for a taste bud-tingling backyard barbecue.
Visit littlepotatoes.com/summertime for more summer grilling recipes.
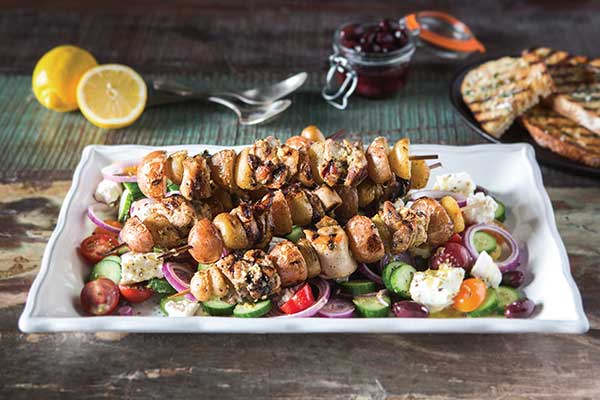
Grilled Greek Kebabs
Dressing/Marinade:
- 3/4 cup olive oil
- 2 lemons, zest and juice only
- 1 teaspoon dried oregano
- 2 teaspoons Dijon mustard
- 1 garlic clove, finely chopped
- 1 teaspoon sugar
- salt, to taste
- pepper, to taste
- 3 teaspoons mayonnaise
- Skewers:
- 2 cups The Little Potato Company Dynamic Duo bagged Creamer Potatoes, cut in half
- 4-6 boneless, skinless chicken thighs, cut into 1-inch cubes
- 8 wooden skewers dipped in water
- pita bread (optional)
Salad:
- 2 cups cherry tomatoes, halved
- 4 sliced Lebanese cucumbers
- 1/4 cup red onion, finely sliced
- 1 cup feta cheese
- 1 cup pitted kalamata olives
To make dressing/marinade: In measuring cup, mix olive oil, lemon juice, lemon zest, oregano, Dijon mustard, garlic and sugar. Season generously with salt and pepper, to taste. Pour 1/3 cup marinade into large bowl. Refrigerate remaining.
To prepare skewers: Add potatoes and chicken pieces to bowl with marinade. Mix well to coat and marinate 30 minutes, or as long as overnight in refrigerator.
Preheat grill to medium heat.
Skewer potatoes and chicken cubes alternately on wooden skewers. Grill 6-8 minutes on both sides. Grill pita bread, if desired.
Finish dressing by adding mayonnaise.
To make salad: In large serving dish, mix tomatoes, cucumber, onions, feta cheese and olives. Place kebabs on top and drizzle with dressing.
Serve with grilled pita bread, if desired.
Sipping on Sweetness
When it's summertime, many people crave something cold and fruity. Simply combine frozen strawberries with frozen pink lemonade concentrate to create a cool concoction perfect for a sizzling day. This fizzy summertime treat can delight your taste buds and keep you quenched while enjoying the sun's rays.
Find more summer drink recipes at Culinary.net.

Strawberry Spritzer
Recipe adapted from Taste of Home
- 1 package (10 ounces) frozen sliced strawberries, sweetened and thawed
- 2 liters lemon-lime soda, chilled
- 1 can (12 ounces) frozen pink lemonade concentrate, thawed
- In blender, process strawberries until blended thoroughly.
- Pour strawberries into large pitcher; stir in soda and pink lemonade.
A Simple Stuffed Side
Whether you need a quick appetizer or something to snack on, these Stuffed Cherry Tomatoes make for an appealing bite.
Find more snack recipes at Culinary.net.
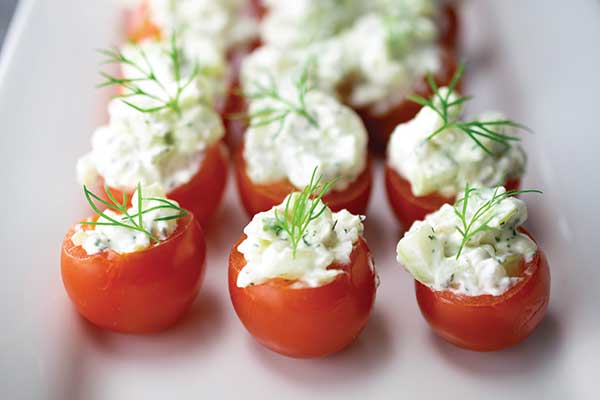
Stuffed Cherry Tomatoes
Recipe courtesy of Culinary.net
- 24-48 cherry tomatoes
- 1 package (8 ounces) cream cheese, softened
- 2 tablespoons mayonnaise
- 1 medium cucumber, peeled and diced
- 3 green onion stalks, diced
- 2 teaspoons minced dill
- fresh dill, for garnish
- Cut thin slice off top of each tomato. Scoop out pulp. Invert tomatoes on paper towel to drain.
In medium bowl, combine cream cheese and mayonnaise until smooth. Stir in cucumber, green onion and dill. Spoon mixture into tomatoes. Top with fresh dill. - Refrigerate until ready to serve.
Photo courtesy of Getty Images (Steak)
Source: The Little Potato Company

Family Foods with a Weight Loss Focus
(Family Features) Losing weight and focusing on a healthful diet may lead you back to the same tried-and-true tricks, however, conventional wisdom doesn’t always pay dividends. Some eating plans may offer up new twists to help you and your family eat meals you enjoy without forgoing your health goals.
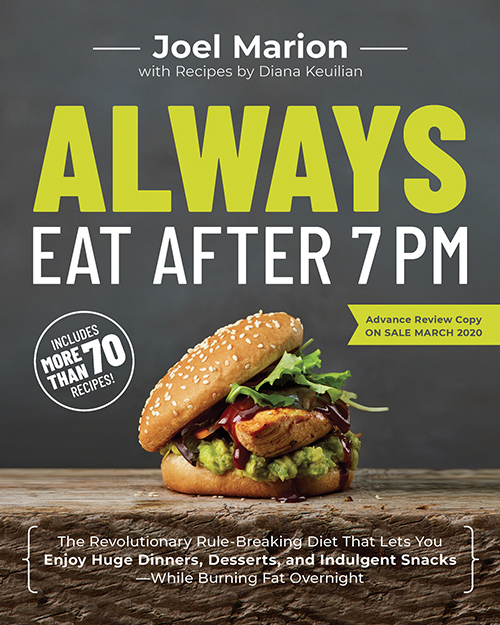
For example, “Always Eat After 7 PM,” written by Joel Marion, CISSN, NSCA-CPT, five-time best-selling e-book author and co-founder of the e-commerce supplement company BioTrust Nutrition, debunks popular diet myths and offers an easy-to-follow diet that accelerates fat-burning and allows you to indulge in your most intense cravings by eating the majority of your calories at night. The outlined plan features a 14-day “acceleration phase” designed for rapid results, a “main phase” when you’ll learn which fat-burning foods to eat to achieve your weight loss goals and a “lifestyle phase” to keep the weight off for good.
Conventional wisdom dictates that it’s best to avoid carbs, eat an early dinner and never eat immediately before bed. However, Marion debunks the myths underlying traditional dieting with a simple, highly effective weight loss program allowing readers to enjoy social dinners without restriction, satisfy nighttime hunger with fat-burning sweet and salty pre-bedtime snacks and indulge cravings with strategically timed cheat meals.
With straightforward food lists, easy-to-follow meal plans and recipes for each phase, this can be a simpler, more enjoyable way to lose weight without feeling restricted. Taken directly from the book, these recipes for Pot Roast Tacos with Chimichurri, Cheesy Ground Beef Skillet and Chili Loaded Baked Potato can help you take part in the program while enjoying time with loved ones at the family table.
Learn more about the diet and book at joelmarion.com.
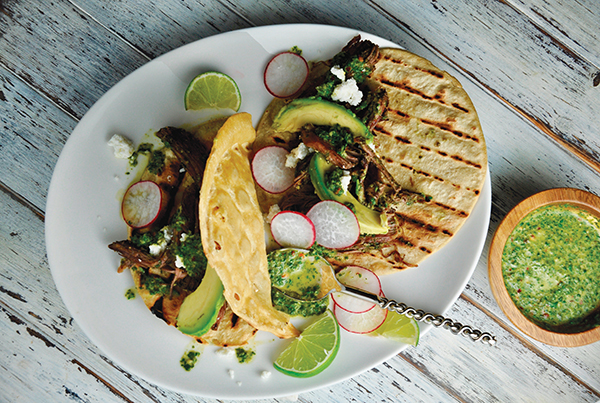
Pot Roast Tacos with Chimichurri
Recipe courtesy of “Always Eat After 7 PM”
Prep time: 10 minutes
Cook time: 5 minutes
Servings: 8
Chimichurri:
- 1 1/2 cups fresh Italian parsley
- 1 cup fresh cilantro
- 2 tablespoons green onion, chopped
- 1 tablespoon garlic, chopped
- 1/4 cup olive oil
- 2 tablespoons fresh lemon juice
- 1 tablespoon water
- 1 teaspoon sea salt
- 1 teaspoon crushed red pepper
Tacos:
- 3 cups chuck roast, slow cooked and chopped
- 8 yellow corn tortillas (6 inches)
- 1 ripe avocado, pitted and sliced
- 4 radishes, sliced
- 1/4 cup queso fresco, crumbled
- To make chimichurri: In food processor, combine parsley, cilantro, onion and garlic until chopped. Add olive oil, lemon juice, water, salt and red pepper; process until fully combined.
- To assemble tacos: In medium skillet over medium-high heat, cook chopped chuck roast 5 minutes. Remove from heat and mix in 1/2 cup chimichurri. In grill pan, char tortillas then fill evenly with meat, avocado, radishes and queso fresco. Serve with remaining chimichurri.
Nutritional information per serving: 410 calories; 24 g fat; 12 g carbohydrates; 366 mg sodium; 2 g fiber; 41 g protein; 1 g sugar.

Chili Loaded Baked Potato
Recipe courtesy of “Always Eat After 7 PM”
Prep time: 15 minutes
Cook time: 1 hour, 35 minutes
Servings: 6
- 6 sweet potatoes (8 ounces each)
- nonstick cooking spray
- salt, to taste
- pepper, to taste
- 1 tablespoon olive oil
- 2 pounds ground chuck
- 2 yellow onions, diced
- 2 tablespoons garlic, minced
- 3 tablespoons chili powder
- 2 tablespoons ground cumin
- 1 tablespoon dried oregano
- 2 teaspoons smoked paprika
- 1/4 teaspoon cayenne pepper
- 3 cups low-sodium beef broth
- 1 can (28 ounces) crushed tomatoes
- 1 tablespoon apple cider vinegar
- 1 can (15 ounces) butter beans, drained and rinsed
- 1/2 cup fresh cilantro, chopped
- 1 Anaheim chile, minced
- 1 teaspoon sea salt
- 1/2 cup plain Greek yogurt
- 1/4 cup fresh cilantro leaves
- 1/4 cup red onion, minced
- Heat oven to 400° F. Line baking sheet or pan with parchment paper. Rinse and scrub sweet potatoes; pat dry with paper towel and pierce several times with fork or knife. Place in prepared pan. Lightly spray sweet potatoes with nonstick cooking spray and season with salt and pepper, to taste. Bake 45 minutes- 1 hour until tender when poked.
- In pot, heat olive oil. Saute chuck until fully cooked. Drain fat and return to pot; add onion, garlic, chili powder, cumin, oregano, paprika and cayenne pepper. Reduce heat to medium-low and saute until onions are soft, about 10 minutes, stirring often.
- Add broth, crushed tomatoes and vinegar to pot. Increase heat to high and bring to boil. Reduce to medium-low and simmer 10 minutes. Add butter beans, cilantro and chile; cook 5 minutes. Season with sea salt.
- Split potatoes lengthwise; fluff flesh with fork. Top evenly with chili, yogurt, cilantro leaves and red onion.
Nutritional information per serving: 573 calories; 10 g fat; 58 g carbohydrates; 588 mg sodium; 11 g fiber; 25 g protein; 12 g sugar.

Cheesy Ground Beef Skillet
Recipe courtesy of “Always Eat After 7 PM”
Prep time: 20 minutes
Cook time: 38 minutes
Servings: 6
- 1 3/4 cups water
- 1 teaspoon sea salt
- 1 cup white rice
- 1 tablespoon olive oil
- 1 pound extra-lean ground beef
- 1 yellow onion, chopped
- 1 tablespoon garlic, chopped
- 1 red bell pepper, seeded and chopped
- 1 teaspoon dried oregano
- 1 teaspoon dried basil
- 1/2 teaspoon crushed red pepper
- 1/2 teaspoon sea salt
- 1/4 teaspoon ground black pepper
- 1/2 cup tomato sauce
- 1 can (15 ounces) kidney beans, rinsed and drained
- 1 cup shredded cheddar cheese
- 1/3 cup fresh parsley, minced
- In saucepan over high heat, bring water to boil. Add salt and rice; stir once then cover pot and reduce to low heat 18 minutes.
- In large skillet, heat olive oil. Stir in ground beef. Cook and stir until beef is crumbly and no longer pink. Drain and discard excess grease. Mix in onion and garlic; cook until tender, about 5 minutes. Add bell pepper, oregano, basil, red pepper, sea salt and black pepper; cook and stir until bell pepper is tender, about 5 minutes.
- Stir in cooked rice, tomato sauce and kidney beans. Reduce heat and cover until vegetables are tender, about 8 minutes. Remove pan from heat, sprinkle cheese over top and garnish with parsley.
Nutritional information per serving: 399 calories: 14 g fat; 36 g carbohydrates; 816 mg sodium; 4 g fiber; 30 g protein; 3 g sugar.
Source: Promote A Book

A Simply Sensational Summer Meal
(Family Features) Whipping up a fresh cooked meal is one of the true joys of summer, especially when grilled grub is paired with tantalizing sides and tempting desserts.
Spice things up with Mexican Beef Sliders with Jalapeno Salsa and Avocado Cream coupled with a side like Roasted Potatoes then cap off a filling meal with these sweet and decadent Strawberry Cream Cheese Tartlets. If you’re looking for ways to mix meat and veggies all at once, these ideas for kebabs are a surefire way to please a variety of palates.
Find more summer meal ideas at Culinary.net.
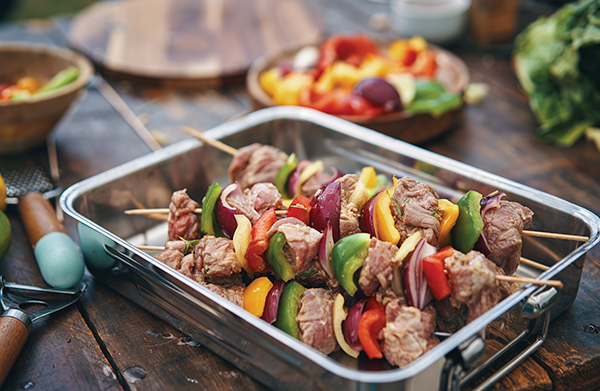
Cook Up Kebabs
As one of the most versatile main courses that can be grilled, kebabs offer nearly endless opportunities for customization. From protein to veggies, soaked wooden skewers can be loaded with just about any favorite flavors before hitting the grates. Consider these options for kicking your kebabs up a notch:
- Steak, cut into chunks
- Chicken, cut into chunks
- Bratwurst or sausage, cut into slices
- Ground beef, shaped into balls
- Lamb
- Shrimp
- Salmon, cut into chunks
- Bacon, cut into small pieces
- Sliced onions
- Sliced bell peppers
- Sliced jalapenos
- Sliced mushrooms
- Sliced cucumbers
- Cherry tomatoes
Summer Sliders with a Spicy Kick
Summer calls for firing up the grill for a fresh-cooked meal, and sliders are an ideal way to enjoy a downsized version of a warm weather favorite.
These Mexican Beef Sliders with Jalapeno Salsa and Avocado Cream are perfect for summer with their spicy kick of salsa and bright, cooling cream. Made with grass-fed beef from New Zealand, where the animals are allowed to roam and graze freely over lush green hills and pastures year-round, the mini burgers boast a lean, finely textured meat that tastes just as nature intended.
Find more tasty summer recipes at beefandlambnz.com.
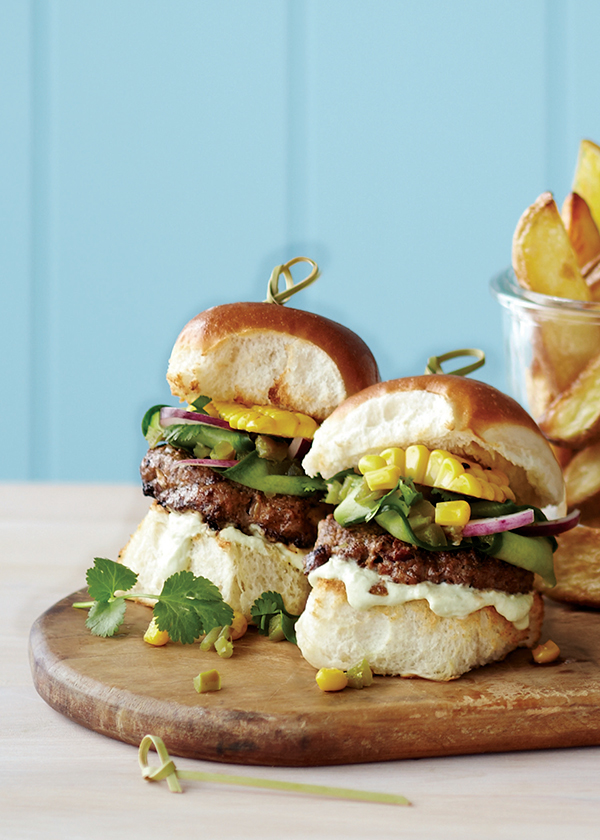
Mexican Beef Sliders with Jalapeno Salsa and Avocado Cream
Recipe courtesy of Beef + Lamb New Zealand
Prep time: 20 minutes
Cook time: 15 minutes
Servings: 4
Patties:
- 1 1/3 pounds lean New Zealand grass-fed ground beef
- 1 clove garlic, crushed
- 1 medium onion, grated or finely chopped
- 1 egg, lightly beaten
- 3/4 cup red kidney beans, rinsed and drained
- 2 tablespoons tomato paste
- 3 teaspoons dried oregano, chopped
- 2 teaspoons mild smoked paprika
- 2 teaspoons ground cumin
- 1 teaspoon ground coriander
- 1/2 cup Parmesan cheese, grated
- salt, to taste
- pepper, to taste
- olive oil
Jalapeno Salsa:
- 1 cup cucumber, thinly sliced into long ribbons
- 3/4 cup fresh cilantro leaves, chopped
- 1 red onion, finely sliced
- 1/2 cup pickled jalapenos, finely chopped
- salt, to taste
- pepper, to taste
- olive oil
- lime juice
Avocado Cream:
- 1 avocado, mashed
- 1/2 cup sour cream
- 1 lime, juice and zest only
- salt, to taste
- pepper, to taste
- 8-12 slider buns, halved
- 2-3 cobs sweet corn, cooked and sliced into shards
- 8-12 small bamboo skewers
- To make patties: In bowl, combine beef, garlic, onion, egg, kidney beans, tomato paste, oregano, paprika, cumin, coriander, Parmesan cheese, salt, to taste, and pepper, to taste. Shape into 8-12 small patties. Cover and refrigerate 15 minutes.
- Heat grill or frying pan to medium heat.
- Brush patties with oil on both sides. Cook 2-3 minutes on each side, turning once to brown both sides evenly, until cooked through.
- To make Jalapeno Salsa: In bowl, combine cucumber, cilantro, onion and jalapenos; season with salt and pepper, to taste. Drizzle with olive oil and lime juice.
- To make Avocado Cream: In bowl, combine avocado, sour cream, lime juice and lime zest; season with salt and pepper, to taste.
- Spread Avocado Cream on bottom buns and place patties on top. Top patties with Jalapeno Salsa, corn and top buns. Press down gently and poke in skewers to secure sliders.
A Sweet Summer Treat
Sweet flavors and warm weather go hand-in-hand, and many summer occasions and get-togethers call for dessert. Take advantage of warm weather favorites like strawberries and raspberries with these Strawberry Cream Cheese Tartlets.
Made using the best berries nature can provide, these bite-size tartlets feature a graham cracker crust base and an indulgent cream cheese filling flavored with sliced strawberries, honey and lemon topped with Well•Pict’s sweet, juicy strawberries and raspberries, which come fresh in clamshell packaging made from 70% recycled water bottles.
Find more sweet recipes that can bring a smile to your loved ones’ faces at wellpict.com/recipe.

Strawberry Cream Cheese Tartlets
Makes: 24 tartlets (4 ounces each)
- 1/2 cup water
- 2 tablespoons lemon juice
- 3 tablespoons lemon zest
- 2 tablespoons gelatin
- 4 cups Well•Pict Strawberries, sliced, divided
- 1/3 cup honey
- 2 packages (8 ounces each) cream cheese
- 1/2 cup sour cream
- 1 cup ice cubes
- 2 cups graham cracker crumbs
- 1/2 cup melted butter
- 1 cup Well•Pict Strawberries, rinsed, for garnish
- 1 cup Well•Pict Raspberries, rinsed, for garnish
- In blender, mix water, lemon juice, lemon zest and gelatin until frothy.
- Add 2 cups strawberries and honey; blend until smooth. Pour into bowl and chill mix 15 minutes.
- In blender, mix cream cheese, sour cream and ice cubes while incorporating strawberry mixture. Mix in remaining strawberries.
- In blender or food processor, mix graham crackers and melted butter to crumb consistency. Lightly grease two medium muffin pans and pack graham cracker mixture at bottom of each opening. Pour strawberry mixture over graham cracker mixture and chill until set. Gently pull tartlets from muffin tins and place on serving tray. Garnish with strawberries and raspberries.
Roasted and Ready to Serve
Summer meals centered around grilled fare call for a complementary pairing that completes the classic profile of warm weather food. Using a versatile vegetable like potatoes allows you to think up different methods of cooking for a new flavor each time.
While you’re focused on the main dish being grilled, these Roasted Potatoes can bake away indoors for a simple side that requires little attention.
Find more health resources at usda.gov.
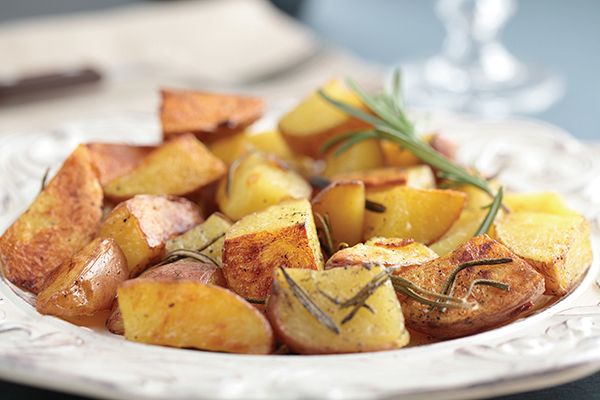
Roasted Potatoes
Recipe courtesy of “A Harvest of Recipes with USDA Foods”
Servings: 6
- 1 pound potatoes, chopped into 1-inch cubes
- 1/2 cup onion, chopped into 1-inch cubes
- 1/2 cup green pepper, chopped into 1-inch cubes
- 1 teaspoon garlic, finely chopped
- 1 teaspoon vegetable oil
- 1/4 teaspoon salt
- 1/4 teaspoon pepper
- 1 tablespoon parsley, finely chopped
- 1/2 teaspoon paprika
- Preheat oven to 350° F.
- In medium bowl, mix potatoes, onions, green peppers and garlic.
- Add vegetable oil, salt, pepper, parsley and paprika. Mix well.
- Cover bowl and refrigerate 15 minutes.
- Spread potato mixture evenly on cookie sheet. Bake about 35 minutes.
Photos courtesy of Getty Images (Kebabs and Roasted Potatoes)
Source: New Zealand Wagyu Beef
Well•Pict Berries

A Menu Fit for Family Mornings
(Family Features) Many spring celebrations call for fabulous food, specifically dishes fit for brunch, even if your “crowd” is simply your nearest loved ones gathered at the family table. A wide variety of recipes may fit the festivities, but a combination of comforting bites with sweet and savory flavors is perfect for appeasing all appetites.
This menu of morning recipes includes Chive and Orange Blossom Honey Waffles and Spicy Garlic Honey Chicken as a filling option to base the meal around with Breakfast Casserole as a more traditional dish. For a sweet sendoff, this Brown Sugar Bundt Cake is best served warm as a midday dessert or can be added to your plate as a simple side.
Find more brunch recipes at Culinary.net.
A Sweet Morning Eat
Add flavor to your brunch with the sweet taste of honey as part of a remade rendition of a breakfast favorite: chicken and waffles.
This recipe for Chive and Orange Blossom Honey Waffles and Spicy Garlic Chicken combines sweet with savory to shine as the main course for your gathering.
Find more recipe ideas at honey.com.
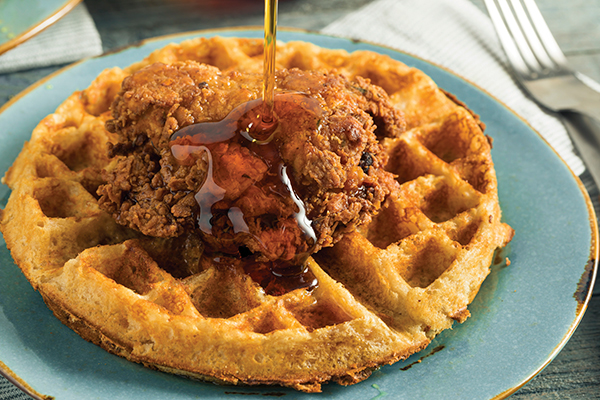
Chive and Orange Blossom Honey Waffles and Spicy Garlic Honey Chicken
Recipe courtesy of chef Jenny Dorsey on behalf of the National Honey Board
Servings: 4
Chicken:
- 8 boneless, skinless chicken thighs
- 2 cups buttermilk
- 2 tablespoons kosher salt, divided
- 3/4 teaspoon ground black pepper, divided
- 1/4 teaspoon rosemary, chopped
- 2 tablespoons orange blossom honey
- 2 cups all-purpose flour
- 2 teaspoons cayenne pepper
- 1 teaspoon garlic powder
- 1 teaspoon onion powder
- 2 teaspoons paprika
- 1/2 teaspoon ancho chile powder
- vegetable oil, as needed
Waffles:
- 1 1/2 cups all-purpose flour
- 2 teaspoons orange blossom honey
- 1 teaspoon orange zest
- 1 teaspoon kosher salt
- 1 teaspoon baking powder
- 1 1/4 cups whole milk
- 2 large eggs
- 1/4 cup fresh chives, chopped
- 3/4 cup sharp cheddar cheese, shredded
- honey
- To make chicken: Rinse chicken thighs and pat dry with paper towels; place in large bowl.
- In separate bowl, combine buttermilk, 1 tablespoon salt, 1/4 teaspoon black pepper, rosemary and honey. Pour buttermilk mixture over chicken; cover and let marinate 8 hours or overnight.
- In separate mixing bowl, combine flour, remaining salt, remaining pepper, cayenne, garlic powder, onion powder, paprika and ancho chile powder; stir.
- Remove each piece of chicken from buttermilk, shake to remove excess liquid and dredge in flour mixture. Shake off excess.
- In deep fryer, heat oil to 375° F. Fry chicken until internal temperature reaches 175° F or juices run clear, approximately 5 minutes per thigh.
- Drain on paper towels.
- To make waffles: In large mixing bowl, mix flour, honey, orange zest, salt, baking powder, milk, eggs, chives and cheese until combined.
- Use waffle maker to cook four waffles in batches.
- Place chicken on waffles and drizzle with honey.
A Dairy-Fueled Brunch Dish
Whether it’s just part of a brunch spread or the focus of your meal, an egg-based casserole is a perfect way to appease a morning crowd.
This version of Breakfast Casserole calls for potatoes, ham, eggs, milk and cheese for a simple dish that requires little preparation before popping in the oven.
Visit milkmeansmore.org for more morning dishes.

Breakfast Casserole
Recipe courtesy of Marcia Stanley, MS, RDN, on behalf of Milk Means More
Prep time: 25 minutes
Cook time: 45 minutes
Servings: 6
- 1 pound red or white potatoes, scrubbed and cut into 1/2-inch pieces
- water
- 1/2 small onion, coarsely chopped (about 1/2 cup)
- nonstick cooking spray
- 1/2 teaspoon salt, divided
- 1/4 teaspoon pepper
- 1 cup reduced-fat and reduced-sodium, chopped, cooked ham (about 4 ounces)
- 1 cup (4 ounces) shredded Swiss or cheddar cheese
- 4 eggs
- 1 1/2 cups skim milk
- 1 tablespoon mustard
- Heat oven to 350° F.
- In large saucepan, cover potato pieces with enough water to just submerge. Bring to boil. Reduce heat; simmer, covered, 5 minutes. Add onion. Return to simmer, covered, about 5 minutes, or until potatoes are just tender. Drain well. Cool slightly.
- Coat 8-by-8-by-2-inch baking dish with nonstick cooking spray. Place potato-onion mixture in baking dish. Sprinkle with 1/4 teaspoon salt and pepper. Gently stir to combine. Sprinkle ham and cheese on top.
- In medium bowl, lightly beat eggs. Whisk in milk, mustard and remaining salt. Pour over layers in baking dish. Bake, uncovered, 40-45 minutes, or until knife inserted near center comes out clean. Let stand 5 minutes before serving.
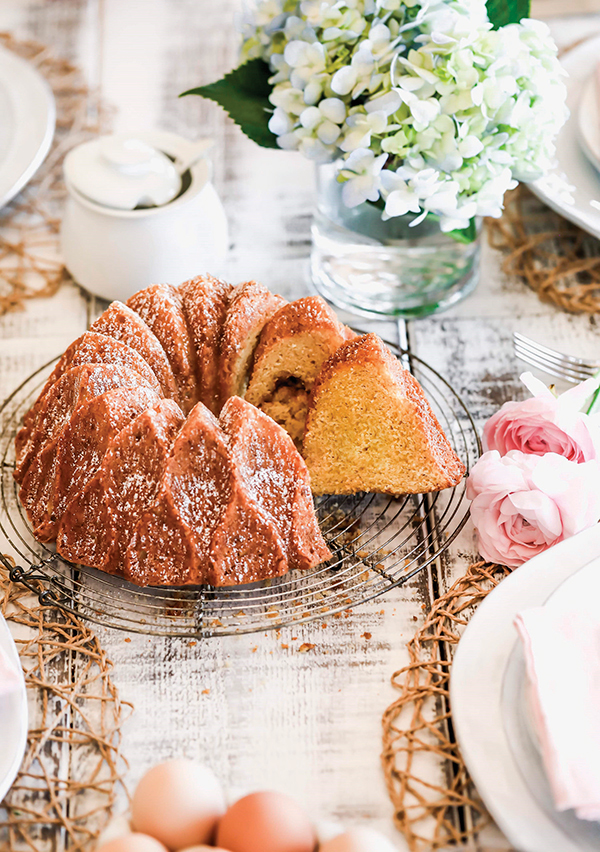
A Bundt Cake for Brunch
Many brunch festivities may center around classic breakfast foods like quiches and fresh fruits, but you can take your gathering to the next level with a treat to pair with nearly any dish.
This Brown Sugar Bundt Cake can be the simple, sweet side your guests crave as a complement to the savory recipes on the table. Made using just a handful of household ingredients, including the flavor-boosting addition of C&H sugars, it can be created in about an hour and served warm during your next at-home brunch gathering.
Find more sweet treat ideas at chsugar.com.
Brown Sugar Bundt Cake
Recipe courtesy of “Browned Butter Blondie” on behalf of C&H
Prep time: 15 minutes
Cook time: 50 minutes
- Nonstick cooking spray
- 2 cups all-purpose flour, spooned and leveled
- 1 teaspoon baking powder
- 1/2 teaspoon baking soda
- 1 teaspoon kosher salt
- 10 tablespoons unsalted butter, at room temperature
- 1 3/4 cups packed C&H Golden Brown Sugar
- 1/4 cup C&H Granulated Sugar
- 2 large eggs, at room temperature
- 1 1/2 teaspoons vanilla
- 1 cup full-fat Greek yogurt
- C&H Confectioners’ Sugar, for dusting
- Heat oven to 350° F.
- Grease 10-cup bundt pan with nonstick cooking spray. Set aside.
- In medium bowl, whisk flour, baking powder, baking soda and salt.
- In bowl of stand mixer fitted with paddle attachment, beat butter, brown sugar and granulated sugar until light and fluffy. Add eggs, one at a time, mixing well after each addition. Add vanilla and mix on low speed.
- With mixer on low, add flour mixture in three additions, alternating with yogurt. Begin and end with flour mixture. Mix until just combined.
- Pour batter into prepared bundt pan and use offset spatula to level batter.
- Bake 50-55 minutes, or until cake is golden brown and toothpick inserted in center of cake comes out clean. If cake browns too quickly while baking, cover with foil after 35 minutes.
- Remove from oven and cool on baking rack 20 minutes. Invert pan onto baking rack and gently tap bottom of pan to release cake.
- Cool completely before dusting with confectioners’ sugar.
Photo courtesy of Getty Images (Chive and Orange Blossom Honey Waffles and Spicy Garlic Honey Chicken)
Source: Domino Golden Sugar
United Dairy Industry of Michigan