Red Velvet Heart Pancakes
Finding something unique and special to do on Valentine’s Day for your significant other can be a challenge. Every year, the day to celebrate love rolls around and every year it may seem like you’re out of ideas. Many people feel the same way.
However, with just a couple bowls, a cookie cutter and a skillet, your Valentine’s Day could start off a lot sweeter.
Try these Red Velvet Heart Pancakes, which are one of a kind and a delicious way to spend your morning with your loved one. Celebrating the day of love has never been easier.
Start by combining flour, sugar, cocoa powder, baking powder, baking soda and salt in a large mixing bowl.
In another bowl, whisk an egg and add buttermilk, butter, vanilla extract and a few drops of red food coloring. Whisk everything together and pour it into the first bowl of dry ingredients.
Prepare a skillet and grab a heart-shaped cookie cutter. Pour a small amount of batter into the cookie cutter in the skillet, let it cook for 2 minutes then remove the cookie cutter and flip. Let it cook for 1 additional minute.
Add your favorite pancake toppings like butter, syrup, powdered sugar or raspberries. In the end, you will have yourself a scrumptious breakfast, made with love and as sweet as can be.
Kids also love the fun shape and color of this breakfast. It’s a neat way to have them help in the kitchen and make a meal for the whole family.
Valentine’s Day is a big reason to celebrate. You don’t have to stick to the same flowers and chocolates as last year. Mix it up with this delectable recipe meant to spread some love on a significant day.
Find more breakfast recipes and sweet treat ideas at Culinary.net.
Watch video to see how to make this recipe!
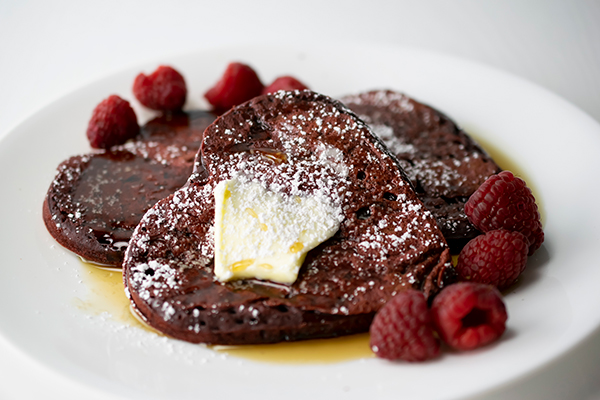
Red Velvet Heart Pancakes
Servings: 8-10
- 1 cup flour
- 1/4 cup sugar
- 3 tablespoons cocoa powder
- 1 teaspoon baking powder
- 1/2 teaspoon baking soda
- 1/2 teaspoon salt
- 1 egg
- 1 cup buttermilk
- 2 tablespoons unsalted butter, melted, plus additional for garnish
- 1 1/2 teaspoons vanilla extract
- 30-40 drops red food coloring
- nonstick cooking spray
- syrup, for garnish
- powdered sugar, for garnish
- raspberries, for garnish
- In large bowl, whisk flour, sugar, cocoa powder, baking powder, baking soda and salt.
- In medium bowl, whisk egg. Add buttermilk, 2 tablespoons butter, vanilla extract and food coloring; whisk until combined.
- Add wet ingredients to dry ingredients and stir to combine.
- Spray heart-shaped cookie cutter with nonstick cooking spray and place in skillet. Add enough batter to fill heart. Cook 2 minutes. Remove heart cutter. Flip pancake and cook 1 minute.
- Serve with butter, syrup, powdered sugar and raspberries.
Note: If mixture is too thick, add water until desired consistency is reached.
Grape Frangipane Tart
(Family Features) All kinds of holiday celebrations, whether with immediate family or joining loved ones virtually, can be made better with sweet treats that add special meaning to the occasion. Including fresh fruit in your treat can make it an even tastier take on seasonal tradition.
For example, fresh California grapes are available into January and are perfect for the holiday season. Enjoy them as a fresh, healthy snack or side dish, or as an ingredient to add taste and visual appeal to recipes to make the season feel special.
This Grape Frangipane Tart offers a simple solution when your sweet tooth calls for a dish to share with family. Everyday ingredients likely already in your pantry combine with fresh grapes for a sweet-tart twist worthy of the holidays.
Find more holiday dessert recipes at grapesfromcalifornia.com.
Watch video to see how to make this recipe!
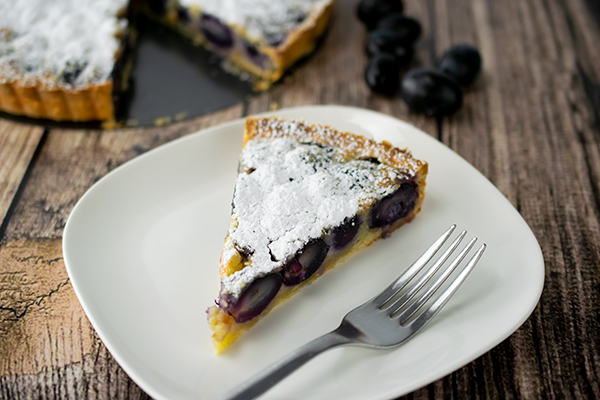
Grape Frangipane Tart
Servings: 10
- 1 tart pastry, single crust (10 inches)
- 3 1/2 cups red or black seedless California grapes
- 2 ounces almond paste
- 1 large egg
- 1/4 cup sugar
- 1/4 cup butter
- 2 tablespoons flour
- 1 pinch salt
- confectioners’ sugar
- Preheat oven to 375 F.
- Line 10-inch tart pan with pastry. Arrange grapes snugly in decorative rings in pastry. With electric mixer, combine almond paste, egg, sugar, butter, flour and salt until smooth to create frangipane. Carefully spread over arranged grapes and bake 35 minutes until tart is golden brown and cooked through.
- When tart is cool, remove from pan and dust with confectioners’ sugar.
Nutritional information per serving: 151 calories; 2 g protein; 8 g fat; 46% calories from fat; 19 g carbohydrates; 34 mg cholesterol; .8 g fiber; 86 mg sodium.
Easy Tiramisu Dip
(Culinary.net) Do you know that moment when something sweet hits your taste buds and a smile instantly spreads across your face? It’s almost magic to some. To others it’s just simply bliss. This holiday season, try something that’s simple yet sophisticated for an easy way to ensure smiles all around.
Try an Easy Tiramisu Dip because whether you’re relaxing at home, having a small get-together with friends or joining your annual family gathering virtually, this dip is sure to spread culinary cheer.
The recipe starts with “easy,” and it holds true to its name. With a short list of ingredients and only a handful of instructions, this is something you can whip up (literally) in just a few moments. Also, using minimal tools in the kitchen is always a plus for at-home chefs. The only appliance needed to make this recipe is a mixer.
The outcome is fluffy, rich and sweet with a hint of espresso. It’s not overpowering, however, so little ones or non-coffee lovers can still enjoy this delicious dip.
This is also a unique dessert because it can be served cool or chilled. If you are planning to take a sweet treat to a party this holiday season, this is nearly perfect. No oven time needed and simple to serve to kids and adults alike.
Serve with ladyfingers or fruit to bring that sweetness to a whole new level, and it’s topped with a final sprinkle of cocoa powder to give it that extra appeal. You do eat with your eyes first after all.
Give this one a try and see the faces of your loved ones light up with joy this season. This creamy, tasty dip is sure to impress.
For more easy dessert recipes, visit Culinary.net.
Watch video to see how to make this recipe!
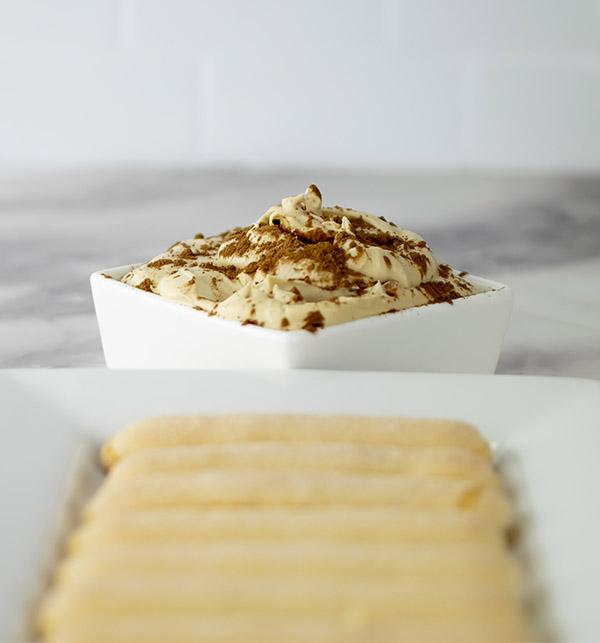
Easy Tiramisu Dip
Servings: 4
- 1 cup heavy whipping cream
- 1 tablespoon espresso powder
- 4 ounces cream cheese, softened
- 8 ounces Mascarpone cheese
- 1/2 cup powdered sugar
- 1 teaspoon vanilla extract
- 2 teaspoons cocoa powder
- wafers or fruit, for dipping
- In medium bowl, whisk heavy whipping cream and espresso powder until blended.
- In large bowl, use hand mixer to beat cream cheese until smooth. Add Mascarpone cheese and beat until combined. Gradually add powdered sugar, beating after each addition. Add vanilla extract; beat mixture. Add espresso mixture; beat until soft peaks form.
- Keep refrigerated until ready to serve.
- Spoon mixture into serving bowl. Sprinkle with cocoa powder. Serve with wafers or fruit.
Oatmeal Cream Cookie Sandwiches
Cooler weather often brings about nostalgic cravings for seasonal dishes and desserts. From grandma’s classic pies, to the sweet taste of apple cider touching your tongue, Fall is full of flavor, spice, sweets and treats, just waiting to be devoured with family and loved ones alike.
Home chefs will know it’s time to tap into the flavor of fall once that first leaf drops to the ground. The pumpkins are set on porches and little ones all bundle up to go outside and play in the cool breeze. Nearly everyone can tell when the warm and cozy delight is here to stay for the season.
The kitchen is often known as the “heart of the home” and homes all over the country will smell and taste like fall festivities all season long with this recipe for Oatmeal Cream Cookie Sandwiches.
The best part about this timeless recipe is that it’s known to evoke memories from childhood and can help introduce a new generation to a treat many generations before them have enjoyed.
Easy to make and pretty to look at, these cookies are great to make with little ones after a long day of pumpkin carving. Let the kids help with the preparation. They can use many ingredients you may already have in your pantry especially the ones they can reach with their little hands.
The result are a soft and slightly chewy, cinnamon-spiced oatmeal cookies sandwiched around a fluffy layer of vanilla bean cream filling that can keep each member of the family reaching for another.
Serve them to friends, neighbors, kids and adults and you will notice the delight spread across their faces with the very first bite. This recipe is something scrumptious that makes a statement for the upcoming season.
Find more seasonal dessert recipes and fall flavors for your family at Culinary.net.
Watch video to see how to make this recipe!
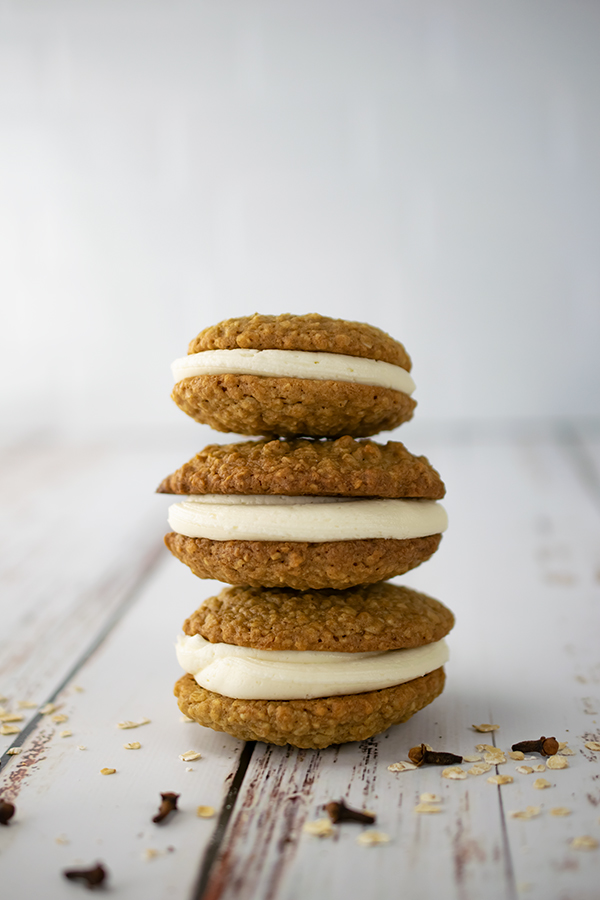
Oatmeal Cream Cookie Sandwiches
Servings: 10-12
Oatmeal Cookies:
- 1 cup unsalted butter, softened
- 1 cup dark brown sugar
- 1/2 cup light brown sugar
- 2 large eggs
- 2 teaspoons vanilla extract
- 1 1/2 cups flour
- 1 teaspoon baking soda
- 1/2 teaspoon salt
- 1 teaspoon cinnamon
- 1/4 teaspoon ground cloves
- 3 cups rolled old-fashioned oats
Vanilla Bean Cream Filling:
- 3/4 cup unsalted butter, softened
- 2 1/2 cups powdered sugar
- 1 teaspoon vanilla extract
- 1 tablespoon heavy cream
- Heat oven to 350 F. Line baking sheet with parchment paper and set aside.
- To make oatmeal cookies: with a mixer, cream butter, dark brown sugar and light brown sugar on medium-high speed until creamy. Add eggs and vanilla extract; mix until combined.
- In medium bowl, whisk flour, baking soda, salt, cinnamon, cloves and oats. Gradually add oat mixture to wet ingredients, mixing until just combined.
- Spoon dough into hands and roll into balls. Flatten balls and place onto prepared baking sheet, leaving about 2 inches between each cookie. Bake 10-12 minutes, or until lightly golden brown around edges. Move cookies to wire rack to cool completely.
- To make vanilla bean cream filling: with a mixer, cream butter on medium-high speed until light and fluffy. Gradually add powdered sugar, vanilla extract and heavy cream; mix until combined.
- Pipe or spoon a large dollop of filling on bottom sides of half the cookies; top each with second cookie.
Kid-Friendly Recipes for At-Home Learning
(Family Features) During a school year that’s sure to be a new experience for students and parents alike, many of the everyday necessities, like eating breakfast and lunch, remain. However, this year, many little learners will be enjoying their lunches from the comfort and safety of home rather than at school, meaning moms and dads are back in charge of keeping the kitchen running throughout the day.
According to a survey conducted by OnePoll in conjunction with Sabra, 74% of caregivers expect this school year to be more chaotic than ever and 64% of moms and dads complain they are dreading becoming the “lunch lady” at home.
You can improve those school day blues with quick, kid-friendly recipes that refuel children for their educational explorations. By providing a steady stream of balanced meals and snacks made with wholesome ingredients, you can feel good about boosting your at-home students’ learning capabilities even during these tricky times.
In the morning, try starting with this Chocolate Banana Cinnamon Toast recipe from Tabitha Brown, the actress and vegan foodie known as “America's Mom.” Sliced banana powers this breakfast with the rich, decadent taste of Sabra Dark Chocolate Dessert Dip & Spread to thrill chocolate lovers for a combination of flavors kids love.
For a lunchtime solution with easy prep and quick cleanup, a Hummus Flatbread Pizza takes just 10-15 minutes to make. Made with easy-to-find ingredients you can keep on-hand like pizza sauce and hummus, simply top with sweet favorites like pineapple for a fun boost for long days of learning.
To find more at-home recipe inspiration, visit sabra.com.
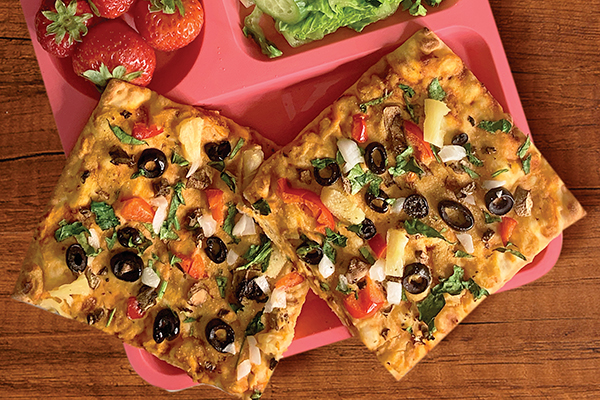
Hummus Flatbread Pizza
Recipe courtesy of Tabitha Brown
Prep time: 10-15 minutes
Yield: 1 flatbread
- 4 teaspoons pizza sauce
- 1 rectangular flatbread
- 3 tablespoons Sabra Classic Hummus
- 1/2 teaspoon garlic powder, divided
- 1/3 cup pineapple tidbits or fresh pineapple pieces
- strawberries
- chopped romaine lettuce
- English cucumber slices
- Preheat oven to 500 F.
- Brush pizza sauce to edges of flatbread. Swirl to spread hummus to edges of flatbread. Sprinkle 1/4 teaspoon garlic powder over flatbread. If using canned pineapple tidbits, drain and pat dry with paper towel. Add pineapple tidbits to flatbread and sprinkle with remaining garlic powder.
- Bake 5-10 minutes, or until flatbread is light golden brown.
- Cool and cut flatbread. Serve with strawberries and mix chopped romaine lettuce and English cucumber slices for simple salad.
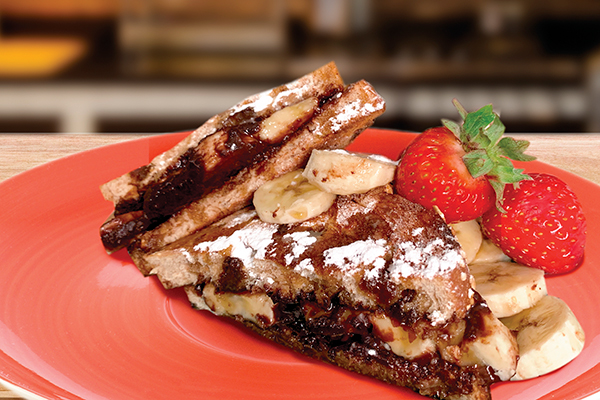
Chocolate Banana Cinnamon Toast
Recipe courtesy of Tabitha Brown
Prep time: 10-15 minutes
Yield: 2 pieces toast
- 2 slices cinnamon raisin bread
- 3 tablespoons Sabra Dark Chocolate Dessert Dip & Spread
- 6 banana slices, plus additional for serving (optional)
- 1/8 teaspoon cinnamon powder
- 1 tablespoon maple syrup
- fresh strawberries (optional)
- powdered sugar
- Toast bread to desired doneness.
- Using spoon, swirl to spread 1 1/2 tablespoons chocolate spread on each slice of toast.
- Add banana slices to one slice of toast and sprinkle with cinnamon.
- Top with second slice of toast.
- Slice in half diagonally. Add to plate with extra sliced banana and fresh strawberries, if desired. Drizzle toast with maple syrup and sprinkle with powdered sugar.
Source: Sabra
Make a Commitment to More Family Meals
(Family Features) Spending moments together with loved ones carries obvious benefits like time to catch up and opportunities to bond, but sharing meals actually provides definitive value for families. With restricted social interactions and confinement at home due to COVID-19, many families are facing meal challenges that have shifted from juggling busy schedules to seeking new ways to mix up the traditional menu or using digital solutions to reconnect at a virtual table.
A study published in the "Journal of Nutrition Education and Behavior" funded by the FMI Foundation shows that more frequent family meals are associated with better dietary and family functioning outcomes. The results build on years of previous research studies to punctuate the creation of the Family Meals Movement, which encourages Americans to pledge to share one more family breakfast, lunch or dinner at home per week.
Consider these notable findings from the study:
- Family meals improve fruit and vegetable consumption. Studies show a positive relationship between family meal frequency and fruit and vegetable intake when examined separately, but also when fruit and vegetable intake are combined.
- Family meals improve family dynamics. Nearly all the studies included in the systematic review and meta-analysis demonstrated a positive relationship between family meal frequency and measures of family functioning. Family functioning is defined as family connectedness, communication, expressiveness and problem-solving.
"There are thousands of individual studies that examine the impact of family meals on nutrition and family behavior, but this meta-analysis looks at the relationship between family meal frequency and family functioning outcomes," said David Fikes, executive director of the FMI Foundation. "We can confirm that family meals are a valuable contributor of improved nutrition and family dynamics."
Find tips, recipes and ways to increase your family meal frequency despite COVID-19 circumstances at familymealsmovement.org.
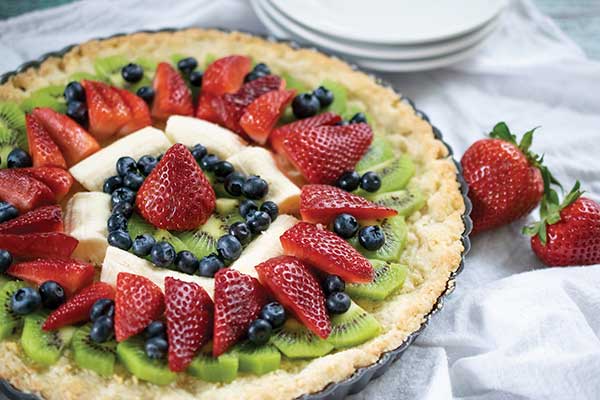
German Fruit Tart
Recipe courtesy of Deanna Segrave-Daly on behalf of the FMI Foundation
- 1 cup all-purpose flour
- 1/4 cup whole-wheat pastry flour
- 1/2 cup sugar
- 1 egg
- 1 tablespoon half-and-half or cream
- 1/8 teaspoon almond extract or 1/4 teaspoon vanilla extract
- 6 tablespoons unsalted butter, thinly sliced
- cornstarch
- sliced strawberries
- sliced kiwi
- sliced banana
- blueberries
- 2 teaspoons turbinado or powdered sugar (optional)
- Preheat oven to 350 F.
- To make crust, beat together flours, sugar, egg, half-and-half and almond extract. Add butter slices and mix together until sticky ball of dough forms. Refrigerate 30-60 minutes.
- On heavily floured surface, knead dough a few times and roll out to fit greased 10-inch tart pan.
- Carefully spread dough into tart pan and bake 15-20 minutes, or until tart starts to turn golden brown. Remove from oven and cool.
- Dust crust with cornstarch to help fruit stick to crust. Arrange strawberries, kiwi, banana and blueberries on top of crust; sprinkle with sugar, if desired.
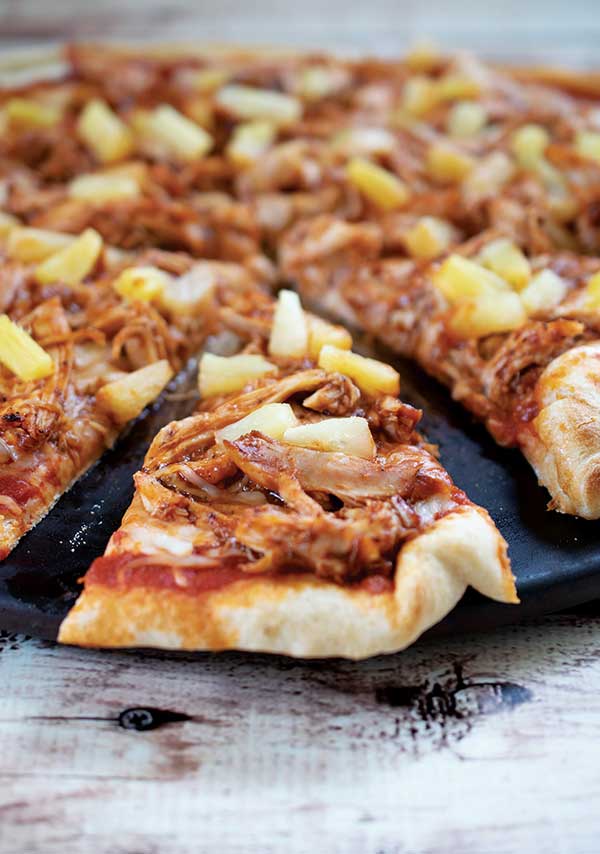
Hawaiian Chicken Pizza
Recipe courtesy of Toby Amidor on behalf of the FMI Foundation
Prep time: 10 minutes
Cook time: 20 minutes
- Nonstick cooking spray
- 1 1/2 cups shredded rotisserie chicken
- 3/4 cup barbecue sauce
- 1ready-made pizza crust or whole wheat pizza crust (10 ounces)
- 1 cup canned or jarred tomato sauce
- 2 cups shredded mozzarella cheese or part-skim mozzarella cheese
- 1 cup finely chopped fresh pineapple or canned pineapple tidbits packed in 100% juice
- Preheat oven to 375 F. Coat pizza pan or baking sheet with nonstick cooking spray.
- In medium bowl, combine rotisserie chicken and barbecue sauce.
- Place pizza crust on pan and evenly spread tomato sauce over crust. Sprinkle evenly with cheese. Top evenly with rotisserie chicken mixture and pineapple.
- Bake until crust is crisp and browned around edges, about 10 minutes. Let pizza cool 10 minutes before cutting into eight slices.
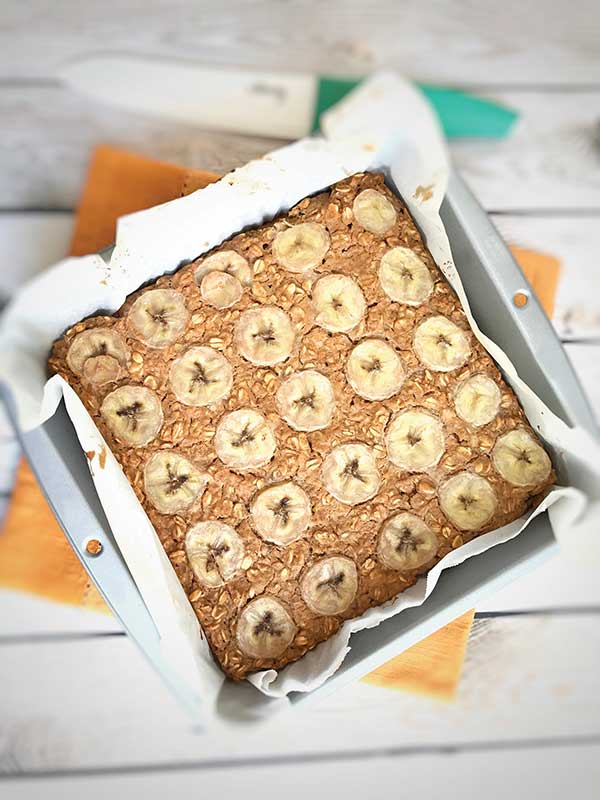
Peanut Butter Banana Protein Baked Oatmeal
Recipe courtesy of Lauren Harris-Pincus on behalf of the FMI Foundation
Prep time: 15 minutes
Cook time: 30 minutes
Servings: 6
- 2 cups old-fashioned oats
- 1 teaspoon baking powder
- 1 teaspoon cinnamon
- 1/2 teaspoon salt
- 3 packets stevia (sugar substitute) or preferred sweetener
- 1/2 cup powdered peanut butter
- 1 scoop (1/4 cup) vanilla plant-based protein powder
- 1 cup unsweetened vanilla almond milk
- 1/2 cup nonfat plain Greek yogurt
- 3 tablespoons liquid egg whites
- 1 ripe banana (4 ounces), mashed
- 1 teaspoon vanilla extract
- 1 ripe banana (4 ounces), sliced into 24 slices
- Preheat oven to 350 F.
- In large bowl, combine oats, baking powder, cinnamon, salt, stevia, powdered peanut butter and vanilla protein powder.
- In separate bowl, combine almond milk, yogurt, egg whites, mashed banana and vanilla extract.
- Add oat mixture to wet ingredients and gently stir until fully combined.
- Line 9-inch brownie pan with parchment paper. Pour mixture into pan and spread evenly.
- Top with banana slices in four rows of six slices each.
- Bake 27-35 minutes, or until golden brown and set.
- Let cool and cut into six rectangles. Wrap and refrigerate extras until ready to eat.
Source: FMI Foundation
Minty Shake
(Culinary.net) St. Patrick’s Day may call to mind hearty meals and pots o’ gold, but that doesn’t mean sweets can’t be part of the equation, too. Add dessert to your celebration with this green Minty Shake, a cold, refreshing way to honor the colorful tradition.
Find more seasonal dessert recipes at Culinary.net.
Watch video to see how to make this recipe!

St. Patty’s Minty Shake
Serves: 1
- 1 cup whipping cream
- 1/2 teaspoon peppermint extract
- 2 teaspoons powdered sugar
- 1/2 cup milk
- 1 3/4 ounces Baileys Irish Cream liqueur
- 3 scoops mint chocolate chip ice cream
- chocolate syrup
- chopped sugar cookies, for garnish (optional)
- pistachios, for garnish (optional)
- mint chocolate candy, for garnish (optional)
- Using mixer, whisk whipping cream until soft peaks form. Add peppermint extract and powdered sugar; mix until well blended. Set aside.
- In blender, blend milk, liqueur and ice cream until smooth.
- Drizzle chocolate syrup inside soda glass. Pour ice cream mixture into glass. Top with whipped cream and garnish with cookies, pistachios and mint chocolate candy, if desired.
Luck o’ the Irish Mint Pie
(Culinary.net) Even if you’re not Irish, a green treat like this Luck o’ the Irish Mint Pie can get you and your guests into the festive spirit. With enough seasonal flavor to go around, this recipe makes two pies, so be sure to cut every leprechaun a generous portion.
Find more festive recipes at Culinary.net.
Watch video to see how to make this recipe!
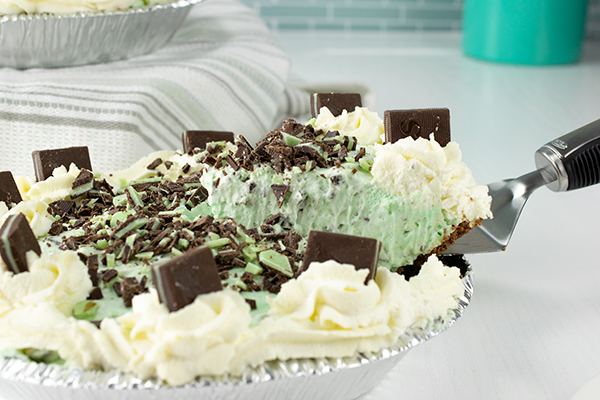
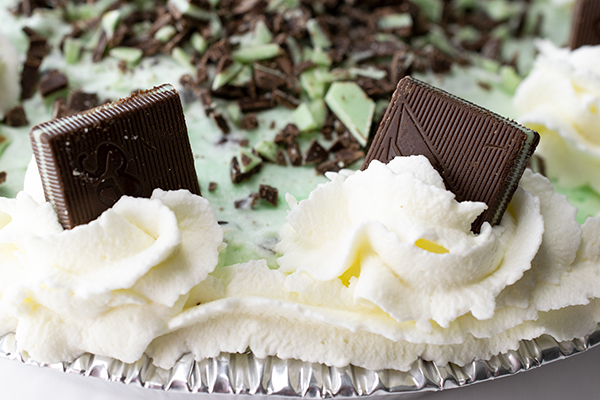
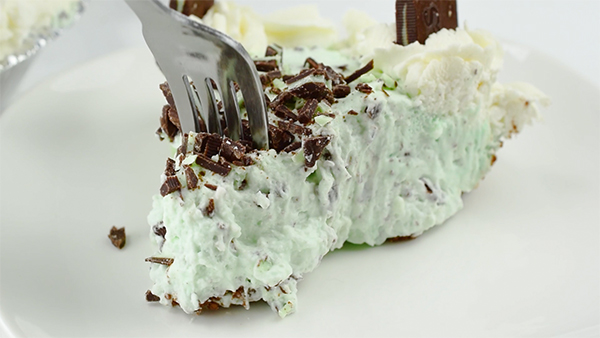
Luck o’ the Irish Mint Pie
Makes: 2 pies (9 inches each)
- 3 3/4 cups heavy whipped cream, divided
- 8 ounces cream cheese, softened
- 1 1/4 cups, plus 2 tablespoons, powdered sugar, divided
- 5 drops green food coloring
- 1 1/4 teaspoons vanilla extract, divided
- 1/4 teaspoon mint extract
- 1 bag mint chocolate candies, chopped, divided
- 2 chocolate cookie crusts (9 inches each)
- 1 bag mint chocolate candies
- To make filling: In bowl of stand mixer, whisk 2 1/2 cups heavy cream until stiff peaks form. Transfer to bowl.
- In separate stand mixer bowl, beat cream cheese on high 2 minutes. Gradually add 1 1/4 cups powdered sugar and green food coloring; mix until smooth. Add 1/4 teaspoon vanilla and mint extract; mix well.
- Fold prepared whipped cream into cream cheese mixture. Fold 1 cup chopped mint chocolate candies into filling.
- To make frosting: In bowl of stand mixer, whisk remaining heavy cream and remaining powdered sugar. Add remaining vanilla extract and mix until stiff peaks form.
- Pour filling into crusts and smooth tops.
- Fill decorating bag with frosting and pipe thick band around edges of pies. Then pipe circle dollops evenly around edges of pies.
- Scatter 1 cup chopped mint chocolate candies in middle of pies. Place whole mint chocolate candies into each dollop of frosting around edges of pies.
- Refrigerate until firm, 5-6 hours.
Mini Razz Crush Tarts
(Family Features)Fruits, like raspberries, are unique in their ability to add both flavor and nutrition to breakfasts, snacks, desserts and beyond.
With a sweet-tart flavor and eye-catching color, red raspberries are the main ingredient in these Mini Razz Crush Tarts, perfect for breakfast on-the-go or as an afternoon snack. Because 1 cup of the tasty fruit includes just 80 calories and contains 6 grams of fiber while providing 28% of the recommended daily allowance of vitamin C, it’s a nutritious way to fill up.
Find more recipes at redrazz.org.
Watch video to see how to make this recipe!

Mini Razz Crush Tarts
Servings: 8
Red Raspberry Crush:
- 1 bag (12 ounces) frozen red raspberries
Tarts:
- 1 1/2 cups Red Raspberry Crush
- 1 1/2 tablespoons cornstarch
- 1 package (two 9-inch crusts) refrigerated pie crust
Glaze:
- 1 cup powdered sugar
- 2-3 tablespoons reserved raspberry juice
- 1/2 teaspoon vanilla
- sprinkles (optional)
- To make Red Raspberry Crush: Thaw raspberries on countertop at room temperature 30 minutes.
- Using rolling pin, gently mash raspberries in sealed bag.
- To make tarts: Heat oven to 425° F. Line baking sheet with parchment paper and set aside.
- Place strainer over medium bowl; strain Red Raspberry Crush 10-15 minutes, allowing raspberry juice to fall into bowl. Reserve raspberry juice for glaze.
- In medium bowl, combine drained Red Raspberry Crush and cornstarch; mix to combine.
- Roll out both pie crusts into rectangular shapes and cut each into eight 2 1/2-by-4-inch rectangular pieces. Place rectangular pieces on prepared baking sheet. Add 1-2 tablespoons Red Raspberry Crush to center of each piece and top each with second rectangular piece. Use fork to crimp edges of dough.
- Bake 10 minutes, or until crust is golden brown. Remove pastries from oven and allow to cool completely.
- To make glaze: In medium bowl, whisk powdered sugar, reserved raspberry juice and vanilla.
- Drizzle glaze on cooled pastries and garnish with sprinkles, if desired.
Source: Red Razz
Holiday Desserts from Around the Globe
(Family Features) Over time, many families tend to return to the same holiday favorites, from ham and mashed potatoes to pies and cookie classics. This season, you can add a twist to tradition with these globally inspired desserts.
Rugelach, for instance, is like a cross between a croissant and a cookie featuring walnuts for a nutty flavor and crunch with ties to Greece, Turkey and the Middle East. If you’re looking to steal the show at cookie exchanges, Mexican Wedding Cookies provide a crumbly, melt-in-your-mouth texture perfect for dipping in hot chocolate.
Both treats include California walnuts, which have an agricultural history deeply rooted in tradition and can stand alone as a tasty snack or offer an opportunity to level up dishes from appetizers to desserts.
Find more holiday dessert ideas at walnuts.org/holiday.
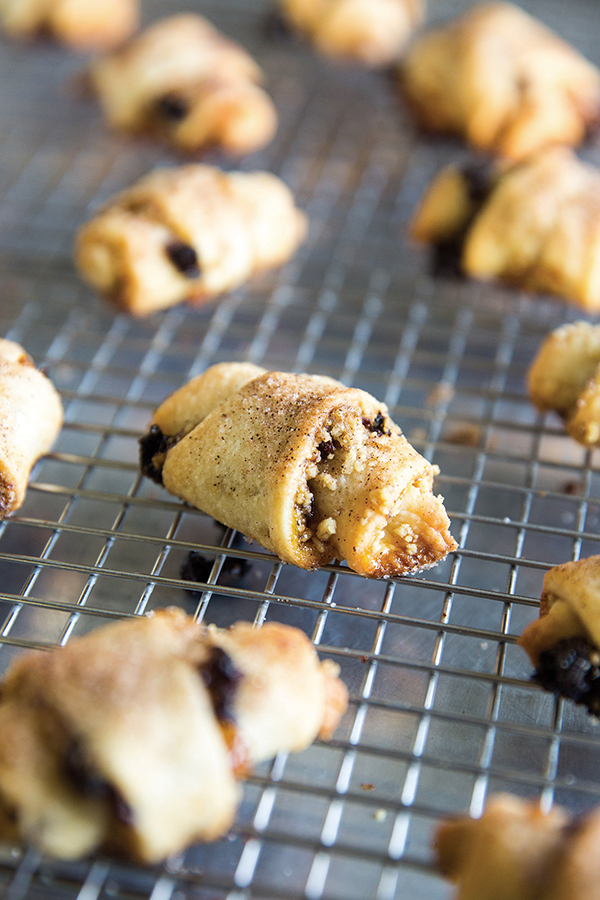
Rugelach
Recipe courtesy of California Walnuts
Prep time: 50 minutes
Cook time: 20 minutes
Servings: 32
Dough:
- 1/2 cup (1 stick) unsalted butter, softened
- 4 ounces cream cheese, softened
- 1 tablespoon granulated sugar
- 1 teaspoon vanilla extract
- 1/2 teaspoon salt
- 1 cup flour
Filling:
- 1/3 cup granulated sugar
- 1 tablespoon ground cinnamon
- 1/2 cup apricot jam
- 1 cup finely chopped California walnuts
- 1/2 cup raisins, chopped
- 2 tablespoons unsalted butter melted
- To make dough: In large bowl, using electric mixer on medium speed, beat butter, cream cheese, sugar, vanilla and salt until light and fluffy, about 5 minutes.
- Scrape sides of bowl and beaters as necessary. Reduce speed and slowly mix in flour, about 30 seconds.
- On floured work surface, form dough into ball. Divide into two equal pieces.
- Wrap tightly in plastic wrap and press into two disks. Refrigerate 30 minutes, or until firm.
- To make filling: Heat oven to 375° F and place racks at upper-middle and lower-middle positions.
- Line two baking sheets with parchment paper.
- In small bowl, combine sugar and cinnamon; mix well and set aside.
- On lightly floured surface, roll out each piece of dough into 11-inch circles, about 1/4-inch thick. On each round, spread 1/4 cup jam and sprinkle 1/2 cup walnuts and 1/4 cup raisins. Evenly sprinkle 1 tablespoon cinnamon-sugar mixture on each disk.
- Using knife, cut each round into 16 even wedges. Beginning at wide ends, roll each wedge up into cookie.
- Place cookies on prepared baking sheet with pointed end underneath cookie. Space cookies about 2 inches apart.
- Using pastry brush, brush melted butter over cookies; sprinkle remaining cinnamon-sugar over top.
- Bake cookies about 20 minutes until slightly puffed and pale gold, rotating baking sheets halfway through.
- Transfer hot cookies to wire rack and allow to cool completely before serving.
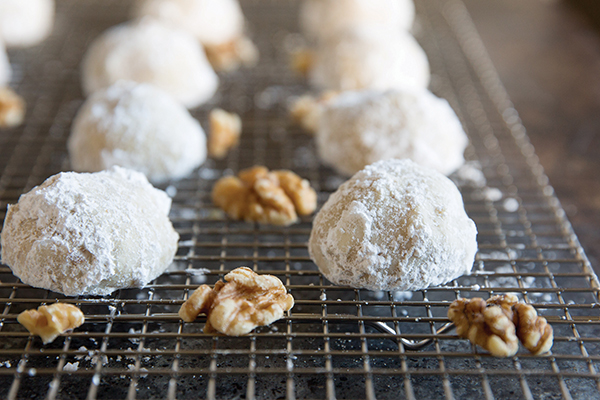
Mexican Wedding Cookies
Recipe courtesy of California Walnuts
Prep time: 20 minutes
Cook time: 38 minutes
Servings: 36
- 2 cups California walnuts, toasted, divided
- 2 cups all-purpose flour
- 3/4 teaspoon salt
- 1 cup (2 sticks) unsalted butter, softened
- 1/3 cup granulated sugar
- 1 1/2 teaspoons vanilla extract
- 1 1/2 cups powdered sugar, plus additional (optional)
- Heat oven to 325° F. Adjust oven racks to upper-middle and lower-middle positions. Line two baking sheets with parchment paper or silicone mats.
- In food processor, finely grind 1 cup walnuts, about 10-15 seconds. Transfer to medium bowl.
- In food processor, pulse remaining walnuts about 5 seconds. Add to medium bowl with finely ground walnuts. Stir in flour and salt; set aside.
- In electric mixer bowl, combine butter and granulated sugar. Beat 2 minutes, or until fluffy. Scrape sides of bowl. Add vanilla; beat 1 minute. Add flour and walnut mixture; beat 30 seconds, or until combined. Scrape down sides of bowl and beaters; continue hand-mixing dough until well combined.
- Working with 1 tablespoon dough at a time, roll into 1 1/4-inch balls and arrange 1 inch apart on prepared baking sheets. Bake until cookies are lightly golden brown, about 18 minutes, rotating baking sheets halfway through.
- Remove cookies from oven and cool on baking sheets 10 minutes. Transfer to wire rack; cool completely. Roll cookies in powdered sugar.
- Before serving, re-roll cookies in powdered sugar, if desired. Gently shake to remove excess.
Source: California Walnuts


