
Bring a Chill to Summer with Cool, Creamy Cheesecake
(Family Features) When it’s hot but you crave something sweet, turn to a delicious dessert that’s cool and creamy. French Style Cheesecake with Vanilla Wafer Crust offers the best of both worlds as a fresh, no-bake, refrigerated favorite you can top with chocolate, fruit or vanilla wafer crumbs. Find more summer dessert ideas at Culinary.net.

French Style Cheesecake with Vanilla Wafer Crust
Recipe courtesy of “Cookin’ Savvy”
Total time: 25 minutes, plus 3 hours refrigeration
Servings: 8
Crust:
- 2 cups vanilla wafers, crushed
- 1 stick butter, melted
- 1/4 cup brown sugar
Whipped Cream:
- 1 cup heavy cream
- 3 tablespoons sugar
- 1 teaspoon vanilla
Cheesecake:
- 8 ounces cream cheese, softened
- 1 teaspoon vanilla
- 1/2 cup powdered sugar
- To make crust: Mix crushed vanilla wafers, melted butter and sugar; press into pie pan or individual pudding cups.
- To make whipped cream: In large bowl, using electric mixer, mix heavy cream, sugar and vanilla until thickened into whipped cream.
- To make cheesecake: Add softened cream cheese, vanilla and powdered sugar to whipped cream bowl. Using electric mixer, mix until smooth. Pour over vanilla wafer crust and chill 3 hours.
Source: Culinary.net

Get Creative with Easter Sweets
(Family Features) Holiday hams and deviled eggs may take center stage at Easter gatherings, but edible crafts offer a reminder of the magic of the season that’s found in moments spent together. Simple recipes that call for a dose of creativity are perfect ways to bring the kids to the kitchen, made even easier when all that work leads to sweet treats.
While plastic eggs may have led to a decline in good, old-fashioned egg-dyeing, there are still fun ways to bring crafts back to Easter celebrations. Consider these Kids Krafty Easter Cake Pops, which call for little ones to help dip seasonal shapes in chocolate, use cake molds and more.
Children of virtually any age can relish in the joys of using cookie cutters and decorating Easter Sugar Cookies, all with a little supervision and short list of instructions. This version shows how to make the cookies and homemade icing so you can create any color you desire for maximum creativity.
Remember, these delicious crafts don’t have to be perfect – having fun and making memories that last a lifetime are what make Easter truly special.
Visit Culinary.net to find more Easter inspiration and recipes from “Cookin’ Savvy.”
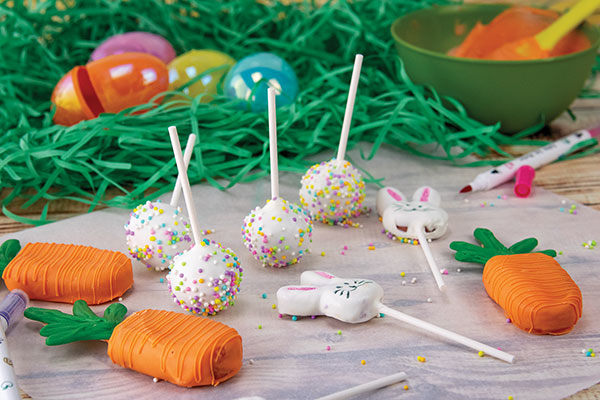
Kids Krafty Easter Cake Pops
Recipe courtesy of "Cookin' Savvy"
- 1 box cake mix
- 1 can frosting
- 1 bunny chocolate mold
- 1 cakesicle mold
- ice pop sticks
- 1 bag white chocolate chips or melting chips
- cake pop sticks
- 1 bag orange melting chips
- 2 tablespoons canola or coconut oil, divided
- 1 bag green melting chips
- pastel sprinkles
- 1 piece hard foam (optional)
- edible markers
- Bake cake according to package instructions and let cool completely.
- Crumble cake and mix with 1/2 can frosting until dough forms. Add more frosting, if needed. Using small cookie scoop, form dough into balls and set aside. Place dough in bunny molds then pop out and set aside with balls. Place dough in cakesicle mold, insert ice pop stick in each slot and freeze 5-10 minutes.
- Melt handful of white melting chips. Stick tip of each cake pop stick in chocolate then insert into every cake ball and bunny until each has one stick. Set aside to dry.
- Remove cakesicles from freezer and pop out of molds. In bowl, melt orange melts then mix in 1 tablespoon oil and transfer to cup. Dip cakesicles and scrape off excess using rim of cup. Place on parchment paper to dry.
- In bowl, melt green melts then place in zip-top or piping bag. Cut tip off bag, pipe carrot leaves onto piece of parchment paper and let dry.
- Melt remaining white melts and mix in remaining oil. Transfer to cup and dip ball-shaped cake pops and bunnies then tap stick on edge of cup to remove excess.
- Over separate bowl, sprinkle ball-shaped pops with pastel sprinkles. To keep ball shape, let dry by sticking in piece of hard foam. Bunnies can dry face side up on parchment paper. After bunnies are dry, use edible markers to make face and color in ears.
- When carrots and leaves are dry, remelt orange melts and place in piping or zip-top bag. Cut off tip and drizzle orange over carrots. Add small line of orange on each ice pop stick and place leaves on each stick. Let dry.
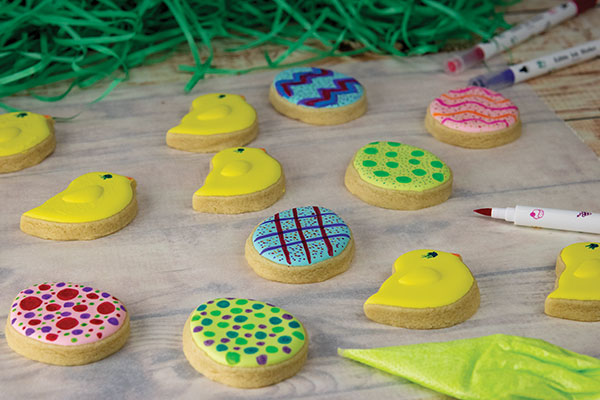
Easter Sugar Cookies
Recipe courtesy of "Cookin' Savvy"
Icing:
- 1/3 cup meringue powder
- 1/2 cup warm water, plus additional for thinning (optional), divided
- 3 tablespoons vanilla
- 1 bag (2 pounds) powdered sugar
- 2 tablespoons corn syrup
- assorted food coloring
Cookies:
- 2 sticks unsalted butter, at room temperature
- 1 cup sugar
- 1 egg
- 1 tablespoon vanilla
- 2 teaspoons baking powder
- 1 dash salt
- 3 cups all-purpose flour
- To make icing: Mix meringue powder, 1/2 cup warm water, vanilla, powdered sugar and corn syrup. Separate into bowls and add food coloring; mix with water, as needed, to thin for piping.
- To make cookies: Heat oven to 350 F.
- Cream butter and sugar. Mix in egg, vanilla, baking powder and salt. Mix in flour 1 cup at a time to form dough. Roll dough out to 1/4-1/2-inch thickness.
- Cut into shapes, place on baking sheet and freeze 10 minutes. Bake 8-12 minutes. Cool completely before icing.
- Place icing in zip-top or piping bags and cut off tips. Put cookies on parchment paper. Trace outline first then fill in middle. Use toothpicks to smooth out.
- Let dry 6 hours and finish decorating with different icing colors or edible markers.
Source: Culinary.net

Unite Loved Ones with a Luscious Dessert
(Family Features) Celebration-worthy treats are perfect ways to cap off days spent with those you love, whether there’s a special occasion or you’re simply looking for creative ways to share more moments together. As a beloved staple in American households for generations, pie provides a sweet, delicious way to bring family and friends to the table.
By bringing some of the most popular pie flavors together, the Tart Cherry Unity Pie offers the familiar, distinct sweet-tart flavor of Montmorency tart cherries that pair well with pecans, apple and pumpkin pie spice for a sense of nostalgia representative of family, tradition and celebration.
In this unique recipe, the bold and vibrant flavors of tart cherries take center stage, complemented by the subtle sweetness of apples and crunch of pecans. With their burst of brightness and acidity, tart cherries perfectly balance the other flavors to create a pie fit for any occasion.
U.S.-grown tart cherries are a particularly versatile ingredient that makes them an ideal partner for other beloved ingredients and flavors. In fact, as the demand for sour, less sweet food and beverages continues to gain momentum, they provide a multi-faceted, sweet-tart profile for favorite foods and drinks. While tart cherries are increasingly featured in a wide array of recipes, they remain a favorite ingredient in confectionary items and baked goods like pies.
Slow down your fast-paced world and savor a slice of this timeless dessert alongside loved ones for a moment of respite. With its sweet and tangy filling, flaky crust and tart cherry topping, you can indulge in life’s simple pleasures for a sense of coziness and comfort.
Visit ChooseCherries.com to find more celebration-worthy tart cherry desserts.
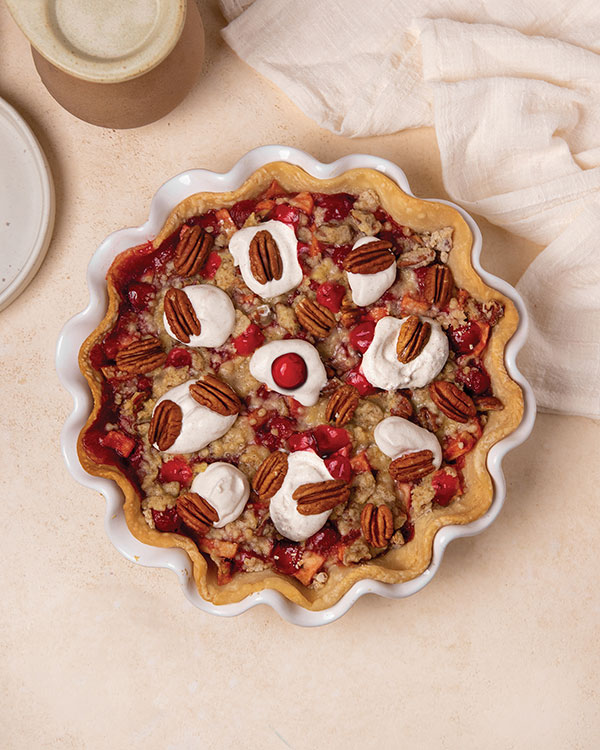
Tart Cherry Unity Pie
Recipe courtesy of the U.S. Tart Cherry Industry
Prep time: 20 minutes
Cook time: 55 minutes
Servings: 8
Pie:
- 1 pie crust (9 inches)
- 2 cups canned tart cherry pie filling
- 2 cups canned apple pie filling
- 1 egg, beaten (for egg wash)
Streusel:
- 1/2 cup all-purpose flour
- 1/4 cup brown sugar
- 2 tablespoons granulated sugar
- 1/3 cup pecans, roughly chopped
- 1 pinch salt
- 4 tablespoons butter, melted
Pumpkin Spice Whipped Cream:
- 1 cup heavy cream
- 2 tablespoons powdered sugar
- 1/2 teaspoon pumpkin spice
- Preheat oven to 400 F.
- Fit pie crust to 9-inch pie dish. Crimp edges and use fork to poke holes in bottom. Place pie crust in freezer to chill.
- In large bowl, combine tart cherry pie filling and apple pie filling. Set aside.
- To make streusel: In bowl, use fork to mix flour, brown sugar, granulated sugar, pecans and salt. Pour butter over dry ingredients and mix until ingredients come together in clumps.
- To assemble pie: Pour cherry-apple filling into prepared pie crust and sprinkle streusel on top. Brush beaten egg onto exposed pie crust edges.
- Bake 25 minutes. At 10-minute mark, cover pie dish with foil to prevent crust from over-browning. After 25 minutes, lower oven temperature to 375 F and bake 30 minutes.
- To make pumpkin spice whipped cream: In large bowl or bowl of stand mixer, add heavy cream, powdered sugar and pumpkin spice. Use hand mixer or beater attachment on stand mixer to beat on medium-high speed 3-5 minutes until stiff peaks form. Refrigerate whipped cream until ready to serve.
- Let pie cool 2-3 hours then dollop pumpkin spice whipped cream on top, slice and serve.
- Substitution: Storebought whipped cream topped with pumpkin spice can be used in place of homemade pumpkin spice whipped cream.

Sweeten Up Spring with an 'Eggstra' Creative Brunch
(Family Features) It’s hard to top a brunch feast spent snacking on sweet treats in the sunshine with loved ones. At the center of your celebration can be a springtime tradition with nearly endless possibilities: eggs.
Lean into the season with creative recipes like Prosciutto and Parmesan Egg Cups or Eggy Lemon Sandwich Cookies to take brunch to the next level. As a natural source of vitamins and minerals, eggs are a delicious protein powerhouse with just 70 calories per large egg. Boiled, scrambled, poached, baked and any other way you like them, they’re a kitchen superhero.
This spring, add eggs to your menu and explore fresh ways to celebrate the season at incredibleegg.org.
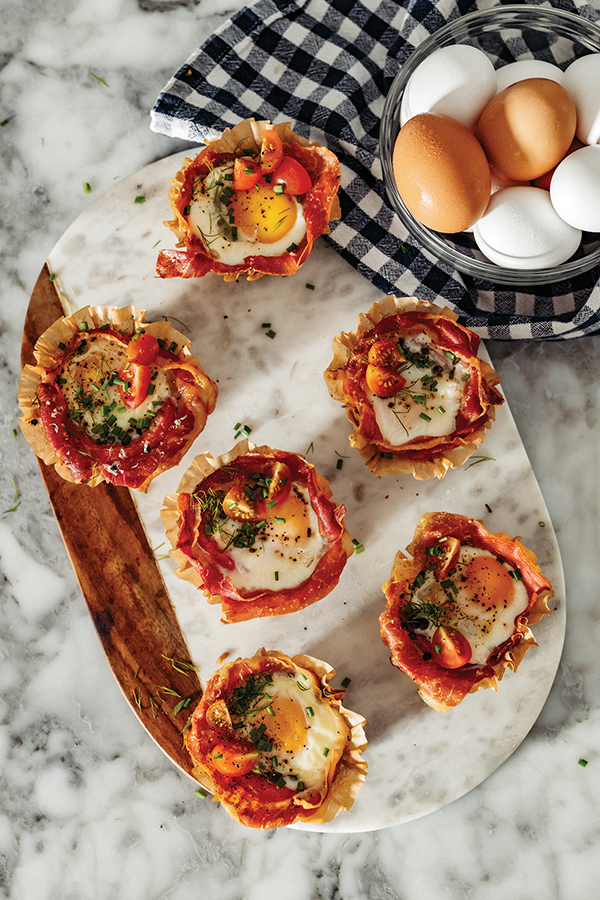
Prosciutto and Parmesan Egg Cups
Recipe courtesy of the American Egg Board and "Joy the Baker"
Total time: 34-36 minutes
Yield: 6 cups
- 12 pieces thinly sliced prosciutto
- 6 slices tomato
- 1/3 cup finely grated Parmesan cheese
- 6 large eggs
- fresh cracked black pepper, to taste
- 1/4 cup finely chopped chives
- Place rack in upper third of oven and preheat to 350 F.
- Line muffin pan with six cupcake liners. Drape two slices prosciutto in each cup over liner, ensuring there are no holes for egg to sneak through.
- Place one tomato slice in each cup. Sprinkle 1 tablespoon Parmesan atop each tomato. Crack one egg into each cup. Sprinkle each with fresh cracked black pepper, to taste.
- Bake 14-16 minutes, or until eggs are cooked as desired. Top with chives.
- Cool 5 minutes before serving warm.
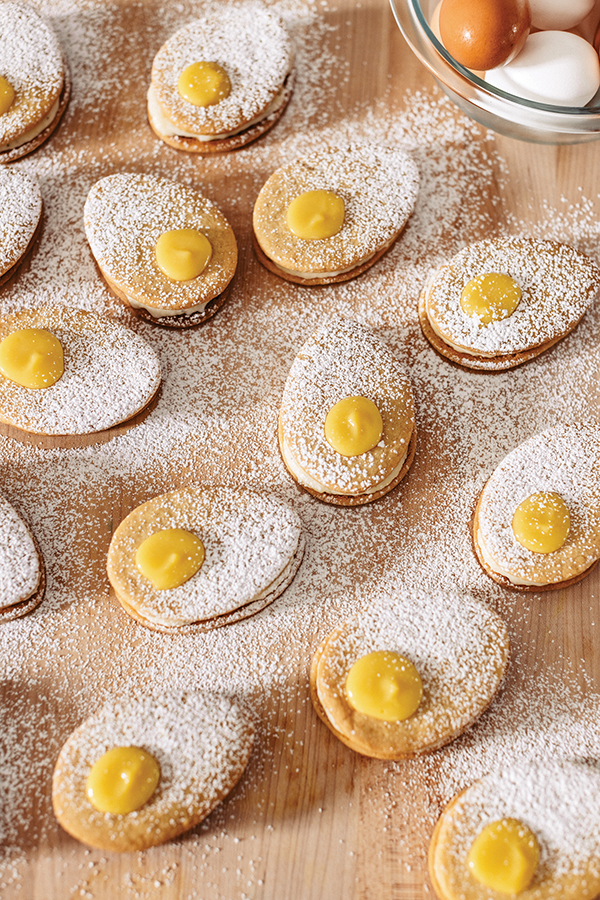
Eggy Lemon Sandwich Cookies
Recipe courtesy of the American Egg Board and "Joy the Baker"
Total time: 1 hour, 40 minutes
Yield: 16-18 cookies
Dough:
- 3 cups all-purpose flour
- 1 1/2 teaspoons baking soda
- 1/2 teaspoon baking powder
- 3/4 teaspoon kosher salt
- 3/4 cup vegetable shortening
- 1/4 cup unsalted butter, softened to room temperature
- 1 cup granulated sugar
- 1 large egg
- 2 tablespoons whole milk
- 2 teaspoons vanilla extract
Lemon Curd:
- 1/2 cup fresh lemon juice
- 2 teaspoons finely grated lemon zest
- 1/2 cup granulated sugar
- 3 large eggs
- 6 tablespoons unsalted butter, cut into cubes
Buttercream:
- 1 cup unsalted butter, softened to room temperature
- 2 cups powdered sugar
- 1 pinch salt
- 1 teaspoon finely grated lemon zest
- 1-2 tablespoons warm milk
- 1 teaspoon poppy seeds
- To make dough: In medium bowl, whisk flour, baking soda, baking powder and salt.
- In bowl of stand mixer fitted with paddle attachment, cream together shortening and butter until well combined. Scrape down sides of bowl, add sugar and beat on medium speed until pale and fluffy, 3-5 minutes.
- Add egg, milk and vanilla extract; beat until combined. Add dry ingredients and beat on low until dough forms. Scrape down sides of bowl to ensure no dry pockets at bottom. Wrap and refrigerate dough 30 minutes.
- Place rack in upper third of oven and preheat to 350 F.
- Roll half of dough on lightly floured counter to 1/4-1/2-inch thickness. Cut with 2-3-inch egg cookie cutter and place on parchment paper-lined baking sheet. Use 1-inch round or egg-shaped cookie cutter to cut yolk holes out of half the cookies. Bake 8-10 minutes until just golden around edges. Cool completely before filling.
- To make lemon curd: In 2-quart heavy saucepan, whisk juice, zest, sugar and eggs. Stir in butter and cook over low heat, whisking frequently, until curd is thick enough to hold marks of whisk and bubbles appear on surface, about 6 minutes.
- Transfer lemon curd to bowl and chill, covered with plastic wrap, until cold, at least 1 hour.
- To make buttercream: In medium bowl using electric hand mixer, beat butter until well softened. Add powdered sugar, salt and lemon zest; beat on low. Add milk and whip to combine. Beat in poppy seeds. Transfer frosting to zip-top bag with corner cut off or piping bag with medium round tip. Leave buttercream at room temperature until ready to pipe.
- To assemble cookies: Flip each whole egg cookie so bottoms are facing up. Pipe buttercream frosting around edges. Spoon 2-3 teaspoons lemon curd into centers of cookies. Top each with one cookie with hole; press gently and spoon 1 teaspoon lemon curd into cookie hole.
Source: American Egg Board

'Tis the Holiday Baking Season
(Family Features) One of the best parts of the holidays is the aromas and flavors of the season, from walnuts and cinnamon to peppermint and nutmeg. Sweet treats and mouthwatering desserts can bring family and friends around the table to celebrate the season together, one bite at a time.
During your festive gatherings this year, choose walnuts as the star baking ingredient. As many home cooks turn to wholesome ingredients that offer health benefits this holiday baking season, California walnuts make for a perfect addition to almost any dish and are an excellent source of omega-3 ALA (2.5g/oz). With a buttery flavor that elevates traditional and modern recipes, home bakers can do more with walnuts in the kitchen.
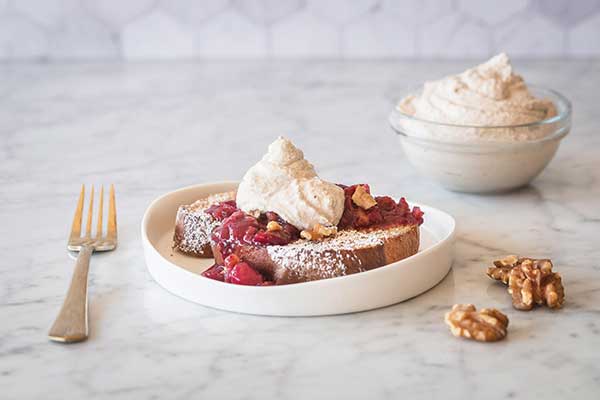
Part pumpkin, part cheesecake, this Walnut Pumpkin Cream Cheese Tart spices up the classic pumpkin pie recipe. Top it, or other favorite desserts, with light and airy Vanilla Walnut Whipped Cream flavored with honey and vanilla to complement festive dishes.
This holiday season, pick up a bag of walnuts for all your baking needs. To discover more festive dessert ideas, visit walnuts.org.
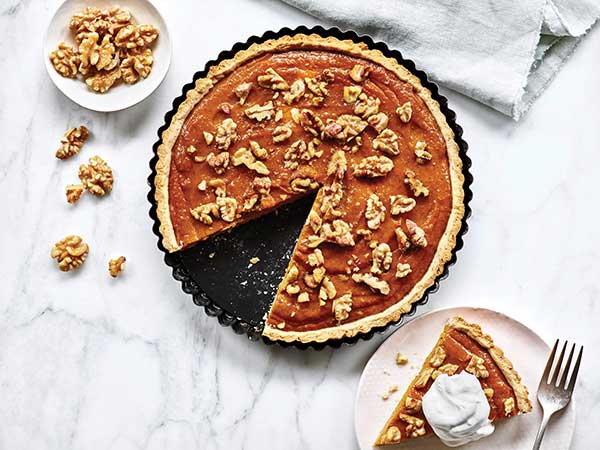
Walnut Pumpkin Cream Cheese Tart
Total time: 2 hours, 30 minutes
Servings: 12
Sweet Tart Crust:
- 1 1/4 cups flour
- 1/3 cup California walnuts, finely chopped
- 1/3 cup powdered sugar
- 1/3 cup salted butter, softened
- 1 large egg
- nonstick cooking spray
Filling:
- 1 can (15 ounces) pumpkin
- 4 ounces low-fat cream cheese, softened
- 1/2 cup brown sugar, packed
- 2 teaspoons pumpkin pie spice
- 1 teaspoon vanilla extract
- 1 egg, plus 1 egg yolk
- 1/2 cup California walnuts, coarsely chopped
- whipped cream, for serving (optional)
- To make sweet tart crust: In medium bowl, stir flour, walnuts and powdered sugar. Stir in butter and egg. Using fork, stir well until soft dough forms. Gather into ball and wrap tightly.
- Refrigerate at least 1 hour, or until dough is easy to handle.
- Preheat oven to 350 F and coat 9-inch tart pan with removable bottom with nonstick cooking spray.
- Lay pastry dough on lightly floured board and roll into 11-inch circle. Press dough into bottom and sides of prepared pan and poke with fork on bottom and sides. Bake 20 minutes.
- To make filling: In medium bowl, whisk pumpkin and cream cheese until smooth. Add brown sugar, pumpkin pie spice, vanilla extract, egg and egg yolk, beating until incorporated.
- Pour into prepared crust and top with walnuts. Bake 40 minutes, or until filling is set when pan is gently tapped.
- Remove from oven and let cool. Cover and refrigerate until ready to serve.
- Serve each slice with dollop of whipped cream, if desired.
Vanilla Walnut Whipped Cream
Total time: 8 minutes
Servings: 14
- 2 1/2 cups California walnuts, divided
- 1 cup water
- 2 tablespoons powdered sugar
- 1-2 teaspoons honey, divided
- 1 teaspoon vanilla extract
- 1 pinch salt
- In blender, puree 2 cups walnuts and water 2 minutes, or until light and fluffy.
- Add powdered sugar, 1 teaspoon honey, vanilla extract and salt; blend 30 seconds. Add remaining honey if sweeter taste is desired.
- To achieve thicker whipped cream, add remaining walnuts and puree until light and fluffy.
- Store tightly covered in refrigerator until ready to use.
Source: California Walnuts

Healthy Holiday Baking Swaps
(Family Features) Many holiday hosts tend to pull out their most treasured family recipes when entertaining loved ones. After all, taste is the most important aspect of most holiday spreads, particularly when it comes to favorite baked goods and desserts.
Put a better-for-you twist on your baked classics this holiday season by swapping out less healthy cooking fats like butter, canola oil and vegetable oil with an option like Pompeian Light Taste Olive Oil. Ideal for baking desserts like this Lemon Cake or Sugar Cookies with Orange Glaze, as well as frying, this light tasting olive oil provides a healthier take on your holiday recipes without impacting the taste you and your guests love. This olive oil is high-quality and authentic, backed by a brand that has been perfecting the craft of olive oil since 1906.
Find more better-for-you holiday recipe inspiration at Pompeian.com/recipes.
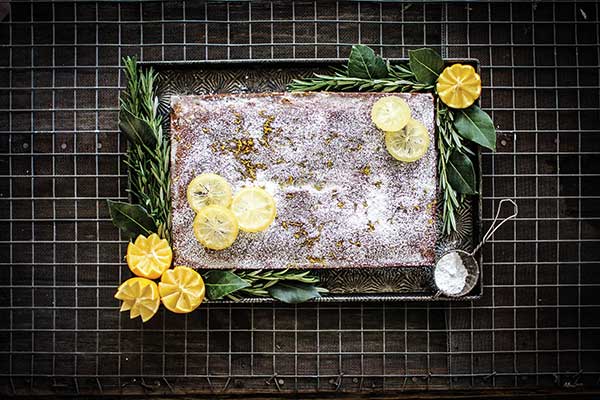
Lemon Cake
Prep time: 10 minutes
Cook time: 1 hour, 15 minutes
Servings: 30
- 1 1/3 cups Pompeian Light Taste Olive Oil, plus additional for oiling pan
- 2 cups all-purpose flour
- 1 cup sugar
- 3/4 cup brown sugar
- 1 1/2 teaspoons kosher salt
- 1/2 teaspoon baking soda
- 1/2 teaspoon baking powder
- 1 1/4 cups whole milk
- 3 large eggs
- 1 1/2 tablespoons grated lemon zest, plus additional for garnish (optional)
- 1/4 cup fresh lemon juice
- 1/4 cup limoncello
- powdered sugar, for garnish (optional)
- dried sweetened lemon rings, for garnish (optional)
- Heat oven to 350 F. Oil 8-by-12-by-2-inch pan with olive oil and line bottom with parchment paper.
- In bowl, whisk flour, sugars, salt, baking soda and powder. In another bowl, whisk 1 1/3 cups olive oil, milk, eggs, lemon zest, juice and limoncello. Add dry ingredients; whisk until just combined.
- Pour batter into prepared pan and bake 60-75 minutes until top is golden and cake tester comes out clean. Transfer cake to rack and let cool 30 minutes.
- Run knife around edge of pan, invert cake onto rack and let cool completely, 2 hours.
- Sprinkle with powdered sugar, lemon zest and lemon rings right before serving, if desired.
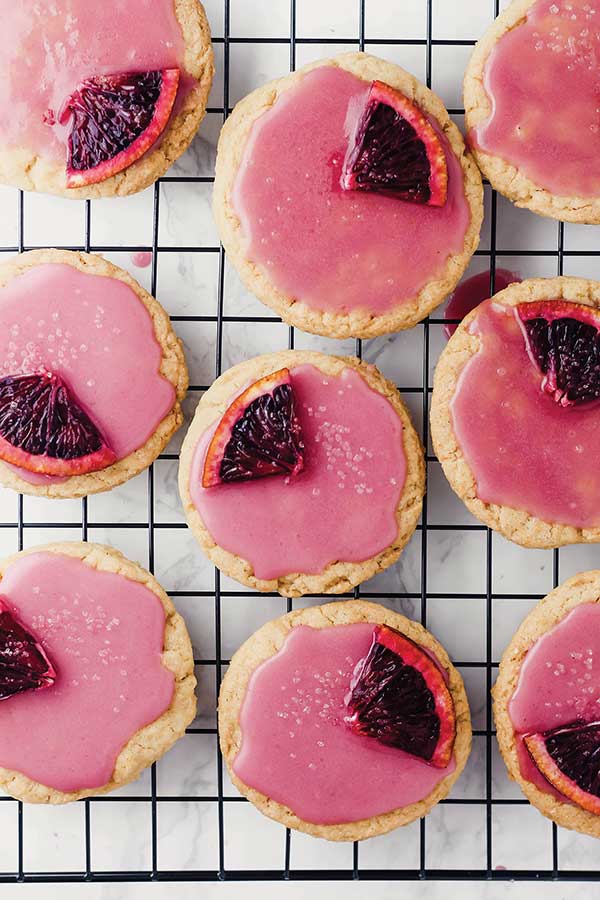
Sugar Cookies with Orange Glaze
Prep time: 15 minutes
Cook time: 10 minutes
Servings: 36
Cookies:
- 2 cups all-purpose flour
- 1 cup cake sugar
- 1 teaspoon baking powder
- 1/2 teaspoon baking soda
- 1/2 teaspoon salt
- 1/2 cup Pompeian Light Taste Olive Oil
- 2 teaspoons vanilla extract
- 1/2 teaspoon almond extract
- 2-3 tablespoons unsweetened milk of choice
Glaze:
- 1 cup powdered sugar, plus additional if needed, for thickening
- 2-3 tablespoons fresh orange juice
- 1/8 teaspoon salt
- orange slices or blood orange slices, for topping
- sugar, for topping
- To make cookies: Preheat oven to 350 F. Lightly grease baking sheet.
- In large bowl, stir flour, sugar, baking powder, baking soda and salt to combine.
- Add olive oil, vanilla extract and almond extract. Stir until crumbly dough forms.
- Add 2 tablespoons milk; stir until soft dough ball forms, adding more milk if needed.
- Place dough ball on lightly floured surface. Roll out dough until 1/4-inch thick. Using jar lid or other circular object, cut out cookies; place on baking sheet. Repeat until all dough is used.
- Bake 8-10 minutes; do not overbake. Set aside to cool.
- To make glaze: In small bowl, stir powdered sugar, 2 tablespoons orange juice and salt until thick glaze forms. Add more juice, if needed, to thin out glaze or add more powdered sugar to thicken.
- When cookies are cooled, glaze them. Top with orange slices or blood orange slices and pinch of sugar.
Source: Pompeian Oils & Vinegars

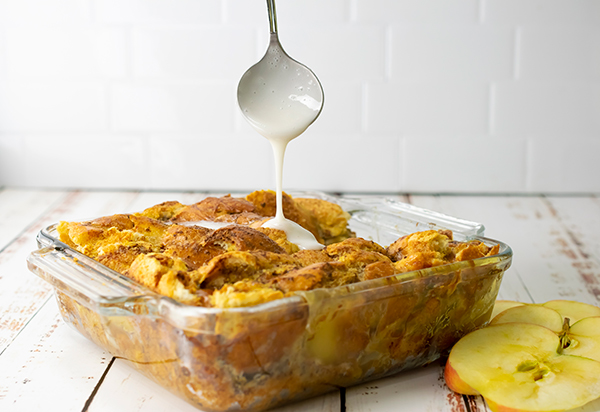
Overnight Apple Cinnamon French Toast Casserole
(Culinary.net) Waking up, no matter how late, can be such a drag. You’re moving slow and cuddled up warm under the blankets. However, your stomach is growling which means eventually you are going to have to arise.
When you do stumble out of bed, it’s time to get the day started with a delicious casserole on your plate. It’s a warm, freshly baked Overnight Apple Cinnamon Fresh Toast Casserole.
Prepared the day before and chilled overnight, this casserole is ready to throw in the oven once you’re up. It’s gooey on the inside and baked to a perfect crisp on the outside, plus it’s filled with mouthwatering apples and ground cinnamon, not to mention the sweet glaze drizzled on top at the end.
It’s perfect for any breakfast or brunch occasion and the little ones will enjoy the sweet crunch, as well.
To start, add cubed French bread to a glass baking dish. Add apple pie filling on top of the bread and smooth it out over the entire dish. Then add more cubed French bread on top.
In a mixing bowl, whisk nine eggs, half-and-half and cinnamon. Pour the egg mixture over the ingredients in the baking dish.
Cover the dish with aluminum foil and chill overnight.
Remove the foil and bake for about an hour. Let cool.
In a small bowl, whisk together powdered sugar and milk to form a sweet glaze. Drizzle the glaze over your warm casserole and enjoy.
Whether you are waking up on an early Monday morning or lounging around in your pajamas for an hour (or two) over the weekend, this breakfast casserole is worth the wait.
Find more breakfast and brunch recipes at Culinary.net.
If you made this recipe at home, use #MyCulinaryConnection on your favorite social network to share your work.
Watch video to see how to make this recipe!
Overnight Apple Cinnamon French Toast Casserole
Servings: 12
- Nonstick cooking spray
- 1 package (20 ounces) French bread, cubed, divided
- 1 can (20 ounces) apple pie filling
- 9 eggs
- 1 cup half-and-half
- 2 teaspoons ground cinnamon
- 1 cup powdered sugar, plus additional (optional)
- 2 tablespoons milk, plus additional (optional)
- Spray 8-by-8-inch glass baking dish with nonstick cooking spray.
- In baking dish, add 10 ounces cubed French bread in bottom of dish. Pour apple filling over bread. Top with remaining cubed French bread. Set aside.
- In medium bowl, whisk eggs, half-and-half and cinnamon. Pour evenly over bread.
- Cover with aluminum foil and chill overnight.
- Heat oven to 325 F.
- Remove foil and bake 50-60 minutes.
- Let cool 10-15 minutes.
- In small bowl, whisk powdered sugar and milk. Add additional, if needed, until pourable glaze is reached. Drizzle over casserole before serving.

Summer Snacks that Satisfy Cravings
(Family Features) Road trips, outdoor adventures and relaxing by the pool are some of summer’s most popular activities, and all can be more enjoyable by adding favorite snacks to the mix. Next time you bask in the summer sun, bring along some tasty pecan snacks that allow you stay on track with wellness goals without sacrificing those snack-time delights.
Whether you enjoy their natural sweetness straight from the bag or add them to your go-to recipes, pecans are among the lowest in carbs and highest in fiber of tree nuts, an option that’s perfect for snacking. In fact, each ounce of pecans includes 3 grams of plant-based protein and 3 grams of fiber to go with 12 grams of “good” monounsaturated fat and only 2 grams of saturated fat.
Curb your snack cravings with a savory option like Buffalo-Pecan Pimento Cheese Dip with veggies and crackers, or if something sweeter tempts your taste buds, dive into a tangy treat with these Mini Pecan Lemon Berry Tarts.
Visit AmericanPecan.com for more snacking tips and recipes.
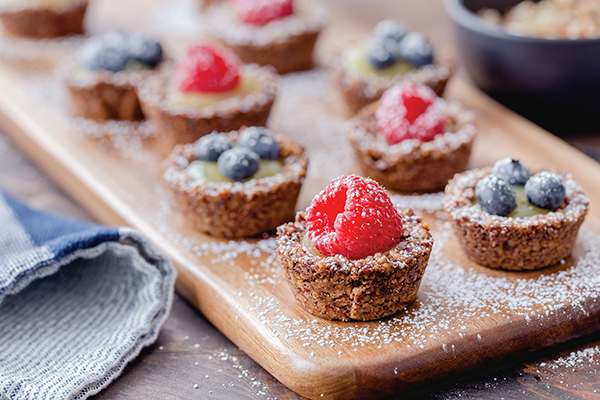
Mini Pecan Lemon Berry Tarts
Total time: 22 minutes
Servings: 24
Mini Pecan Crusts:
- Nonstick cooking spray
- 2 cups pecan pieces
- 1/4 cup butter, melted
- 2 tablespoons sugar
Lemon Filling:
- 1/2 cup lemon curd
- 1/2 cup blueberries, raspberries or combination
- powdered sugar, for dusting (optional)
- To make mini pecan crusts: Preheat oven to 350 F. Line mini muffin tin with paper liners or spray with nonstick cooking spray.
- In food processor, blend pecan pieces, butter and sugar until mixture forms coarse dough.
- Scoop about 2 teaspoons pecan mixture in each muffin tin. Use back of wooden spoon or fingers to press mixture evenly along bottom and up sides of each muffin cup.
- Bake 12 minutes, or until crusts are golden brown. Allow crusts to cool completely before removing from pan.
- To assemble crusts: Spoon 1 teaspoon lemon curd into each mini pecan crust. Top with one raspberry or three small blueberries. Dust with powdered sugar, if desired.

Buffalo-Pecan Pimento Cheese Dip
Total time: 15 minutes
Servings: 30
- 1 cup raw pecan pieces
- 1/2 pound (2 cups) sharp cheddar cheese, freshly grated
- 1 jar (4 ounces) sliced pimentos
- 2 tablespoons red hot sauce
- 2 tablespoons mayo
- 1 teaspoon kosher salt
- 1/2 teaspoon fresh cracked pepper
- 1 tablespoon chives, freshly chopped
- veggies, for serving
- crackers, for serving
- Preheat oven to 350 F.
- On baking sheet, spread pecans and roast 8-10 minutes, or until golden brown and fragrant, tossing once halfway through. Remove from oven and set aside to cool completely.
- In bowl, combine cheddar cheese, pimentos with juice, hot sauce, mayo, salt and pepper. Stir until combined. Add 3/4 of pecan pieces and mix until combined.
- Place dip in serving bowl and top with remaining pecan pieces and freshly chopped chives.
- Serve with veggies and crackers.
Source: American Pecan Council

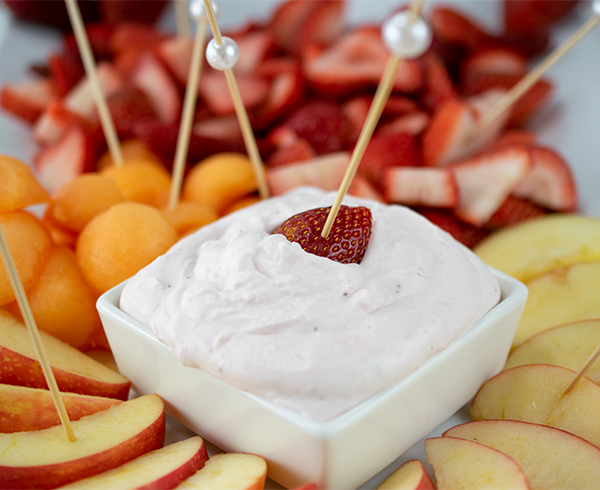
Strawberry Mousse
(Culinary.net) A lazy Sunday afternoon cuddled up with family, playing in the rain with your kids and tasting a perfect, sweet treat on a summer day can be some of the simplest yet best parts of life.
Recipes that can be made with clean, fresh ingredients in a matter of minutes make some of the best-tasting dishes, snacks and treats. Sometimes keeping it simple is the best route to take as opposed to confusing prep that takes too much time.
This Strawberry Mousse, which is made with families in mind, is a perfect recipe to make with your little ones or for a date night dessert. It’s great to take for an outing at the park, a neighborhood party or just to snack on throughout the week.
It’s sweet, fluffy and smooth all at the same time. Made to serve a handful of people, it only takes a few moments to complete. Moms love it and kids enjoy the taste and texture.
To start, puree 1 cup of strawberries in blender until smooth.
In a mixing bowl, combine whipping cream and powdered sugar until smooth.
In a different bowl, beat cream cheese until smooth then add the pureed strawberries.
Finally, add the whipped cream mixture to the cream cheese and strawberries. Stir all the components together until they reach the desired consistency before serving with fresh fruit.
It’s easy, fresh and delicious. Your kids can help you combine all the ingredients and excitedly try the sweet result.
Find more sweet recipes at Culinary.net.
If you made this recipe at home, use #MyCulinaryConnection on your favorite social network to share your work.
Watch video to see how to make this recipe!
Strawberry Mousse
Servings: 6-8
- 1 cup strawberries, halved
- 2 cups heavy cream
- 1 cup powdered sugar
- 1 package (8 ounces) cream cheese, softened
- assorted fruit, for serving
- In blender, puree strawberries until smooth. Set aside.
- In mixing bowl, whip heavy cream and powdered sugar until fluffy.
- In separate mixing bowl, beat cream cheese until smooth. Add strawberry puree to cream cheese and mix until combined. Add whipped cream and stir until combined.
- Serve in bowl with fruit.

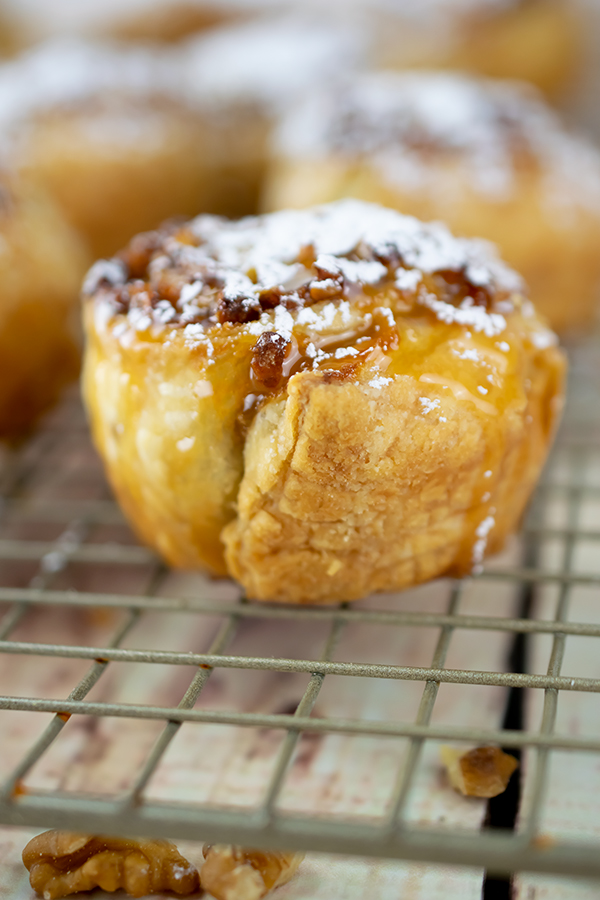
Caramel Sticky Rolls
There are no alarms set and you are cuddled up in bed after a good night’s sleep. It’s late morning and there is nowhere to go, no rushing around to do. No school bus, no work to be done, just relaxing at home with loved ones. However, breakfast is calling your name.
Your stomach rumbles as your stumble toward the kitchen. You need something quick and effortless. The kids will be up soon and you know food will be on their minds.
When you’re in a pinch, there is nearly nothing better to make than something sweet and filling for a weekend family breakfast.
Try these simple and delicious Caramel Sticky Rolls for an easy breakfast for all. The rolls are fluffy, a little crunchy and drizzled with caramel topping.
Start by sprinkling some flour on the countertop. Roll out one sheet of puff pastry. Drizzle and spread caramel sauce on the puff pastry.
Sprinkle 1/2 cup of chopped walnuts on top then roll up the puff pastry and cut it into about nine pieces to place inside a muffin tin.
Bake for 22 minutes and cool. If you like your rolls super sweet, drizzle with some extra caramel sauce.
The result is a pan full of warm, gooey and delightful rolls that are perfect for a large family or to save leftovers to enjoy throughout the week.
Next time you slept in a little too late or your family wants something more than the daily norm for breakfast, try this scrumptious and tasty recipe.
Your family will love it and don’t be surprised if you get a request or two for this breakfast again.
Find more quick weekend recipes at Culinary.net.
Caramel Sticky Rolls
Servings: 9
- Nonstick cooking spray
- flour, for rolling pastry
- 1 frozen puff pastry, thawed
- caramel sauce, divided
- 1/2 cup walnuts, chopped
- powdered sugar
- Heat oven to 400 F.
- Spray muffin tin with nonstick cooking spray.
- Sprinkle flour on work surface. Flatten pastry sheet and roll into rectangle.
- Drizzle caramel sauce over pastry and spread within 1/2 inch of edges.
- Sprinkle chopped walnuts over caramel sauce.
- Starting on short end, evenly roll pastry with filling to other end.
- Cut pastry into nine pieces. Place pastries cut side up into muffin cups.
- Bake 22 minutes, or until golden brown. Immediately remove from pan to wire rack. Let cool 10 minutes. Drizzle with additional caramel sauce and dust with powdered sugar.